pack rat
-
Posts
829 -
Joined
-
Last visited
Content Type
Profiles
Forums
Events
Gallery
Everything posted by pack rat
-
63/64 Caddie hoods/glass
pack rat replied to hedotwo's topic in Model Building Questions and Answers
I just test-fitted a USA Oldies '64 hood to my '63 annual. If you trim the triangular mounting tabs/hinges on the rear corners of the Oldies hood (or just cut them off) it's a perfect fit on the '63. It's virtually the same part. I'm sure the glass is a perfect fit as well, but I wasn't prepared to disassemble the '63. -
An old-school custom from back in the day when the only way to do it was to chop the AMT kit. Paint is custom-mixed Testors enamels to come up with a metallic cherry cola shade.

-
That does NOT look like it was built by someone just getting back into the hobby. Beautiful job!
-
1/25 AMT 1963 Chevy II Station Wagon with Trailer
pack rat replied to Casey's topic in Car Kit News & Reviews
Thanks, Vince! -
1/25 AMT 1963 Chevy II Station Wagon with Trailer
pack rat replied to Casey's topic in Car Kit News & Reviews
That's a tough question to answer when looking at a test shot. Test shots typically contain all parts for all versions/variations of a particular kit, including parts in some instances that might be blocked off on production kits. Without saying any more, I don't think you'll be disappointed, and I'll definitely be picking up more than one of these when they're released. -
1/25 AMT 1963 Chevy II Station Wagon with Trailer
pack rat replied to Casey's topic in Car Kit News & Reviews
I believe all of the trailer parts in my pic are from the "original" section, the same pieces I think are found in the '62 Buick kit (probably the original '63 Nova too-I don't have one of those). It's hard to be 100% sure as after test-fitting various parts for various versions the parts and sprues are all seperated. There are no flat fenders (as found in the '61 Buick trailer) present. Correct re the tires. Every time I dig into this bag of parts I'm really pumped about this one and can't wait to get a production kit. -
1/25 AMT 1963 Chevy II Station Wagon with Trailer
pack rat replied to Casey's topic in Car Kit News & Reviews
Here's the upcoming Nova trailer, just in case anyone out there is still confused..
-
What's the best 1/25 1966 Batmobile kit?
pack rat replied to crowe-t's topic in Car Kit News & Reviews
Here's a pic I took years ago of a junk box Futura beside a resin prototype snap Batmobile (identical to the plastic version).
-
Testors metallic silver spray paint
pack rat replied to cobraman's topic in Model Building Questions and Answers
Tamiya AS-12 Bare Metal Silver is a near-identical subsitute...except for the price, of course -
My number one rule with any Testors enamel....NEVER apply it out of the can, airbrush only. Even with a good base coat, I still had a few botched Testors paint jobs in my younger days, I think we all did.
-
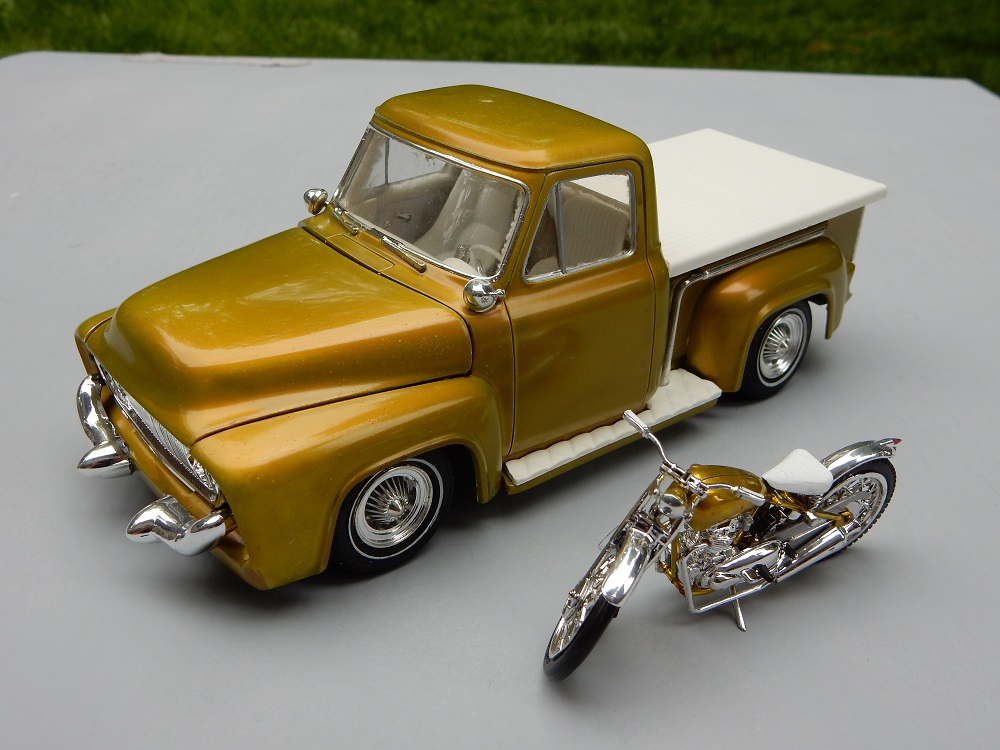
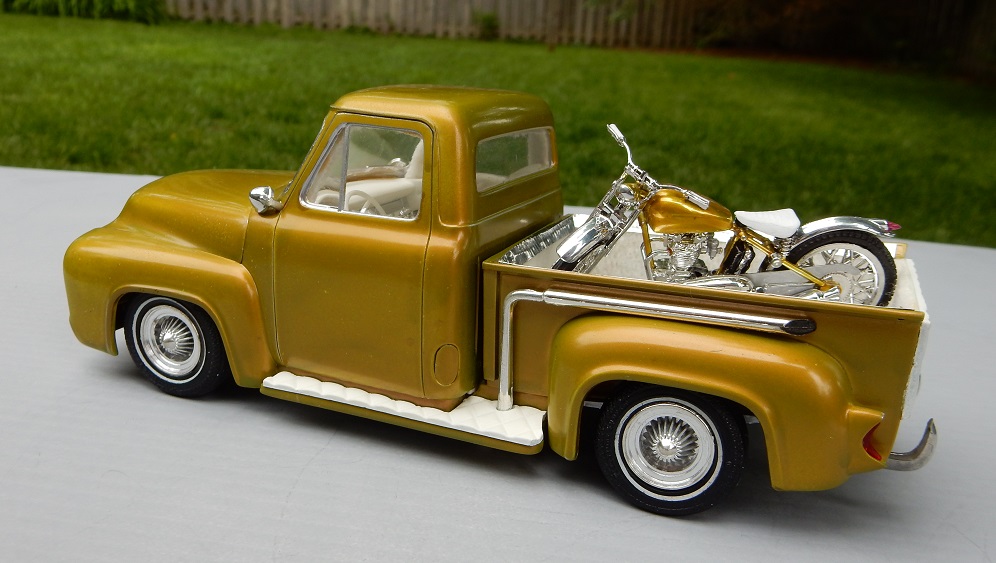
Thanks for the compliment The paint on this one was really basic; old school Testors Lime Gold metalflake airbrushed over a Testors silver base on the truck and over the kit chrome on the bike.
-
So many cool trucks in this thread! One of my all-time favorite AMT kits is the '53 F-100, but I only have one sitting on the shelf; a custom hauler I painted to match a Revell Triumph show bike.
-
I believe the first appearance of that reissue was in the 1970 AMT catalogue. My reference is not 100% complete, so I stand to be corrected. Re Scalemates.....lots of useful information on that site, but take it with a grain of salt. Errors do exist. Still a cool kit, though. I paid pretty decent money for one at a swap meet a few years ago.
-
AMT '62 Ford pickup restored
pack rat replied to pack rat's topic in Model Trucks: Pickups, Vans, SUVs, Light Commercial
Decanted Testors White Lightning lacquer, thinned a little bit and brushed onto the chrome headlights. -
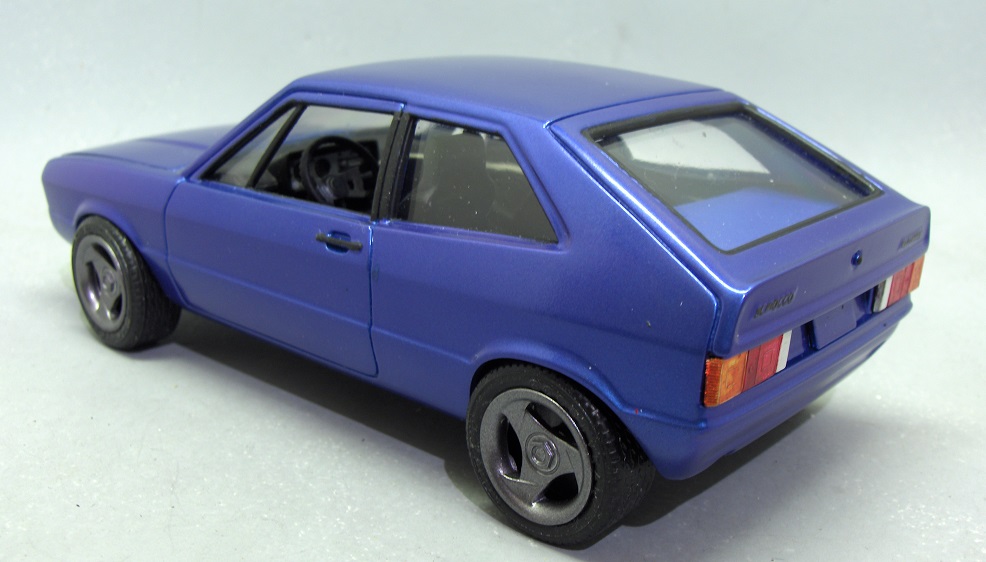
AMT/Matchbox Scirocco.
-
Round2 "Phoned-It-In"
pack rat replied to 1972coronet's topic in Model Building Questions and Answers
I had lots of fun with this one too. Glad you found the part. Test shots are out there (as per standard practice the test shots contain parts for both versions). I can't post pics, but if you like the original annual issue of the wagon you'll like the full detail version (axle pins excepted). I hear you re the arthritis too...we're all getting up there. -
Round2 "Phoned-It-In"
pack rat replied to 1972coronet's topic in Model Building Questions and Answers
Just wondering....did you test-fit one or more of the wheel mounts? When I got my first look at the kit I'll admit I was wondering how those pins would work; thinking I might have to glue the wheels in position, set it on a flat surface while the glue dried so the wheels weren't all wonky etc etc. We've all been there. I was actually impressed with the way they worked....perfect fit to the wheel back and the chassis opening; apply a touch of glue, snap it together, then set it down on the bench with all 4 wheels straight and square. Maybe not the preferred wheel mounting method for some, but there's no way I would call it fiddly. -
Tim; your Scale Auto article on the Judson blowers might have influenced more than just a few vintage kit purchases. About five years ago I found a complete '64 convertible for sale and snapped it up partially based on your article (and those cool custom wheels). Just for kicks I sent detailed pics of the kit contents to John at Round2 along with pics of a hardtop I had converted to a 442 a few years earlier. He thought the pics were pretty cool at the time. This may or may not have had any influence on their decision to restore the kit.....but you never know. .
-
I'm not sure how well-defined the trim will be on production kits; the yellow car above was built from a test shot, and I know there were a couple of tweaks and corrections performed after that one was produced. NOTE-to those who notice the missing 442 emblem on the trunklid; that has been corrected.
-
Good plan. There's nothing worse than beating your head against the wall to the point that you never want to look at a kit again. I usually pick up a simple no-brainer project to play with until I feel like jumping back in. Thank You for the compliment re the 442.
-
The only way to foil that side trim without driving yourself crazy is to cut a long, straight piece of foil (about 1mm thick) a little longer than you need and apply it like a pinstripe. It's not as tough as it sounds. The most challenging part is peeling the strip from the backing without breaking or twisting it. I did the 442 test build this way; I would never attempt the old "apply then trim" method on it....my eyes would still be crossed too.
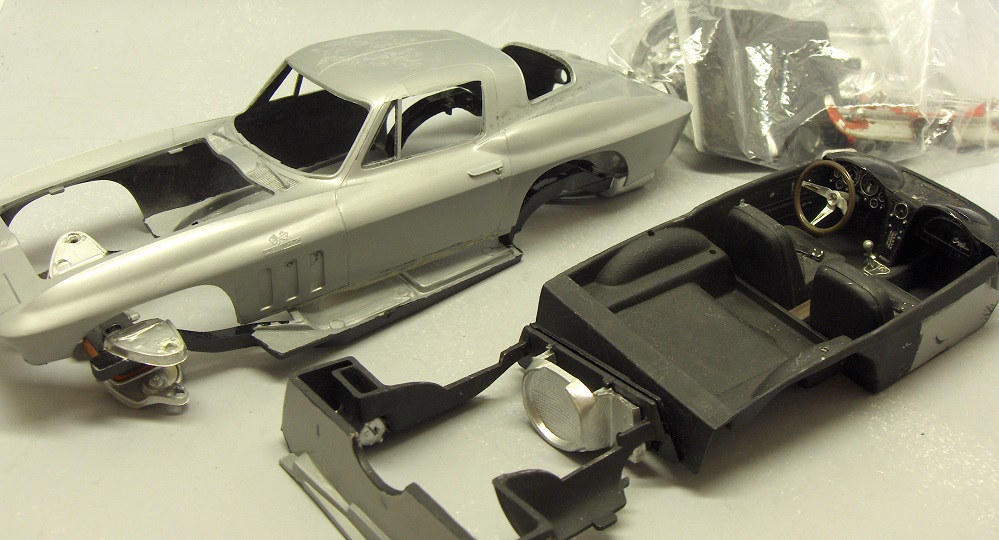
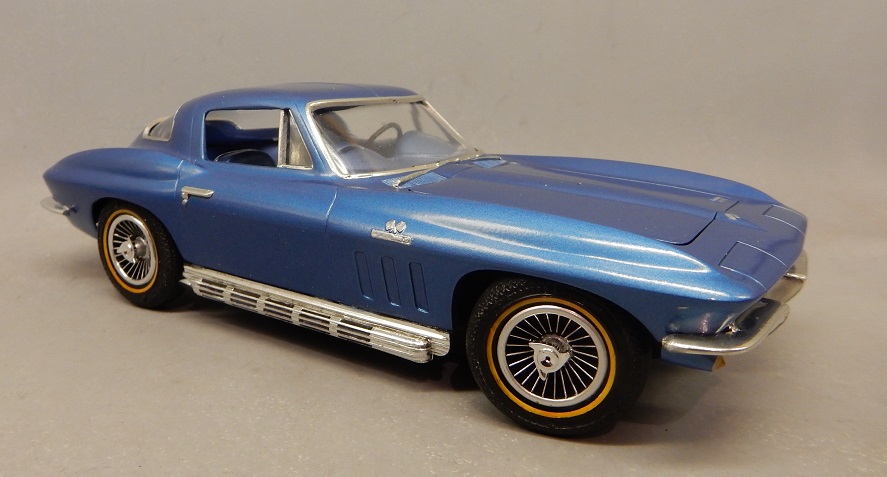
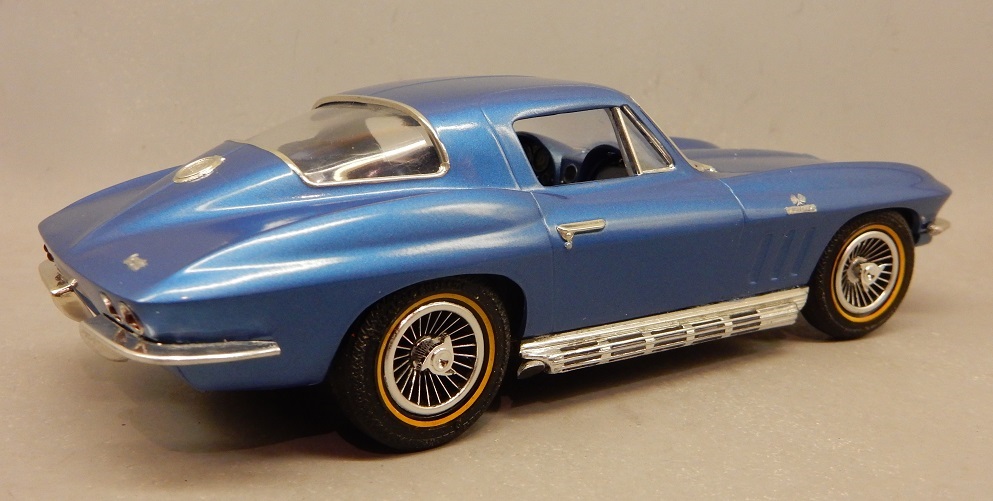
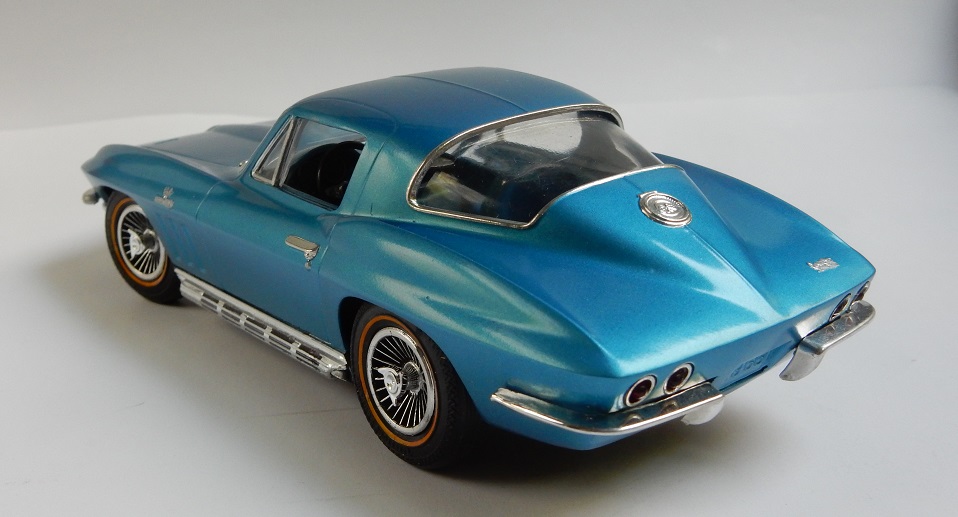
-
I finally restored a partially-complete, disassembled MPC '66 Vette I picked up about 25 years ago. My first dilemma; The body has "427" emblems engraved on it even though the kit was equipped with the same old 327 found in the '64 and '65 kits (MPC called it a 427 on the box). I didn't want to alter the body, so I dug an AMT big block from some unknown kit from the parts box. My next issue...MPC included hoods for both versions in the box but I only had the small block hood; I have a couple of AMT big block hoods but they aren't accurate. So...I can live with a '66 427 Vette with a small block hood; I'll disassemble and repaint if the proper hood ever falls on my lap (fat chance!) I substituted the chassis from one of the '67 reissues as the original '66 had the stock exhaust system engraved on it; MPC expected you to pretend it wasn't there if you used the side exhausts. The wheels are from the recent AMT '63...I applied a wash, dulled the shine down a bit and found some more accurate knock-offs in the parts box. The crowning touch is a set of goldline Firestone Supremes (a little experiment using clear acrylic paint on whitewalls). Paint is Testors lacquer Nassau Blue.
-
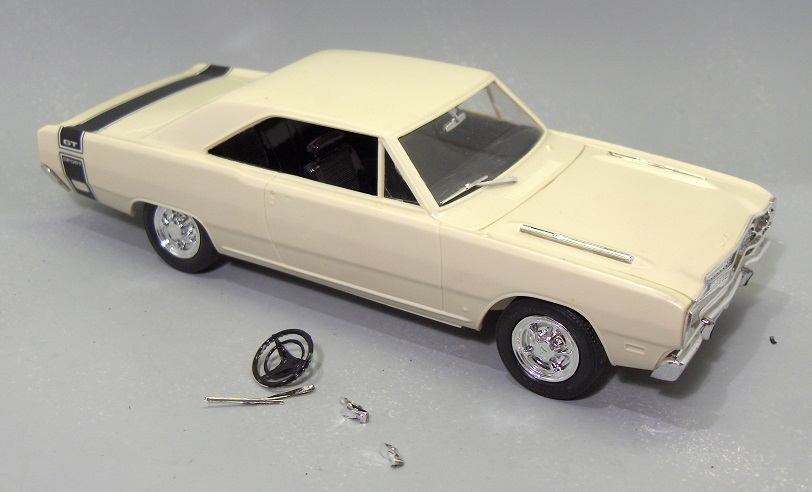
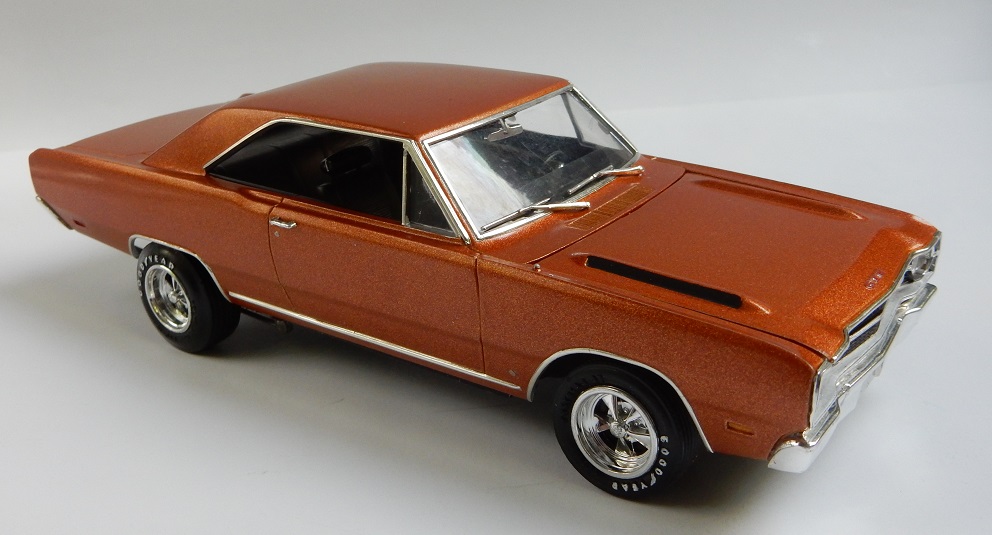
'69 Dart GTS...just like I would have built it in '69
pack rat replied to pack rat's topic in Model Cars
No Hi-Jacker logos,,,,but yup, they're white! -
AMT '62 Ford pickup restored
pack rat replied to pack rat's topic in Model Trucks: Pickups, Vans, SUVs, Light Commercial
The hubcaps are from a '61 F-100 I built as a custom. They're not accurate for a '62 but they look OK to me. -
Back in the late '60's I was a Mopar fan and had a nice 1/25 scale fleet of Chargers, Coronets, Barracudas etc. Unfortunately I couldn't build a Dart GTS or Swinger 340 back then as no one offered a kit. Finally in the 90's Revell released a '69 Dart GTS. I was looking at a built-up I picked up years ago thinking it would be fun to tear it apart and re-do it just as I would have back in '69 if MPC had released it. A pretty simple build, just like I did 'em back then; home-made shackles to raise the rear end and clear the (too wide) tires on Cragars, traction bars swiped from a vintage MPC Charger, an aftermarket air cleaner & headers on the 440 (a 383 is pretty close, so let's just call it that, OK?), an aftermarket steering wheel, and a cool 8-track player I found in my "gee gaw" stash. Paint is Testors Fiery Orange lacquer....gotta have some flake on that street machine. I had fun with this one; I can picture it on my display shelf back in '69...with a few more glue smudges on it and silver paint instead of the BMF (no way I was going that far into the past!). Yea, the hood inserts were ruined on removal...a little flat black paint, fixed!
.JPG.eec722e8cfa744f492e8055428bdcf1d.JPG)
.JPG.af867ba6315ec01001be1369d3c77b86.JPG)