Erik Smith
-
Posts
4,274 -
Joined
-
Last visited
Content Type
Profiles
Forums
Events
Gallery
Everything posted by Erik Smith
-
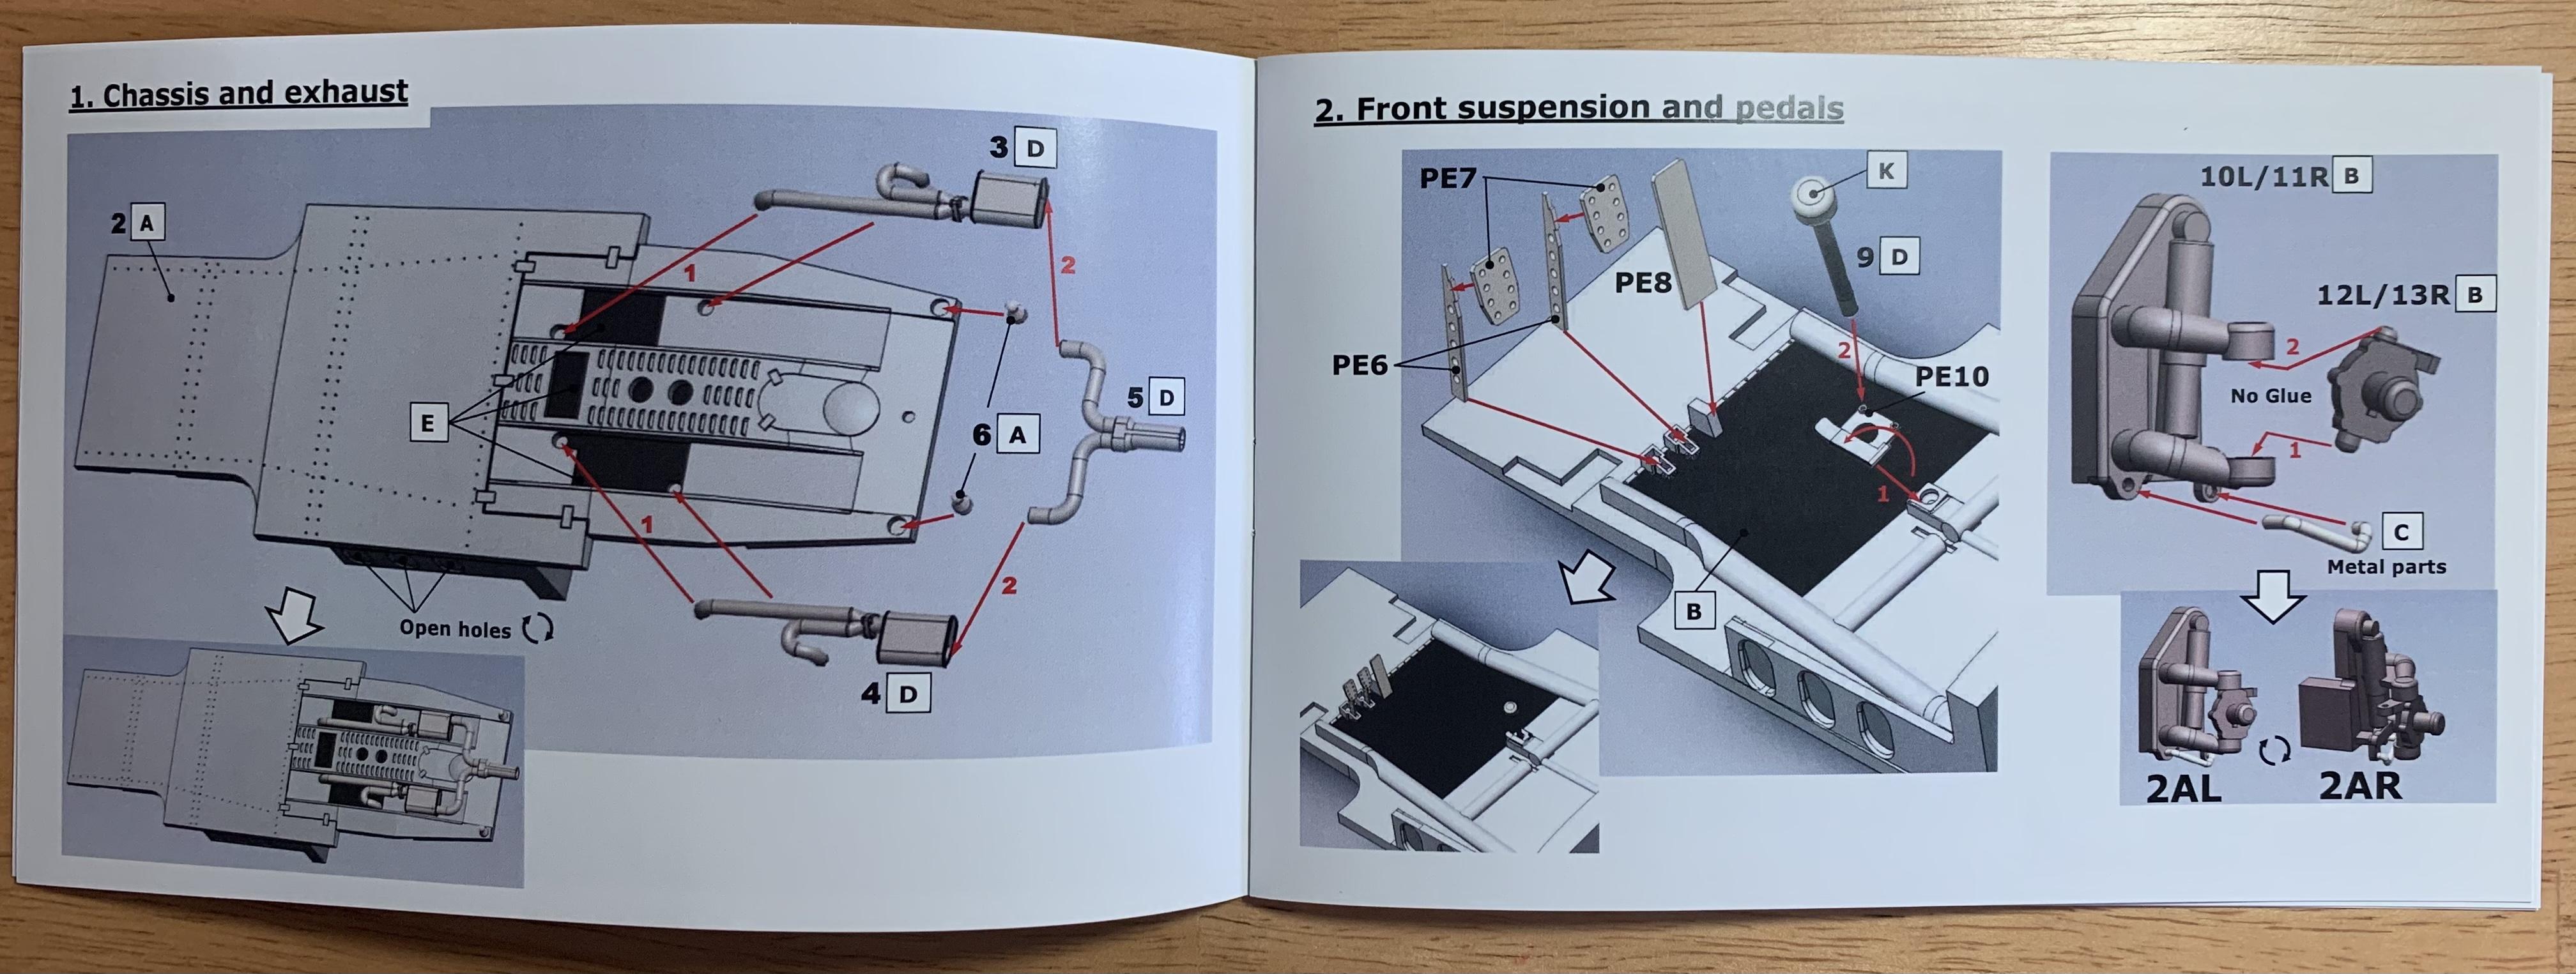
Few more: There are two PE cards this is the smaller of the two and is a little bit of a gold hue, which it appears the real cars had/have? nice little instruction book

-
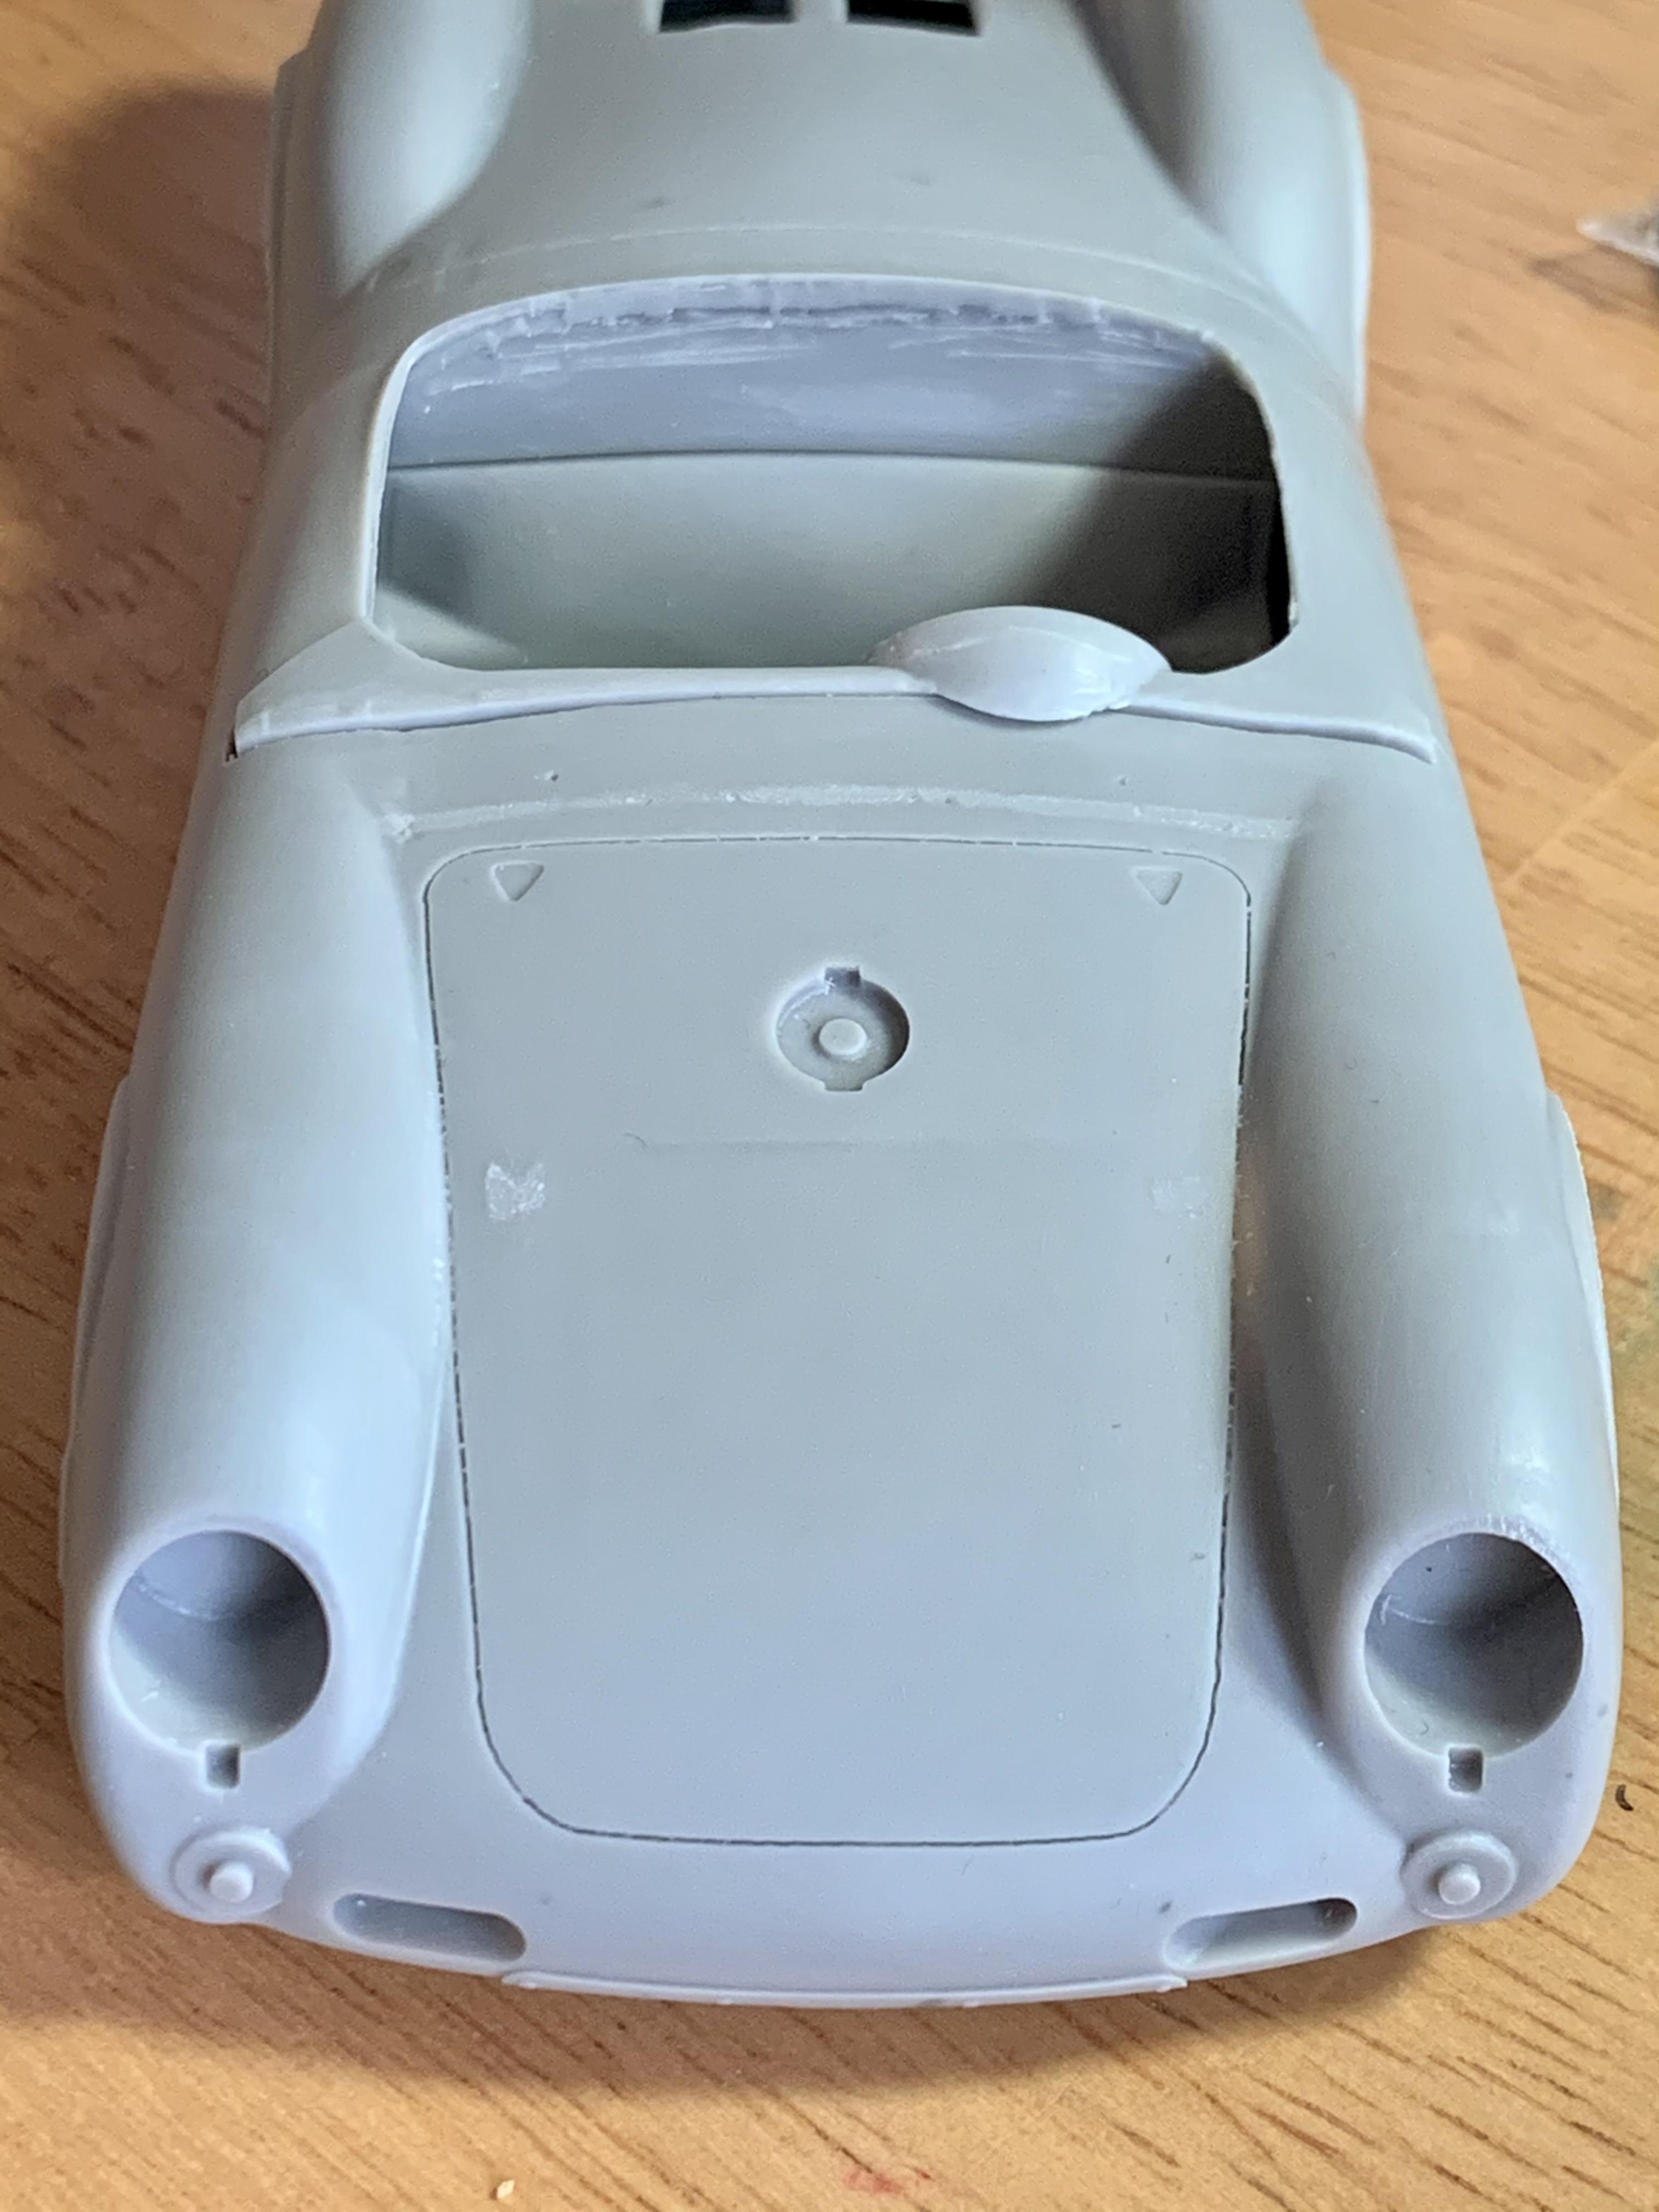
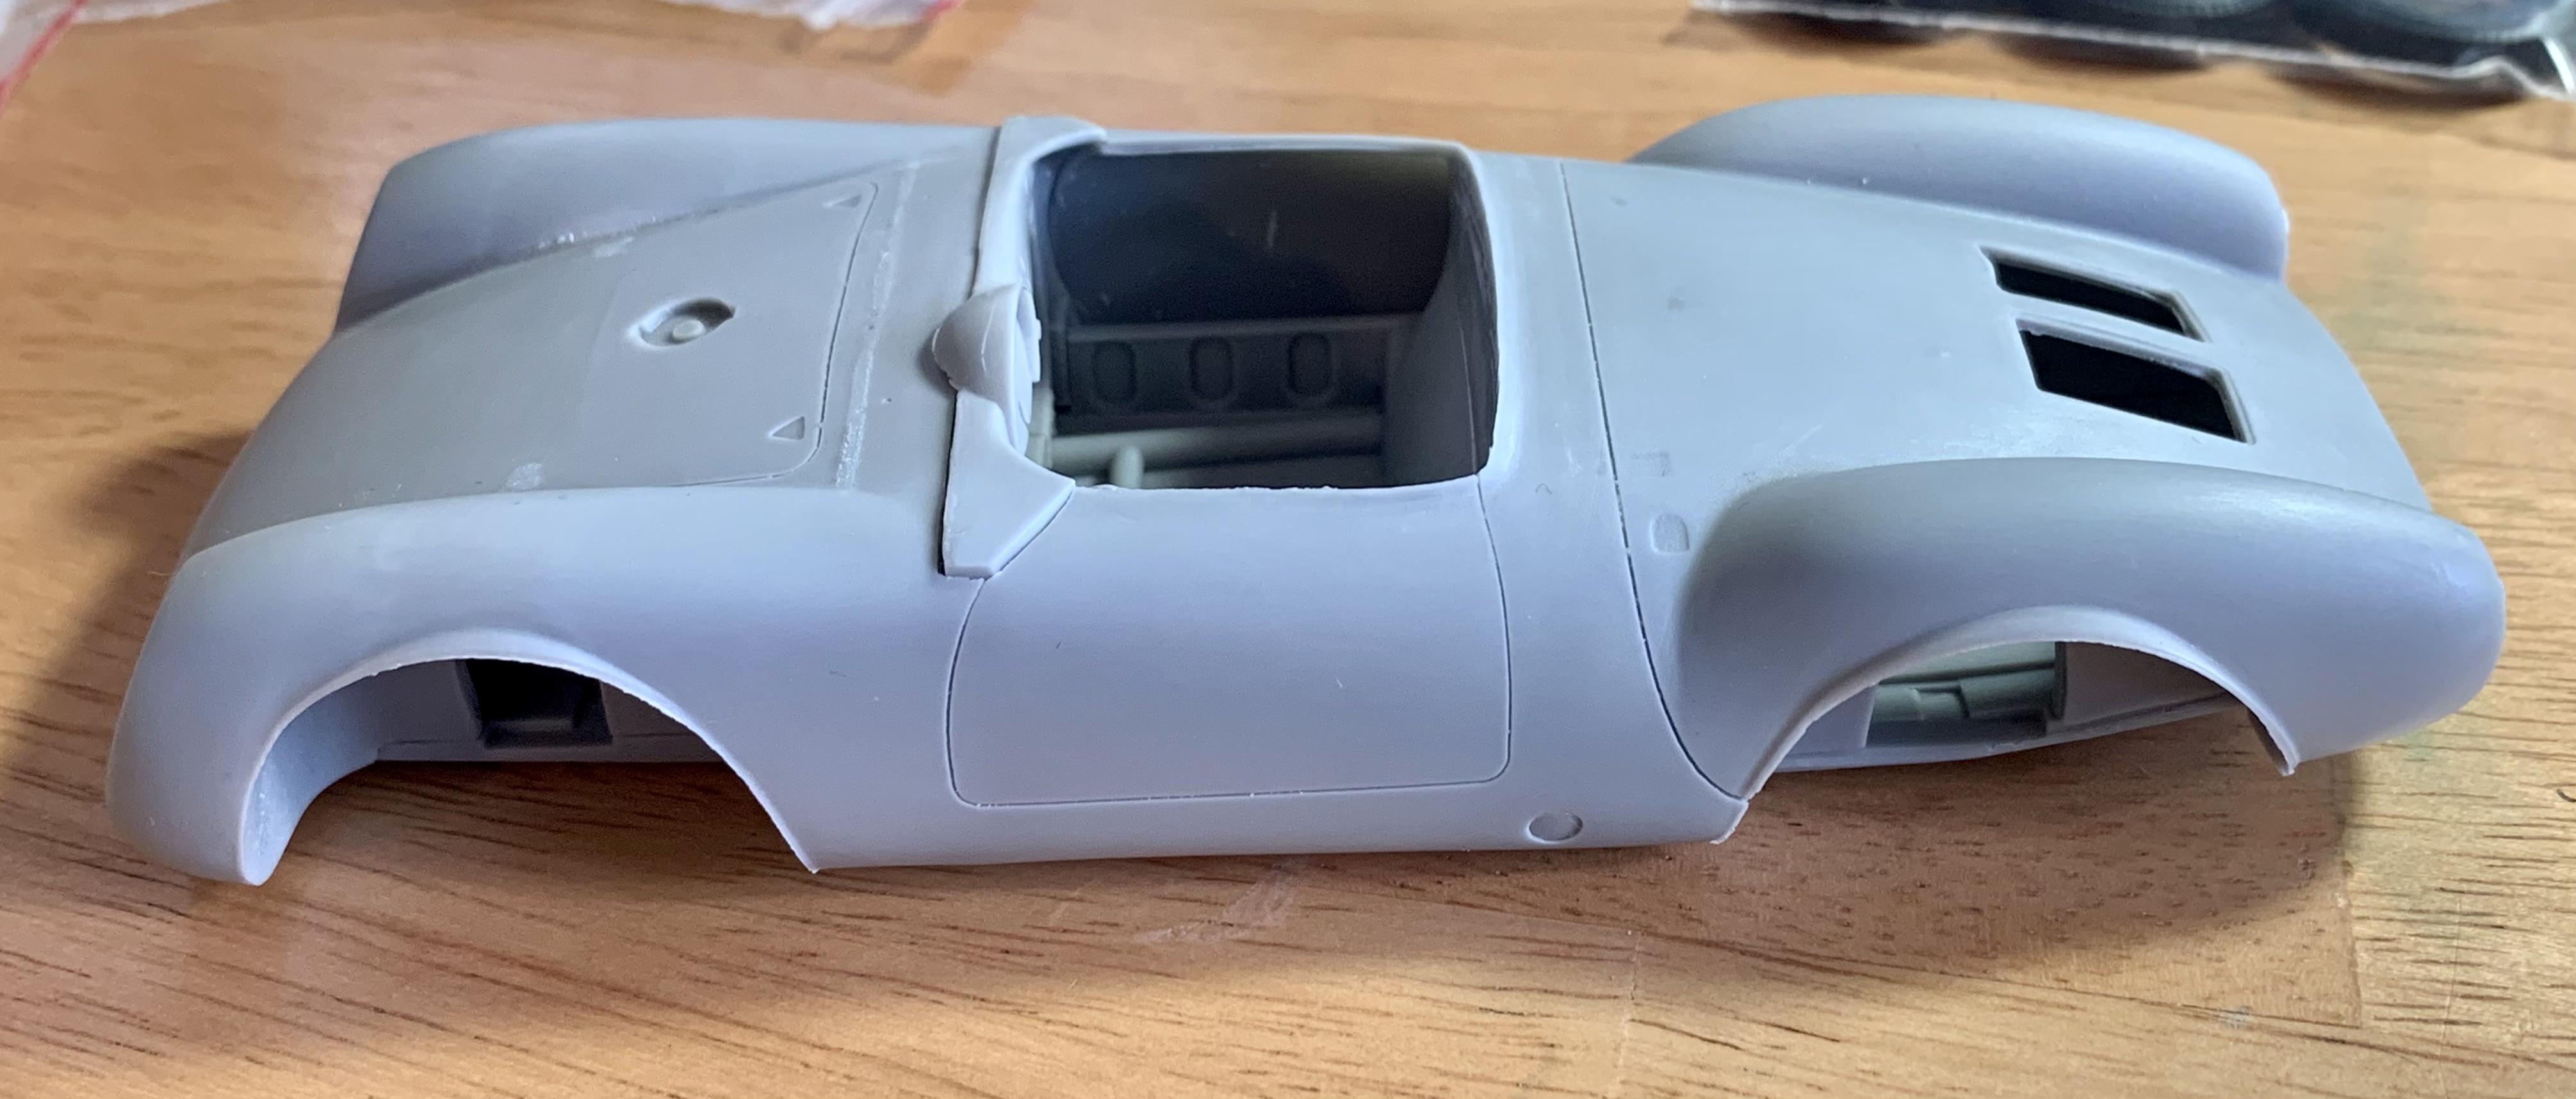
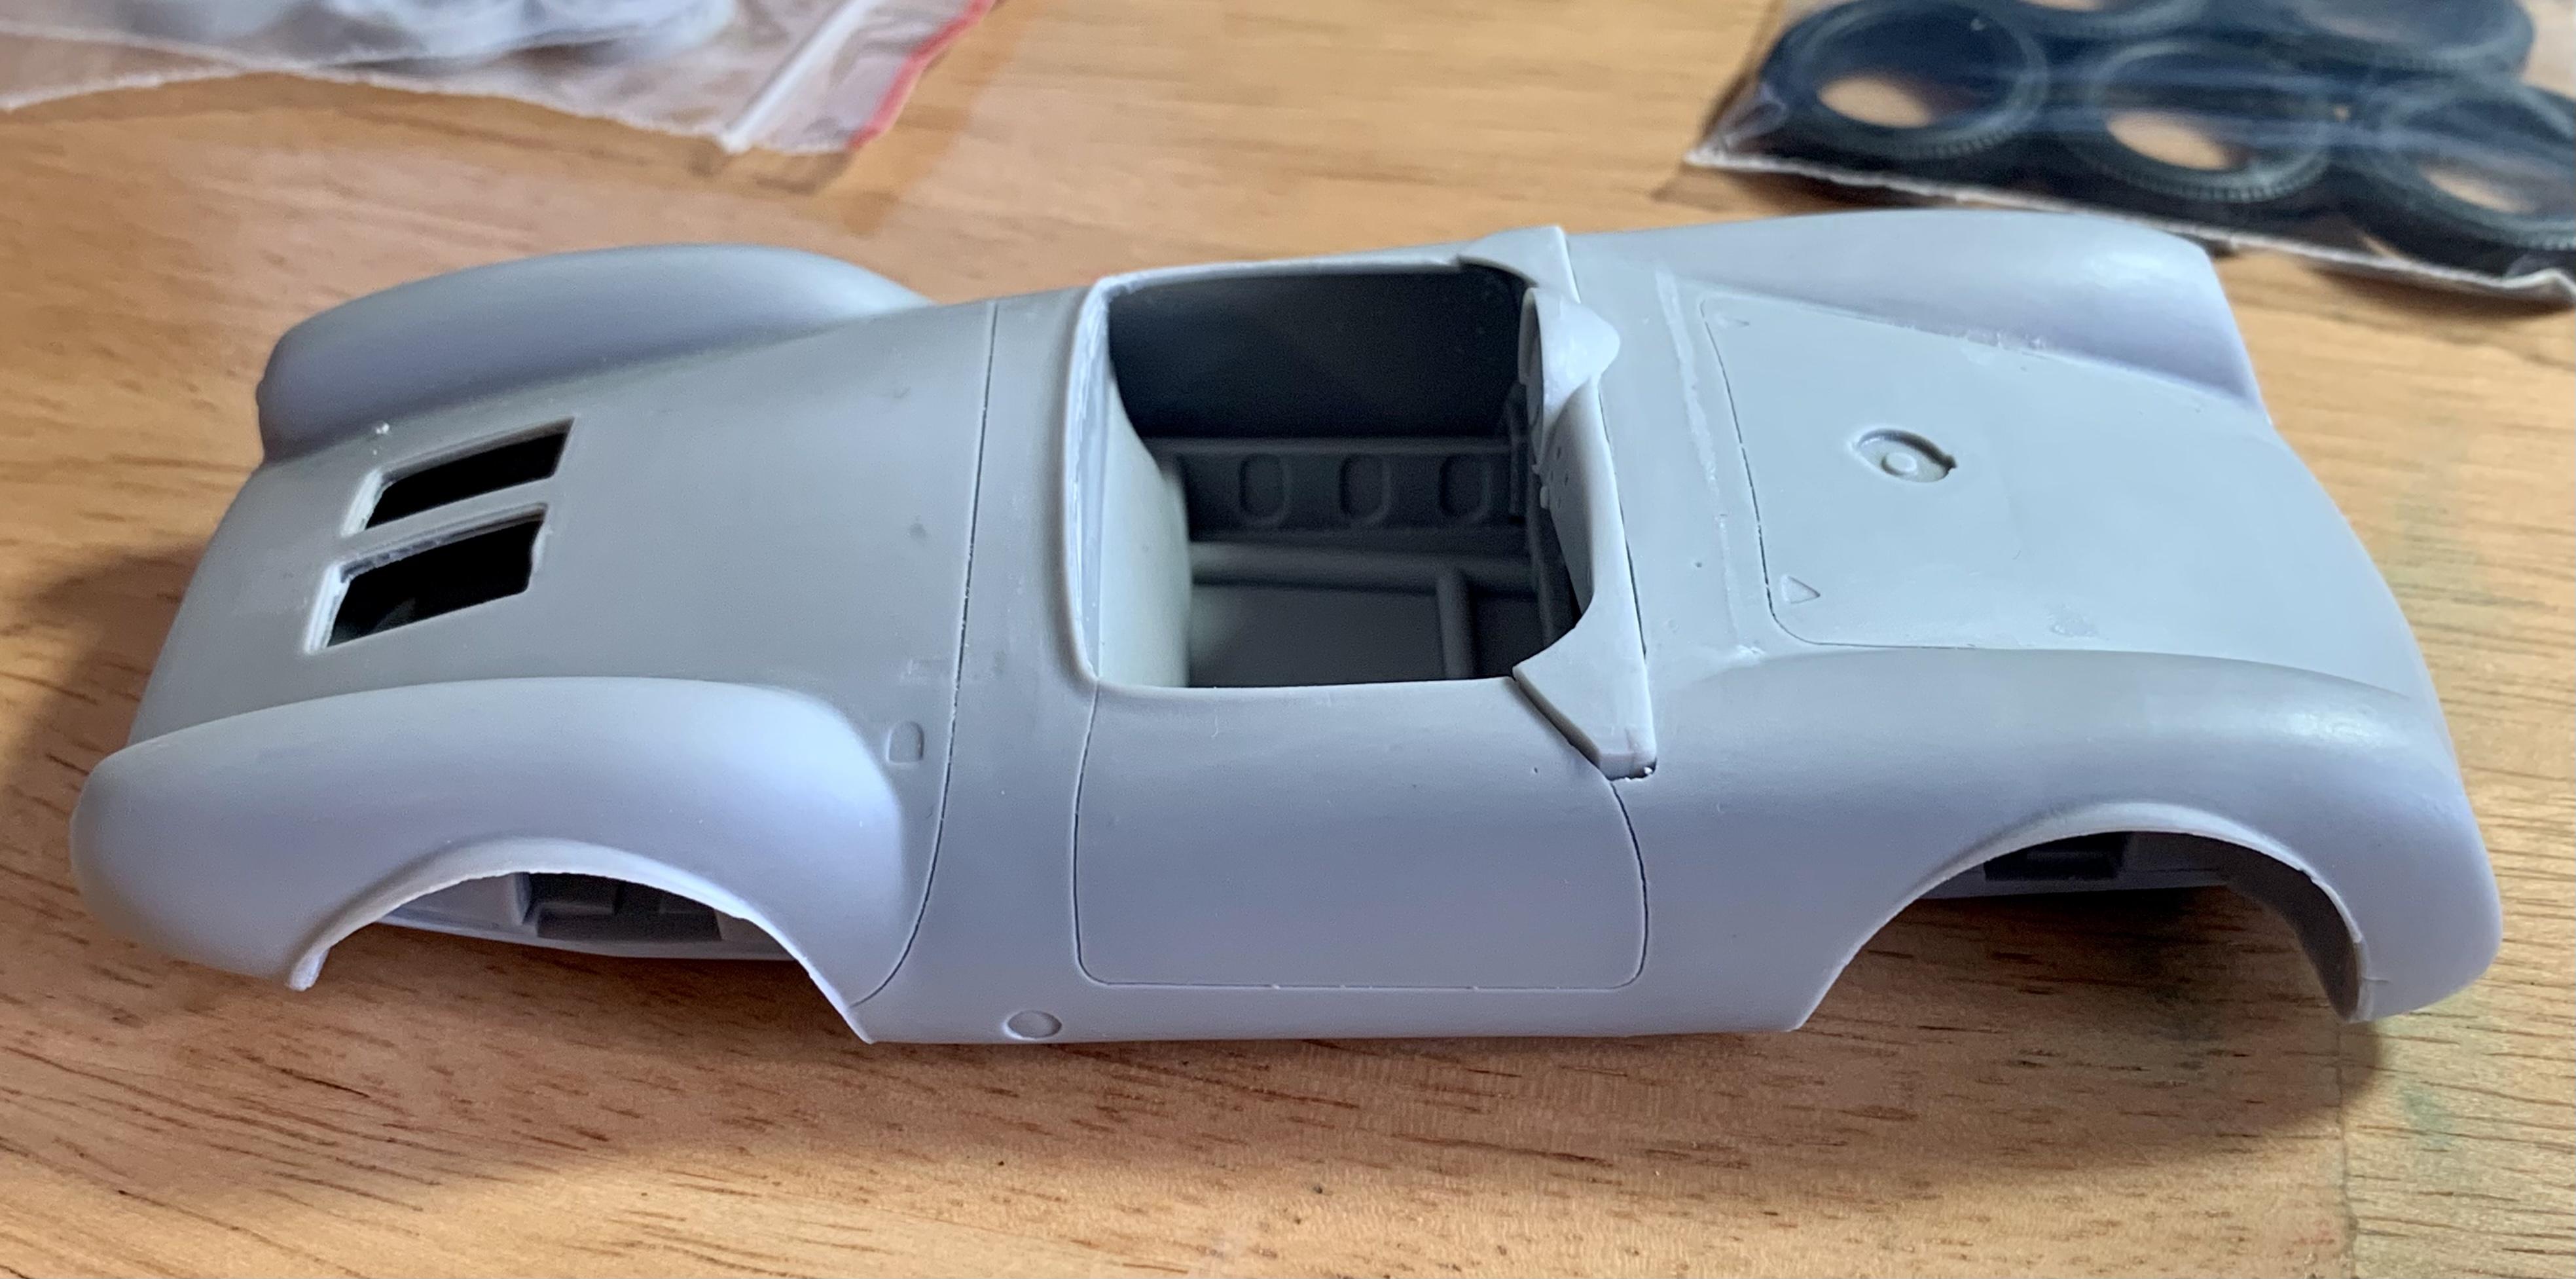
As received. There are a couple spots (the holes for rear engine vents) that need some delicate clean up from resin over flow or something. The dash/firewall assembly will need to be installed then body smoothed - in the photos it’s sitting loose and too high. You can see a little debris in panel lines. There is one very thin spot in the resin body - you can see the light through the front fender on driver side. The wheels and tires and brake drums are very nice. They could probably sell them separately.
-
Plan is to use Future for Porsche and Spyder scripts. The engine vents hopefully will contour well enough to also use Future. We will see. I have a lot of research to do...
-
I just received my Porsche from USCP today. It is a great looking kit. Overall casting is very nice. There is a little clean up on the panel lines and usual stuff like flash but appears no major work. Shipping from Ukraine March 1 and arrived March 8. I'll post a couple photos when I get the kit down to the hobby room.
-

small bolts and nuts
Erik Smith replied to vintagedragcrazy's topic in General Automotive Talk (Trucks and Cars)
Are you looking for actual nuts and bolts or just a representation of nuts and bolts? If you're just looking for things that look like nuts and bolts but don't actually hold anything together, the best bang for your buck are from ModelClub https://www.modelbuilderswh.com/collections/detail-parts/products/bolt-head-on-a-washer-7mm-all-scales -
I get to drive a lot of rural roads, and I seem to always spy an old car or two or three. Today I was cruising through Emida, ID (Google map that) and spotted this old Mopar sitting by a barn. I’d love to know the stories behind so many of the cars I see. The “What did see ON the road thread” sometimes gets these cars thrown in, so let’s just leave this to cars that ain’t seen the road in some time.
-
That turned into a beautiful model. Great work!
-
They should have waited until everybody bought the convertible.
-
What Say You?
Erik Smith replied to TarheelRick's topic in General Automotive Talk (Trucks and Cars)
Proportions just do not work. -
I would be very wary. There are a lot of companies that have “in stock” items that really means if you buy it they will buy it from some place else and ship it to you, maybe. Plus free shipping from Taiwan? If it’s real and it’s free, that’s going to be a long slow boat ride. Down in the Community build section, Cannonball thread, a member ordered from a similar type company and it didn’t work out.
-
Have you seen this thread?: I don’t remember that kit being somewhere in the 43 pages, but it’s (or before PB deal, was) a cool thread.
-
Canyonlands junk cars - diorama idea
Erik Smith replied to 89AKurt's topic in General Automotive Talk (Trucks and Cars)
That looks strange. People just dumped cars on the curb like that? Cool photos. -
Canyonlands junk cars - diorama idea
Erik Smith replied to 89AKurt's topic in General Automotive Talk (Trucks and Cars)
I’ve worked in the “woods” for over 30 years and I am always surprised where I find old cars - wish I had photos of all of them over the years. What is amazing is what parts actually hold up to years of exposure. I found a 1940s Dodge at the bottom of an old road fill and the gauges were intact and as clear as new. I’ve found 1930s cars with chrome bumpers still plated and shiny. One I did photograph (locked in Bucket world): -
If anybody has one of the old Monogram kits and needs over 300 photos of an all original, extremely low mile Blazer: https://bringatrailer.com/listing/1975-chevrolet-blazer-8/?utm_source=dm&utm_medium=email&utm_campaign=2021-02-25
-
Yup, the stuff Peter posted right above.
-
Those bubbles will form in Tamiya paint when your wet coat is applied to thick. Tamiya works best with 3 light coats, or more (I actually do multiple light coats over high spots with an airbrush first). Follow with wet coats. Tamiya paint is actually very forgiving and shrinks quite a bit while drying, but still has its limits. I think the bubbles are gasses in the paint that are trapped due to the thick application, which could be caused by: 1. Painting too close to model 2. Painting too slowly over model Watch some YouTube videos if you can and see how far away to paint and about the speed you want to pass the paint can over the model. Practice helps, but it’s tough to practice when spraying a $8 dollar can of paint. You should be able to easily paint an entire model with one can of Tamiya.
-
Nice - was it that three car auction on eBay? I was watching that one, actually sold for a decent price considering it looked like one was painted but otherwise unmolested. That gen Falcon has been selling for pretty good money lately.
-
Yes, Jo-Han Maverick.
-
Depends. How accurate do you want it to be? Do you mind wasting BMF? If you look closely at the actual trim, there are actually some seams that you can imitate. On the 69 Charger, for instance, there is a separate trim piece on the C pillar, so you could do a small BMF square in the C pillar angle and strips above and below. I usually try to do it like that to avoid one big piece of BMF that wastes all the foil in the center when removed.
-
Is this the same guy that has blatantly recast parts in the past under a different seller name? That seller had trouble with the English language as well. Photos look similar - they are either the original resin part (Hobby Design turbos) or the plastic version, NOT his cast part. No offense, but if a resin caster posts photos of the plastic/resin parts he is copying and not the actual parts, that’s a bad sign.
-
Spray paint or brush for trim pieces?
Erik Smith replied to Raguvian's topic in Model Building Questions and Answers
Regular process tape, paint, and the fun part, peeling off the tape!
-
Our newest member has been with us since September of last year. Miss Birdie has just recently discovered my modeling bench. She is obsessed with stealing things now. Good thing she's cute. Yeah, she's not too kind on the plants either.
-
Depends on what tires you are working with also. I always sand the tread - gets rid of mold lines and makes the tread look better. On vinyl style tires, adding sidewall decals and spraying with flat clear helps. With Japanese style "rubber" tires, mostly just sanding the tread and rubbing my fingers over the sidewalls works to give it a oily finger type sheen. On some the newer kits, the designers make it hard to slip the wheels into the tires. For some reason they think we need a big ribbed surface to go into the tire. On this annoying and pointlessly difficult type of wheel/tire combination, I install the wheel first, mask the wheel, then paint. Otherwise the paint on the vinyl will crack and scuff and look bad while you fight and stretch the tire to install the annoying, pointless new style wheel.
-
Spray paint or brush for trim pieces?
Erik Smith replied to Raguvian's topic in Model Building Questions and Answers
I don’t clear over tape. Apply thin layers of paint (let it flash dry between coats) to build the color you need and it won’t seep under the tape. -
Kitbashing,,,
Erik Smith replied to thomascoffey1959@gmail.com's topic in General Automotive Talk (Trucks and Cars)
No qualms at all from me. I buy kits for the wheels or even recently a transmission. Once you buy it, you aren't getting your money back, so use it as you see fit.