MrObsessive
-
Posts
9,785 -
Joined
-
Last visited
Content Type
Profiles
Forums
Events
Gallery
Everything posted by MrObsessive
-

72 Buick Riviera Boattail (Update 18/12/26)
MrObsessive replied to camaro69's topic in Car Aftermarket / Resin / 3D Printed
When I met Ed Sexton in person a couple years ago at the NNL East and he had his 'Most Wanted' list up, I made mention of this car among a couple others. I mentioned that even as a snap lowrider with minimal parts count, this car would be a knockout especially if parts are there for it to be built stock. He nodded his head and wrote it down, but with the shape Revell's been in as of late, I'm not holding my breath. -
Auto quiz 401 - Finished
MrObsessive replied to carsntrucks4you's topic in Real or Model? / Auto ID Quiz
I thought there was a resin caster that was doing a master of this particular car (I believe a '61 coupe), but I've not heard anything about it in quite some time. Call me crazy, but I can see taking a '55 Chevy and turning this into a Facel Vega. Of course some shortening of the wheelbase would be needed among other things, but I'm seeing the basic 'bones' out of that '55 shoebox. -
1974 Corvette Resto------Update! 12/31/18
MrObsessive replied to MrObsessive's topic in WIP: Model Cars
Dominick, thanks for the nice words! Yes..........Tamiya tape along with BMF works great for stripes! Here's an '05 Mustang I built years ago that I wanted dual stripes on. And the end result.............. Very good stuff IMO and no builder should be without it. -
72 Buick Riviera Boattail (Update 18/12/26)
MrObsessive replied to camaro69's topic in Car Aftermarket / Resin / 3D Printed
Taking a look just now at my resin I have and looking at your resin, yours is not as flat. Short of cutting away the top of the roof section on mine, I see no easy fix in this area. I really look forward to what you're doing with this one! -
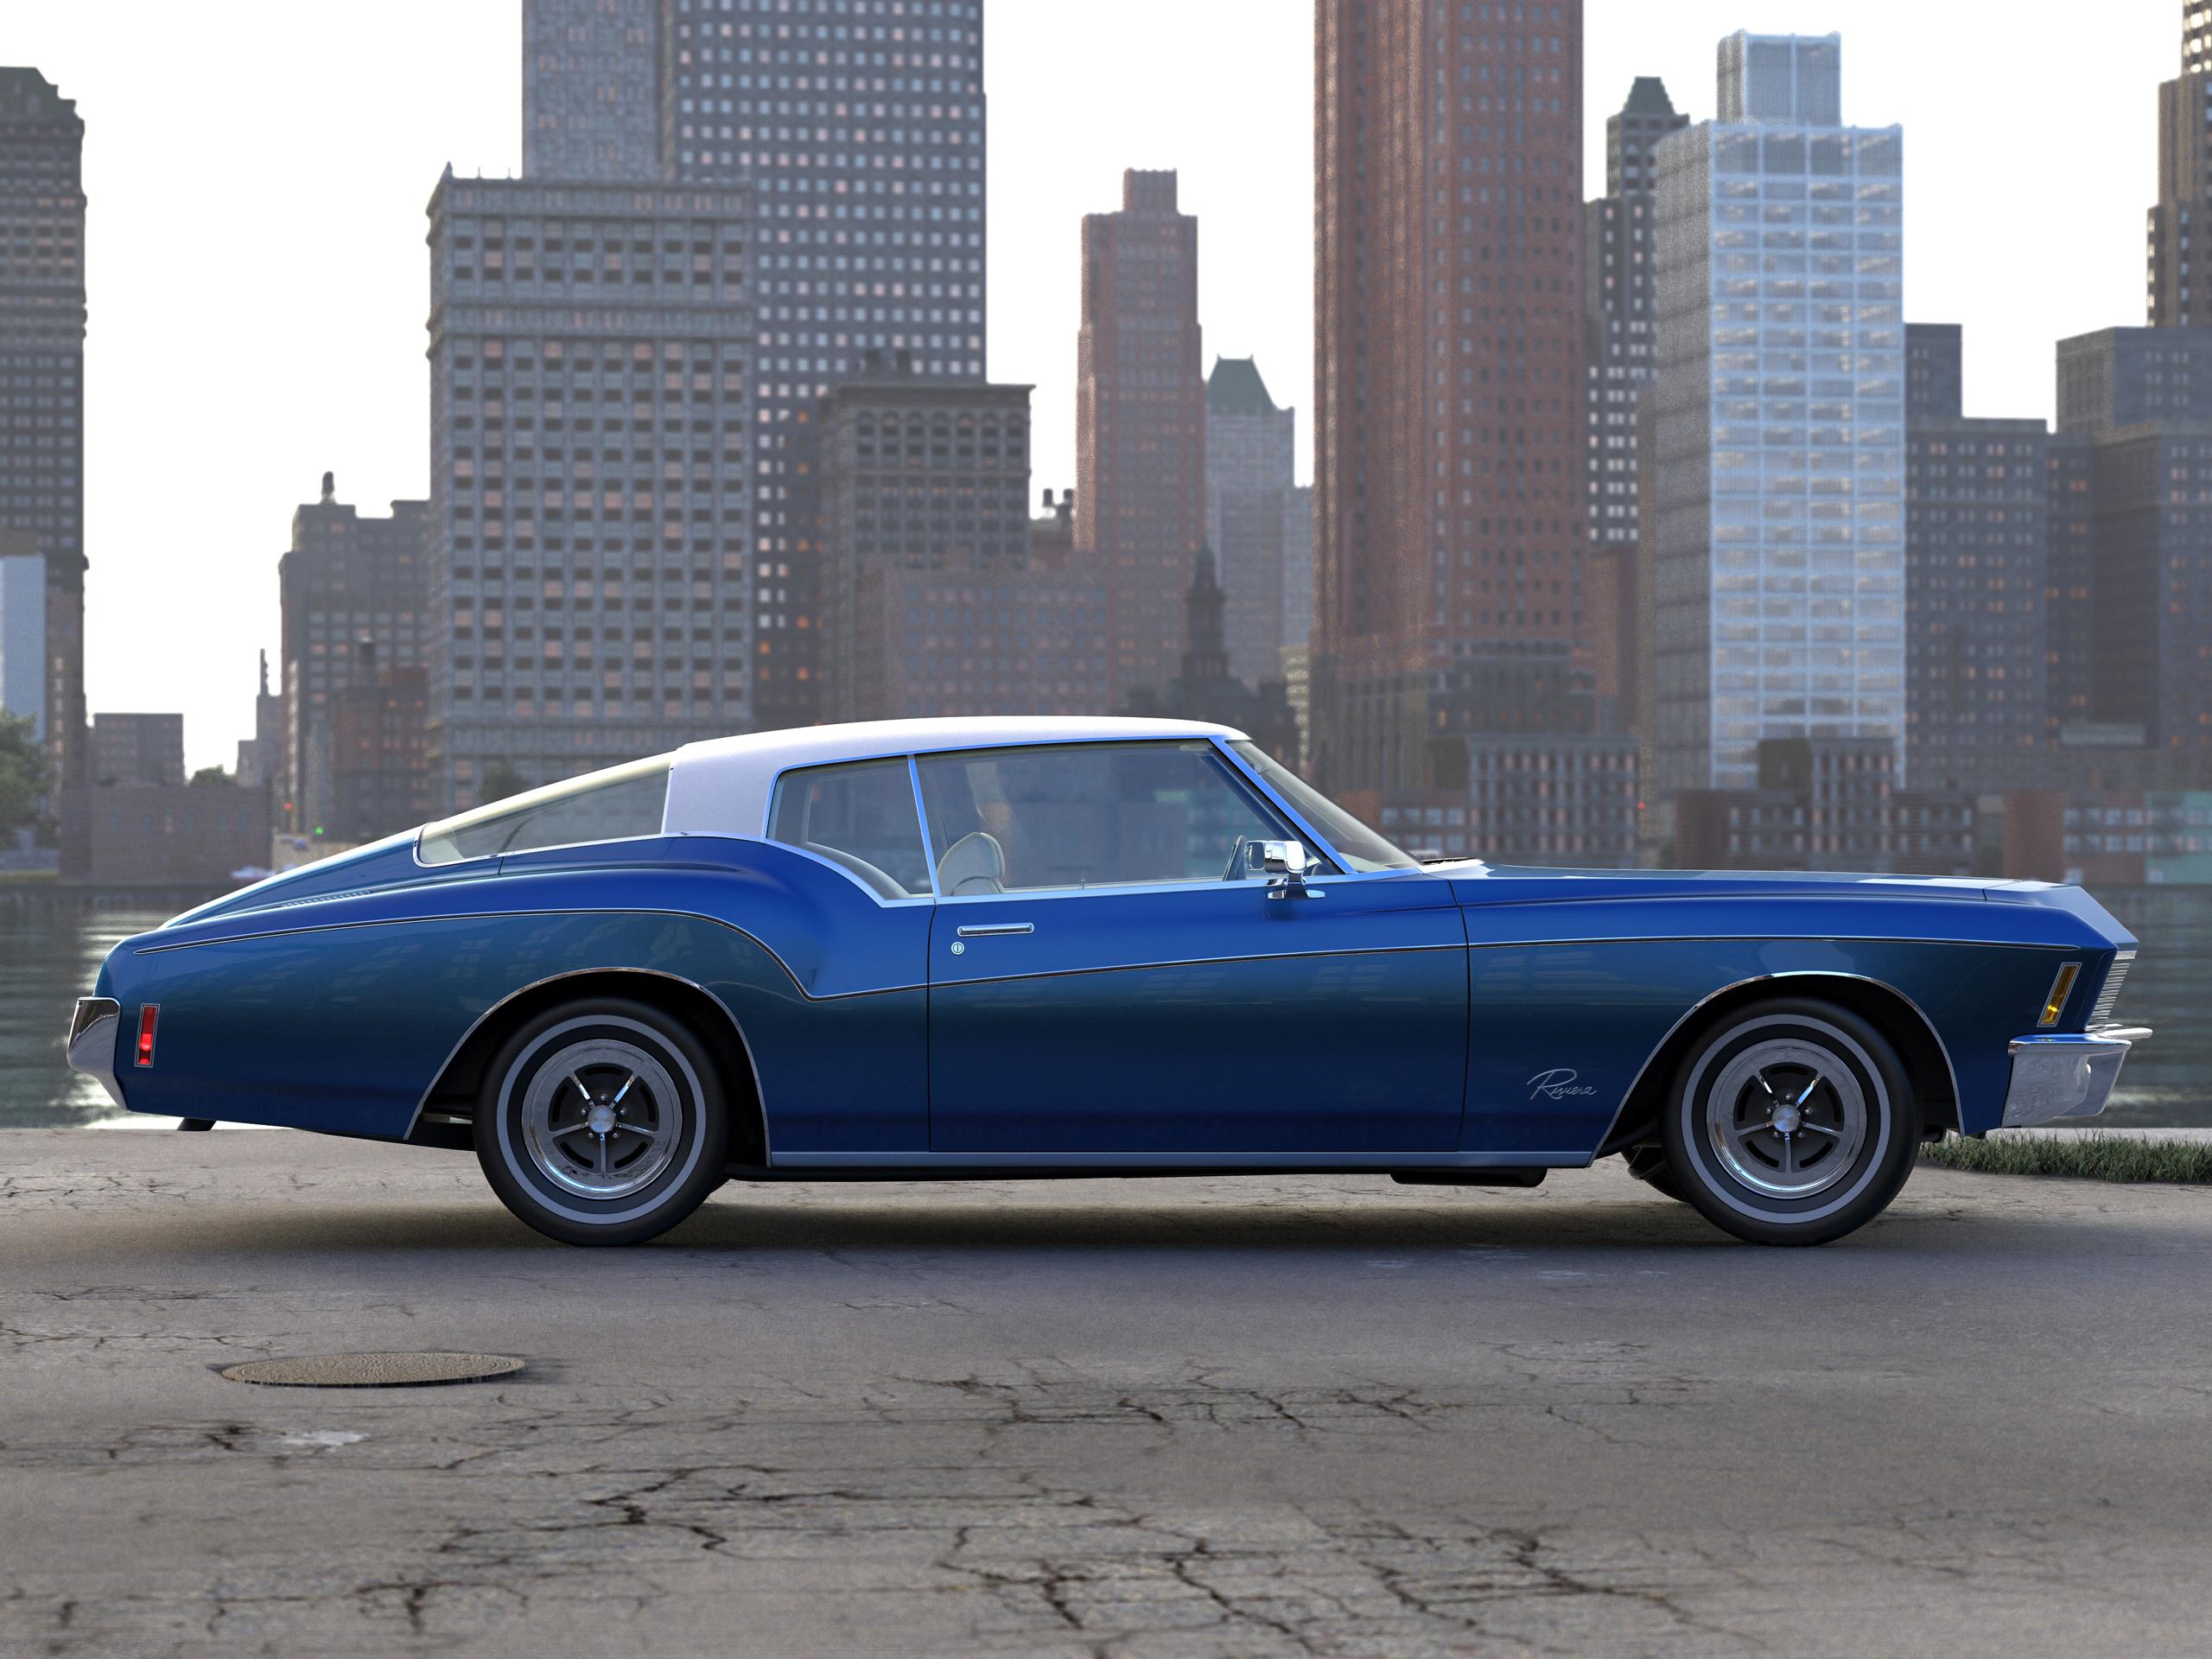
72 Buick Riviera Boattail (Update 18/12/26)
MrObsessive replied to camaro69's topic in Car Aftermarket / Resin / 3D Printed
Rico, you're doing another one of my FAVORITE cars of the '70's! Bill Mitchell sure knew what he was doing when he styled this one and I'd have to say this is one of his best. One small criticism if I may............one of the beefs I've had with the different resins I've seen over the years (I have one of them) is the crown of the roof being too flat. Take a look at the pic below, and then compare it to the resin......... There's a definite curvature to the top of the roof.....it starts at the windshield header and sweeps back to the rear window. If this is too much trouble don't sweat it. It's just one of those things that I notice. You've got the beltline reshaping looking good! That's another area that definitely needed attention! Keep us posted!
-
Trying BMF for the first time-questions
MrObsessive replied to Safire6's topic in Model Building Questions and Answers
I can tell my Exacto blades from one another in that they're the 'round' type----one of them has a knurled surface while the other doesn't. The blade handle with the knurling is the one I use for BMF while other is my 'work' knife. I have picked up the work knife by mistake though and then thought "No wonder this BMF is cutting so terribly.........I've got the wrong knife!" Not long ago, I came across a seller on eBay that sold the blades in large 100 blade packs. I have now enough of 'em that will last me literally years by the way I build! I have a dispenser which holds the blades and I have yet to empty the dispenser as it'll hold roughly 15 or so blades at a time. -
1974 Corvette Resto------Update! 12/31/18
MrObsessive replied to MrObsessive's topic in WIP: Model Cars
It took several days, but I finally got the rubbing out and polishing of the paint done. Some touch ups will be needed here and there, but I'm just glad this part of the WIP is done as far as I can see. I'll have to spend some time getting the wax out of the headlight and door shut lines-----maybe put a very fine wash in those as a very last detail. Next------on to BMF! Doing a quick mock-up to get an idea of how things might sit once it's time to get the wheels and tires on. After the BMF, it'll be time to get the glass in. I'm torn whether or not to tint the glass. I'd like to get the same brand dye that I used to tint the clearcoat, but in blue. I see some on the site where this is sold but I may not want to wait for it to come in. I may leave this off for now, and while I do have another Corvette resto in mind to follow this one, I may tint this glass for that model. That's all for now.........thanks for following along! -
Trying BMF for the first time-questions
MrObsessive replied to Safire6's topic in Model Building Questions and Answers
Those are loaded questions, so what I'll do is give you my process on how I do BMF. You'll have to decide what works for you.............your mileage may vary. I never put clear coat over the BMF, I've found over the years a GOOD sheet (I get mine directly from BMF and NOT the hobby shops), should hold up well on its own. I have models that I've BMF'd from back in the '90's and it's still holding up well. I get your method of putting the BMF on the inside. I do this somewhat, but not overly so. I overlap the A pillars for instance ever so slightly and I have glued the windows (epoxy) on the BMF and have not had them pop out unexpectedly. Cutting tools: I use the newest Exacto blade I can find and in fact, I dedicate one particular hobby knife to BMF ONLY! BMF works best with the sharpest blades, and one does not have to dig hard in cutting it......simply let the weight of the blade do the work. It wouldn't hurt to score a 'guide' along the bodywork where you'll be putting the BMF as that will help trim things away after painting. The knife will have somewhat of a pre made trough to help guide it along. For really faint areas that can be found on reissues and such, it wouldn't hurt to lay a piece of tape or the kind of hard tape (Dymo) that's used to punch out embossed letters and numbers. You can lay this along the edge of where you'll need to make your slight scored line. I'm not a big fan of the "Ultra Chrome" BMF. I've had a lot of trouble with it ever since it came on the scene and I refuse to use it. Your better bet is the regular chrome and then simply take the time to burnish it down and rub it out. As far as cement absolutely stay away from any kind of solvent like cement for windows. You'll want to use either 5 min epoxy, or some kind of white glue. This will depend on the shape of your windows, and how much of a positive contact area you'll have putting them in. You can paint over BMF, but understand that the paint can easily chip/rub off. It's one of the reasons I'm not a real big fan of too much BMF on the inside. Especially if you intend on painting the A pillars like most newer cars. Trying to get the glass in can be frustrating at best sometimes, and this is where you'll want to do as much test fitting as possible before you get too involved with the BMF. That's all the caveats I can come up with for the moment. I'm sure others will have things to say about this, but it's how I handle BMF and I've been using it since the early '90's. If you've got anymore questions, don't hesitate to ask! Hope all this helps! -
He sounds like an Uncle of mine (Mom's brother)! I swear there were years he would have three or four cars pass through his hands within a year! Oddball stuff you don't see anymore as this was back in the '60's and '70's. When Danbury Mint was making cars, this is one I wish they would have done. They did the '56 Buick Roadmaster four door which was basically the same platform as this Caddy, but it would never happen. Who knows, this could have been on the drawing board before the Chinese government stepped in and shuttered the factory.
-
Auto quiz 401 - Finished
MrObsessive replied to carsntrucks4you's topic in Real or Model? / Auto ID Quiz
It certainly is that! I don't think I've ever seen one of these here in the states even at a car show. -
Luc, there are instances where Revell for whatever reason didn't follow the model you suggested. In particular, I'm thinking of Revell's very nice '56 Chevy Del Ray, and then the later '57 Chevy 150 Black Widow. Even though they're essentially the same car in 1:1 save for some body changes and other small details, to me it appears that Revell chose to not modify the existing '56 tool, but tooled up a completely different body. That might have been the smarter thing to do cost wise, but in doing so they missed the mark on some things. It shows to my eyes in the shape of the roofline particularly the rear half. The '56 captured this very well, the '57 not so much. There are times when they will modify an existing tool, but there's always that little detail that they'll skip over which to me is a signature of that particular car. One example that comes to mind is the taking of the '57 Chevy Belair two door sedan and then modifying that into the Bel Air convertible. Not a bad kit at all, but one area that sticks out to me like a sore thumb is Revell didn't bother to modify the upper halves of the convertibles doors, which have a distinct 'sweep down' appearance in the beltline, as opposed to the straight across appearance of the sedans. Another one of those 'signature' details that many of us out here in the lunatic fringe (and maybe not so lunatic) notice. Just my 2¢ worth!
-
Very Nice! And it's in a bodystyle once very popular on American roads.............a genuine pillarless four door hardtop. That was a one year deal interestingly enough as the '57 is a COMPLETELY different car. Cadillac hasn't made a four door hardtop since '76 sadly enough.
-
Oooh Ooooh!! I'm DEFINITELY watching this one!! One of my FAVORITE cars of the '70's and one that shocked buddies of mine along with myself when this first came out! The Torino's wheelbase is off? I thought they were the same wheelbases during those years, but Revell may have their measurements off too. Interesting enough, I thought about doing this sort of conversion for the longest time, but using the Torino mostly as a base. Everything else would have been fabbed out of sheet plastic, but using the basic 'bones' from the Torino. Keep us posted Paul!
-
Randy, that is one super nice Poncho! Very period correct color and it's one of my favorites for that car. It 'sits' just right and despite it being a bit too fiddly, it came out great!
-
That is a good looking truck Luc! I wouldn't mind a kit of that at all! I thought I'd seen resin conversion kits of this on the 'Bay...........for me better to work in plastic, but when there's no other option?
-
It's all in a name...
MrObsessive replied to Oldcarfan27's topic in General Automotive Talk (Trucks and Cars)
That's the Cimarron you're thinking of! What a JOKE of a Cadillac! Thankfully, GM doesn't pull stunts like that anymore. That car should have never seen the light of day as IMO it tarnished the Cadillac brand among other things. -
1974 Corvette Resto------Update! 12/31/18
MrObsessive replied to MrObsessive's topic in WIP: Model Cars
Here's the little tip I made mention of in a previous comment. There are times depending on the shape of the body and this 'Vette is no exception, you'll have a lot of creases and corners to deal with. I've found that masking off those creases (as close as possible) helps a great deal in keeping those areas intact and warding off the issue of paint wearing away while you're doing a rubbing out job. One of my go-to items for masking is Parafilm. If you have a sensitive surface, or you want a temporary seal for jars and whatnot, you'll like this. Parafilm can be used at times when you want to keep an area from getting scuffed from adjacent rubbing out areas such as this sail panel and it won't pull off the paint once you remove it. Another go-to source I like is good ole Tamiya tape. Very good sealing qualities and makes for excellent masking for stripes for example. In this case, I found the tape to be a bit more sturdy for wet sanding as I'm doing here to the paint and note that I put the tape on top of the peak to keep from wearing the paint away from that area. I'm doing the same for the rear fenders and at the time of this writing, I've got the rear quarters and top of the front fenders done. Still a loooong way to go! I'm a huge believer in getting your hood, tops of the fenders, roof and rear deck as glossy and orange peel free as possible. If you ever intend to be in a show be it an NNL or judged contest, the very first thing folks are going to see are those areas. If there's very good lighting above, you want those places practically mirror like. Hope this little tip helps.........it can go a long way in warding off those 'surprises' that always seem to show up when you're on the downside of getting a WIP done! -
Tamiya paint stands...
MrObsessive replied to ScaleAsylum's topic in General Automotive Talk (Trucks and Cars)
I've had to tape my Tamiya stands as I had an unpleasant surprise a couple years ago when I was painting my '59 Chevy. As others have mentioned, I had the base separate from the clamp and I was just able to catch it before things came crashing down. Mike that is a good idea about screwing things together. Don't think that'll come apart any longer! Same thing happened with my Tamiya airbrush holder. If you're not careful, the base can separate from that too so I keep tape at the ready. -
1974 Corvette Resto------Update! 12/31/18
MrObsessive replied to MrObsessive's topic in WIP: Model Cars
I want to add that as of right now the paint is pretty much dry as it's been in the dehydrator for about 12 hours now. I get to now do the arduous task of rubbing out the paint with the cloths, and then polishing it up. Like a real car, I do one section at a time. A fender, a door, rear deck, roof-------this'll take awhile as I want no surprises! After this comes BMF on all the trim and then I can finally get 'er all put back together. In subsequent pics to follow, I want to show a tip on what to do to keep from rubbing through sharp edges such as body creases and fender peaks. For the novices out there, I think you'll appreciate this! -
1974 Corvette Resto------Update! 12/31/18
MrObsessive replied to MrObsessive's topic in WIP: Model Cars
8-Track Player! Haven't seen one of those in YEARS! I can imagine this car playing Gordon Lightfoot's "Sundown" which came out in the middle of that year. Hughes Corporation "Rock The Boat" would sound pretty good too! -
That was very interesting to watch! I just subscribed to their channel to see what they come up with next!
-
I'll definitely be following this one! One of my favorite '60's road racers and I have this kit too with all the bells and whistles. PE, extra tire, tire decals-----the only thing I didn't get was the aftermarket tires which are just a bit too pricey for me at the moment. Rex brings up an interesting point. I'd be curious too about the financial end of doing something like this. Not that I'd ever get into it-------I'm too involved with my own models let alone a regular job!
-
1974 Corvette Resto------Update! 12/31/18
MrObsessive replied to MrObsessive's topic in WIP: Model Cars
As of 7:30 this morning when I left work, my Thanksgiving vacation started! I don't go back till Sunday night, so this means some model time! I was finally able this afternoon to carve out some time and get this oldie painted. My local paint guy mixed up 1973 Chevy Green which is very close to the Corvette Green for '74. Unfortunately, he may have misunderstood that I needed a metallic and what I got was a solid color. No problem though as I have some gold flake on hand which I mixed in and since this is a basecoat type paint, this gives me the chance to clearcoat it with a slight green tint. OK! Model Master Clearcoat with a 'grass green' dye mixed in was airbrushed on, and so far so good! As of now the paint is setting up and later I'll put the body in the dehydrator to fully cure for a day or so. Afterwards, I'l break out the polishing cloths to rub out the clearcoat and then with a chamois cloth polish out the whole works with Meguiar's Car Cleaner Wax. One Faux Pas I made while I was painting was that I intended to BMF the scripts before the last couple color coats were put on. Steven Guthmiller had mentioned this during one of his WIP's and I'd thought I'd give it a try. Well, I forgot and really don't want to go back and try now that the clearcoat is on. Just the same, I'll go over those scripts using a dry brush technique with the Molotow paint I have------very carefully dipping just the very tip of the brush in the paint and very lightly go over those letters and scripts. Another option is to foil this scripts and carefully flow paint around them to bring out the letters. After all of this, then it's time to BMF the trim and look to getting this all put back together and in a case! -
Stanfding or setting?
MrObsessive replied to iBorg's topic in General Automotive Talk (Trucks and Cars)
To echo what Dale said, I definitely sit. My paint booth sits on one of my work tables and it requires me to sit. In fact, I literally just finished painting my Corvette resto a half hour ago and I sat the whole time. Like Snake said however, if I'm rattlecanning something (like red oxide primer on a chassis), I'll stand to do that as I'll usually paint outside if it's a nice day. I'd love to one day get a stand-up painting booth with full ventilation (we had one where I used to work). It would be kinda nice to have free range of motion when painting and not restricted to a cube------albeit somewhat large like my paint booth. -
1971 Dodge Demon, Round 2 looking into doing a release?
MrObsessive replied to GMP440's topic in Car Kit News & Reviews
If they did a reissue of the new tool version, it would be nice if they fixed that upper window line. That's always bugged me about that kit. Not a hard fix, but to me quite noticeable. That's wishful thinking though among other things.