
Sport Suburban
-
Posts
1,057 -
Joined
-
Last visited
Content Type
Profiles
Forums
Events
Gallery
Everything posted by Sport Suburban
-
 The 69 Charger 500 uses the same interior as the Daytona kit. If you start with the 69 Charger RT kit. You will need the Interior base with the longer package tray and rear window. If you start with the Daytona kit you would need the Charger hood and front valance. I think it would be easier to cast the hood and valance as stated above and start with the Daytona kit as a donor.
 -
I have the 68 Charger bumper and an extra MPC grill. My thoughts are to trim it down and fit it inside the 68 Charger grill. The other bumper is the Revell 69 with the grill cut off. The MPC grill is wide enough but somewhat narrow. As far as sales go. How well did the Missing Link 70 Charger conversion sell? I think that kit would sell better than a 69 Charger 500. That is just my opinion thou.
-
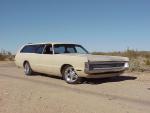
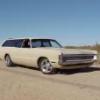
I have one that I have been playing with for a few years now. I was not very serious about a 69 Charger 500 when I started. I had an extra Daytona body and decided to cut off the front fenders and swap nose's. It came out nice. Now that the bodywork in 95% done I'm working on the grill. Here is my progress photos.
-
Yes, This is true but if The model company's thought this way we would not have Revells awesome 69 Camaros, 32 Fords, and the tri 5 Chevys. AMT did it with the 70 Camaro Z28. When they had a vintage tool 70 Z28.
-
I have a project going of a 69 Charger 500 using Revell kits. Modelhaus does sell the MPC grill in resin. I would love to see Revell use this tooling for 68/69 Coronet R/T or Super Bees. How about Roadrunners?
-
Very nice! I have one of these to build still.
-
New Revell 1/25 2013 Camaro ZL-1 (pre-painted)
Sport Suburban replied to Brett Barrow's topic in Car Kit News & Reviews
So, did the paint strip off the example a few pages back? What stripped it? I am interested in this kit but will wait for a non painted kit. -
I wonder if your rear bumper is like mine. My 72 has some serious sink marks in the rear bumper. I thought it was glued but when I took it apart it was snapped and no glue was used. The chrome on mine is shot. So I was planning on filling it in and getting it rechromed.
-
AMT 68 Roadrunner in need of an opinion
Sport Suburban replied to carcrazy19's topic in WIP: Model Cars
Don't be afraid to try something different. I like stock Muscle Cars and I really like pro touring cars. My only suggestions is if you go pro touring don't build it as a stock body with the big wheels. Stay away from stock colors also. I would lower it some more but not scraping pavement. Shave off the handles and marker lights. -
Yes, they had 2 more. Bring your 40% coupon. I went for some gloss black paint and left with more.
-
I just picked up this kit at Hobby Lobby. I'm surprised that they had it in stock this soon.
-
Historic Racing Miniatures
Sport Suburban replied to cruz's topic in Car Aftermarket / Resin / 3D Printed
His stuff is great but his wait times can be rough. Patience is defiantly needed but so worth it. I have his Cobra Daytona Coupe (5 month wait), Corvette Gran Sport roadster (4 month wait), 62 Corvette (15 month wait) ,61 Corvette (18 month wait). And two of his GT40 engines. The Corvettes I order just after one was featured in the Model Cars mag. The demand was higher because of the coverage. I got the 62 just before the Revell kit hit the shelves. All my orders were though Strada Sports and my credit card was not charged until he received the order and was ready to ship them to me! I also knew that his wait times were long when I placed the orders and was fine with it. Also as a note to Harold and his customer service. I had bought the Cobra Daytona Coupe 6 or so years ago. I started building it a few years ago. I noticed I was missing the two front inner fenders. I contacted him about it and he sent me the missing parts at no charge. -
Anyone else see this?
Sport Suburban replied to madhorseman's topic in General Automotive Talk (Trucks and Cars)
I need to sell my set now! -
By the way, I didn't use anything else from the 73 kit. It was a donor for one of my 70 Cougar restorations. So most of the parts are going for that build.
-
Wow, Thanks everyone. Now to answer a few questions. The color is Testors Model Master custom spray enamel Turquoise Metallic #2945. I decanted it and sprayed it with my airbrush. I liked this color so much that I am also painting a 60 Thunderbird convertible with it. The model itself is mostly right from the kit. This issue has these wheels and the 428CJ engine. As for the convertible boot. It came from this issue 73 Cougar. I don't know if all of the issues have the boot or not. I did add the dog legs to the 69 tub. I just used some flat styrene and putty to do that.
-
Here is one that I have been wanting to build for some time now and had finally got around to doing it. This is a 69 Cougar 428CJ convertible. This started out as the 428CJ coupe kit. Not much was needed to turn this into a convertible. I cut the top off and used the boot from the 73 Cougar kit. That kit has a convertible boot even though it is only a hardtop kit. Leftover part from the 70 Cougar kit days. I changed out the front bumper for an older issue that had the bumper guards. Then added the trunk rack from the 72 Corvette kit. Let me know what you think of this one?
-
Looking really good. One small suggestion, sand off the hood pins from the hood and use the photo etch ones. The ones on the hood are in the wrong spot. They should be in the lower section closer to the fender right next to were they are now. That has always bothered me about that hood. That and the fact that the shaker is missing the grills.
-
Thank you, those funny car parts have been sold long ago. They were pretty popular too.
-
I have had some bad kits and made them better. To me that is some of the challenge. But my first real surprise was in the late 80's. I finished the Revell 70 Superbird and had built the MPC 71 Superbird. I still have both those builds today. I wanted to complete the set and got the AMT 69 Daytona. What a shock that was and the directions even listed the use of putty. I did build it but it became a donor later on.
-
Here is a pic of the stuff that was available from Replicas and Miniatures.
-
See next post! Duplicate, sorry.
-
Thanks again everyone. I really enjoy restoring these old subjects that you don't see much of. This one was probably one of the hardest ones I have ever attempted to restore. Mainly it was finding all the parts I needed to build it stock. All the build ups I could find were drag versions. The hardest part to find was the interior tub. I ended up buying a promo and resin casting that tub for my build. Also with the prices that Johan kits go for now, just buying donor kits was getting expensive. The best solution was resin casting for all the missing parts I needed to build these AMC Javelins. So coming soon in my pile of projects is a 68 Javelin SST, 70 Javelin Dan Gurney edition(stock muscle car not the race car), 74 Javelin AMX, plus all the stock 2 seat AMXs (68, 69 and 70).
-
This is another one of my recently finished models. This one is pretty much built right from the box. It is Revells 55 Chevrolet Bel Air Pace Car convertible. This is a very nice kit that I really enjoyed building. I only had one issue with mine. The kit decals were bad and would not stick to the body. That was a first for me they had also yellowed badly and while it was not noticeable on the red panels, it was obvious on the white sections. I found some Fred Cady decals on eBay to finish it up.
-
Decals came from Mike Coleman, whom I found on Facebook. The paint is Testors guards red in the bottle. I airbrushed it on and covered the whole car in automotive clear coat.
-
I did struggle on that issue. I had decided to build it as issued by Johan. I would like a better more detailed chassis and engine compartment. Once it is on my shelf I rarely open it up. My only deviation from Johan in the outside rear view mirror. It's Revell 68 Firebird. I do have the Johan bull it mirror but just could not put it on this one. Thanks everyone for all the great comments. I do appreciate them.