
Sport Suburban
-
Posts
1,057 -
Joined
-
Last visited
Content Type
Profiles
Forums
Events
Gallery
Everything posted by Sport Suburban
-
What was your 1st 1 to car
Sport Suburban replied to 69NovaYenko's topic in General Automotive Talk (Trucks and Cars)
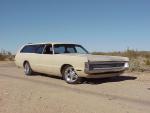
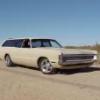
My first car is my avatar. It's a 71 Plymouth Sport Suburban. It was born as a 383/2v in beige. I was 8 or 9 when my dad brought it home in 1982. I learned to drive in it and have many memories with it. I bought it off my Mom back in 92 with my income tax return of $360. I had blown the 383 so it sat in the back yard. They would not give it to me for free and wanted to teach me some responsibility. Here is a pic of it in the back yard. It is sitting next to the 58 Thunderbird that was supposed to be mine. Plus another of my Dad's Thunderbirds. That one is a 60. He has a total of 5 Squarebirds. This is what it looked like when I bought it and put the 400 engine in it. Here is the oldest pic I have from when my Mom owned it. Next to it is one of my Dads other Thunderbirds, that one is a 59. As weird as it is to say, I really fell in love with this car and I still have it today. Someday I will finish the bodywork and paint it. This pic is now pretty old but it pretty much looks the same. It now looks like a 70 Sport Suburban instead of a 71. I changed the grill, hood and lower valance to the 70 versions. I also have another 70 for a parts car. I will reinstall all the wood trim when I paint it. It now has a build 440 with aluminum heads. It makes over 400hp and 500ft torque. The 727 has a shift kit, and 2400 stall converter, electronic ignition, 4 wheel disc breaks and custom sway bars front and rear. It is sitting on 17x8 front and 17x11 rear wheels. The 8 3/4 rear has a sure grip and 3:55 gears. I also have added Dual A/C, power windows, tilt, cruise (quit working), 6 way power bench seat, 140 Cop car speedo and the rare oil pressure gage (replaces clock) -
I'm not big on building Pontiacs of this era but this kit looks so good I have to have one!
-
Stock hood for '69 AMX
Sport Suburban replied to 69NovaYenko's topic in Car Aftermarket / Resin / 3D Printed
Check with Missing Link Resin. I bought two of their hoods for the 68 and 69 kits without the holes. -
DESERT SCALE CLASSIC 2015 - NEW LOCATION & DATE
Sport Suburban replied to Danno's topic in Contests and Shows
Here is a link to the photo's I took of the show. http://smg.photobucket.com/user/darkrapid/library/Desert%20Scale%20Classic%202015?sort=9&page=1 -
Amt did make the correct hood for that kit. Some of the AMT 69 GTX kits had the correct parts. Many of the rereleases had 68 Roadrunner hoods, grills and rear bumpers.
-
68/69 Charger Hood?
Sport Suburban replied to revshag's topic in Car Aftermarket / Resin / 3D Printed
The hood Modelhaus sells fits only the original annual 68 and 69 MPC Charger. I think it can be worked to fit the later 69 MPC Charger. -
I used the boot right out of the 73 Cougar kit. Kit is a hardtop but has this boot in it.
-
I think the review was pretty fair on the kit. Thankfully this kit is still available and has been reissued once again. Thankfully with correct box art. Does anyone remember the box art with the 428 Cougar but had only this 302 Eliminator in the box. Thankfully you didn't spend $150 plus for a 67,68 Cougar kit. You would have seen most of the same parts with a more generic engine. The engines, interior tub and wheels were updated in the 80's. I have an earlier 69 issue that has the XR7 interior and Boss 429 engine. I think it is a late 70's issue. I personally like this kit and it does build up well. Here are a few of mine built up.
-
You could also find some Fred Cady ones on eBay. How about the rear stripes from the Revell 69 Charger. The stripe is the same.
-
I personally really like the Monogram 340 TA version myself. I have built about three of them over the years. I did buy the new tool 1:25 version and found out it is based on the die cast version that Revell had out for awhile. I built that Vanishing Point die cast but did not like it. The newer kit is mostly a plastic version of that kit. The body looks real boxy to me and does not look right. When it comes to the 70 Challenger kits. I would put the MPC kit up at the top of the list. Monogram 1:24 in second, AMT kit next, (love it with the Flinstone RT/SE body), then the Revell 1:25 TA or RT two in one last.
-
The Modelhaus kit does have the R/T scoops molded on the doors and in the grill. It is a direct copy of the MPC kit.
-
I am using the 429CJ in the Torino kit.
-
Jens, you did not hijack it. I asked for others input on this combo and you did just that. Thank you for your input and warning about the engine height. Beautiful build by the way!
-
1/25 Lindberg '66 Chevelle Super Sport
Sport Suburban replied to Casey's topic in Car Kit News & Reviews
I have a few of these also and built one. I did learn to follow the directions on this kit. Don't install the fan alternates assembly until it says to do so. I found out the hard way that the body does not fit over the engine with the alternator off to the side! -
If you really want to see the build from when we took the body off. Look here: http://smcbofphx.proboards.com/thread/1013/teresas-chevelle-update
-
Here is the 1:1 1971 Chevelle Malibu. This is truly homebuilt by my wife and I. Before about 2002 During 1/23/2011 Just registered 5/3/2014
-
Thanks guys! Here is the early pic of the 70 Shelby GT500 convertible. Not much different. Just a repaint and foil. I did have to redo some body work. This is the 60 Thunderbird convertible that I turned into a 58. It had 59 bumpers on it but a 60 interior tub. The hood opens up so I knew the body was a 60. This is the 70 Camaro SS 396
-
70 Firebird Formula 400 72 Camaro SS 396 69 Javelin SST, I have shown this one before. This is what I started with from ebay!
-
Here are a few of the before photos. 60 Thunderbird convertible 60 Thunderbird Sunroof 64 Corvette coupe 65 Corvette coupe 66 Corvette coupe
-
Revell/Mini Exotics 70 Shelby GT500 convertible. I built this years ago and wanted to repaint it and foil it. This is not the new kit that came out this last year! AMT 60 Thunderbird sunroof restored, I cut the sunroof opening in this one to replicate the rare option for this car. I just realized that all of my finished builds are restorations. Many of these I have photos of what I started with.
-
I didn't do this last year but figured that I would show off what I completed this year. I finished 11 this year which I figured I would get more done since I finished the 1:1 71 Chevelle this year back in May. I have many more started and unfinished projects in the pipeline. So I hope to finish many more this year. AMT 58 Thunderbird convertible, Started with a 60 that had all the emblems sanded off. Modelhaus bumpers, wheels and a 59 interior tub. Body emblems were foil cast from a 58 promo. Uptop is from a 65 Thunderbird annual. AMT 64 Corvette annual restored AMT 66 Corvette annual restored JoHan 69 Javelin SST restored from junkers MPC 70 Camaro SS 396 restored AMT 60 Thunderbird convertible restored MPC 72 Camaro SS 396 restored AMT 65 Corvette annual restored MPC 70 Firebird Formula 400 restored
-
I would love to see them also. MPC did do the annuals and they are nice. Here is a 69 GTO convertible that I have to restore. Plus these are 1:25. MPC also did the 70 GTO but it has not been rereleased since 87. Here is a teaser of my 70 Judge convertible next to my finished hardtop!
-
Didn't Model King reissue what was left of the 68 Cougar tooling. It was a 68 Cougar funny car.
-
I don't know much about the original decals from the two kits. I do have a few sets of the Model King issue decals that have both the 70 and 71 stripes on them. Those are nice decals also. Here are the two hoods. Sorry but the burgundy is hard to photograph.
-
If anyone else has done this conversion please add any suggestions using this chassis. I will be doing this one more time on a 70 Cyclone in my stash also. By the way, The MPC 70 and 71 Cyclone kits have only two differences besides the molded in colors. I have only seen 70's molded in burgundy, and the 71 kits molded in white but don't know if there are any exceptions to this. The obvious is the dated bumpers. Less known is the hoods are different. 70 hoods have cowl vents in the hood, 71 hoods do not. This is actually true to the real cars also.