Exotics_Builder
-
Posts
3,635 -
Joined
-
Last visited
Content Type
Profiles
Forums
Events
Gallery
Everything posted by Exotics_Builder
-
 I'm in the same boat as you. I will use different clears, TS13, Testor Wet Look Clear (still have some left), Mr. Hobby Gloss, Scale Finishes 500 Clear and soon to experiment with Vallejo Clear. I WILL NOT use 2K for the reasons you stated. I have seen some 2K paint jobs that looked like the model was dipped almost like the end result of decoupage ( I like your donut glaze analogy better). Use of the above allows me to tweak the shine to reflect the model. Shinier for a show car, less so for a stock car. I admit, besides polishing, watching out for decals can result in calamities at times, but airbrushing mist coats seems to alleviate that in most cases
 -
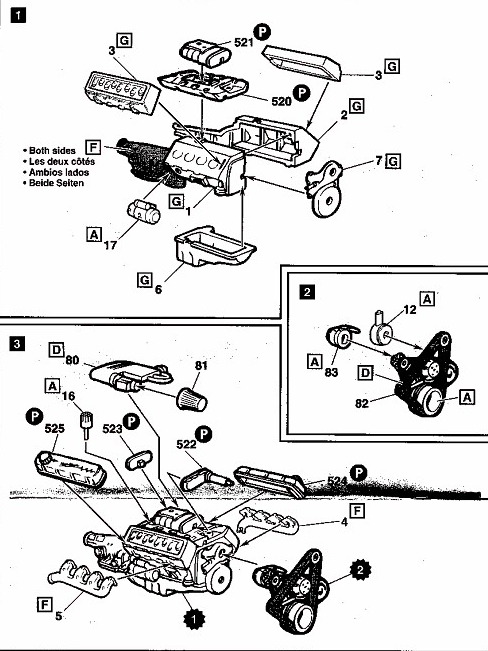
This is what the Revell instructions show I can check the kit to verify, if needed
-
New Project – Revell 1969 Camaro Pace Car
Exotics_Builder replied to Exotics_Builder's topic in WIP: Model Cars
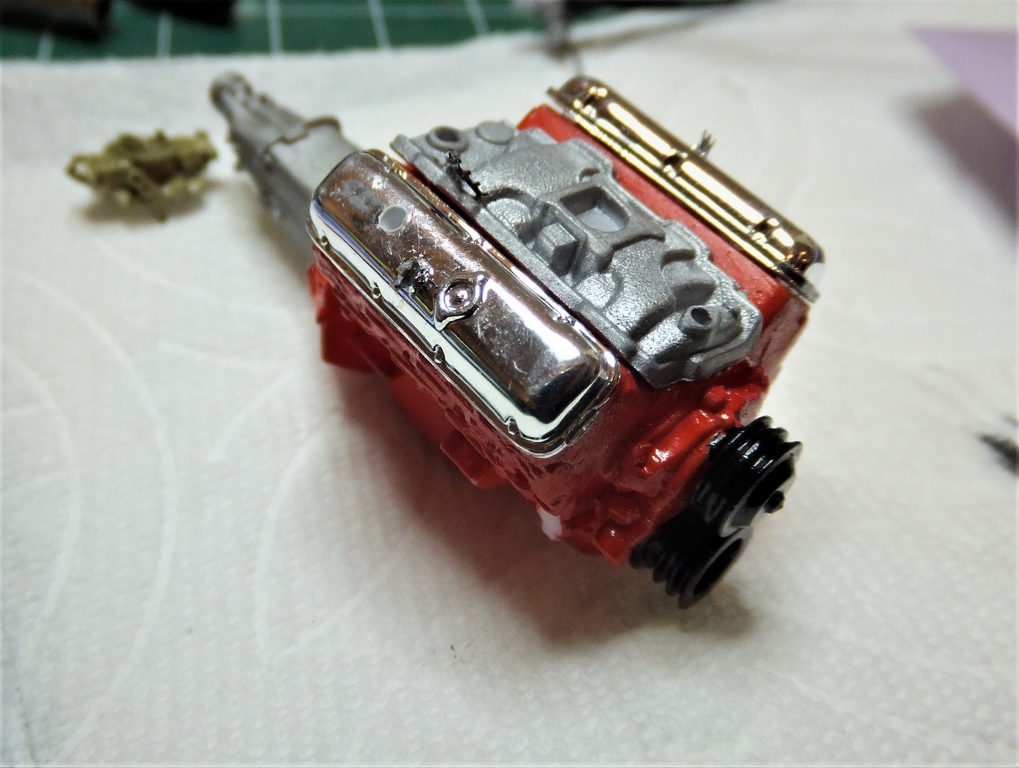
While waiting to redo the decals for the GeeTO and start the clearcoat on the WRC Escort, I got back to doing some details on the 69 Pace Car. I added the Smog (AIR system) and power steering pumps to the engine. Revell only provides the alternator, and a 396 CI 375 HP engine would have required these as well. Since solid lifter engines such as this 396 and Z/28 couldn't have air conditioning, I didn't add any. Still crafting the plumbing for the AIR. That orange wire you see in the photo eventually will be the dipstick. On the dashboard, Revell did provide air vents for the defroster or the radio speaker. Since this is a convertible and will be displayed with open top, it was kind of glaring. I had some PE for speaker grilles that I selected one to use. I also used two defroster vents from the MCG 53-55 Corvette PE set as well. They're slightly more curved than the real ones, but given the black of the dask, will not be that noticeable. I also started detailing the center console. The interior level in this car should have wood grain on the dash and console. Revell, again, did not provide. I used the MCG PE set console plate and then used some old Microscale wood decals to get the effect. The same decal will be used on the dash face.
-
That would definitely be a plus for the 70 Monte Carlo kit I have.
-
I know. I checked the Monte Carlo kit and no interior decals
-
Off the top of my head, the newer version AMT 70 Monte Carlo has the horseshoe shifter, but I would have to check the box to see if there is a decal associated with it. Can do later. Ray's decals offers a 69 Camaro Sheet with center console decals. The consoles for the 68 and 69 are very similar if not the same He has posted here. Not cheap, but good quality https://rayskits.com/decals/
-
1/25 1955 Cadillac sombrero hubcaps
Exotics_Builder replied to chaves pah's topic in Model Building Questions and Answers
Revell 49 Mercury sedan has Cady hubcaps. Not sure if an exact match but are 1/25 scale (Internet pic, not mine) -
Tesla or other EV power units?
Exotics_Builder replied to Joe Handley's topic in Model Building Questions and Answers
Let me check. I MAY have a parts Revell C5 Vette which has a separate transaxle. -
Tesla or other EV power units?
Exotics_Builder replied to Joe Handley's topic in Model Building Questions and Answers
Off the top of my head, the closest I have seen to a motor for EV is the Revell BMW I8 (which is a hybrid). The LaFerrari is very specialized on hybrid ability -
1/25 AMT 1963 Chevy II Station Wagon with Trailer
Exotics_Builder replied to Casey's topic in Car Kit News & Reviews
It appeared the original was the same as in the Buick Special Wagon kit. Would be nice for those to be brought back. I have the Buick, so either way is fine by me. But a lot of us would love the extras
-
Double that
-
What kits have Motor Wheel Spyder mags?
Exotics_Builder replied to Bills72sj's topic in Model Building Questions and Answers
Super. I'm about 70 miles away. -
Sorta looks like it https://www.revell.de/en/products/modelmaking/trumpeter/accessories/fix-kit-repair-powder.html
-
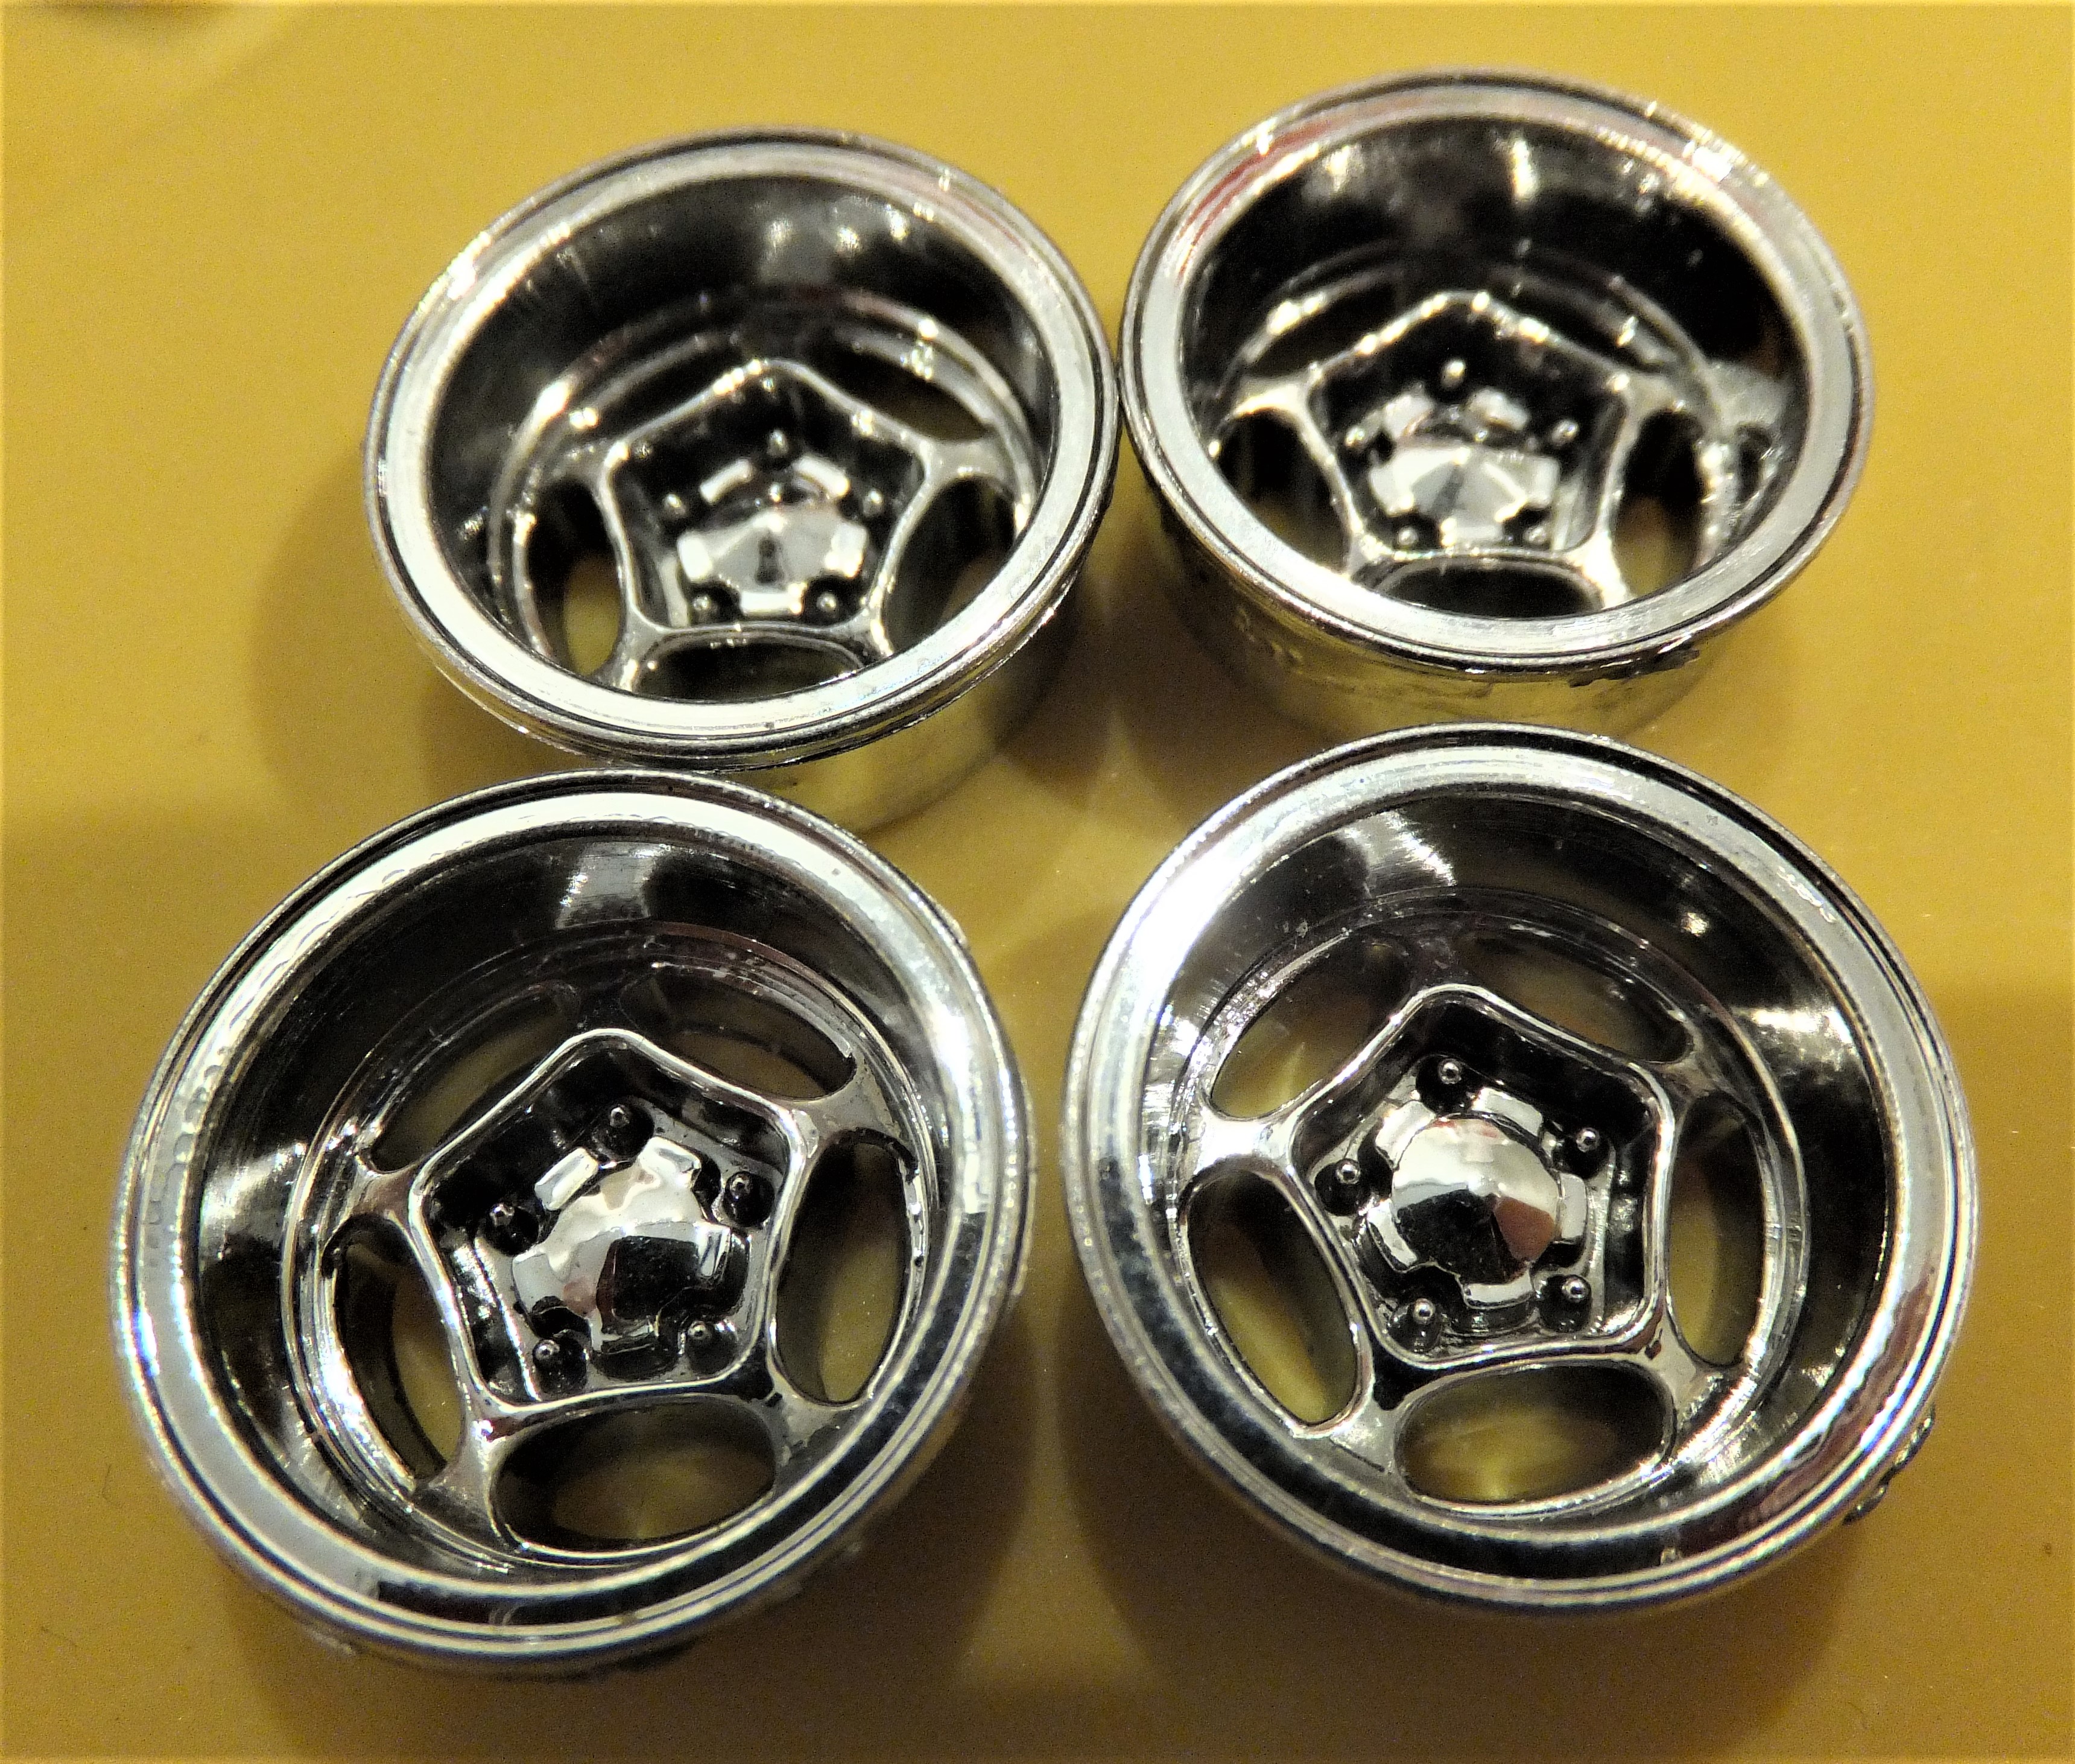
What kits have Motor Wheel Spyder mags?
Exotics_Builder replied to Bills72sj's topic in Model Building Questions and Answers
Are these the wheels you are seeking?
-
A good way to do it. Another option is RB Motion http://rbmotion.com/rbmshop_3.0/image/cache/catalog/Products/web1315-500x500.JPG
-
New Project – Revell 1969 Camaro Pace Car
Exotics_Builder replied to Exotics_Builder's topic in WIP: Model Cars
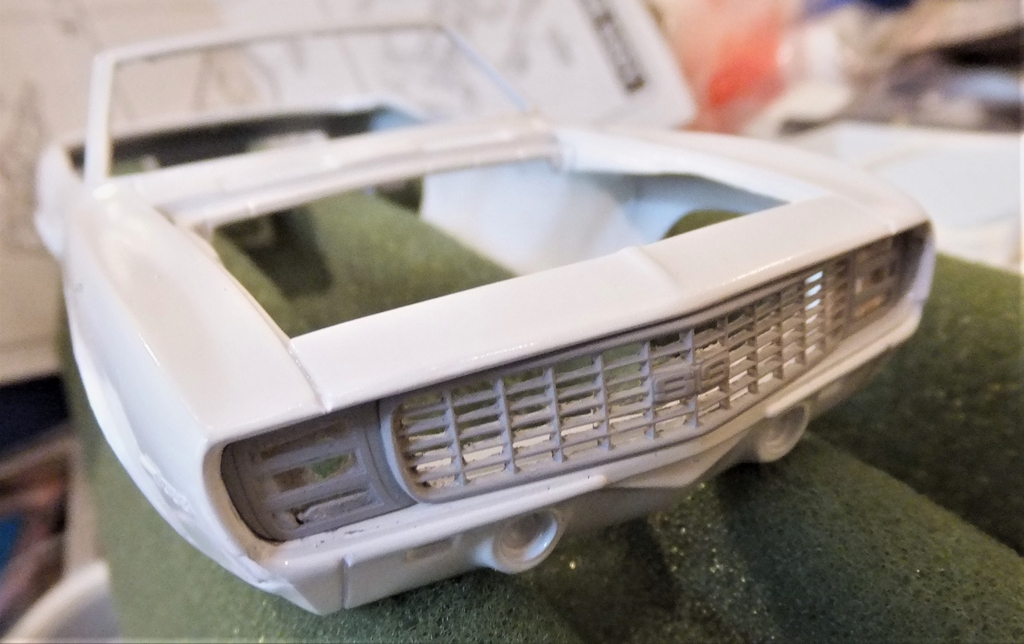
Yes. Sanded the back out on the grille section and built up the headlamp area to get a better match (the Revell stock is too deep). Then added the Model Car Garage PE. -
New Project – Revell 1969 Camaro Pace Car
Exotics_Builder replied to Exotics_Builder's topic in WIP: Model Cars
Before getting back to some painting, I kept at the details of the 69 Pace Car. For the grille, I have made some mods and did a test fit. It is close. Needs some tweaking and then on to paint. On the engine, I had to scrap the idea of using R&D spark plugs since the headers leave little wiggle room. So, I am going to the usual plug wire with boot approach. I also am fabricating the AIR tubing. For the accessories, I hogged out the harmonic balancer to let the Parts by Parks lower pulley fit in and glued them in. I took a power steering and smog pump from the parts box, along with a Revell Nova Alternator and attached Parts by Parks pulleys to them. I also used some Detail Master and Replica and Miniatures brackets to help the look. Work on this will go on the back burner for the next week plus so I can get painting and finishing done on the GeeTO and Focus WRC.
-
Modeling vs. reality
Exotics_Builder replied to El Roberto's topic in General Automotive Talk (Trucks and Cars)
First, it is a hobby and modelers do things for the enjoyment and the "art". I had a friend (who recently passed) that mainly would do body mods and primer them. That was it. There are models that are "slammed" that the modeler is showing it in parked mode. We've all seem 1:1's like that. If the model is a curbside, the intent is in the display. If detailed, my expectation is that they would have simulated some kind of air suspension. But then, if not in a contest, what does it matter. Some of Ed Roth's cars were not really drivable (or for very far), but were certainly art on wheels. As for myself. I prefer the models I build to reflect real world, drivable vehicles. One model I recently completed is shaved and "poppers" would be considered the way to open the doors. Also, there was no likeable way to add a gas filler cap, so my perspective is that the gas filler is located in the trunk. This is not unreasonable for several custom or even sports cars of the 60's (reference Ferraris). But when I make these kind of decisions, I log them and keep them as part of the model description. In detailing a model, there are many compromises one must make unless you are top flite GSL builder. I am not just talking about the hanging generator/alternators or too thick fan belts, either. For example, a current project, the Revell 69 Camaro Pace, has a lot weaknesses that can be left alone or addressed yet still achieve a reasonable looking model. These would include: The chassis being for a coupe and lacking the addition bracing for the convertible. Revell did include the X-bracing for the 55 Chevy. The engine has only an alternator. A real 396 CI 375 HP engine would also almost always come with Power Steering (as would many cars) and, in this case, a AIR smog system (which Revell at least has the pump included in their Novas). The RS grille is not right and needs some work to be more prototypical. The hood hinges are not prototypical and would require extensive work to make it more so. Also, most models have, at best, moderate under hood detail like bracing, insulation and latching. In almost all cases, we modelers tend to ignore it and, in fact, often remove the hood entirely to display the engine compartment. Concluding, even if I think the intent and presentation of the model bears a lot to what I may call the "cringe factor" (how is that realistic). I would have a different view if an individual is displaying versus competing in contest. Whether I like it or not is less relevant than what was the builders intent and how did they go about achieving it. -
Revell (Germany) Ferrari 250SWB! New for October
Exotics_Builder replied to Matt Bacon's topic in Car Kit News & Reviews
http://www.modelcarsmag.com/forums/topic/161703-two-classic-race-cars-to-trade/ -
One of those small block engines is finding its way into the Monogram 65 Impala because my first car was a 65 Impala SS with 327 300 HP and Powerglide.
-
So, by your question, you are looking for a supercharger in this style: Versus a twin screw but packaged unit like the Corvette or LSA: Is that correct? I don't recollect any 1/24 scale kit having such a supercharger in it. Only 1/25's and you hit the major candidates. I think there was also an AMT 1/25 El Camino that ha one, but was stylized
-
Here to help
-
Here's one I found on his FB page
-
New Project – Revell 1969 Camaro Pace Car
Exotics_Builder replied to Exotics_Builder's topic in WIP: Model Cars
While dealing with some paint problems on two projects, I decided to get back to the 1969 Camaro Pace Car. I have cleaned up the body, including deepening the door, trunk and panel lines; removing the molded in windshield wipers; and scribing around the wheel well trim (which was soft). I will dig into the parts box to figure out a representative set of wipers. I also will need to clean up the wheel well scribing before final prime coat. I used Tamiya gray primer first to blend the putty work, then applied a coat of Tamiya white primer. Final primer will be the white. Next, I started to plan out the engine. I have drilled the plug holes and am planning to use R&D Unique spark plugs (I still have a few left and decided on these versus the RB Motion plugs). Ignition will be Morgan Automotive Detail with a Replicas and Miniatures vacuum advance. Given that the engine will be the 375 HP 396, I will be adding power steering and A.I.R. system to the kit supplied alternator.
-
Wiring for engine details
Exotics_Builder replied to rob1957's topic in Model Building Questions and Answers
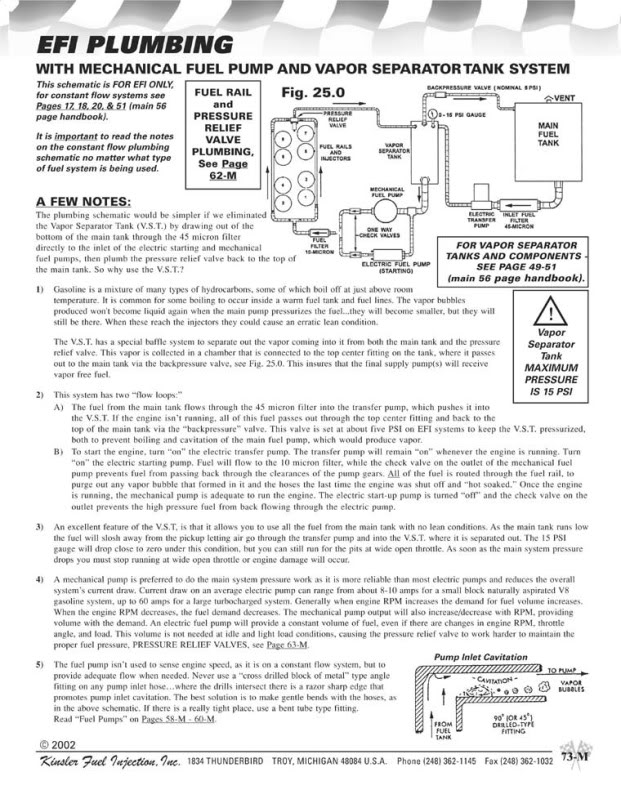
Some basics
.JPG.be23d80aaab87c997b1123752a8a8619.JPG)
.JPG.c09cce34970e7cccfdb867b9e8cf5ca2.JPG)


.JPG.28ed29289dced785db3ec41283be3f8d.JPG)
.JPG.4c789f4b1ad99a02e898893ce883e46b.JPG)
.JPG.bf874c1d27720d39a211b2770b7ae38b.JPG)
.JPG.7e97f942a1f7ad7ff68adca849d6d2cc.JPG)