
Sam Cates
-
Posts
359 -
Joined
-
Last visited
Content Type
Profiles
Forums
Events
Gallery
Everything posted by Sam Cates
-
After the first body melted like a black crayon, I snagged the body from the onther Stude I had to finish this build up. Used '99 Camaro seats, intake, wheels and tires from '49 Merc, added plug wires.
-
new fire model
Sam Cates replied to Chariots of Fire's topic in WIP: Model Trucks: Pickups, Vans, SUVs, Light Commercial
Freakin' SWEET! I love it, looks very well detailed and the Power Wagon cab is just tits! -
Hit it with some Future, that red styrene may bleed through the paint after clear, it's happened to me even with sealer/primer.
-
Supercharged Inline 6
Sam Cates replied to Swampdonk's topic in WIP: Model Trucks: Pickups, Vans, SUVs, Light Commercial
Reminds me of this beautiful '35 sedan I found while looking for Stovebolt gassers and dragsters. -
Got the interior almost done, didn't take much since everything is black, the door panels in the kit are not quite correct for a '74 but I am choosing my battles here. I also need to figure out where the 6 point is going to attach in the big car so I can replicate it in scale. As far as the big car goes, I may be replacing the whole trunk pan, started sand blasting it today and every spot I hit instantly turned to swiss cheese. The bulk of the pan looks good, its much worse around the edges and in low spots where water gathered. Got the fenders stripped, deck lid is ready for paint, hood is ready to be cut for the tunnel ram.
-
Well after a few failed attempts at finding the right color, since GM Bright Yellow doesn't exist anymore, I finally found GM Daytona Yellow. Got the body stripped and shot the first coat. Looks dead on with the original color of the 1:1. The resin kit fit very nicely with minimum trouble but deletes the front side marker lenses, after a couple goof ups on trying to scribe them into the correct place I gave it up. So far the 1:25 is coming along much easier than the big car, I got the right rear quarter filled and sanded, deck lid filled and sanded, still waiting on the left quarter patch panel though. trunk pan is cleaned out and ready for bed liner. Decided on replacing the left fender, picked one up from the wrecking yard for $20, looked like it was in really good shape, then I started stripping the paint and found that almost the entire fender has been skim coated in filler. Not a huge issue, just makes more work for me *Breaks out hammers and dollies* More photos tomorrow!
-
...and the finishing touch. Still working on the back drop, hope to have it done next weekend.
-
Sorry for some of the poor quality photos, my camera got sent in for warranty repair (no flash) so I am using my stupid cell phone camera. Here are some of the parts I am using, mostly from the parts box. Got these billet engine pulleys for it from a hobby shop in Modesto CA back in February
-
Oddly enough, the frame rails are in great shape, found a few pin holes in the floors and trun pan, but nothing that merits buying new pans, going to weld them up and shoot the floor and truck with bedliner. The car spent about 15 years on the WA coast so I am quite impressed with how mush rust it DOESN'T have.
-
Good call, I will definitely do that.
-
Sometimes ya just can't win.
Sam Cates replied to Jantrix's topic in General Automotive Talk (Trucks and Cars)
What the heck are you driving?! I can't even think of a good reason for an exhaust manifold to cost that much, even with labor. -
Sometimes ya just can't win.
Sam Cates replied to Jantrix's topic in General Automotive Talk (Trucks and Cars)
What glass? *swings a baseball bat across the table* I only see more crud to clean up... Seriously, check out what was suppose to be an easy job doing body work on my Camaro. It's only a water pump, believe me you will feel much better just getting the repair done and out of the way than wasting good beer drinking time trying to figure out when and how you will get your next kit. No worries, keep your chin (and your gloves) up. -
-
Well since my 1:1 is "on the workbench" I figured it's time to get back to my replica as well. Unfortunately the more I tear the car down the more rust I am finding, so far I am looking at a new left quarter skin, possibly a new left fender, and a right rocker panel. Most of the other rust holes have been sandblasted and will be filled with a welder to cut down on panel replacement costs. I have the hood and deck lid stripped to bare metal and they look excellent. Doors are not terrible but I haven't really opened them up and stripped them yet. As far as the 1:25 car, I used the resin conversion kit from Dencon I got a while back. As of now I used a set of MRC Keystone Classic wheels and tires, I am not sure if I will used Keystone Classics on the 1:1 or my old ET slotted mags. I will be painting it factory GM Bright Yellow, with black interior. I'll start off with some past and current photos of the 1:1 and will post photos of the kit this evening when I dig it out. This is what "Amber" looked like when I brought her home a few years ago the turdly old factory 2bbl 350, though it had plenty of power to lay rubber all the way down the street. Now this is the third time I have had her in the shop for body work and it will be the last. Got the rear panel filled and sanded Rust, rust and more rust...and no, not the good kind Virgil (Left front fender [lower rear])
-
Wow, that is just amazing, my old Nova looked just like that inside, even the trunk was crammed full of junk just like that. Very nice job on the details!
-
Red Plastic Is Made By The Devil
Sam Cates replied to Junkman's topic in General Automotive Talk (Trucks and Cars)
Look toward the FUTURE FUTURE FUTURE FUTURE! (ambient echoes) I had that problem with a Revell Jag in red plastic, only thing that cured it was a thorough coat of Future Shine floor wax, even the Pledge with Future works well. -
question about dupicolor color match
Sam Cates replied to martinfan5's topic in General Automotive Talk (Trucks and Cars)
Maybe I am missing something here, are you washing your parts with soap and warm water? I have had that problem with Krylon before, it seems to me that it depends on how long you wait between coats, and I always clean and sand between each coat to remove any contaminants that may be present between coats. -
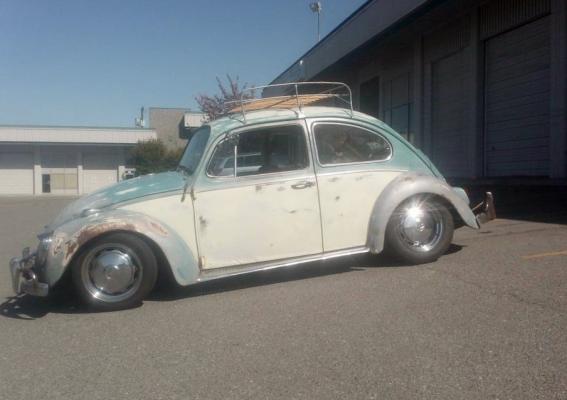
That is freakin' sweet, but what are all thos squiggly lines and dots?
-
Call out to all Miget builders
Sam Cates replied to walt francis's topic in General Automotive Talk (Trucks and Cars)
:lol: :lol: :lol: -
ENGINE LOVE--Post Your Favorites
Sam Cates replied to Dr. Cranky's topic in General Automotive Talk (Trucks and Cars)
Does a 1:1 engine I built count? Built this a couple years ago, put it in my '74 Nova. Runs GREAT with tons of power, enough that I blew the well built trans at the track during Super Chevy weekend in July. Since then I put it in my '79 van. The last photo is what it looked like when I started. -
Thanks guys for all the complements, I am working on a small diorama scene for it right now, hope to have it done in the next few days. I am also going to add a few little things to the wagon, not sure what to do for a tail light yet, but I'll figure it out.
-
Well it is all done for now, see the rest of the photos in "Under Glass" I may work with it more later but for now I am pleased with how it turned out.
-
Finished it up (for now) Took a lot of parts box use and abuse, lots of trial and error in the weathering department but I think it looks good enough to collect more dirt and dust on the shelf. Mainly the parts (Chassis, side panels, roof) came from a '31 Woody. Modified a resin copy of the Bad Medicine skeleton to look like Vic, scratched the scythe. Hope you guys like it, comments welcome!
-
Super smooth looking ride, love the colors and the engine detail. Nice hinge work too!
-
91% or higher Isopropyl alcohol works well for taking paint off clear parts in my experience. Honestly, I would rip off the wing windows and leave the entire windsheild clear, gives it a wild custom look. Great start though, Keep it up!