Greg Wann
-
Posts
1,268 -
Joined
-
Last visited
Content Type
Profiles
Forums
Events
Gallery
Everything posted by Greg Wann
-
Austin Flying A Hood Ornament
Greg Wann replied to JPolli's topic in Car Aftermarket / Resin / 3D Printed
You might ask Fireball Modelworks to create one for you. Uncertain of cost -
Pontiac Resin Bonanza!
Greg Wann replied to George Bojaciuk's topic in Car Aftermarket / Resin / 3D Printed
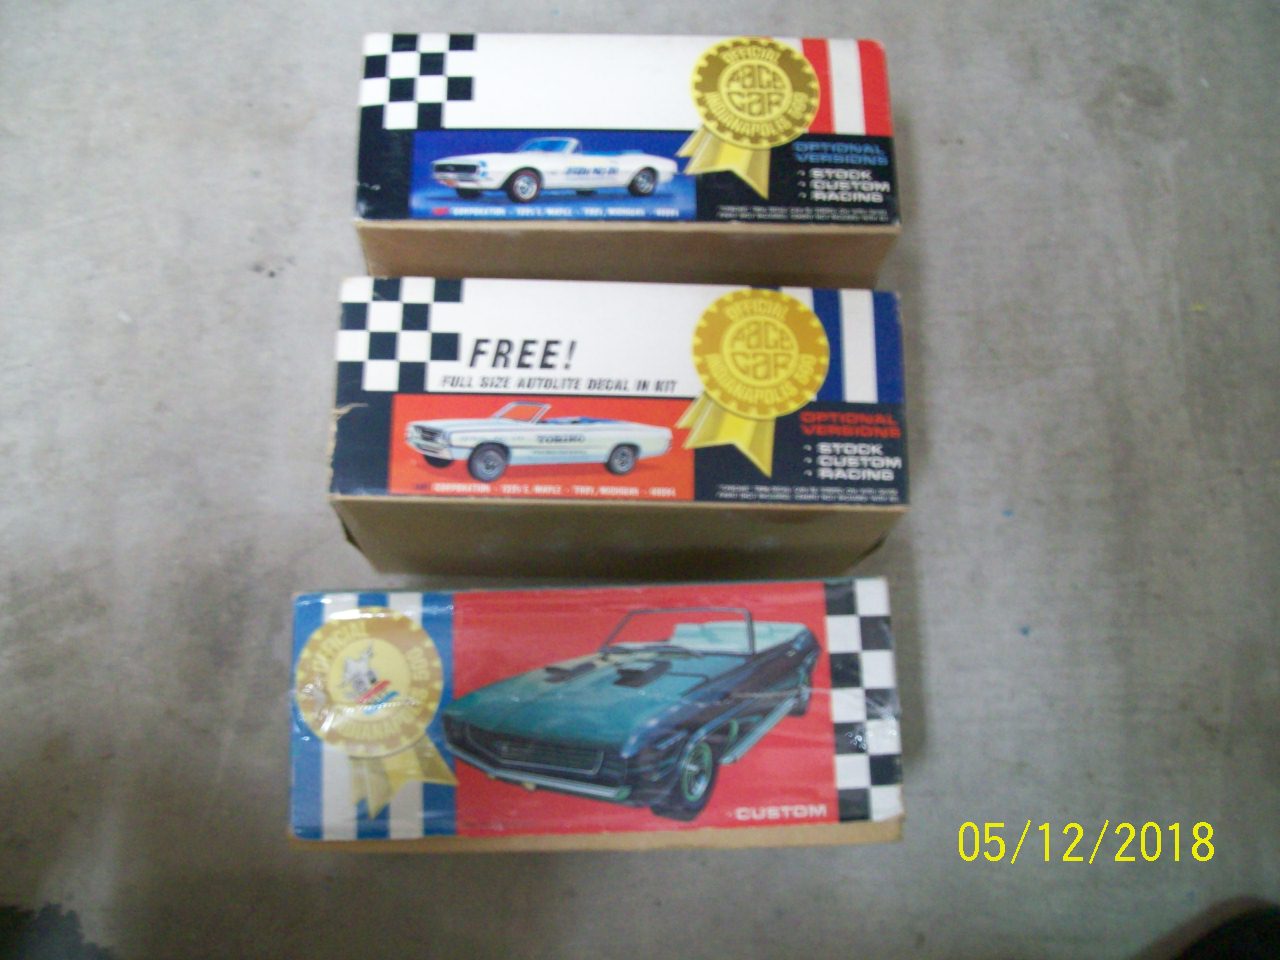
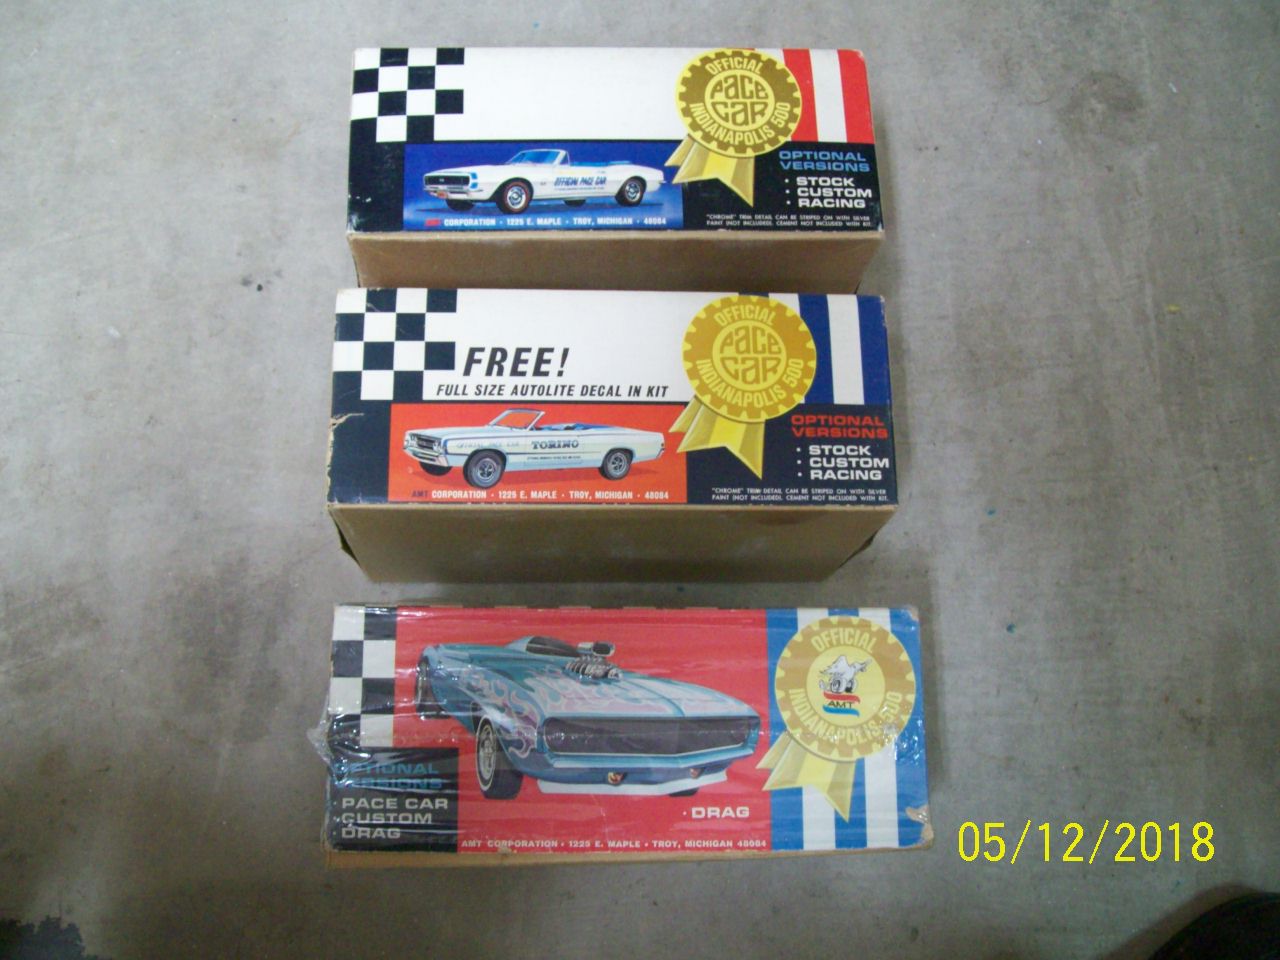
I really appreciate George offering to help add new products to what I can make and help give business a boost. I do have lots of original mint unbuilt kits begging to be dipped in silicone so that a Holy Grail can be achieved and be more affordable. Here are three nice examples and they were pricey kits for me too. The 67 Camaro is my favorite. The 69 Camaro has a lot of parts that may have never been offered in resin. The Torino kit is only missing a window glass but that's OK. Mike Schnur the vacuum glass expert will create a buck so that a glass would be in the kit. I know, I know, posting this in George's thread was rude. I don't think he will mind much.
-
How Old Are You
Greg Wann replied to iamsuperdan's topic in General Automotive Talk (Trucks and Cars)
60 -
1988 - 1991 Ford LTD Crown Victoria Scratchbuild
Greg Wann replied to DEL's topic in Car Aftermarket / Resin / 3D Printed
From Rocky and I at Holy Grail Resins once all the molds are made. -
Pontiac Resin Bonanza!
Greg Wann replied to George Bojaciuk's topic in Car Aftermarket / Resin / 3D Printed
Thank you George, the conversation was very much appreciated. I do have a couple of mint unbuilt 1:24 scale Monogram kits, number 2794. Perhaps the spoiler could be copied and added for body parts. I also have a mint 76 MPC formula kit that came with the separate fender vents. This is a 1:25 scale kit so I am not certain of the difference in the physical size between these two bodies. I thought they might be worth throwing in for fun. I already have a small mold that makes them. -
1/24 Yugo or Fiat 127 kit by chance?
Greg Wann replied to aurfalien's topic in Car Aftermarket / Resin / 3D Printed
I am pretty sure a Yugo was kitted in this scale. I have seen a kit of a Smart Car as well. -
Hi George, They should be easy enough to duplicate since they come apart.
-
Are you wanting to make resin parts or build a resin kit?
-
Those parts look great. The air cleaners might not be fun to demold, but I will give it a try. I am looking at what appears to be a hollow opening inside the "horns". I guess that is what they are called. Silicone has to form the inside area and then be gently pulled from the master and all of the following parts without tearing from the mold itself. Not every part is fun or easy to make.
-
1988 - 1991 Ford LTD Crown Victoria Scratchbuild
Greg Wann replied to DEL's topic in Car Aftermarket / Resin / 3D Printed
Here is a photo of the first two hoods. They turned out nice. I should clean up a body and set it in place.
-
1988 - 1991 Ford LTD Crown Victoria Scratchbuild
Greg Wann replied to DEL's topic in Car Aftermarket / Resin / 3D Printed
That is great news , Dan. Welcome aboard. With you, Mike, Rocky Smith, Harold Oswald, Jeff Bowman, Brad Noorgard and myself, we should be able to get some kind of schedule working. I need guidance with this. I really need to get my buddy on the bathroom and kitchen in my shop. I am hoping tomorrow to get a Polar Air compressor brought to my shop. It weighs 958 pounds, I sure hope getting it from ASU to my house is successful. It is not free. https://www.eatoncompressor.com/piston-compressors/premium-vertical-piston-series-5-15hp/7.5hp Two Stage Industrial Plus Series/7-5hp-v4-single-phase-80-gallon-vertical-air-compressor -
1988 - 1991 Ford LTD Crown Victoria Scratchbuild
Greg Wann replied to DEL's topic in Car Aftermarket / Resin / 3D Printed
Here is the tire mold filled with silicone. I wanted this to set a good while before adding it. I suggested to Mike that we might add a texture under the hood that could duplicate the roughness of insulation in those areas by using sand paper. I suggested using his original stencil to draw an outline of the openings on the back side. Then I would cut them out and glue them to paper. Then I would pour silicone over the parts. I might be able to create these sections to their perfect size and then glue them down in the hood and then finish the mold.
-
1988 - 1991 Ford LTD Crown Victoria Scratchbuild
Greg Wann replied to DEL's topic in Car Aftermarket / Resin / 3D Printed
Mike Said he was going to do the repairs before returning it to Dwayne, then one of the resin copies will get worked over by Mike so that a new mold can be made. I would like two or three molds of the parts. This will take some time. How many copies can I get out of a mold. This is not easy to predict. Do molds for certain parts wear out faster than others? Yes, parts with fine detail like dashes and wheels can deteriorate more quickly. Resin gets very hot when curing. These fine details in the mold can bake and become brittle and loose their elasticity despite using mold release. The resin can pull the silicone out loosing detail. Then the mold needs replaced. You say that chassis are a pain to mold. Is that because of all the complicated curves and undercuts? Yes You are welcome for the information. -
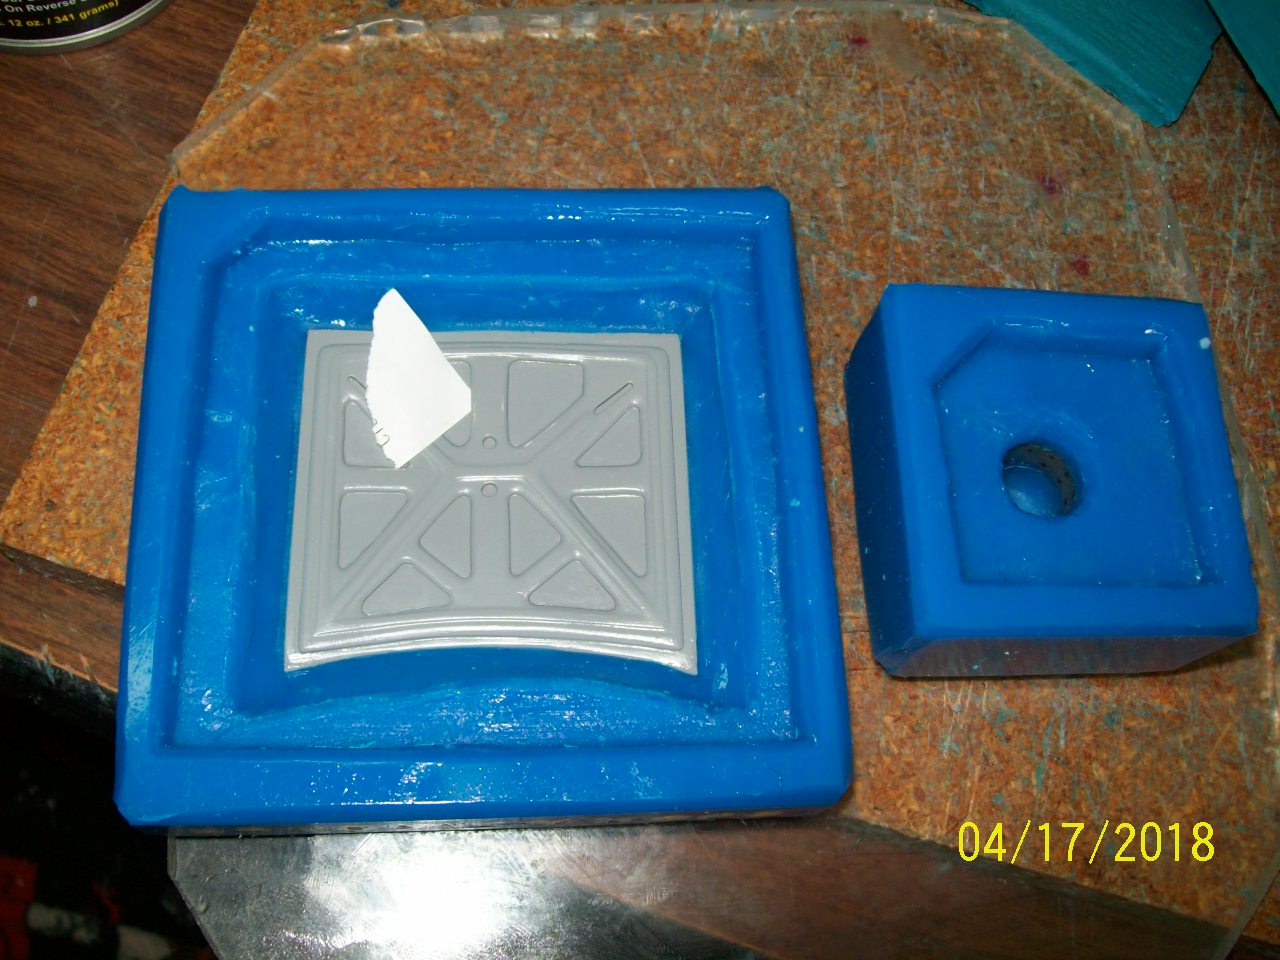
1988 - 1991 Ford LTD Crown Victoria Scratchbuild
Greg Wann replied to DEL's topic in Car Aftermarket / Resin / 3D Printed
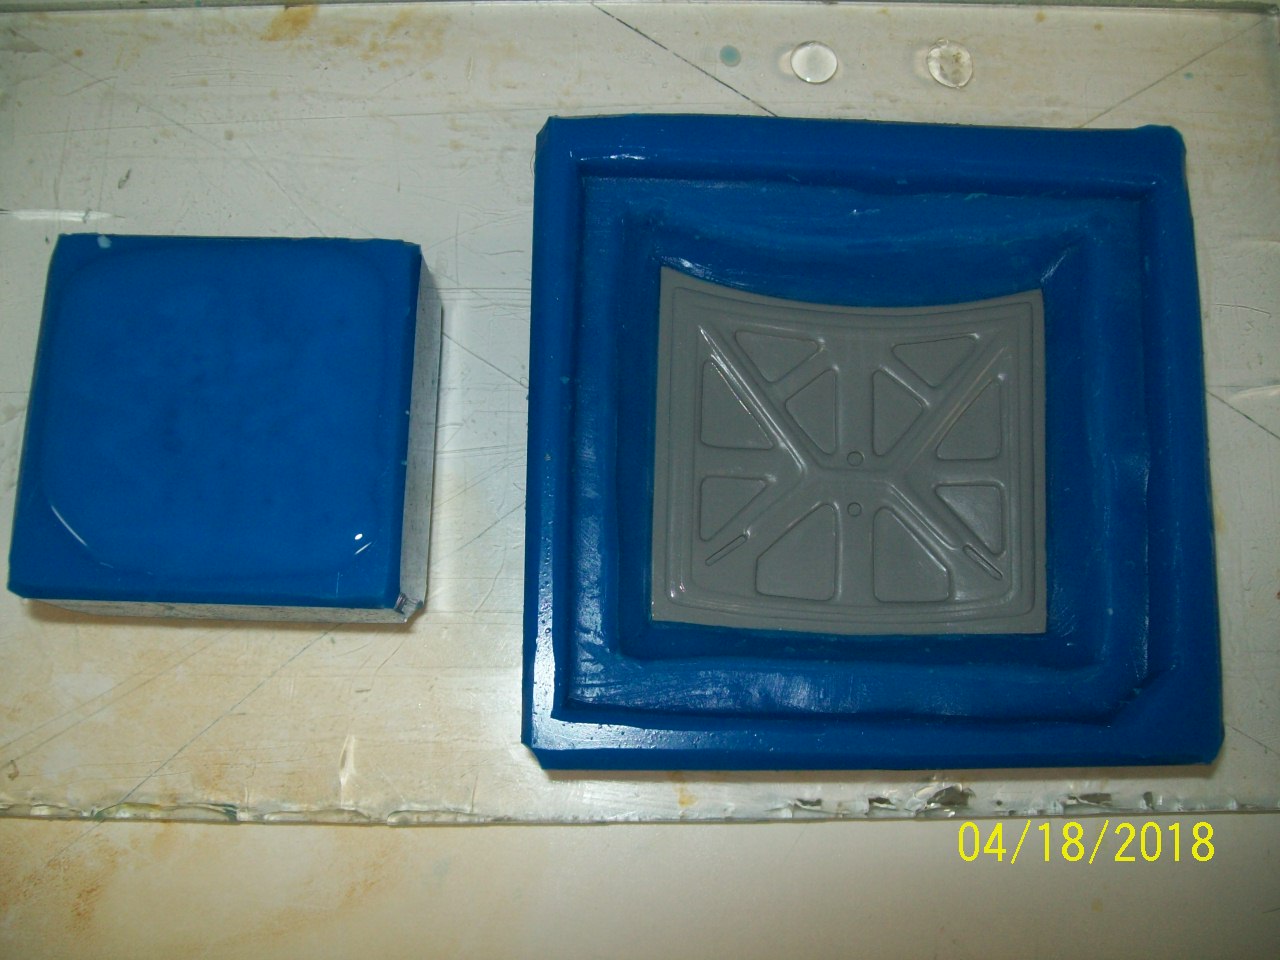
Here is the underside of the hood mold and tire mold. I trim away unwanted silicone edges. The GE silicone II I use to seal the mold box is not compatible with the MS30. The 30 will not fully cure when it is against the GE stuff making it goopy to touch so I cut it away. The clay I use is KLEAN KLAY. The clay is removed from the underside of the hood. There is a tire in the mold. I see trouble with the hood. Mike added this amazing detail but there are a couple of areas that are not GOOT N' TIGHT. The corner of the paper slides under the added piece. I will force some clay in these cracks and then continue with pouring silicone in. The tire has about a 1/4 inch of silicone over it. Peteski: I have pondered the question and I have an answer. This might not be a bad idea for most parts. I don't think it is a good idea for bodies. Here is why. Silicone is pretty heavy. Once silicone is poured in to the mold to form the male part, it would be too easy for the sides to be pushed away from the sides of the mold that first formed the outer sides The silicone would settle into the area making a bad mold. It could probably be better worded. Here is another explanation. Once the outer mold of the body is finished, great care is needed when removing the clay from within the master body. It is important to not pull the sides of the silicone from the sides of the master body. silicone can actually seep between to master body and the already cured molds side. This creates a "ghost layer" of silicone. It's a term I made up. When the first resin body is pulled from the mold you will look on the body for this ghost layer. On the body, it will appear as removed resin. Take a pencil eraser and attempt to peel it out. It might loosen on it's own after three or four pours as resin can reach 160 degrees in heat. Careful not to scratch the mold.
-
1988 - 1991 Ford LTD Crown Victoria Scratchbuild
Greg Wann replied to DEL's topic in Car Aftermarket / Resin / 3D Printed
Hi Peteski, I have never thought about spraying a mold release on a master. We, or actually Mike, Cleans up a first generation casting to make improvements or create yet another version as he did with the Fox body LX and Hatchback variations. As far as explaining the process, I am pretty shocked that there is little documentation on this process, at least I am not aware of any. There should be a section for this, but Once you have seen one project you have seen many. There is a lot of things to consider when making a mold of a part. I have already made but not shown the mold of the interior tub and it is just kicking my ass! Interior tubs and chassis are my two worst nightmares of parts to replicate. I will show those when it comes their turn. -
R&D Unique did a 62 but they are no longer in business. https://www.ebay.com/itm/kit-Ferrari-250-GT-Breadvan-15-Monthery-1962-Modelling-Plus-kit-1-24/232719687576?hash=item362f2c9f98:g:naMAAOSwc~laGcrf Here is one for sale on the Bay
-
1988 - 1991 Ford LTD Crown Victoria Scratchbuild
Greg Wann replied to DEL's topic in Car Aftermarket / Resin / 3D Printed
There is a possibility of this happening. -
1988 - 1991 Ford LTD Crown Victoria Scratchbuild
Greg Wann replied to DEL's topic in Car Aftermarket / Resin / 3D Printed
Here is a single tire clayed up. I will attempt to create four hard copies and then create a mold that will make four at a time. Three more bodies. Here is the hood clayed up.
-
1988 - 1991 Ford LTD Crown Victoria Scratchbuild
Greg Wann replied to DEL's topic in Car Aftermarket / Resin / 3D Printed
You are welcome, Ron. I don't think much casting work ever gets posted here by anyone. My camera is a cheap hundred dollar Kodak. It might be getting Alzheimer's and can't remember the date. New batteries did not help either. I don't build models but my bodies do clean up quickly. The resin in the window openings pops out fast and easy. The sheet metal keeps it all goot n' tight! I could use some photo etch for badges. Mike can clean up a copy, add the PE parts and another mold can be made. I'm going to need multiple molds. -
1988 - 1991 Ford LTD Crown Victoria Scratchbuild
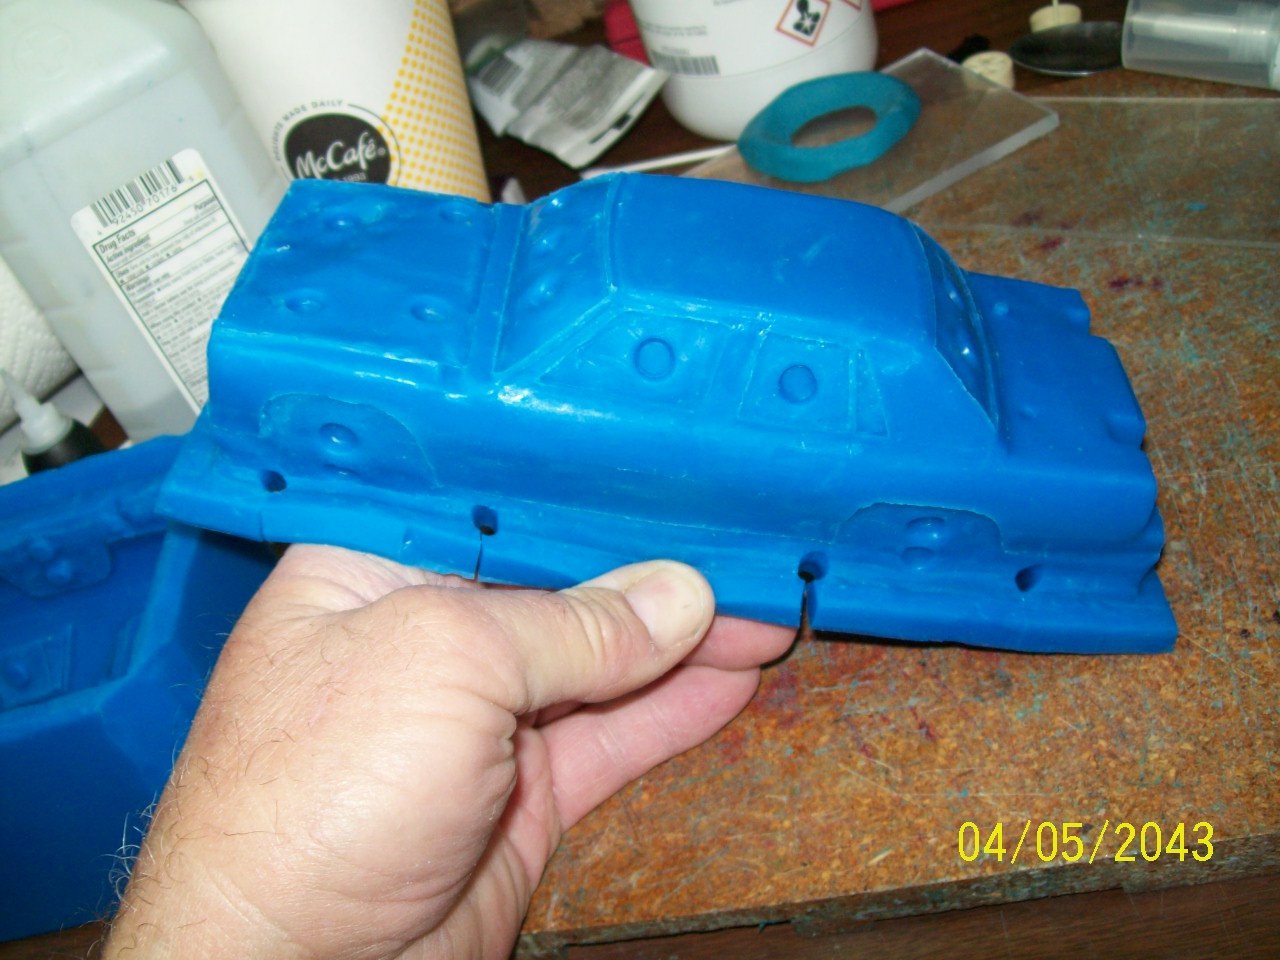
Greg Wann replied to DEL's topic in Car Aftermarket / Resin / 3D Printed
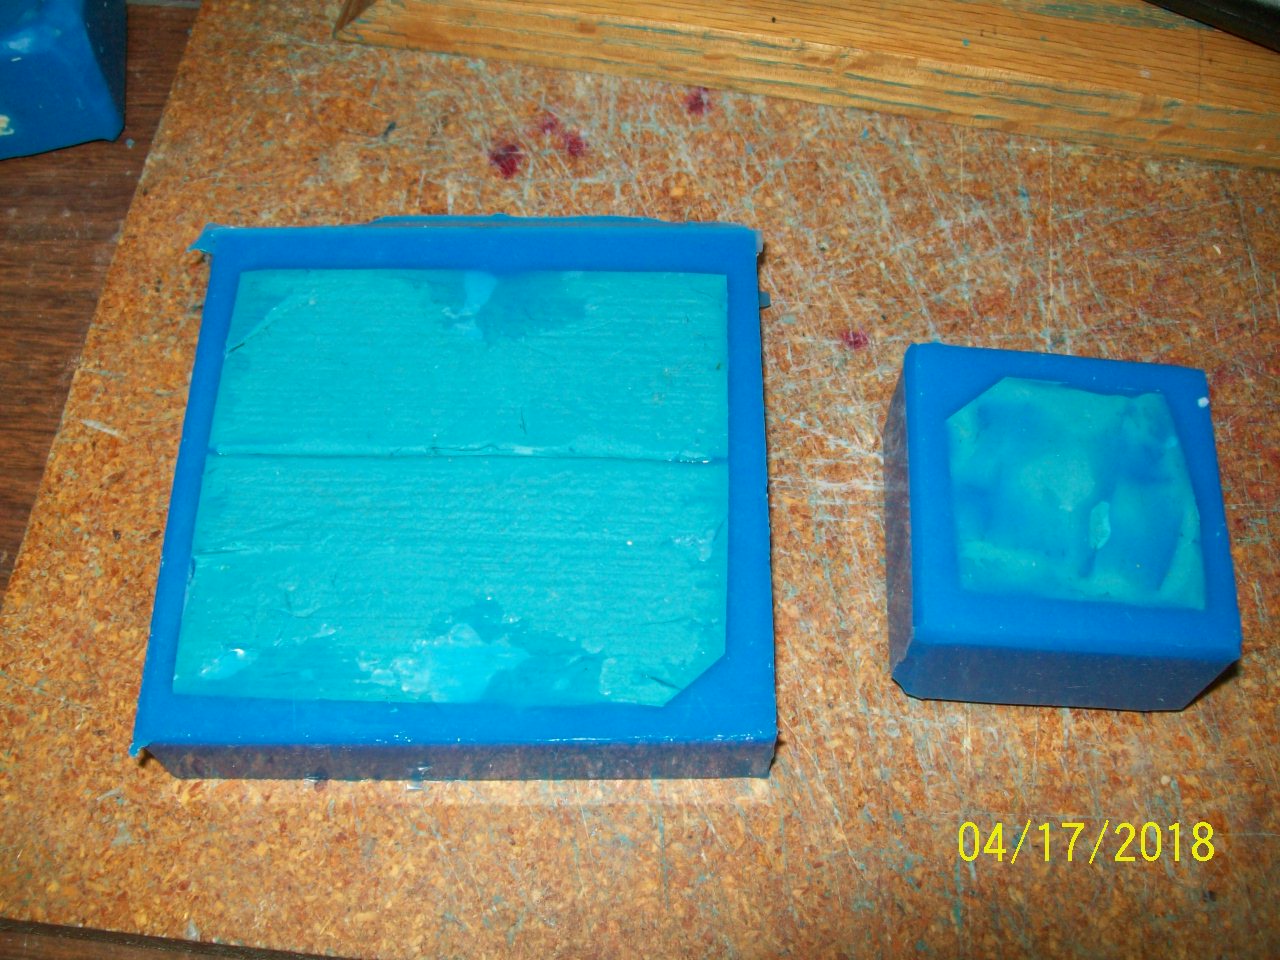
Here are photos of the second body. So I cut those little V shapes in the mold. These break away and don't really effect the body. I made these tires with a little bit of black dye. So far, so good.
-
1988 - 1991 Ford LTD Crown Victoria Scratchbuild
Greg Wann replied to DEL's topic in Car Aftermarket / Resin / 3D Printed
OK....So I made this partial mold out of the 30 silicone. I mixed and poured some of the flex 60 in without any dye. The two materials seem to like one another. I made another one and added some black dye. I may have added way too much dye and it may take a long time to cure.
-
1988 - 1991 Ford LTD Crown Victoria Scratchbuild
Greg Wann replied to DEL's topic in Car Aftermarket / Resin / 3D Printed
OK.....so once the mold has completely cured and taken apart and the master removed my fluid management venting system is installed. First I will point out that I had to trim the corners down to make it fit in the pot. Holes in the mold are easily made by simply taking a piece of K&S tubing and sharpening it on it's inside diameter. Place the tubes end where you want to make a hole. Firmly grip the mold in the area and push the tube in and give it a little twist while pushing. Careful as you go as you could get a core sample of your finger. It won't tickle either. Next photo is of the pressure pot. It is a converted 6 quart pressure cooker. The black round thing acts as a muffler as the sound of air pressure being released from the pot is quite loud and this will quiet it a good bit. Next photo is the holes get cut open to make the flash easy to break away for removal. The last photo is of the wedged shaped holes I cut in the mold these align with the holes in the plug. In the first photo is the sheet metal the mold gets cradled in as the resin is curing. This makes the sides nice and tight against the inner plug. As you will soon see, the flash in the window openings will be very thin. The dimples I create with the knife handle keeps the mold parts locked together firmly. I mixed and poured 80 milliliter of SMOOTH - ON TASK 8 resin into the mold. I then pick the mold up and tilt it around to cover the inner surface of the mold. I tilt the mold up to allow the resin to pool into the rear end portion of the cars area and work the end in first. This will force the resin to work it's way to the front of the body. Once the plug is in it gets set in the sheet metal. The sides get pushed together forcing resin up through the holes filling the trough that I cut in. It becomes a sort of well of extra resin. Since I don't really know what happens under 65 PSI, it all seems to work pretty well for me. If only I could actually patent it. If you are going to try to make bodies you can refrigerate the resin. It will give you about two more minutes of work time or potlife, but your casting will take longer to fully cure. Lots of patience is a must! This pressure pot is a PRESTO 6 Quart. This lid sealing design is important. This is the best one. If you are shopping a Goodwill or other store or garage sale and find one of this design of any size you should buy it.
-
1988 - 1991 Ford LTD Crown Victoria Scratchbuild
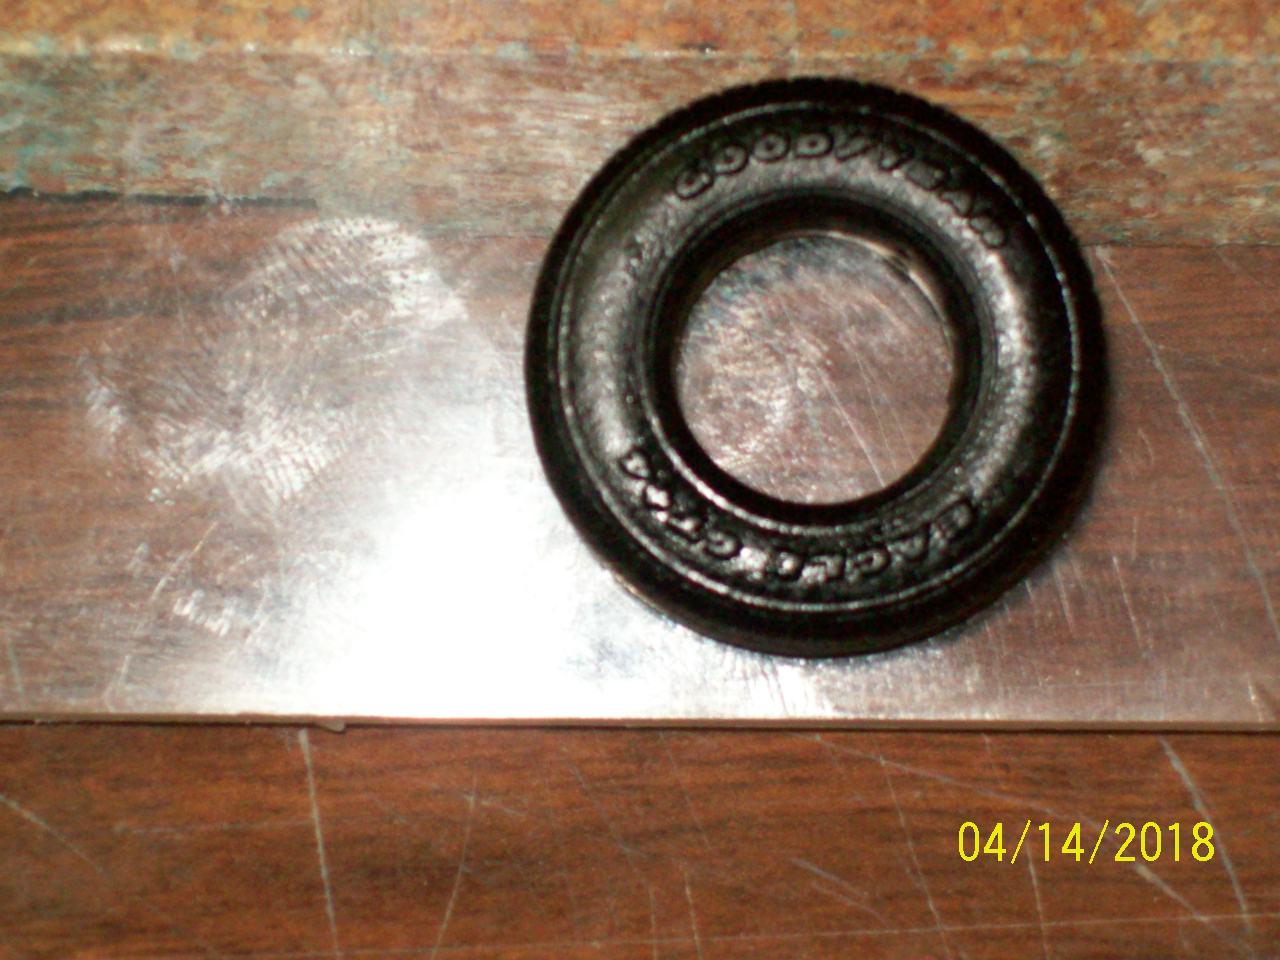
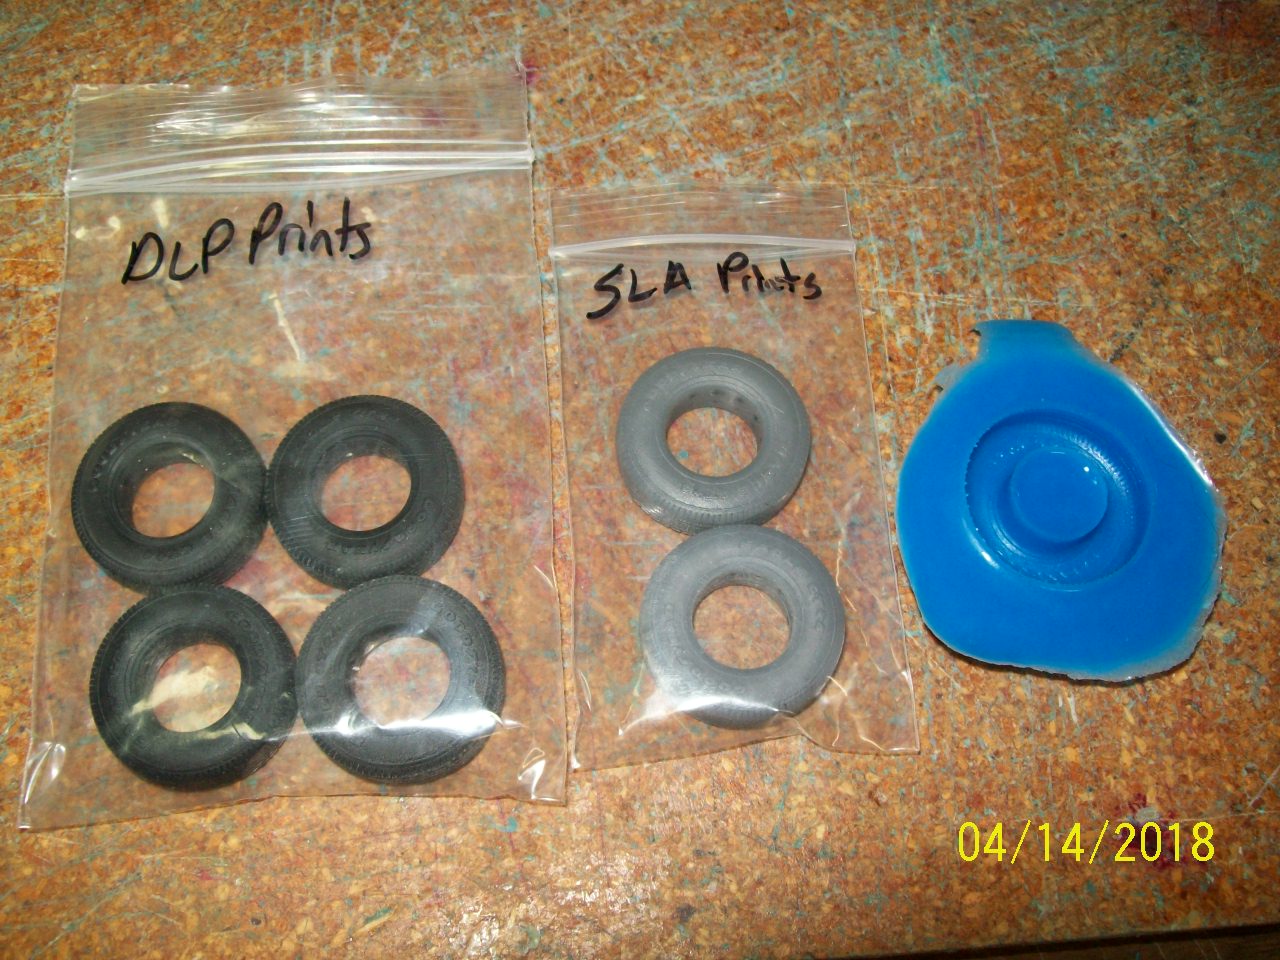
Greg Wann replied to DEL's topic in Car Aftermarket / Resin / 3D Printed
https://www.aeromarineproducts.com/ https://www.polytek.com/products/pt-flex-60-liquid-rubber https://www.reynoldsam.com/product/mold-star/ Here is the most damage the master suffered from being removed from the mold. It could have been worse. Here are the tires that Joseph made. This is going to be a PITA. Incompatible material issues can be a real problem. I only paid Joseph $45.00 to do the drawing work and making these tires for me. I thought this kind of work was going be more costly. He hand wrote a note that these tire materials could only be copied in silicone that is tin based. I purchased a half gallon kit of silicone that I thought was tin based but turned out to be a platinum silicone. I typically use the Mold Star 30 for mold making and I intend to make tires out of the Polytek material with some black dye added. SO.......I mixed up some material and the best I have for a match is the Mold Star 30 with the two SLA printed tires. Nothing I have liked the DLP material. I am in hopes of taking one tire and making a mold out of the 30, pull four good tires out of the resin I use and then create a good mold out of the Aeromarine 128. I don't think the Polytek likes the 30 material. Hopefully I can make these in a bright white resin like Joseph does and then they can be painted black so that the lettering can be sanded to create a white letter version. It's all about getting the materials to like one another.
-
chrome plating in Canada
Greg Wann replied to Greg Wann's topic in General Automotive Talk (Trucks and Cars)
Thank you, Paul. -
1988 - 1991 Ford LTD Crown Victoria Scratchbuild
Greg Wann replied to DEL's topic in Car Aftermarket / Resin / 3D Printed
I set the mold out this morning in the warm sun to help cause it to cure more quickly. Now the clay is removed and the mold is trimmed up a bit. It fits nicely in the sheet metal as planned. I should have tried it in the 6 quart pot to see if it is too long but I just remembered. I sprayed in MANN 200 mold release and let it dry then I filled the cavity up with silicone and this piece of bass wood that is 1 1/4 " square and about 6 inches long. I do this so that once it is removed from the cured mold I can collapse it to help remove it from the inside of a body. This is something that I thought needed to be done on my body molds. The wood becomes buoyant in the silicone and needs held down.