Ace-Garageguy
-
Posts
39,253 -
Joined
-
Last visited
Content Type
Profiles
Forums
Events
Gallery
Everything posted by Ace-Garageguy
-

molded in headlights question
Ace-Garageguy replied to Tom Kren's topic in Model Building Questions and Answers
Lotsa times this has been addressed previously. Here's just a few, some with pictures and additional links. -
"Bastan", besides being a place in Russia, is also the name of a type of poblano pepper, and a French turboprop engine from the late 1950s...according to Google.
-
Absolutely beautiful model. Peteski's right. She could certainly pass for real.
-
I've yet to encounter anything that is.
-
Plans of men and mice, best laid, often go awry.
-
A very few days back it was 10deg F. Today it's in the upper 60s, has been raining for two days, and is forecast to rain two more...then get cold again. I could really go for just a little snow right about now.
-
Obvious things aren't obvious to the unaware.
-
Models of the two-legged female variety took precedence in my life over little cars and trains and boats and planes for many years, but nothing lasts forever.
-
Game birds make tasty eatin', but they ain't much meat on a sparrow.
-
Lots to love about this one. Nice.
-
BIG smile maker.
-
Around heah, them's fightin' words.
-
Most of mine are molded in salmon. Double yuk, but a reasonably period-correct color.
-
What does "NNL" stand for?
Ace-Garageguy replied to spudmuffin1959's topic in General Automotive Talk (Trucks and Cars)
Welcome to the standard world of interdwerbdom. No matter what the subject, no matter how thoroughly versed in it you may be, no matter how well you know it and KNOW you know it, and no matter how many links or documents or court records or studies or patents or video of actual events you can try to show them, there's always some clown (or dozens or even millions depending on the topic) who can simply NOT be swayed in their mistaken beliefs...and who will argue forever. It's such a common phenomenon today, it's kinda surprising there's not a clinical category for it in the DSM...though the Dunning-Kruger effect partially describes the fool who is so stupid and so certain, in his ignorance, that he's right, that he won't or can't tolerate any conflicting information. There's an entire class of personality who behave this way, people apparently so desperate to be RIGHT, as though the integrity of their egos hinges on BEING right, that they just don't give a blank about what's actually TRUE. And when backed up against a wall and asked to provide one single piece of verifiable evidence to back their beliefs, you invariably get the "I have a life and can't waste my valuable time to produce any proof" response, or some variation thereof. -
Inexpensive solvent based glue
Ace-Garageguy replied to Oldmopars's topic in Tips, Tricks, and Tutorials
Exactly. Last time I tried to buy it here, all I could get is "MEK substitute". Which is why I had it shipped to me in bulk...enough to last me years, for a small fraction of what I'd pay one little bottle at a time. What IS surprising is that the local laws here don't YET forbid having it shipped in, and it doesn't require expensive HAZMAT packaging...though some materials I use DO, like the slow hardener for my aircraft-grade epoxy. EDIT: Both toluene and acetone are still available here, however...for now. -
What non-auto model did you get today?
Ace-Garageguy replied to chunkypeanutbutter's topic in The Off-Topic Lounge
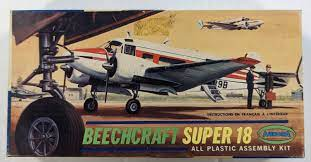
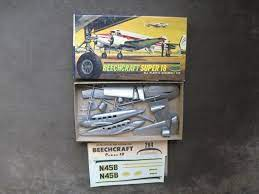
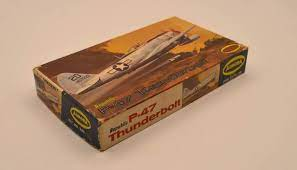
A couple little tiny airplane models, 1/88 to be exact, a close-enough scale to work with 1/87, which is HO. First up is Aurora (nee Comet) kit #83 from 1963, of a Beechcraft Super 18. There were thousands of these things built, some heavily modified and even turbine-re-engined, and they served in private, corporate, transport, and military roles. The kit sold for a buck new, very few survive, and percentage-wise, it may be the most cost-inflated model I ever bought. This one will probably represent John Galt's personal airplane, as part of a heavily compressed Mulligan's Valley module to be incorporated into my next layout. It will need landing gear fabbed, as it's a pylon-mounted model only, box art notwithstanding. It looks almost right parked alongside the old 1/90 DC-3 from Revell, which is pretty common and WAY cheaper. Next up is another 1/88 Aurora kit, #286 from 1964, a P-47 Thunderbolt. This one sold for 39 cents new, and is also pretty rare...though the price I got this one for was considerably less inflated. Just as well, 'cause it's missing the clear canopy...but hey...I'm s'posed to be a modeler, right? It'll need feet and legs made too, as it's also only a pylon-mount. You have to remember that many surplus military aircraft could be bought for not much more than scrap value after the war, so it's entirely feasible that somebody who could afford the gas could have had ons as a private toy in the late '50s and early '60s, which is the approximate time frame my layout is to represent. These are both nicer models than I'd expected, with recessed panel lines, rather than raised, which were much easier to tool and fairly common on early plastic aircraft kits. A few subtle mods like cutting the flaps and elevators loose, and a few more minor upgrades like metalized finishes, these should look great parked on the ramp.
-
Man...really really pretty. I need to get at least one of each to never build.
-
"Terms" are not the same as "terns", and I think it's amazing what a difference a single little bump on a letter can make.
-
Ow. That hurts from here.
-
Always wondered what those looked like built. Yours looks good.
-
Simply to accommodate the reality of tooling-design for injection molding. The "tuck-under" of the nose panel, and the carve-outs for the grille, could not have been formed in one piece with the body without resorting to more expensive sliding die elements, and possibly straightening the lower front edge of the body so it would come out of the tool. Unfortunately, some tooling designers have indeed taken the expedient route, straightening the lower edge, making a "flat face", and the model's finished appearance suffers unless it's corrected by the builder...usually beyond the skill set or interest level of the typical modeler. Be glad they did it the way they did, 'cause you've about got it beat, and it's going to look great.
-
"Atrocious" is what used to flash through my mind whenever I saw pink and green used together, but the combination can be quite nice in some contexts.
-
Complaining on the interwebs rarely accomplishes much, other than eliciting a little moral support in the way of feedback.
-
Fixin' to clean the gutters I installed recently on the back of the house. We have a downpour coming, and when it rains hard, if the gutters aren't clear they overflow, flooding the idiot-built "French drain" that has no outlet. Then water comes in under the wall and runs over the floor that other idiots built below grade...which is way the later idiots built the "French drain". All the problems this little house has are the direct result of "renovations" done by "experts", apparently without any kind of permitting or engineering oversight...and the fact it was vandalized and stripped of every bit of copper they could get to in 2012.
-
The Official EBay Discussion Thread
Ace-Garageguy replied to iamsuperdan's topic in General Automotive Talk (Trucks and Cars)
Everybody wants to be Amazon.