Miatatom
-
Posts
2,250 -
Joined
-
Last visited
Content Type
Profiles
Forums
Events
Gallery
Everything posted by Miatatom
-
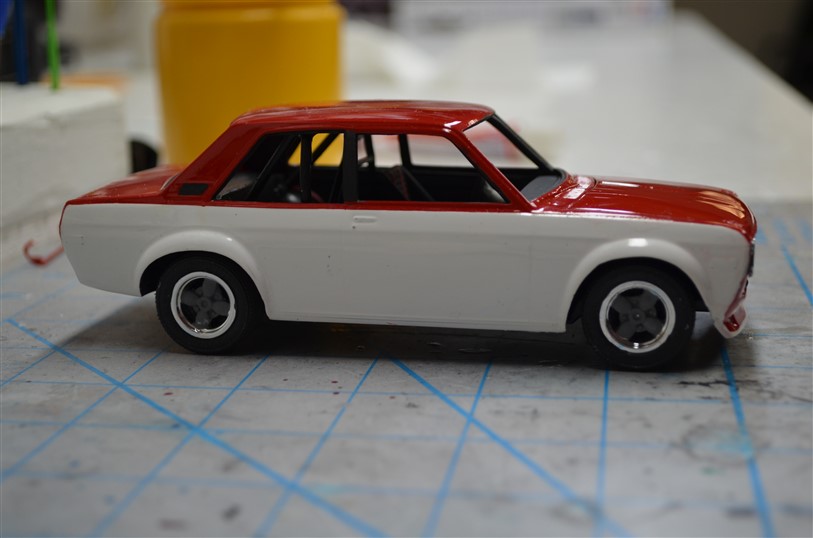
Love them! I had a 71 with a 2.0 that I autocrossed. It was a blast. I'd hoped to finish the BRE 510 that's on the workbench but it's going to take a few more hours. Maybe done by the weekend. Here's a shot I took yesterday before putting on the bumpers. Windows and decals and it's done.

-
Thanks, Michael!
-
Where'd you get the wheels/tires?
-
That may be an issue with HF filters. To use them, looks like you'll have to pour the paint through the filter while holding the filter sideways. Otherwise, there's some waste in the bottom of the filter. How many did you get for $8?
-
Pantyhose.
-

Elfin 400 Repco (Aussie 60's Big Banger Sports Car)
Miatatom replied to Dave B's topic in Model Cars
Sounds like the Aussie version of the CanAm series. Nice looking race cars. -
Nice detail work. Great job!
-
If I were him, I wouldn't get back in the car starting today. He's got to race Talladega twice and Daytona once before the season is over. Too many concussions. Nastycar is in trouble and has been for a number of years.
-
Using Micro Mesh Sanding Sheets
Miatatom replied to Miatatom's topic in Model Building Questions and Answers
I can't use alcohol since all my painting is with lacquers. -
Using Micro Mesh Sanding Sheets
Miatatom replied to Miatatom's topic in Model Building Questions and Answers
I'm doing a test overnight with half an area washed with Dawn. I'm going to hit it with some clear tomorrow morning and see what happens. -
I've used Micro Mesh sanding sheets and gotten great results but there's one issue I'd love to clear up. In the past, I've had fisheye issues after sanding with the sheets and then applying more paint. Someone told me that the sheets have silicon in them and that was the problem. If that's the case, can it be removed with a good soap and water bath? In the past, I've always used the sheets on the final coat, be it color or clear because I kept running into the fisheye issue. I'd like to be able to use the sheets and then apply more paint or clear without having to deal with fisheyes.
-
Newbie glue/bonding broken windshield support ?
Miatatom replied to 428street's topic in Model Building Questions and Answers
Welcome back! Like you, I took a break of about 50+ years. A lot has changed. To get things perfectly lined up, you can try a couple of things. These are going to take 3 hands or some sort of tool to hold the parts together. You could try gluing the pieces by applying CA glue (Super Glue) and while you or someone holds it in "perfect alignment", hit it with some accelerator. It'll bond instantly. I use this brand. https://www.hobbylinc.com/hobbylinc-insta-set-cyanoacrylate-accelator-2oz-hobby-ca-super-glue-accelerator-151 You can also try the stuff they're selling on TV (can't remember the name) that cures instantly when you shine the light they provide on it. I've also heard that it is good for filling voids. I don't know if it will work on your problems. If there's space without it being too noticeable, I'd cut a piece of thin sheet plastic and glue it to the back side for added strength. -
Dawn soap (not ultra) for washing brushes, etc.
Miatatom replied to GerN's topic in Tips, Tricks, and Tutorials
I wear the nitrile gloves from Harbor Freight for that. -
Dawn soap (not ultra) for washing brushes, etc.
Miatatom replied to GerN's topic in Tips, Tricks, and Tutorials
Dawn is an excellent degreaser and it's in the first step when I build a model. "Wash all non-chrome parts in Dawn". -
Has anyone tried power coat powder for floor mats?
Miatatom replied to dlh's topic in Model Building Questions and Answers
How did it turn out? -
Using an Electric Toothbrush on Model Cars
Miatatom replied to Miatatom's topic in Tips, Tricks, and Tutorials
As suggested, I bought a set of punches at Horror Fright and they do make it easy to cut out tape or thin plastic. -
Model Cars Magazine, The Future
Miatatom replied to Gregg's topic in General Automotive Talk (Trucks and Cars)
Another great idea! -
Model Cars Magazine, The Future
Miatatom replied to Gregg's topic in General Automotive Talk (Trucks and Cars)
I like this idea a lot! Maybe you could combine martinfan5 and Bills suggestions. I'd pay $10/year to continue to access this valuable resource. Maybe combine that with a digital only subscription to the magazine for an additional fee? Some recognition such as the bar or something else unique might motivate some to contribute if they see a lot of folks with those notations below their avatar. Tribal culture! -
Thanks, Bill. It's cheap too!
-
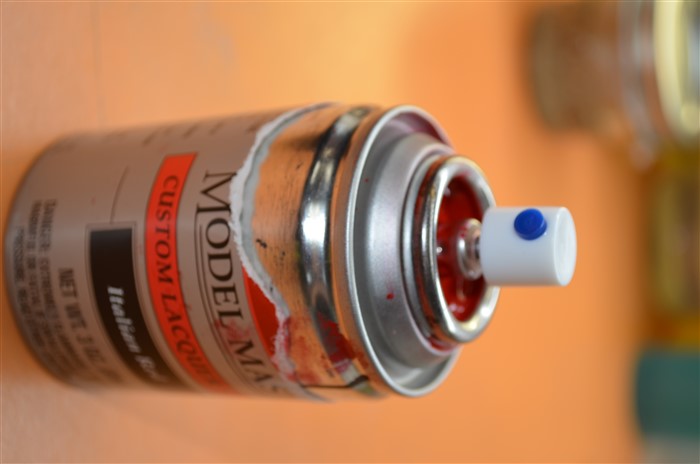
Everyone seems to love the spray nozzle that comes with Tamiya spray paints. I do. They are much better than the MM nozzles. But Tamiya doesn't have every color you might need. So how can we use a Tamiya spray nozzle on a Model Master can? Here's the solution I've some up with. I started thinking about this when I saw a tip about making an adapter to fit cans in order to decant paint for airbrushing. As many of you know, the blue tip of the Tamiya spray nozzle protrudes and the outside diameter dimension is the same as the inside diameter dimension of a plastic straw. You can put a straw on the tip and decant to your hearts content. I used some aluminum tubing from a local hobby store. There are two pieces to make. The two sizes of aluminum tubing you'll need are 0.125" and 0.157". Both are outside diameter measurements. Cut a piece of the larger diameter tubing 0.2" in length and cut a piece of the smaller tubing 0.4" in length. Insert the larger tubing piece into the Tamiya nozzle and insert the smaller piece into the larger one. As you can see, I've had a little paint spray out onto the top of the can. I'm going to experiment with shortening the longer piece and see if that will help. Might try using a little epoxy to seal it all up too.
-
White primer on white molded parts ??
Miatatom replied to Goodwrench3's topic in Model Building Questions and Answers
That's what I'm using but I just bought some cheap Walmart primer to try. -
Sad Sad Sad News: Our Harry Passed Away
Miatatom replied to Gregg's topic in General Automotive Talk (Trucks and Cars)
Thank you Harry for all that you did for us all on this forum. As bismarck said above, fair winds and following seas. -
White primer on white molded parts ??
Miatatom replied to Goodwrench3's topic in Model Building Questions and Answers
No, I use white on white. -
White primer on white molded parts ??
Miatatom replied to Goodwrench3's topic in Model Building Questions and Answers
Some primers actually are labeled as filling fine scratches. They have a high build up and can bury details. Tamiya white and grey both go on smooth and need little sanding. They're not cheap though. What type of primer are you using? -
I'd put the decals on and then shoot clear over them. Then you can polish and wax the clear to get the shine you want. Most of my models are race cars and I don't polish them to a high gloss, just a nice shine that would represent the period the car raced in.