Search the Community
Showing results for tags 'van'.
Found 24 results
-
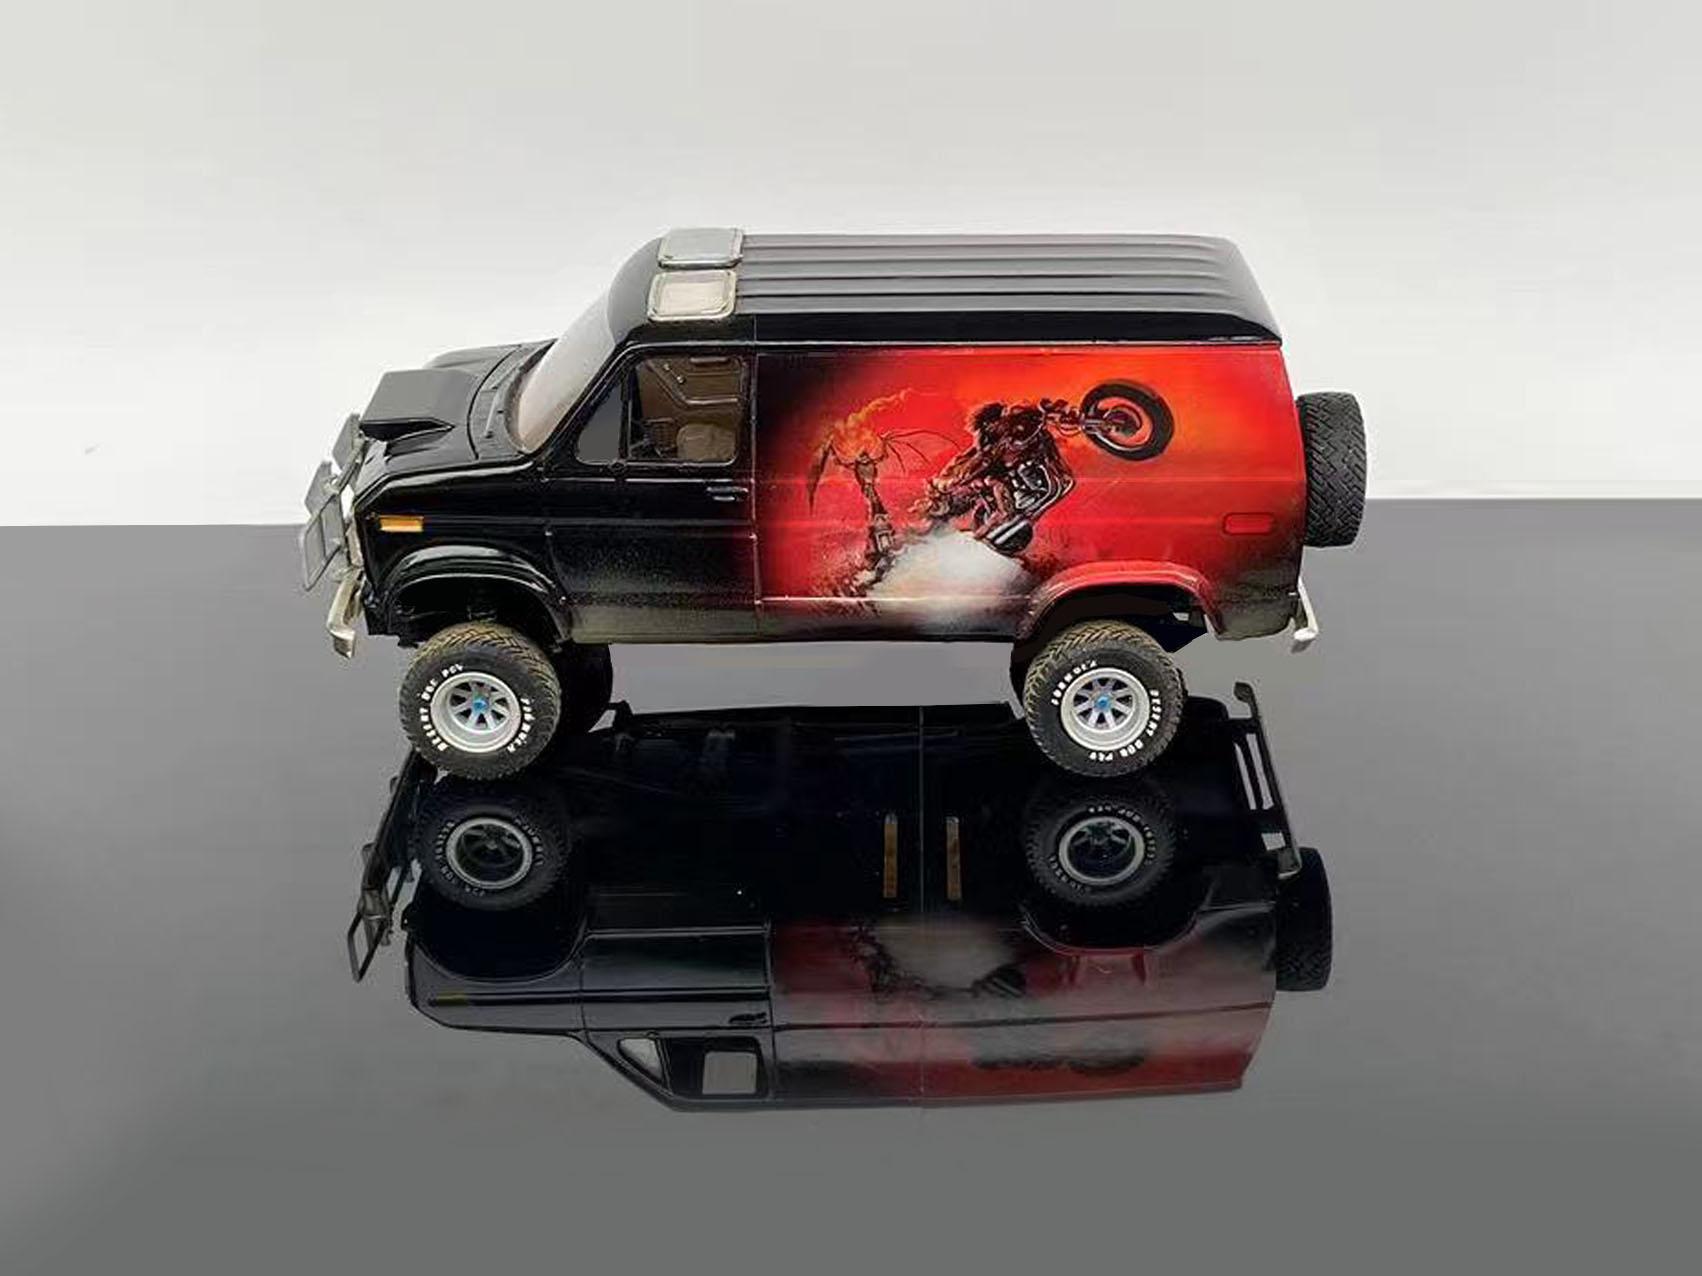
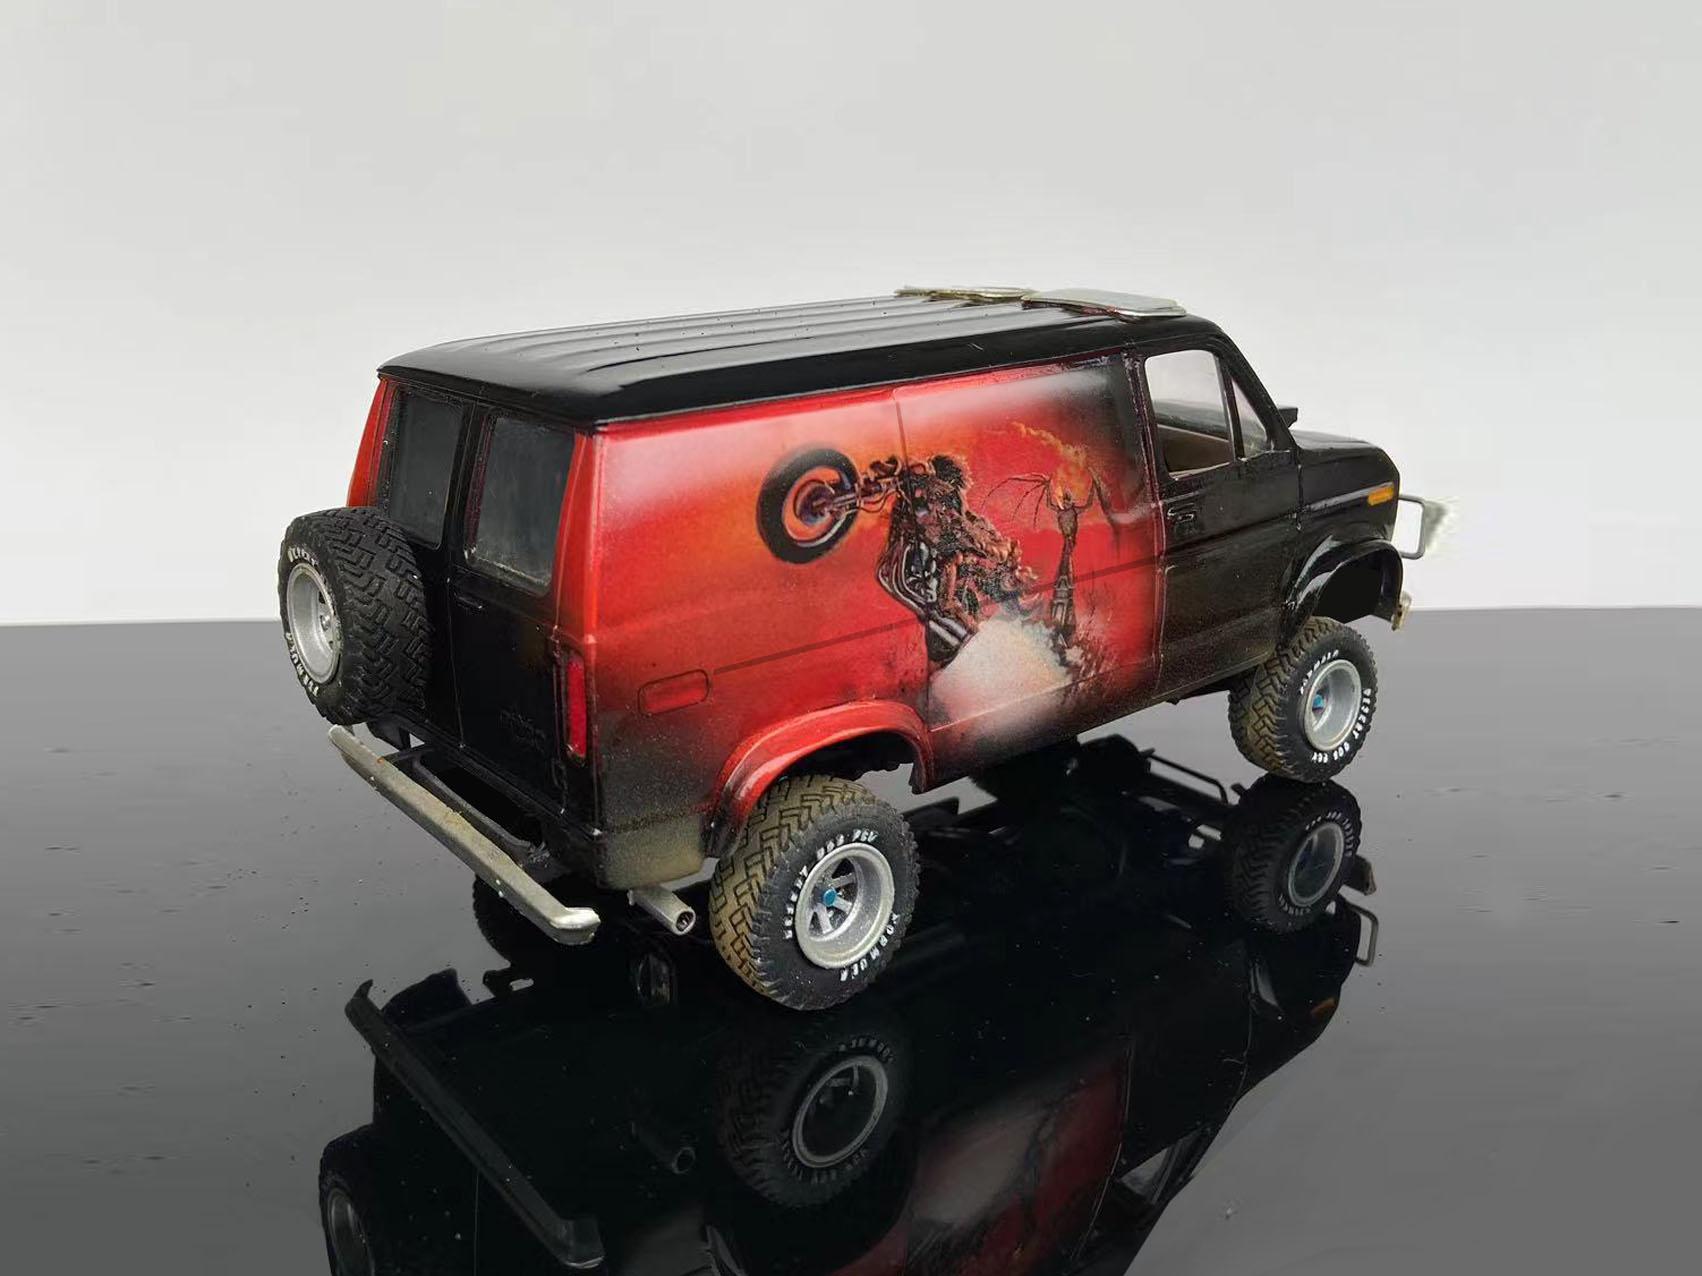
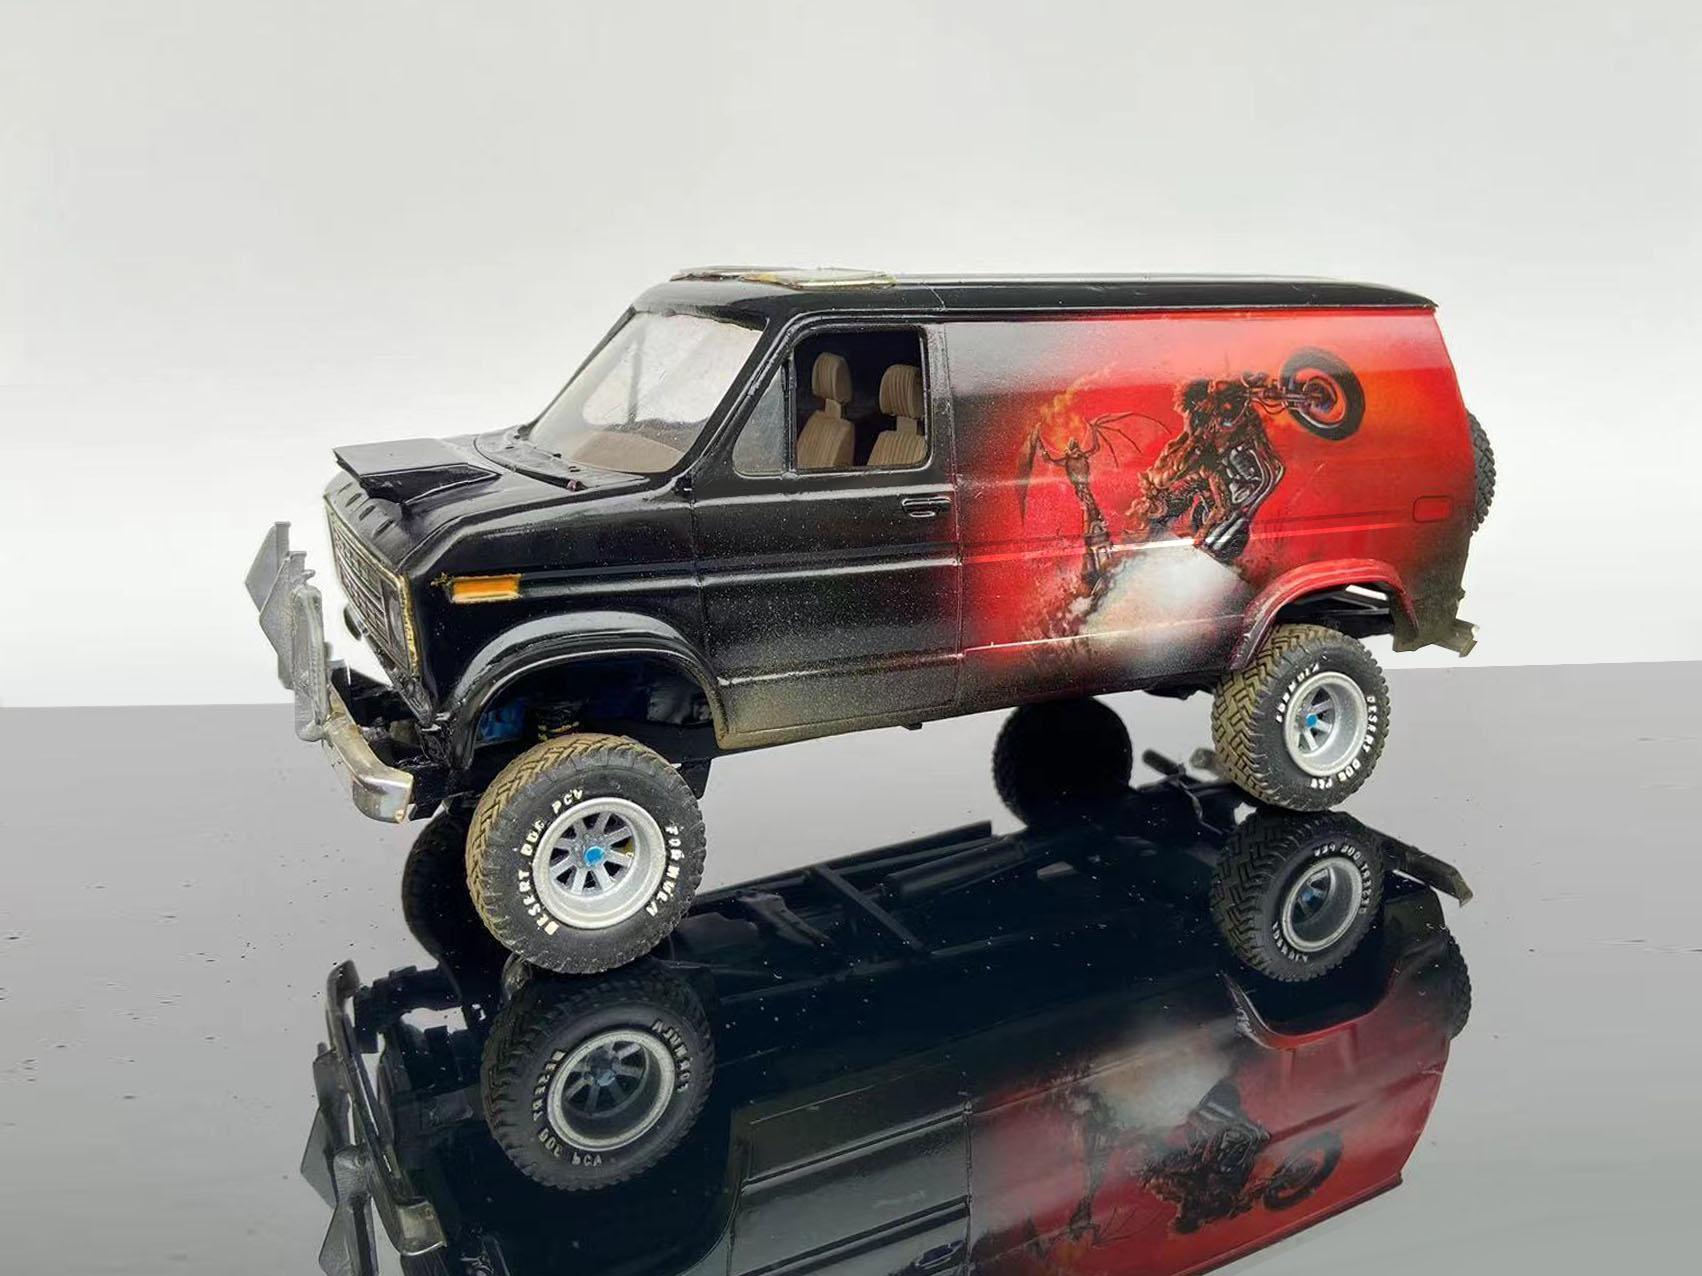
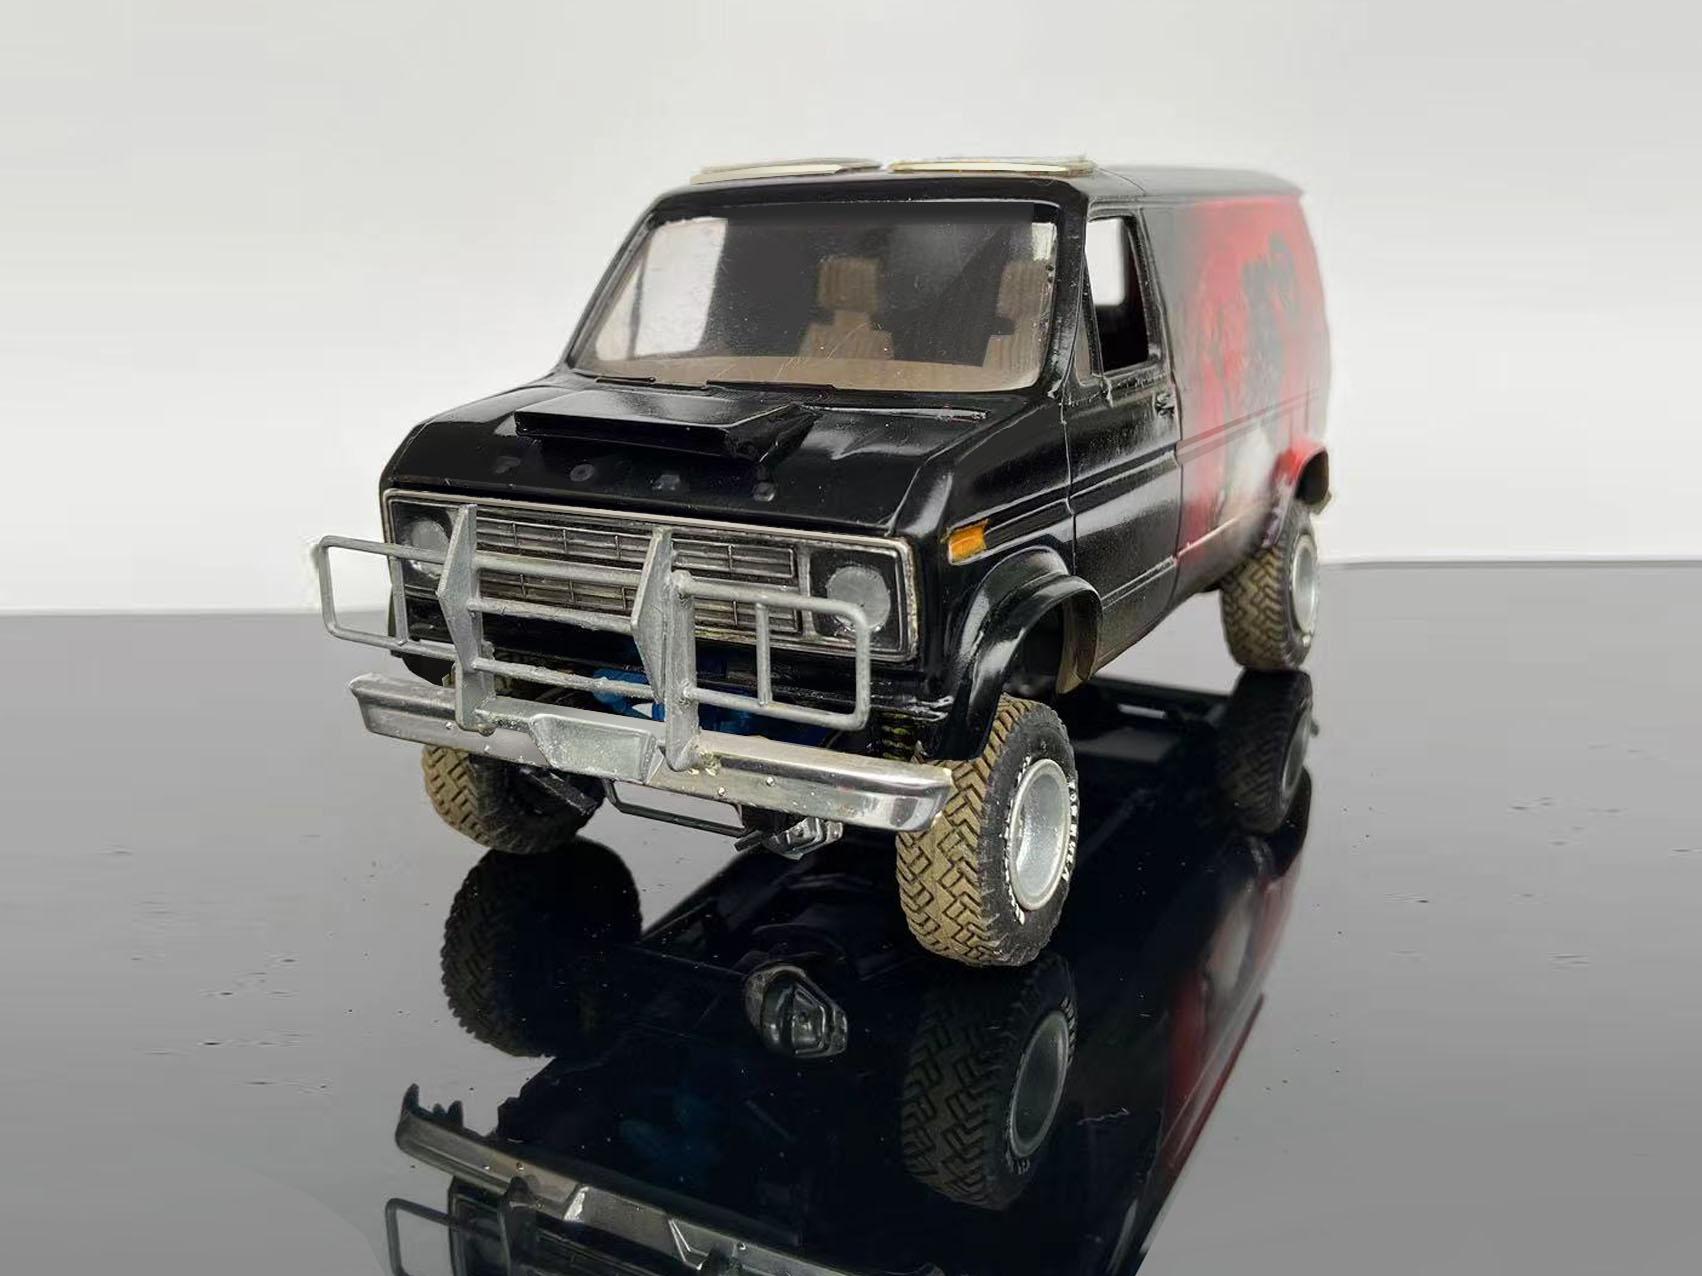
I'm a big fan of '70's custom vans. Last year I bought a box of scraps and inside was this Ford 4X4 glue bomb. It was a great opportunity to build one. I still need to make a pair of rear view mirrors, a whip antenna and I want to put a skid plate under the front bumper. It was a simple kit so I just disassembled it, cleaned it up repainted and reassembled it. The mural is printed on vinyl and oversprayed with an airbrush to blend it in, the sides are relatively flat so they blend in well and on radiuses pieces I used paint. The engine and interior are there but really nothing exciting. I weathered the exterior a bit because I imagine hell as being a bit dirty.

- 23 replies
-
- 15
-

-
An entertaining and informative video of a Ford Econoline that once served the West coast. There's even a brief history of the graphic design elements.
-
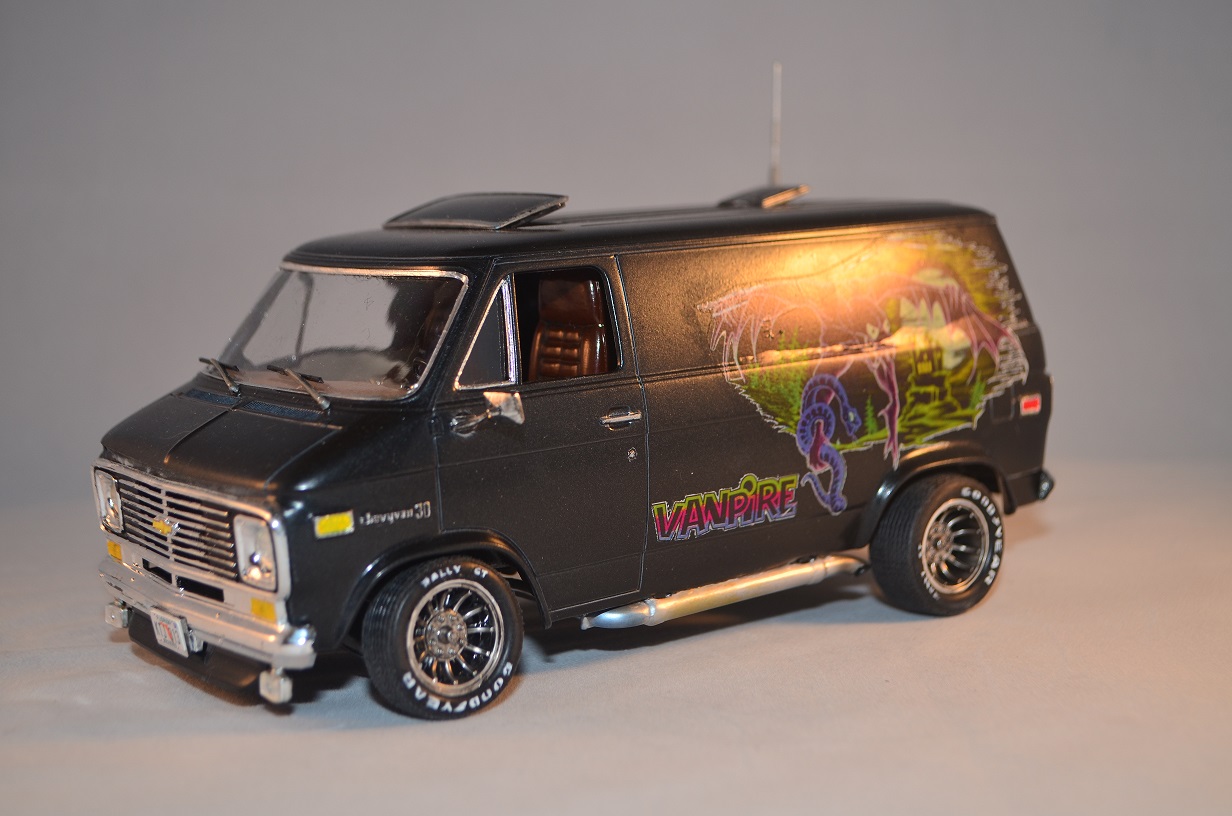
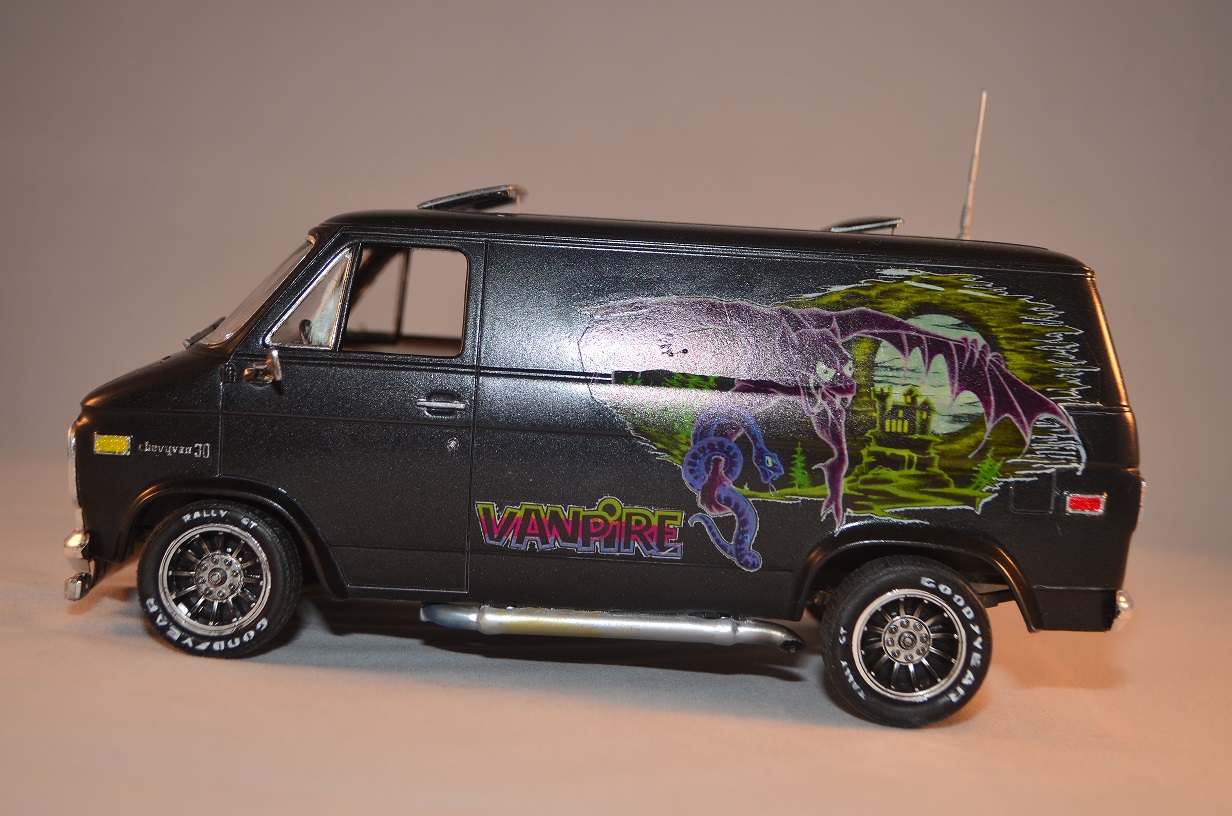
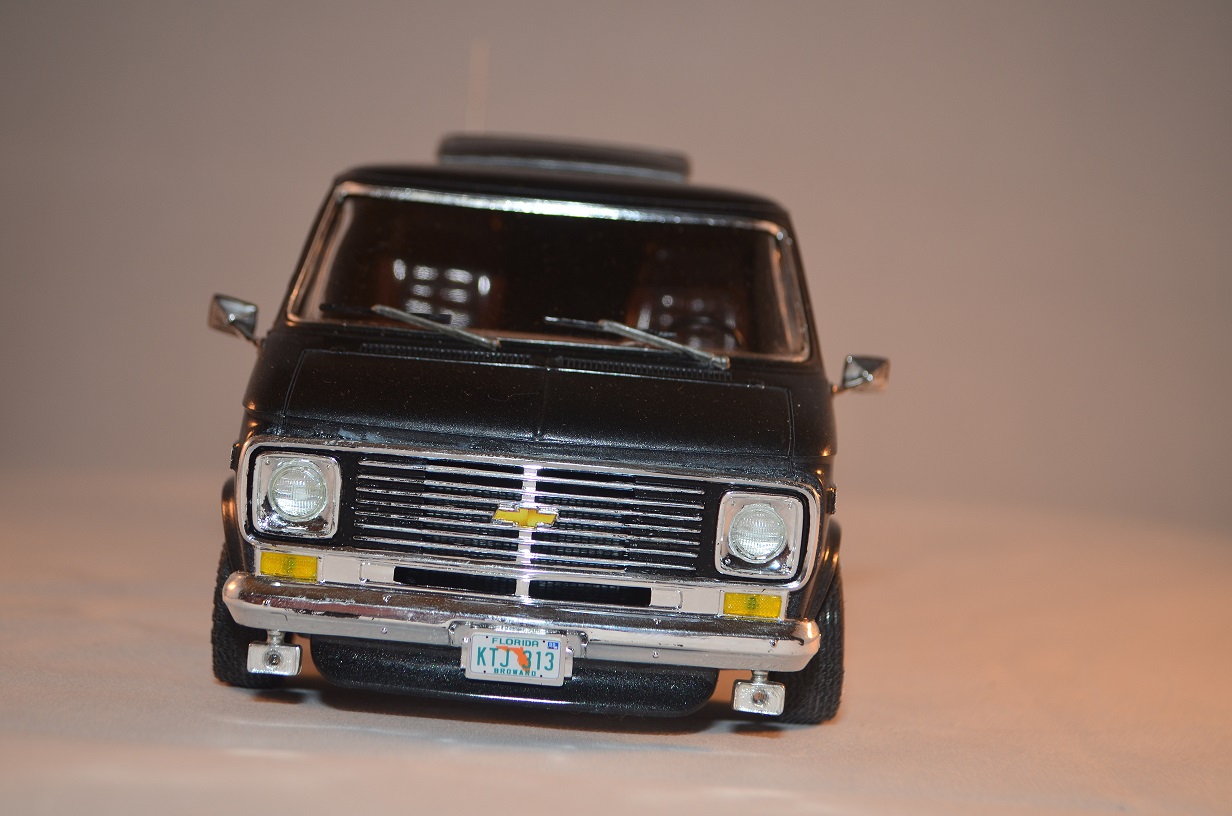
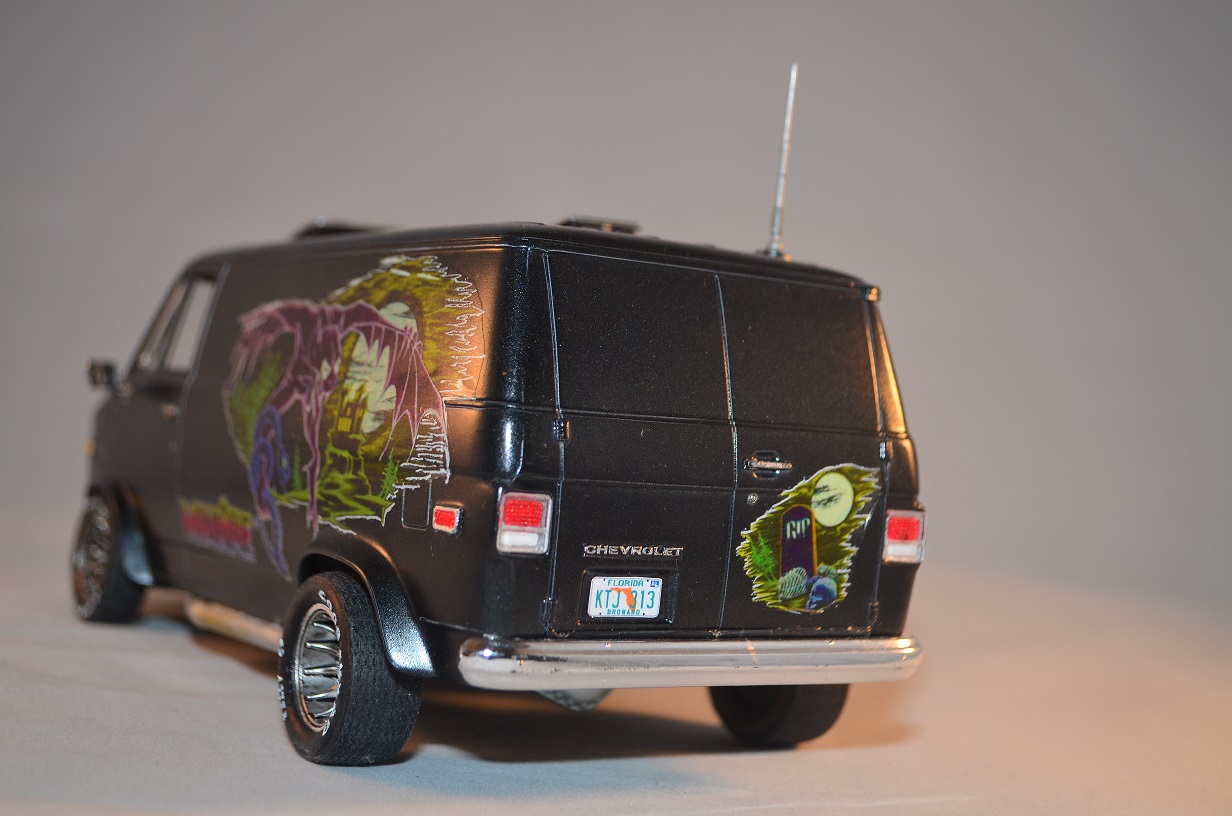
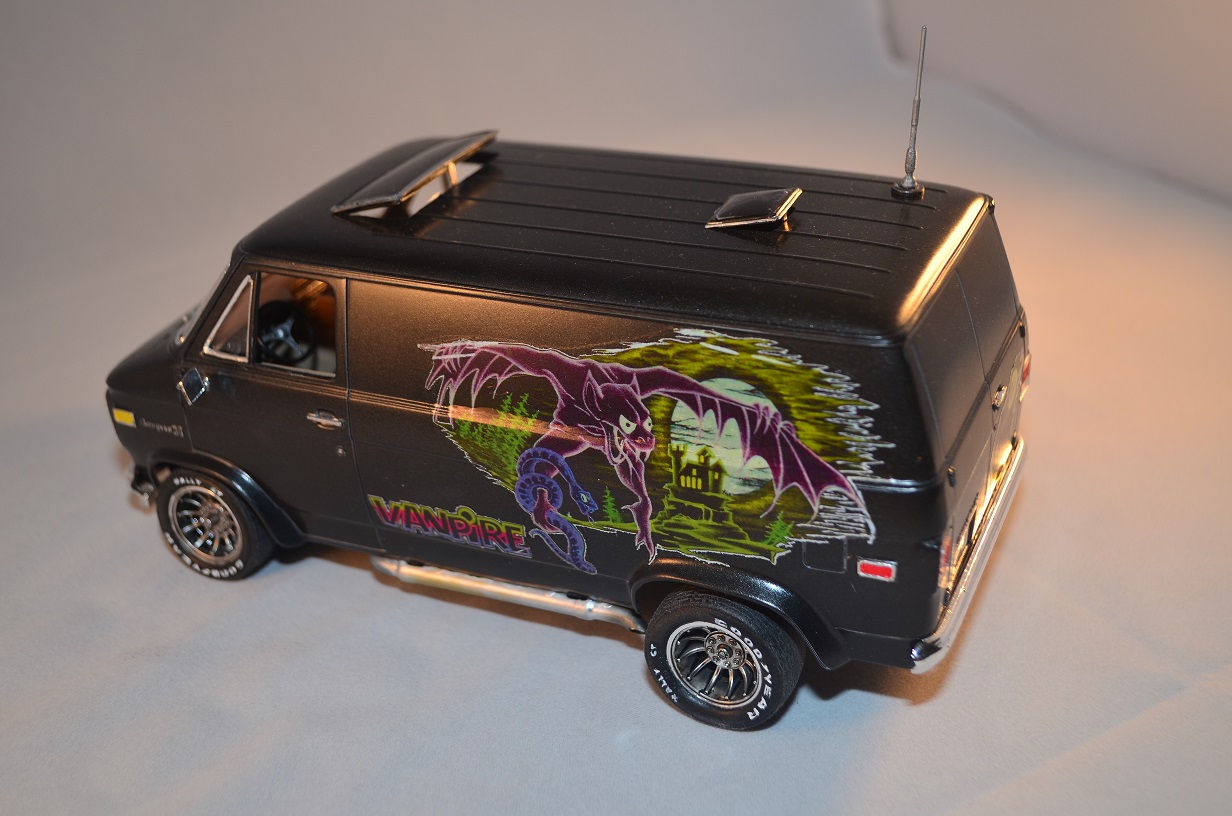
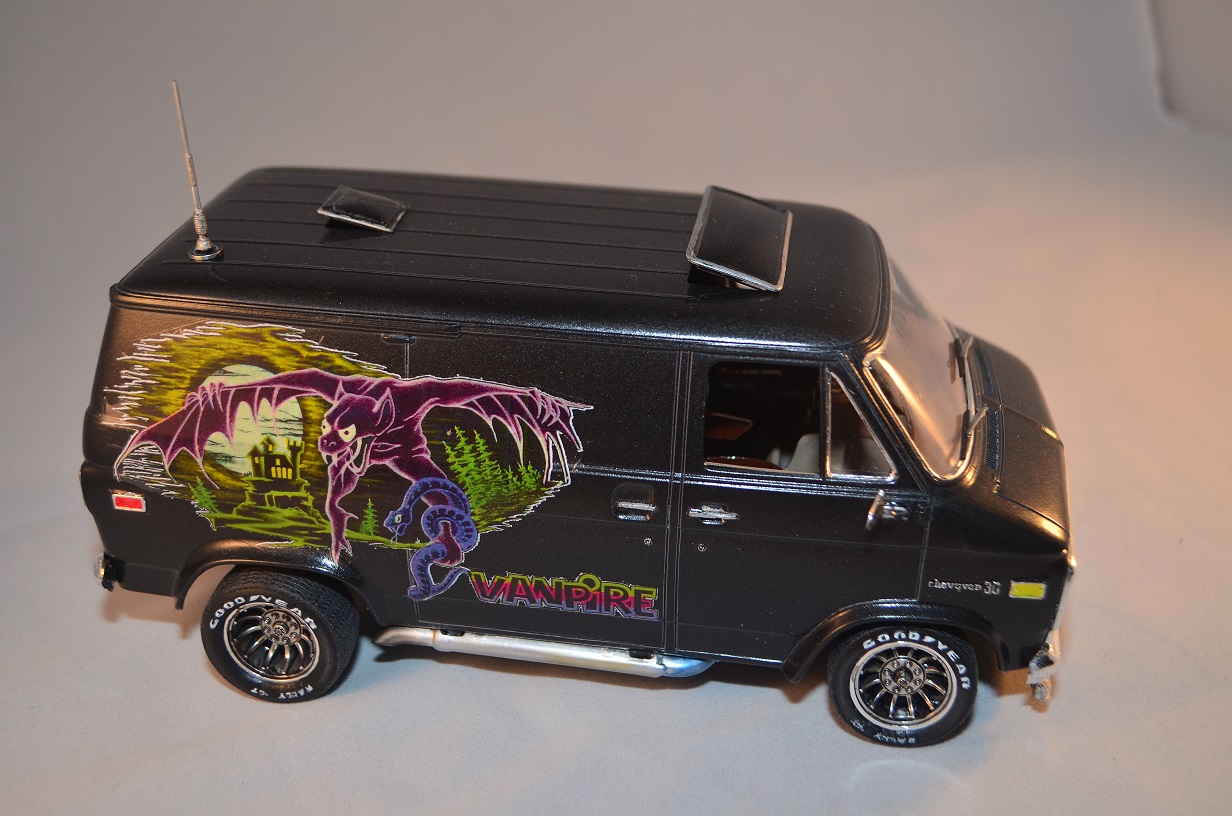
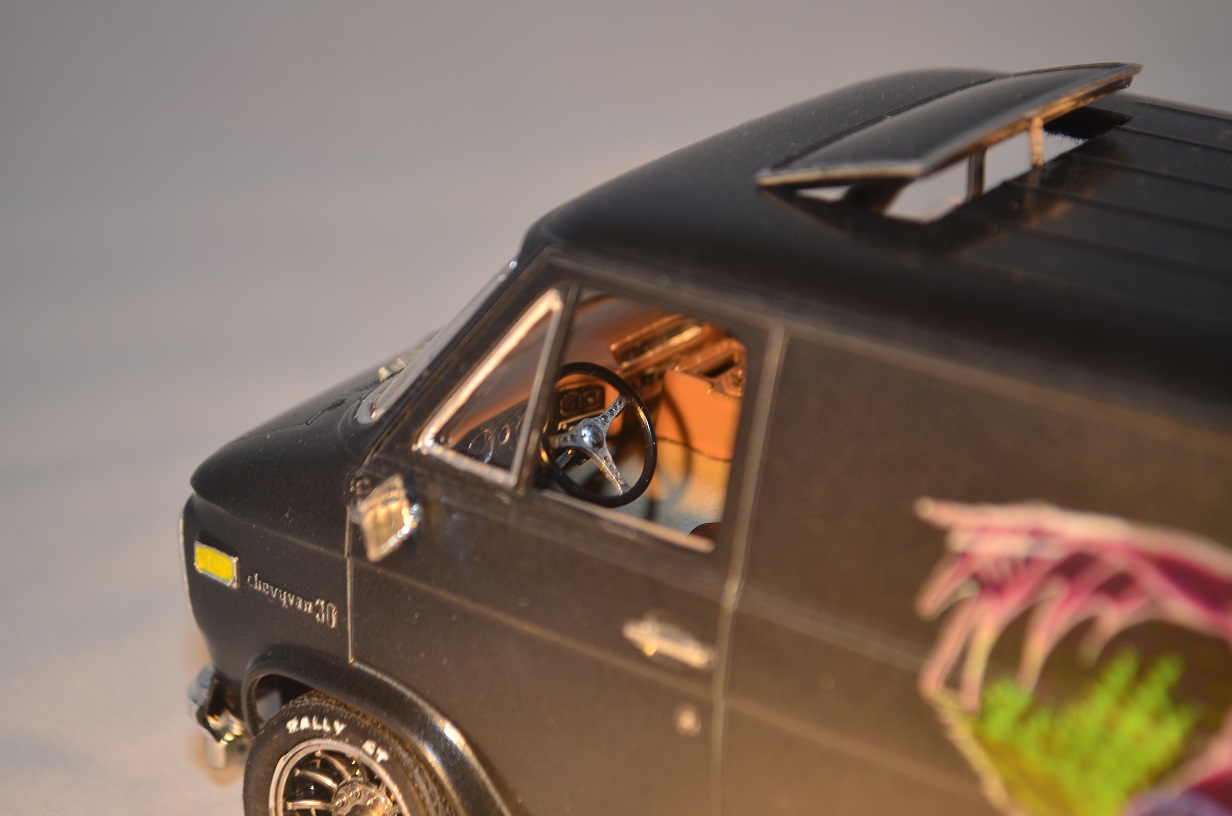
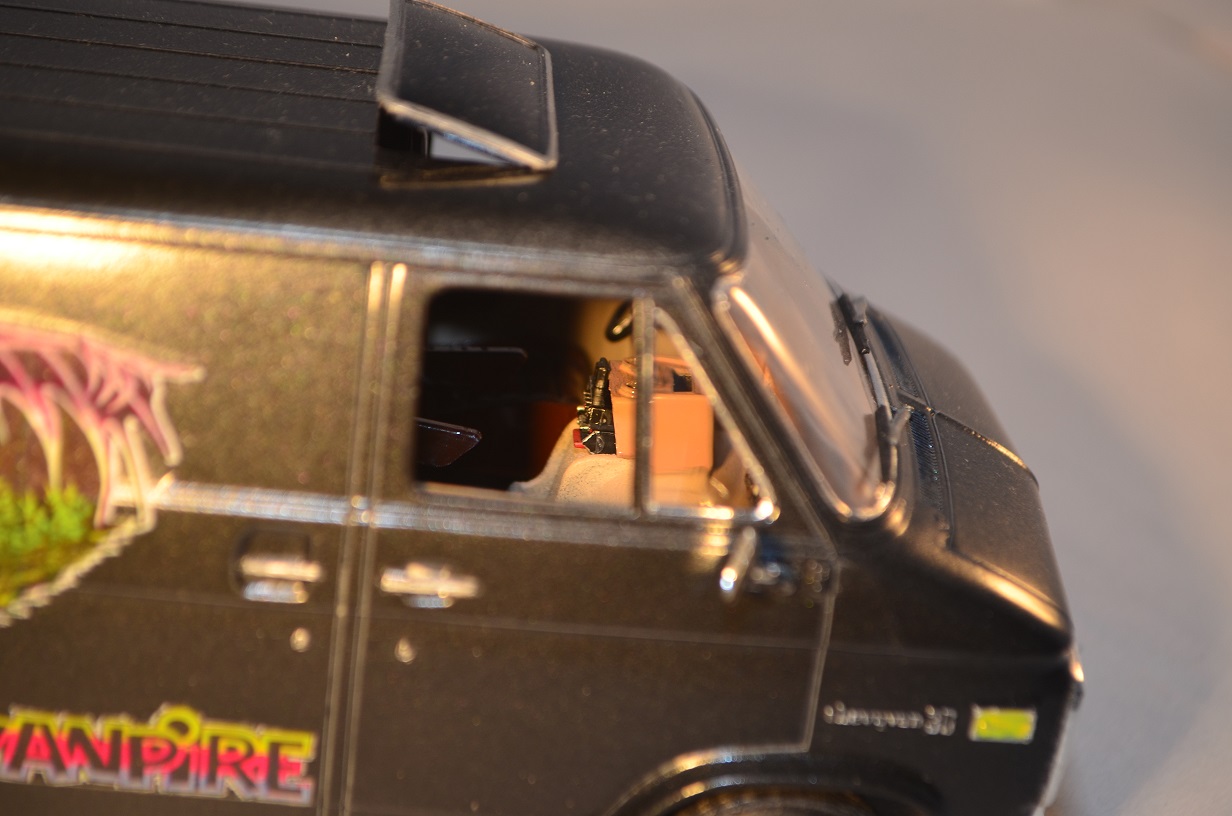
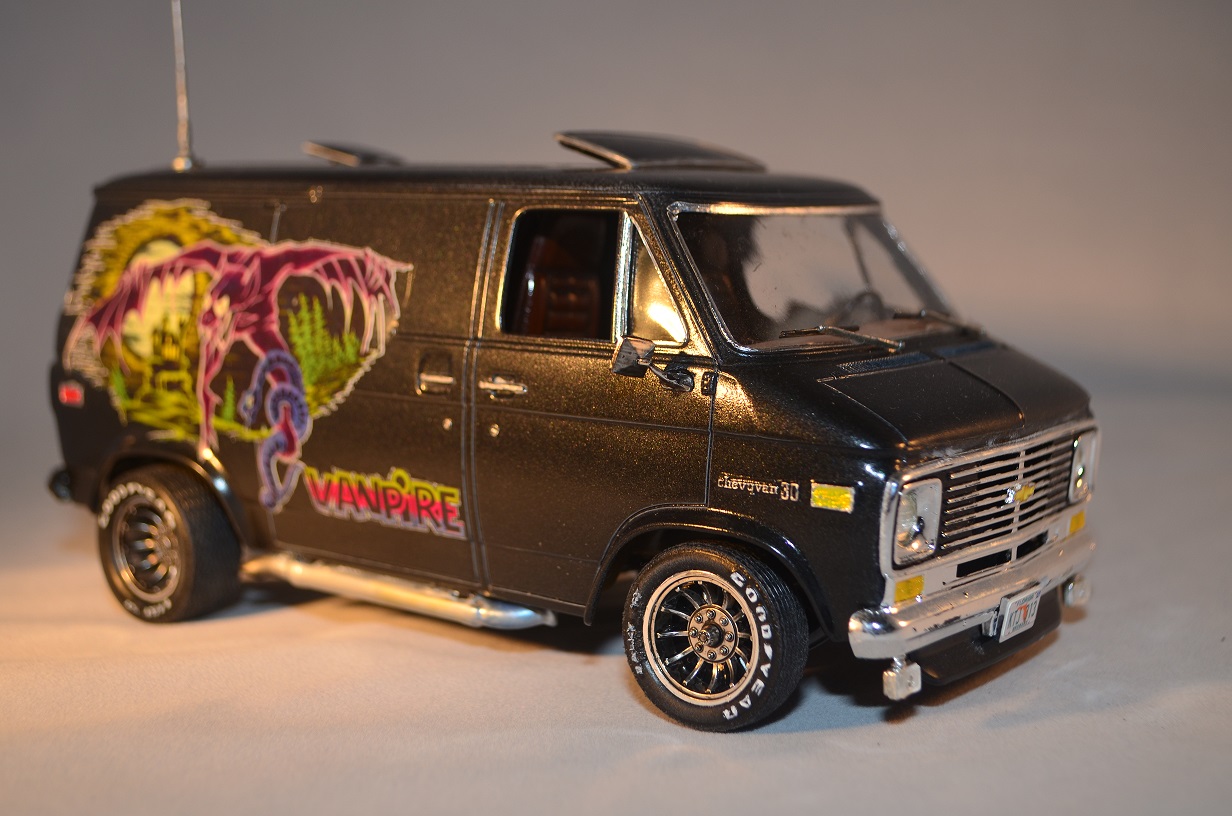
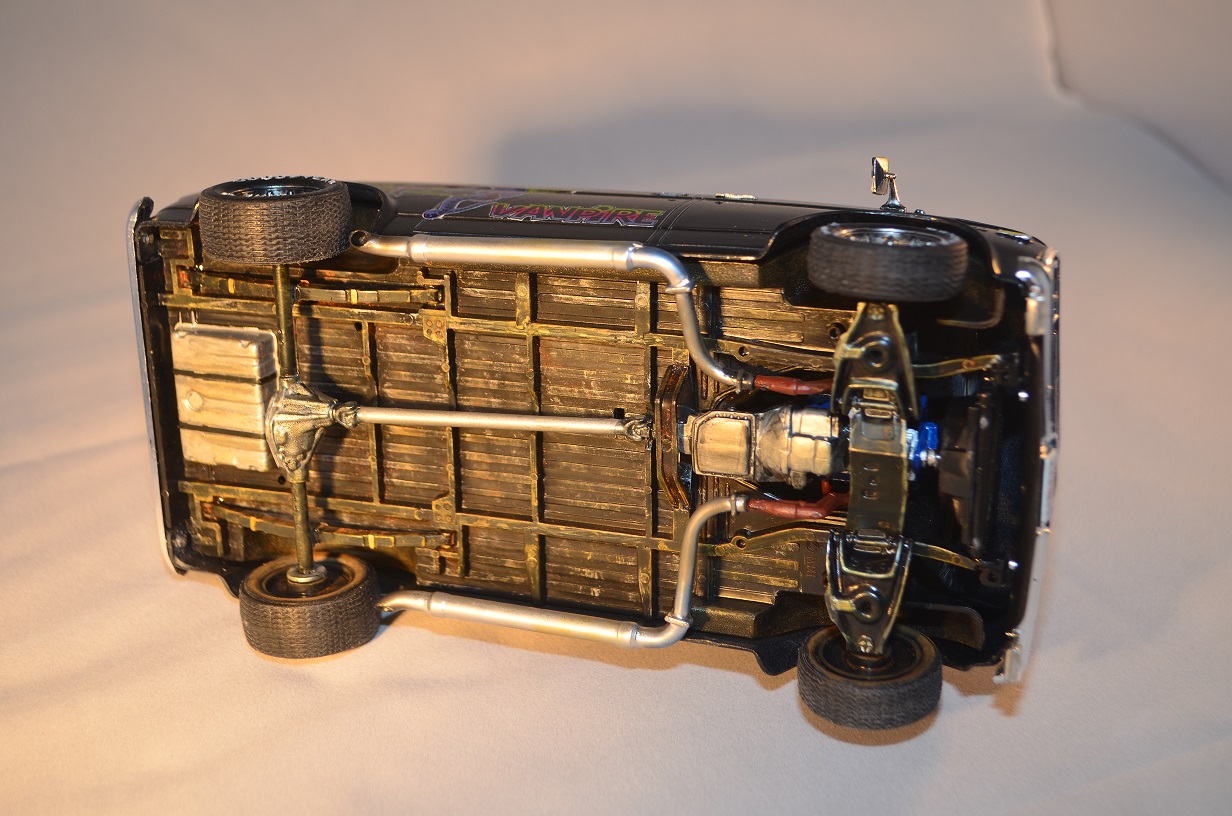
 I've been having so much fun building vans, I dusted off my old Monogram Vanpire that I've had in storage. I couldn't resist since I've always thought the Vanpire decals were cool & a bit frightening as a kid. To be sure, I sprayed them with Testors Decal sealer and they settled down like a charm. I had fun with this build. I cut out the moon roof openings and propped up the moon roofs. I also drilled out all the lightening holes in the steering wheel for accuracy. I mounted and painted the CB radio and 8-Track player. I tried to weather the bottom a little to show some wear. I also toned down the bright shiny chrome rims with Tamiya Smoke. Finally, I printed and attached my own Florida license plates. If you have a Monogram Van kit in your stash, I highly recommend you build it. It goes together so well. BTW, the other Monogram '77 Chevy Street van is exactly the same as this one right down to the extra port holes & optional windows. The only difference is the decal sheet. I hope you enjoy looking at the pictures as much as I had building this gem. Many Thanks!
-
 For this build, I decided to combine the Ford surfer van (graphics) with the Chevy custom van. First off, I like any porthole window in custom vans, but the graphics are so cool that I didn't want to take away from that, so I filled the windows in with some styrene strips and glued them into place. Next, they'll get some putty to smooth them out. Next if you haven't already gone to the dollar store and pick up some of these plastic clothes pins you should. They're great for everything. Strangely, the instruction sheet has a picture of an intake manifold but there is none in the kit. Or valve covers but a shiny chrome air cleaner. No biggie, this is pretty much a curbside kit anyway. Secondly, those 2-piece tires totally suck. I even used some 3M black weather-stripping adhesive and first there is no way to line the 2 halves' up. You just have to wing it. Not cool Revell. Stick with 1-piece tires from now on. This is the 2nd time I glued them together. They fall apart the moment I try to put them onto the socket to spin them to even out the tread. I'll let them set up overnight.
-
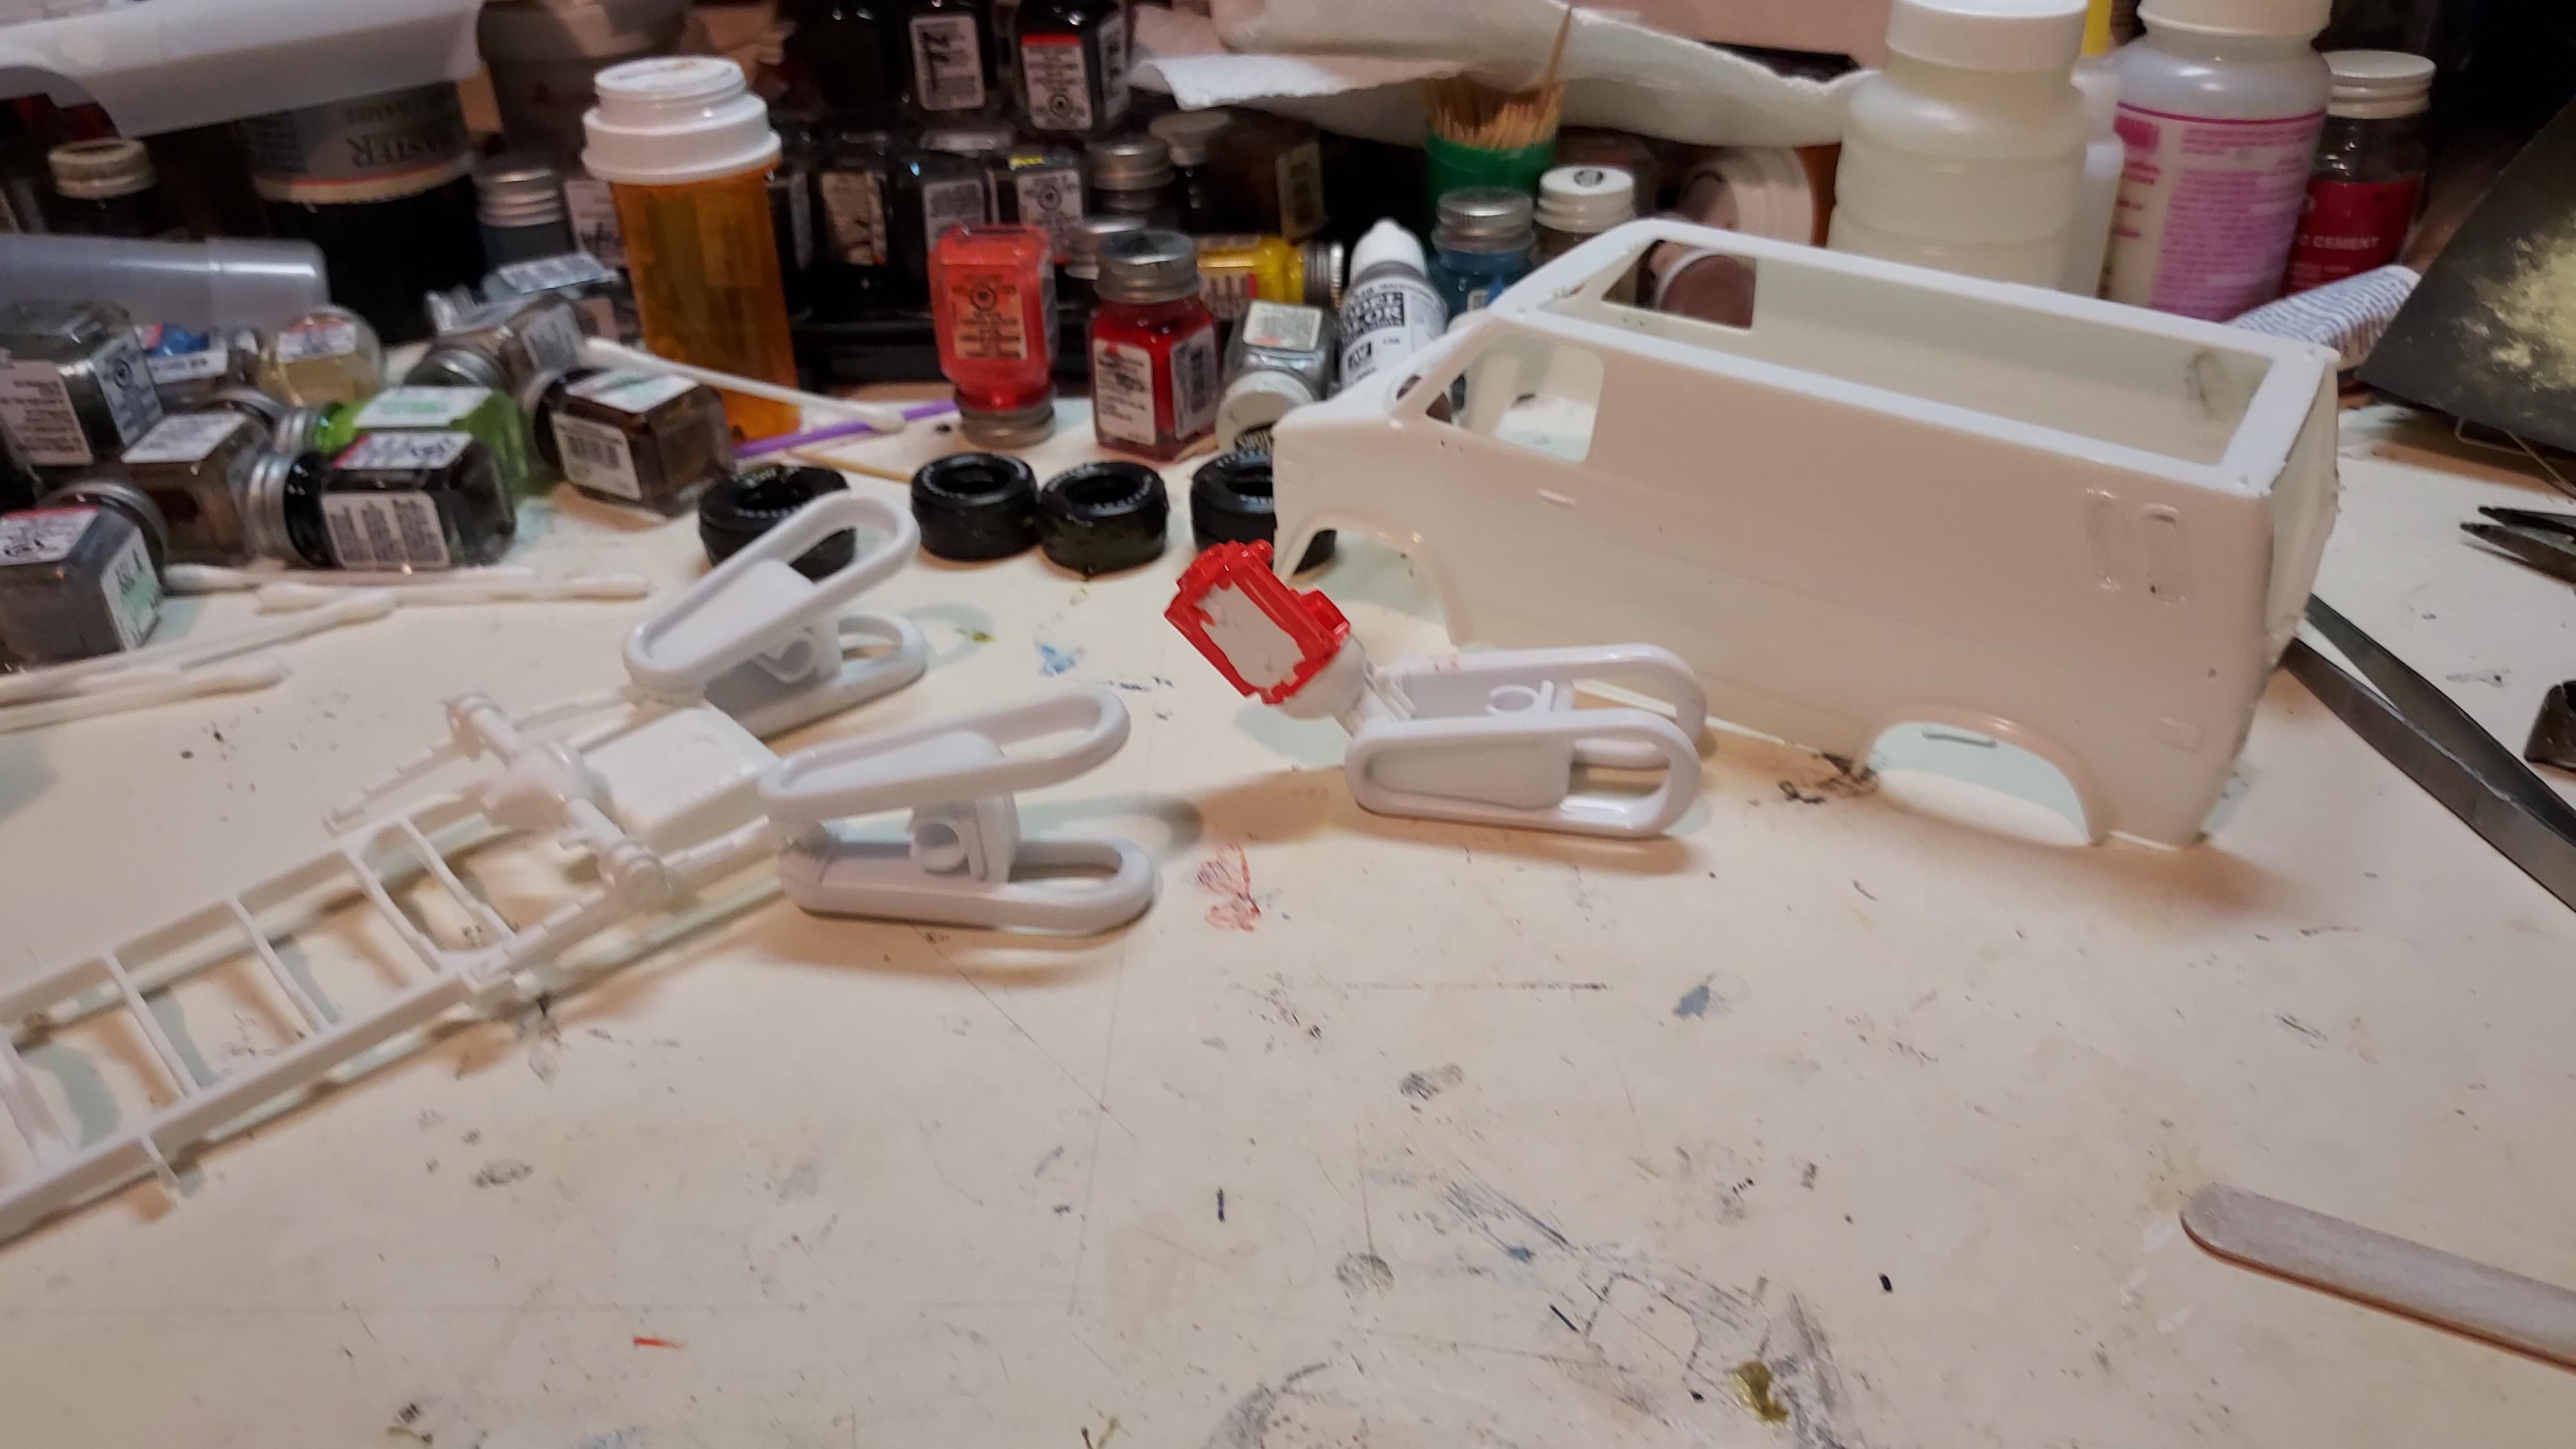
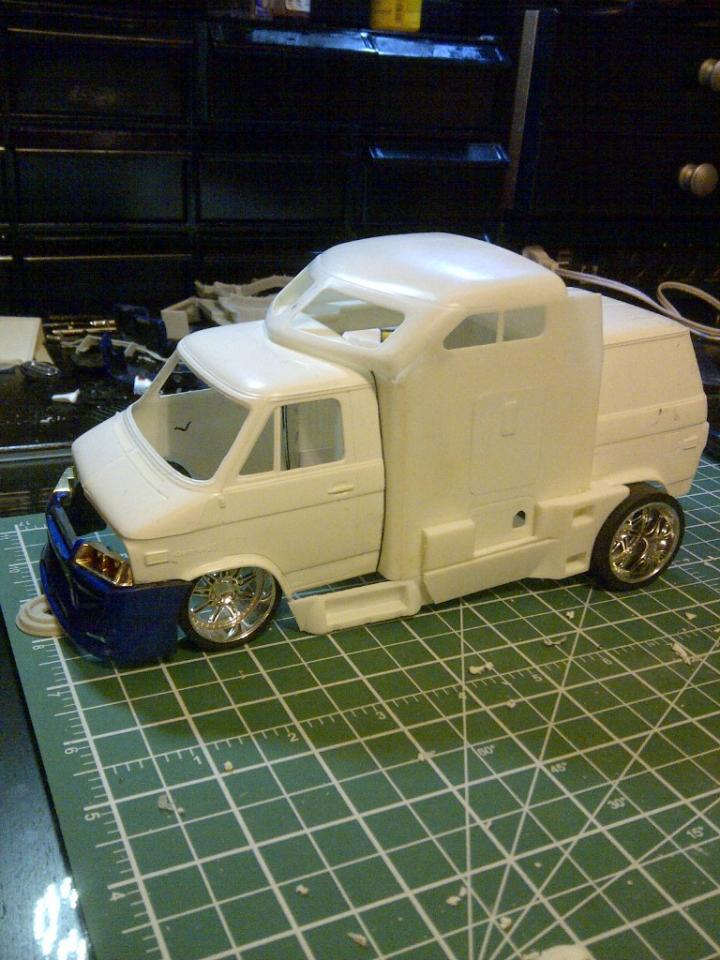
 I have already apologized to Can-Con, Steve, for starting a build thread of the same kit he is building. Mine will be a quick build without much in the way of detailing. It is being built for a Halloween themed FB group. I started it around the end of Sept. and need to have it finished by Oct. 31st. It is not intended to be anything more than a shelf model. It is not intended to be a contest quality build. I have cut a lot of corners on this one...lol. It is refreshing to build a model and not sweat the little details. Here is what I am starting with. Here are the kit contents. I started with cleaning up the body. I removed most of the molded on features. This includes FORD and Econoline emblems, door locks, etc. The drip rail on my copy was horrible. It was uneven and dented. There was no way to paint and polish this area. It had to go. First step in removing the drip rail. Wanting to keep damage to a minimum in case I slipped with the chisel, I taped off the body. Progress! Check out the mold lines down the corner and the flash in the windows! I use a chisel made by Trumpeter. These things are amazing. It is easy to remove too much plastic and to gouge the surrounding area. You really have to be careful. I decided early that I was not going to detail the engine so I also decided to glue the hood on. At this point the body is pretty much ready to go. I rescribed the panel lines and I scribed around the windshield. This gives a nice little trough for the scalpel blade to follow when applying BMF.
 -
Here is my 2021 Halloween themed group build. I have always wanted to build this kit. It is a simple, low detailed, shelf model. I do realize that the driver's sided tires have the tread facing the wrong direction. I will have to fix that. If you would like to see the WIP here is a link: On to the pics.
-
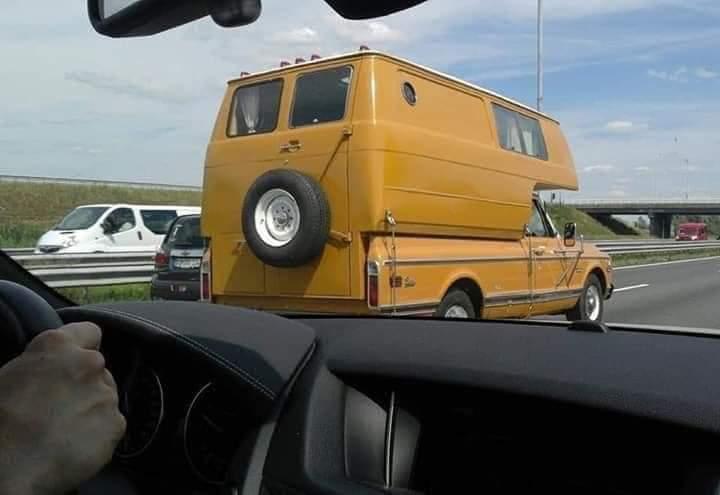
 1964 Ford Snow Cat Van - For Sale Having the right vehicle makes all the difference in the world in wintery conditions, and you would be very, very hard-pressed to find a better one than this 1964 Ford Falcon Club Wagon. Actually, to be honest, it’s a mashup between the Ford van and a 1974 Snowcat, hence the tracks, and it’s done just as we like. The van body is in beautiful shape and the 302/C6 automatic powertrain is intact. ... Is there a Snowcat model?
 -
 From Facebook...
-
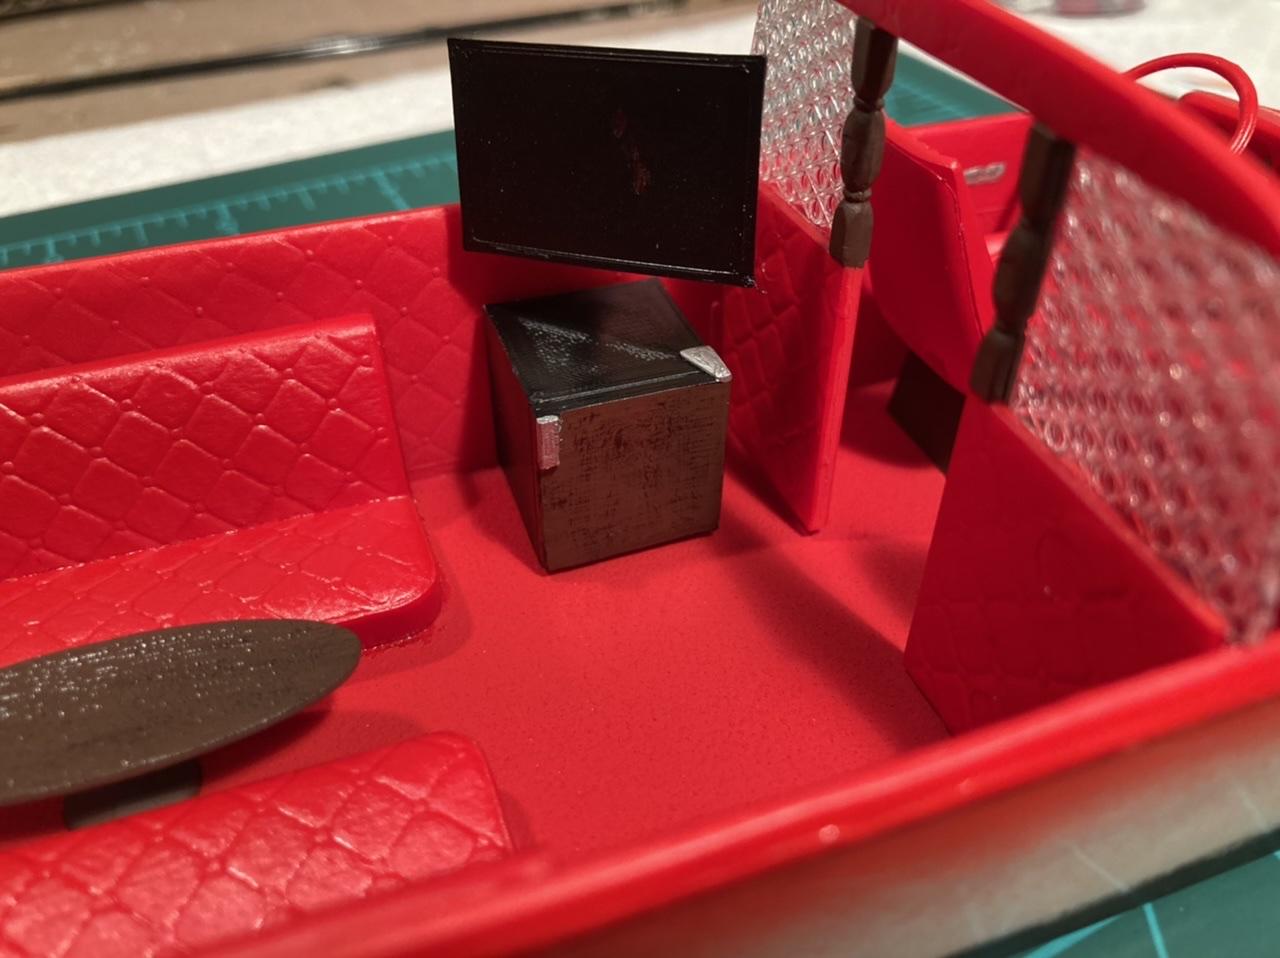
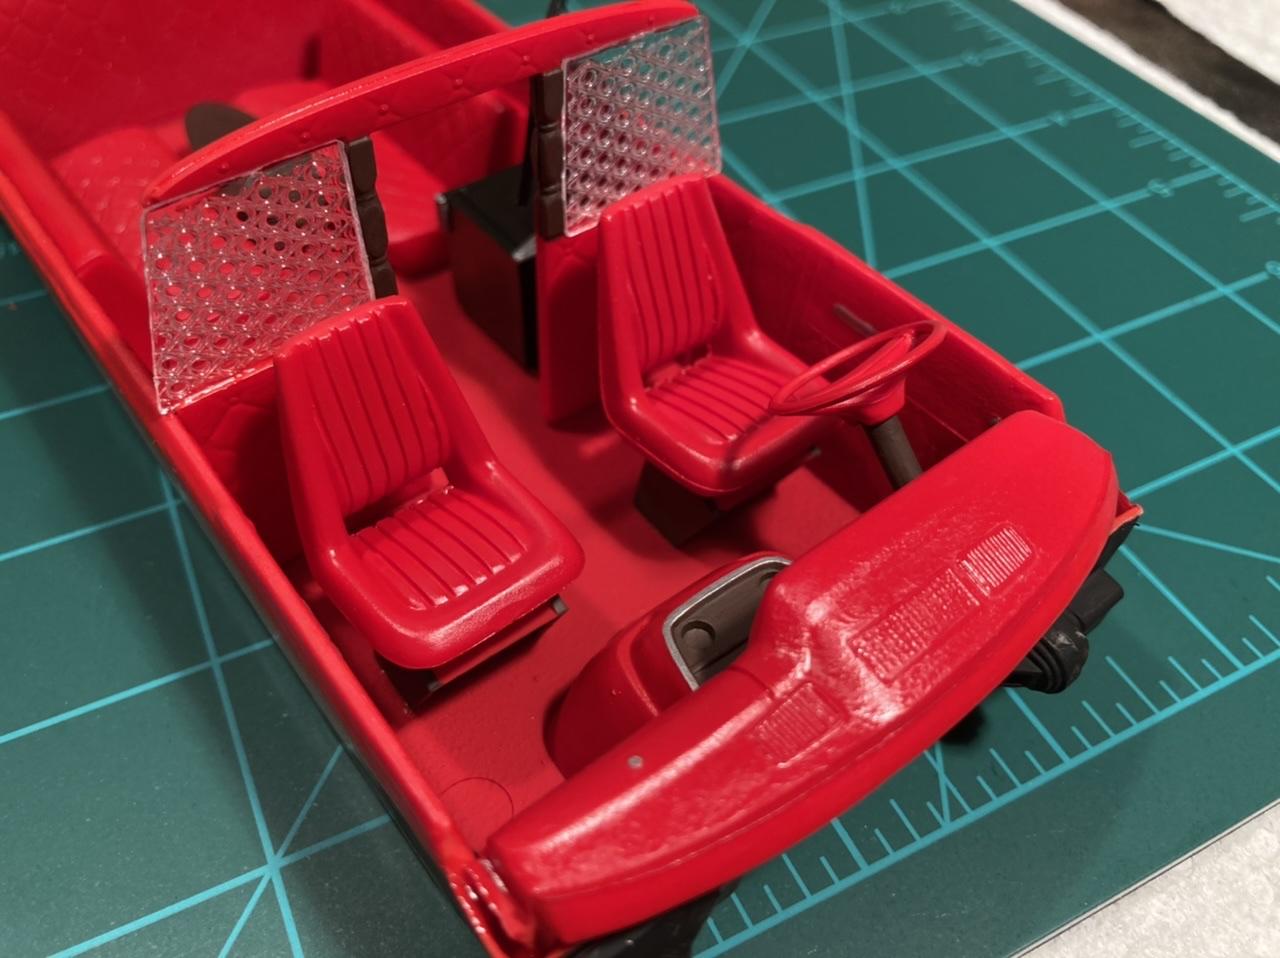
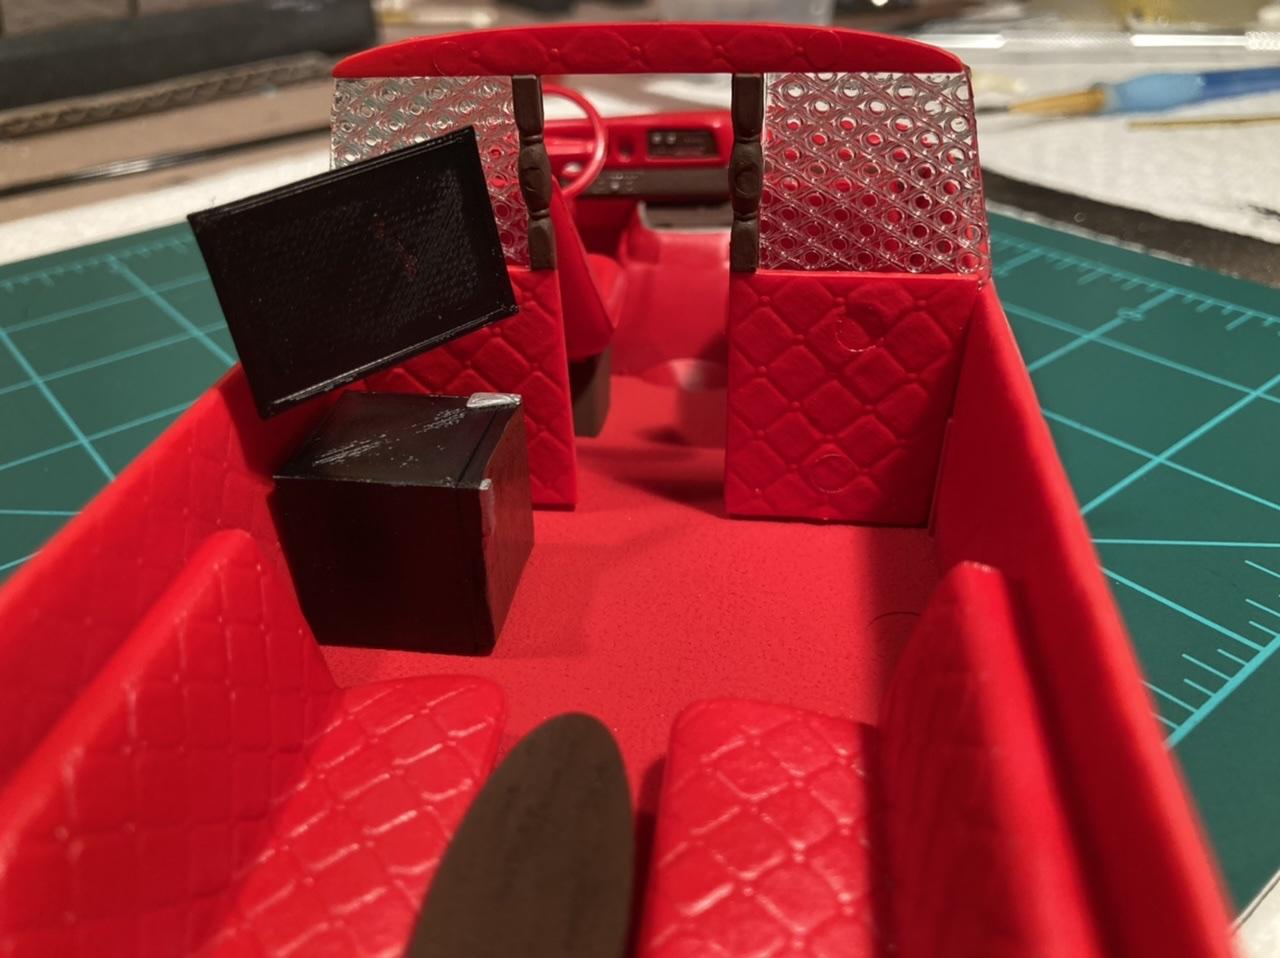
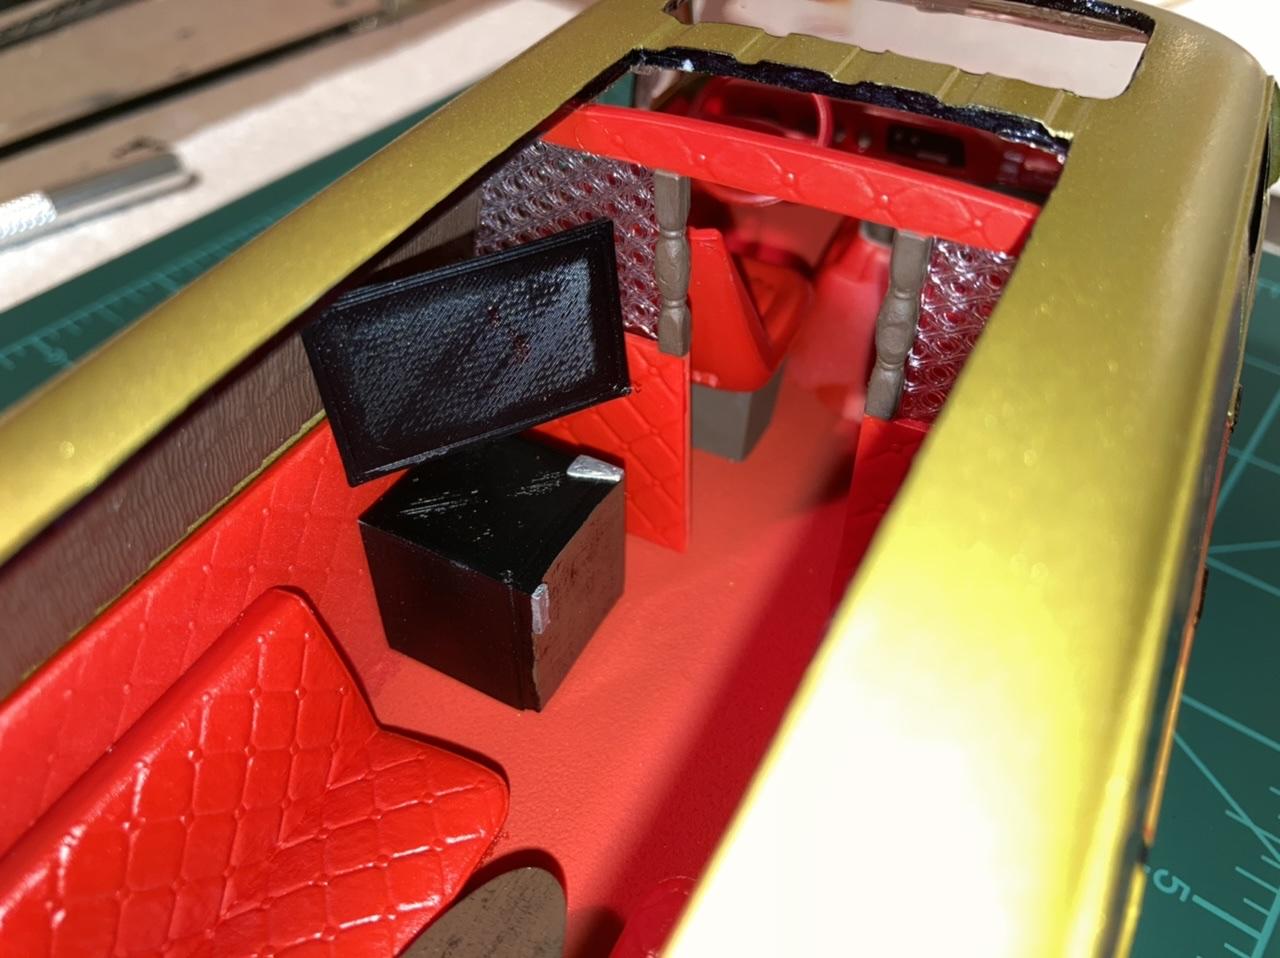
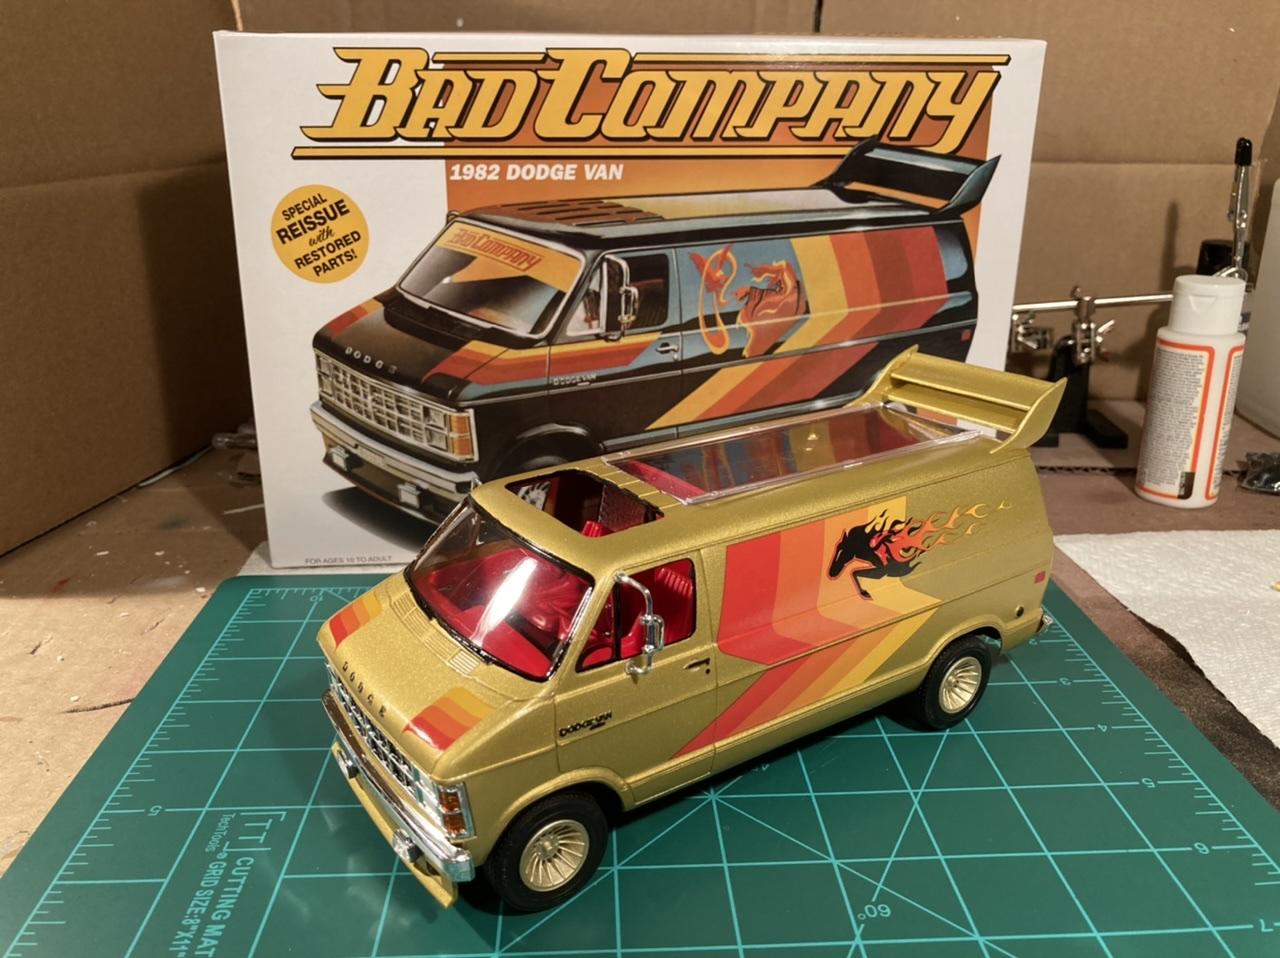
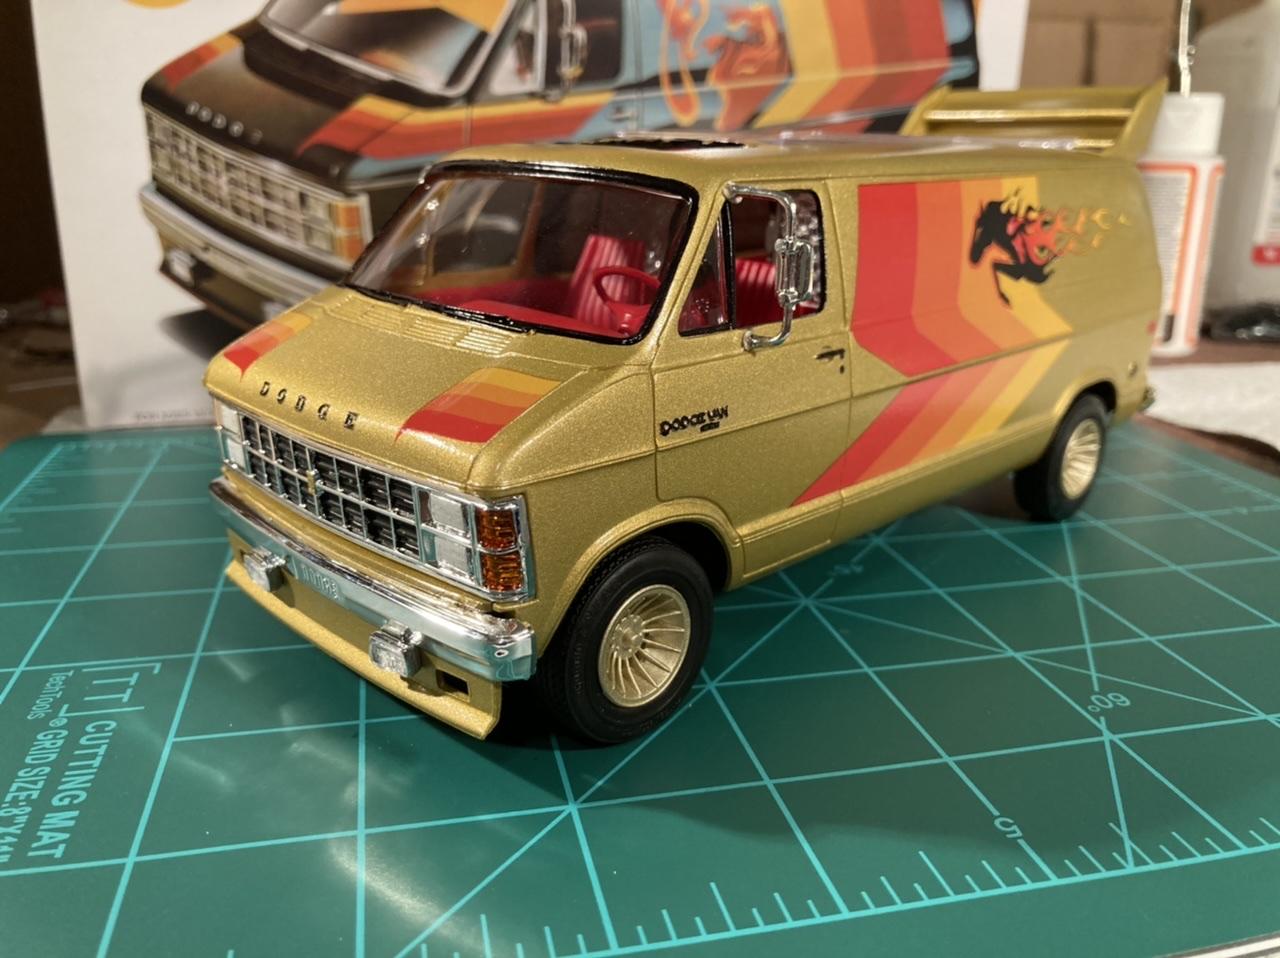
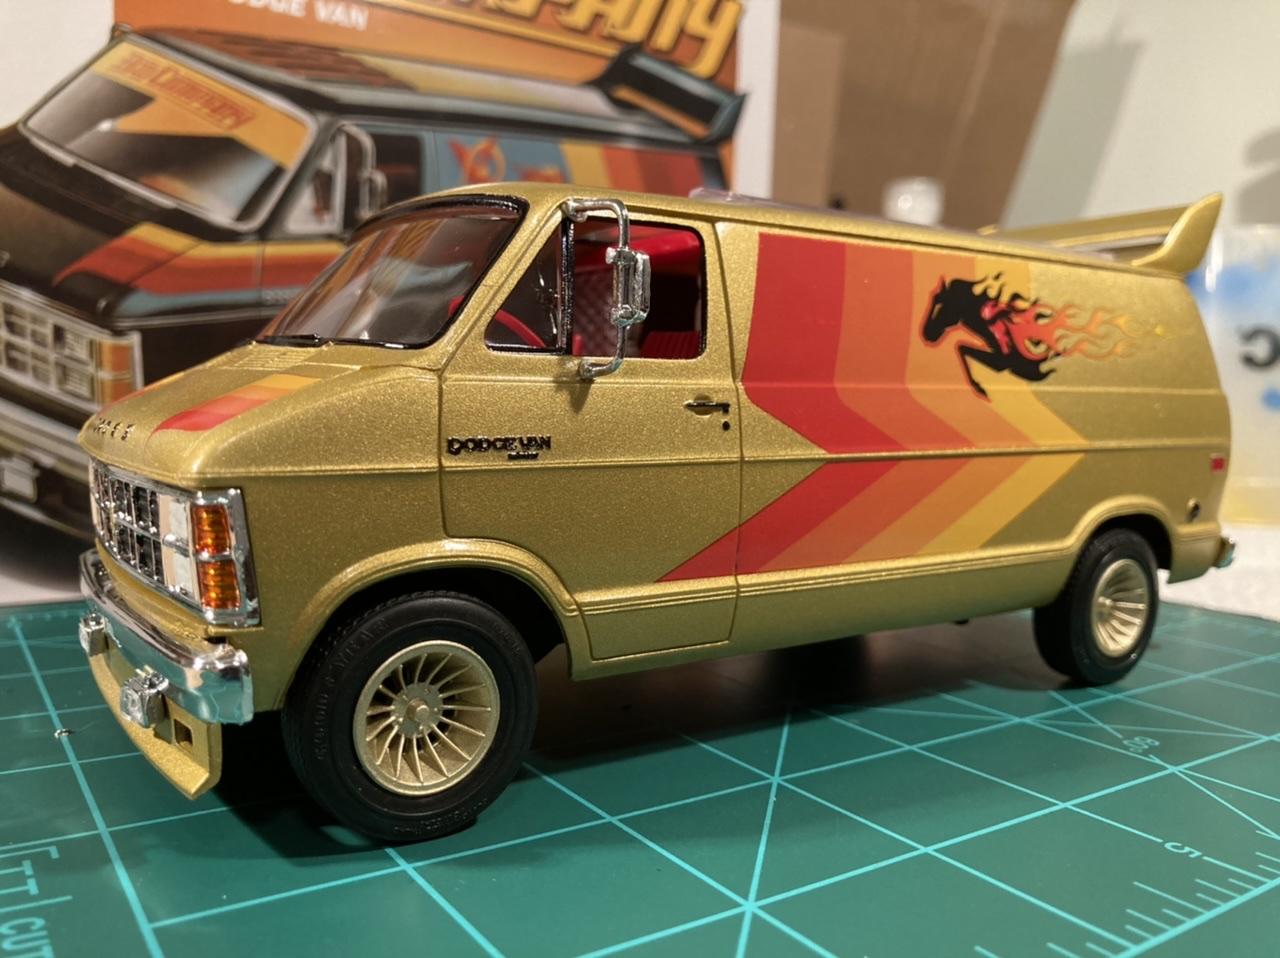
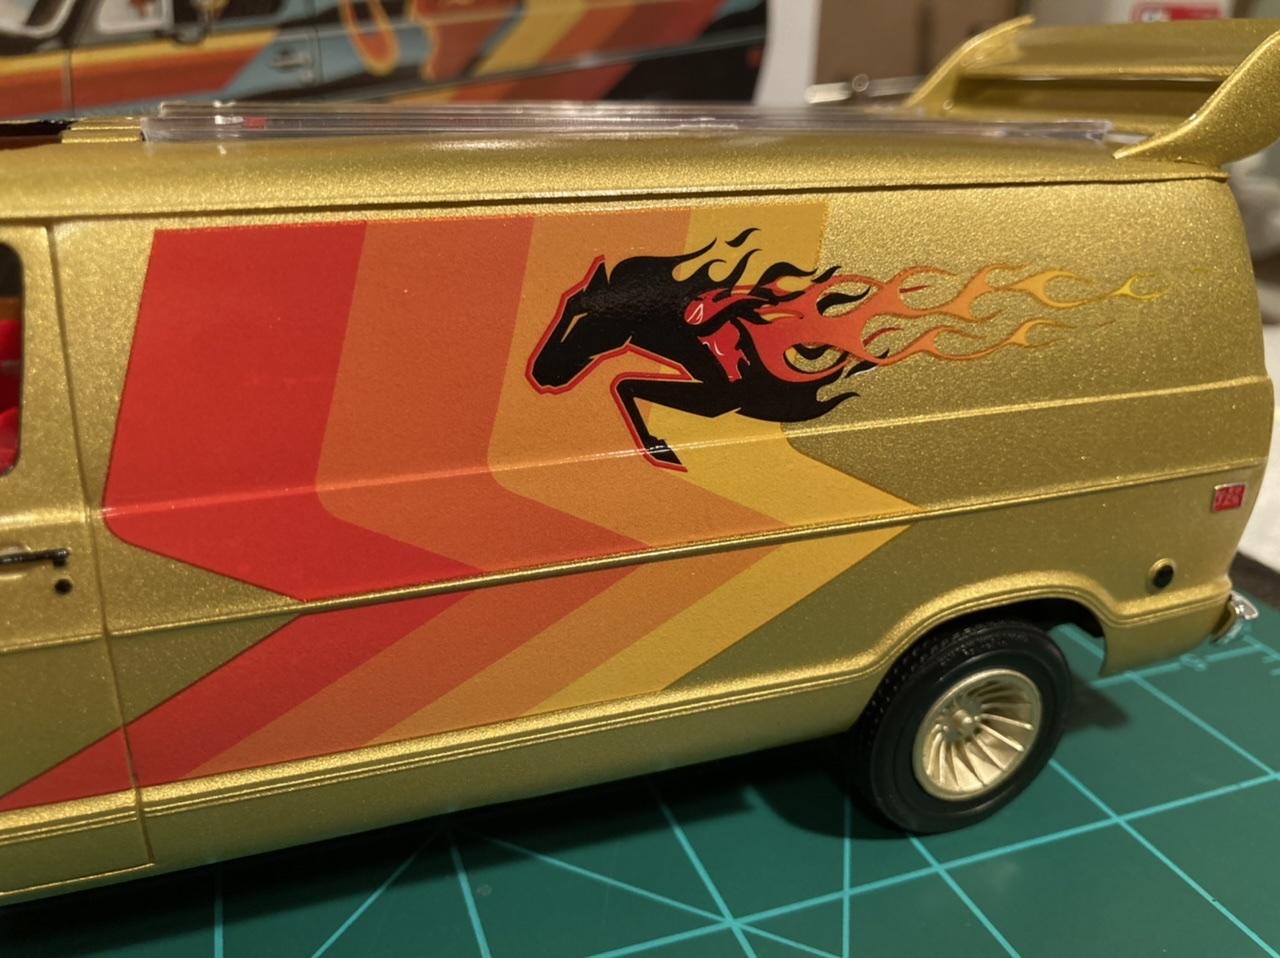
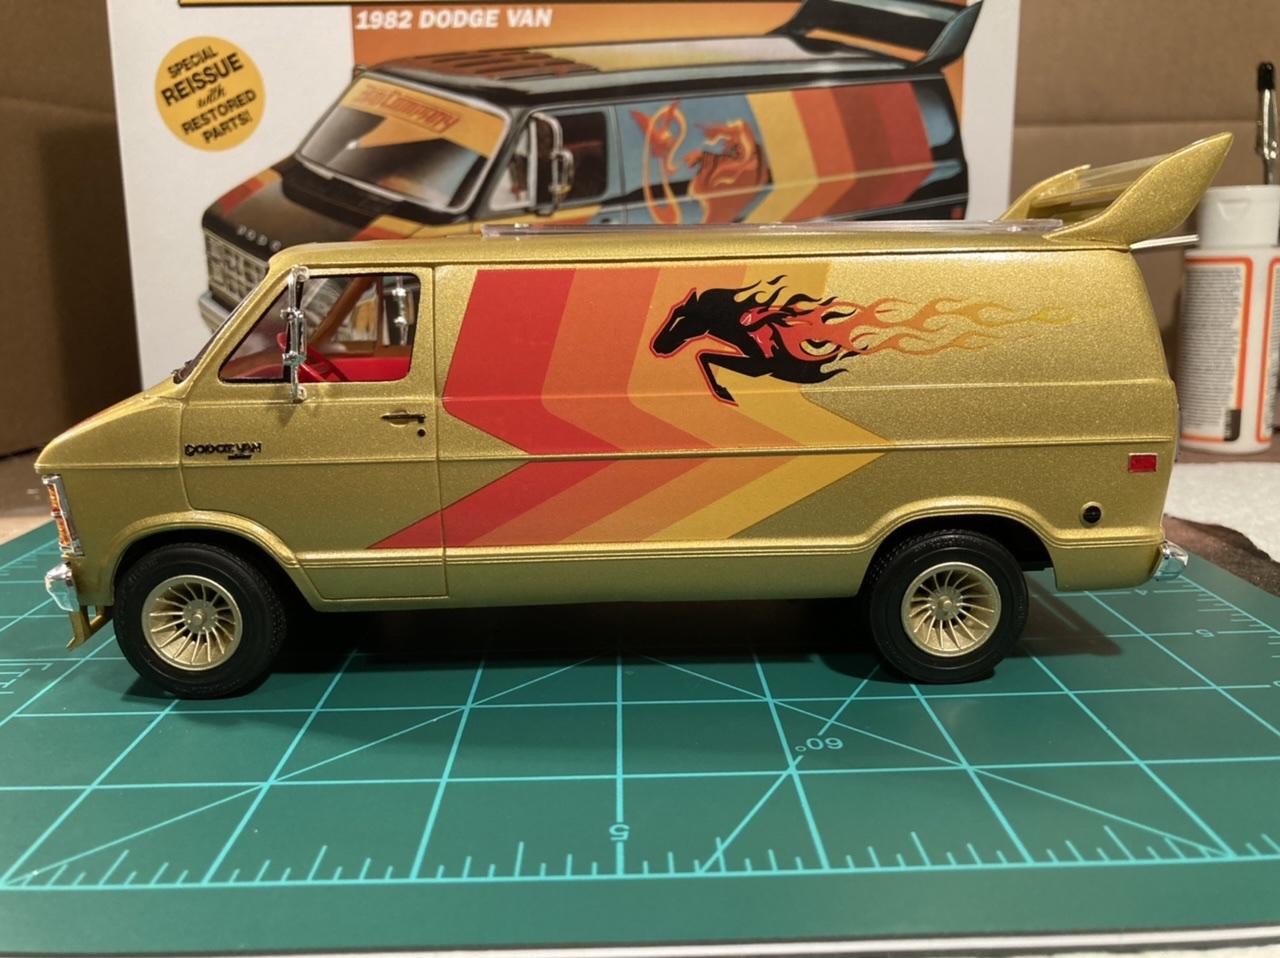
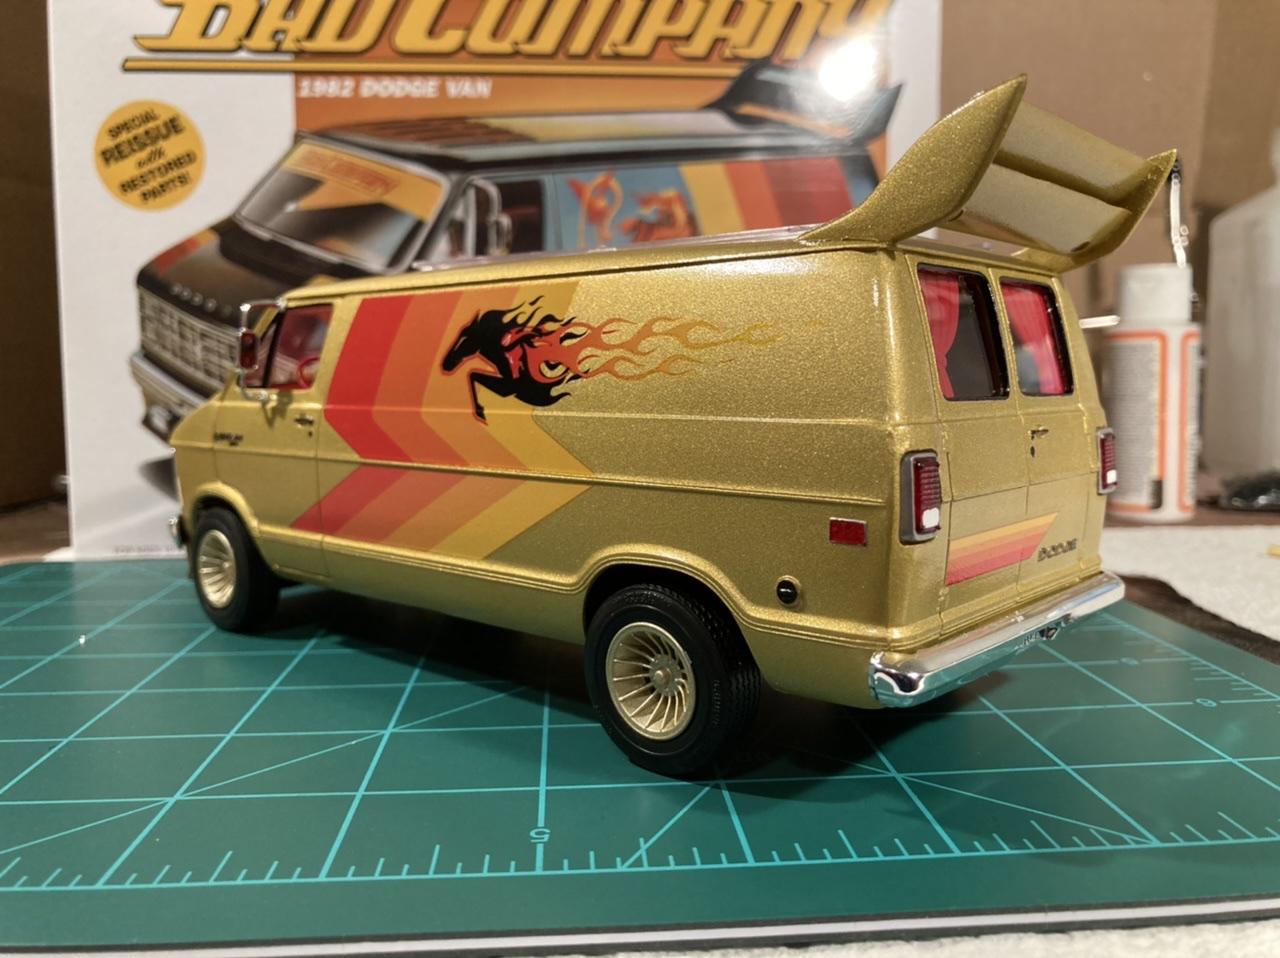
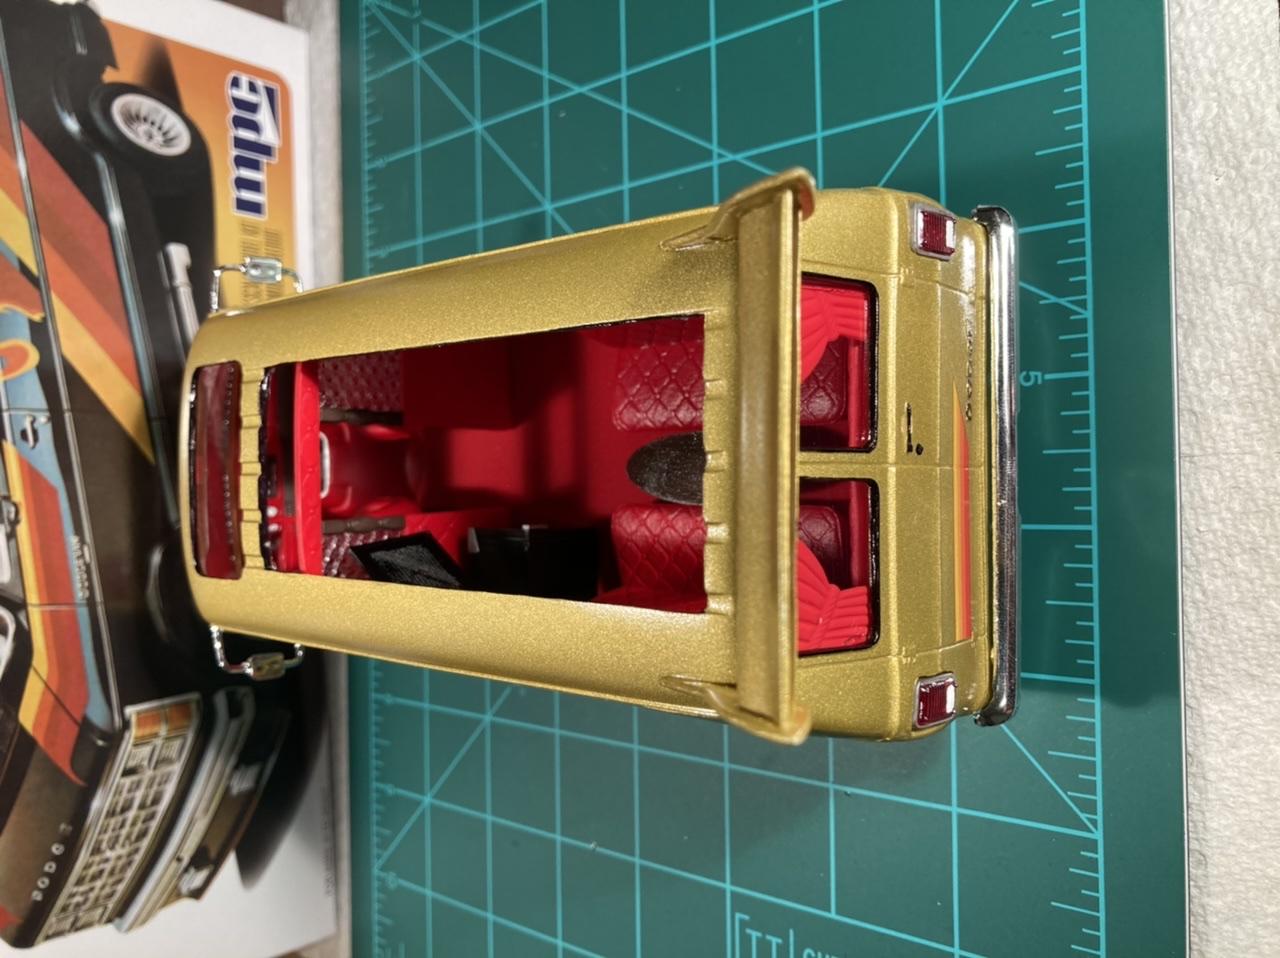
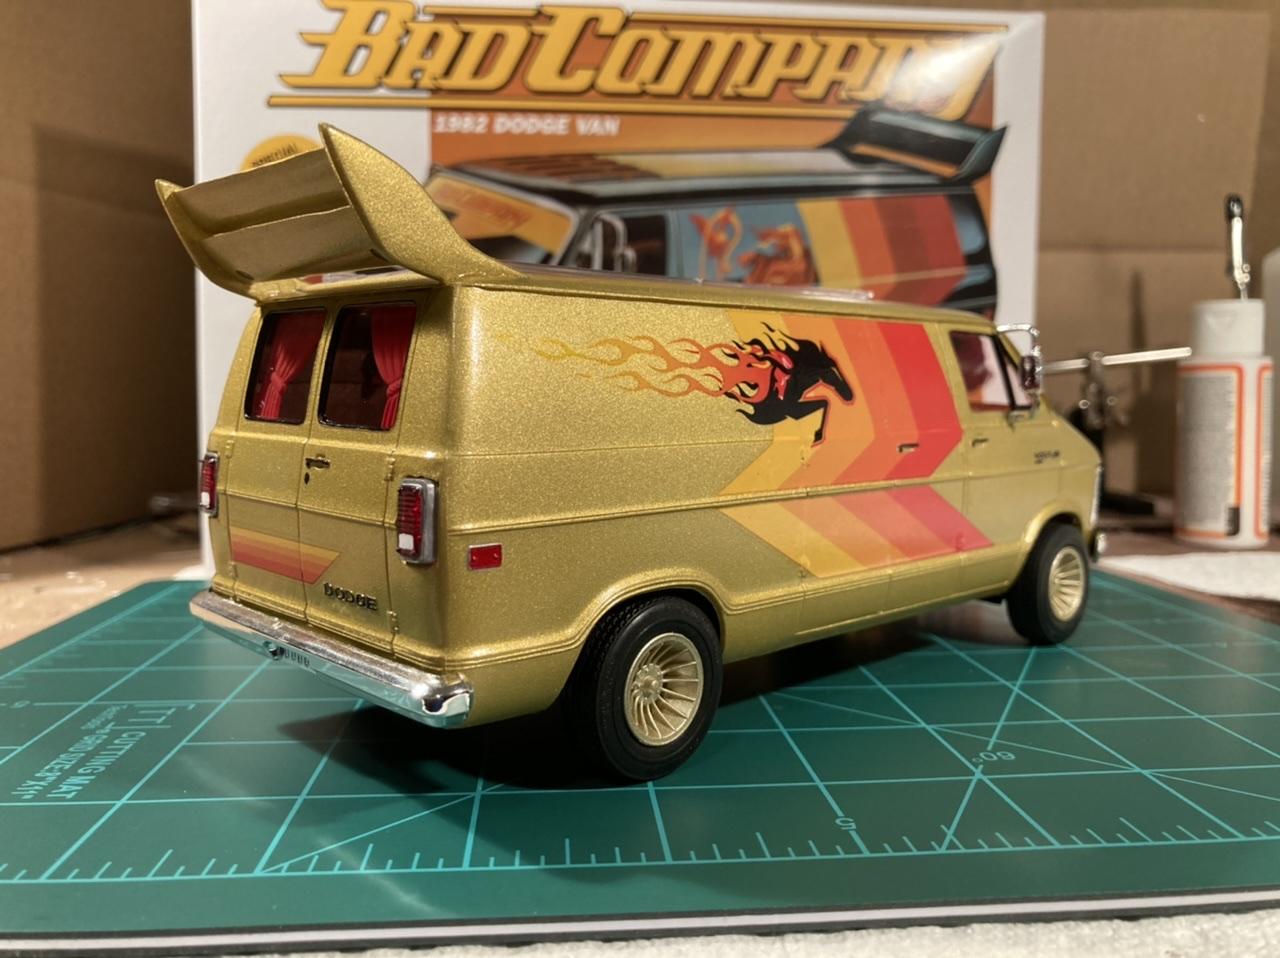
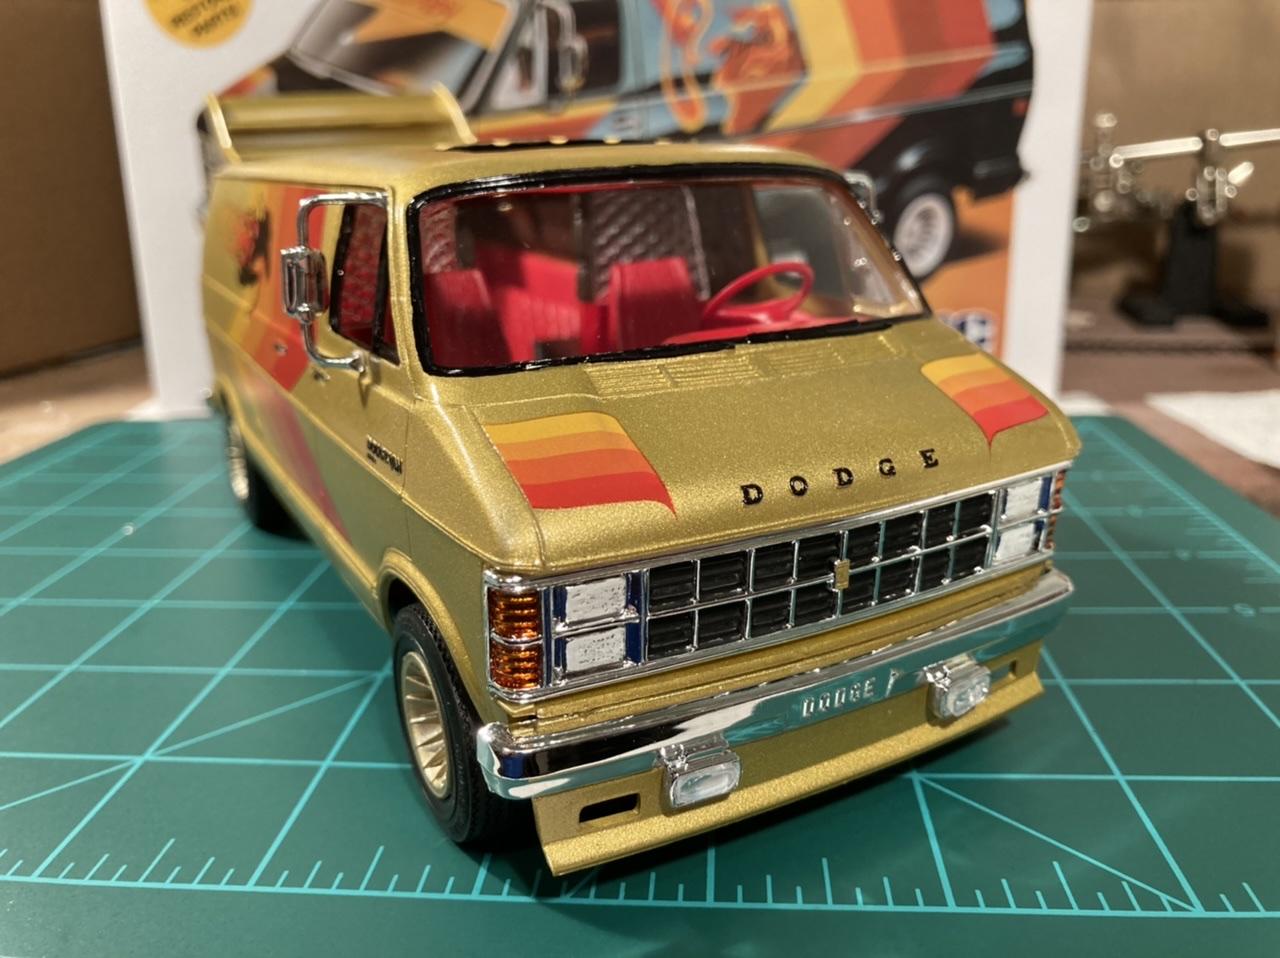
 Here is my ‘82 custom Dodge Van! It’s the re-released “Bad Company” kit from MPC, with my own mix on the decals. The black flaming horse decals came from the MPC Pinto Pony Express re-issue, and the sunset flaming horse came from the recent release AMT ‘66 Mustang coupe kit. I thought the wizard decals in the kit looked goofy so I swapped in those horse flame decals. I think they look like they belong together! I painted the body in Tamiya X-12 Gold Leaf, and the interior in XF-7 flat red, with Future on the seats, dash and walls. This was my first time using Future floor polish and I am definitely a convert! The body paint really pops with three thin coats of future. FYI, it’s now called “Pledge Revive It Floor Gloss Original” - it took me a while to find the current name and I had to order it from Amazon. The interior is mostly box stock, but I added a simple mini fridge and 32” flat screen tv that I modeled up in CAD and had my brother 3D print for me. The TV wall mount is just a cut piece of scrap sprue. Overall this kit went together pretty well, but it took some finessing to get the interior tub and chassis to seat properly in the body. The large glass roof panel is definitely supposed to be glued in from the inside, but it then won’t fit with the cab partition panel in place. I left it removable and just set it in from the outside. I wanted to use the chrome side exit exhaust pipes, but there doesn’t seem to be a way to actually attach them to the body or frame without doing custom fab. I didn’t realize this until final assembly so I won’t bother adding an exhaust. This kit’s eye candy is up top anyway, no one is ever going to look underneath! I probably should have left the engine out too since you can’t really see it. This is definitely the wildest looking kit I’ve ever done, and I had a blast doing it. I grew up well after the custom van scene died out, but it definitely needs to make a comeback!
-
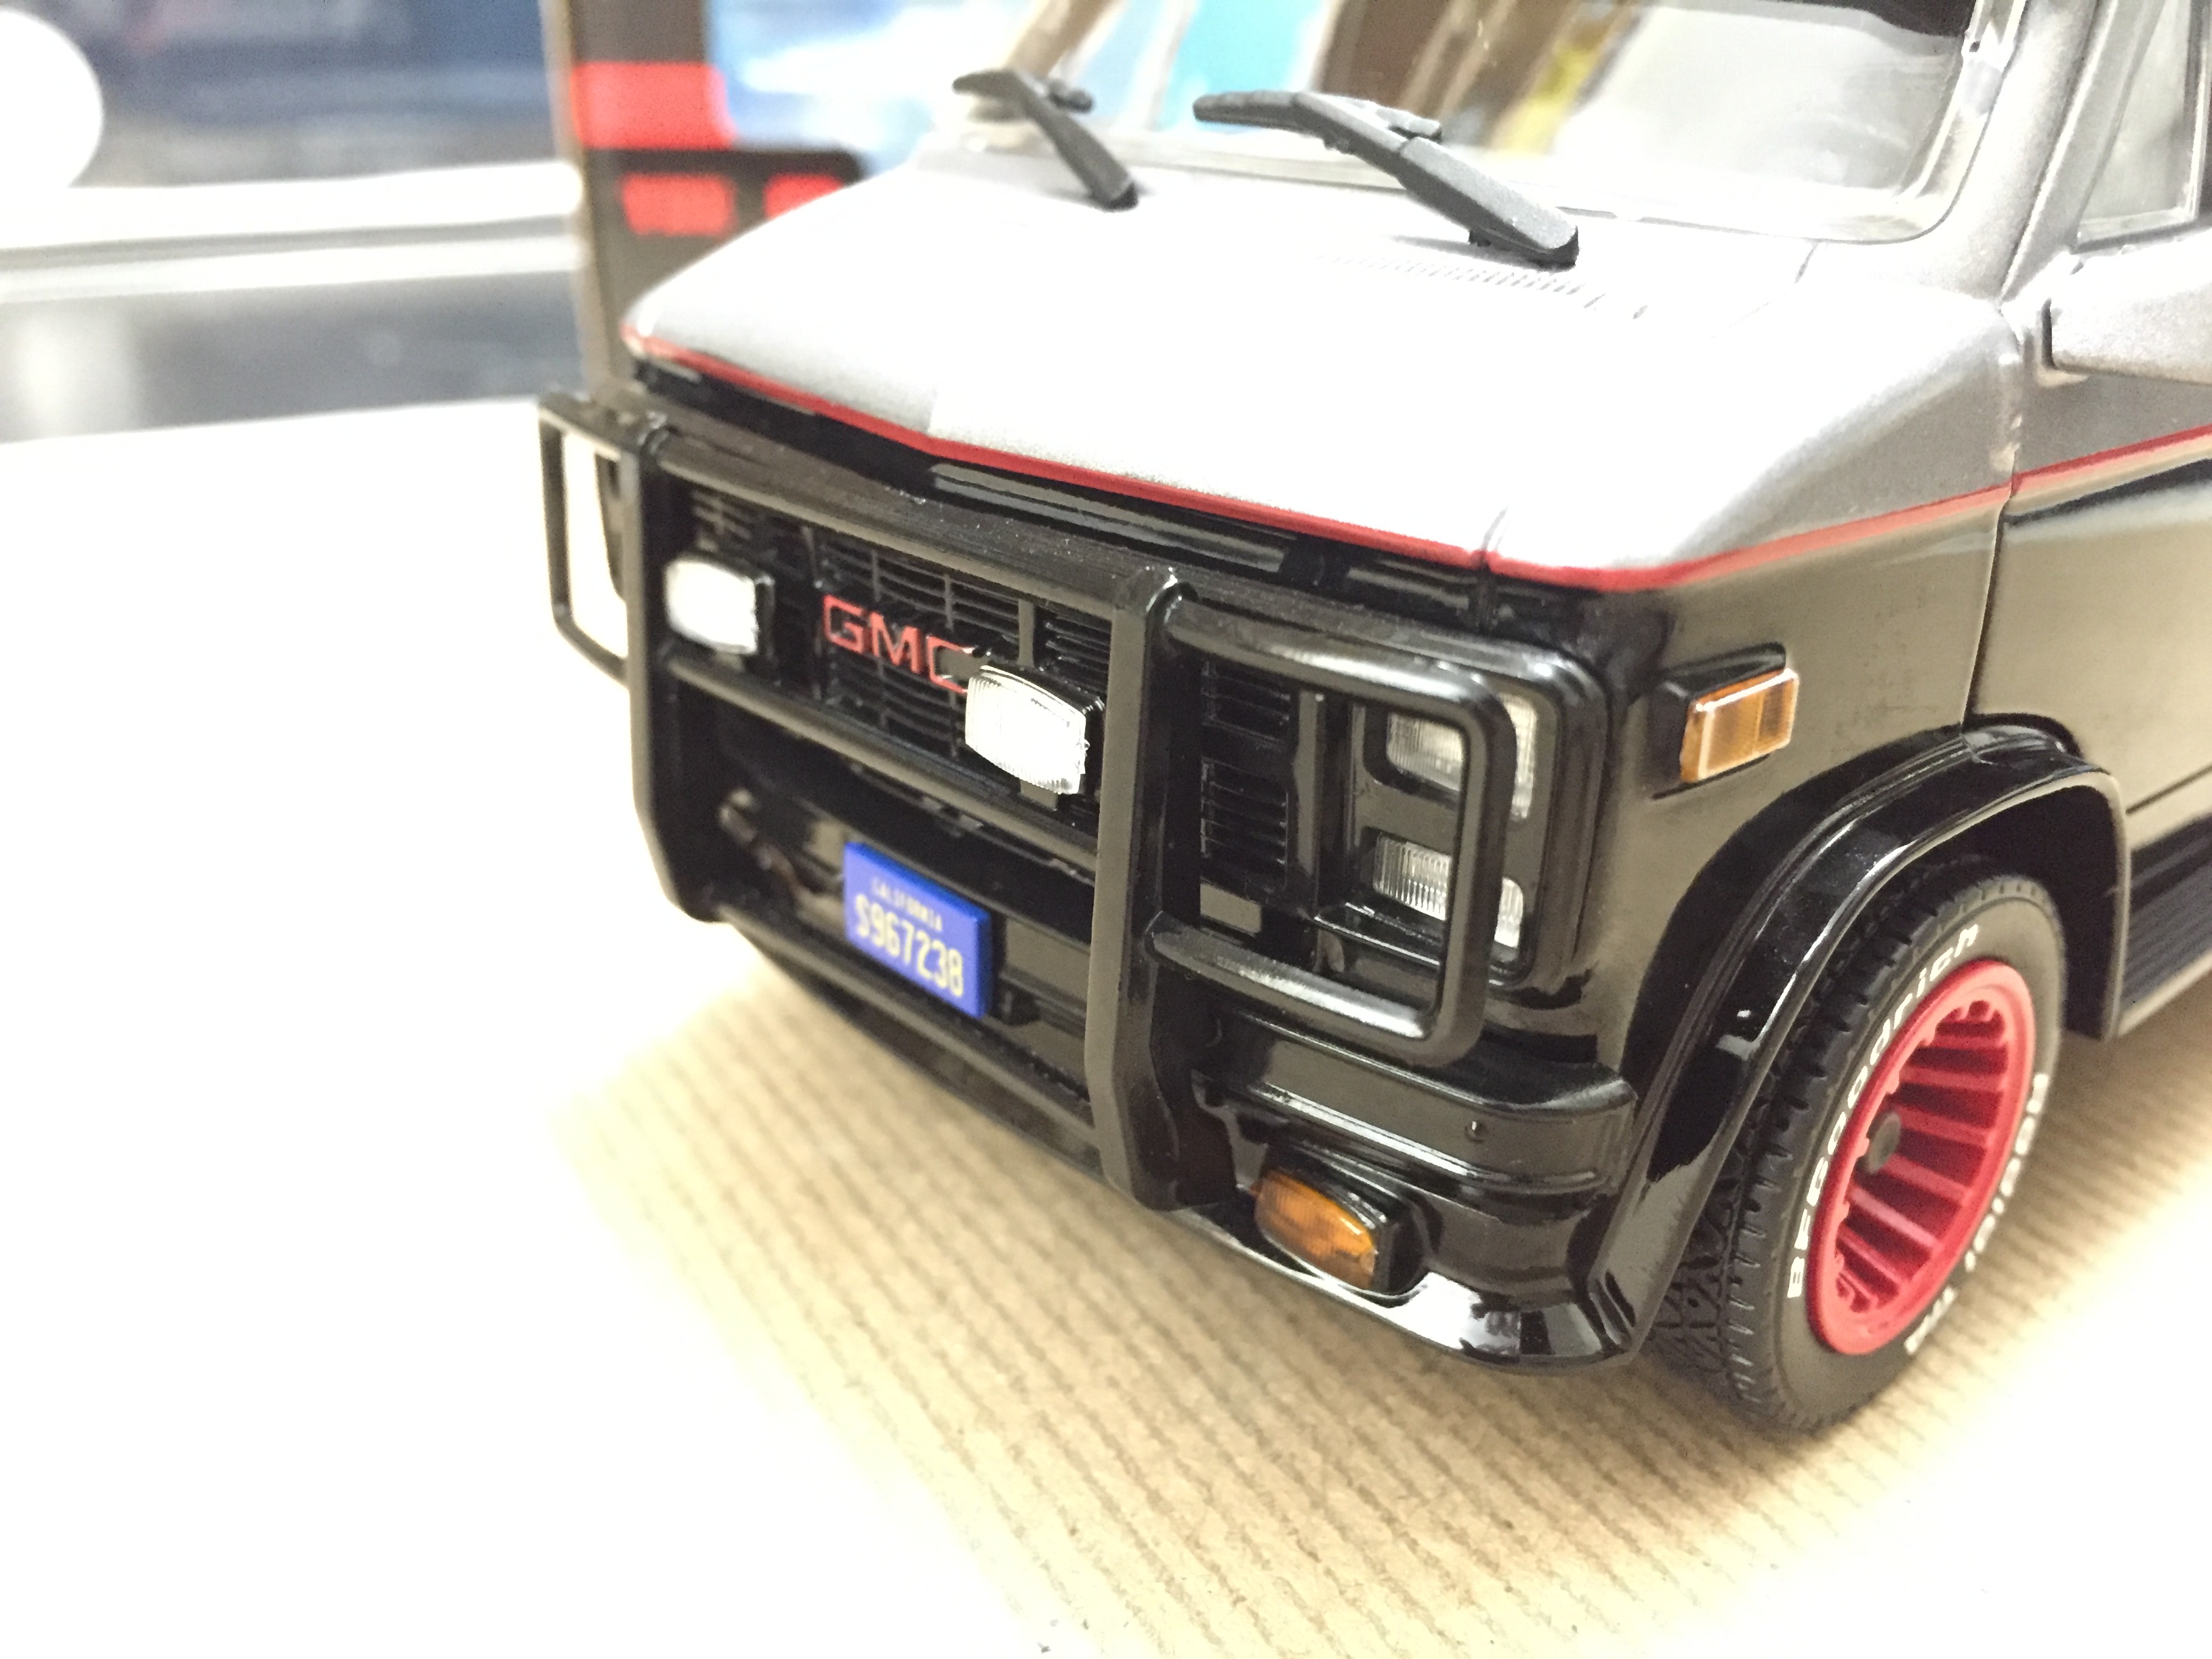
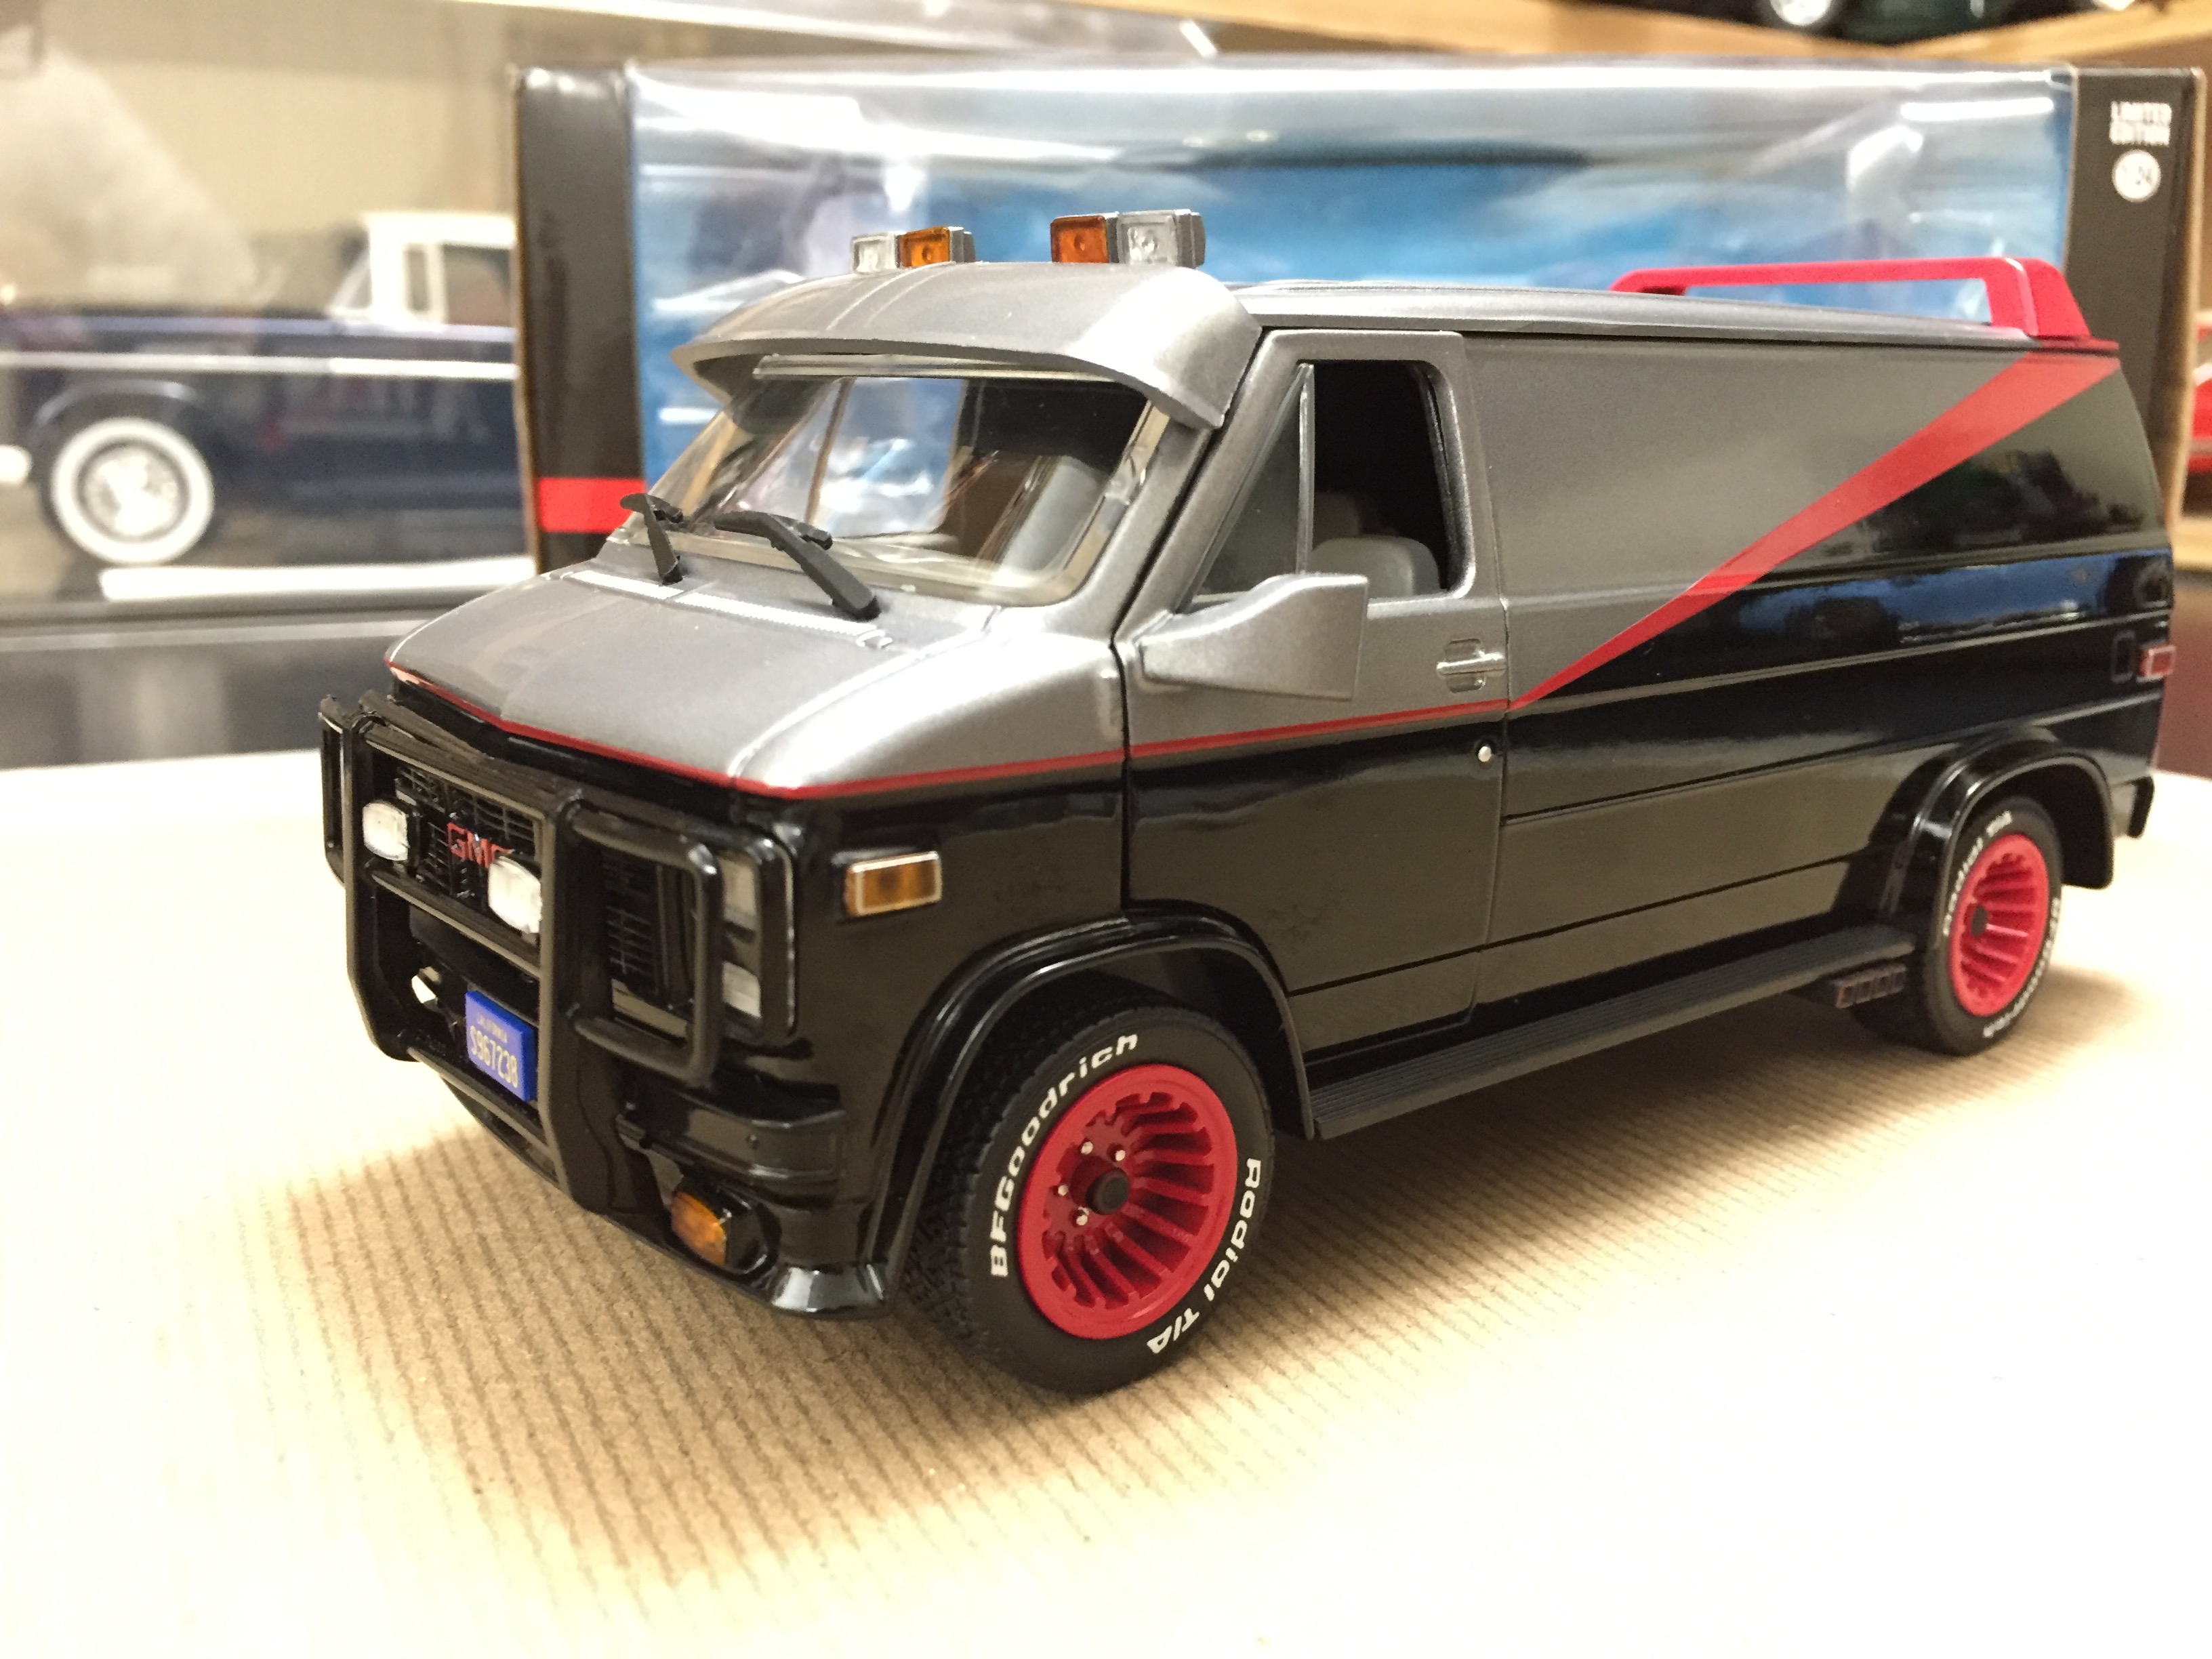
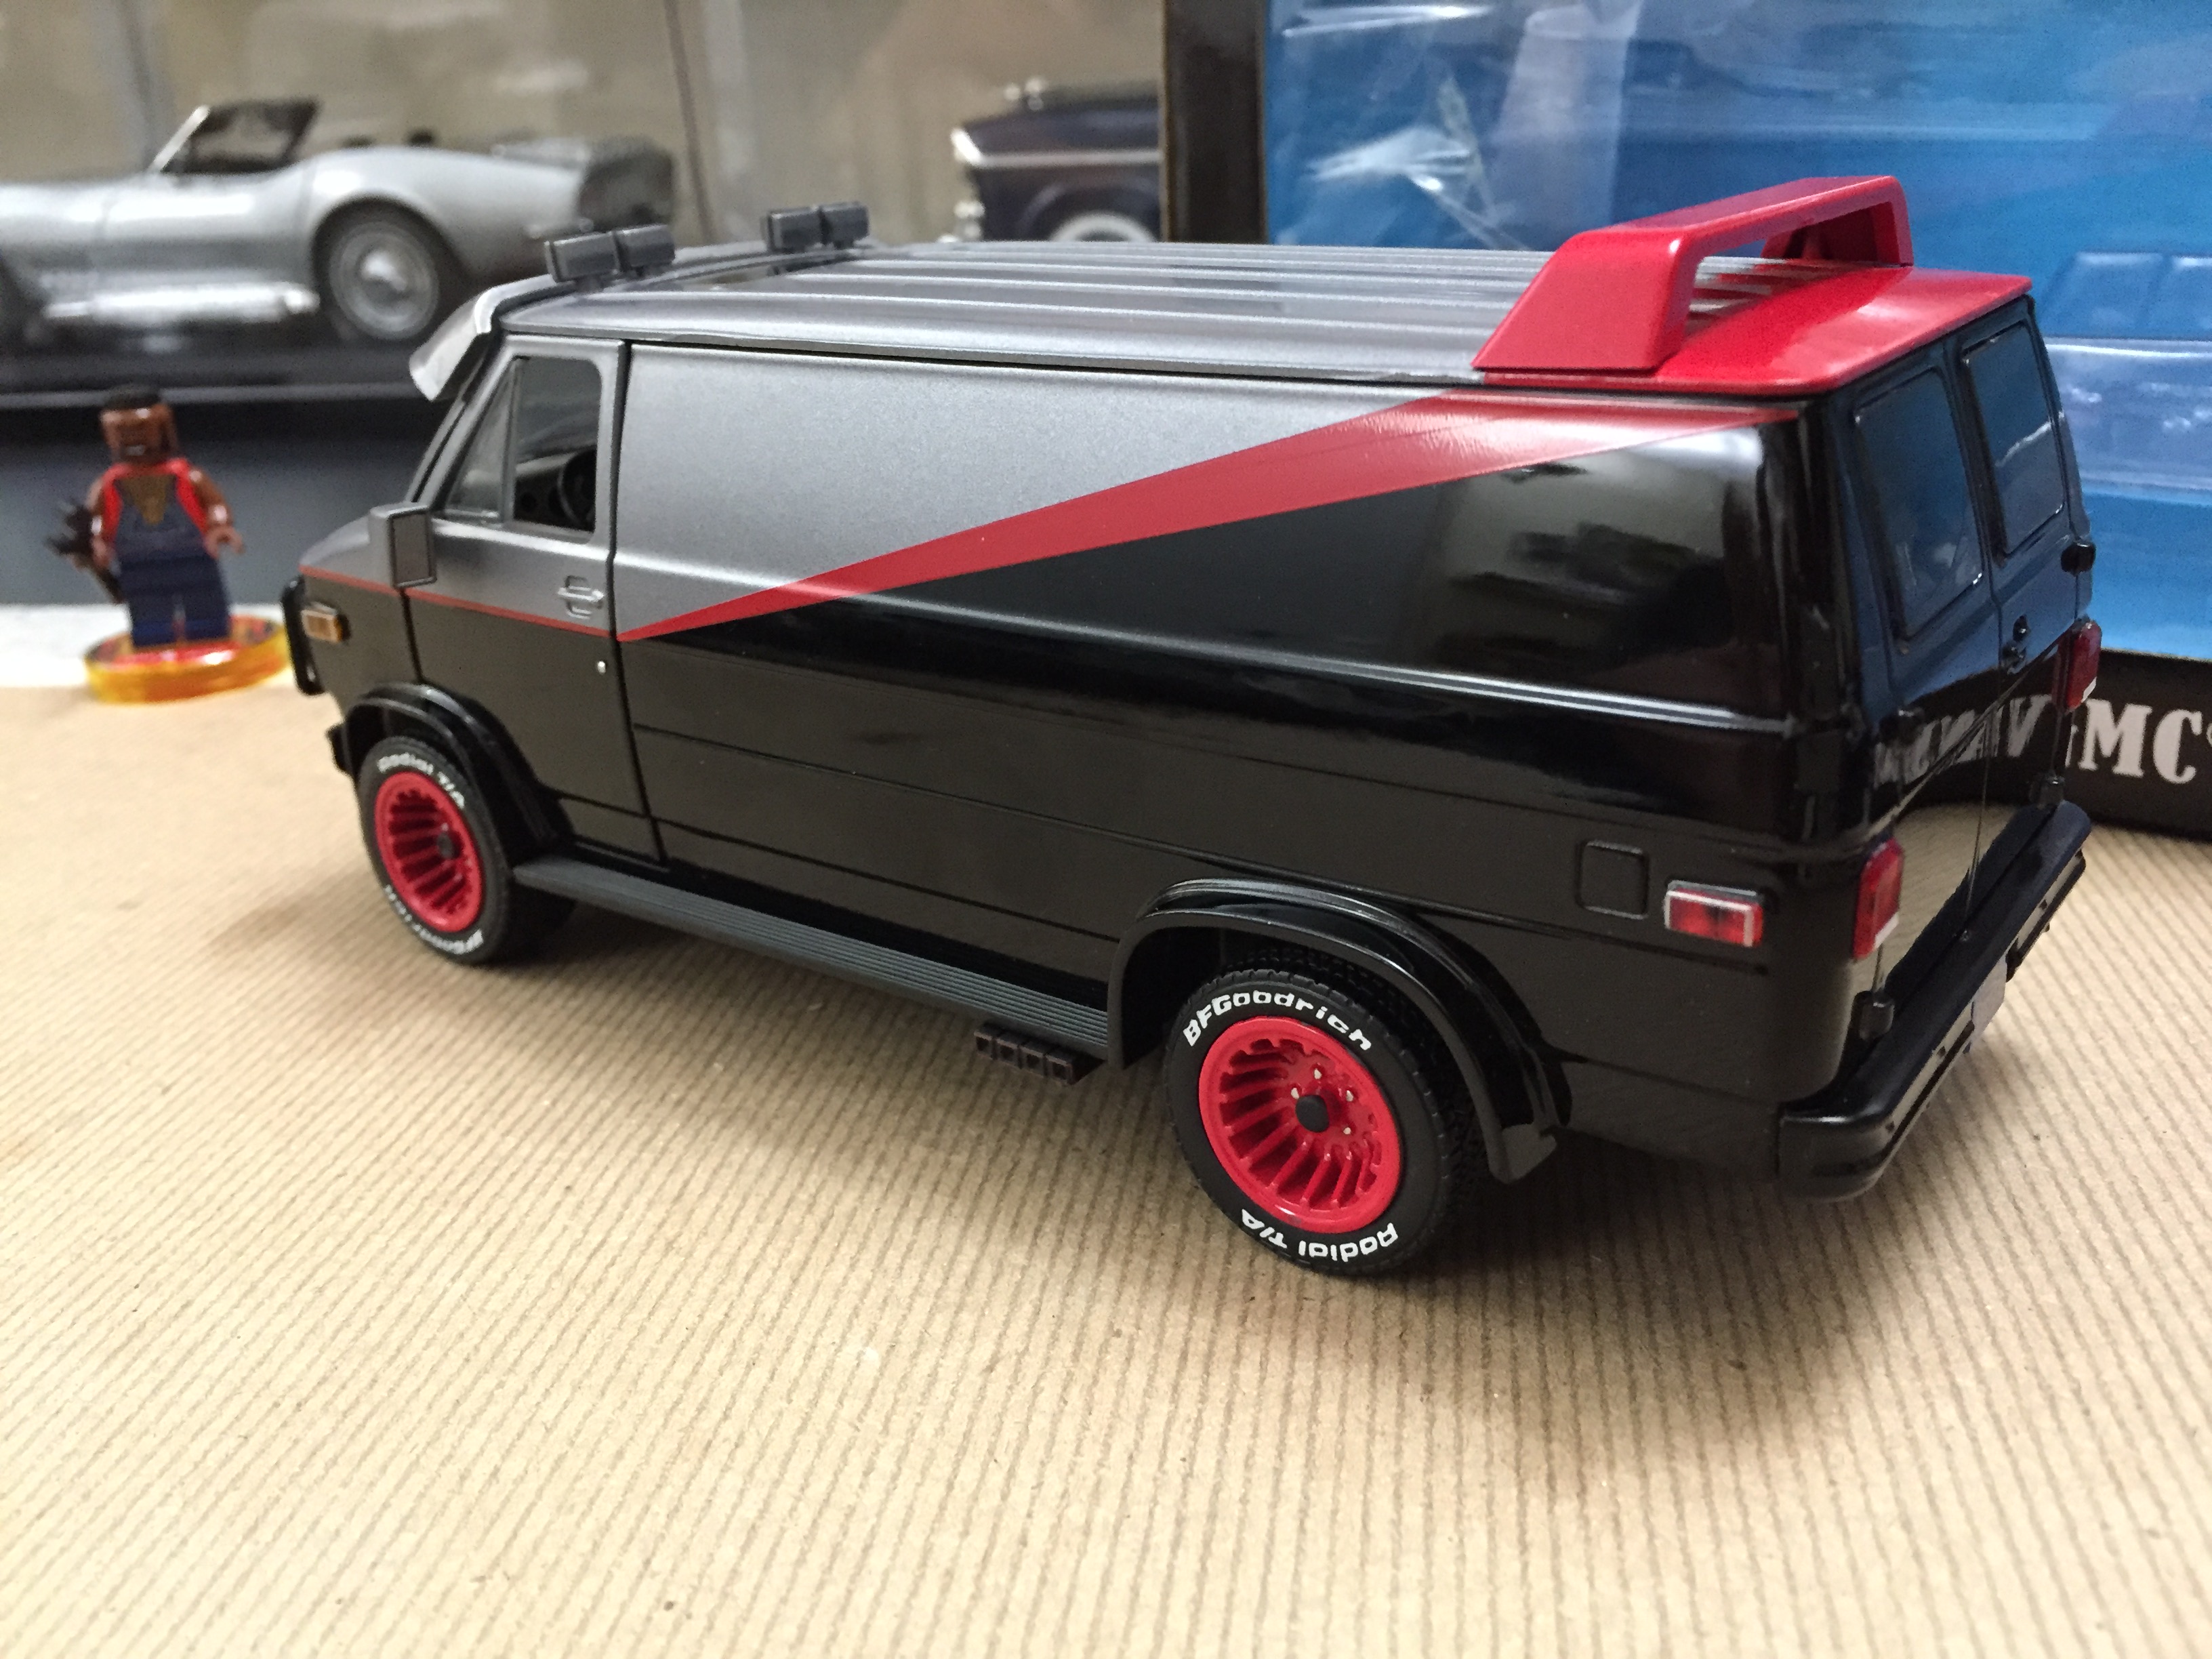
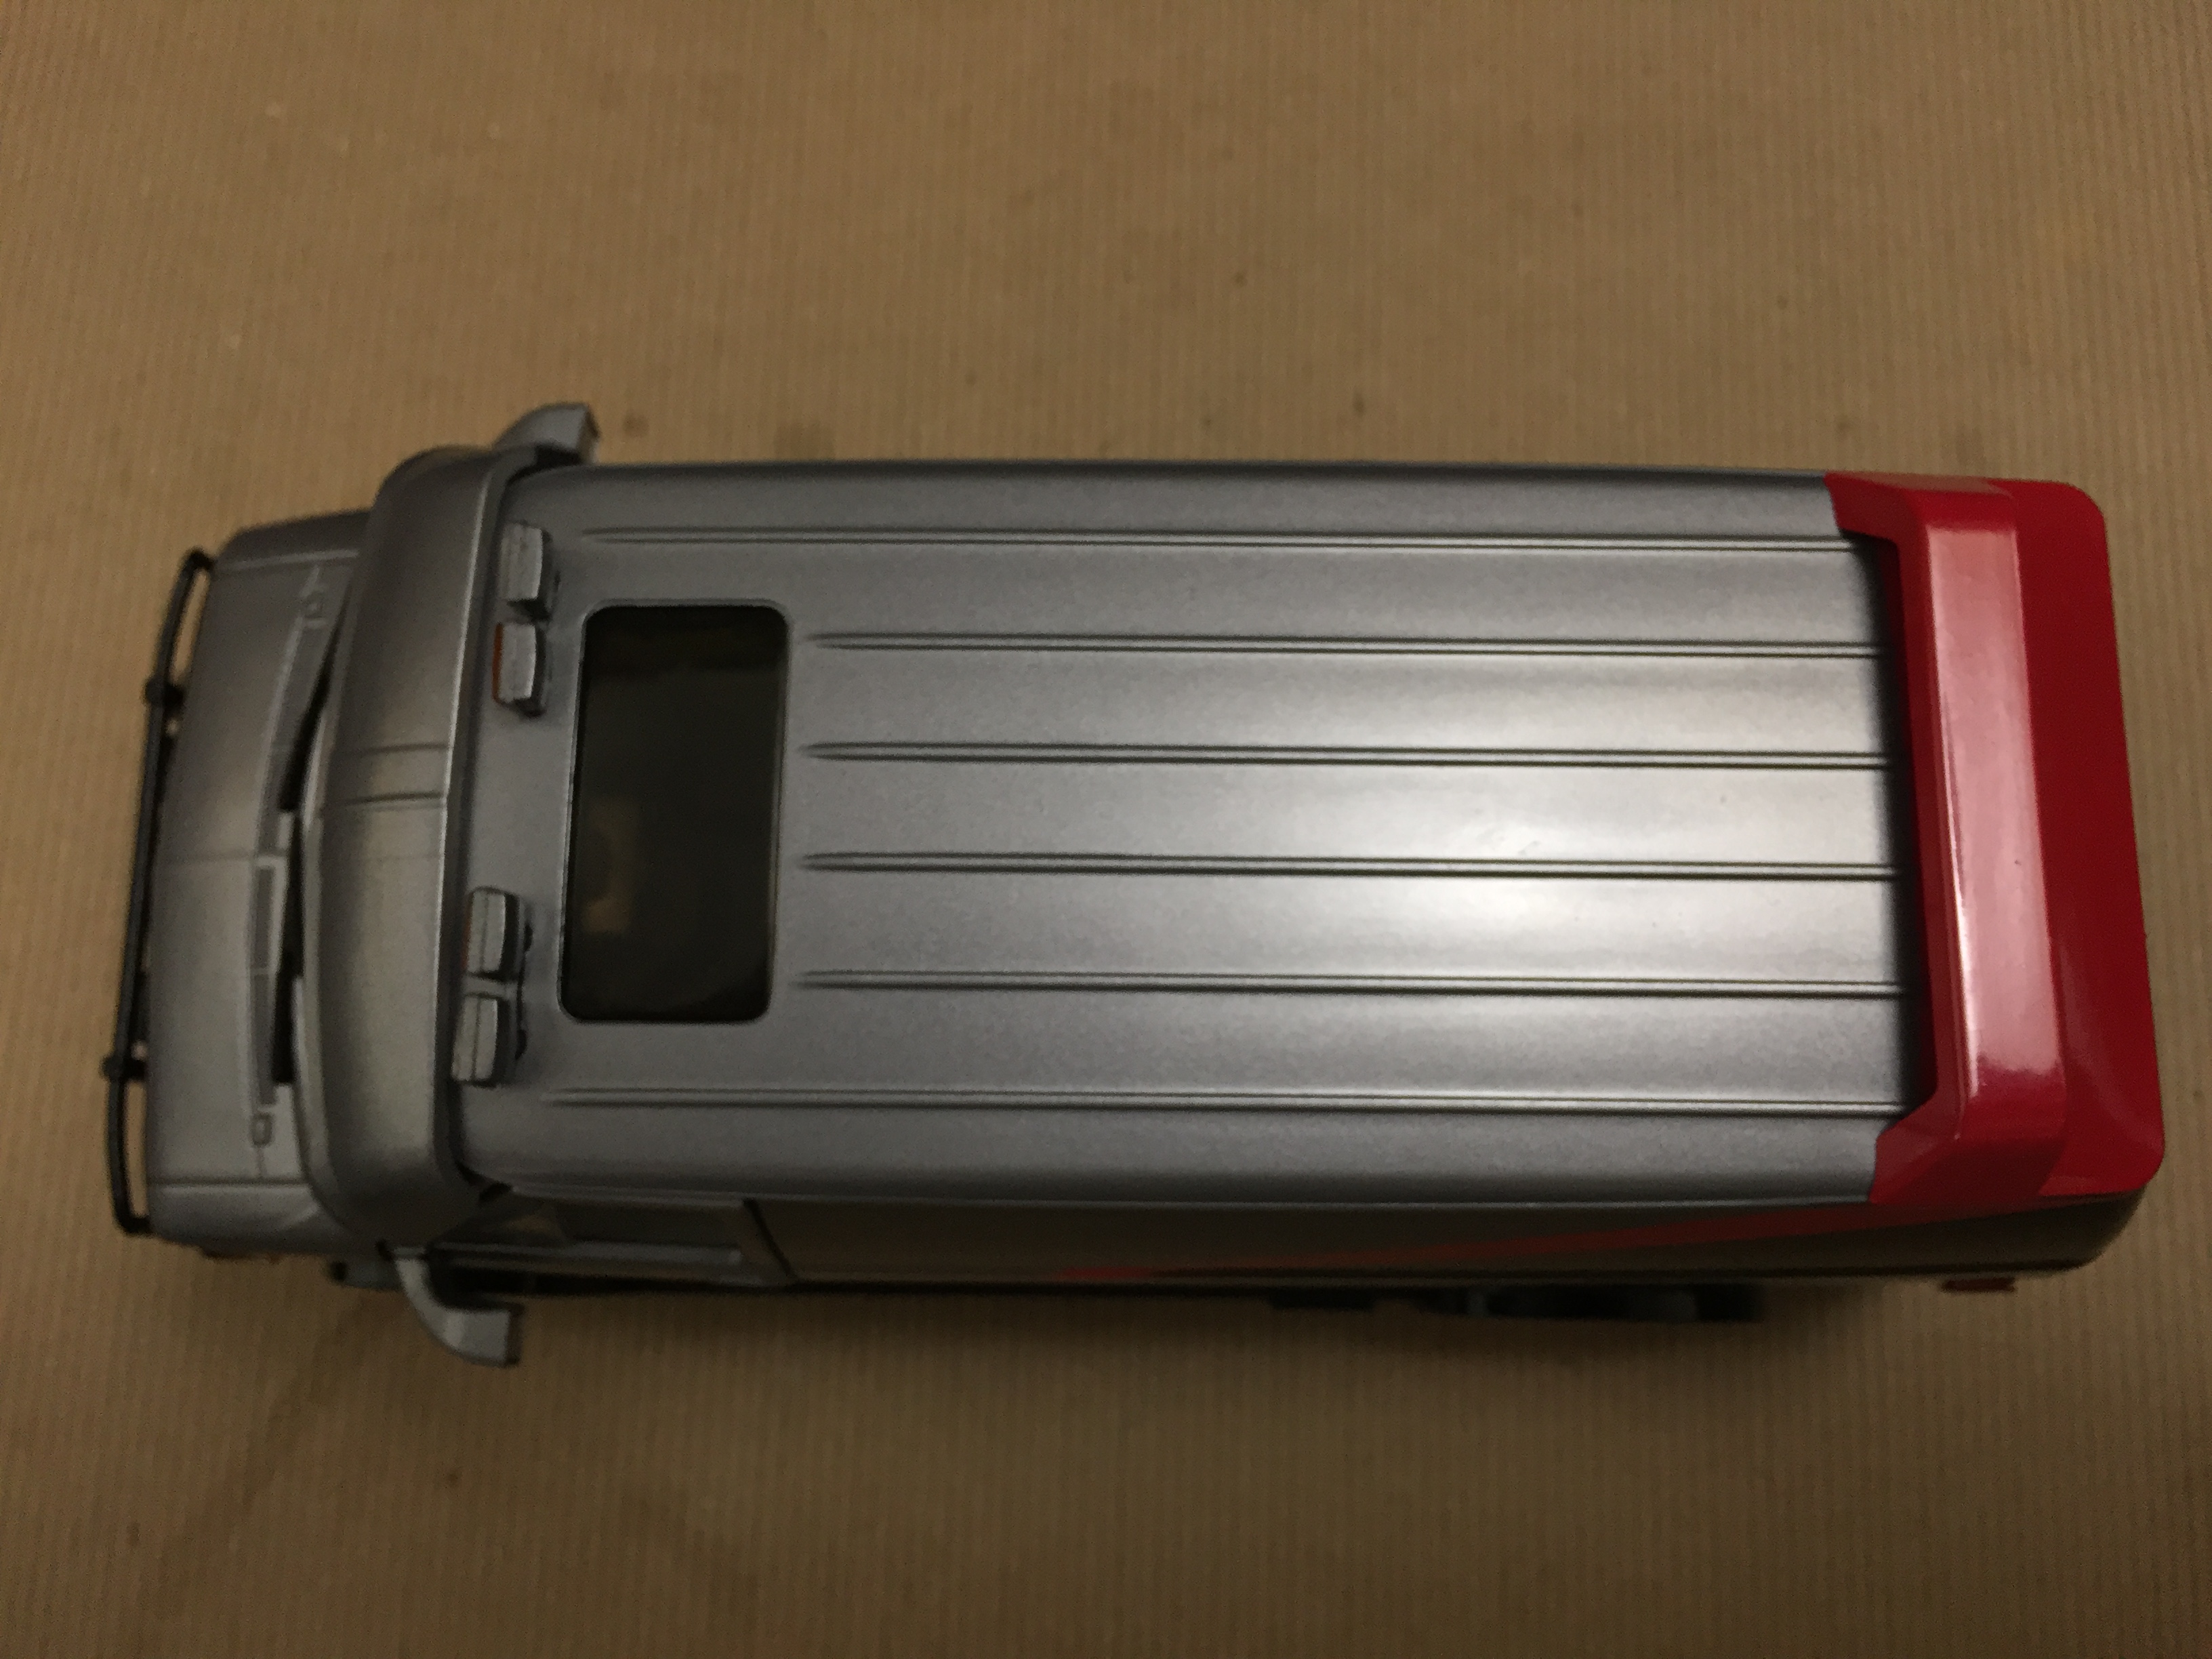
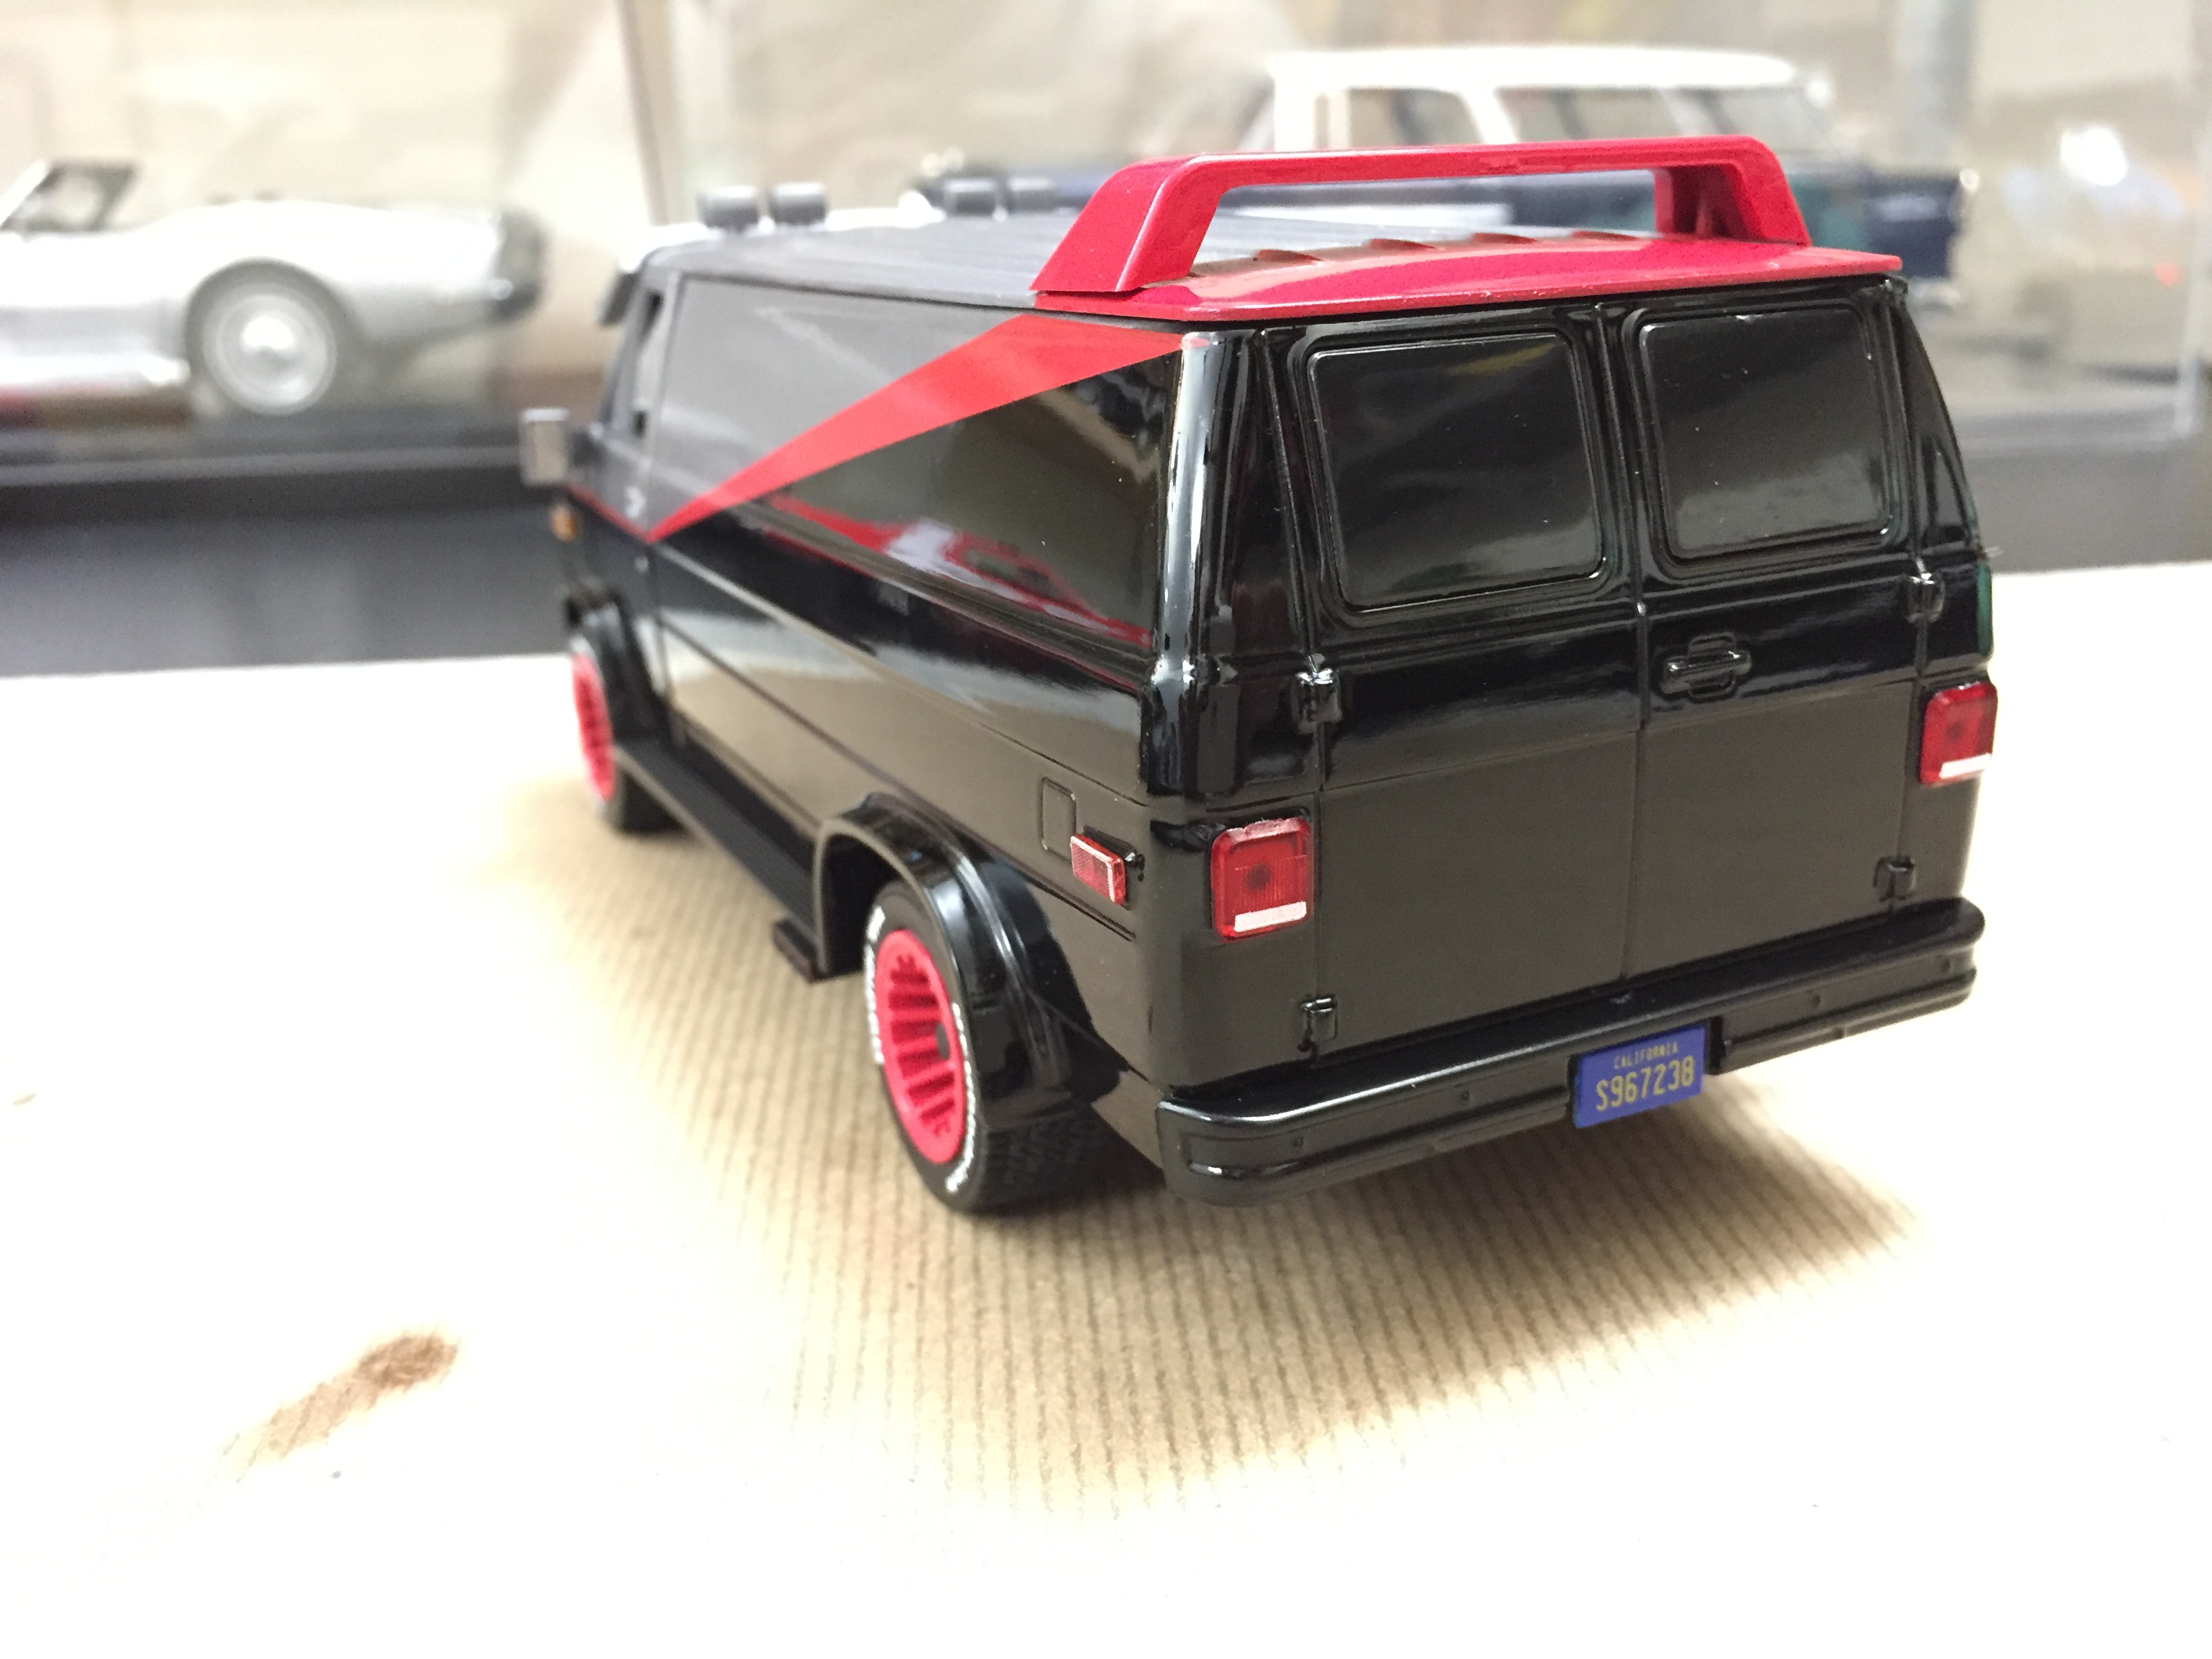
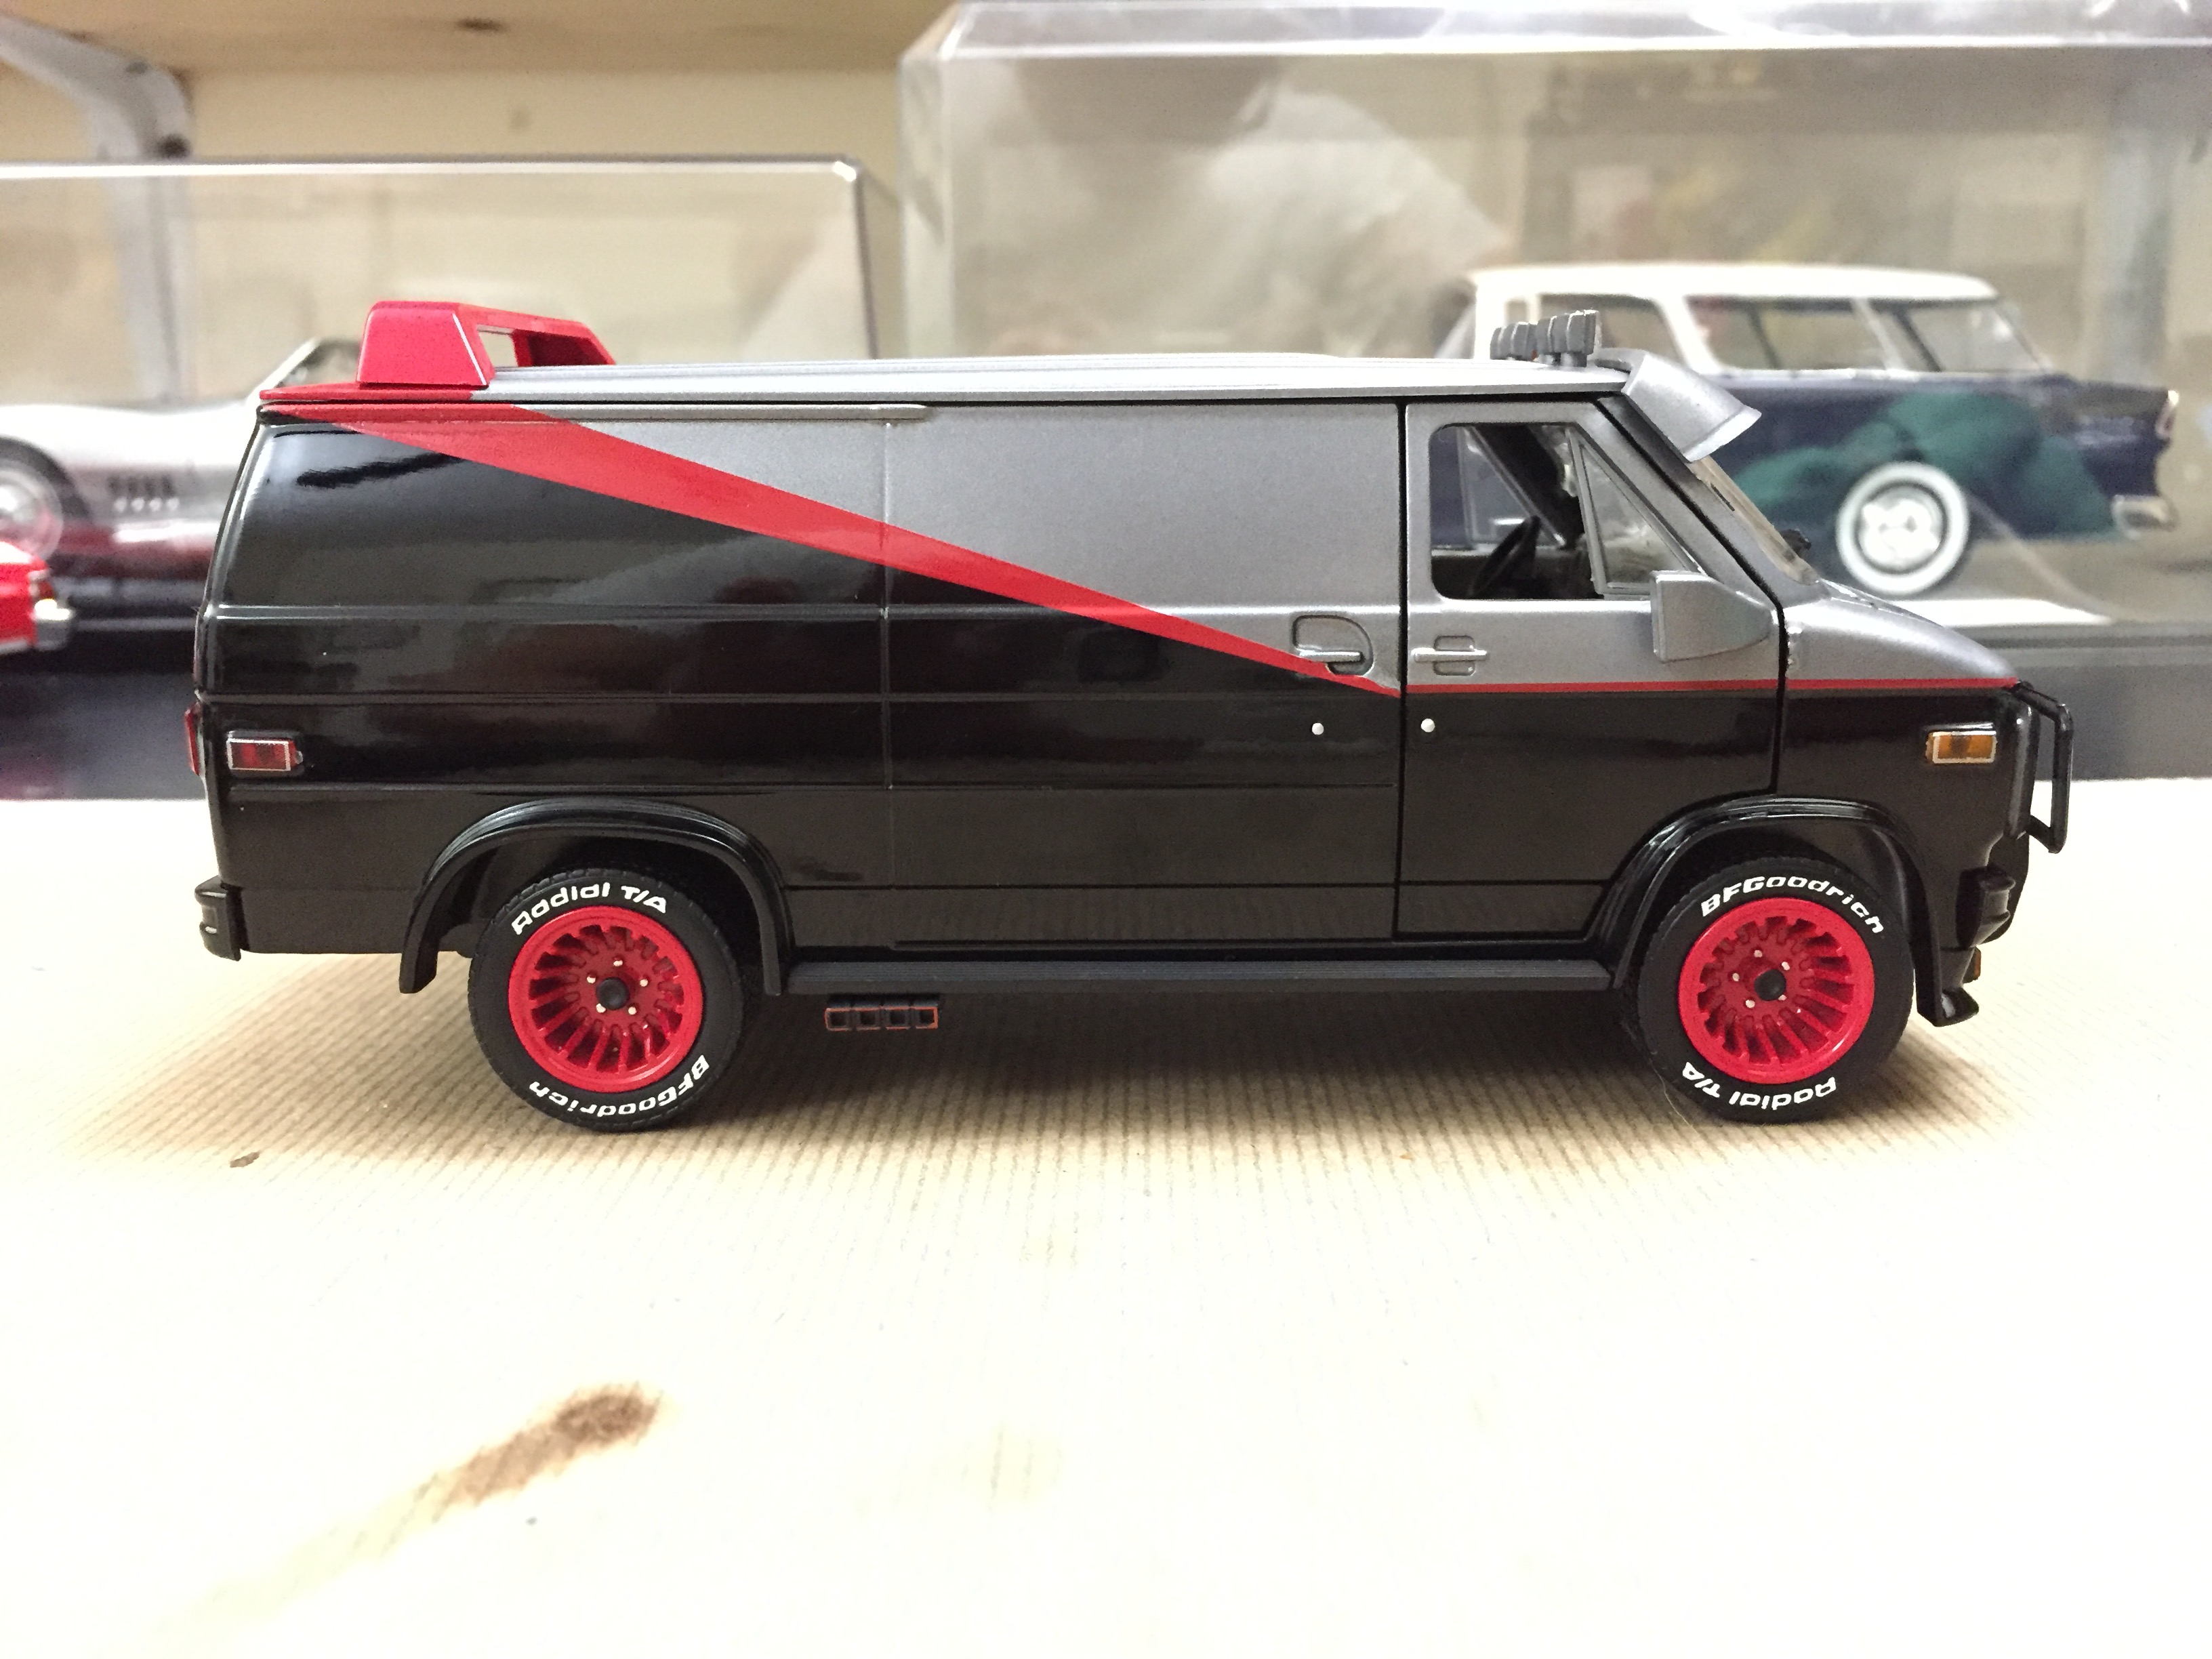
A-Team van by greenlight. Check it out.
-
 Hi guys. I've bought this kit to try to build an "all open" custom van, with carpeted interiors, and a custom trailer based on the metal one I have, which is way too heavy: And here's the copy, just with a little more room for the wheels: And here are the fenders, I've glued two sheets of heavy paper, and sanded it. I wanna finish it like raw metal, without painting: With the twin wheels: Current state: I've found the right plastic rod, so I can hook up the ramps like they were supposed to be: Next step, external hinges like these ones, which will be sanded and replaced with working ones: And build a rail to let the door slide out, also because I'm installing the wide fenders kit: If you have any input or link for the sliding door, it would be greatly appreciated. I'm still undecided on what to put on the trailer, a ford car or two bikes:
 -
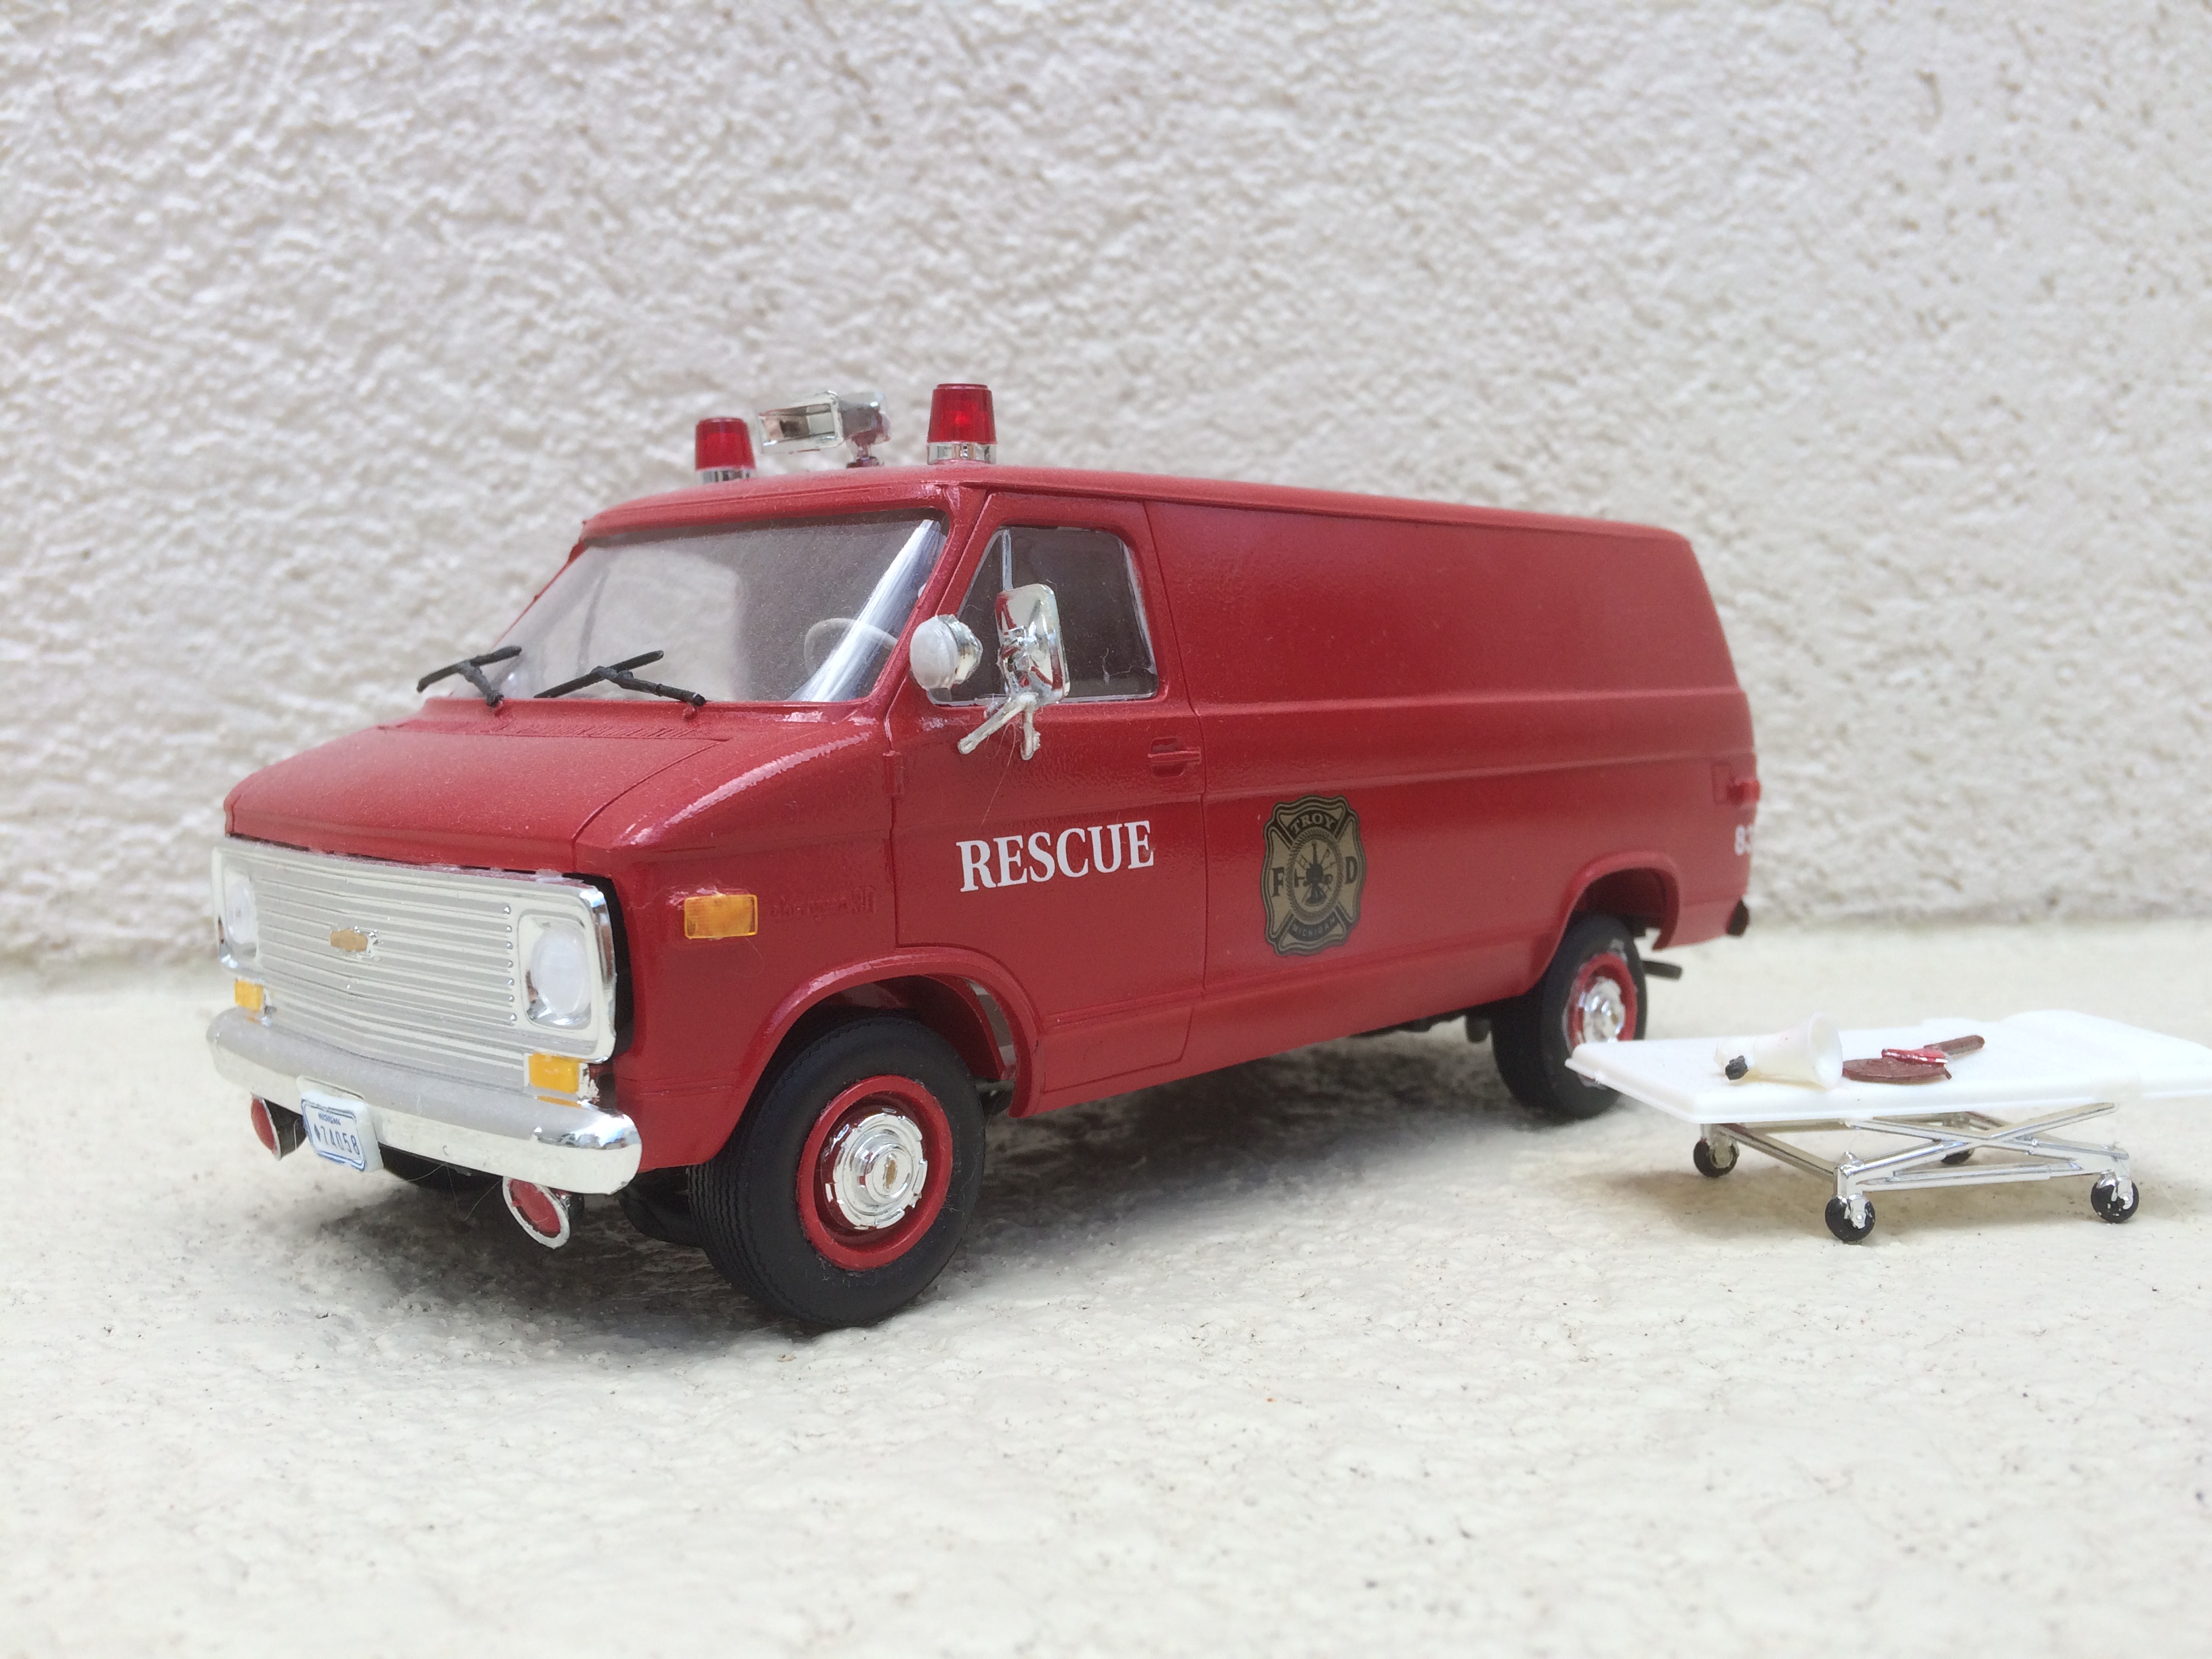
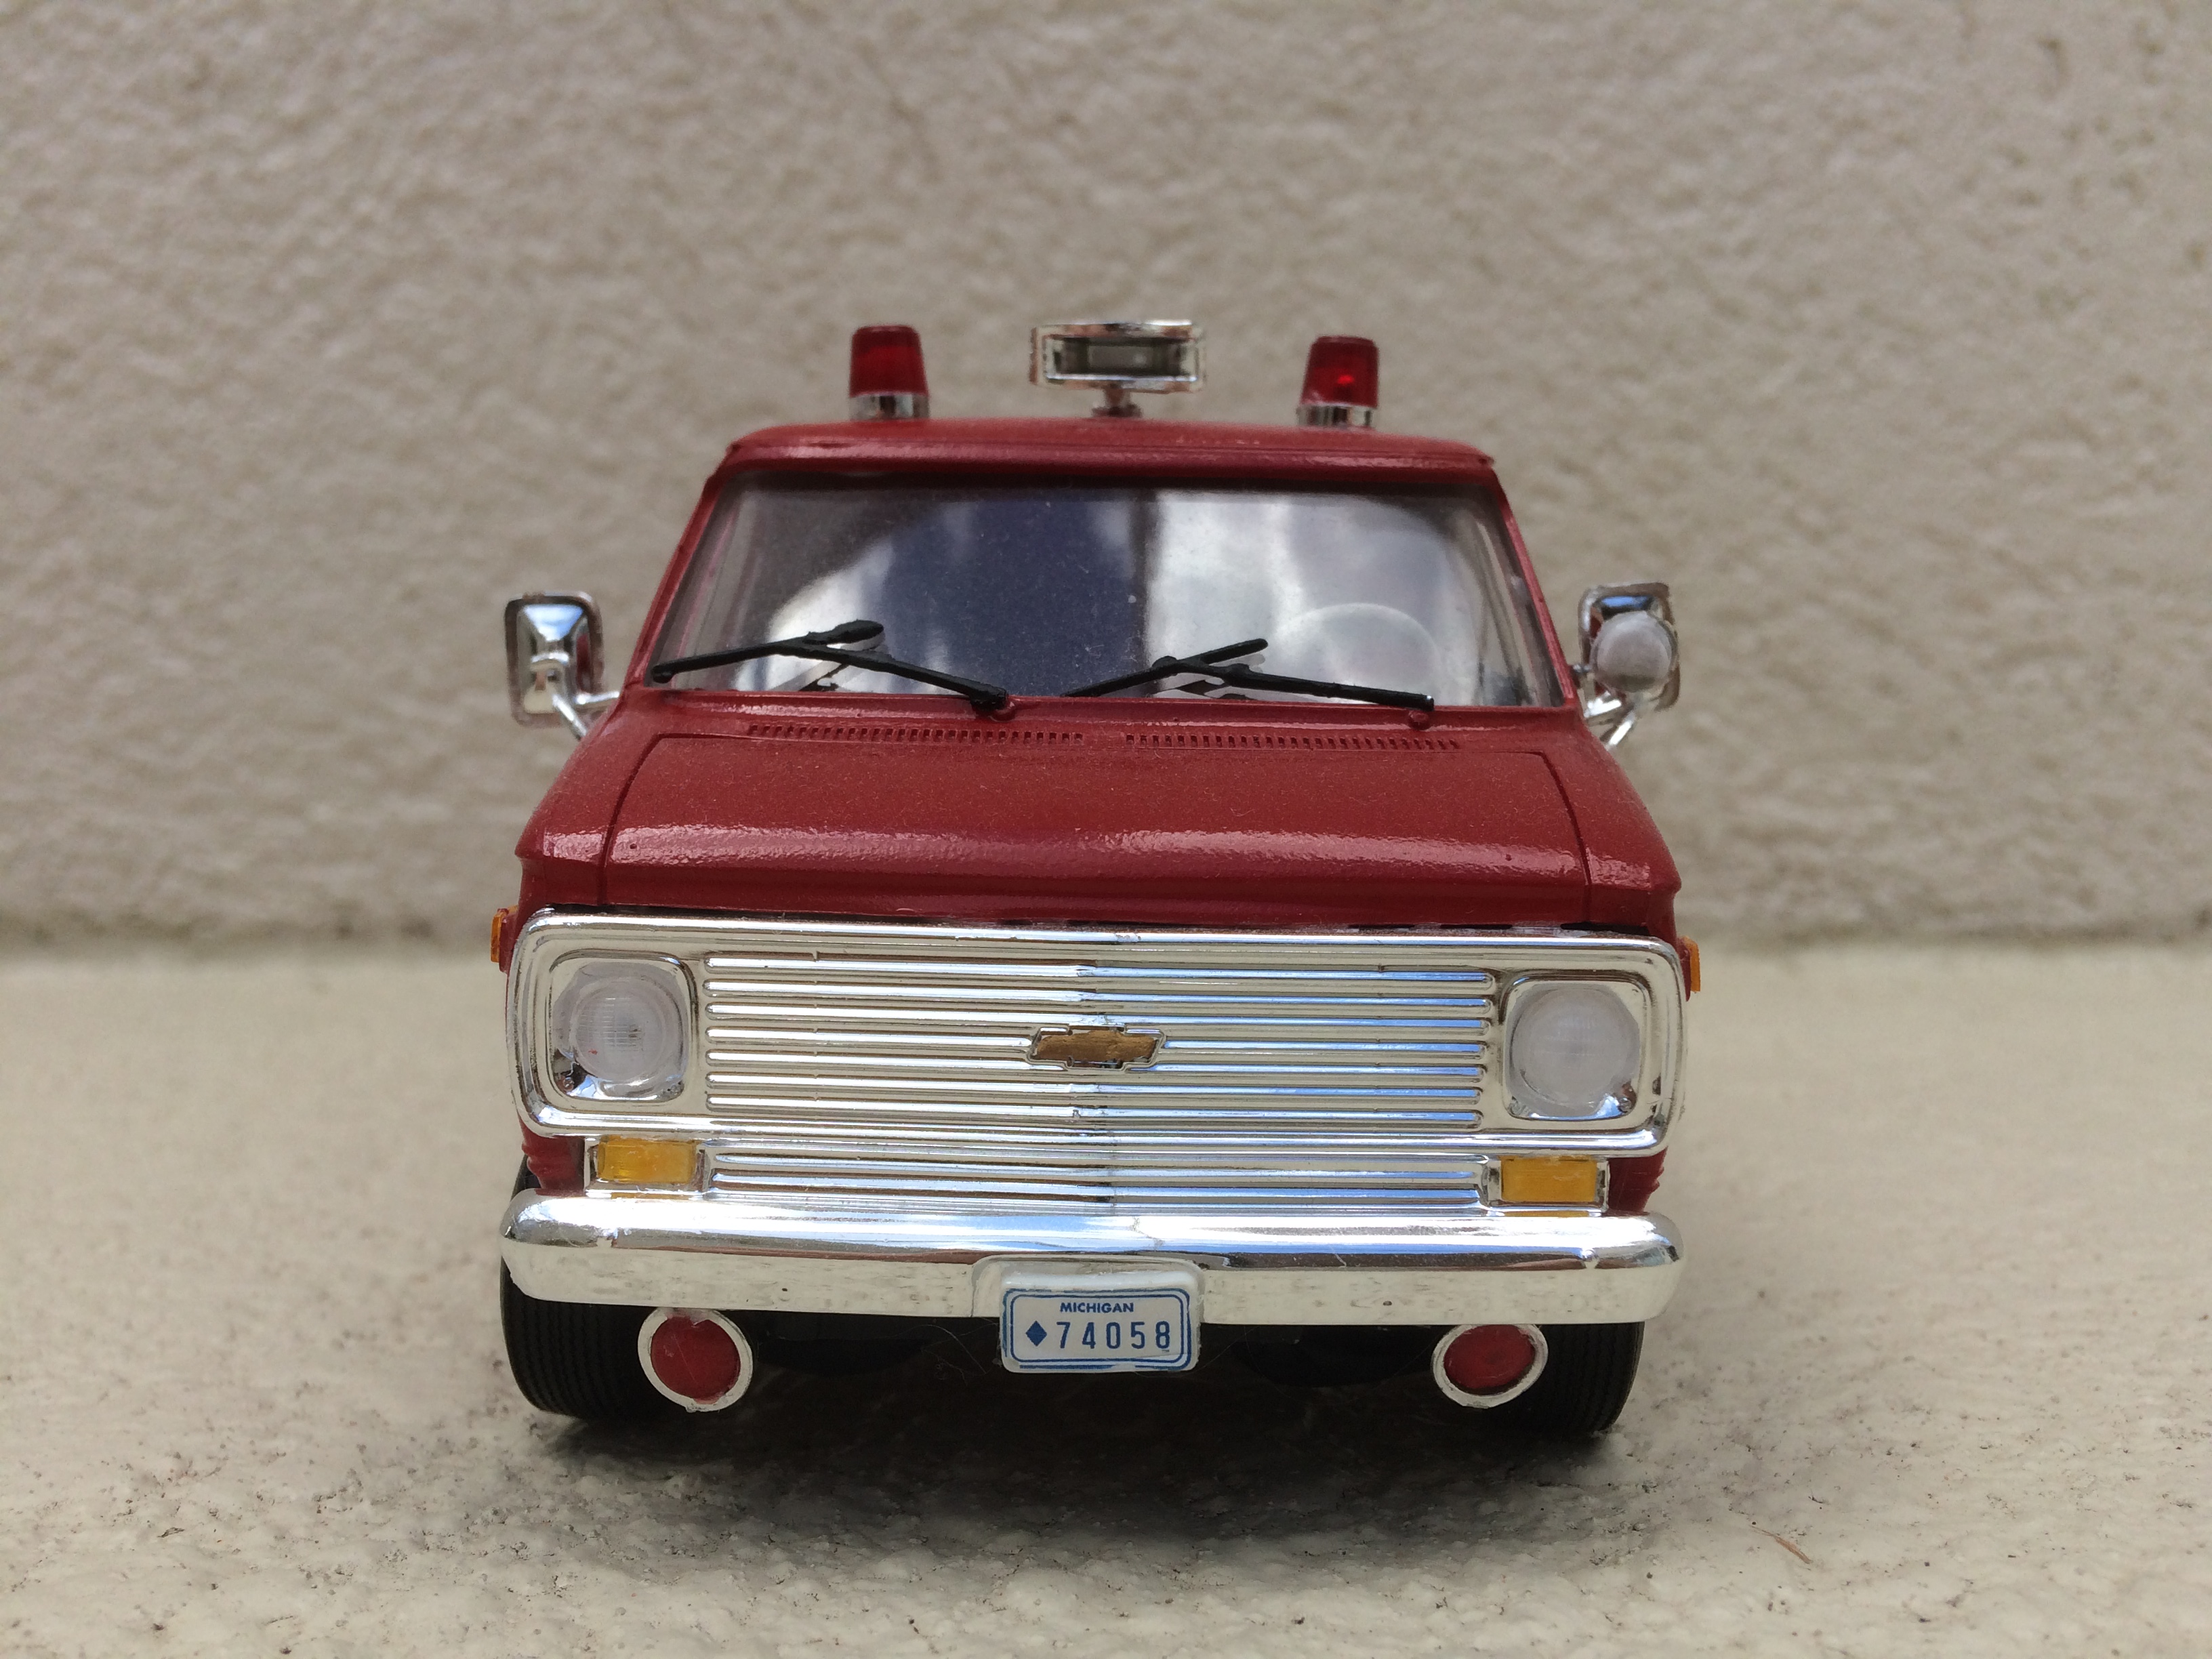
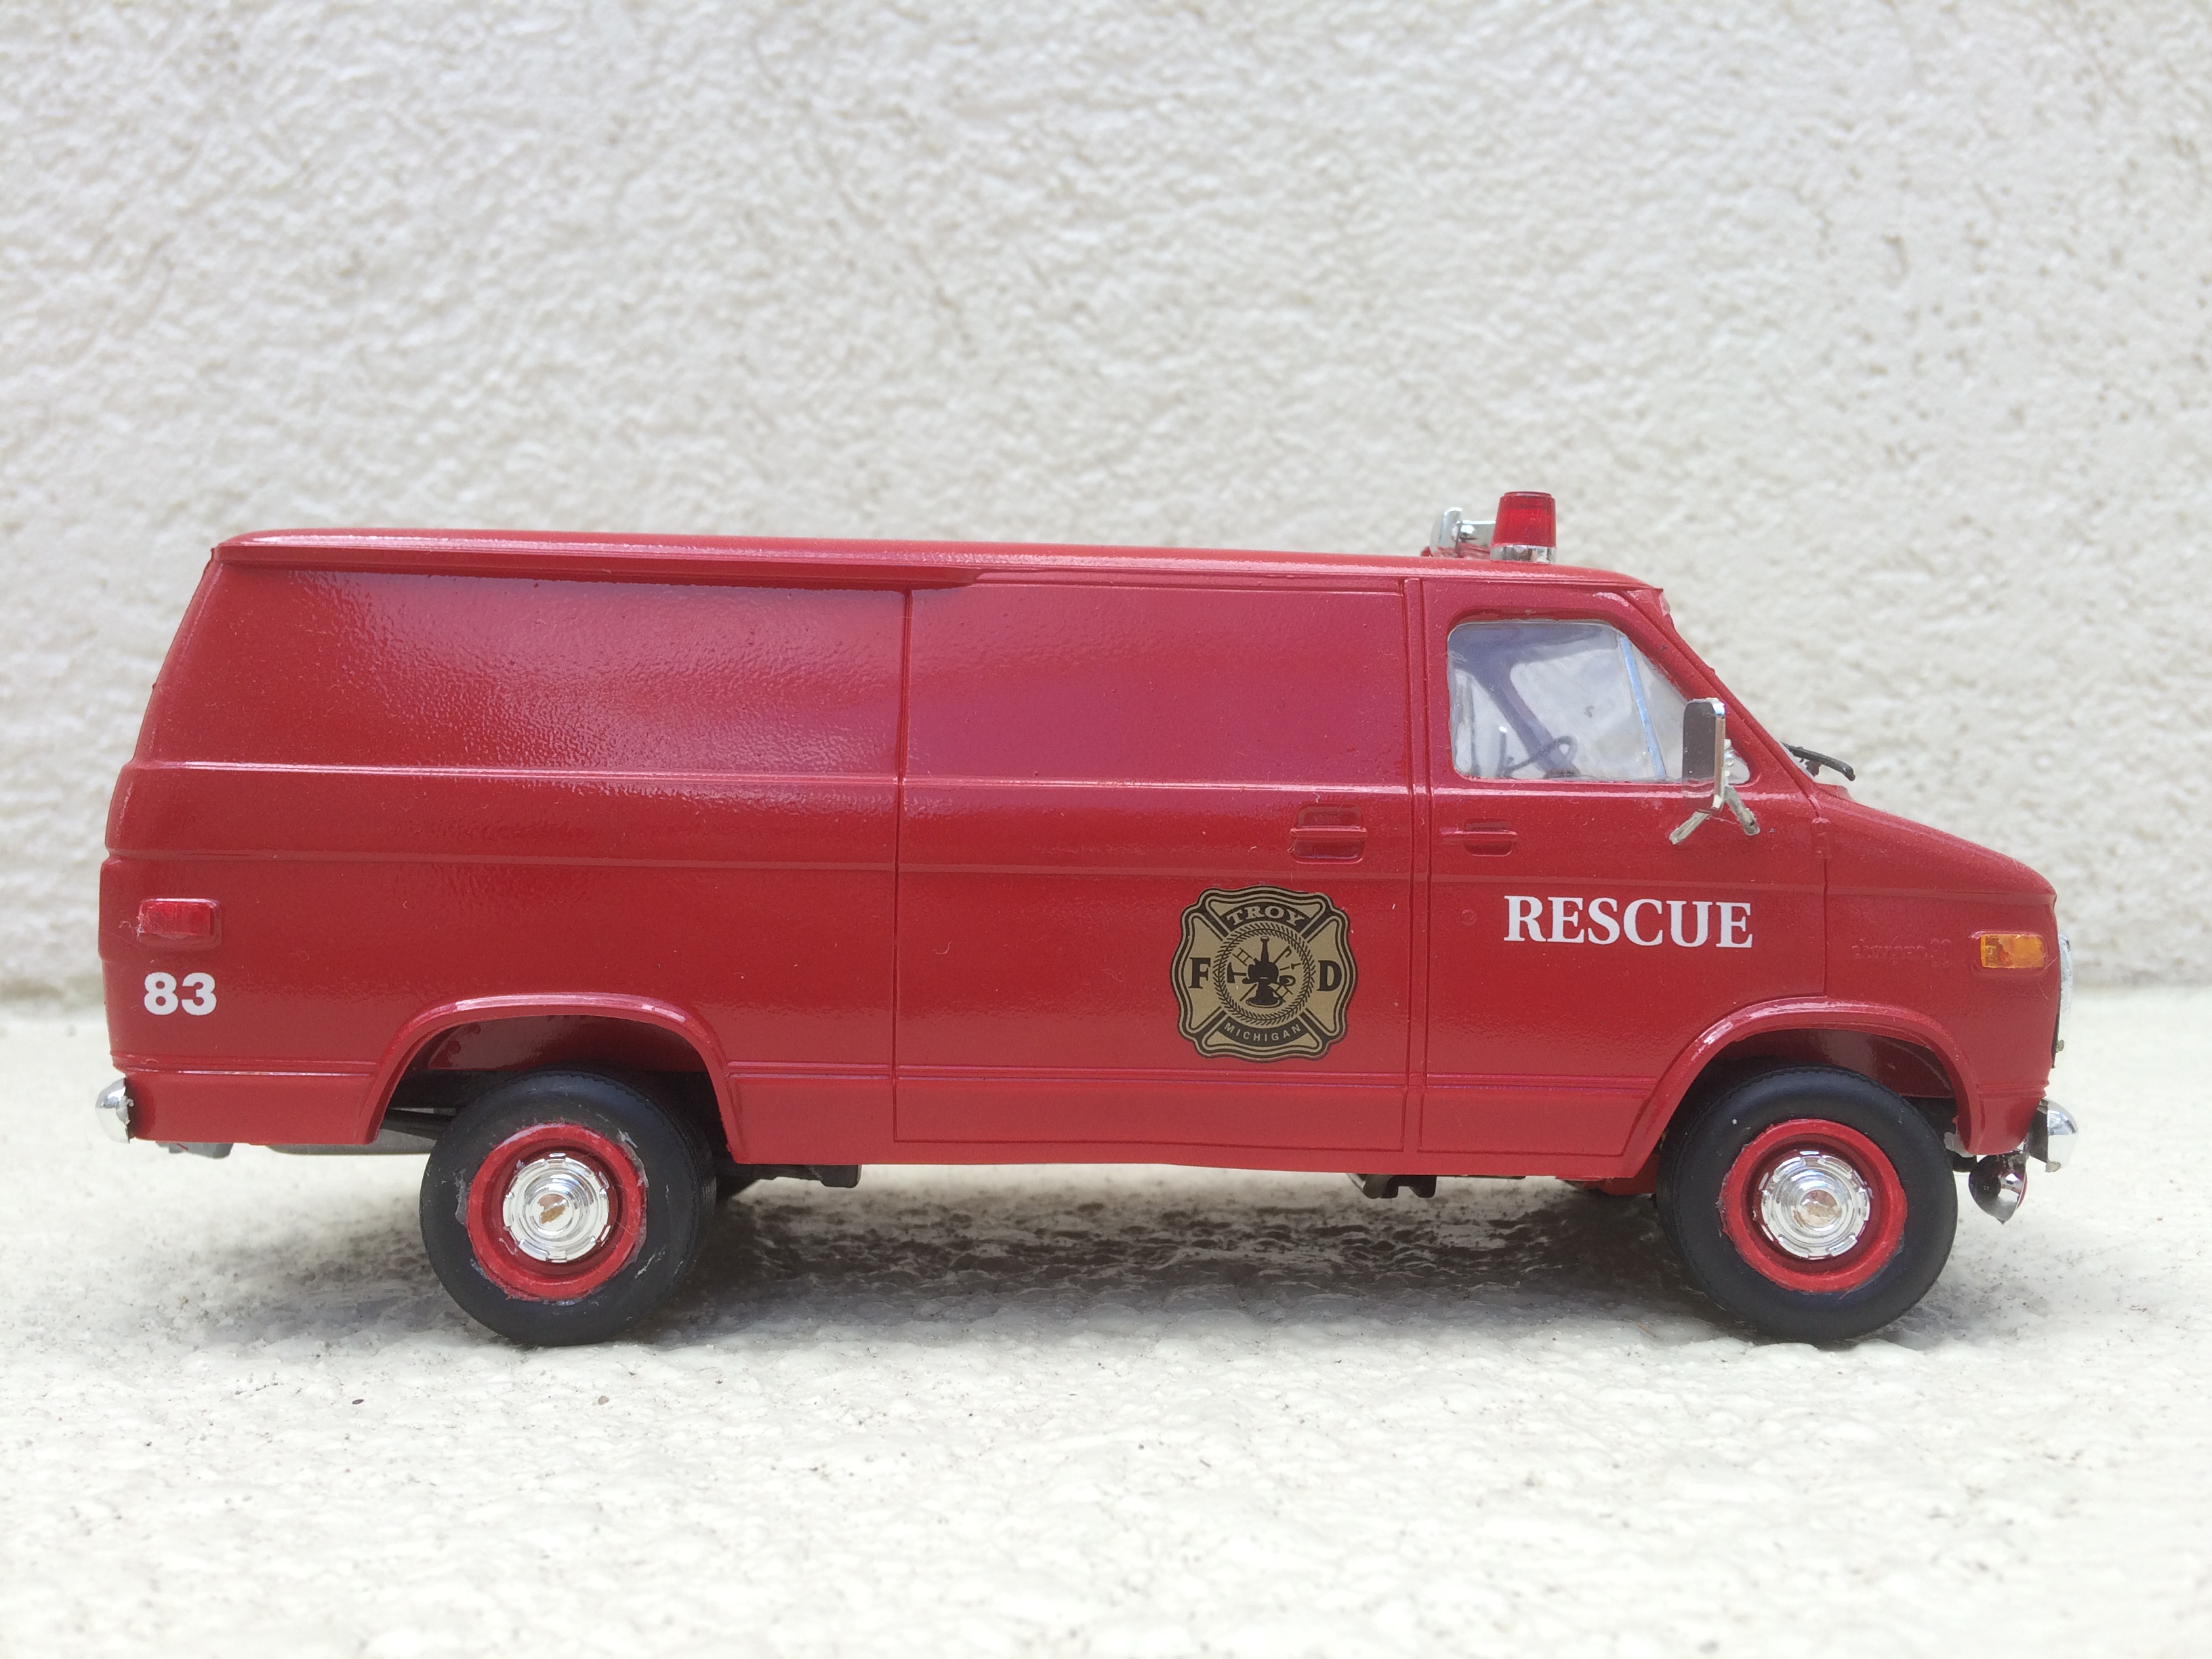
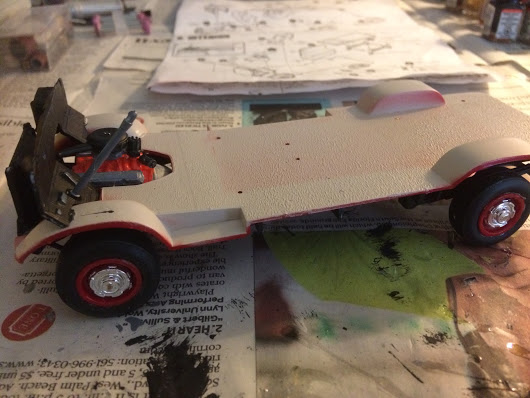
 This is probably the first model I created that I'm happy with the end result. With that said, it's far from perfect. Being that I'm still learning, there's plenty of imperfections like the misaligned front passenger side wheel, sub-par body paint job, and the overzealous amount of glue on the rear tires. There's also plenty of small details that I simply couldn't add in due to my lack of experience (although, I was able to paint all the Chevy logos gold, both on the grille and hubcaps). But I'm mostly happy with how it turned out, it's definitely unique, and I'm a fan of emergency vehicles. The model also came with a stretcher and some other emergency equipment, which I glued to the stretcher and kept separate. This thing is also difficult to handle, as it has many delicate details like the mirrors and siren that will fall off at the slightest touch. Anyway, thanks for looking and tell me what you think. I've got a Honda Odyssey lined up for one of my next builds, so hopefully that van can at least turn out as good as this one. Also, I found this old, crappy photo I got back when the van was still being built. As you can see, I didn't mask the rear floor completely, but I wasn't too worried since you cant see it very well. This vehicle does have a complete engine, but its mostly covered up and there's no hood to remove. Even if you could, the engine is mostly under the engine cover in between the seats.
-
Saw this on a buddy's Facebook post and I was wondering about it???
-
 Not perfect, but at least I like the style!
 -
 Hello, welcome to my new gallery! It's my first finished model of 2015, the kit is a 1984 Ford Transit by Esci in 1:24. Quite rare, and nowadays very pricey. I was able to get mine from Kingkit in the UK for about 1/3rd of what they go for on Ebay, and though I had in mind how it should end up even before I had bought it, I had my doubts once I opened the box. But then, chances are slim that you'll see one of these on the next modelshow unlike a VW bus. I know of only five of these built, and this is the only one built like that. The kit itself is a curbside, the chassis detail is only very rudimentary, and if you'd intend to display the bottom, you'd have to do some serious scratchmods. The interior needs work, and the body is one of the best scale car bodies I have ever seen, and if you spent some time on details (the kit is 33 years old), you'd end up with a fairly correct, very rare model of a very popular* van. *These are still holding the record for the most popular getaway vehicles for bankjobs, no kidding. I decided to super detail the kit to a certain degree. Sometimes the changes were just cosmetic, sometimes, they were necessary. My changes are as follows: - added visible bolts to the chassis - chromed all surfaces under the turnsignals and rear lights - added 4 screws to each turnsignal - added screws and modified the grille - scratch built the lenses of the front lights - added lugs and valve stems to each wheel - scratch built mudflaps - scratch built the hubcaps - modified the doorhandles - added door buttons - drilled out the exhaust - added the seat piping - built the seat posts - built the rails for the drivers seat - sculpted the floor mats - modified the shifter - built the missing window posts - added screws to the numberpaltes - added headliner - added levers for light, turnsignals, and wipers - scratch built the wipers All in all I managed to add about 182 elements if I count correctly. Here's the link to the workshop section: http://www.modelcarsmag.com/forums/topic/99167-1984-ford-transit-by-esci/?page=1 This is the car I was using for reference: This is the interior during the construction... I built a fire extinguisher, a jerry can, a tool box, a clipboard with a pencil, a pack of cigarettes, and a bit of junk for the cab... The toolbox: And this is all of that with the van wrapped around it:
 -

Dodge A100 Van
BBodyBlues posted a topic in WIP: Model Trucks: Pickups, Vans, SUVs, Light Commercial
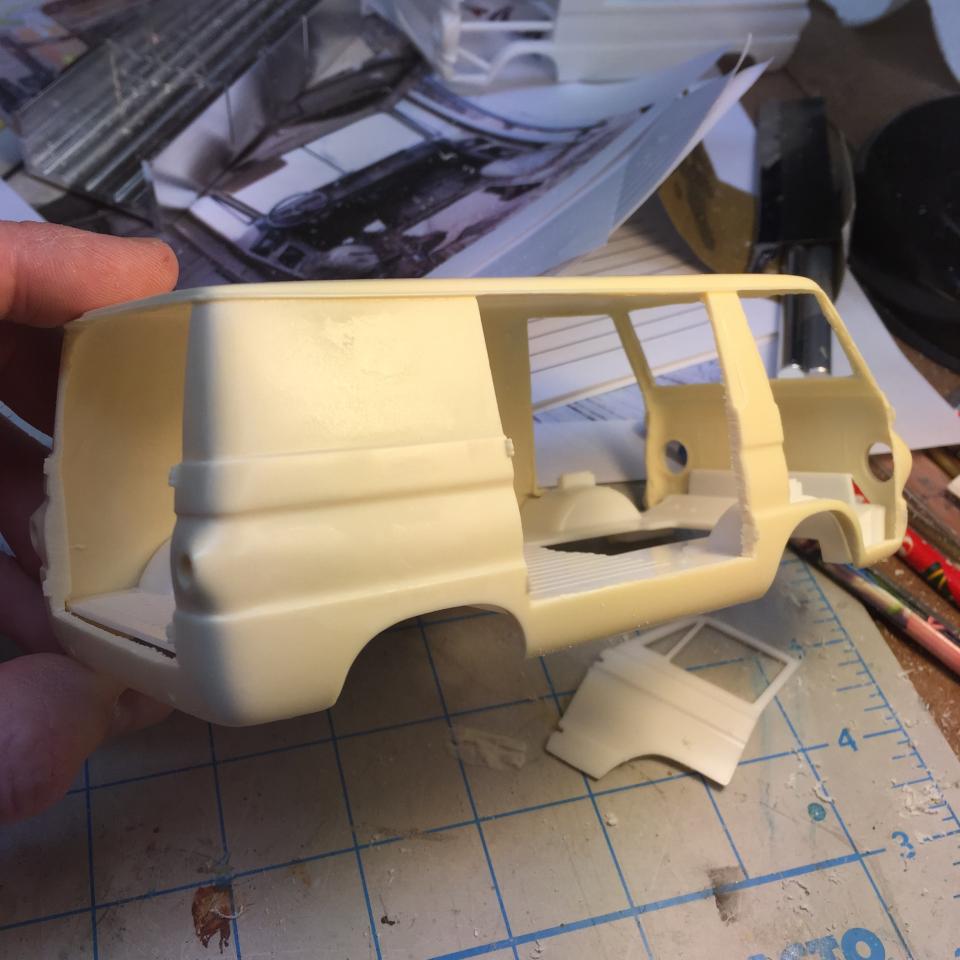
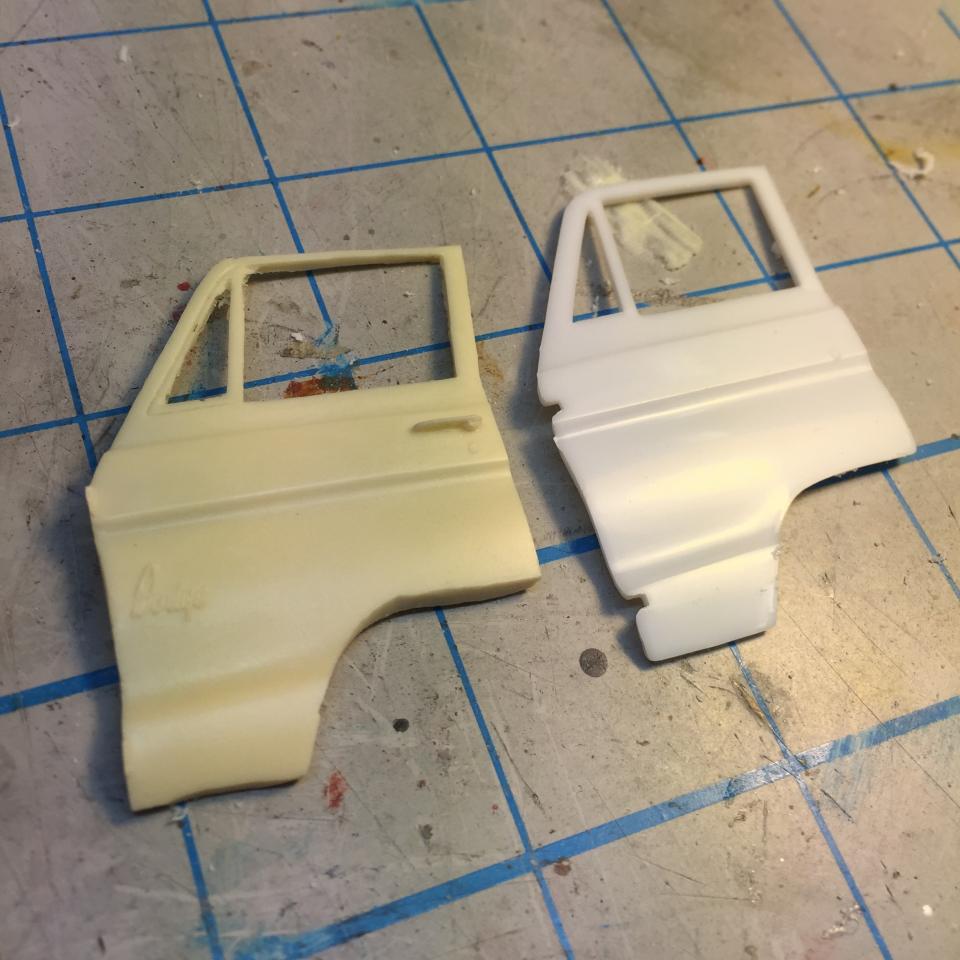
First time trying a resin body. I don't know of any other manufacturer, so I think it's a Jimmy Flintstone. I'm opening it all up, so the first challenge will be to correct the gaps in the doors. Closing the gaps in styrene plastic is easy: simply cement on additional plastic and shape. With resin, I'm a little leery of gobbing on 5-minute epoxy as a filler. I've had that stuff easily separate from the styrene. If I mixed my own resin, could that be used as a filler? Bondo? I'd like to use the resin doors, since they have the Dodge script. Is anyone aware of a photo-etch set that would provide this script? Chris
-
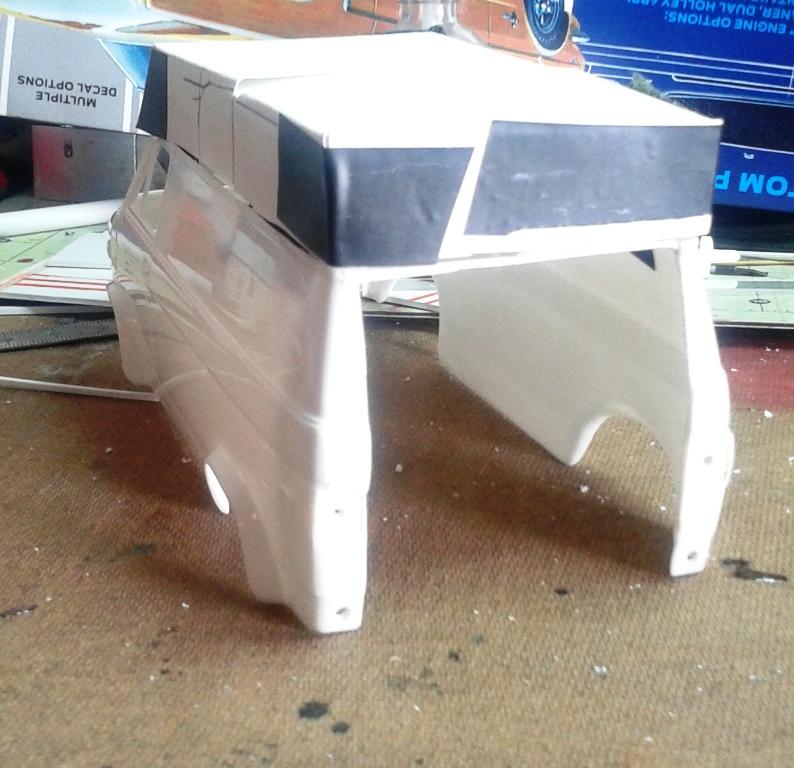
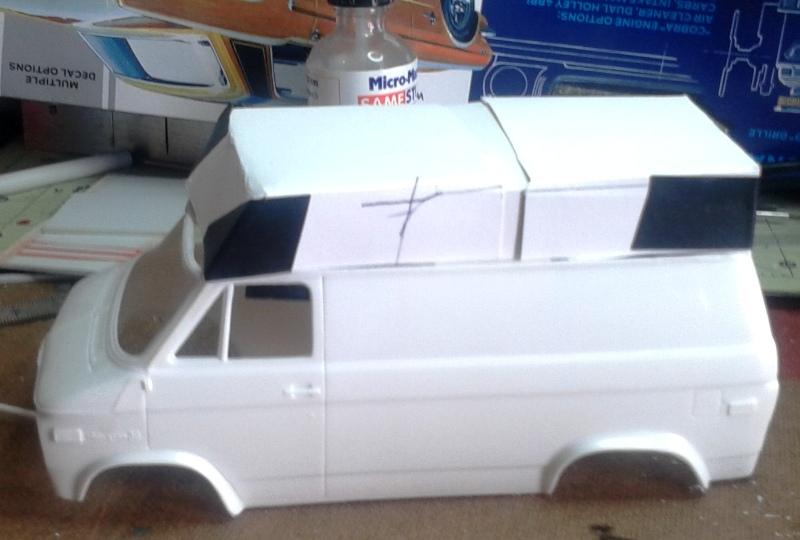
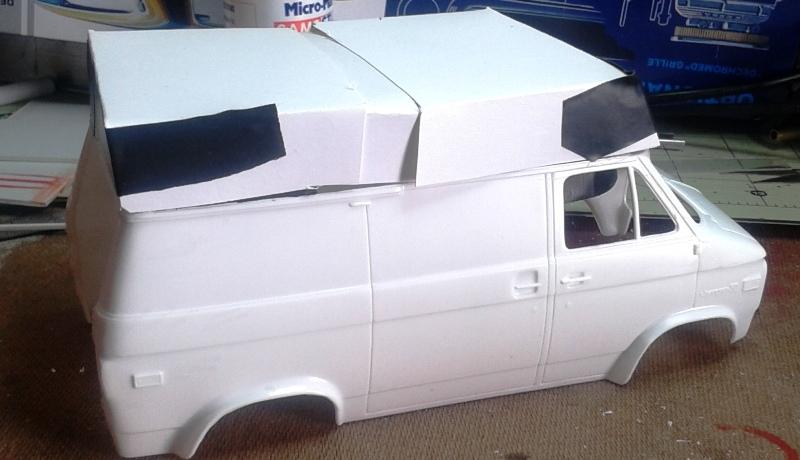
My current build is the 1977 Chevy Van, that I am going to build into a camper. I have removed the roof to add a 24 inch extension and cut the back doors open. My intention is to add a cabinet with Microwave, Refrigerator, and sink; a table and chairs, bench seat/fold down bed, as well as storage overhead of the van cab. Carpet will be grey felt and the walls will have simulated paneling. The raised roof with simulate the fiberglass cap that was relatively common for conversion vans back then. I plan to paint the van white and use the blue decals that came with the kit to decorate the outside. Jeff
-
 Just completed this one. I used three paints for the body in layers, starting with Tamiya Light Gunmetal, then Tamiya Gunmetal, and finally Model Master One-Coat Blazing Black Lacquer. I printed these plates off some time ago when I did my KISS Army Vette Van... Borrowed "Dirty Donny" skulls for a cool look... And I made a rear tire carrier to fit my fifth wheel. Wheels and tires came from my Jeep CJ-7 kit that met a tragic end with the floor and our cat. Also hard to see are the two gemstone portholes I mounted on the back panels at the rear of the van. Instead of tinting the rear glass, I took sheet styrene, cut it to shape, then painted it Blazing Black. I then glued them inside the van against the rear door, then stiffened it inside with thick sprue. Once all that dried I used Micro Krystal Klear to glue the portholes to the sheet so it wouldn't mess up my work. I'll try to get some better lighted shots of the back to show the gemstones. A nice kit, but be warned. There are flash, edge seams, and sink marks EVERYWHERE in this one.... CHECK EVERY PART.
 -
 Just a box built 77 van, no paint on the exterior, Not much to show, just happy this was the first model I've been asked to build. My sisters company did commission me to build it for advertising purposes. they will ad their company logo stickers on it, So no exterior paint. fun 2 day build and it's all ready to go to work! Peace Oh and yes eventually I'll run out of monkeys! Jonathan
-
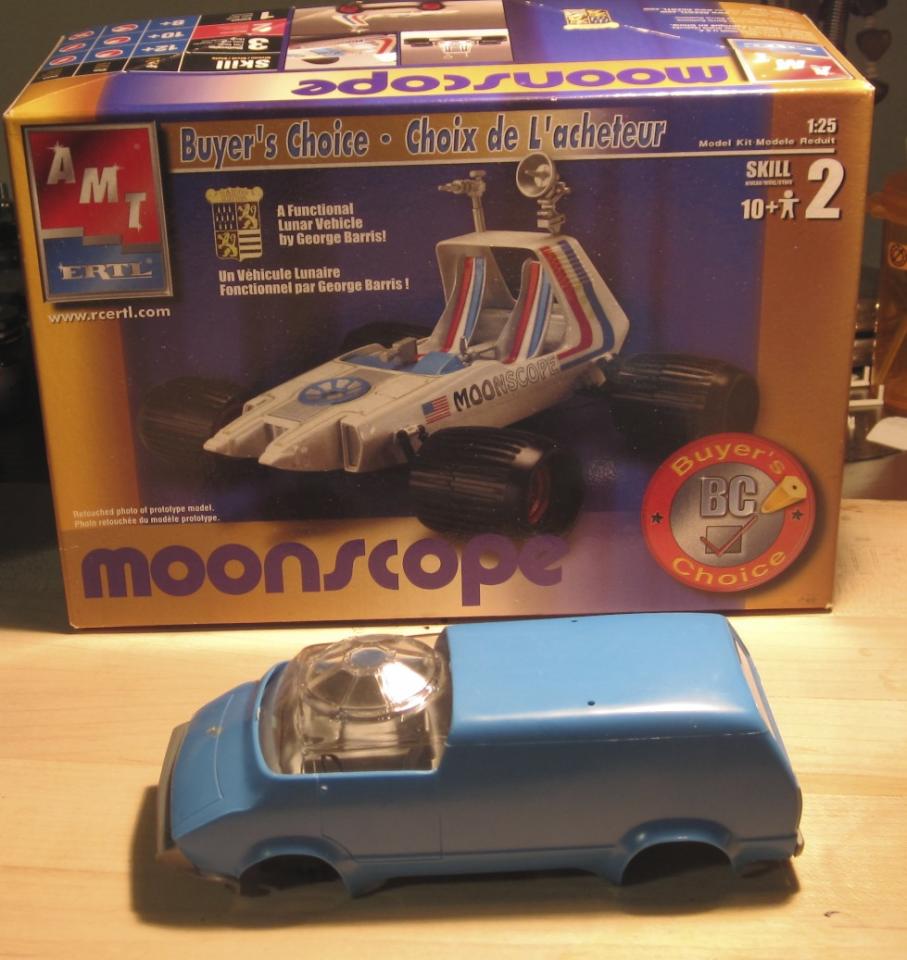
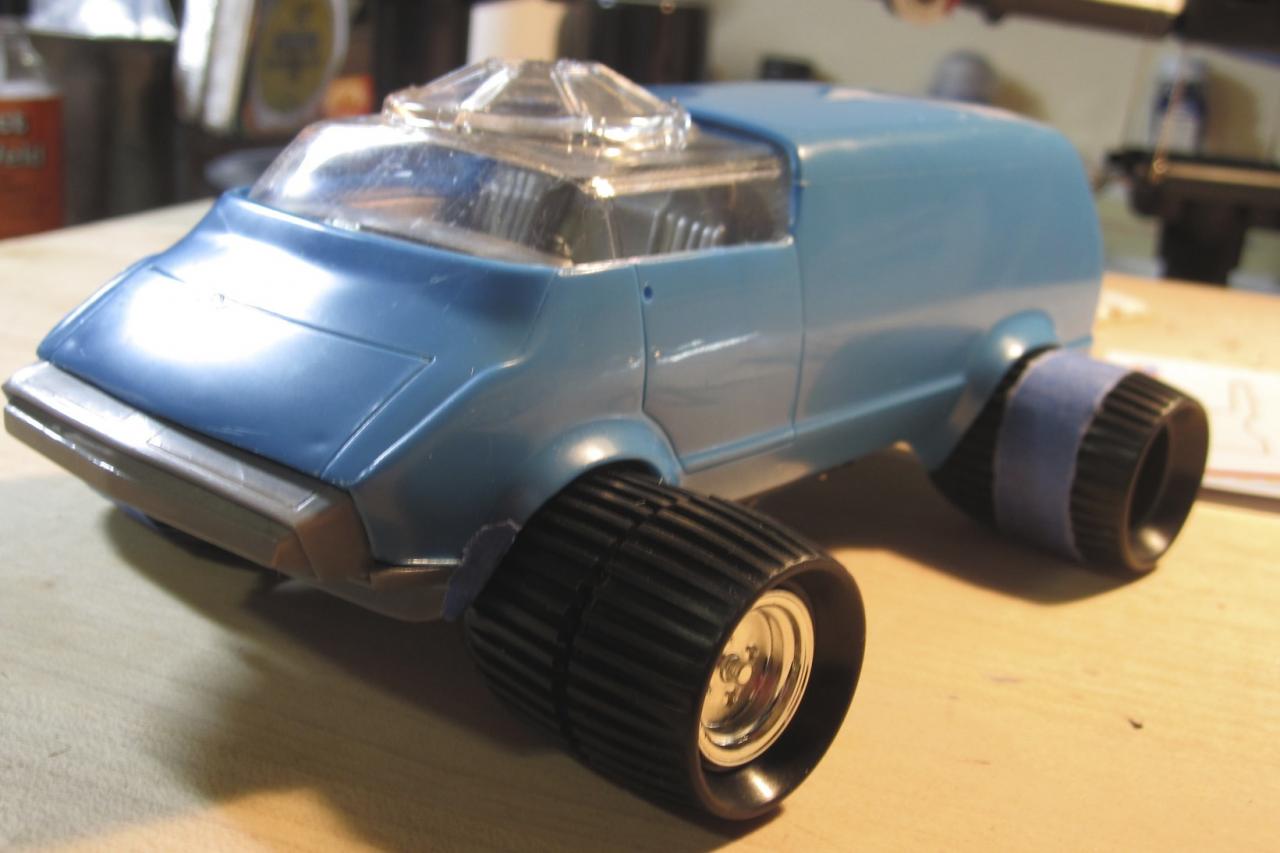
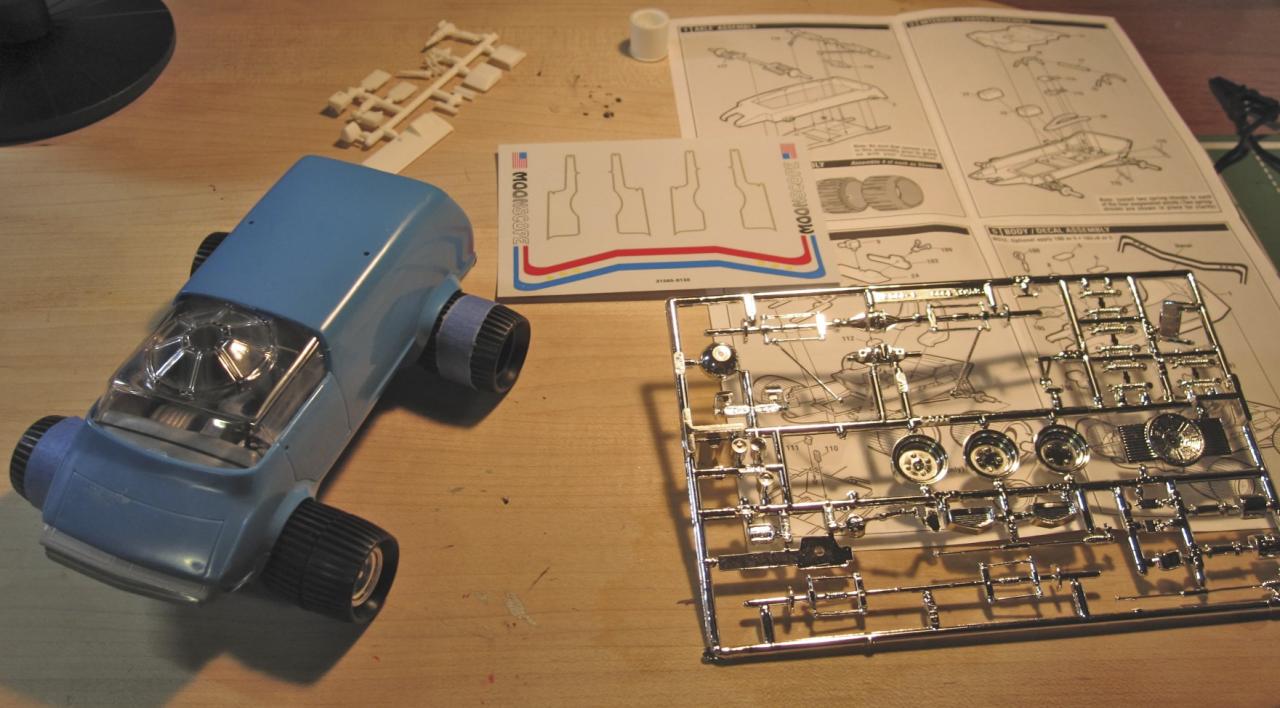
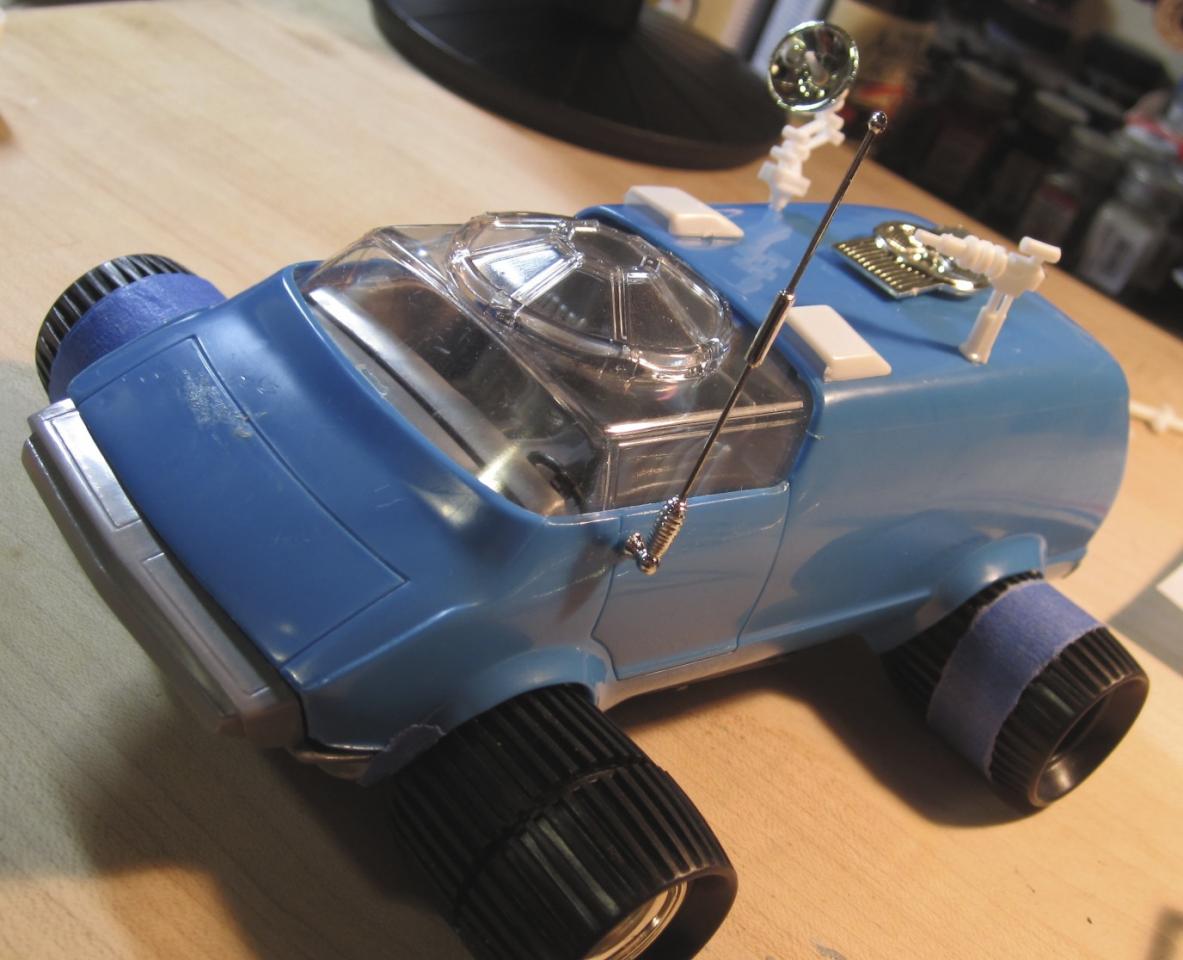
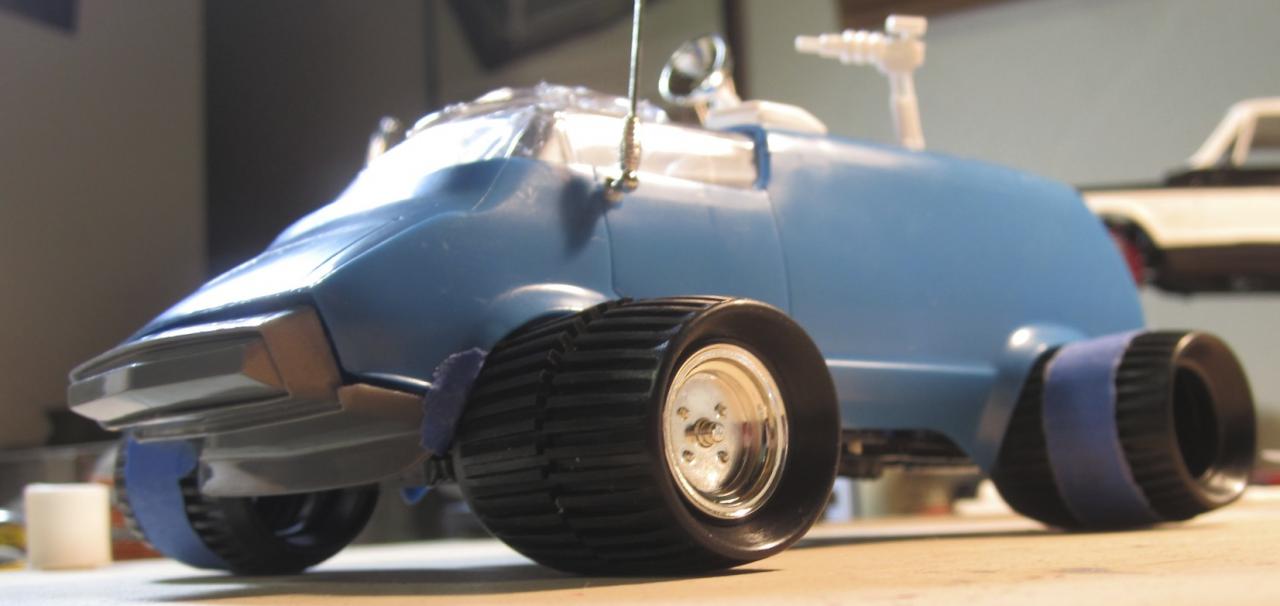
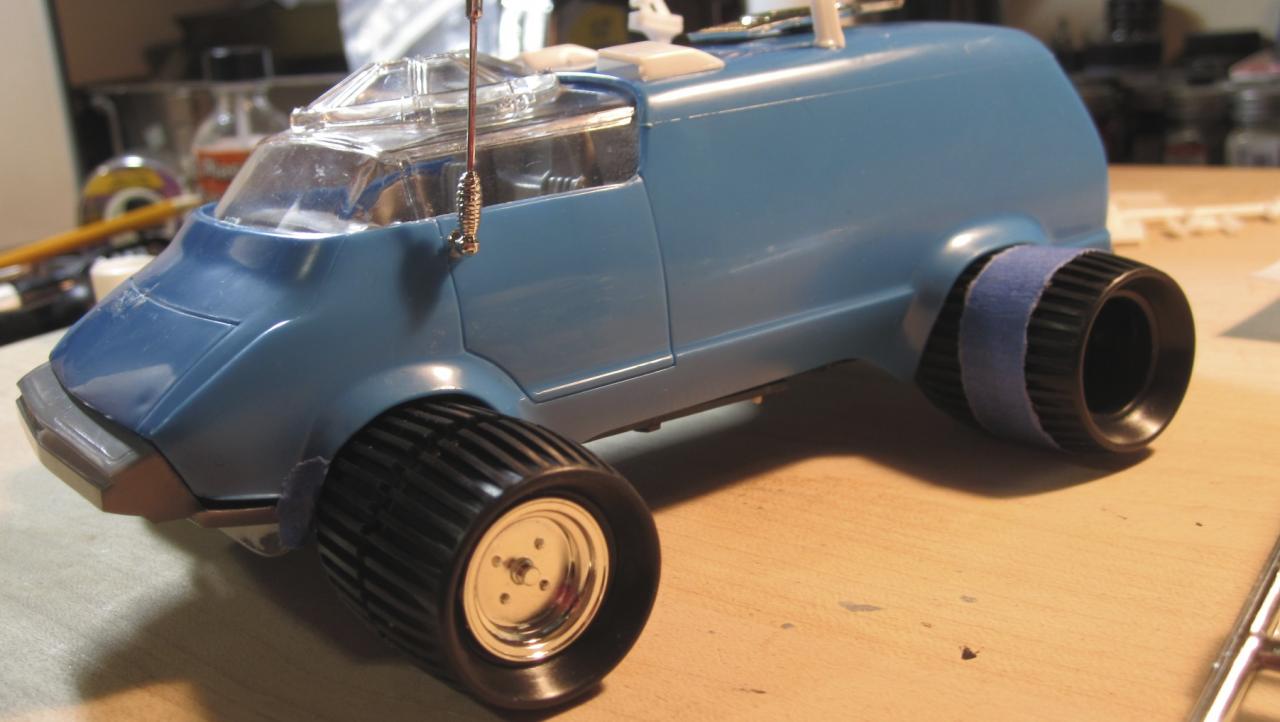
I'm still waiting for my income tax return, and waiting and waiting... So I picked up a side project for fun and to fill the time! It's a little 1/32 scale 1978 Star Wars R2 D2 van kit, missing many part's but i though it would go great with the Moonscope thing. I was also Inspired by my good friends comic and children's costume play armor, on this build, Moonscope parts on this van with a tie fighter window! In a world of space exploration. it seems to fit well. Great timing as Snapz releases this weekend. Check them out: www.facebook.com/SNAPZLLC?fref=photo
-
Finally getting around to messing with this one. Been wanting to do a custom van since my snap together model days of the 70's. I love these vans.
-
Wondering if I should continue this project as a custom, finished shiny model... or go the Dr Cranky route and make it an apocaliptic vehicle... What do you guys think?
-
Hi buddies, here is my last built in 2011 - completed in November. My Dodge A-100 Delivery Van: It based on the old IMC-Kit and a Resinbody (i think you know it) from Jimmy Flintstone To this body i will say, that it fixed perfect! The quality was really good and so i had only cut a little bit on the front and backframe. Also the windows and Doorpanels fixed perfect. Well done Jimmy! That was a easy and funny built. Enought of words, here are some pics - enjoy it ...more coming up... ... ...for a look inside the van...
-
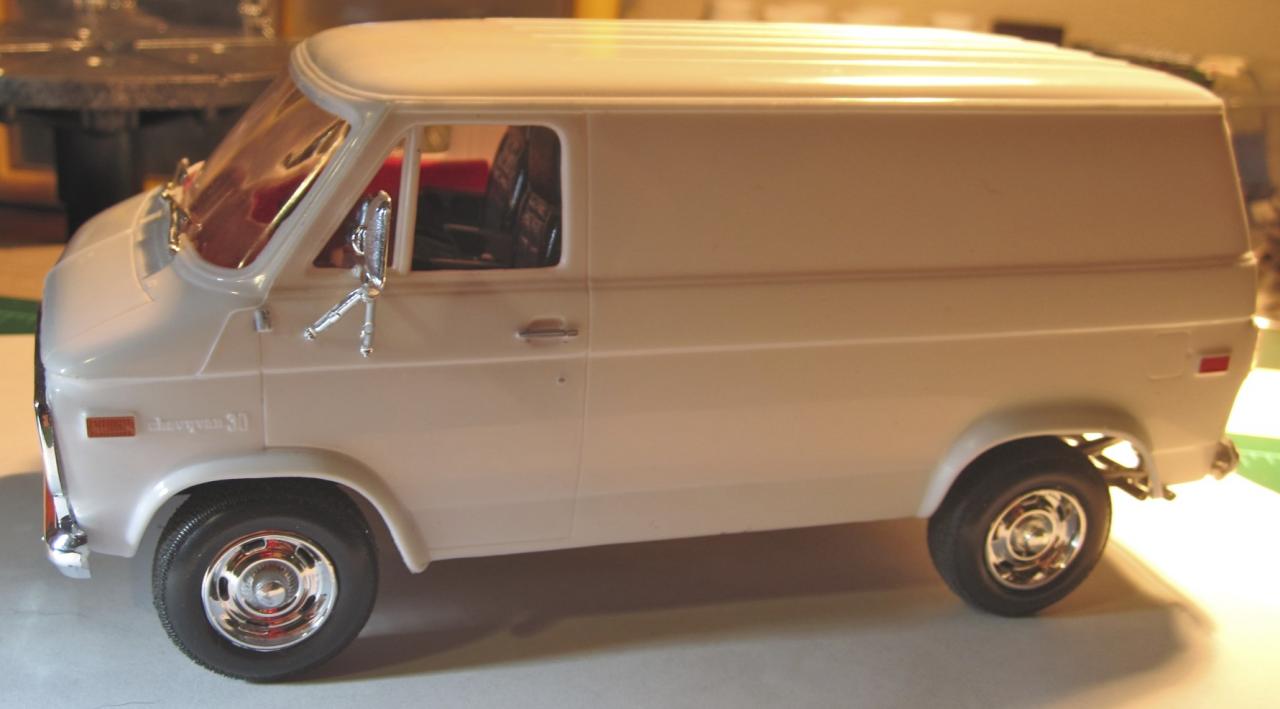
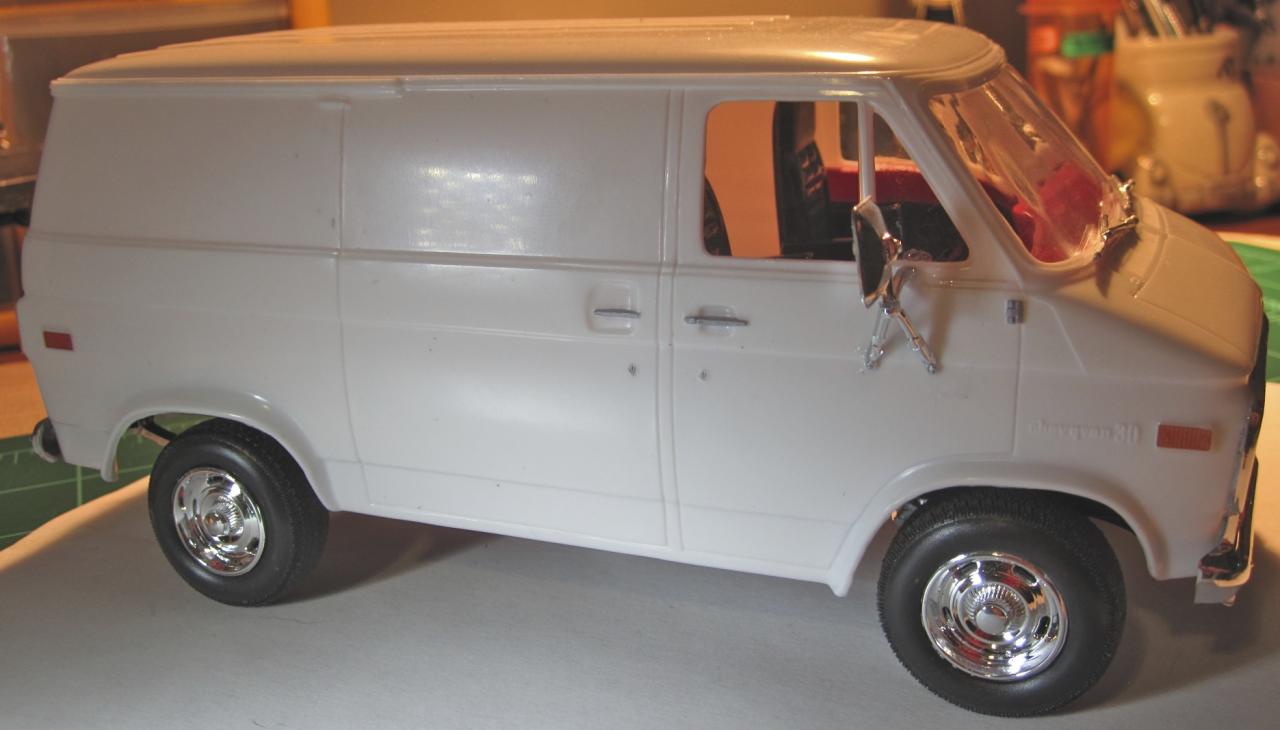
 Hey guys back on the bench here building I built this Revell Chevy van its also had the race trailer too but am keeping that for another build someday.I built this van pretty much stock or factory look .Since no hood opens or doors thought this would be a basic builder.I weathered the under chassis and exhaust well have a look. Hey guys also checkout some videos I posted on youtube heres a link http://youtu.be/lmKpKVe2BL8