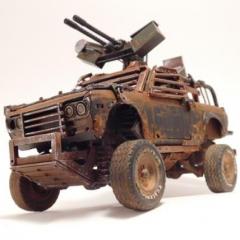
Daxman Posted December 17, 2020 Author Posted December 17, 2020 Thank you all!!! On 12/10/2020 at 3:05 PM, rob1957 said: Fantastic work . Something right out of Mad Max genre . What method are you using to create that excellent rust effect ? I haven't had any luck with that at all. I see videos explaining chipping effects on armour but nothing like what you have created here . The Picasso of rust effects . Thank you Rob. i start with a base coat of rust colored primer. Then two coats of Dullcoat. Third is a few layers of Acrylic latex in the body color. Lightly sand until it wears thru the latex and the rust primer shows thru. I'll go back with Acrylic rust colors and give it random highlights. I use 4-5 different rust colors for the highlights. Dry brush or with a sponge. Here's some more photos. Close ups of some of the small details. I love putting in tiny details. Most of which isn't seen unless you're really looking. My 1st attempt at the fins on the afterburners. A cool undercarriage view showing the Gundam parts, styrene rod and the kitchen sink. Before paint and weathering. Flight controls. All of them have the steering wheel designed like a flight yolk. Plenty of levers and a few have computer screens. Another undercarriage view. I'm still working on the Jetvette. Procrastinating on the livery decals. It's almost complete at this stage. I just need to do a little weathering. It wont be as weathered as the rest. Just a little grime.
landman Posted December 17, 2020 Posted December 17, 2020 It has all been said, creativity, outstanding weathering, art. Woderfully executed thematic project.??
RAMBENNA Posted December 20, 2020 Posted December 20, 2020 these are some of the most awesome build I have ever seen, they are so fantastic, great weathering and detail, like someone said you can't stop looking at them. Bravo
kruleworld Posted December 20, 2020 Posted December 20, 2020 Nice work. might i suggest for a future project a show rod?
Straightliner59 Posted December 20, 2020 Posted December 20, 2020 These are very, very well done! I'm not big on sci-fi, but your work on these is remarkable. Jetpunk! You can have that. ?
Paul Payne Posted December 22, 2020 Posted December 22, 2020 Just curious, what are your bases made from?
Daxman Posted December 29, 2020 Author Posted December 29, 2020 On 12/21/2020 at 8:48 PM, Paul Payne said: Just curious, what are your bases made from? The bases were given to me by my son. They're bases for standing Gundam figures on. If you look up MSG Chain Base, you should be able to find it. When you combine the price plus shipping, they get fairly expensive.
Big John Posted May 26, 2021 Posted May 26, 2021 WOW! Fifth Element meets Steam Punk! I love your weathering techniques and that you've given a great deal of thought to the technology of each machine. Parts appear to not be just stuck on for the look but give a sense having a purpose and functionality. Definitely movie quality work. Thanks for sharing! 1
spencer1984 Posted May 26, 2021 Posted May 26, 2021 Don't know how I missed this thread earlier, but I'm glad it was brought back. Wow! Just awesome work all around...the concepts, the details, and your skill are all top-notch! 1
misterNNL Posted May 27, 2021 Posted May 27, 2021 Absolutely outstandingly inspirational stuff! I was hooked on these from the beginning and am so very pleased that you have seen fit to continue adding more vehicles in this jenere. They collectively remind me of some "found object" art pieces I have seen like some future builders have scrouned what few pre-apocalyptic vehicle parts available and added the propulsion systems of a new era. Since I owned a real '48 Chevy your '47 hits a real sweet spot with me. I have built a couple jet propulsion devices in the last year that are are sitting on my bench looking for a ride that needs them. Ahhh...so many ideas and so little time 1
Charlie B Posted May 27, 2021 Posted May 27, 2021 Great inspiration gonna build one myself if ya don’t mind 1
carbuilder1950 Posted June 8, 2021 Posted June 8, 2021 You live in a world in your head that doesn't exist for the rest of us, and that's what makes model building so much fun, and so cool, when there is such a variety of imagination, talent and skills. Your work stands out here and really grabs our attention. I love how we all have different ways to approach this hobby and make it so much fun for ourselves and others. Beautiful work on everything my friend, and a real treat for me to enjoy. Dave 1
Daxman Posted June 9, 2021 Author Posted June 9, 2021 6 hours ago, carbuilder1950 said: You live in a world in your head that doesn't exist for the rest of us, and that's what makes model building so much fun, and so cool, when there is such a variety of imagination, talent and skills. Your work stands out here and really grabs our attention. I love how we all have different ways to approach this hobby and make it so much fun for ourselves and others. Beautiful work on everything my friend, and a real treat for me to enjoy. Dave Thank you Dave! On 5/26/2021 at 12:28 AM, Big John said: WOW! Fifth Element meets Steam Punk! I love your weathering techniques and that you've given a great deal of thought to the technology of each machine. Parts appear to not be just stuck on for the look but give a sense having a purpose and functionality. Definitely movie quality work. Thanks for sharing! Thanks for bringing this post back John! Now I can add my 62 Impala. 62 Impala - Lowrider/Highflyer - Build 11 From the start of this build, I wanted it to have the lowrider style. Not too flashy. Simple and clean. I'm very happy with the color combo. Tamaya TS-60 Pearl Green and TS-7 Racing White. I used Aluminum spray over anything that was supposed to be chrome. I added about 3/16" Styrene strip to the lower rear quarter panel below the white side stripe. It helped bring the rear wheel arches down and also give the car a more rectangular look from the side. I also cut out reliefs in the front fenders. You know I love my vents and large intakes! I used the same VTOL type thrusters under each of the wheel wells as I did on the 41 pickup, and the 32 Ford Vickie. It's probably the most simple type thruster to make. Take half of a V8 engine. Cut off the transmission housing from the bell backwards. Glue two Styrene tubes where the heads mount. Then glue it to the undercarriage so the thrusters angle out at 45 degrees. Then cover it in pipes or whatever will disguise the engine block. Fill the wheel wells with parts that look like they belong.
Rocking Rodney Rat Posted June 9, 2021 Posted June 9, 2021 WOW!! These are laugh-out-loud KOOL!!! Great weathering, really imaginative. Very interesting... -RRR
echo Posted June 9, 2021 Posted June 9, 2021 Your compilation of your jet car builds is fantastic. Thanks for doing it . Each of your builds have so much going on and so much to appreciate. Nice work on all of them. The photos show them off quite well.
Dominik Posted July 7, 2021 Posted July 7, 2021 On 6/9/2021 at 1:42 PM, Rocking Rodney Rat said: WOW!! These are laugh-out-loud KOOL!!! Great weathering, really imaginative. Very interesting... -RRR agreed
roadkill Posted July 8, 2021 Posted July 8, 2021 (edited) Wow, just wow, you clearly have a wicked, (warped) mind, (imagination) to create all these freakin awesome builds, and the build quality is second to none, awesome builds you should be very proud. Michael Pederick. (roadkill) Edited July 8, 2021 by roadkill
Recommended Posts
Create an account or sign in to comment
You need to be a member in order to leave a comment
Create an account
Sign up for a new account in our community. It's easy!
Register a new accountSign in
Already have an account? Sign in here.
Sign In Now