rsxse240
-
Posts
633 -
Joined
-
Last visited
Content Type
Profiles
Forums
Events
Gallery
Everything posted by rsxse240
-
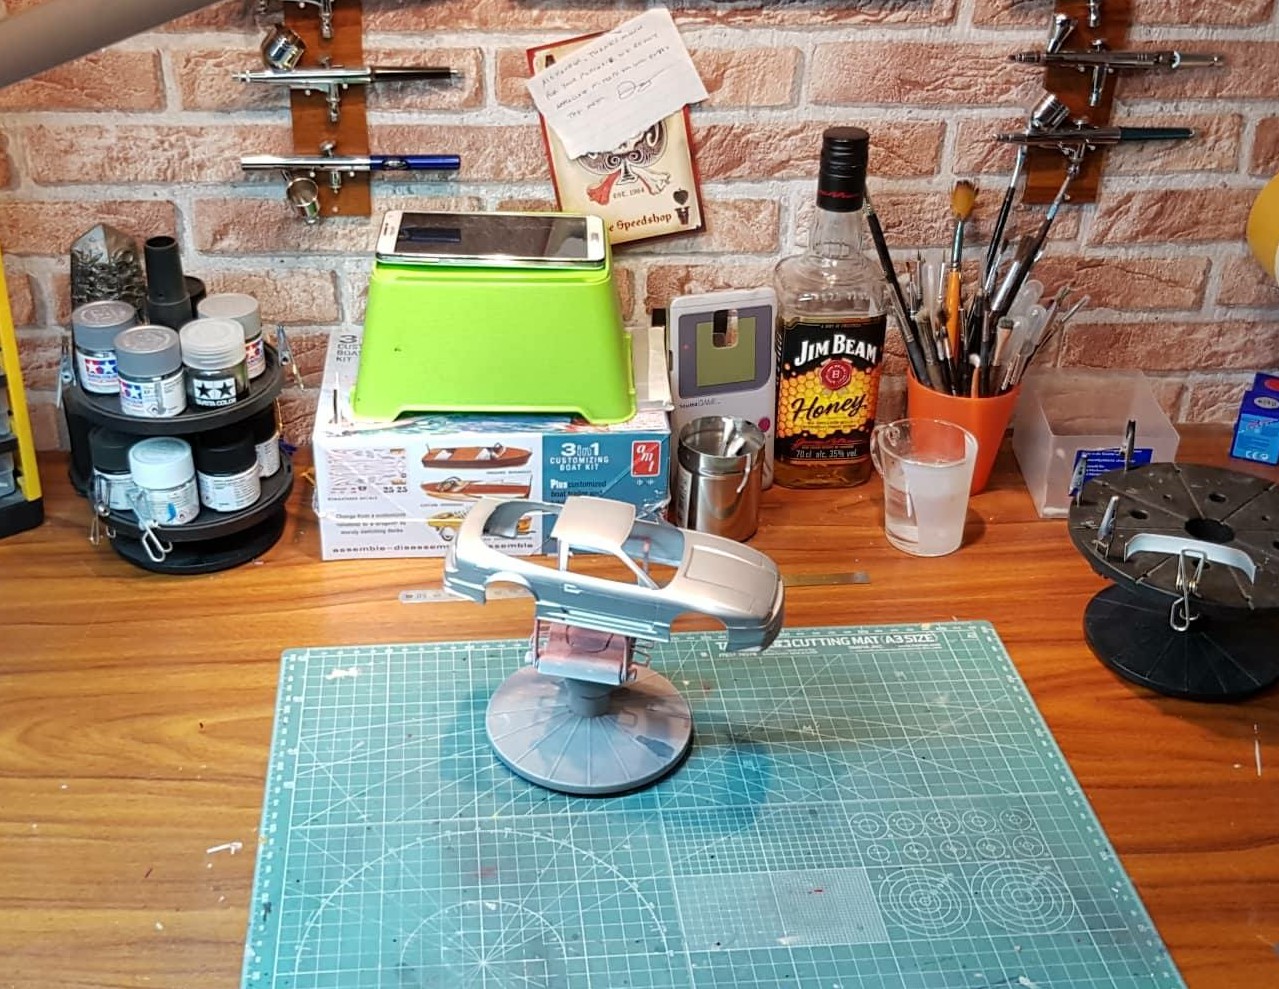
Well it's been a while but I do have a sort of update. It has a, not so fresh, base coat. It's been sitting in paint jail for a long time. Hopefully soon we can see some color.

-
Re-engineering Monograms Lotus Esprit...new update!
rsxse240 replied to Dann Tier's topic in WIP: Model Cars
Dann, you really need to invest in a spray booth. If you are getting mountains of primer dust on the floor, what amount of it is getting into your lungs? I can't even imagine the boogers you are dealing with! Lol! All warnings and jokes aside, this is a GORGEOUS build! You should consider using this as a master and having a mold made for casting resin bodies. I look forward to more progress! Thanks for the inspiration! -
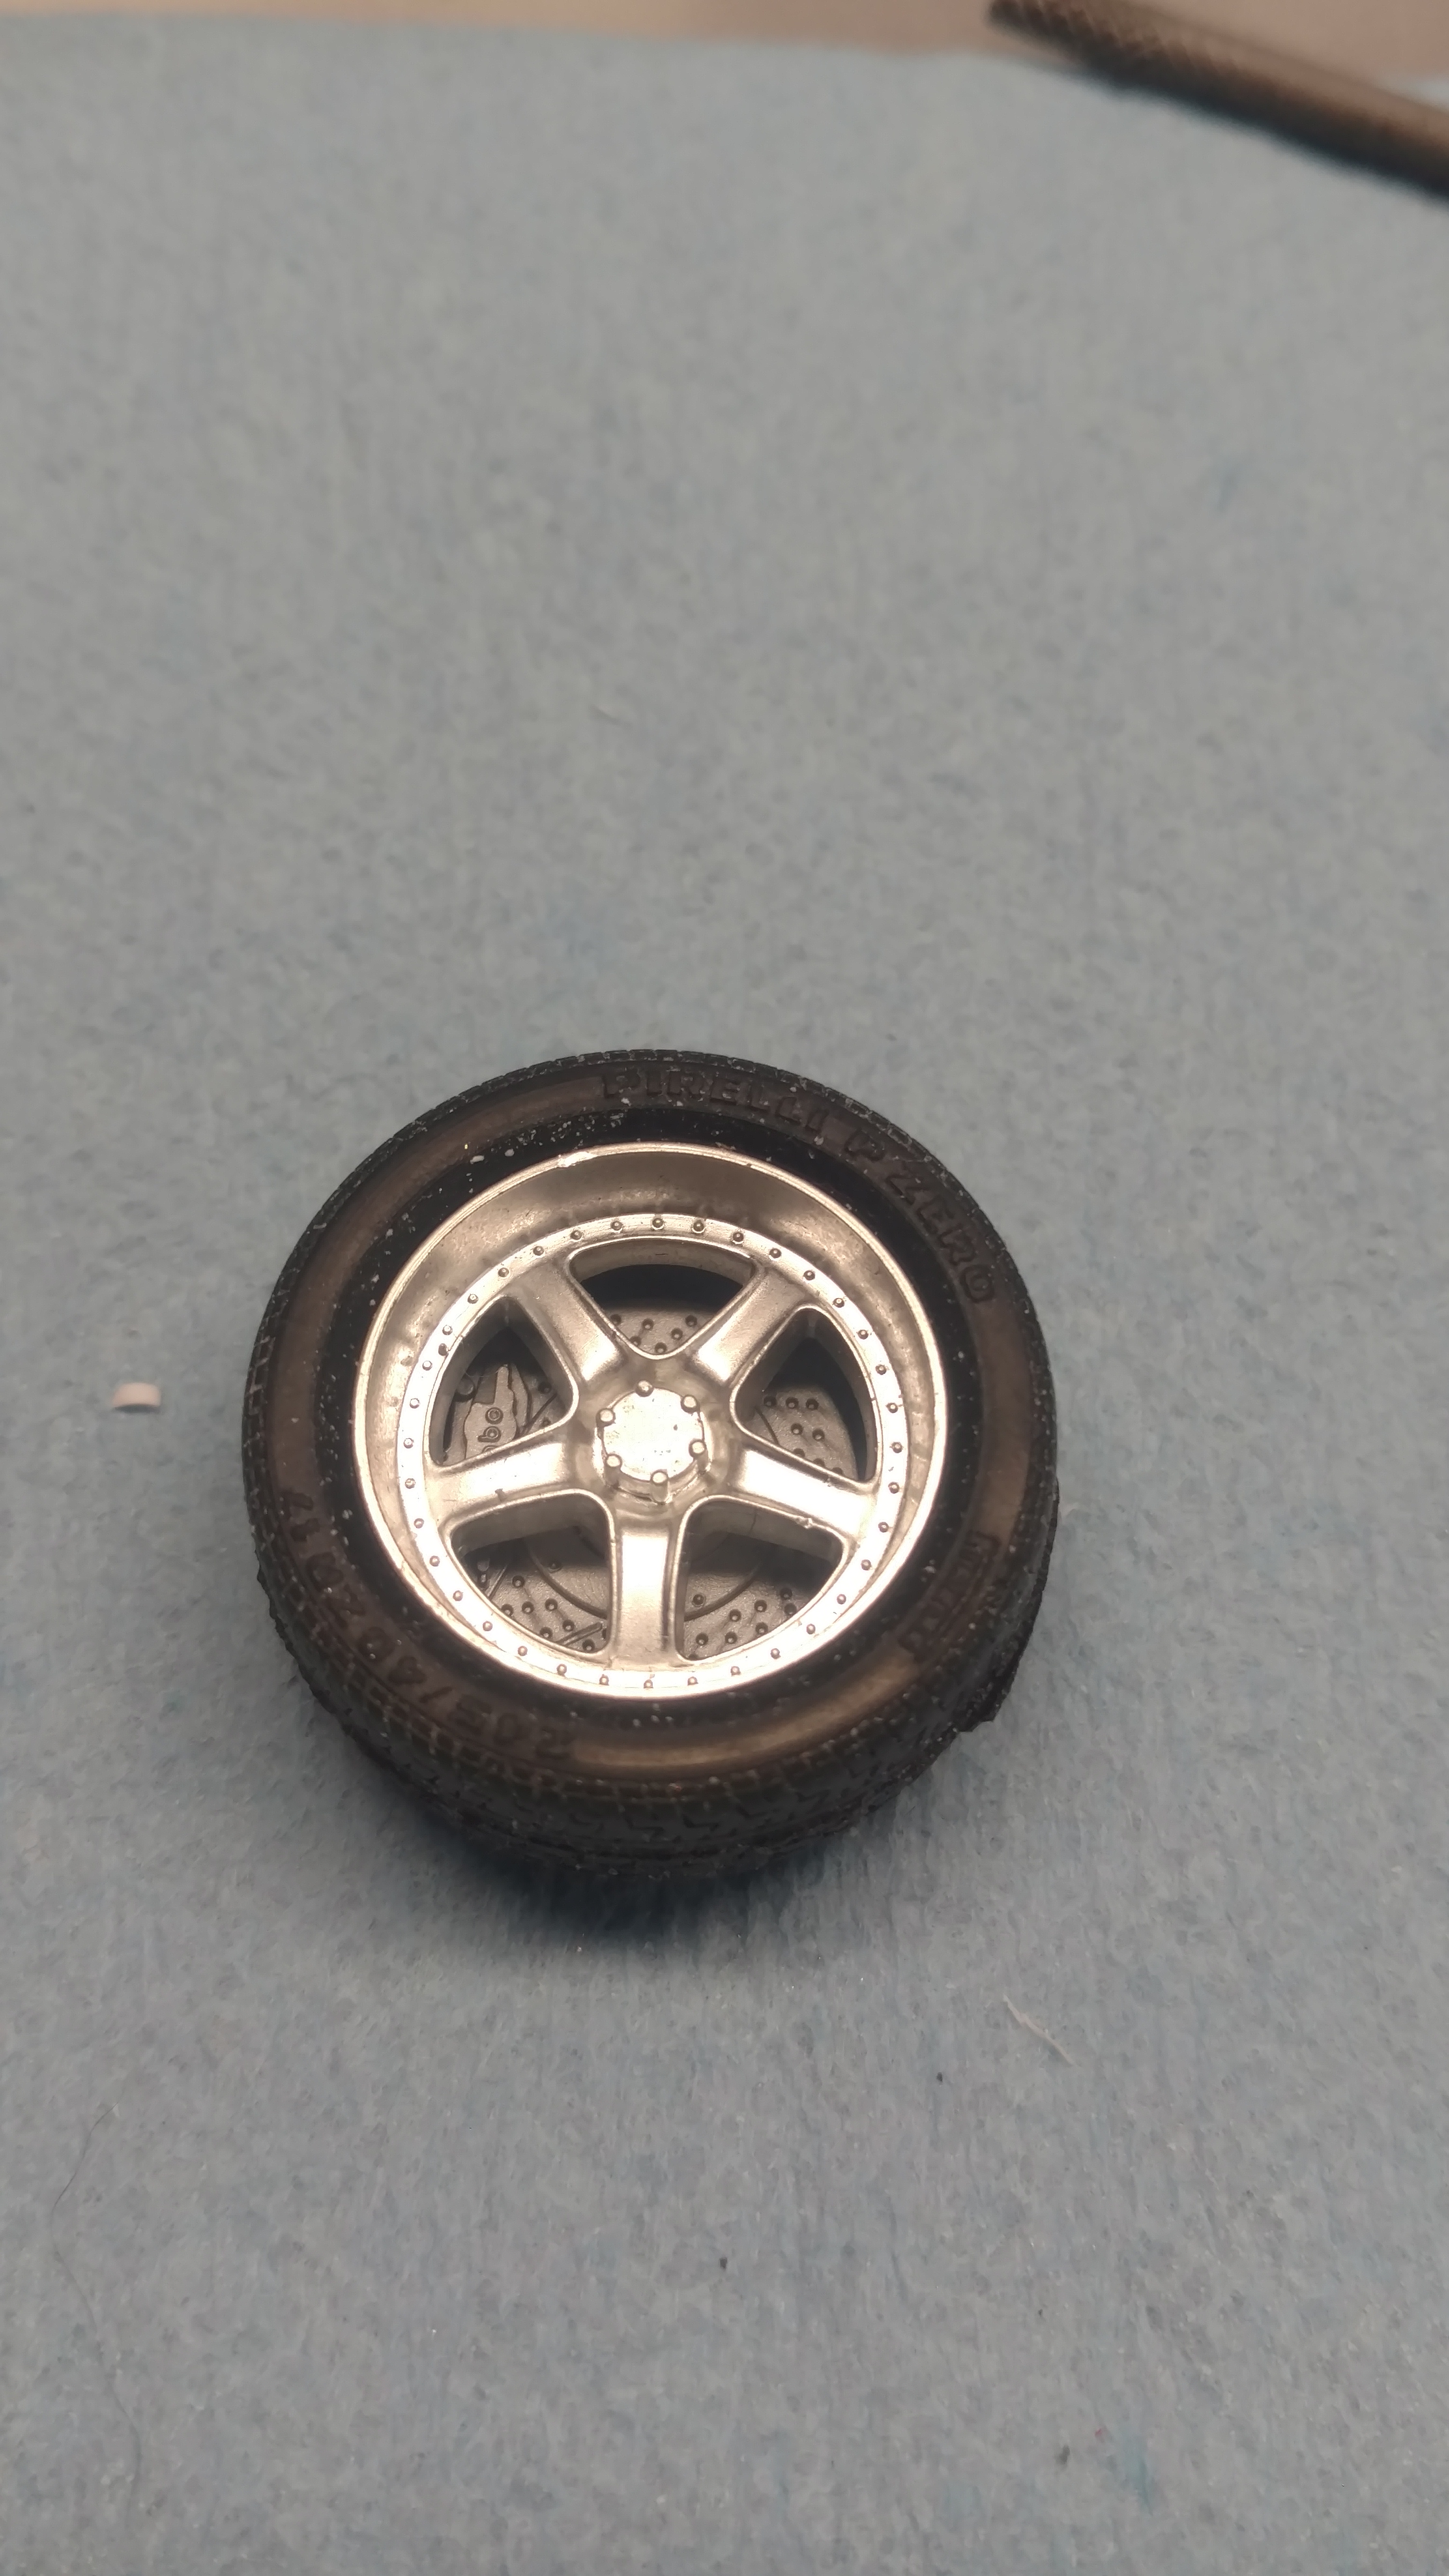
Some more work done on the SVO. The stock wheels just weren't going to be sufficient so I dug out some older, era correct wheels from the spare wheels stash. I THINK they're Aoshima or Fujimi. With the new wheels, I had to make axle adapters. Broke out the drill and emry board and went to work. I then realized the spokes were VERY open and it looked terrible without brakes, so I went to the parts box again and found some Brembo brakes from Fujimi. There was only details on one side, so I carved up some plastic and some aluminum tube to represent the back of the caliper and a fresh air scoop for the rotor. In the picture above, you can also see the axle ends and brake caliper bracket that was also scratch built from sheet styrene. Here is a mock up of the whole shebang. The wheels are not true to life with the giant inner lip, so I checked them in the lathe and corrected the issue. (Last picture) They definitely look better. To get the whole assembly together, I'll have to build it into the wheel and I'm not quite ready for that. Thanks for looking!
-
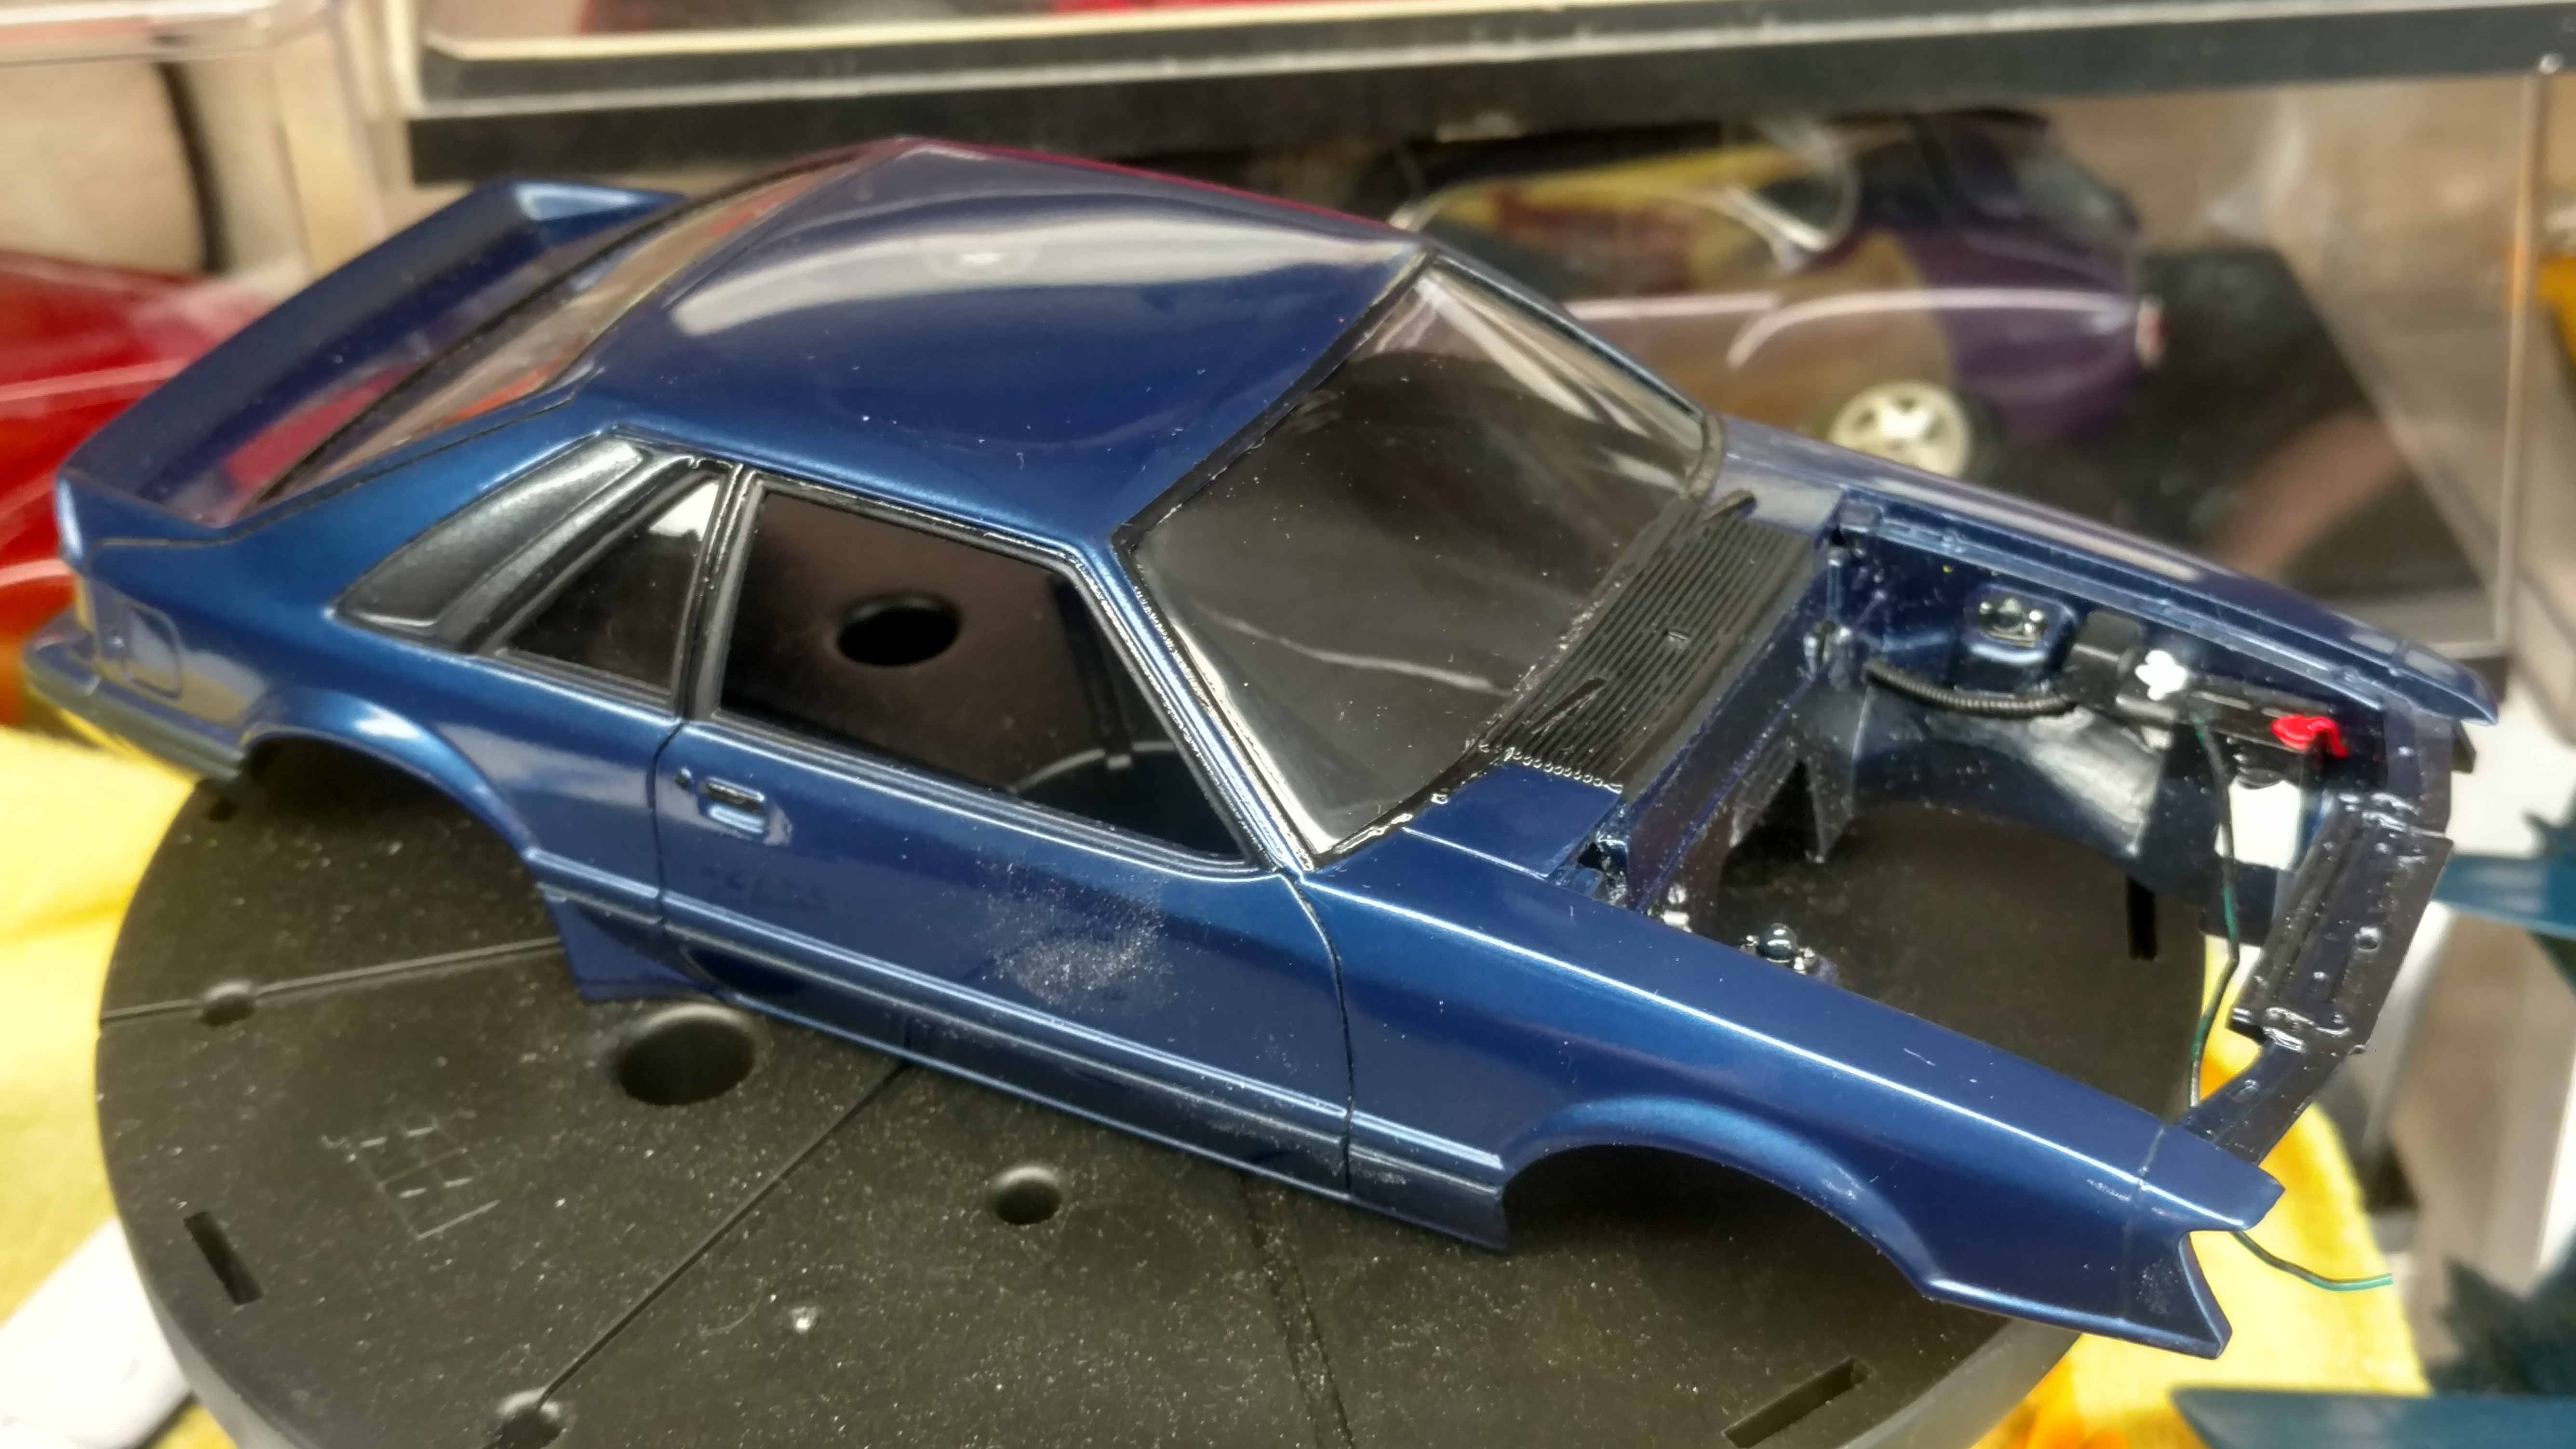
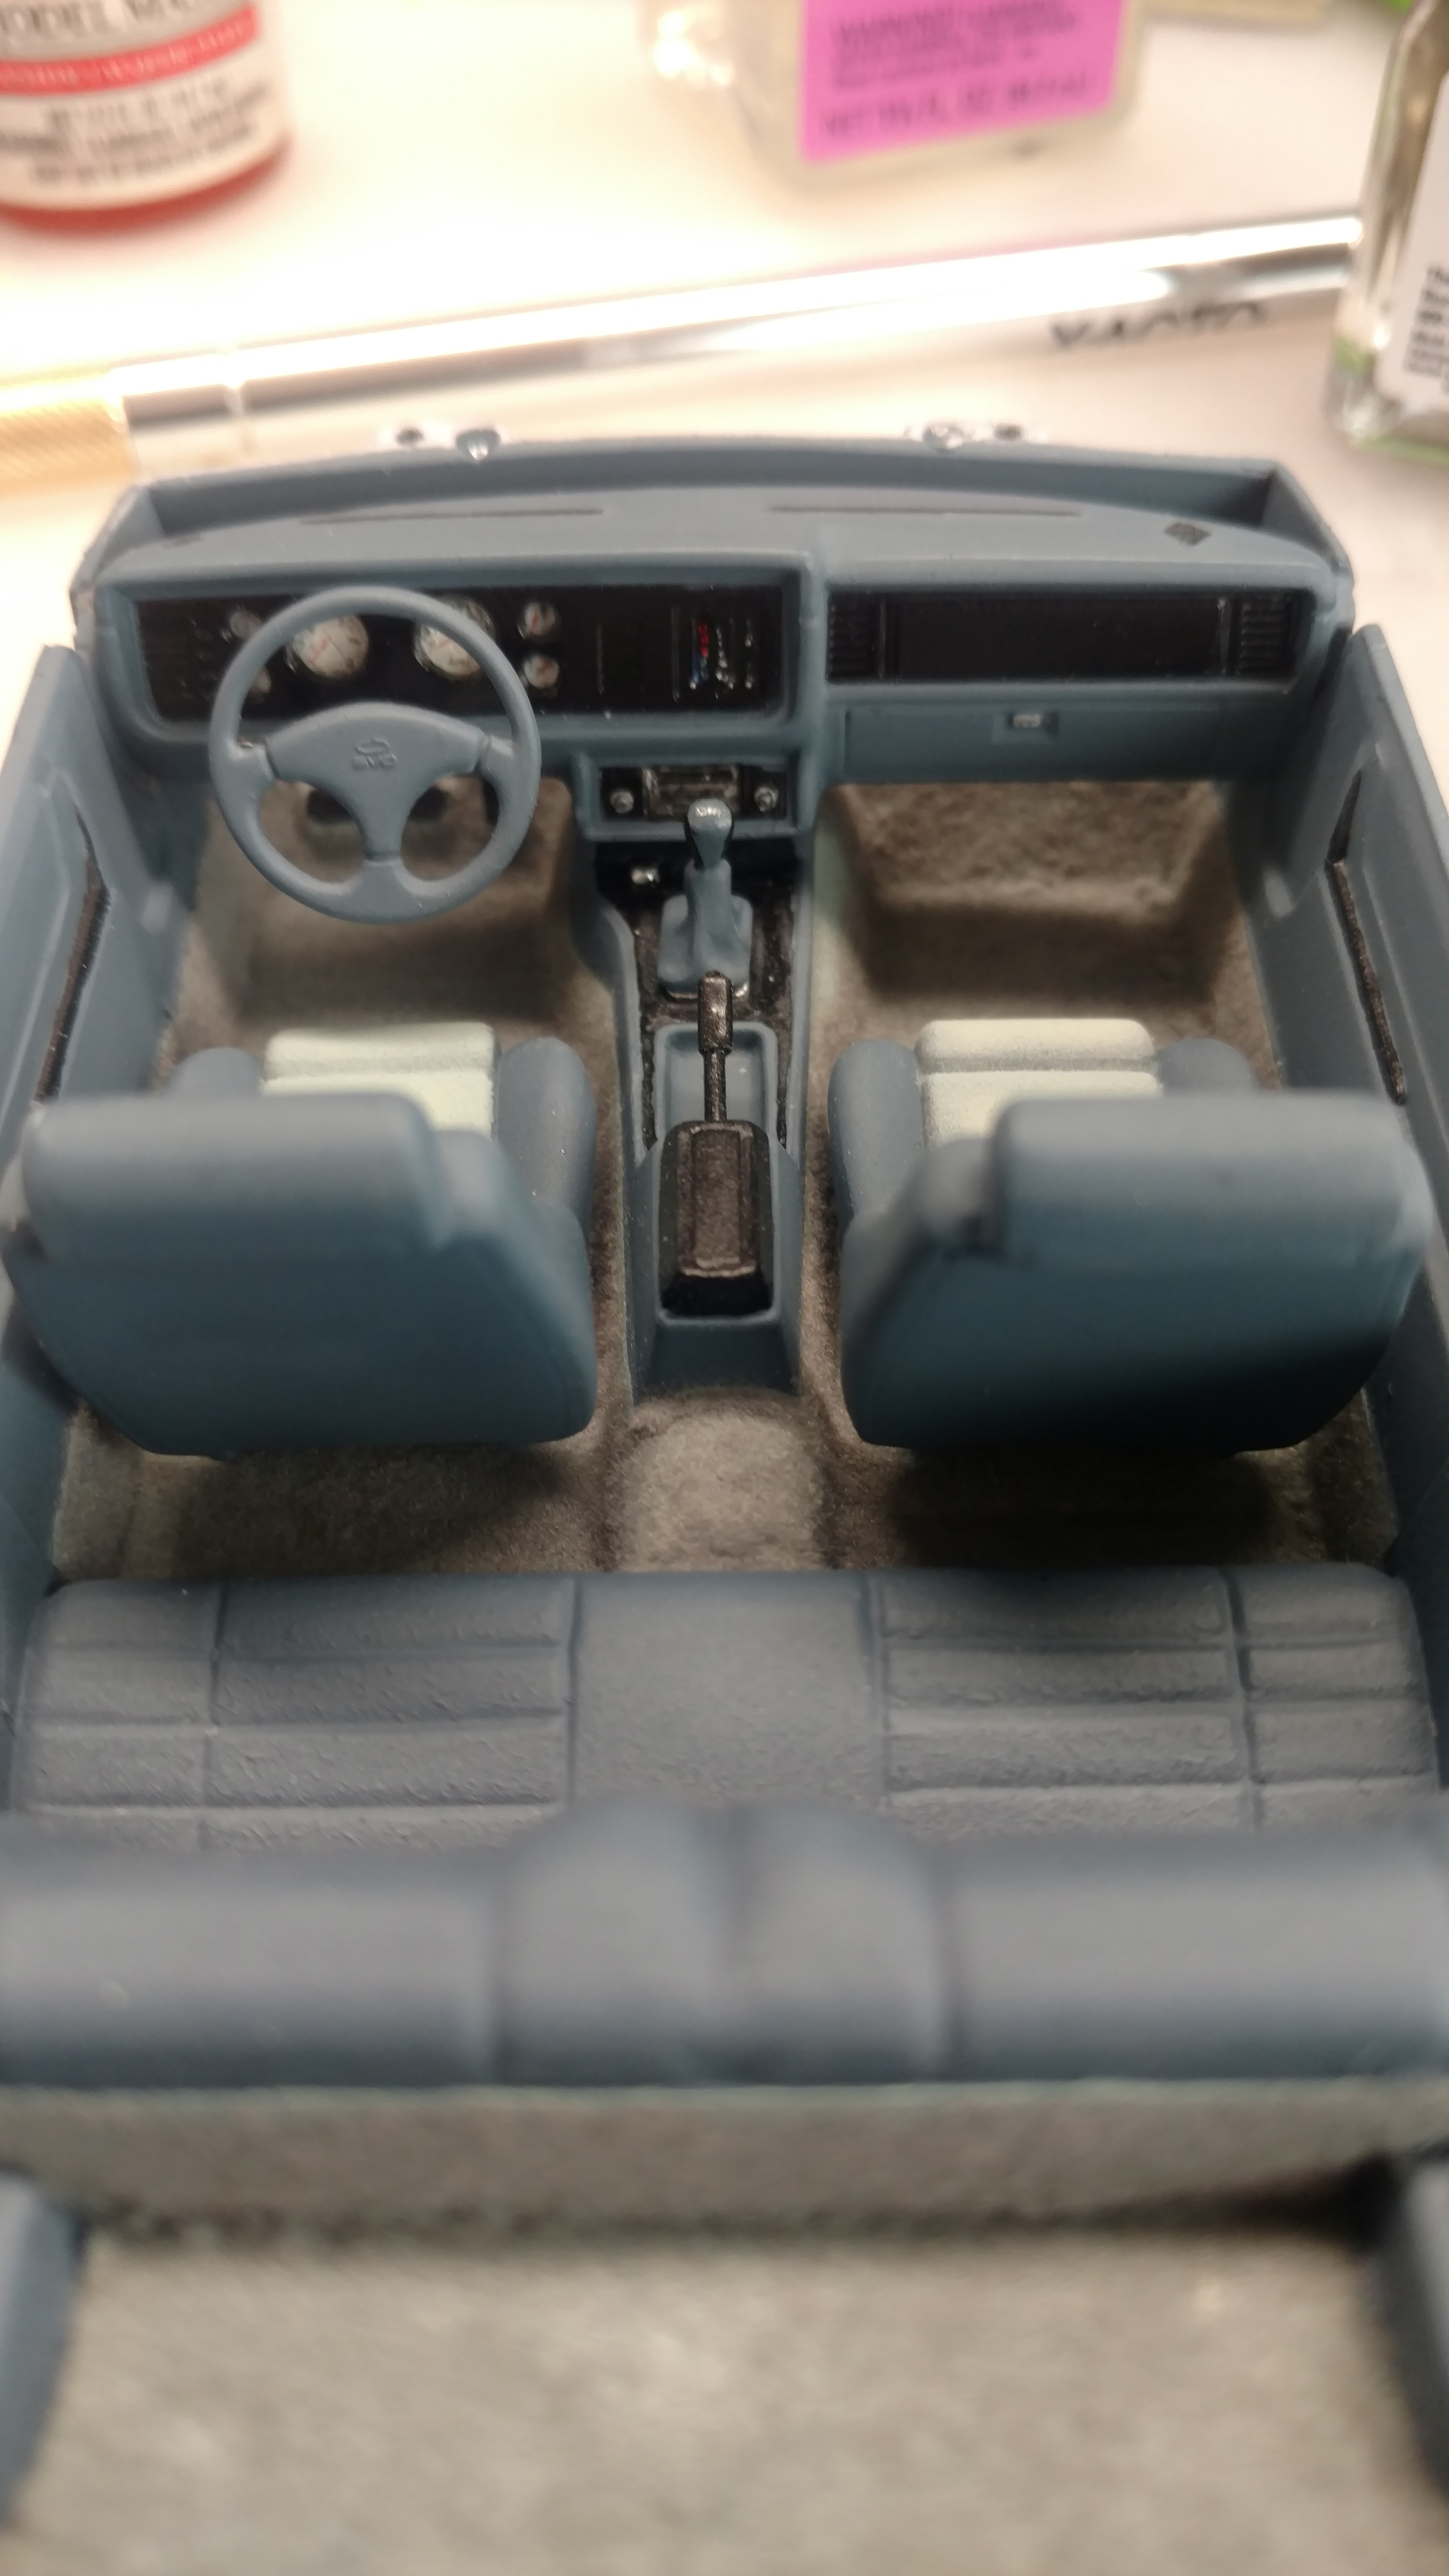
"Why does it take so long to build a model?" they ask. Well, it's because I can't leave well enough alone. I re-detailed the brake master cylinder. Just because I like to torture myself. I finished the interior. Just basically out of the box with some attention to available details. I also have repaired the fender, painted the trim and mouldings, and installed the glass. I also made ANOTHER set of headlights because I keep giving them away. I also made a second set for the other SVO in my stash. Not much to do now, other than adding more details to the engine bay and chassis. Thanks for looking in. -Ken
-
It looks infinitely better than the original headlight! Now all there is to do is replicate it on the other side! Looks great, friend. Keep it up and keep on posting updates!
-
One step forward and repaint a fender because I was stupid and dripped some CA accelerant on the paint. Now to wait a few days for this acrylic paint to fully cure and re clear the fender. GRRRR!!!
-
Fujimi Nissan Skyline R34 25GT Turbo 1:24
rsxse240 replied to Funkychiken's topic in WIP: Model Cars
OH MY GOD WHAT A TEASE! I was so excited to see your beautiful interior panels in place only to scroll down and find you still have more to go! It is like a cliff hanger TV show. Now I'm hooked and can't wait to see how it come out in the next episode! Great work here, friend! I honestly look forward to seeing more! -
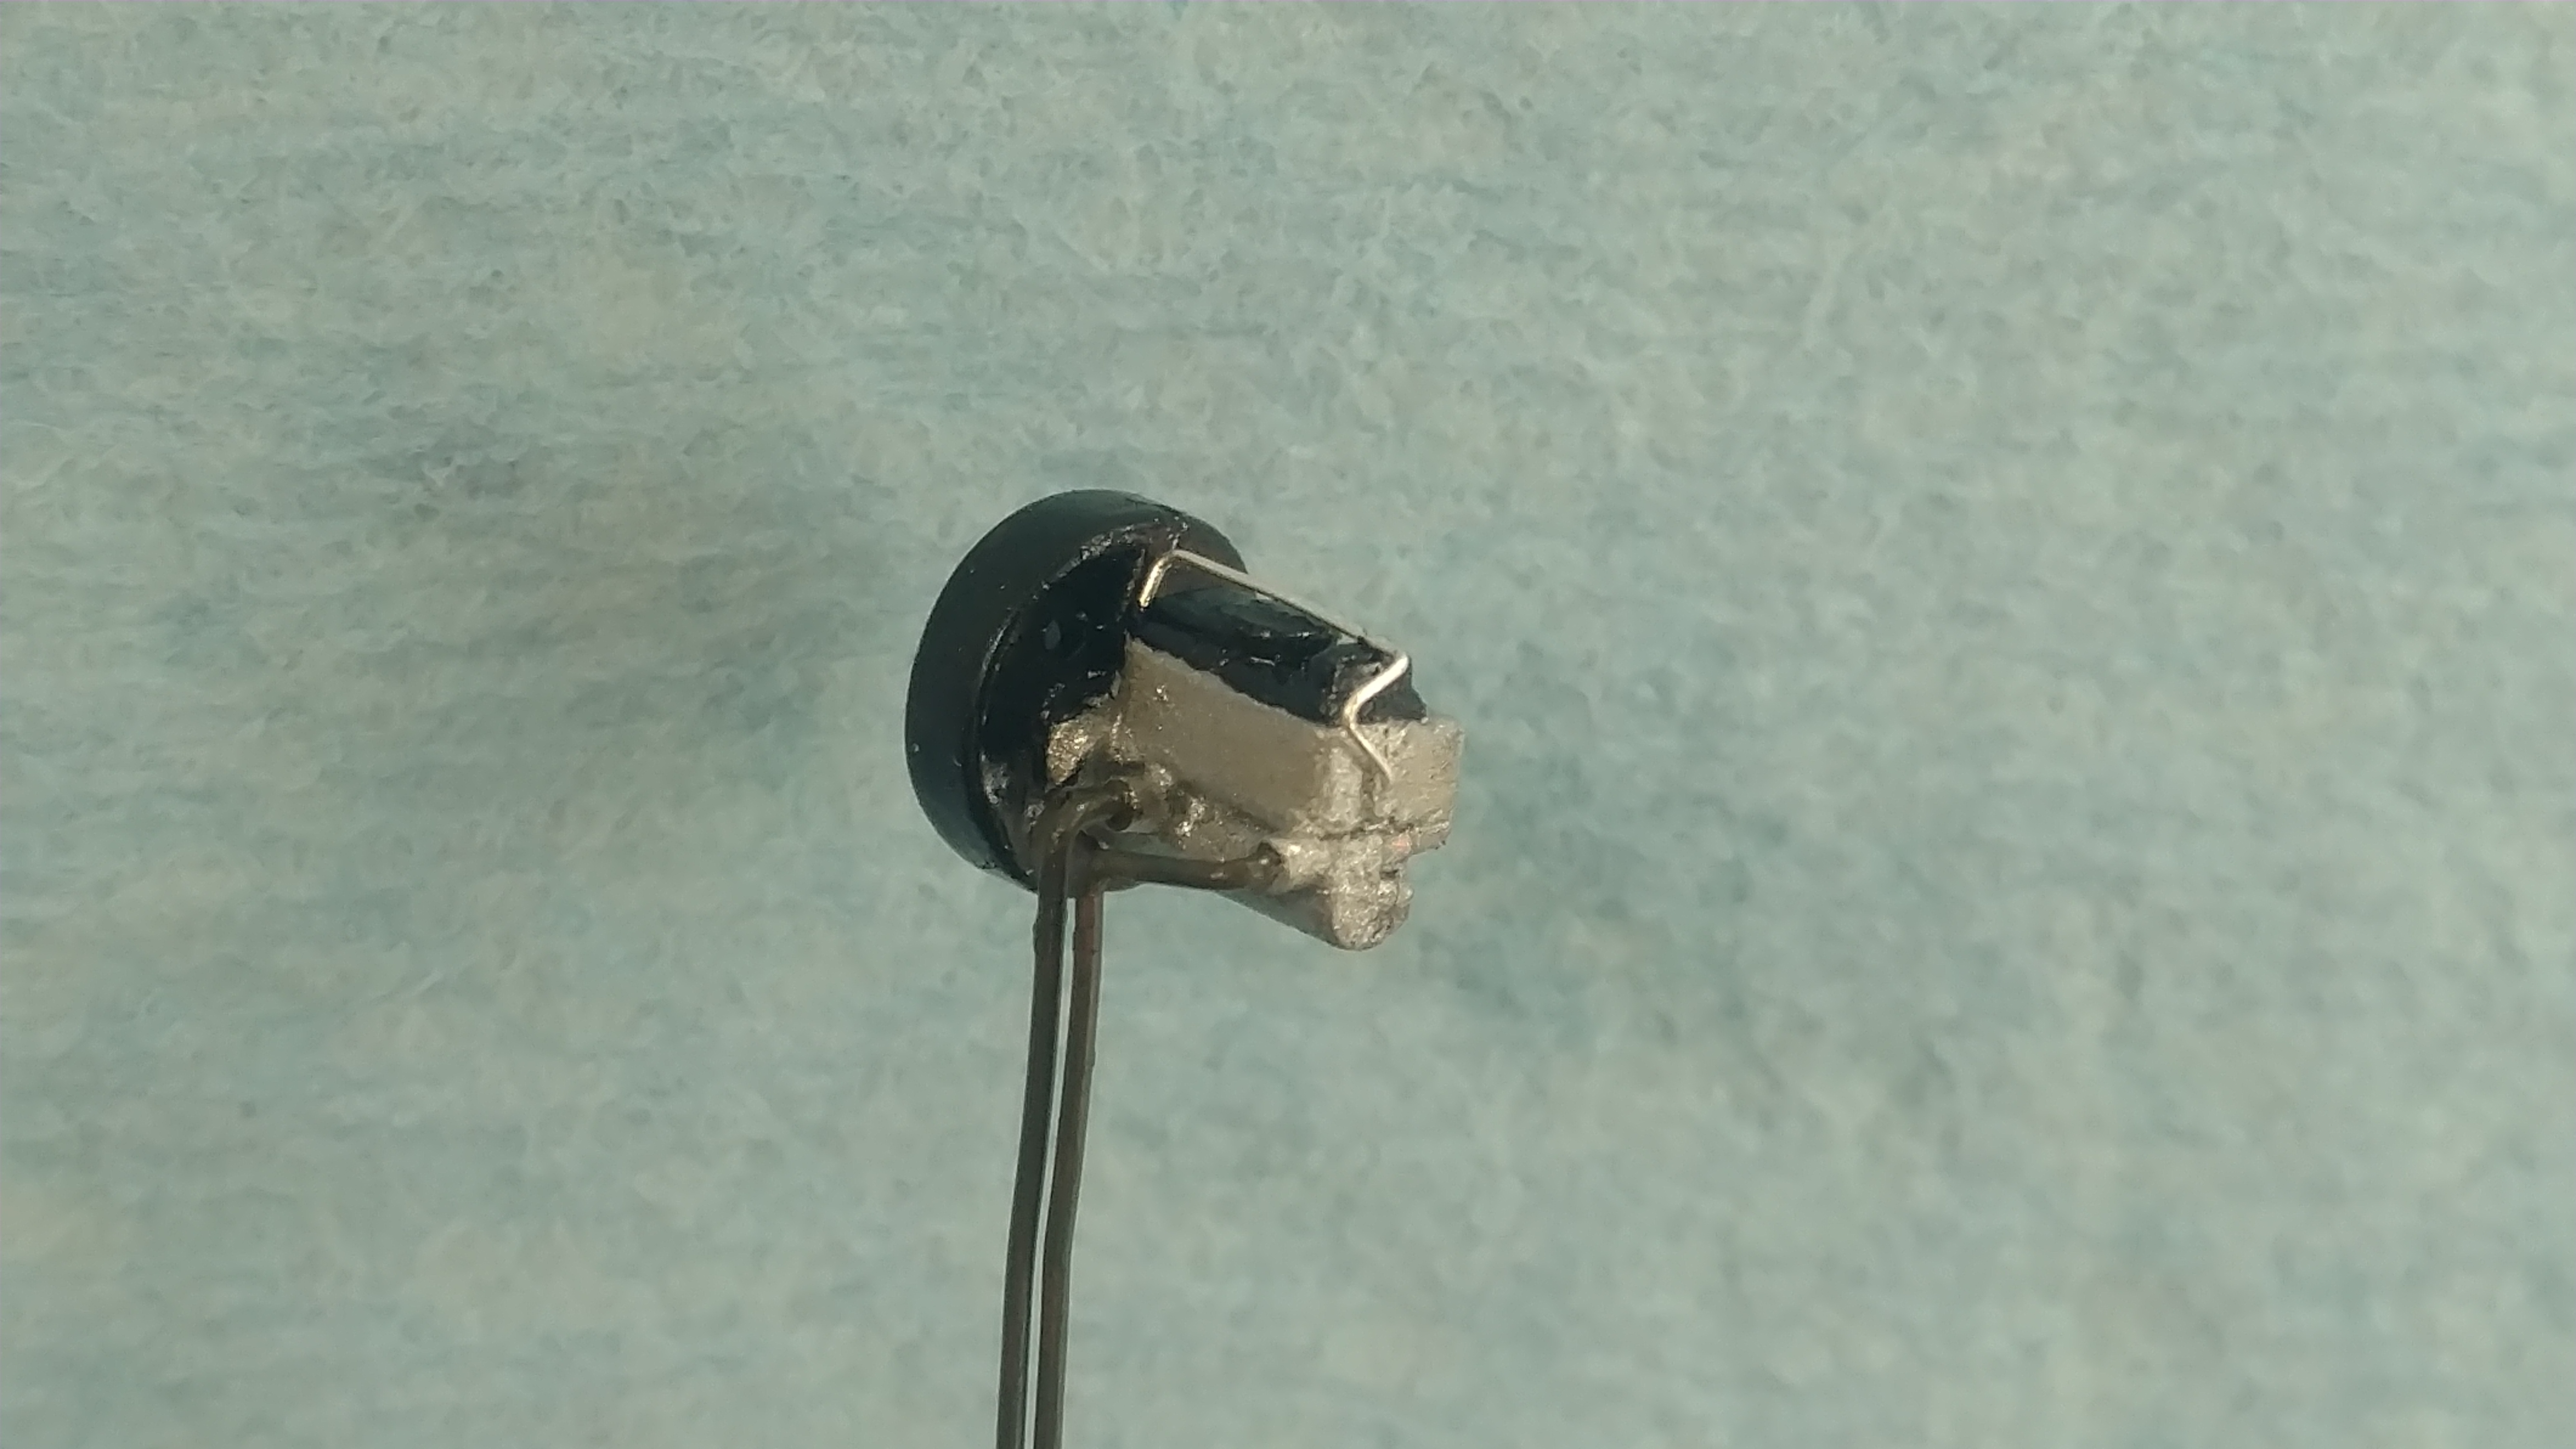
I usually edge all of my "glass" and clear Parts with black to add depth and hide the thickness of the lens. You may, however be on to something with the silver. It would carry the reflection bucket out to the edge of the lens. What you have done so far is nothing short of amazing. On a side note. My method of making clear headlights to replace the chrome plated ones is to use filler/putty on the back side of the chrome headlights and shape it into a reflection bucket, then make a mold and cast it in clear resin. Paint the back of the "bucket" chrome with a Molotow pen then drill a tiny hole and fill it with Amber or silver paint to represent bulbs. These are from my current project, SVO Mustang. It came with chrome turn signals and clear headlamps.
-
I have this one and one other, that I had to rob the glass from because this one cracked. I would like to get a few more for some future builds of ideas I have.
-
Hasegawas Lamborghini Miura SV....new update!
rsxse240 replied to Dann Tier's topic in WIP: Model Cars
After seeing this, I am just that much more disappointed with the Italeri Miura (ESCI rebox) kit. This one looks so much better! -
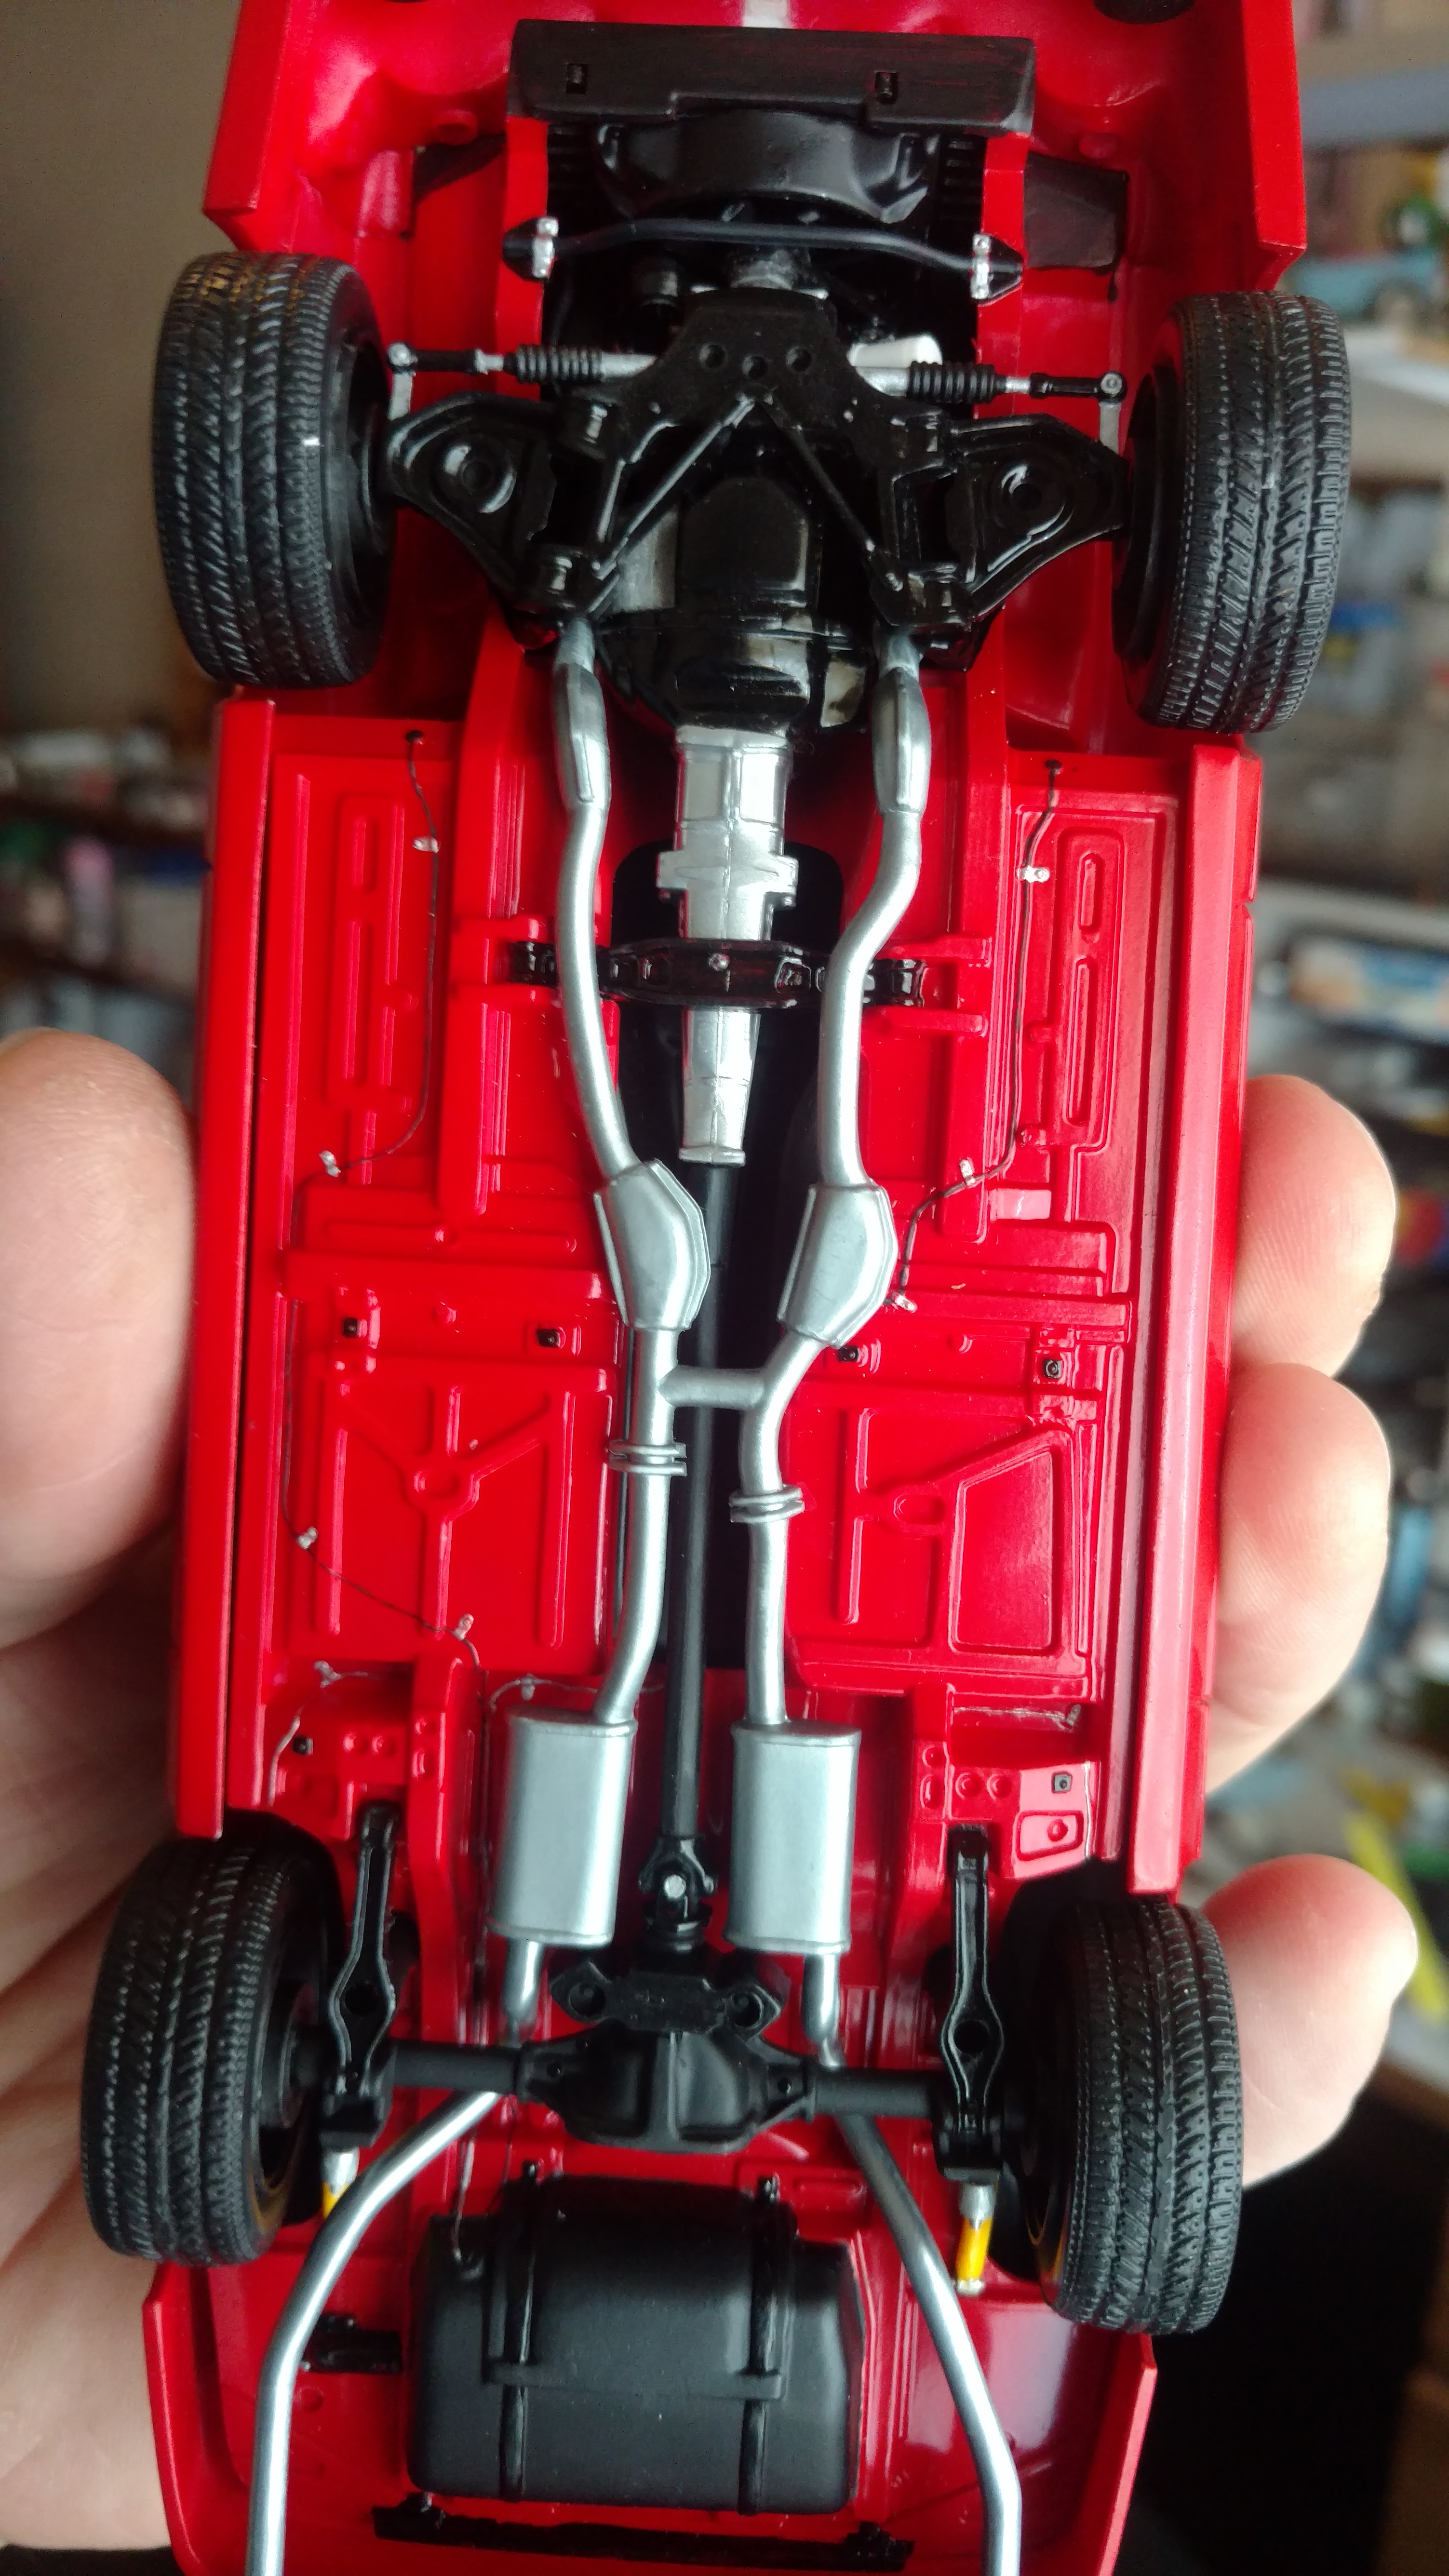
Well, I dug this back out. I've been having a multitude of self induced problems that I won't bore you with. Here's today's work. Added wires to the battery, brake lines to the master cylinder, and I used some guitar string painted black to represent the main chassis harness coming from the fuse box to the firewal I should hope to be progressing quickly to completion in the near future! Thanks for looking.
-
I always get excited when I see "Made in Brazil". You never disappoint! Very cool build.
-
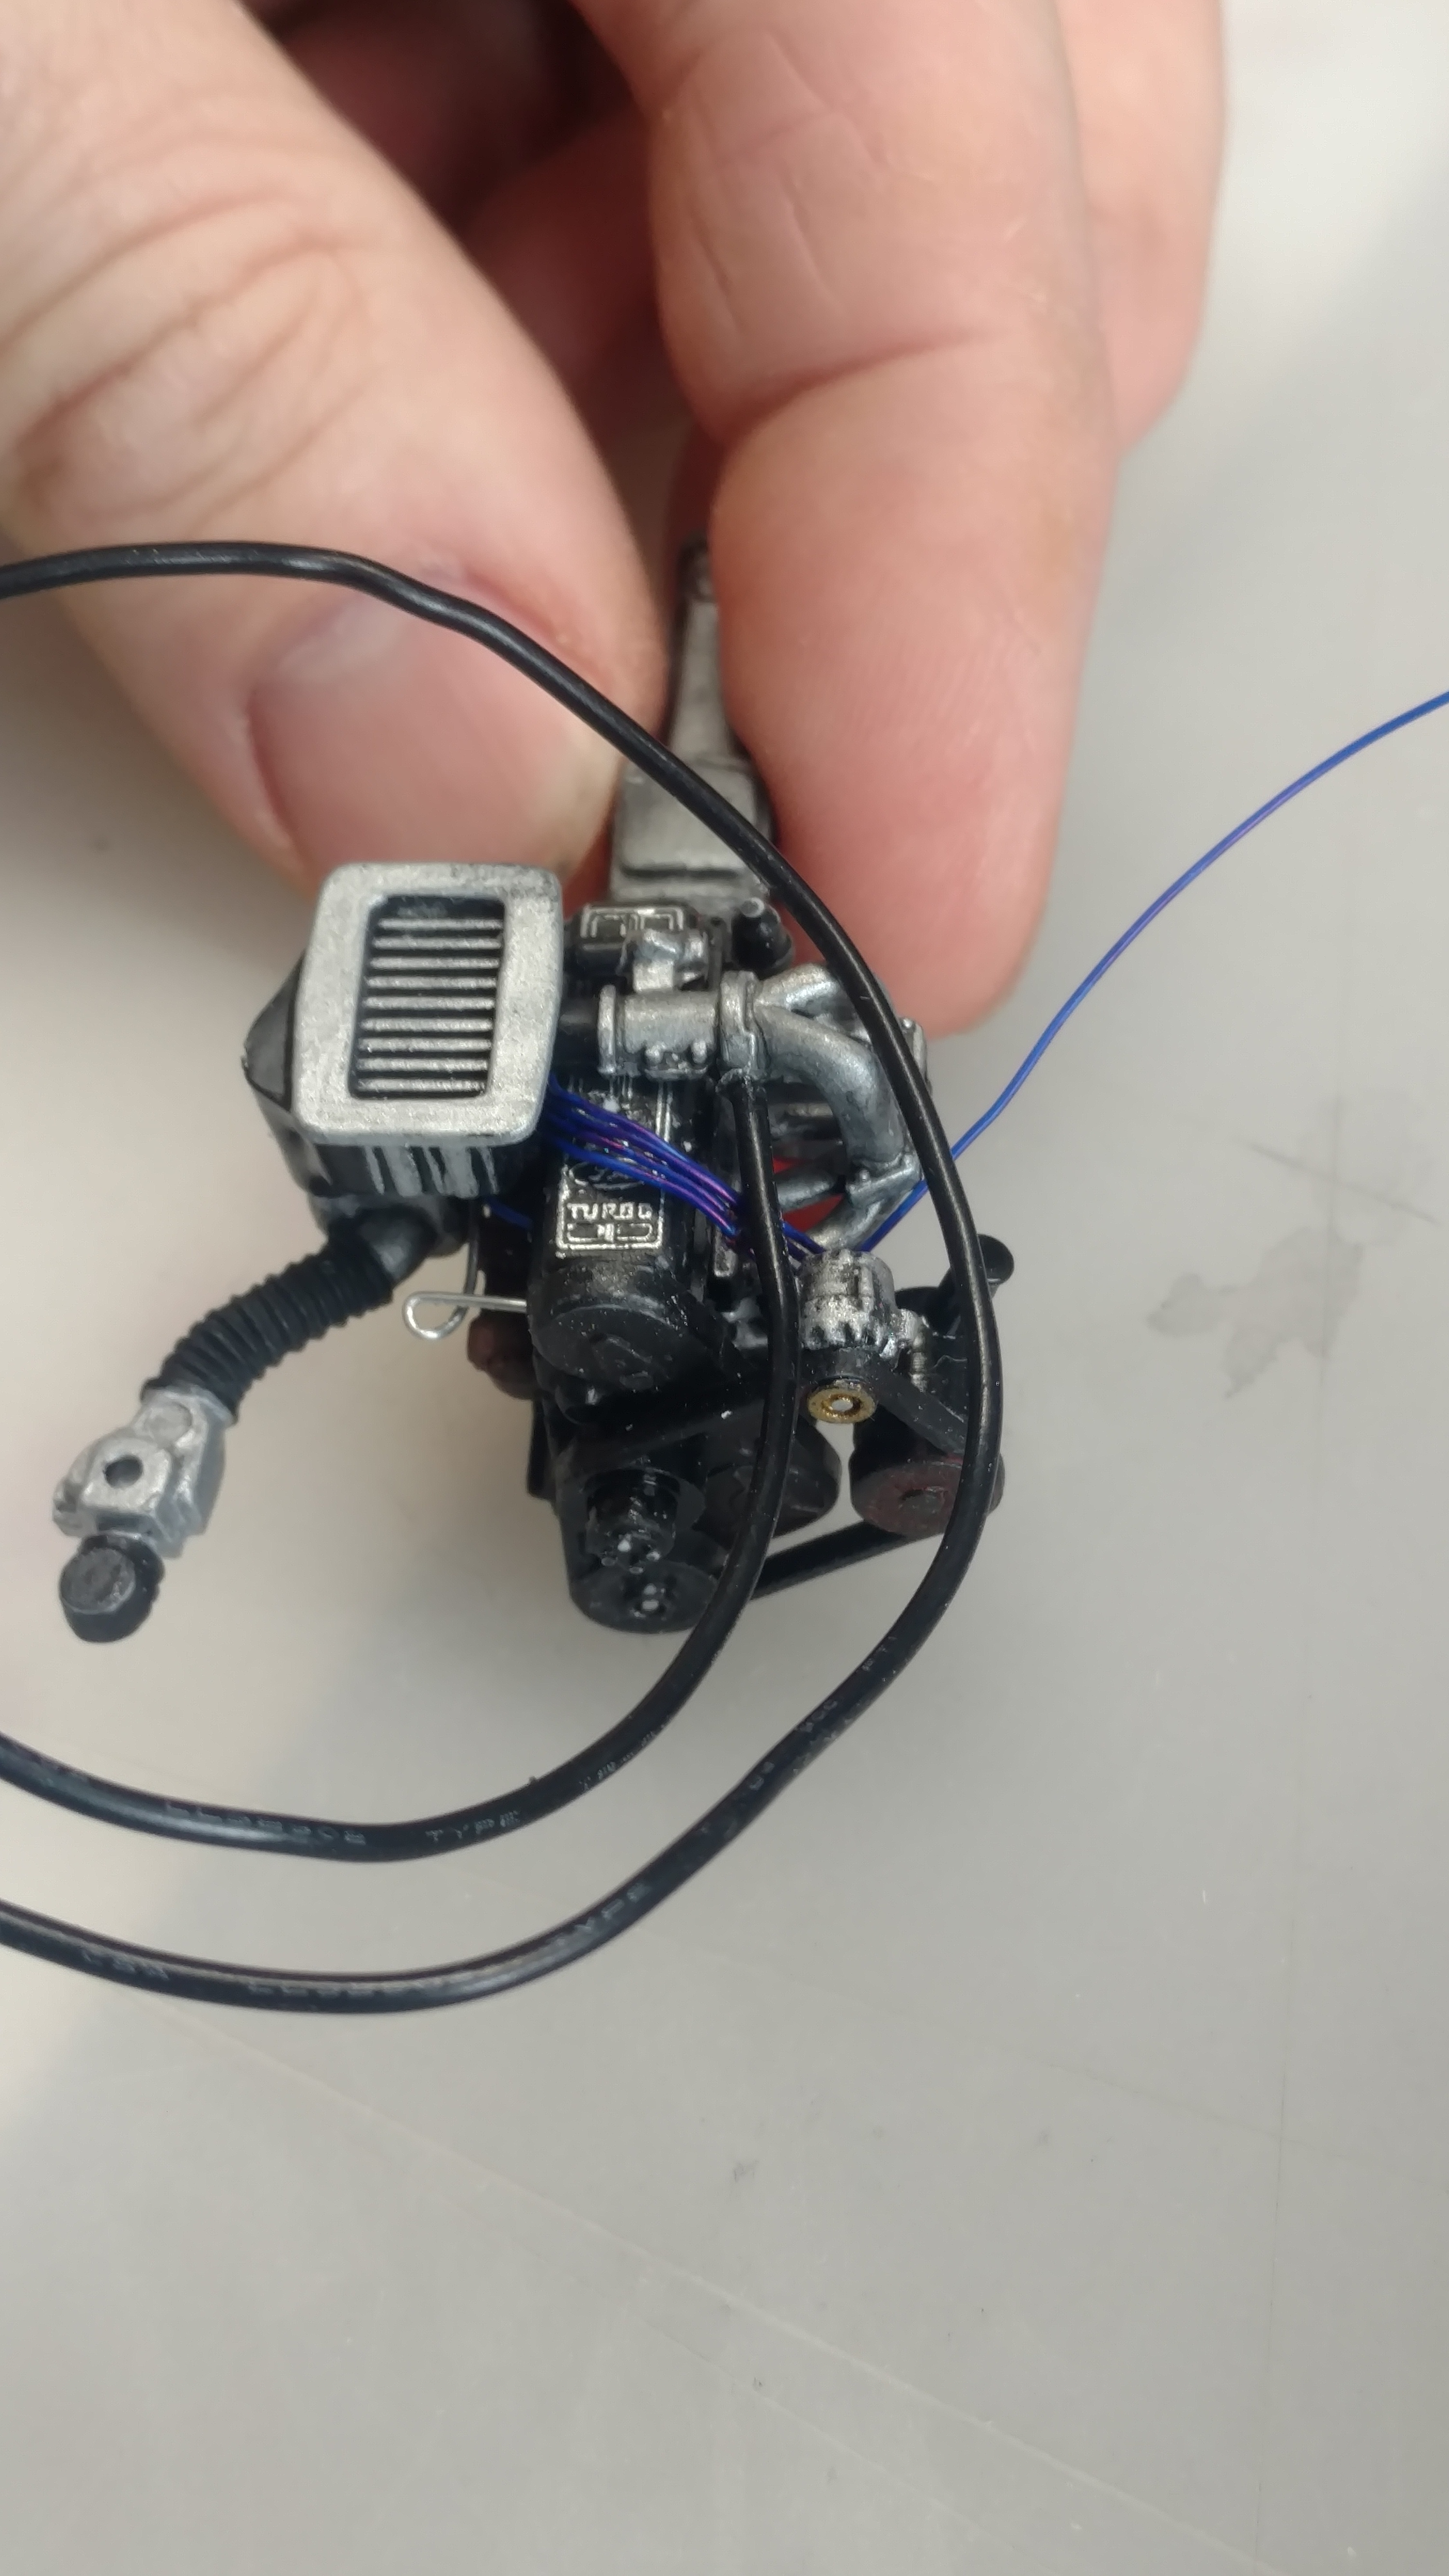
I plan on using the Mustang SVO engine in my Pinto. This particular one is going into my SVO, of course. But it is a great fairly accurate 2.3 liter.
-
Dream car 2.0 (68 Dodge Charger) update 5/8/2018
rsxse240 replied to 426 pack's topic in WIP: Model Cars
I am so glad you kept your old one! I wish I still had my childhood builds. They all went into the parts bin or sold to pay the gas/electric bill. Your current build is coming along nicely! I look forward to your progress. Incidentally, the '68-70 Charger is my dream car as well. -
Since the Fox Body Mustang is a shared chassis with a MULTITUDE of other Ford, Lincoln and Mercury (as well as other makes world wide) there may not have been much to change to make the Ute. Infact, there was probably an Aussie contribution. I have always wanted to build a SVO or Capri wagon or "Ranchero" using a Ford LTD II (Fairmont) wagon. Or super base model mustang with a bench seat and column shift using parts from a Fairmont or Zephyr and the square front end bolted to a Mustang coupe body.
-
I think Aoshima did a V35 Skyline Nismo gts coupe. And I believe Fujimi or Aoshima did a Nismo 370Z.
-
Wow, both are great looking cars!
-
Despite the poor craftsmanship of your 4rotor, it turned out very nicely!
-
The problem with using 1:1 scale paint is the 1:1 scale flakes. You can actually get custom made flake to suit your needs. However, in such a small scale, 1:25 scale flakes would basically be powder and really wouldn't show up as well. Now if you were painting a bass boat... that's a whole different story, lol. Your Golf still looks amazing. I've been wanting to get a MK II for a while. Now that the Revell MKI Golf is out and has a great looking Engine and chassis, I may have to get on HLJ.com and order a Fujimi kit.
-
I love it! The paint looks flawless from what I can see. I too am a huge Nissan fan. I've owned my Silvia (USDM S13 240SX Coupe with JDM Silvia front body work) for a little over 18 years. I've had several others also, as well as various other Nissan and Infiniti cars and trucks. You should look into the S-Chassis for the Nismo R-200 and the Silvia and 180SX Nismo offerings. I think they would compliment your collection well.
-
You're doing a fine job on this, that is for sure! My son had a Miata for a while, but he couldn't take care of it so we traded it in for a Ranger pickup. That was indeed a pleasure to drive, even if it was a no muffler straight pipe, wheels falling off, opaque back window, no interior deathtrap. It was fun to drive. As for your build, be sure to use several shades and texture of black inder the car. Even some olive drab for the hard fuel and brake lines where they aren't covered with heat or abrasion shielding. Use a pale brass color for the connections. Flat or semi-gloss for the rubber boots on CV joints and steering rack boots, aluminum or gloss black for the rack itself, pale gold or pale brass for the bolt heads on the subframes, etc. Here's a picture of my Tamiya 370Z that is one solid chunk of plastic with just detail paint. And one of my Revellogram 93 Cobra Both were straight out of the box and were awarded first places in box stock due to the detail painting and attention to details of fit and finish. Keep it up, you're going to have a trophy on your shelf before long.
-
Thank you for the compliment, Eric. I just happened to pick up this exact kit today. The one issue I am having is that mine doesn't seem to have the stock louvers behind the side windows but it does come with some crazy "aftermarket" louvers that I do NOT intend on using. So far you seem to be doing a great job on yours. I look forward to seeing your progress.
-
Thanks. It's all just thinned acrylic paint and dry brush. As a mechanic, I see a LOT of daily driven car chassis, so I really know what they look like. Lol You see the blue "overspray" like ithe car was recently painted? I am going for a used but well driven look
-
I never cared for the monochromatic look. It always makes cars look cheap unless it's an old hot rod or something.
-
Thank you for your compliments. It really does fuel the drive to do better and push through the difficult parts of modelling. Don't mistake this one for not having clear headlight lenses, it does. However, it doesn't have clear front corner markers or turn signals.