Straightliner59
-
Posts
5,809 -
Joined
-
Last visited
Content Type
Profiles
Forums
Events
Gallery
Everything posted by Straightliner59
-

Monogram Chaparral 2D Wheels/Tires
Straightliner59 replied to Straightliner59's topic in Model Building Questions and Answers
Thank you, JC and Steve. I thought I had read in this forum, somewhere about HRM's set, but, couldn't remember whose it was. Much appreciated! I see Model Builders Warehouse is out, at the moment. I'll see if I can hunt down a set. Maybe not having them will help keep me focused on my Model A. ? This Chaparral has been screaming at me, over the last couple of weeks, though. -
Does anyone have a source, kit or otherwise, for wheels/tires for this kit? I think I can modify the kit's wheels to work, but, I don't really like any of the tires I have, on hand. Thanks, folks
-
Metalizers
Straightliner59 replied to BubbaBrown's topic in General Automotive Talk (Trucks and Cars)
That stuff looks great! They make it sound as if it's very durable, too. Thanks for the heads-up! -
Thanks, Tom. I appreciate your kind words! I would have used basswood, but I didn't have any on hand, when I started playing with the roof framing. I had a lot of different sizes of craft sticks, so, I went ahead and used them. There were a couple of times I was thinking, "Hey, moron! Why don't you just make your life easier, and go get some basswood?!" ? The grille shell is indeed aluminum foil. I used tooling aluminum that I bought at Hobby Lobby, years ago. I simply embossed it over the kit piece. I decided to try that, because I discovered that I could use a little more room for the fan. Thanks for checking in!
-
Thank you, Chris. Much appreciated! I started using those handrail stanchions, years before there were any heim/ball joints specifically made for model cars. I bought a ton of them, back then (mid-'80s), and never ran out! ? They look pretty good, so I never saw a reason to buy anything else. Thanks for checking in!
-
"Bring Out Your Dead" Completion Build--ROUND 2 Is On!
Straightliner59 replied to Snake45's topic in WIP: Model Cars
Apparently, I have finally grown tired enough of looking at this thing, taking up space on the bench, that I decided to squirt a little white primer into a plastic cup, so that I could brush it on, to fill the chipped-out sections of paint, on the spoiler. Once it's cured a few days, I will block sand it, and shoot some color over it, re-stripe, as needed, give the entire thing a wet-sand, shoot a little more clear, and call it good...
-
Here are some wood pieces I've been working on, for the roof. I want it to be as prototypical, as I can make it. I've changed course, a couple of times, to try different sources for the wood, because I am determined to use something I have on hand. So far, I have used three different sizes of craft/stir sticks, and I still had to laminate pieces to make the front header.The cross-pieces need to be shaped, as they are fairly thin, in the real car. I've also included something I have been playing around with, regarding the radiator surround. Not sure I'll be able to get it to my liking, but, if I can, I think it'll be worth the effort. Also, the new head and water pump are visible. The old head is too thick, and interferes with the firewall. I wanted to make the water pump better, too. Mission accomplished, on both counts! Now, I have plenty of room for the pulleys and fan. As always, questions, critiques and comments are welcome! Thanks for looking in!
-
I have been building a new head and water pump for the Model A. Also started work on the wood framing for the roof.
-
Painting chassis question
Straightliner59 replied to STYRENE-SURFER's topic in Model Building Questions and Answers
Thanks, Kurt! That stuff used to be everywhere! -
I wouldn't think a knobby tire would be necessary, for a street bike, but, if you need them, those bicycles look like a good choice.
-
Very, very nice work, Steve. I am, and have been thoroughly enjoying watching this project come together!
-
Painting chassis question
Straightliner59 replied to STYRENE-SURFER's topic in Model Building Questions and Answers
Definitely! The manufacturers probably bought it from Zolatone. -
Painting chassis question
Straightliner59 replied to STYRENE-SURFER's topic in Model Building Questions and Answers
It's Zolatone. I would guess it could be done with an airbrush. I've done it with spray bombs. Here's are a couple of examples, along with the Zolatone color chart. I spray the base color, then, spray the spatter from a distance. It looks pretty convincing, I think!
-
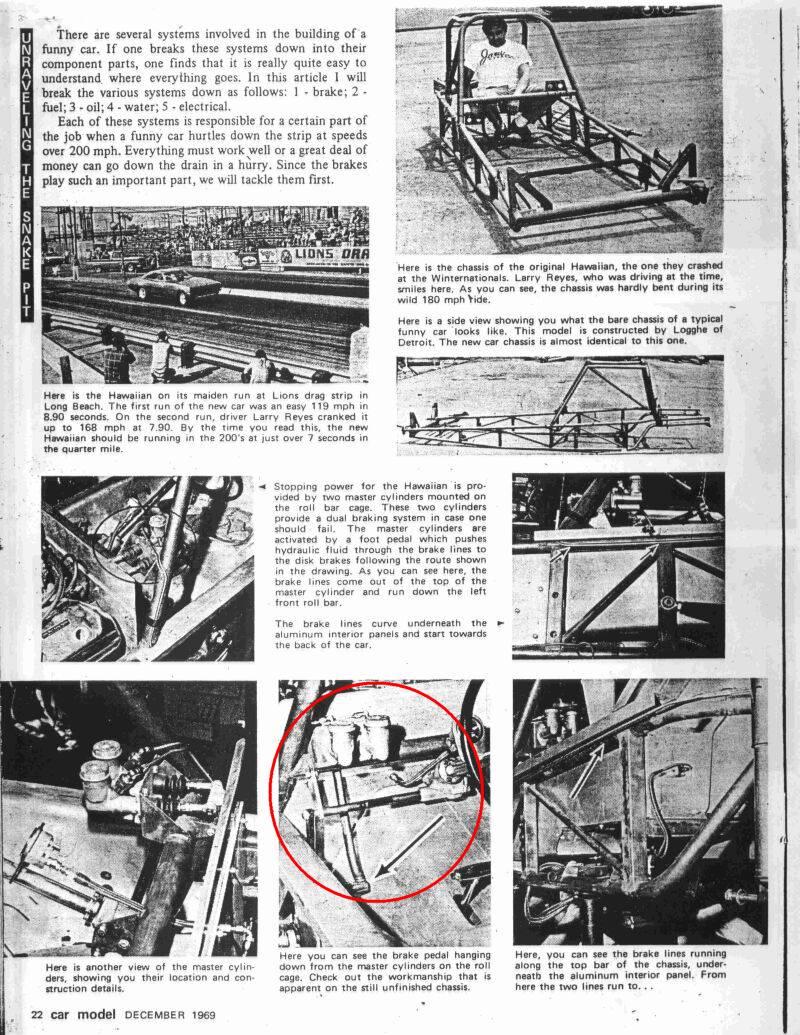
Here are a few shots of that setup, taken from the old "Unraveling The Snake Pit" article by Jim Keeler, from Car Model magazine. Text explains how the brake lines run.
-
Fantastic work, Tim! I have been giving more serious thought to what I will do, to get my feet wet, with the mill. Your work is inspiring, toward that end. Thanks for that!
-
How does this body differ from the coupe? It appears to be the same body, to me. It even has the molded roof locator pegs. I think it's a very cool kit, nonetheless. I love those old Monogram kits! I've built a ton of them! Nice pick-up!
-
It's so true, Tom. We all remember the days when research was much more scarce, and difficult to do. Now, if the desire is there to do it properly, so is the information! It's also the most fun part, for me! Thanks for looking, everyone!
-
Thank you, JC! I hope that I can pull it all together, once the sub-assemblies are ready. Thanks for looking, sir.
-
Opened the roof on the '31, and started working on the wood header. It's likely I won't use this one, as it's a mule to test wrapping the header with tooling aluminum.
-
Thanks, Mark! I got some more work done on it, today. I cut the roof open, and started working out the metal-clad wood header. I mounted the shocks, but have already decided that I want to re-mount them. I have some figgerin' to do, up front, with the radiator and water pump clearance. Now, looking at these photos, I can see a little work that needs to be done with the water pump. Here are a few photos. As always, questions, comments and critiques are welcome!
-
Nice work! Those collectors worked out real well!
-
I really appreciate that! Thanks!
-
Fantastic work! I've soldered a few dragster chassis, over the years. I'm not sure that combined, they have as many joints as this thing does. This entire project is amazing! Thanks for sharing it.
-
1/24 on the Coupe. The dragster is 1/25. Thank you, Pat!
-
Thank you, Sonny! Thanks for looking! Glad you're enjoying it.