Straightliner59
-
Posts
5,809 -
Joined
-
Last visited
Content Type
Profiles
Forums
Events
Gallery
Everything posted by Straightliner59
-
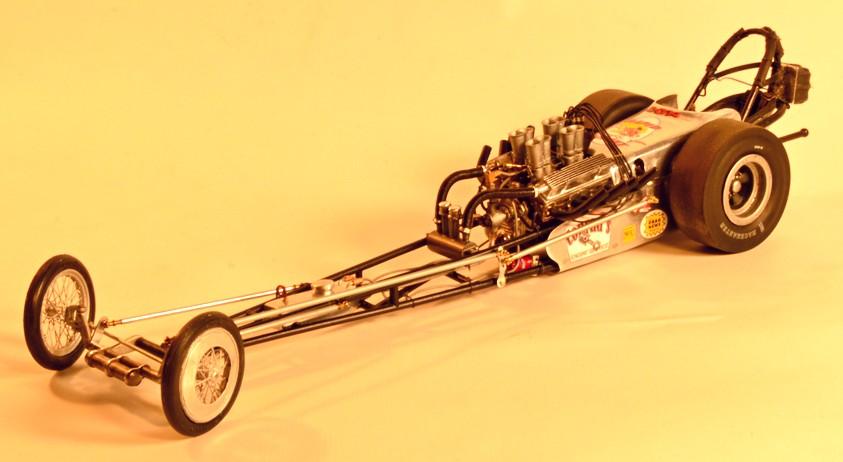
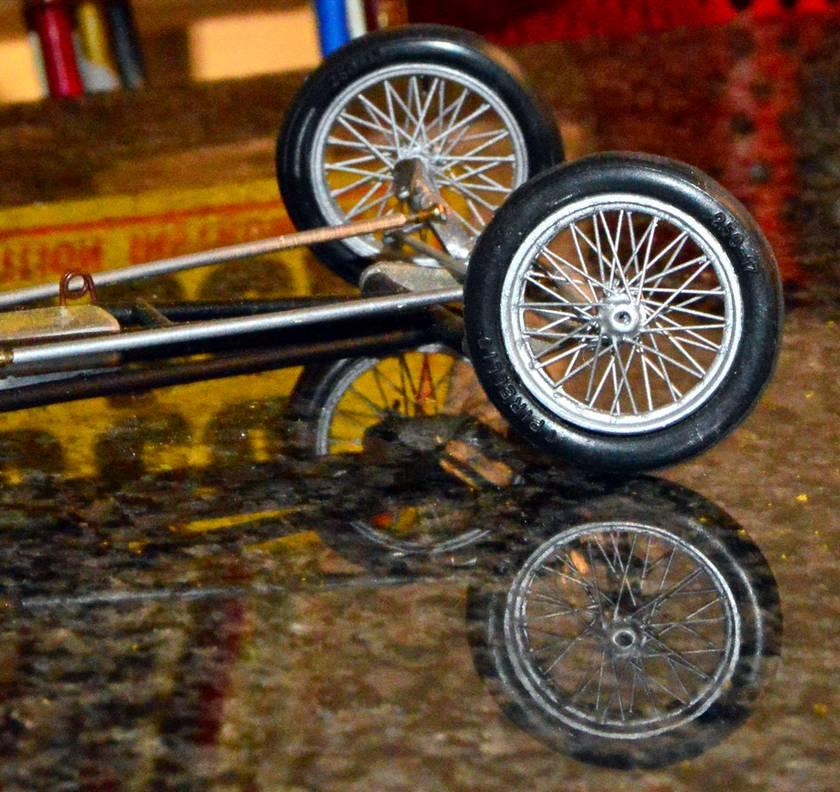
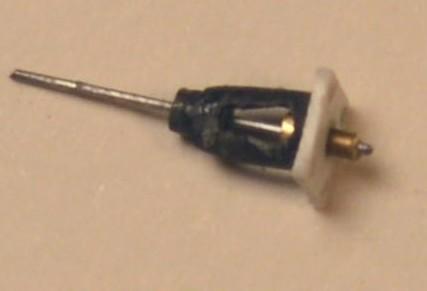
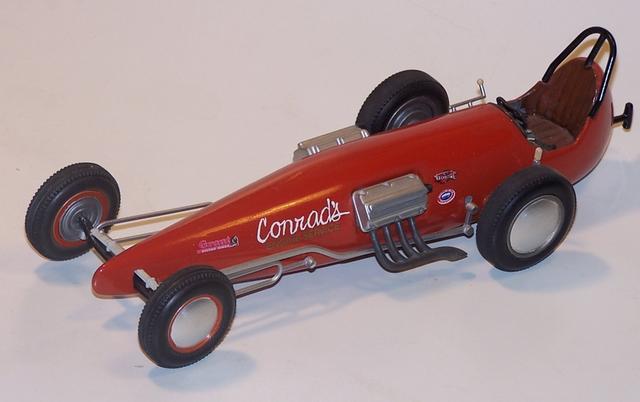
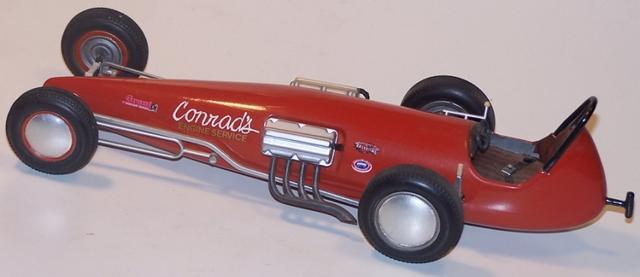
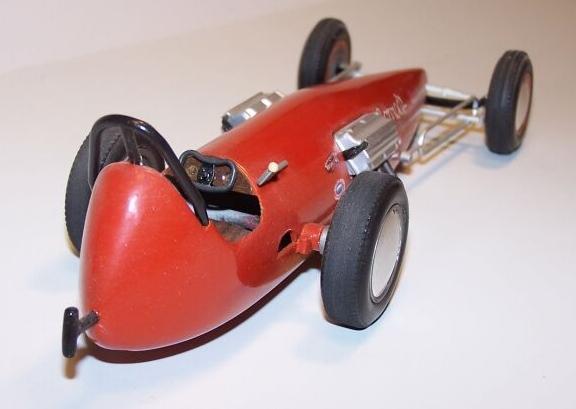
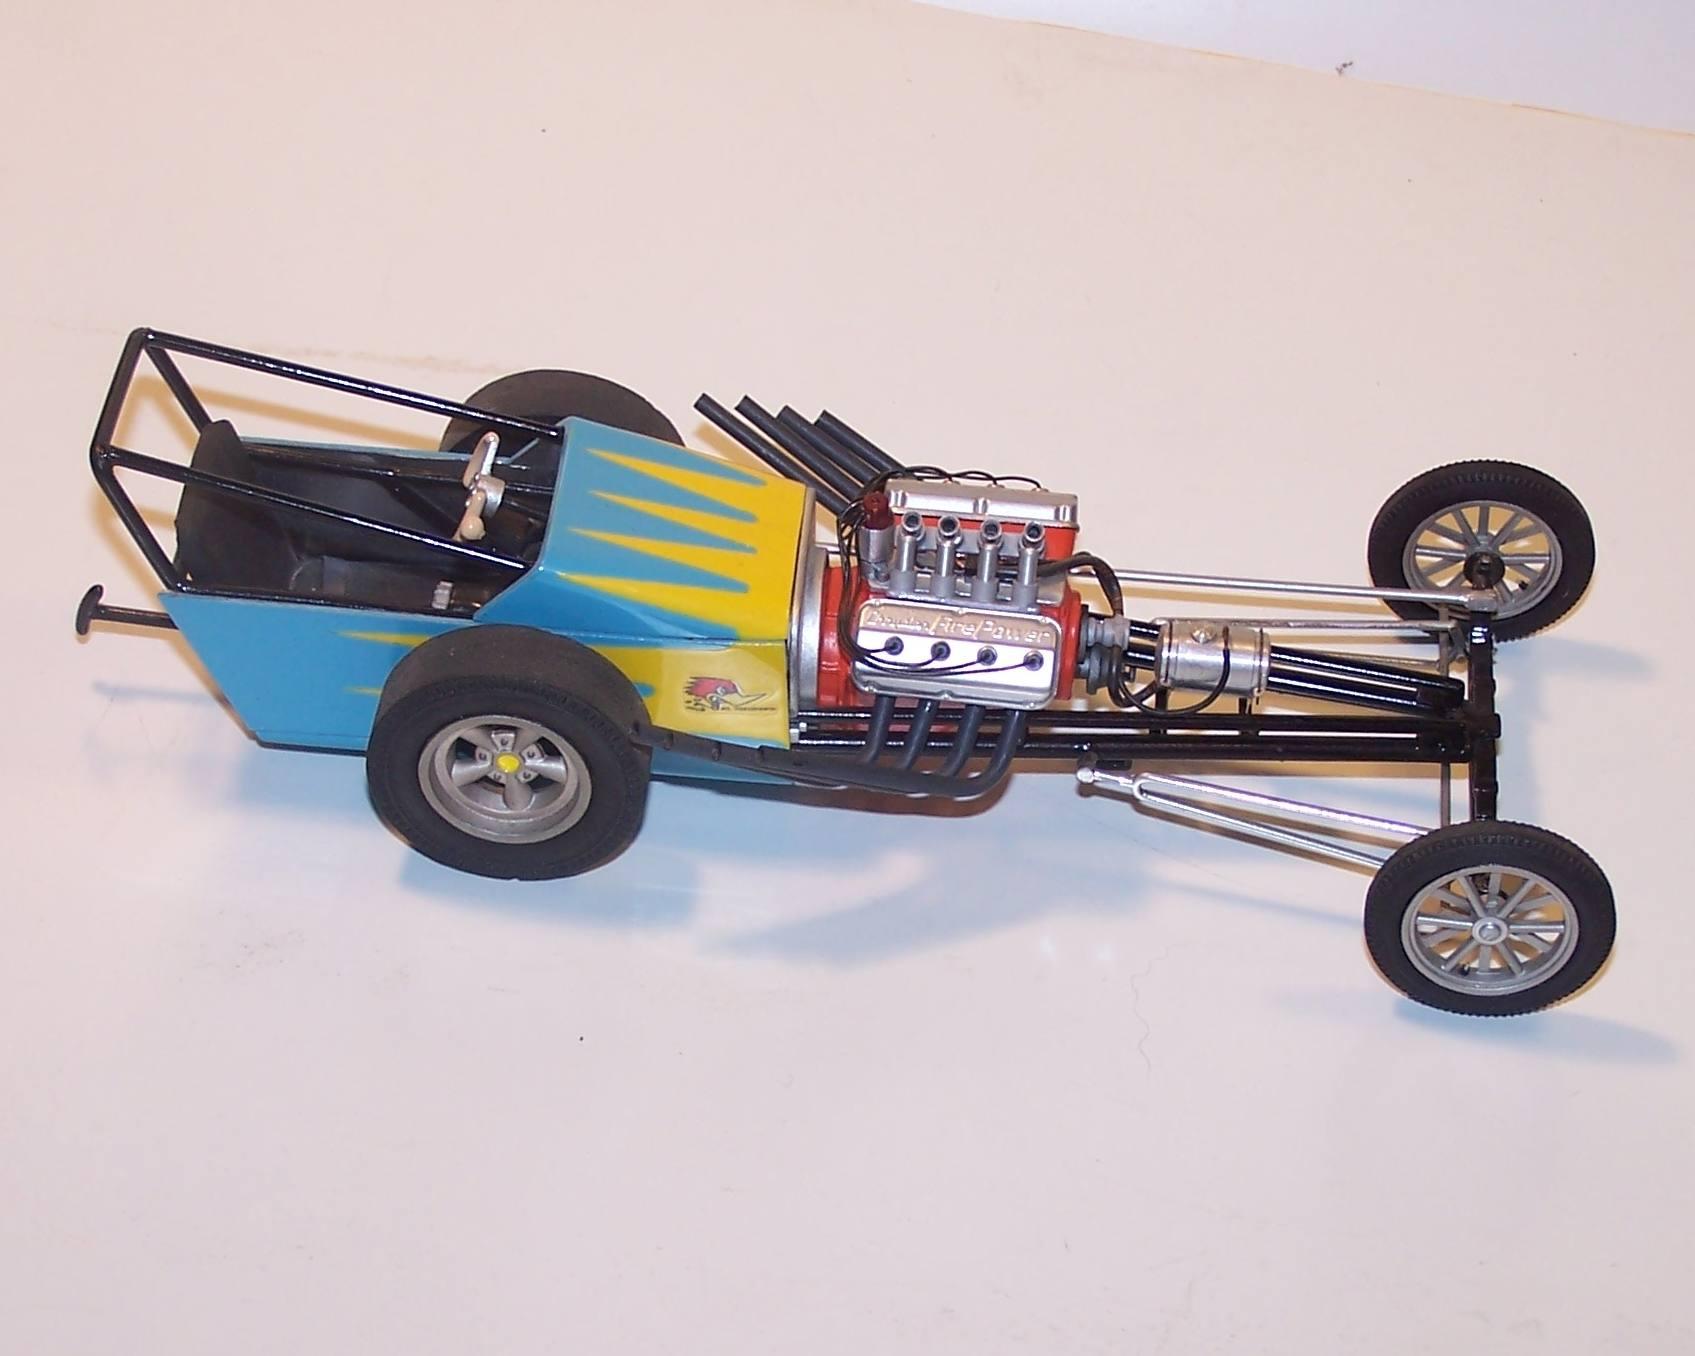
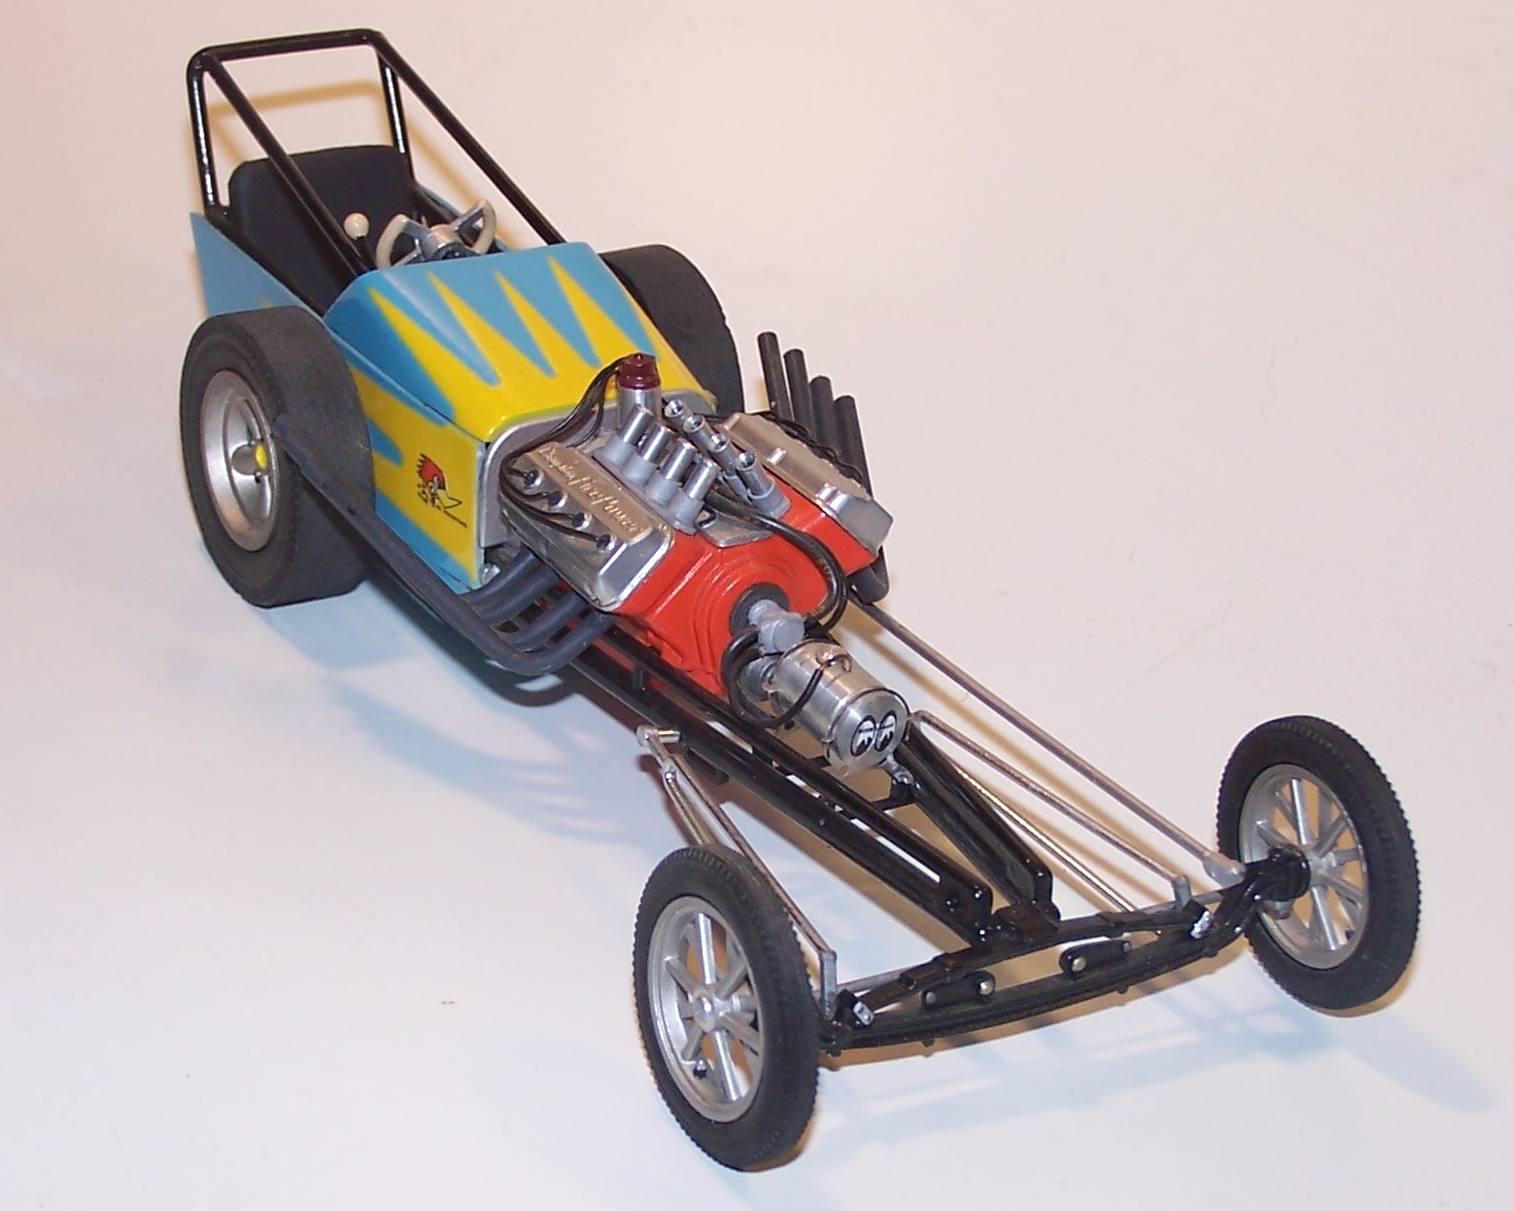
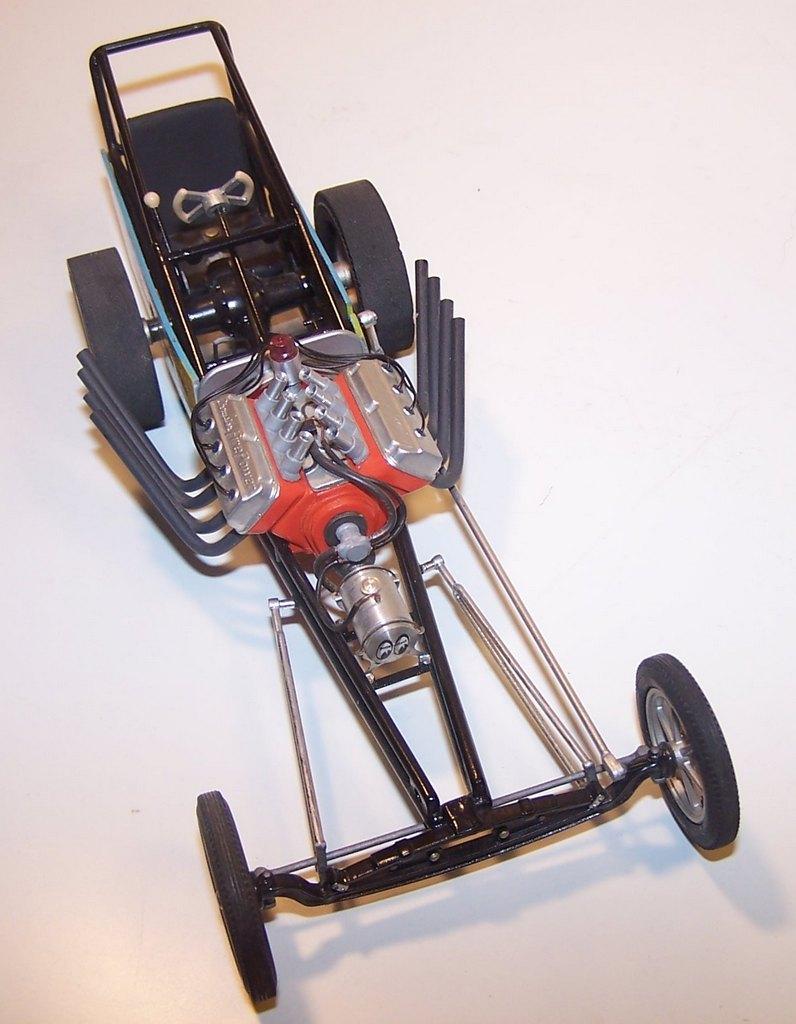
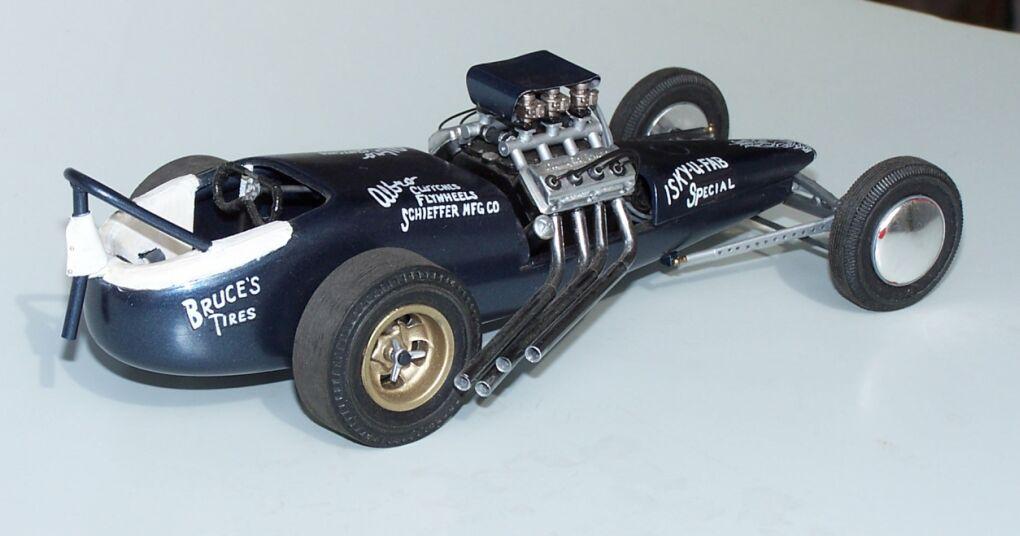
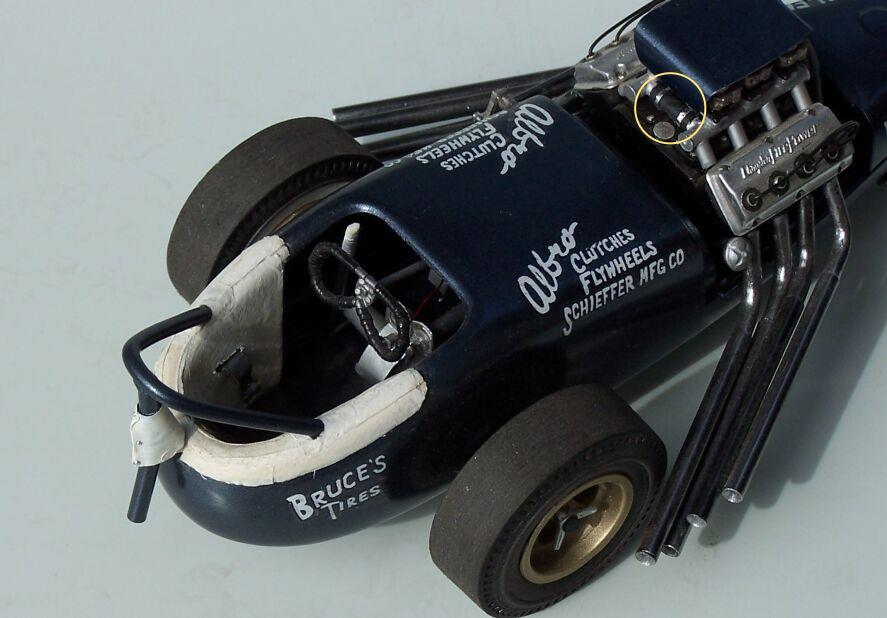
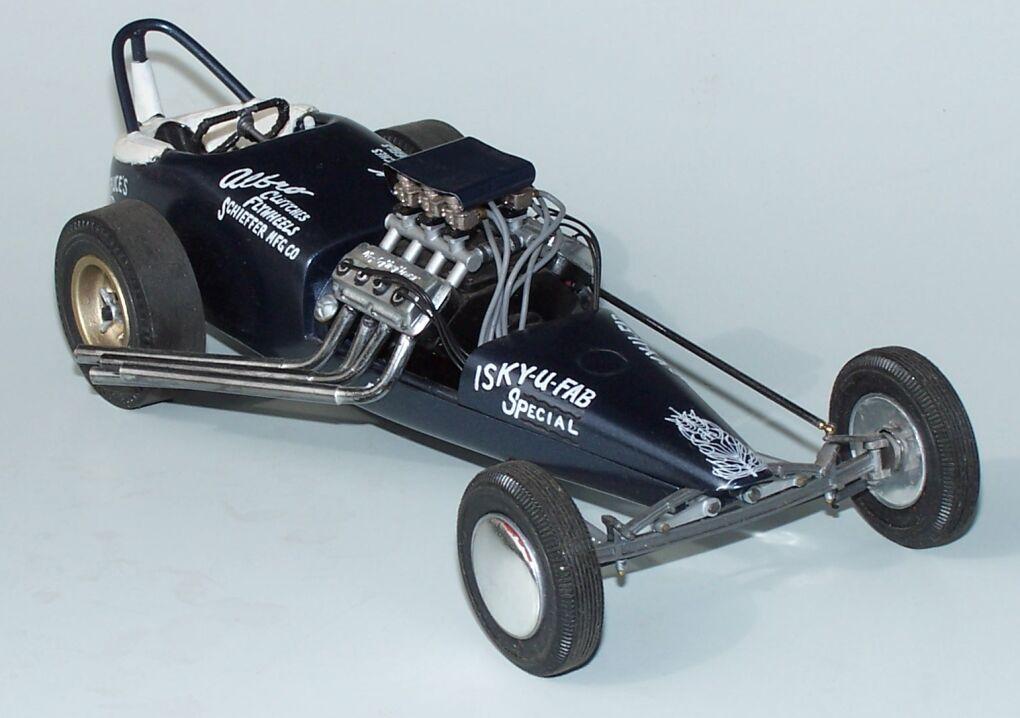
This is a neat thread, that I don't recall seeing, before! Here are a few things I've built, over the years. The four-banger Flattie is for a current project. The engine is scratched, above the oil pan. The first two photos are the water pump, I just built. The other photos are of a junior fueler I completed last year (after a 20-year journey). Much of it is scratchbuilt, including the entire fuel system, headers (which are brass), aluminum body and front wheels.

-
Thanks, David. I appreciate that, very much! I try to build each sub-assembly as a model, unto itself, but, sometimes, I talk myself out of it! ? I want to thank you again, for the photos of the trans/clutch/brake/bellhousing assembly. The more I think about it, the more I'm leaning toward going that direction. Your photos will be a handy reference.
-
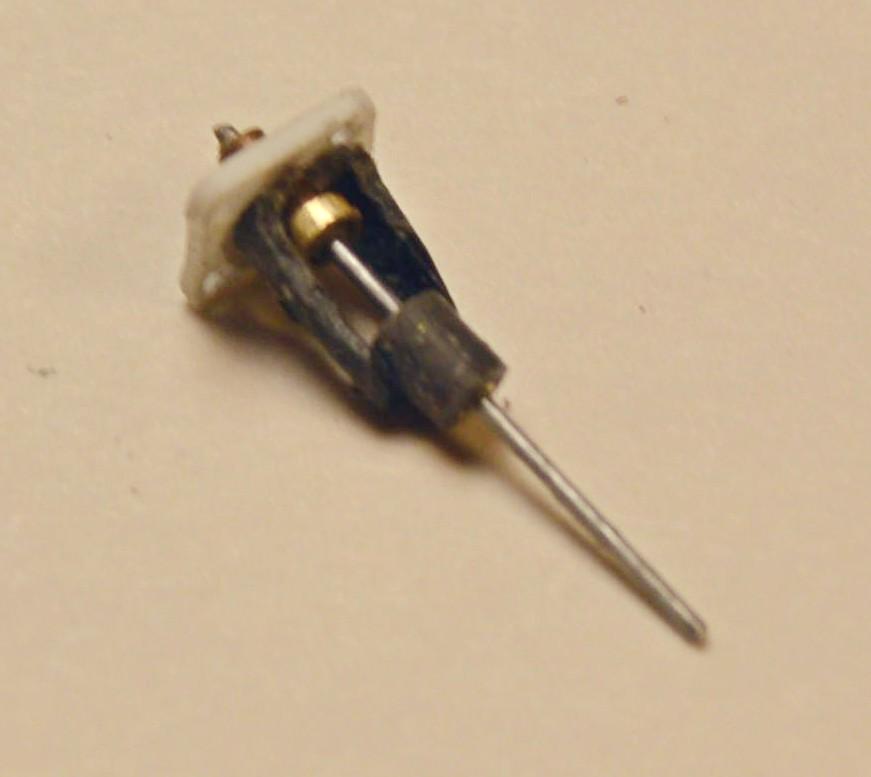
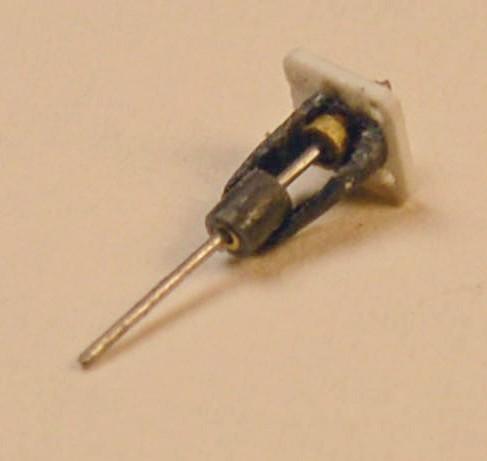
 Here's the stuff I got done, yesterday. Just got home from work, tonight and haven't been to the bench, yet. Here are the water pump and the shocks for the Model A. The rear "bushing" for the pump isn't in its final location, just yet, but, I plan to get it mounted later tonight.
-
I admire you guys who do this kind of work, Tim! I suppose that I could figure it out, but, for now, I am content to under-use my mill to make the odd part, here and there. That said, beautiful work, sir!
-
Here are a few things I have worked on, the last few days. I scratchbuilt some shocks from Evergreen rod. The arms are made from K&S aluminum tube, flattened, then drilled and cut out. The water pump still needs a little cleanup. It's constructed from some Contrails plastic tubing, and Evergreen flange, and two sizes of brass tubing, on a music wire shaft. I got the radius rods cut and mounted, as well. As always, questions, critiques and comments are always welcome!
-
Indeed! Rush's influence spans the pantheon of music.
-
I built the front shocks for the Model A. The day before yesterday, I got the radius rods installed. I'll post photos on my build thread, once I have the shocks installed.
-
I remember reading somewhere Neil talking about how he used to carry a small case with him on the road, that had some tools and supplies, so that he could build. I don't recall him saying what time period that was, but, I assume it was before he began riding bicycles, then motorcycles, between gigs. Very cool that you got to meet him, and chat with him about models!
-
Thanks to everyone for posting your reclamation projects. It's really cool to see this stuff "rise from the ashes".
-
Very nice concept and execution. Beautifully subtle. Love the blue!
-
Thanks, Bill! Nice job with the save. The roof is nice and smooth/flat. It looks great, in the green.
-
Thanks for chiming in. Looking forward to seeing it finished, Tom!
-
I know you're a fan of rescues! I think it may have been your thread that sparked this, in my head. Both the GTOs look much better, in the "after" photos! I don't have any "before" photos of my diggers, since I don't even think I owned a camera, then. Certainly not one that would shoot models. You're welcome, Snake! This should be fun!
-
Now you're talking! ?
-
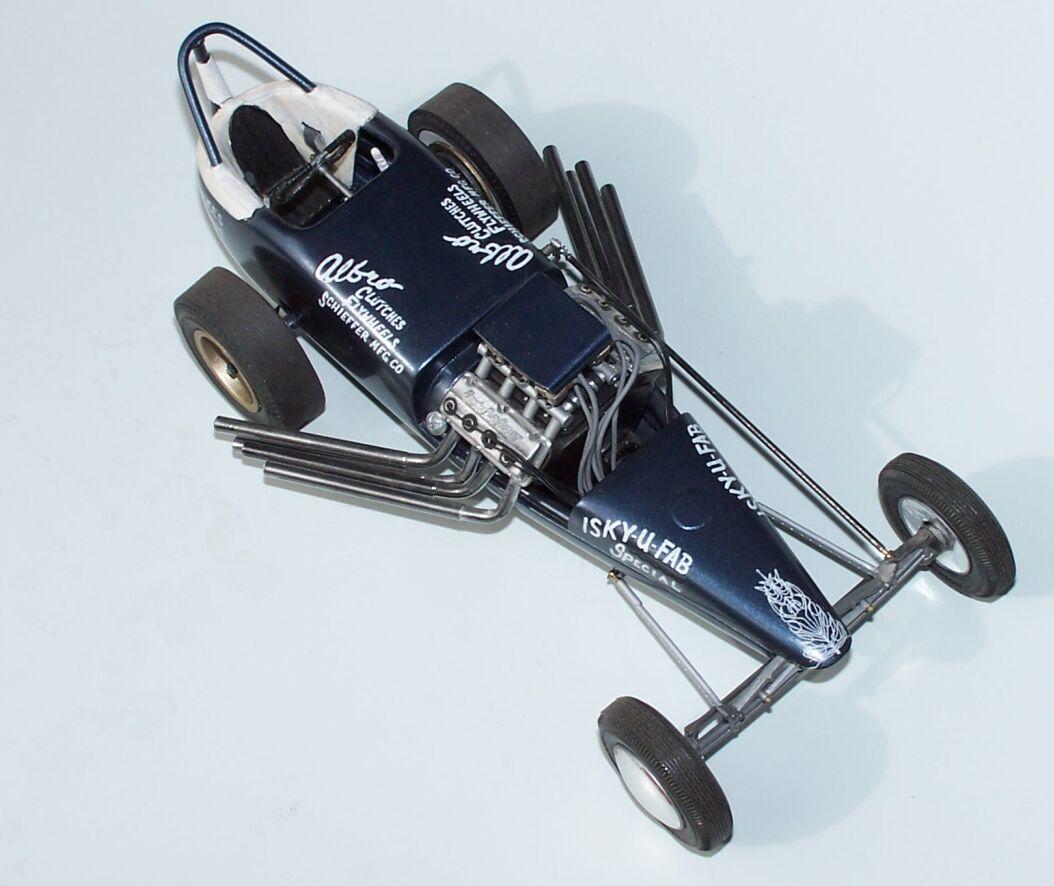
It may have been done, before, but, I couldn't find it...I was thinking a thread of folks' models that were saved glue bombs might be interesting! I'll start with the three I have. Oddly enough, they are all early Monogram dragsters. The first one I built was the Long John. I was working in a hobby shop when a friend walked in, handed me a baggie of glue-marred parts, a few of which were broken, and asked me if I wanted it, since he was "never going to build it". This was years before the kit was reissued. Of course, I was all too happy to have it. I think I built it within the next few weeks. When I showed it to him, he said, "If I had known it could look that good, I would have kept it!" I just now realized that I never put a brake handle, on this thing! There's a quickie project! One of the guys I worked with, at that same shop brought in the Sizzler, one day to show it to me. It was in basically the same condition as the Long John, but, a couple of its parts had gone AWOL. I asked him if I could build it for him, and said that he could have it back, once it was done. I went to work on this one, pretty quickly, as well, and finished in a matter of weeks. When I took it back to him, he said, "No. You built it. It's yours!" The last of the three I built was the Slingshot/Cook and Bedwell dragster. I found it at a swap meet, and paid a buck, for it. It was probably four, or five years, before I finished it. I spent some time with this one, because I could so clearly see the Cook and Bedwell car in the lines and form of the Slingshot, that I wanted to build it as a replica. In retrospect, I think the blue may be a little too dark. I'm sure the one in Garlits' museum isn't the right color, because the real car was painted a metallic blue, and the museum car appears to be almost a French blue. I used the old HRM article for reference, and I don't recall mention of the color, in it, other than saying it was blue. All three of these models were original issues, and were built before the Slingshot and Long John were ever reissued. The decals on the C&B car were made by Jack Smith. Last I knew, he still had some available. Any questions or comments regarding my models are welcome, but, I'd really like to see models that others have saved from their despair! ?
-
You're welcome! Hope it's a help. I bought most of my brushes at art supply stores, as well. There's no substitute for a quality tool!
-
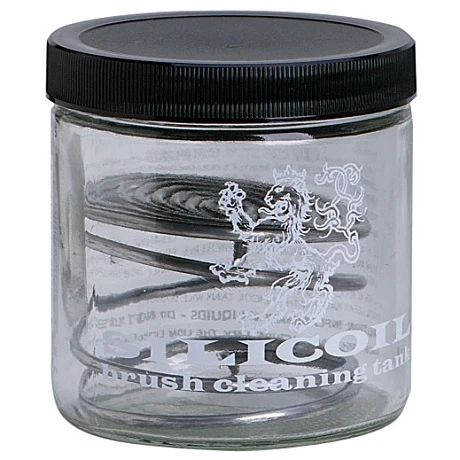
I use a Silicoil brush cleaning tank. It's not as complex as it sounds! Since I use mostly enamels, I use their fluid, as well, but mineral spirits would work fine, I'd think. It was made for oil painters, and is available in art supply stores, or, all over the place, online! I have brushes I still use, even after 40 years.
-
Rush has been my favorite band since 1977. Saw them 13 times, the first in May, 1978 at the Auditorium Arena in Denver. They are the closest thing to a religion, in my life, for most of my life. Much of that waas due to Neil's lyrics. They simply spoke to me. I was fine with their retirement. They earned it. This is a heartbreaking blow, for me.
-
Hobby Lobby and Michael's both carry it. It's called "Maid-O-Metal". They also have brass and copper.
-
And a fine cover, it is!
-
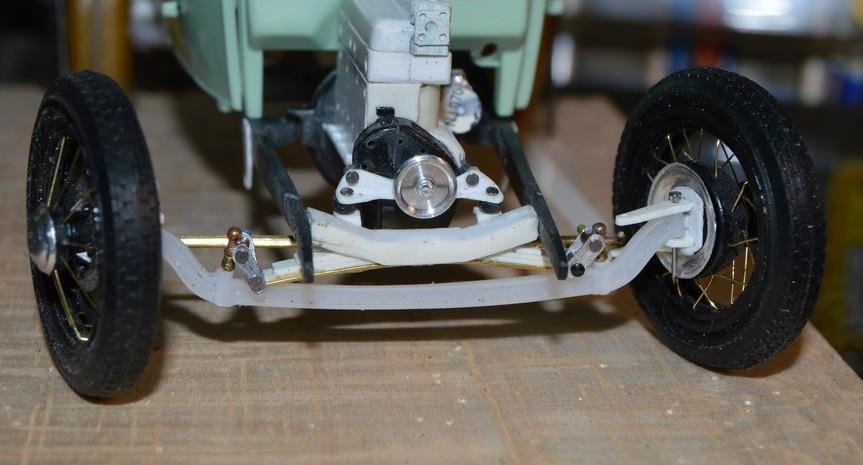
I disassembled the front suspension so that I could make and install the tie rod. That's done! Now, to decide about the radius rods. The ones I made may be a bit too fine, so I may need to redo them with different ends, and 1/32" tube. Here are a couple of photos of the re-installed suspension. Questions, comments and critiques are always welcome!
-
Great work, Steve. I have been enjoying watching this come together. The other day, I was thinking about the fabulous work you've done with the air cleaner, and burnished a small piece of tooling aluminum over a similar one I had in the parts boxes, and thought that I should post it, in case you were interested in making one for your Olds. It only took maybe five minutes. I didn't trim it very well, because I just wanted to see how well it would burnish. Anyway, in case you're interested...
-
That kit's worth having multiples of, just for the engine.
-
Here is how I learned/read how to do it: You'll need a good torch (I use a Bernzomatic MAPP gas torch), a bar of Ivory soap, and something to hold enough water to quickly quench the sheet. Coat the metal by rubbing it with the bar of Ivory soap. Light the torch, and heat the aluminum. As soon as the soap coating turns black, quench the sheet, and you should be good to go!
-
Yesterday, I got the steering put together Made the tie rod and got it mounted. Next, I have to re-hang the front axle, and install the radius rods.