Straightliner59
-
Posts
5,809 -
Joined
-
Last visited
Content Type
Profiles
Forums
Events
Gallery
Everything posted by Straightliner59
-

Bantam Fuel Altered - New pics 1-7
Straightliner59 replied to Codi's topic in WIP: Drag Racing Models
Thank you, Tim! I am happy that other modelers are getting some use out of it! Thank you,as well, for sharing this build--it's exceptional, and very inspirational, to me. -
Nice job! I love those Chaparrals.
-
Looks very nice! I love these old Matchbox kits. I still need the 917 Porsche and the Surtees.
-
It scales out to about 1/22.5:1, if I remember correctly.
-
Beautiful work! Loving this car, JC!
-
Bantam Fuel Altered - New pics 1-7
Straightliner59 replied to Codi's topic in WIP: Drag Racing Models
Tim, there are no words! "Fantastic" is only a beginning. -
Hey, Mike. I have Flex-I-File cement, now. I used Ambroid, as well. I like the Flex-I-File cement, just fine. When this bottle's gone, I will be using Weld On. I ordered mine online, but, I have heard Home Depot carries it. I've used the Plastruct cement, too. It works well, too. I am going to guess that many of these cements have the same solvents. Not sure this is any help!grin
-
Congratulations, John! I've been a few times. I can't recall seeing anyone making a haul, like that! Great job!
-
Agree with the above! Thanks, so much!
-
I'd like to see them, please! Cool thread, this!
-
Sodium Glider fantasy Bonneville Streamliner
Straightliner59 replied to Claude Thibodeau's topic in WIP: Drag Racing Models
Nice build of a very cool concept! Diggin' it! -
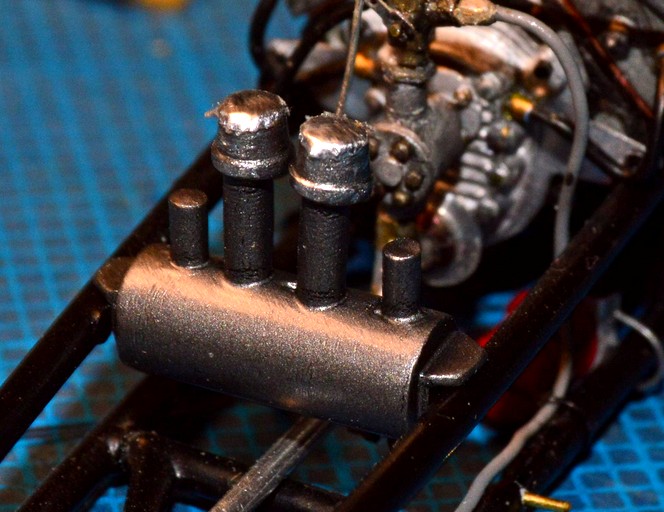
A little update: This project likes to back me up a step, for every bit of progress, I make. Case in point; Initially, I had hoped to wrap the rollcage with narrow strips of electrical tape. In fact, I did. It was not uniform, no matter the effort I took to make it so. That had to come back off! So, I decided on short lengths of heat-shrink tubing, fastened with zip ties. No problem, there, until I decided I wanted "padding" to better conform to the cage. I waved a lighter past the heat-shrink, and the "padding" softened slightly, and conformed. Okay! That's all good! Except, in the process of that, the heat melted the ends of the zip ties, as you can see in these pics. I am in the process of replacing them all, now. I am using finer line, this time, as well. The harnesses are all installed. I will be working more on their finish, retouching some of the black, where the highlights got a little out of control, and reapplying some India ink wash. I also got paint on the puke tank, and a draincock, installed there, as well. I really want the cockpit done, so I can move on to getting the body mounted!

-
You're right! I had a total brain fart. Yes, the Cammer car would be better, for sure. Sorry 'bout that. They're both awesome, but, there's no substitute for cubes!
-
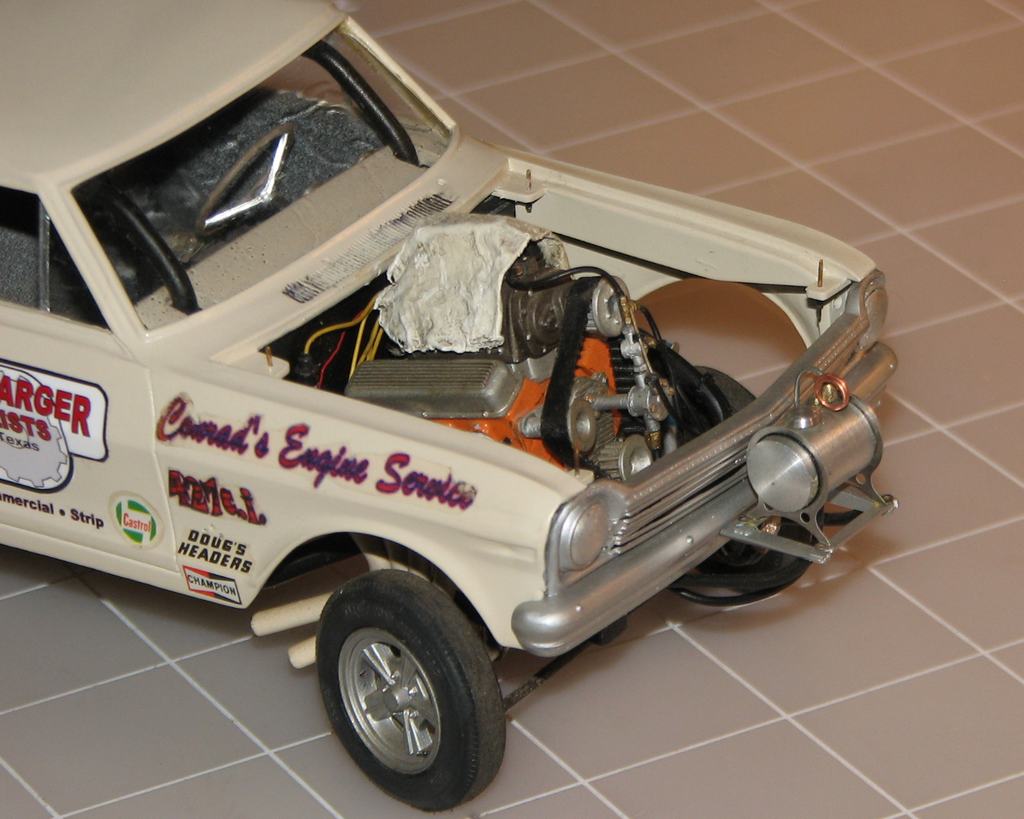
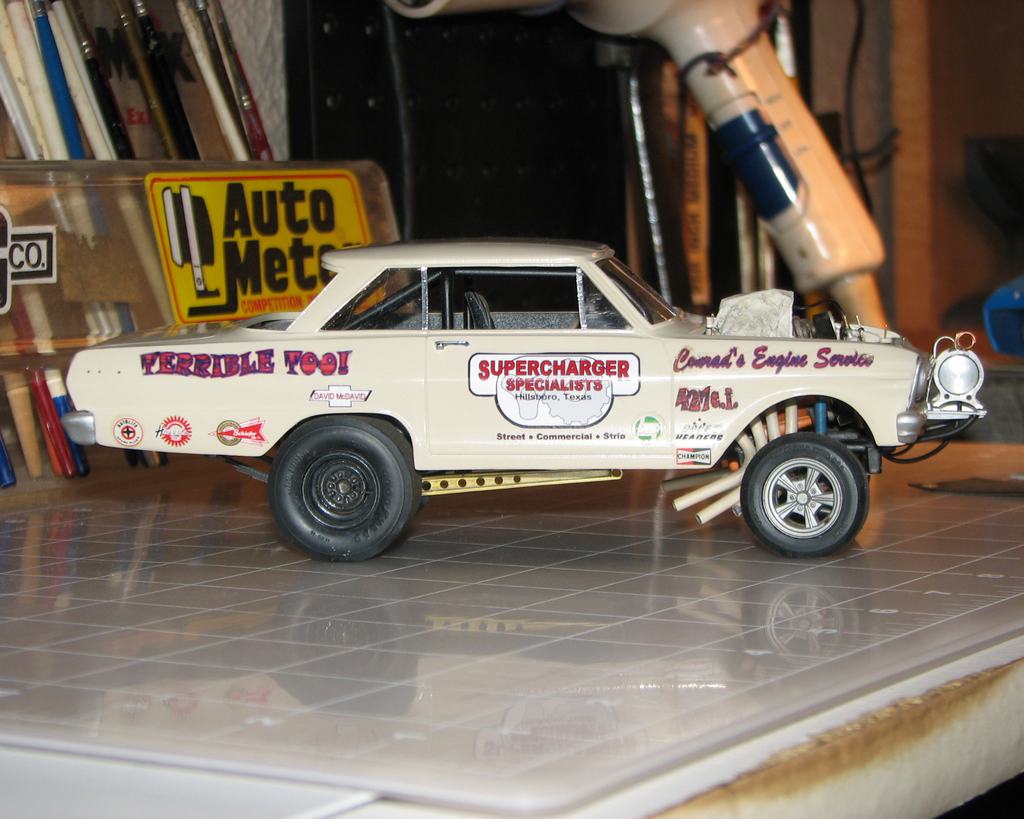
Blown Rat! I'm not saying what's under the "terrible towel"!
-
When you get it finished, I'll match race you with my Chevy II!
-
Resistance Soldering Questions
Straightliner59 replied to Straightliner59's topic in Model Building Questions and Answers
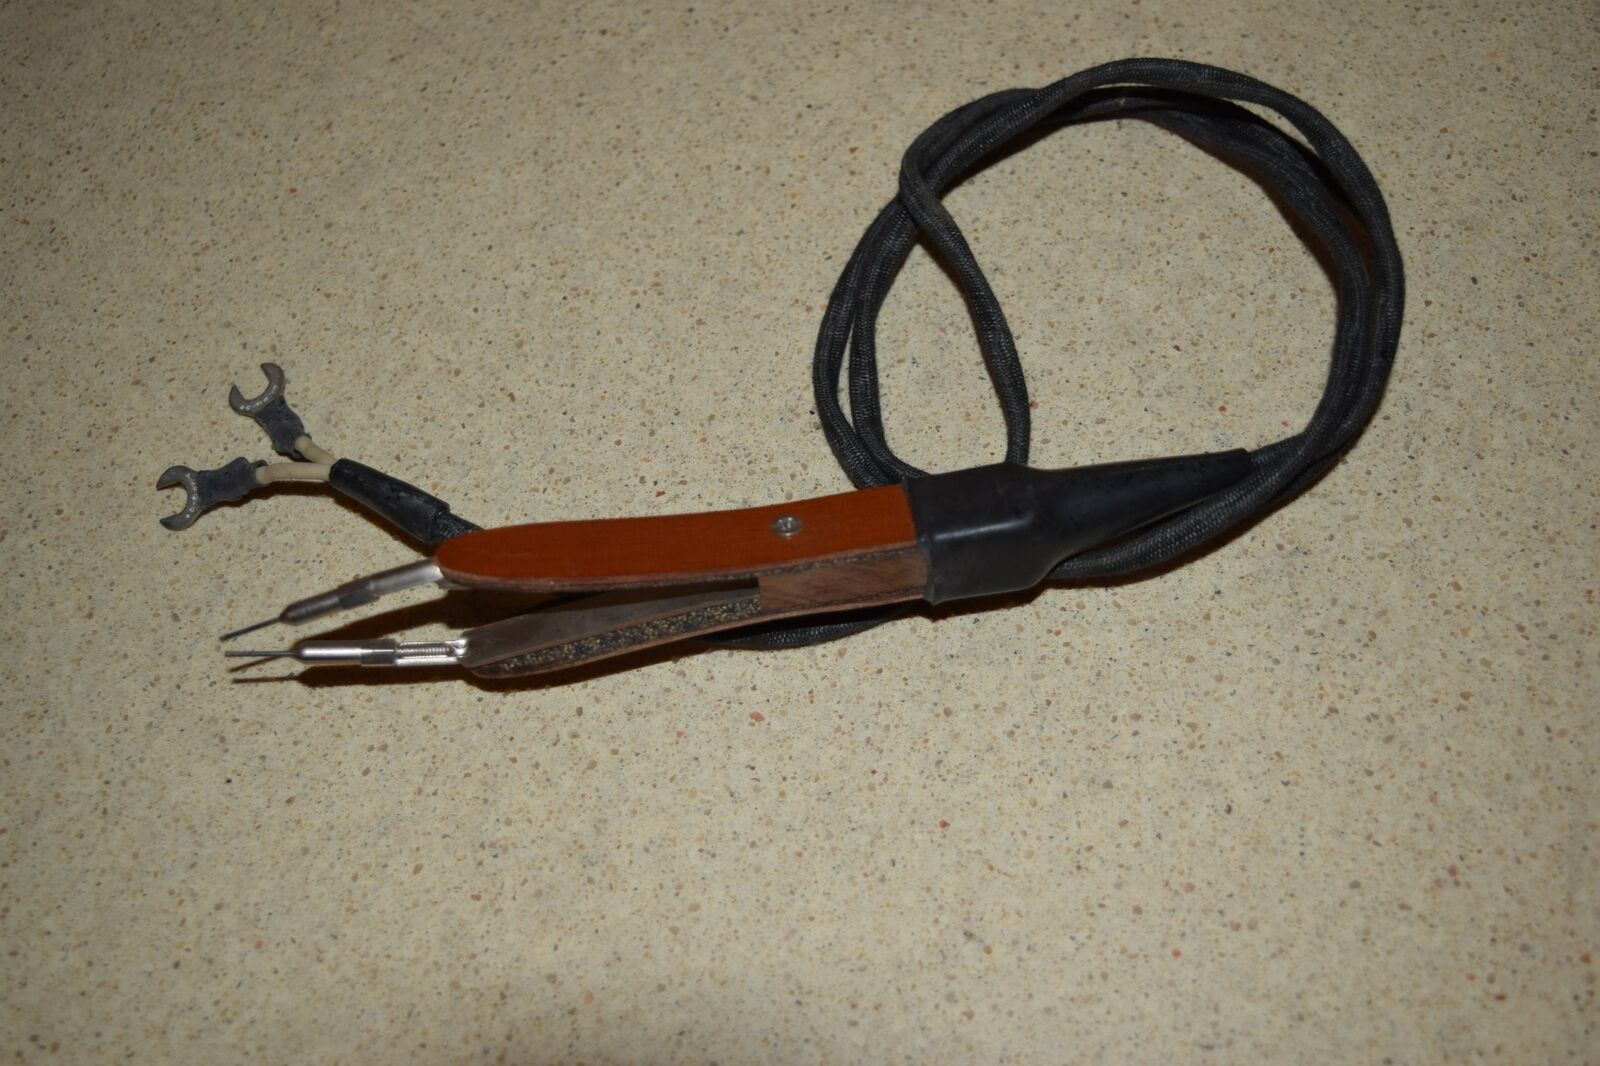
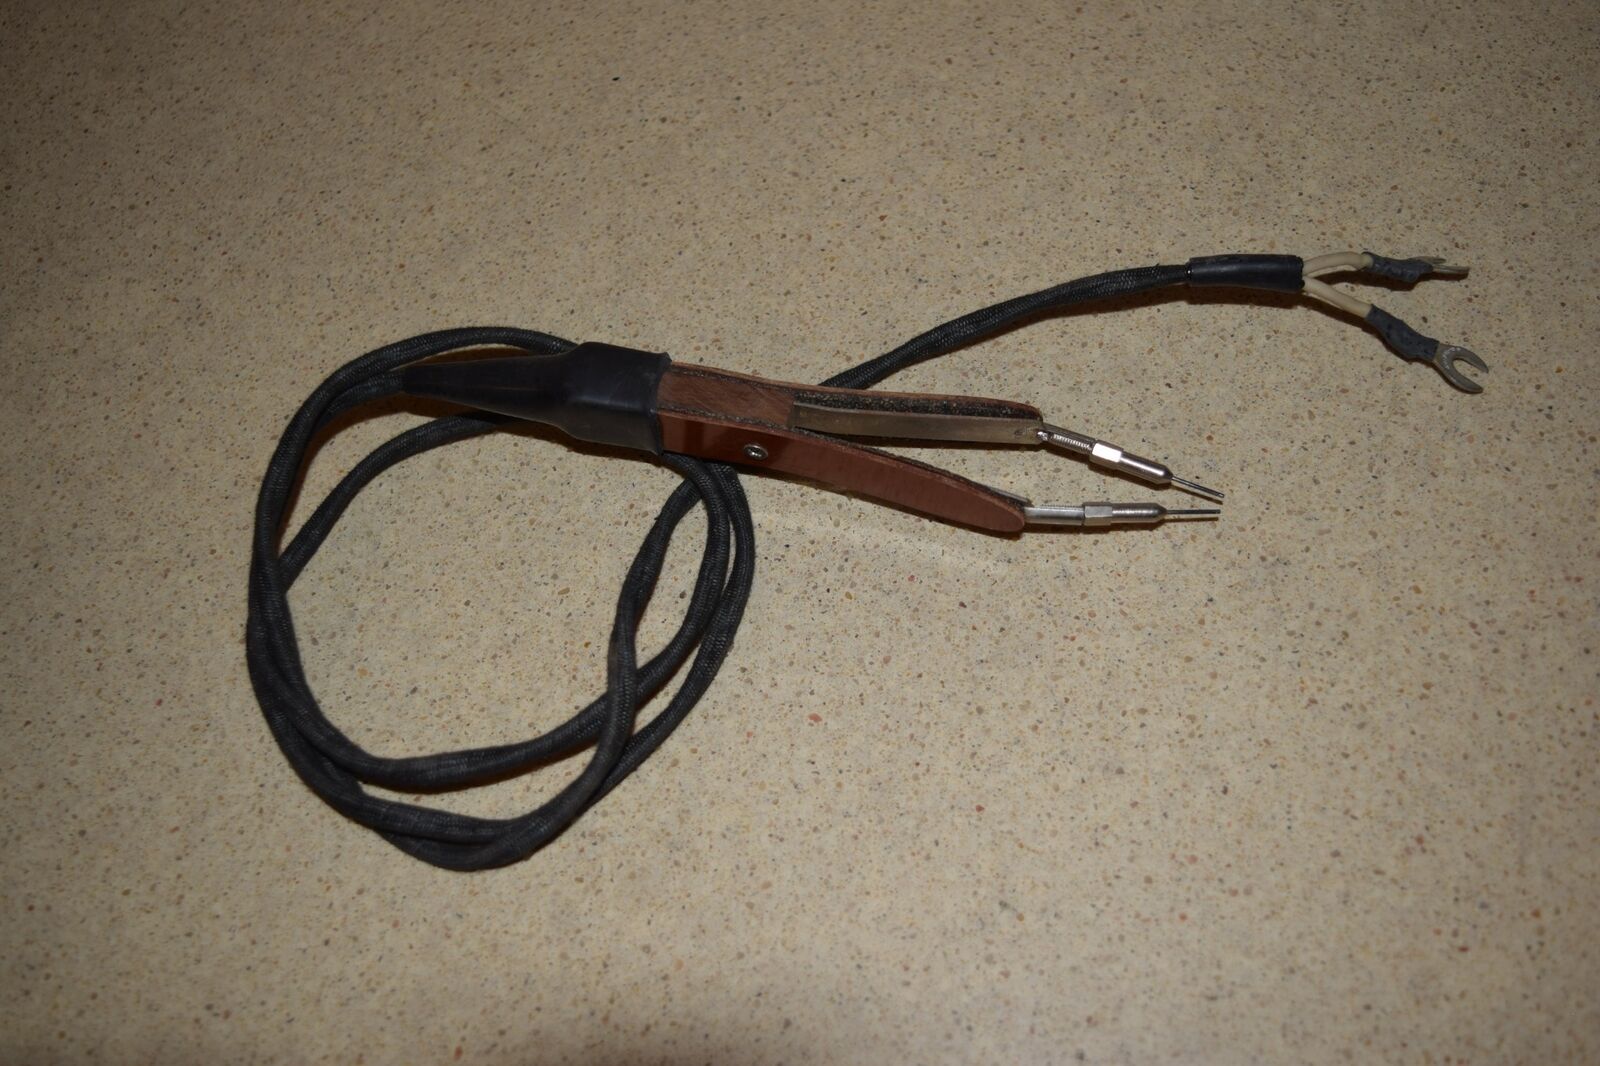
Good points, Ray. I found these tweezers on Ebay. Got them for $36, shipping included! Micro Mark wants $159, for something comparable. I got a foot switch for $15, and the power unit for $39, shipping included. I can use my Dremel speed control for greater adjustability, as, several of the sites I've been reading suggest that. Once this stuff arrives, I should be good to go! When I build the probe, I will use copper-clad carbon "gouging" rods, as recommended due to cost-effectiveness, for the contact/tip. The "mad science meets modeling" was a play on the old Oakley drag racing campaign, "Mad science meets nitromethane".
-
Nice work, JC! This thing looks just right.
-
Resistance Soldering Questions
Straightliner59 replied to Straightliner59's topic in Model Building Questions and Answers
I've been soldering stuff, for years! I am interested in using it for 1/25 scale dragster chassis construction, especially in places where joints are close together. That's why I'm doing it inexpensively--It's an experiment. You know--mad science meets modeling! -
Resistance Soldering Questions
Straightliner59 replied to Straightliner59's topic in Model Building Questions and Answers
Thanks, Ray. I kept eyeing Micro Mark's RSU, and even tried to order it, once. They didn't have one in stock, and were supposed to email me, when they resupplied. They never did. One of the hand built systems I read about, the guy used stainless steel welding rod for the contacts. I reckon that would be for the same reason. My investment is fairly minimal, anyway! I can take a little time to build the tweezers, and the probe should be a piece of cake. I've already ordered a foot switch and a ground cable/clamp. I am looking forward to trying it. -
Resistance Soldering Questions
Straightliner59 replied to Straightliner59's topic in Model Building Questions and Answers
Right now, I'm thinking that, for the probe (I'll do that, first, and fabricate the tweezers, later, since the probe and a clamp, for the other "side" should be pretty easy), I'll use an old soldering iron. I'll replace the tip with a length of welding rod and replace the two-lead power cord with a single-conductor cable that I can attach to the power unit, opposite the ground clamp. That should get things rolling! -
I picked up a Wassco resistance soldering power unit for $25. I am putting together the rest of the system. I am curious as to whether anyone else has put a system together. More specifically, I am interested in handpieces and probes, and, if anyone has fabricated them. I'd like to see what you did to construct them. I think I have enough info to build either, but, I am interested in ideas, and other approaches. Thanks!
-
You had me at "The Dungeon". Miss that place, since I left Minnesota! Never know just what you'll run across, there!
-
"Bring Out Your Dead" Completion Build--ROUND 2 Is On!
Straightliner59 replied to Snake45's topic in WIP: Model Cars
I've most of the rollcage padding installed. I originally had wrapped it in narrow strips of electrical tape. I didn't like it,because it wasn't uniform, and it was lumpy. I ended up using slit lengths of heat-shrink tubing, bound in place with zip-ties. Looks much better! I need to replace one set of zip-ties, because the line I used to make them was a tad too heavy. It seems like this dragster wants to fight me, at every step! -
No doubt! It was cool to see the letter in my mailbox, and even cooler, when I found this inside!
-
When Kenny Youngblood was doing his time at Seal Beach Detention Center, for his tax problems, I wrote him a letter, describing one Sunday at the Mile High Nationals, back in the mid-'80s. A few days later, I received a letter from him. Enclosed was this drawing! It's one of my most cherished pieces of memorabilia.