BDSchindler
-
Posts
470 -
Joined
-
Last visited
Content Type
Profiles
Forums
Events
Gallery
Everything posted by BDSchindler
-
C-1 Models "Shooting Brake" AKA Camaro Wagon
BDSchindler replied to BDSchindler's topic in WIP: Model Cars
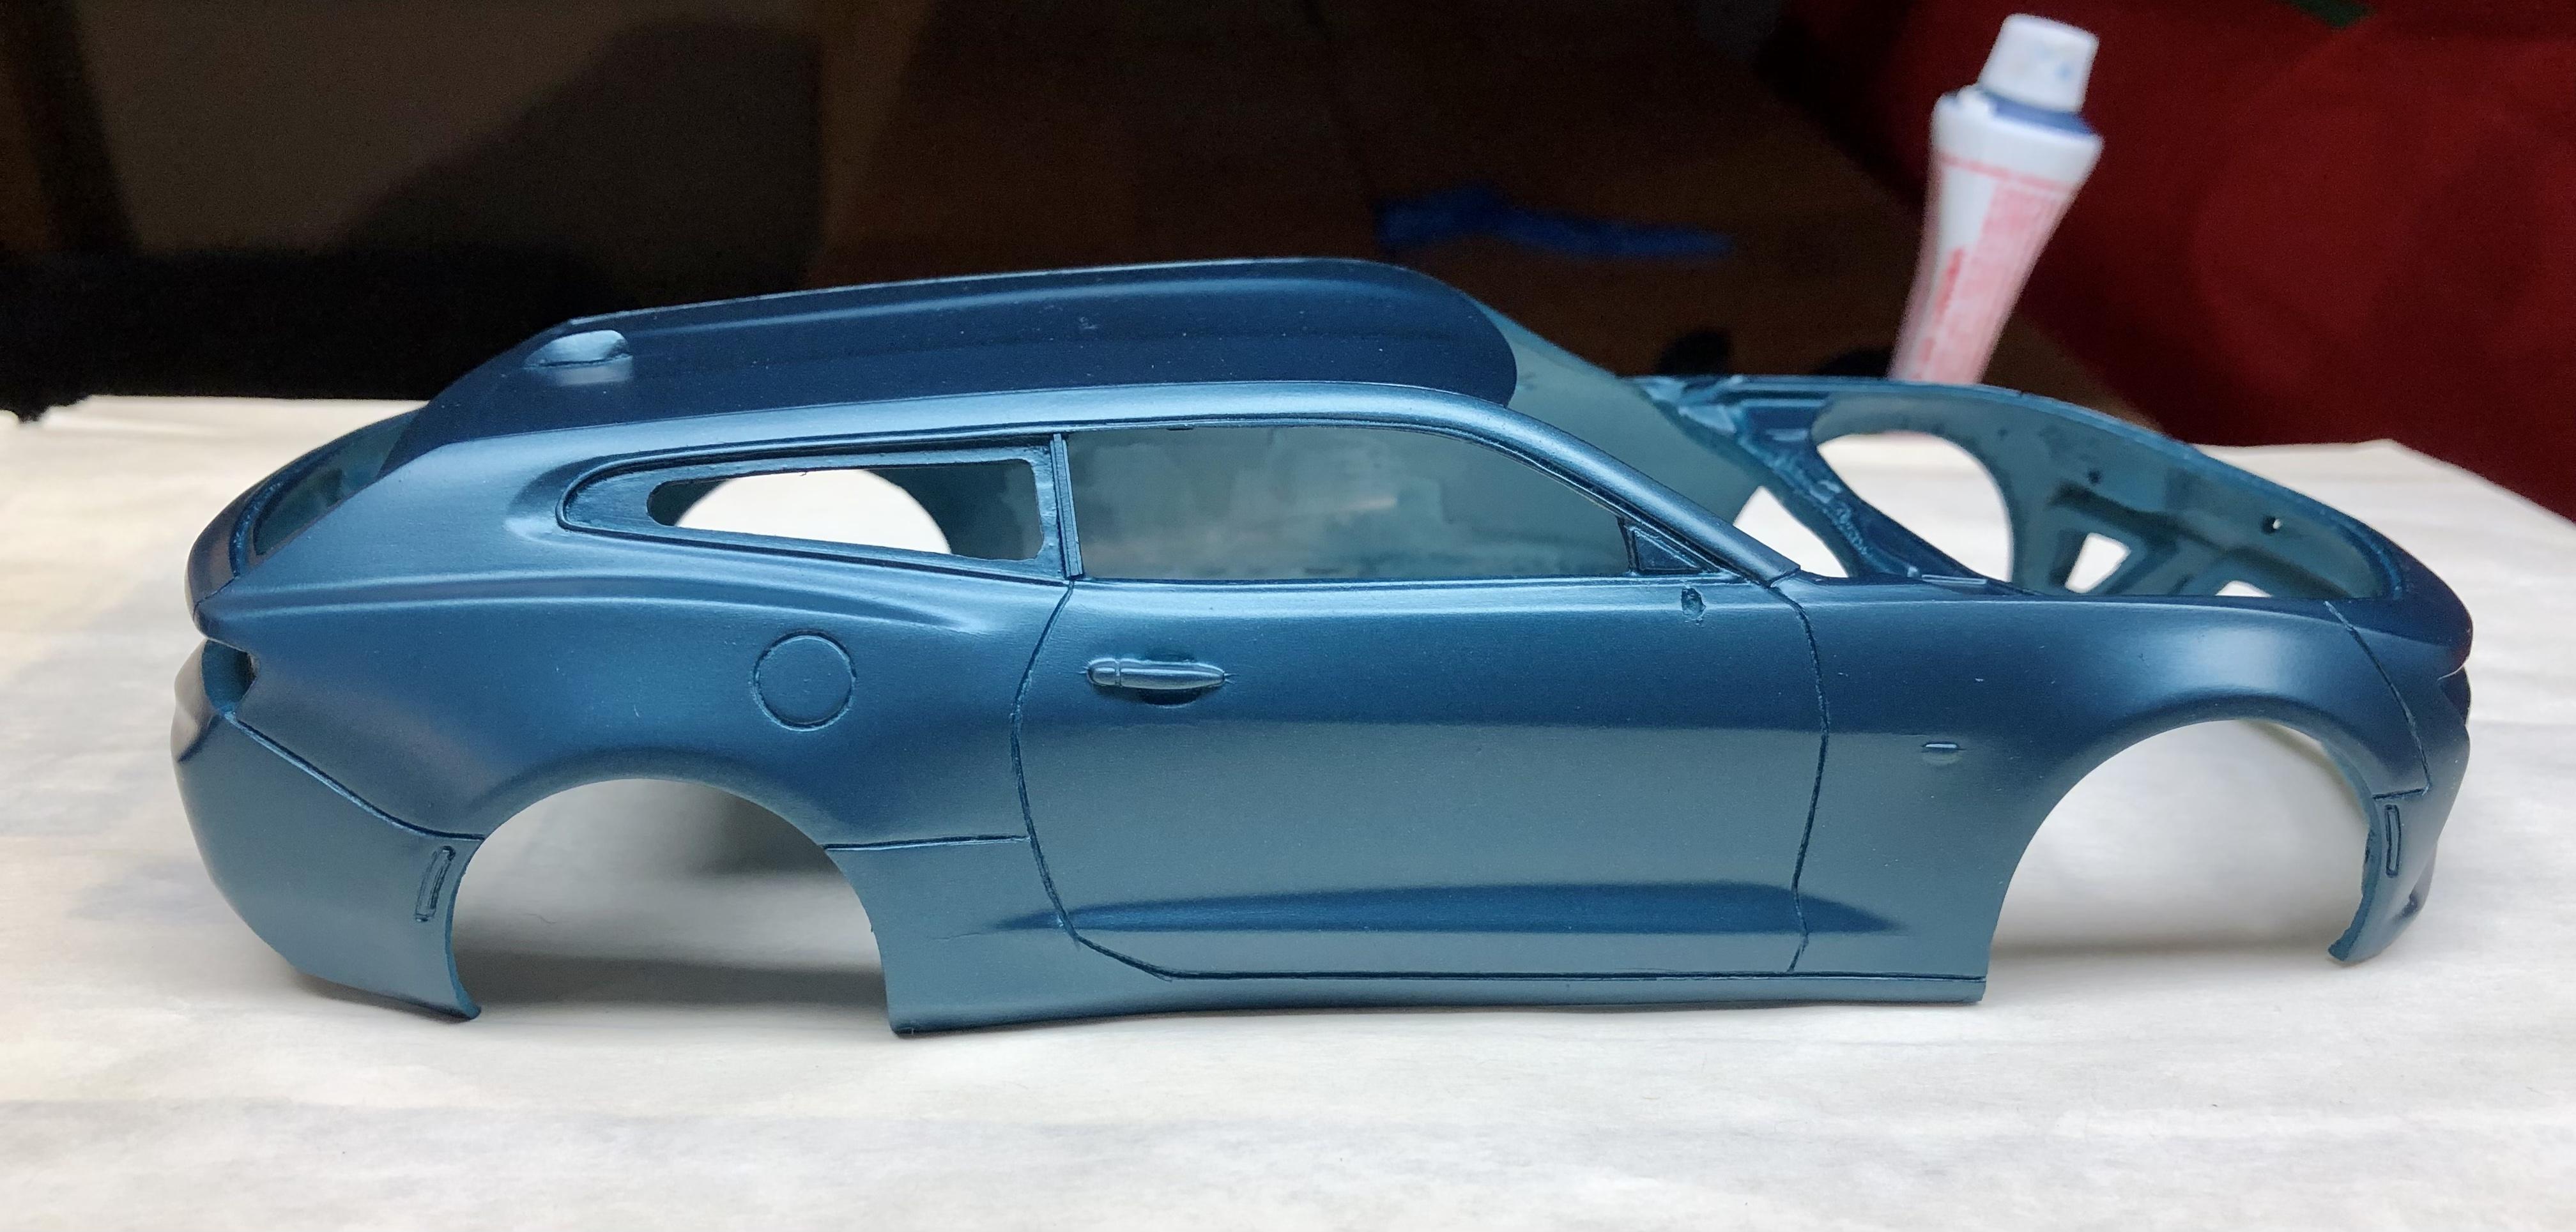
Finally an update, painted the Shooting Brake with Splash Paints Turquoise Blue Metallic. I need to lightly wet sand a couple of spots but overall, it looks good to me. The hood had some deep sanding scratches that I missed and became ever so evident when painted so that went into the purple pond and has since been re-primed.
-
1964 Pontiac Bonneville Convertible.
BDSchindler replied to StevenGuthmiller's topic in WIP: Model Cars
Well...for "shnits and giggles" I gave this a shot using black sprue from the AMT 2017 Camaro and it worked perfectly. When I tried it with Revell white sprue, it took a little more finesse to get it to stretch but I eventually got it to work producing 12" lengths consistently. I see a lot of use for this, Steve. Thanks for the tip! -
Love this build!
-
I use Firefox and have been experiencing the same thing since Aug 2021 but this is the only forum that it happens on. I just select the page I want, right click and open it in a new window. This does not happen with Edge and I hate Chrome
-
C-1 Models "Shooting Brake" AKA Camaro Wagon
BDSchindler replied to BDSchindler's topic in WIP: Model Cars
No worries, Joe! I'm retired now (as of December 2022) so I have plenty of time...well, when I'm not taking care of the never ending "honey-do" list my wife devised to keep me busy! I've been busier in the last 4 months than I was in the last 10 years in I.T.!!!!! Thanks again! -
AMT 2017 Camaro "Fiftieth" Anniversary Edition
BDSchindler replied to mustang1989's topic in WIP: Model Cars
Thanks, Joe! -
AMT 2017 Camaro "Fiftieth" Anniversary Edition
BDSchindler replied to mustang1989's topic in WIP: Model Cars
Joe...I'm currently working on this one but putting C1's "Shooting Brake" (aka wagon body) on it. I have noticed in some builds that the suspension looked too high. I suspect this is why you wanted to lower it just a bit. Just for reference, how did you go about lowering the front and rear suspensions on yours? -
1964 Pontiac Bonneville Convertible.
BDSchindler replied to StevenGuthmiller's topic in WIP: Model Cars
Holy C R A P! That is awesome work, Steve! I'm envious of your talent! Makes me wonder why I keep focused! Let's see...I got about 150 Kits, TONS of aftermarket parts and easily $2,000.00 in tools...$10.00 buys it all, any takers? (just kidding) -
I have had this same identical issue for a long time now and ONLY when using Firefox,,,any other forum like site and it works fine. I also found that only opening the second or more pages in another tab is the only way. Other browsers work fine, only Firefox is the issue it seems. Just a note, I have Java Script enabled on Firefox. If I disable Java Script, I cannot see pictures BUT I can scroll to page 2 and beyond I have cleared cache, cleared history made sure the software was up to date even did an Irish jig in my skivvies and nothing worked. It all started prior to August 15th 2021. https://www.modelcarsmag.com/forums/topic/164179-unable-to-open-secondary-pages-of-a-topic/
-
Just finished this week...
-
If I had built it stock, the front and rear valance would have been installed after the interior and chassis were installed. Since I integrated the valances into the body, I had to get creative with the chassis. I removed a but of the length from the front and rear as well as shaving the Wheel Wells down for easier installation of the chassis. It required flexing the side panels a fair amount. Since the body was going to be finished when installing the chassis, I was afraid of seams cracking where the front and rear bumpers were integrated. This is the reason I used plastic strips at the seams and melted the seams together using liquid glue thereby bonding the plastic for a stronger hold. Kind of like welding but using plastic instead of metal. Lots of sanding and reapplying melted plastic as needed. It also made it so less body filler was needed.
-
Everyone...thanks for the comments
-
No I don't but I'll try and get one up
-
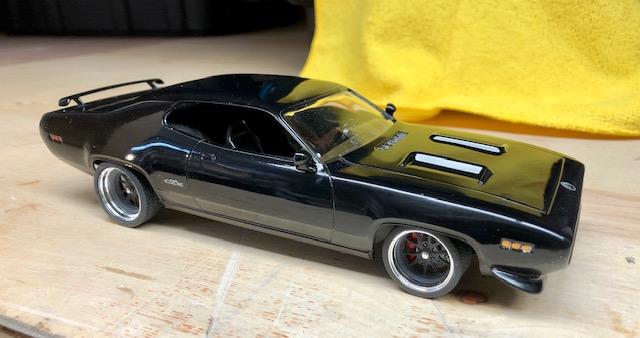
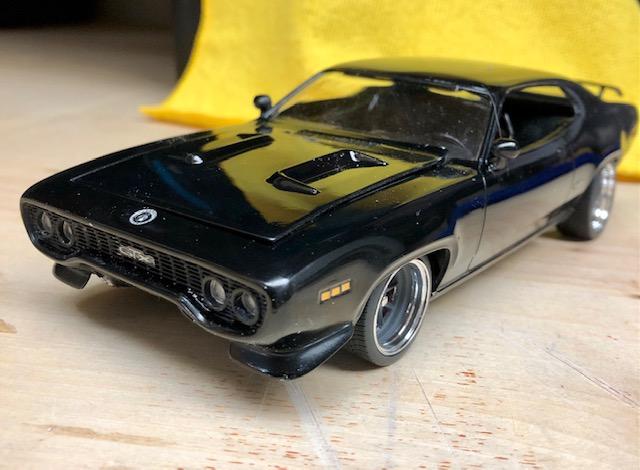
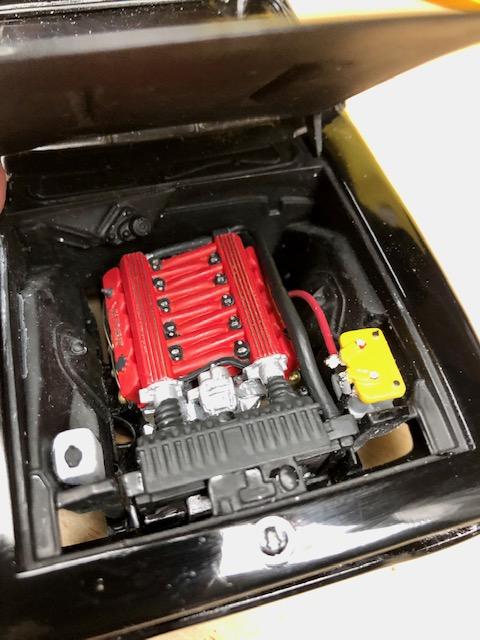
After a year and a half of on again/off again working on this...the 71 GTX is done! I opened the grill on this (4 hours worth of work! Remaining grill is paper thin!), dechromed and narrowed the bumpers then worked them into the body panels using melted plastic and very little filler. Removed the rear seats and tubbed the car. The seats and steering wheel from a Viper RT 10, shifter is from Shapeways. Engine, radiator and shroud are from the Viper. I BMF's the valve covers, painted them red then removed the paint showing the detail in the valve covers. The exhaust was separated from the rear end and I used plastic tube with beading wire stuffed in the entire length. This made the plastic tube bendable without kinking. I used larger tube for the tips and angled the opening. I also made the reveals in the rear valance for the exhaust to poke through. Front suspension was lowered about 2mm...Gives it a meaner look, I think (my opinion). Paint fought me all the way...my own fault. I got dust in the clear coat and wet sanded it then buffed it. I ended up buffing through the paint in 2 spots. Taped it off and fixed those areas but when I removed the tape, the adhesive melted the clear coat just enough to give it a rough vinyl top look. So I wet sanded that buffed it out again. When I was going to glue the radiator in (using Tenax glue as it fuses the plastic better) and of course, a drop of it landed on the nose. Touched it up and it will need some finishing once the paint cures but for now, from 4' away, you can't see it. Wheel and Tires from Steve Zimmerman Here's some pics...ANY feedback is appreciated! The hood DOES sit tight to the body, I forgot to tap it into place before I took the picture. *** Note...Driveshaft was installed since this pic. Originally I forgot about it!
-
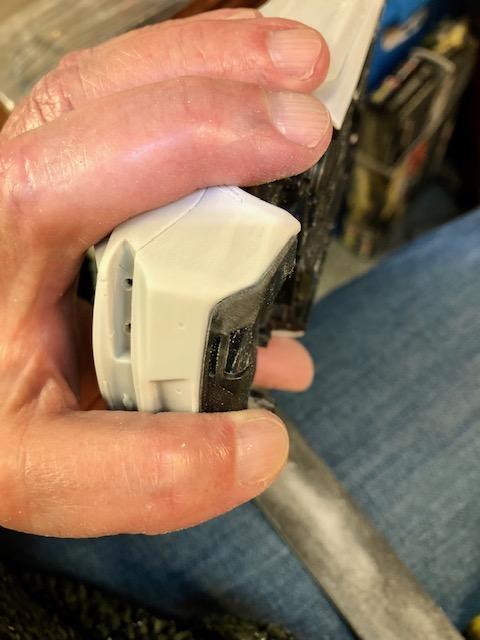
So while waiting for the clear coat to cure on a GTX that I have been slooooowly working on for what seems forever, I figured I'd start my next pair of projects. Part 2 will be a box stock AMT Camaro (inspired by a recent build from Joe Shaw aka "Mustang1989" here===> https://www.modelcarsmag.com/forums/topic/174678-amt-2017-camaro-fiftieth-anniversary-edition/). Part 1 is the C-1 Camaro "Shooting Brake" Wagon. Initial thoughts were that it would be a fairly easy build using the AMT 2016 or newer Camaro donor. Now this is my first resin trans kit and I have been warned that resin kits are more brittle that plastic so I am proceeding cautiously! First real inspection I discovered some pinholes to which I drilled out and filled from behind. I also saw a lot of resin in all panel lines and while lightly trying to dig them out, I noticed the rear of the drivers door is very thin. I barely touched it and it opened up...again filled from behind and will get back to that later. At this point, I figured I should test fit every part that comes in contact with the body...and I'm glad I did! The Shooting Brake needs the hood from the donor kit. When I test fitted the hood, I realized that a lot of massaging was needed. Like 3 hours worth! When it was done, I was happy with the outcome... There was a lot of resin in the recesses of the nose also and it was easier to massage the donor parts to fit correctly. So a quick mock up of the nose produced an acceptable result... The rear valance was a royal pain the rear, however! Again with the heavy amount of resin caused the rear valance to literally hang off the body. There is a YOUTUBE video out there that shows this around 11:43 into it (https://www.youtube.com/watch?v=uvvbEtm4jwQ). I took a fair amount of time to remove the resin, as needed, and massaged the donor valance until it looked closer to what the Camaro actually is. Right and left rear valance pictures are below... You'll notice I have the interior and chassis installed. I did it for 2 reasons...it adds some rigidity while I holding and grinding away on the body but I also wanted to see if the interior went clear to the rear of the Shooting Brake's cargo bay. Well, it doesn't so now I'm torn with... Extending the rear deck to the back Cut out the rear deck and fabricate a cargo area Take the easy way out and black out the rear window and leave the interior the way it is. Blacking out the rear window will not show what you see in the picture below. Thoughts and feedback are appreciated!
-
Wheels roll or not roll?
BDSchindler replied to Biggu's topic in Model Building Questions and Answers
That sounds like challenge to Steve! ? -
2011 camaro convertible
BDSchindler replied to BDSchindler's topic in Model Building Questions and Answers
Thanks for the feedback -
How big is your... stash?
BDSchindler replied to Pierre Rivard's topic in Model Building Questions and Answers
How big is my 'stash? it just goes to the corners of my mouth but all gray now... oh...you meant "model stash"...about 150 or so...a few duplicates like the Revell Foose Ford Pick up as there are parts in that kit that are really well done for kit bashing. I have 10 of those that I picked up really cheap considering the more recent price hikes. -
Wheels roll or not roll?
BDSchindler replied to Biggu's topic in Model Building Questions and Answers
When I was writing and reviewing diecast for various magazines, some companies would gear the rear end so that when you turned the rear wheels, the driveshaft turned, as well. It was a nice touch, granted...but if you wanted to see the drive shaft turn, you had to pick the car up and turn it over. As everyone knows, the more you handle a car, the more likely something is bound to break. On top of which, oils on the hand (or other such chemicals say if you are a smoker) get on the paint which then requires a quick buff before you put it back. Again, more chance of something breaking (who hasn't lost trim, BMF or Photo-etched parts buffing a diecast and/or model?). Driveshafts that turn also added additional costs to the diecast. With some of the diecast in the $150+ price point, the added engineering just wasn't worth it, in my opinion. As for models...everything I have built since I got back into the hobby has been custom or hot rod and used wider tires. So, it necessitated removing the mounting points of pins/axles from the wheels to get them to fit believably in the wheel wells with Disc Brakes attached. So a little dot of JB Weld has been my friend to permanently mount in one position. I haven't flat spotted the tires yet (just never gave it THAT much thought) but I may give it a go on my next build. -
Has anyone put the body from the AMT 2011 Camaro convertible (curbside “Showroom Replicas”) and put it on the 2017 full detail Camaro chassis? If it will work, my thoughts are to open the hood on the convertible for a full detail convertible to go with a regular 2017 camaro and a “shooting brake” Camaro wagon body I got from C1 models. It’ll be a “Camaro Trifecta” for me doing all 3 at the same time…different colors of course.
-
Thanks but I am looking for NON-Rallye gauges. Just a Plain-Jane Duster dash panel.
-
Thanks guys
-
I'm interested in doing a more stripped down version of the 340 Duster and looking for a bench seat and the standard dash (not the 340 dash with round gauges) and standard steering wheel. So does know of an interior conversion the likes of what I am looking for?
-
Organizing styrene sheet strip stock.
BDSchindler replied to LDO's topic in Tips, Tricks, and Tutorials
Ya know, this is a great idea. I have been trying to find a resolution to storing all of the sheet plastic and so forth and this will work perfectly!!! Thanks! -
Empi-Style Dual Carb for VW Bug?
BDSchindler replied to Calb56's topic in Car Aftermarket / Resin / 3D Printed
I'm dying here!!! ?