BDSchindler
-
Posts
470 -
Joined
-
Last visited
Content Type
Profiles
Forums
Events
Gallery
Everything posted by BDSchindler
-
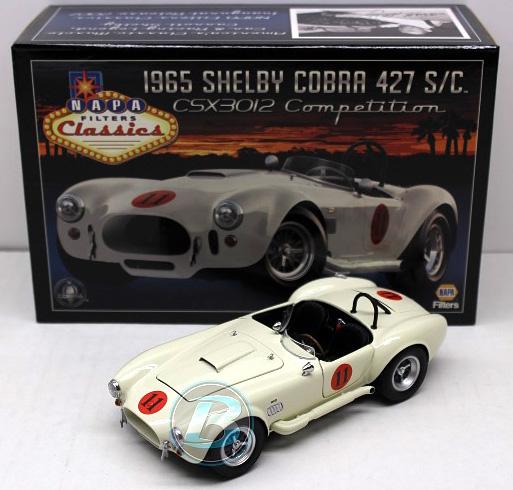
Ray, You may not be aware of this but this particular "Elvis" Cobra from ICONS Inc. with this box art is pretty rare. I ran this in a column I wrote and did sell a few for Toy Cars and Models Magazine somewhere around 2008. I also did some side work for ICONS and they provided me some information on this one. Icons had the box art printed and did sell a few BEFORE they had the rights to market this as the "Elvis" car from Spinout. Turns out that Franklin Mint already secured the exclusive rights to do it in 1/24th scale so ICONS had to have the box art reprinted and was not allowed to market this as the Spinout car but they were allowed to sell the cobra with #11 meatball on it. Those that were shipped to NAPA had to be recalled. The box art was reprinted with the famous Las Vegas marque on it which alluded to the Elvis Vegas car without saying it was. I can't remember how many were released with the Elvis box art but below are the differences ICONS targeted the Franklin Mint version touting the fact that they could provide better detail at a $30 price point for their Cobra's over Franklin's version. George Bojaciuk was the designer for FM and I compared the 2. There was no way it was better then the FM version but for the money, it was a good buy for collectors, especially if on a budget. The collector response to the Cobra (combined with the GT-40 they did for Wix Filter's 40th Anniversary) made ICONS' head swell. They later did a GTO that was in the same price point for NAPA that was targeting the Danbury Mint GTO. ICONS proudly boasted it was better than Danbury could ever think about doing. It didn't garner the same response and humbled ICONS.

-
Interestingly enough, Ray...I did manage to find one on ebay and rec'd it today. It too was also open, appears complete and also had the engine block glued together. Weird
-
I tried Elmer's and it didn't work as well as the color matched adhesive for me. Don-Jer's adhesive holds better and never dries but gets to a tacky state to retain the fibers tighter. Essentially, the Don-Jer method is closest to what is used in 1:1 automotive glove boxes and console interiors. The color matching helps to hide where the flocking may have gone on a little light. I know others that use salt and pepper shakers also with great results but for me, I have too many Rx bottles so it just made sense to repurpose one of those. Works great tho! https://www.flockit.com/
-
Don-Jer is the cats butt! I have used it several times. I bought the flocking and the color matched adhesive. They also have an applicator but I took an old prescription bottle and drilled holes in the lid. tape off anything you don't want flocked like where the seat will be. Apply the adhesive to whatever you are flocking (be generous but not a heavy coating) then pour some flocking in the bottle, invert the bottle and shake it on trying to cover the adhesive as uniformly as possible. let it set up and lightly press it in. turn over whatever you just flocked and shake off the excess. Let it stand for a few hours and peel off the tape.
-
Information on Monogram's Exotics Series
BDSchindler replied to oldcarfan's topic in Car Kit News & Reviews
Thanks -
I've tried to find one of these at a reasonable price but gave up on it. Looks great!
-
? Surprisingly, I got my issue #210 today! After not receiving the last issue through normal channels, I was shocked to see it in the mail this morning. YEAH!!! In so far as the content goes, I think it's a good issue BUT it has different content than #209. That will happen when you have show coverage included and #210 has 10 pages of the Las Vegas show content. It is not chock full of articles like the one on Atlantis in issue #209. If you're going to have show content included, it will take the place of normal content. Can you have both? Sure! The thing is that if you go over a certain number of pages in an issue, the production costs go up to produce that issue depending on how the printing contact was written. When I wrote for the mis-managed and poorly executed The Car Room Magazine, each issue had to be kept under 90 pages. If it went to 95 pages, it hit another price bracket for the entire issue per printed copy. It's like your boss giving you a Bonus check that drives your salary into a higher tax bracket. I'm not saying that is the way MCM is published, just relaying personal knowledge from a previous nightmare...er, ah experience. Do I think the Show Coverage detracts in a normal issue? Well, if one issue a year is planned to be dedicated to all shows throughout the year, I really don't see the point of having show coverage in a "normal" issue. Then there is Covid and not only are model shows shut down, the rest of the world was too. So no issue dedicated to show coverage and since the Las Vegas show may be one of the few to be covered in the last year...well, there ya go. Personally, I like seeing other builder's ideas and probably why I like custom cars so much. The creative processes spark my own creative thinking! But, back to my point... My opinion only but when SAE was in publication, you were offered a separate issue (at a separate price) to your subscription for ONLY show coverage. I say, lets be different...with each subscription of normal issues, get an additional issue with only show coverage INCLUDED!!!! Yes I know, it would be additional cost to MCM but it would help to keep money in-house as opposed to outside. just my 2 cents.
-
Thanks John, I was not aware of that. Given that info, I will be patient a while longer. I rarely follow retail sites via Facebook simply because they have enough info on everyone with all of the different algorithms they (FB) use.. I also don't buy via FB as there are enough thieves and hackers that use FB, it's like shooting fish in a barrel to them. Paranoid? Absolutely! I've just seen too many things happen via FB in my 40+ years of working in IT. All that said, I like Upscale Hobbies. Their inventory sells out fast but the wide range of products and manufactures they carry suit my needs pretty well. Same can be said for MegaHobby and Model Builder's Warehouse. They are my top 3 I go to for what I need. Thanks again for the feedback...much appreciated!
-
Has anybody dealt with Upscale Hobbies lately? I order the new Revell Jag from them in mid July. When I saw them in September appearing in Michael's, I thought it would be sent soon. When it wasn't, I contacted Upscale and they told me they were having trouble getting what Revell had allotted to them. I understand the shipping issues and all that due to Covid but since then, I have contacted them 2 more times and I get no replies. Now it seems that a lot of online hobby shops have them in stock but I still get no reply from Upscale Hobbies. I also ordered the Bronco/sandcrab kit from MegaHobby and already received that one from Mega but still nothing from Upscale. I Upscale still in business? I have ordered several things in the past, some pre-ordered and received everything quickly. So I'm curious.
-
For me, it was Dave that came to the rescue with issue #209
-
I'm hoping this one makes it without your intervention, Dave.
-
To err is human? Some are uncorrectable.
BDSchindler replied to bonehead23's topic in How To Use This Board
"The 9000 series is the most reliable computer ever made. No 9000 computer has ever made a mistake or distorted information. We are all, by any practical definition of the words, foolproof and incapable of error." - Hal 9000.
-
I’m guessing that may be the case, Dave. I still haven’t gotten it!
-
Another week goes by and still nothing. <sigh!>
-
well, Greg told me I am good until issue 215 so my sub hasn't run out. So I got that working for me, at least! ?
-
Still nothing in Maryland
-
Unable to open secondary pages of a topic
BDSchindler replied to BDSchindler's topic in How To Use This Board
yep...don't get it. However, if I right click the page number and select open in another tab, it works. -
Unable to open secondary pages of a topic
BDSchindler replied to BDSchindler's topic in How To Use This Board
It's not consistent, Dave and one of the things that is driving me nuts. I did what you said and reloaded this site completely. The first topic I select with multiple pages will work correctly. I can go to all of the pages of that topic with no issues Then I go back to the listing of all topics find another with multiple pages and page 1 loads, but not 2 or 3 or so on...not even next page. Now, here's the kicker...after going back to the listing and finding another topic with multiple pages, when they don't open, I tried right clicking and select "Open Link in New Tab", the page will open in the new tab and then I can select any page. Weird. -
I know I’ve seen a chart for the correct diameter size wire depending on scale and application (plug wire, radiator, heater hoses, A/C lines, fuel lines, brake lines and so forth) but I’ll be darned if I can find it anywhere! Anybody here know of one? I’ve grown tired of ordering 2ft or 3ft of various sizes and looking to buy in bulk. Hobby Lobby has a lot of various sized bead wire in smaller diameter but like 10 yards for roughly the same price. So I just want the wire diameter size equivalent for the type of detail I’m trying to replicate. Thanks in advance!
-
Oh, I get it! When I was reviewing 1/24th scale diecast for a couple of diecast magazines, I acquired nearly 1,500 cars, trucks and other transportation vehicles just from Danbury alone from all years. Some are more memorable than others. When Danbury halted all diecast production, I stepped away and got back to my roots with modeling after 40-45 years out of it. This (modeling) is much more fun.
-
Danbury actually did a number of pro street cars that were farmed out to car modelers to design (upper shelf, lower shelf is a pewter 1/12th scale Daytona by Franklin Mint). The lot was nothing more than Killer!
-
Yup! I was going to say the same thing, I reviewed it for a couple of Diecast Magazines 5 or 6 years ago.
-
The whole thing is beyond great but that interior, looks like a real car!!! Great job!
-
Unable to open secondary pages of a topic
BDSchindler replied to BDSchindler's topic in How To Use This Board
so I did exactly as you said and Javascript is enabled. When it's enabled, I cant page forward on a topic but I can see pictures. When it is disabled, I can page forward but no pictures. Very strange as if I go to other forums, I have no issues at all, Only here, Raising the white flag -
Unable to open secondary pages of a topic
BDSchindler replied to BDSchindler's topic in How To Use This Board
OK, so I disable JavaScript on Firefox and pictures are displayed but I cannot page forward. If I enable JavaScript, I can page forward through a topic but pictures are not displayed. I don't get it.