Impalow
-
Posts
1,065 -
Joined
-
Last visited
Content Type
Profiles
Forums
Events
Gallery
Everything posted by Impalow
-
untilThis event has been cancelled due to public health concerns Coming March 29, 2020, 9 a.m. to 3 p.m., is the Detroit Area Auto Modelers Motor City Madness contest and swap meet. This is a judged contest. Class trophies and specialty awards will be given. Admission to the show is $5 and there's NO additional charge to enter the contest. We'll have over 300 vendor tables for the swap area, slot car drags and a few real cars on display. We're the biggest show in the Midwest, come and see why.
-
haha... Groovy Bruce! Thanks Jim! I'm using just the standard blade, I did purchase the deep cut blade but found the cut to be less accurate(wider blade?), I also didn't really notice a difference in the depth of the cut on styrene. I purchased my unit used and it came with an extra brand new standard blade, I still haven't had to put that in yet, and its been several years of cutting styrene. I use the "chipboard" preset, and then crank the regular blade to 11... I know it only goes to 10... but it does go a little past 10... haha.. The chipboard setting is a slowest speed double cut, and I usually just do it once at that setting, maybe twice for intricate .020 stuff. I hope to get some good bench time this weekend... I programed a rear console TV and record player last night, I'm excited to get that built. ?
-
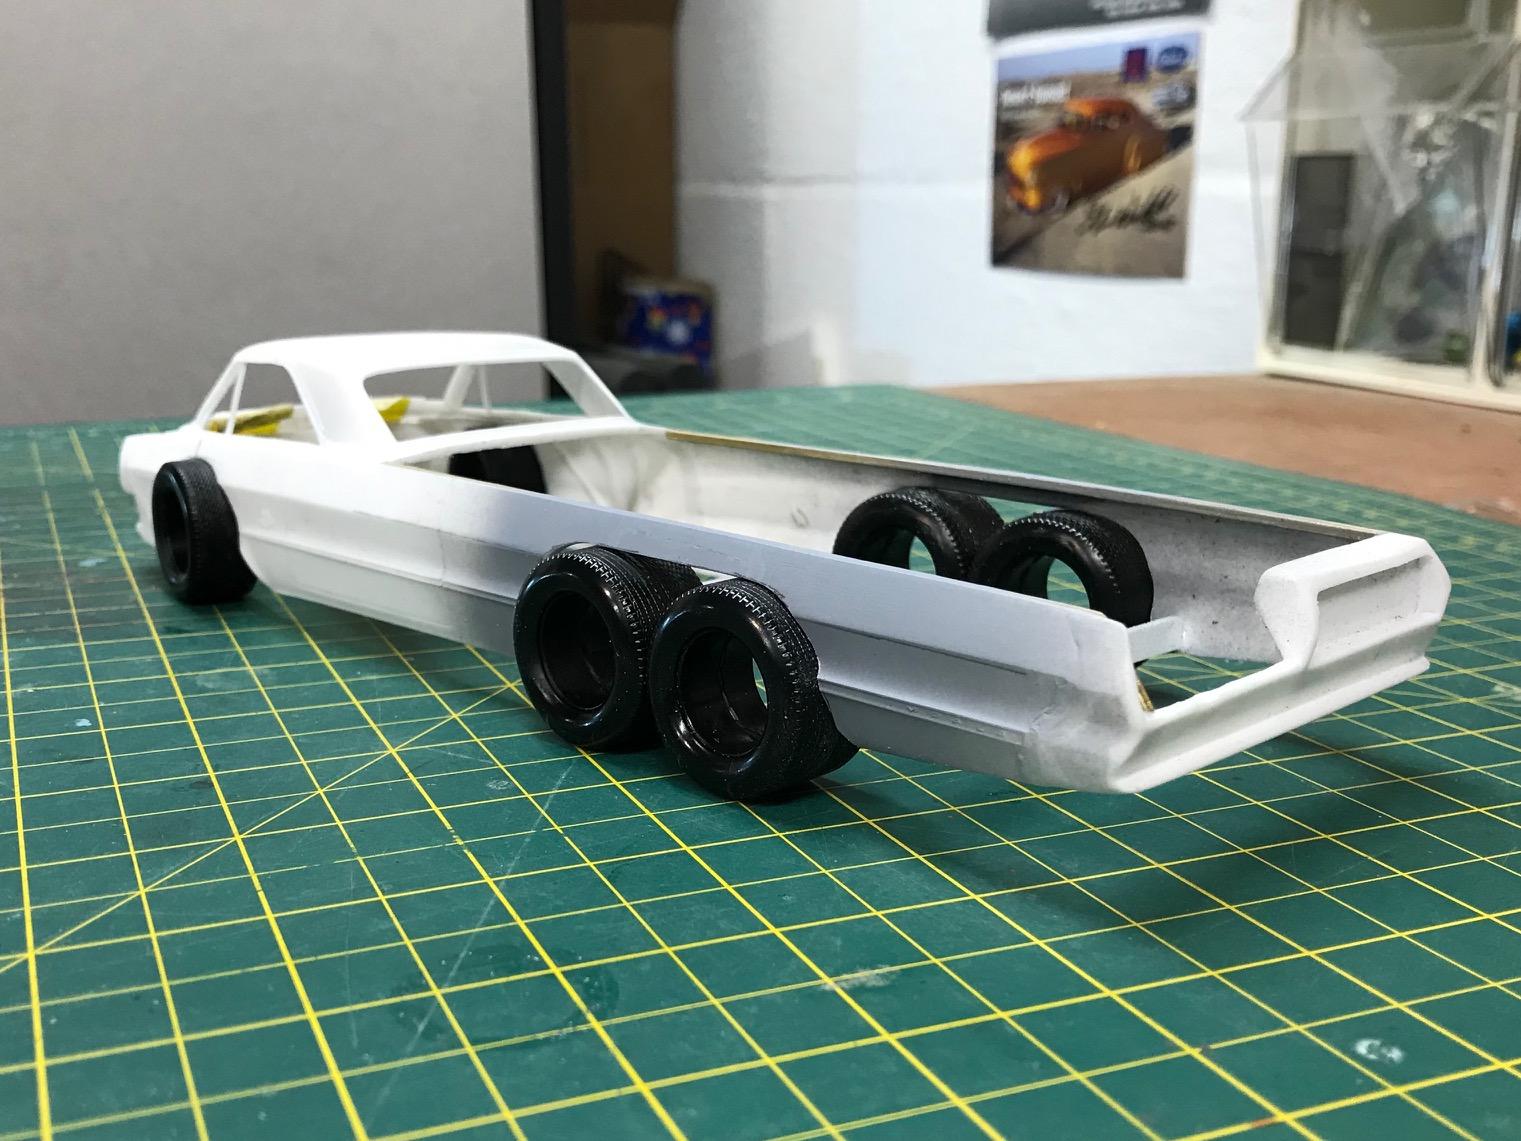
Thanks David! Not a ton of progress here, but it is looking more like an actual kit.... slow progress is still progress... just not getting a lot of bench time lately. Managed to get the rear up on the tires last night, going to re-purpose some parts box front suspension to get the front sorted and determine the track width.

-
Oh that looks nice... great stance & nice work! Personally on the thicker stuff I will rough cut it with an x-acto leaving a big nub... and then carefully sand the sprue nub away with a course sanding stick.... it usually ruins a sanding stick, but it gets the job done. I wish there was something between stainless and aluminum for photo etched parts... the stainless is so hard to cut, aluminum is too flimsy and brass is.... well ....brass colored.?
-
 Thanks for posting this Tim! Very interesting, a great model and a little history lesson. The recent resurgence of nostalgia in the Hobby has really struct me... Not sure if it was just from the last Toledo NNL, or the afterparty/event but I have suddenly been more drawn into the story's these fabulous pieces of plastic we create tell.
 -
Outstanding work on the chassis! Check out this link.... I found this doing research for my build... but wowza... the 70s were weird and I love it! https://jameshandyphotography.zenfolio.com/f1008396796
-
Fantastic! I look forward to seeing you again... and ill bring some extra $$... You had lots of great goodies on your table last year... I will need to get more!
-
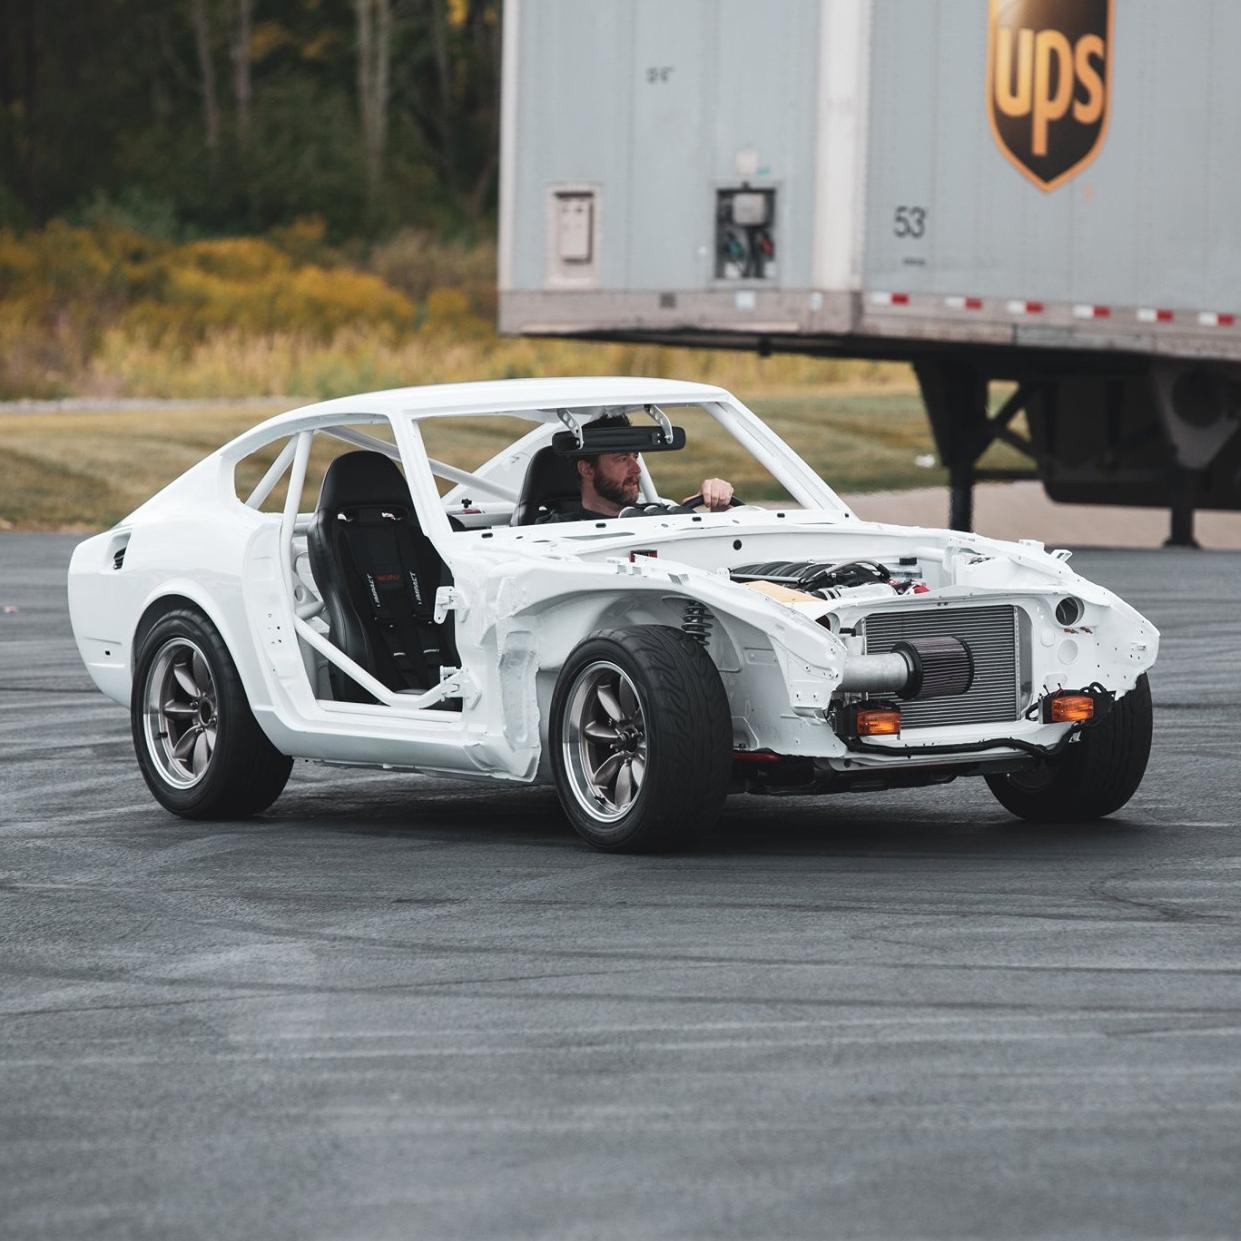
Yeah I drove it like it that... its already a pretty sketchy vehicle, but it feels super sketchy in this configuration...especially without the windshield, and no goggles. hahaha.. Luckily the show was only about 2 miles from our shop. And yeah that Robert Downey Jr fellow is a sleep deprived me..haha Thanks for your interest Bob! I do have a little update.. nothing earth shattering yet, but working on getting this thing all packaged together. Ive created a bulkhead and a rear tool box to help square up this chassis assembly. I have decided to go with a 3 passenger configuration with a center dual joystick controls (like a tank, or zero turn mower) Going to outfit the passenger compartment with some fun late 60's TV's and accessories... possibly some shag carpet. Then the drive train... I went with some brass tubes and dual quick change rear-ends from the Tommy Ivo Showboat parts kits, the forward one will have the drive pass through the cover to the rear one. I'm not 100% this is feasible in 1:1, but looking at diagrams it seems like a valid idea. Then I assembled the Blueprinter parts pack Corvair engines to get an accurate idea of the length... Im going to have to use a pretty short transmission, possibly the "in-Out" box from the parts pack 283... its a showcar, so i guess this is okay... unless I can find another super short option? Next up is finishing the interior "tub" and getting the front suspension sorted... once that is worked out, i can sculpt the wacky flares onto the body...
-
This is exciting! Should be great for modern race parts, and is just a pretty race car. I think the first pic may be of their RC model.... just looking at the wheel nuts, window tint/texture and warning label inside the wheel well. Regardless the kit is going to be a nice addition.
-
Hahaha... that does look a little like my comet.. I'm thinking maybe more like this guy this time... maybe.. but who knows... if even the chassis is done for East... Ill take it.
-
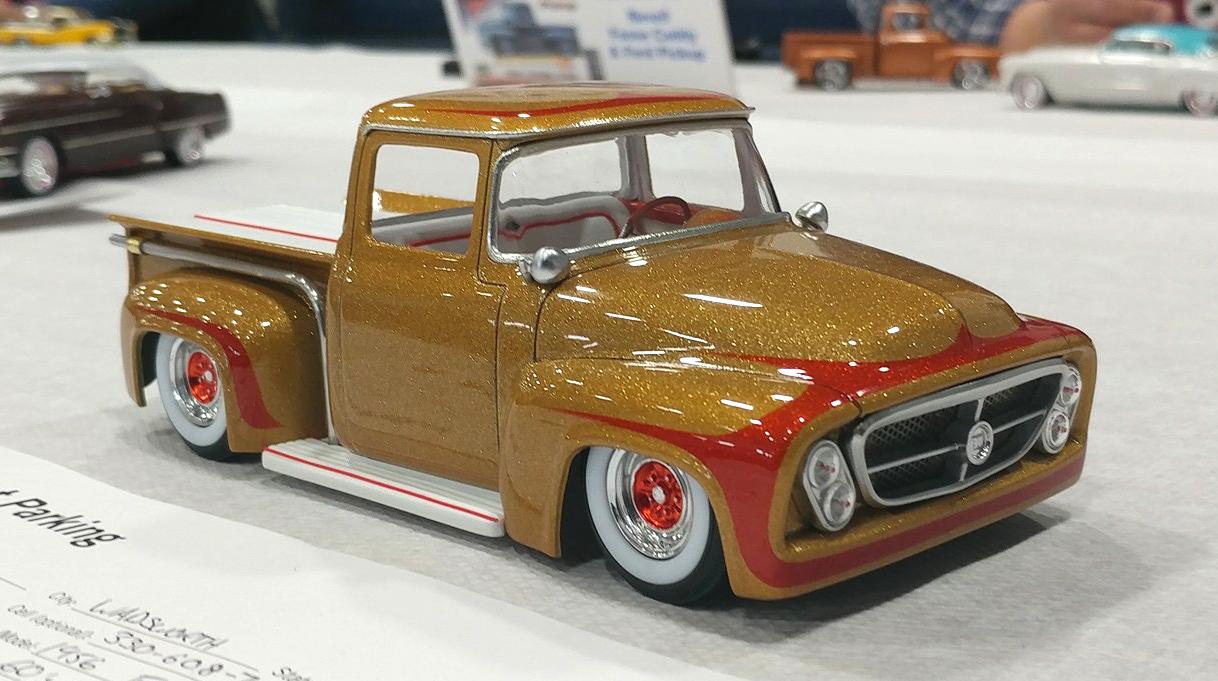
I have been using this lately and have been really impressed with it.... available in 1/32" and 1/28" http://www.coastairbrush.com/proddetail.asp?prod=FBS_PT43_MICRO_Performance_Tape&cat=20 I stopped at the FBS booth a few years back at SEMA, I talked with them about models for awhile... He handed me a couple of sample rolls to try, and honestly... its fantastic.. no leaks, easily bendable. The red scallops on this were done freehand with the 1/32"
-
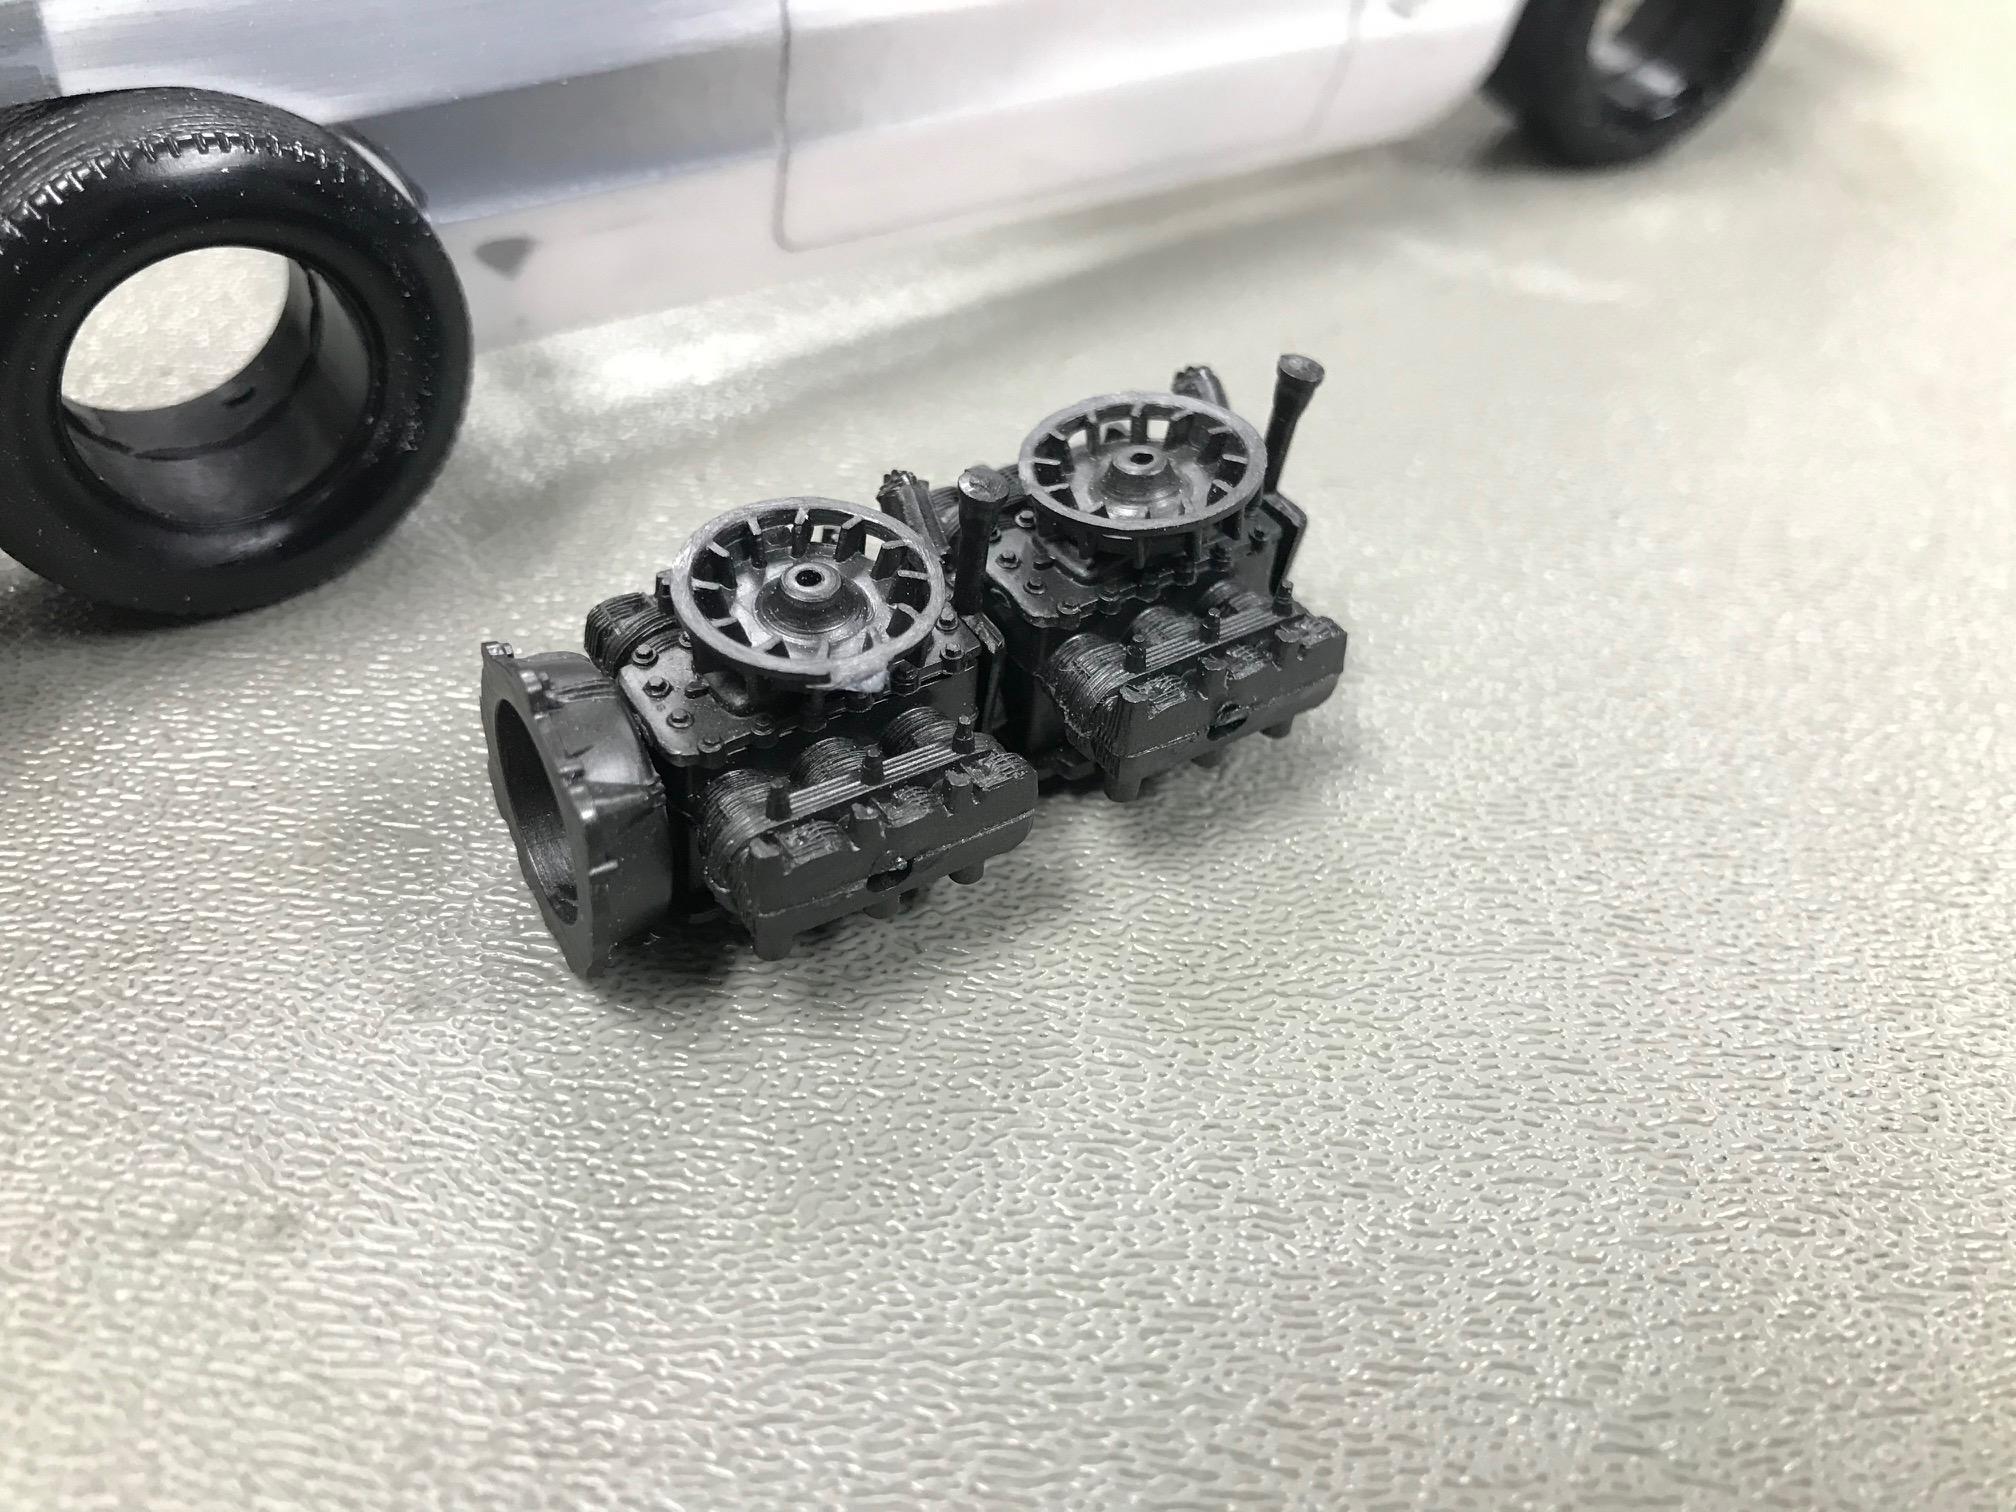
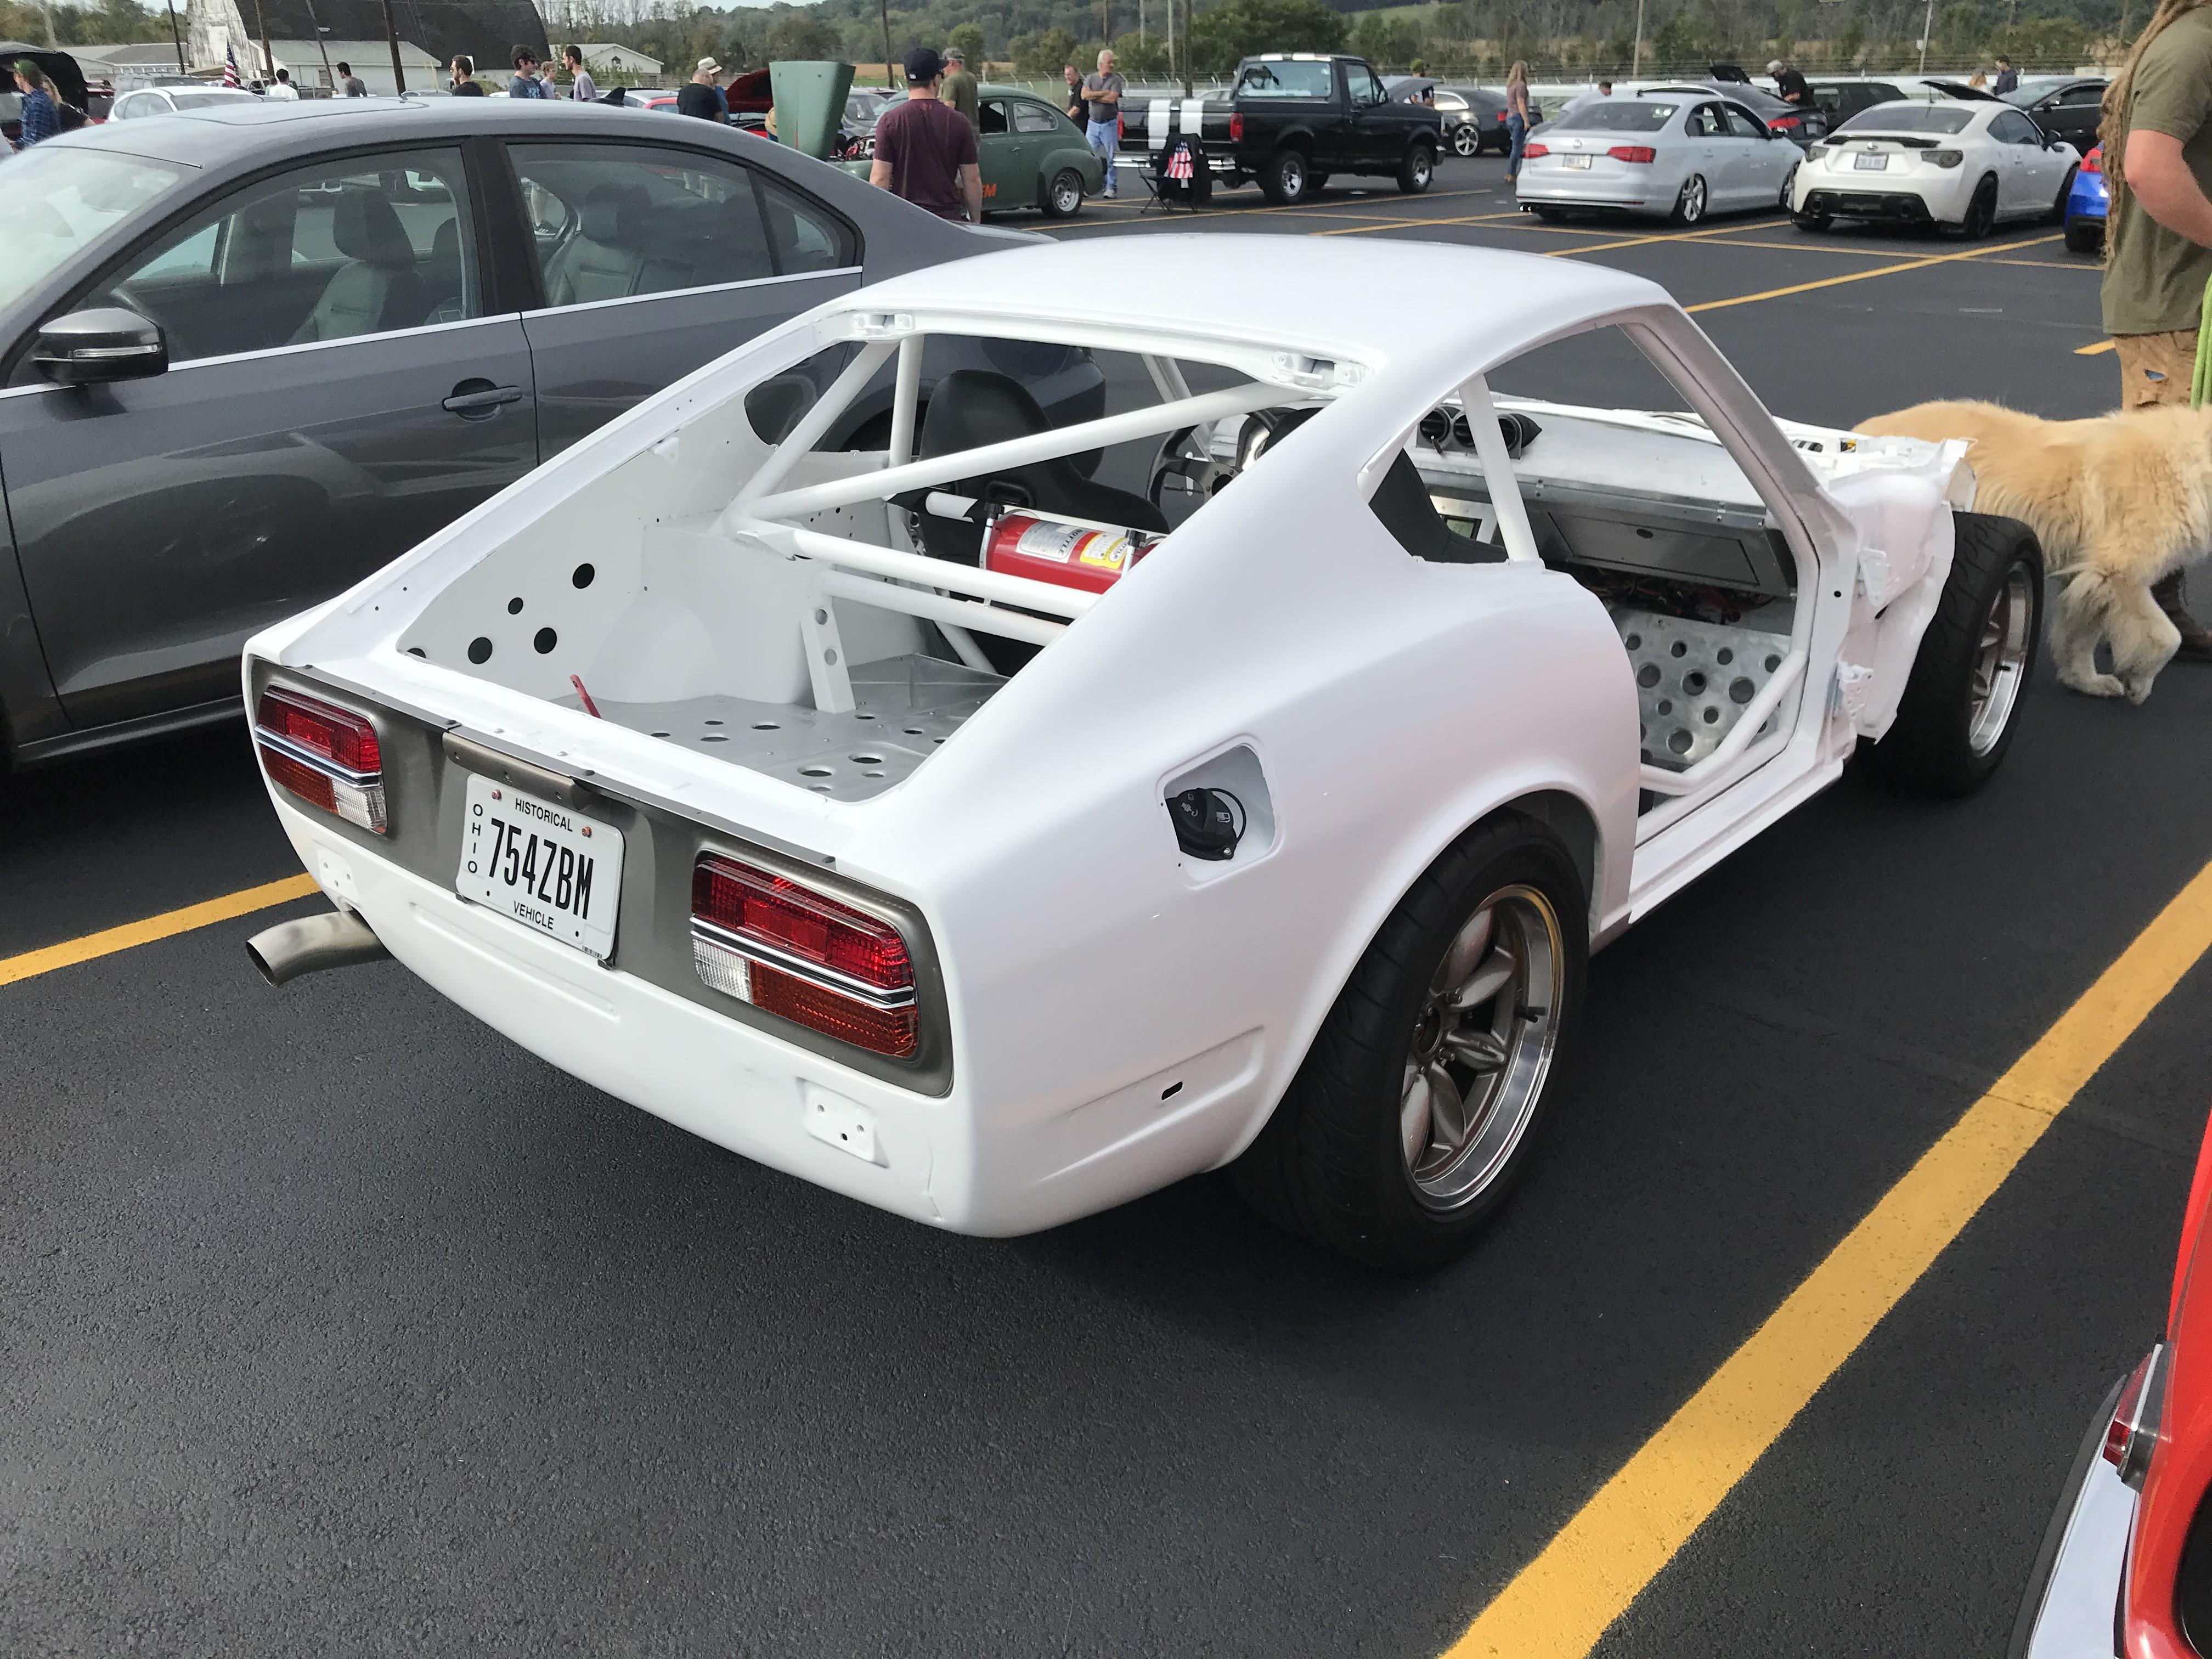
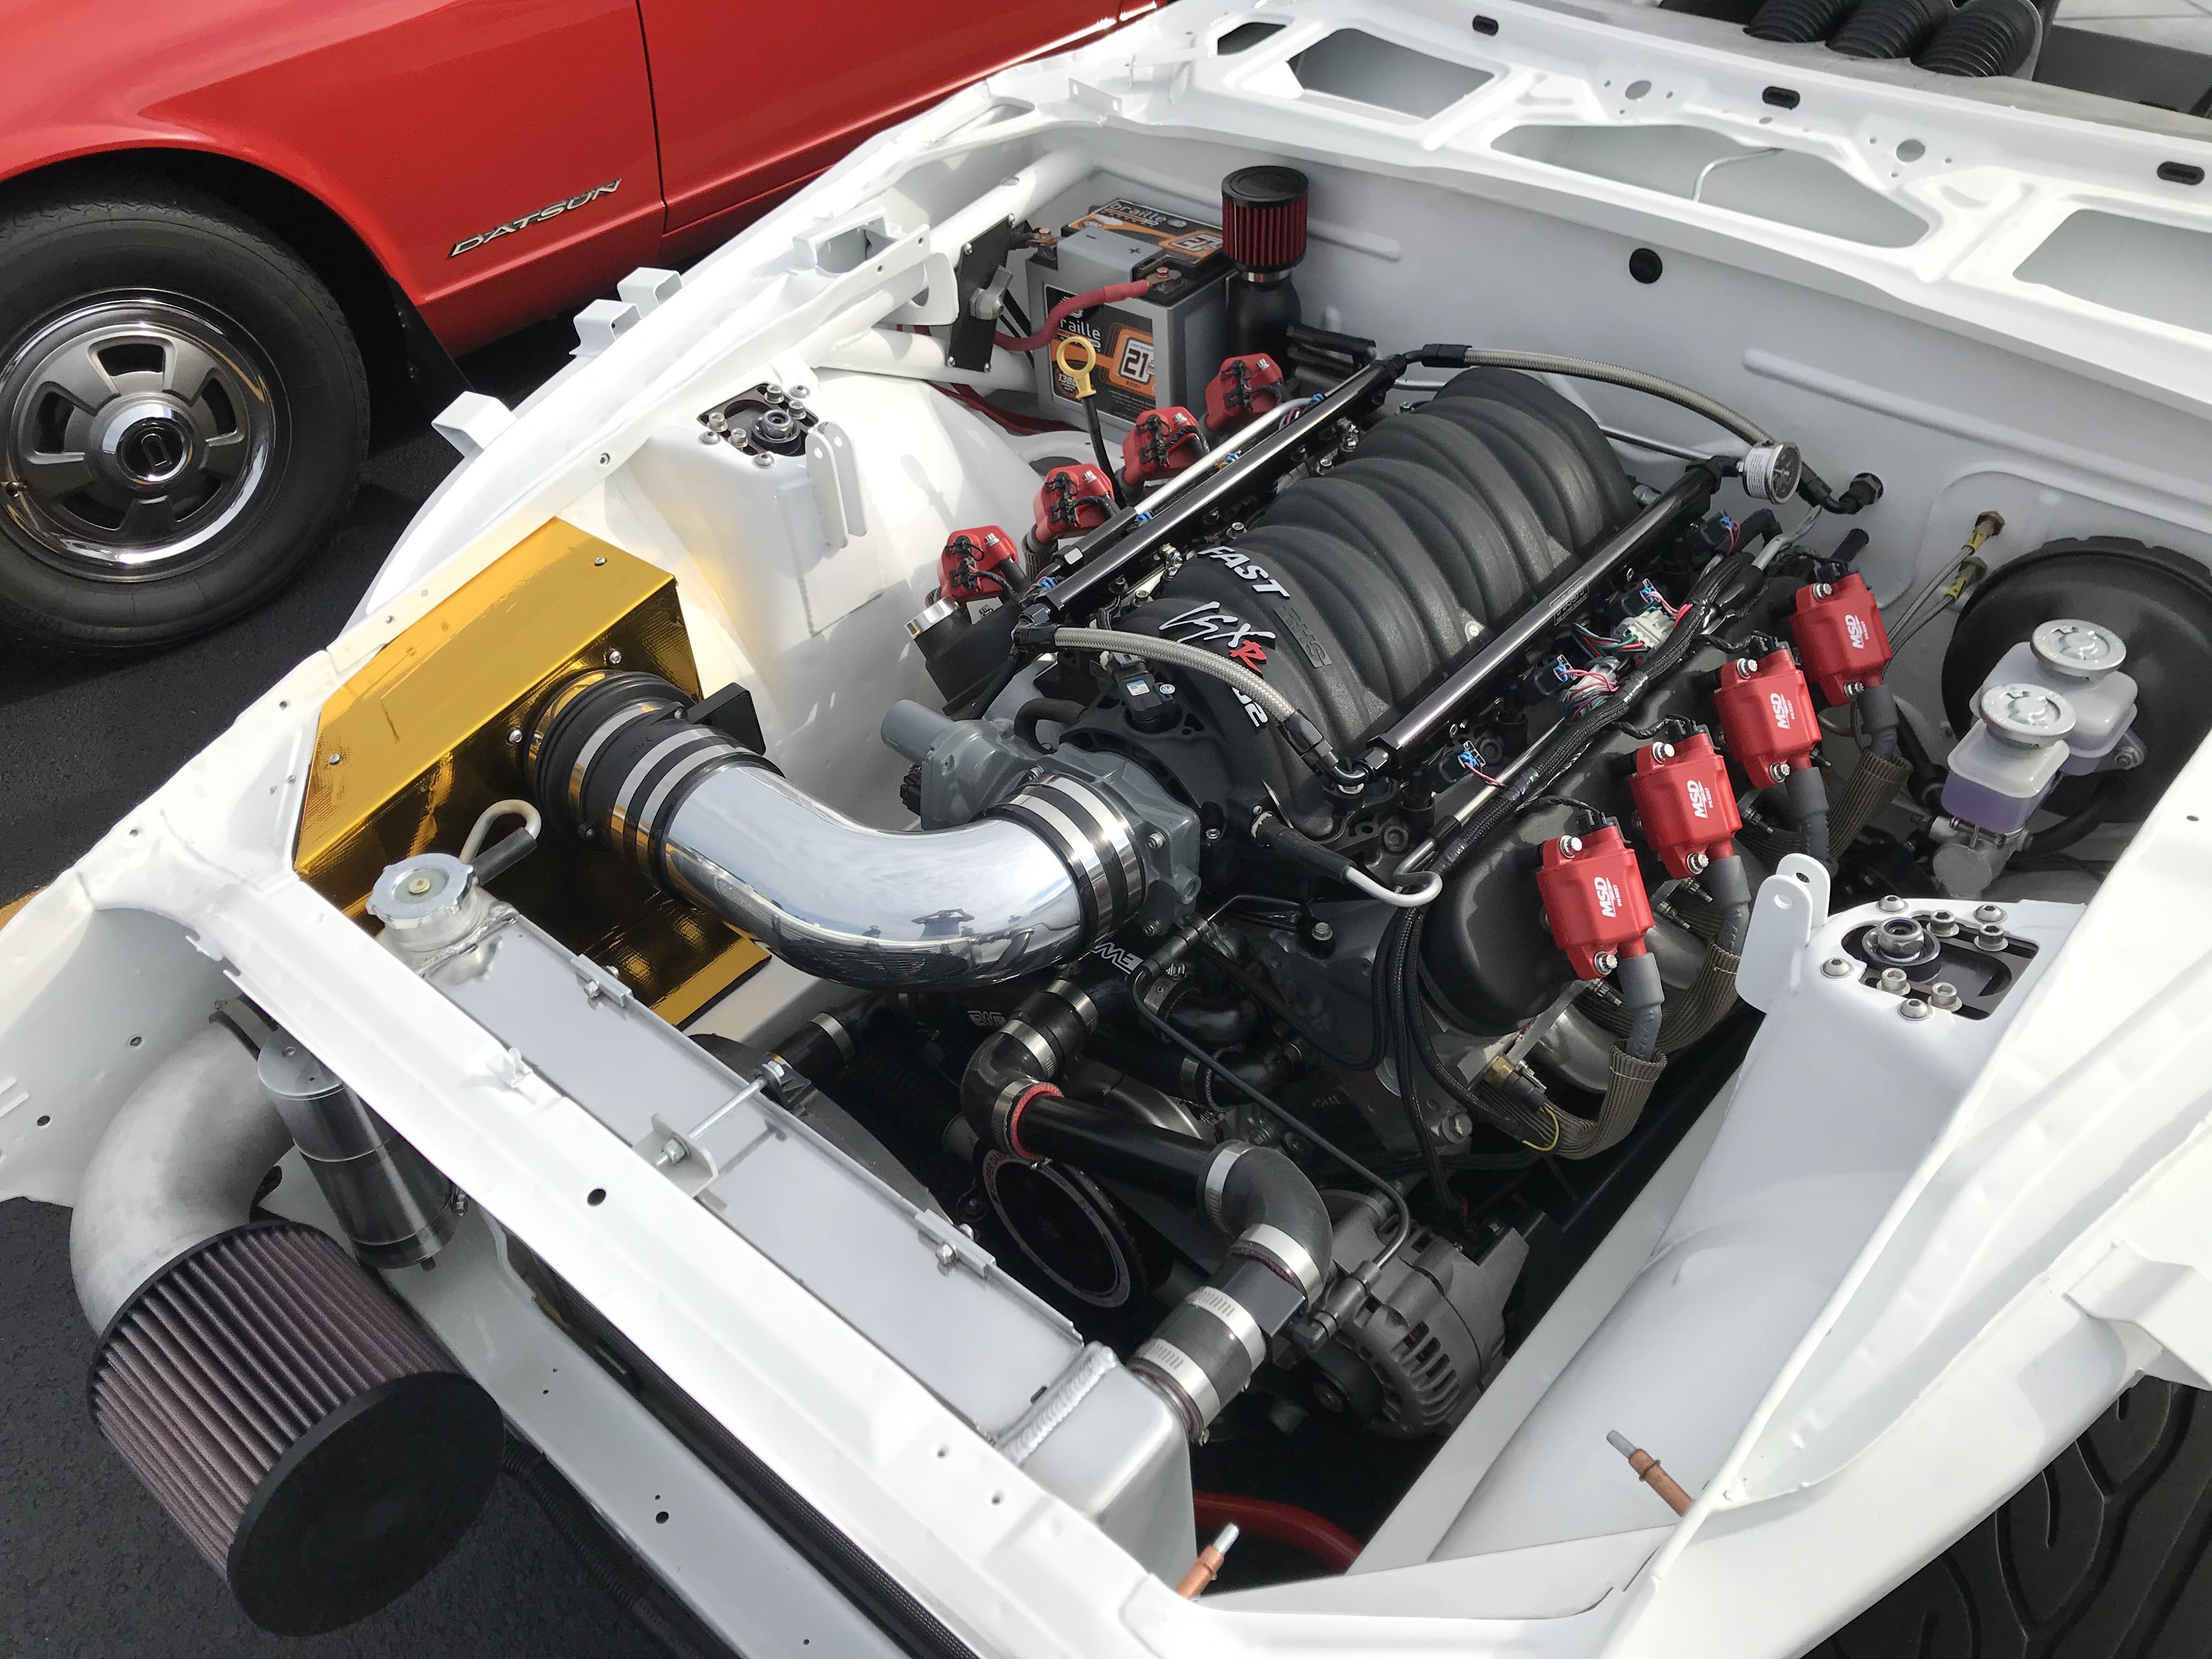
Thanks Martin!! I should be good on Corviar parts, just need to figure out how to get power to the Tandem rear wheels now... I think its going to a mess of 60's hotrod parts.... hahaha The 1:1 is a full rotisserie LS swapped Datsun 240Z build... its a pretty radical one, and should hopefully be done by spring. (fingers crossed) Here is how it looked in the fall when i drove it to a local cars and coffee.. haha and here is a quick shot of a close to completion interior/dash mockup from this weekend... lots of hours of aluminum,suede and carbon veneer in there.. Thanks! I will say that Syd Mead images have popped into my head during this... quite often actually. Oh that is super sweet! I like the chopped stude-y roof! I will say its a really fun project to see how crazy it can get.... I took it to a club meeting and no one could believe all those parts came out of the kit box except the little 1" x 3/8" strip of black styrene to stretch it... well that and the brass.. hahaa
-
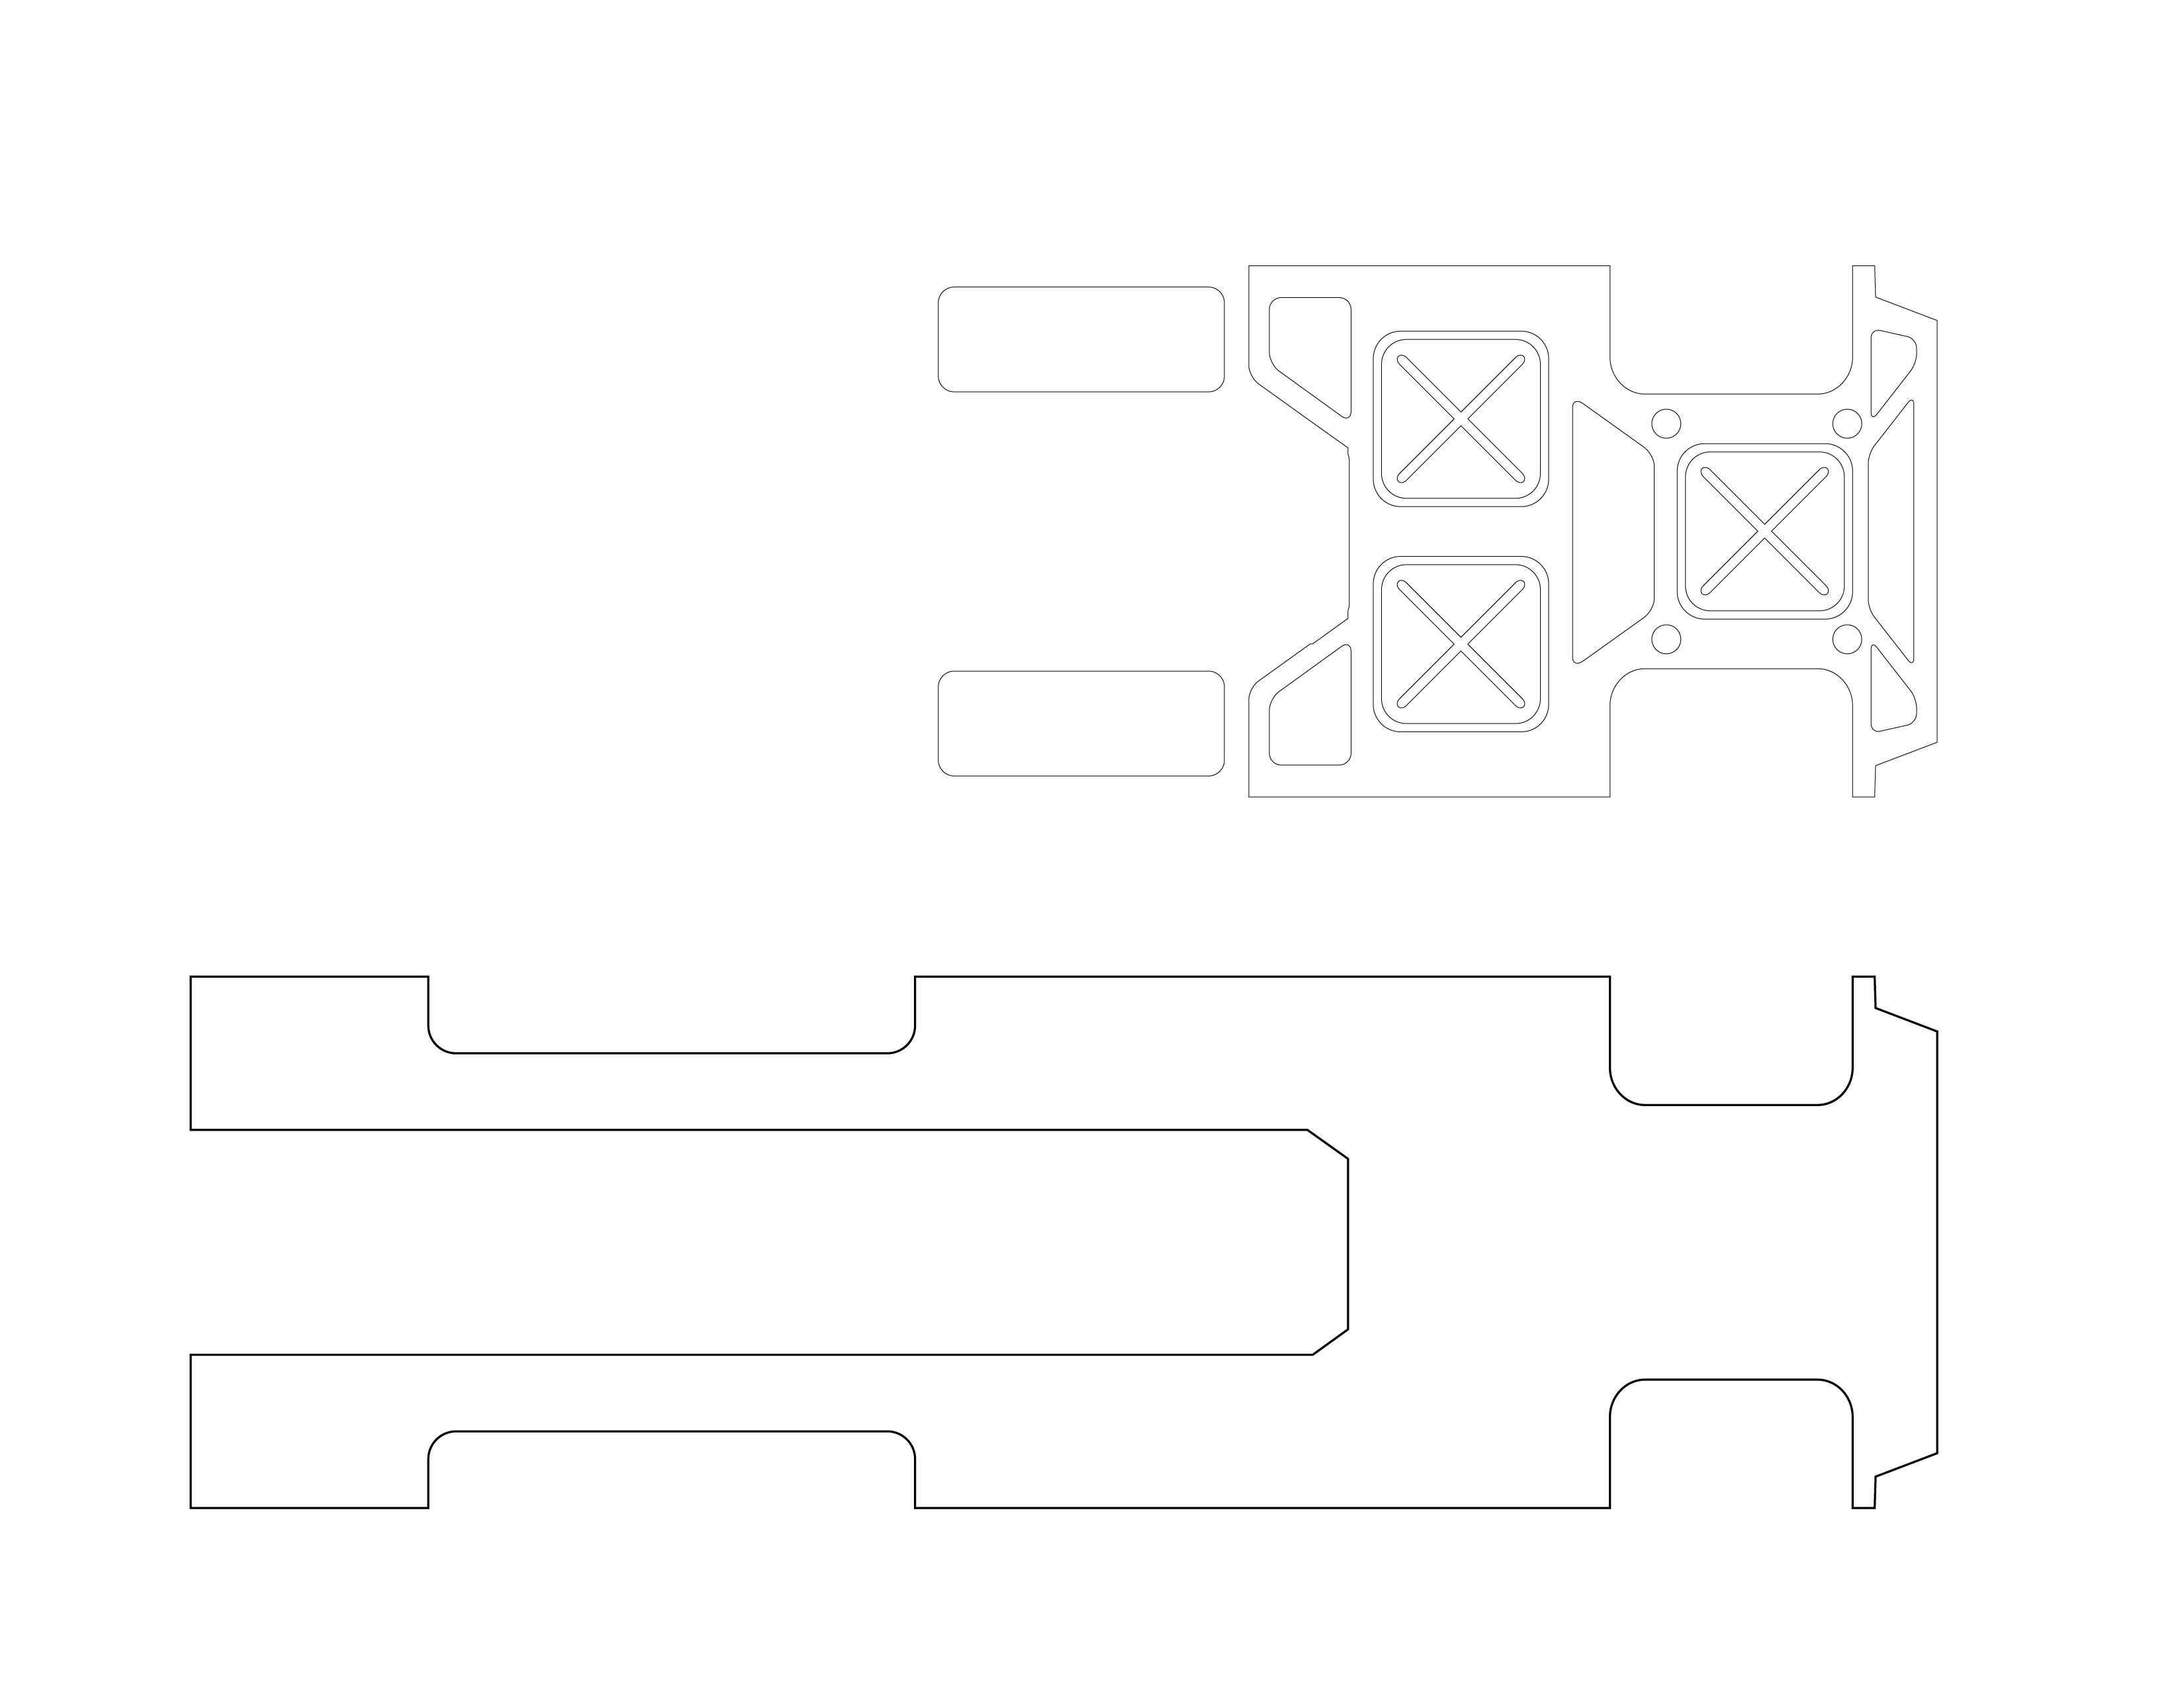
Thank you! I've been using a Silhouette Cameo - Portrait scrapbook cutter... It is their smaller model, which cuts around 8.5" x 11" sheet material, it takes up less room in my workshop that the giant one. The material I use is just .020 and .010 styrene sheet... It deeply scores the .020 and it has to traced with an Xacto, or snapped out, the .010 it cuts clean through. I tend to do the large blocky pieces out of .020 and then use .010 for the more detailed cuts. For example the lower main chassis plate on this is .020 and all of the detail is .010 layered on top. Its a fun way to make parts, not the most detailed cuts... but for roughing things out, and making multiple objects its a major help.
-
Thanks guy! Thank you!!! I'm not 100% sure yet.... but thinking possibly a bare chromed out Showrod rolling chassis, maybe with a 348/409? Or get another kit and chop it up to make a bubbletop 63 impala hot rod.. ideas are flowing, but i want to get this guy ironed out before heading down that road. I was able to get the scratch-built chassis pan built over the weekend.... still away to go, but its shaping up into something odd... that's for sure.
-
Fantastic stuff Karl! I love following along! ?
-
Thanks guys!!! Oh that thing... I am about to run out of things to do on that, still waiting on all the panels from the body shop... which he has had almost 2 years. As of now I have a full running and driving shell and I'm buttoning up the interior. Here is a sneak-peek of the "scratch-built" dashboard with carbon trim... I haven't posted this one on Instagram yet, but its pretty much all handmade. Oh and the model... I got the chassis somewhat programmed in Illustrator... and the intial cutouts done... lots of handwork to do... but it should get the ball rolling.
-
Here are some shots from our Northcoast Auto Modelers Meeting last night... I spent some time with a sanding stick on the body, removing trim, smoothing out ripples and molding the custom front and rear in. I also sanded back the passenger side of the front on an angle, which lightens up the heaviness of that asymmetrical part a lot. And the corvair engines, straight out of the Blueprinter parts packs.... Im thinking hillborn style injection on these.. 12 stacks! ?
-
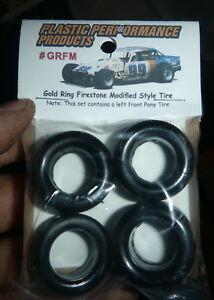
Thanks guys! its coming along pretty well! I'm pretty excited with it! They are these: Firestone Modified Tires Note that there is a pony tire, so to have a true set of bigs and littles you need to buy 2 sets... They are always at NNL East, I have bought 2 sets every year with dreams of showrods in my head... just now getting around to using them on builds. For this build I am going to take a lathe pass off the inside to make them a little more low profile to match my vision. Hahaha... thanks for clarifying... I really wanted to photoshop a ton of famous "allisons" in the bed of this thing for ya... Everyone I tell the Dual Corvair idea to looks at me like a crazy person, so I feel that may be the "correct" choice. haha I look forward to meeting you and seeing your builds in person at east! Thank you! I am thinking some sort of flake and patterns for sure... but not quite sure on color just yet... I have lots of silver, gold, blue, purple, pink and green scale flake.... and then pretty much every color of Kandy.. so lots of options to sort thru... ?
-
Thanks!!! My first thought was actually needing a second kit, but once I committed to the radius-ed rear wheel openings so little was going to show.... some super thick styrene sheet did the trick just fine.
-
Outstanding work Martin! Love this!
-
Thanks for the kind words guys! Yeah if they made a Replica of the real Roth Mailbox I would be all over it... I have thought about scratch-building one.... but... too many other projects. They are these: Firestone Modified Tires Note that there is a pony tire, so to have a true set of bigs and littles you need to buy 2 sets... They are always at NNL East, I have bought 2 sets every year with dreams of showrods in my head... just now getting around to using them on builds.
-
Fantastic work as usual randy! Glad to see you are back on this project! Its beautifully complex.. Hopefully I will get to see it in person again soon, that was one of my highlights of last years NNL East!
-
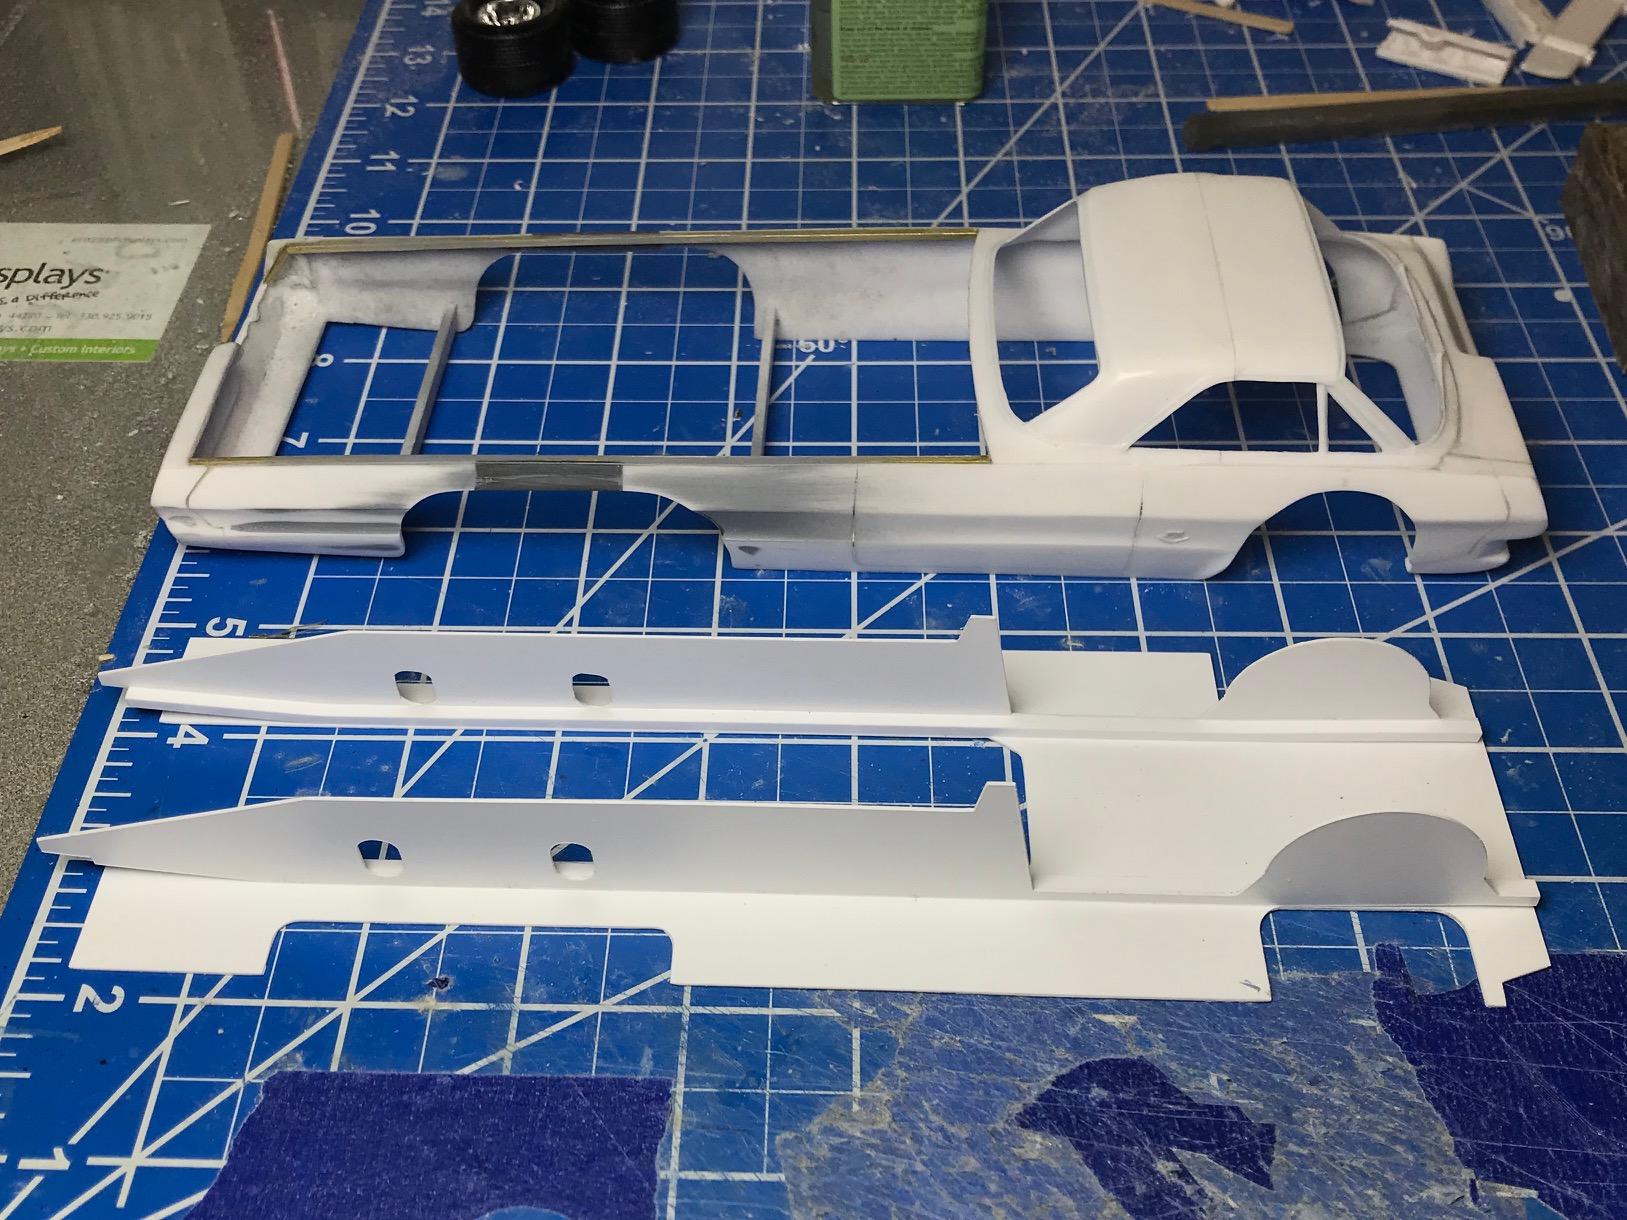
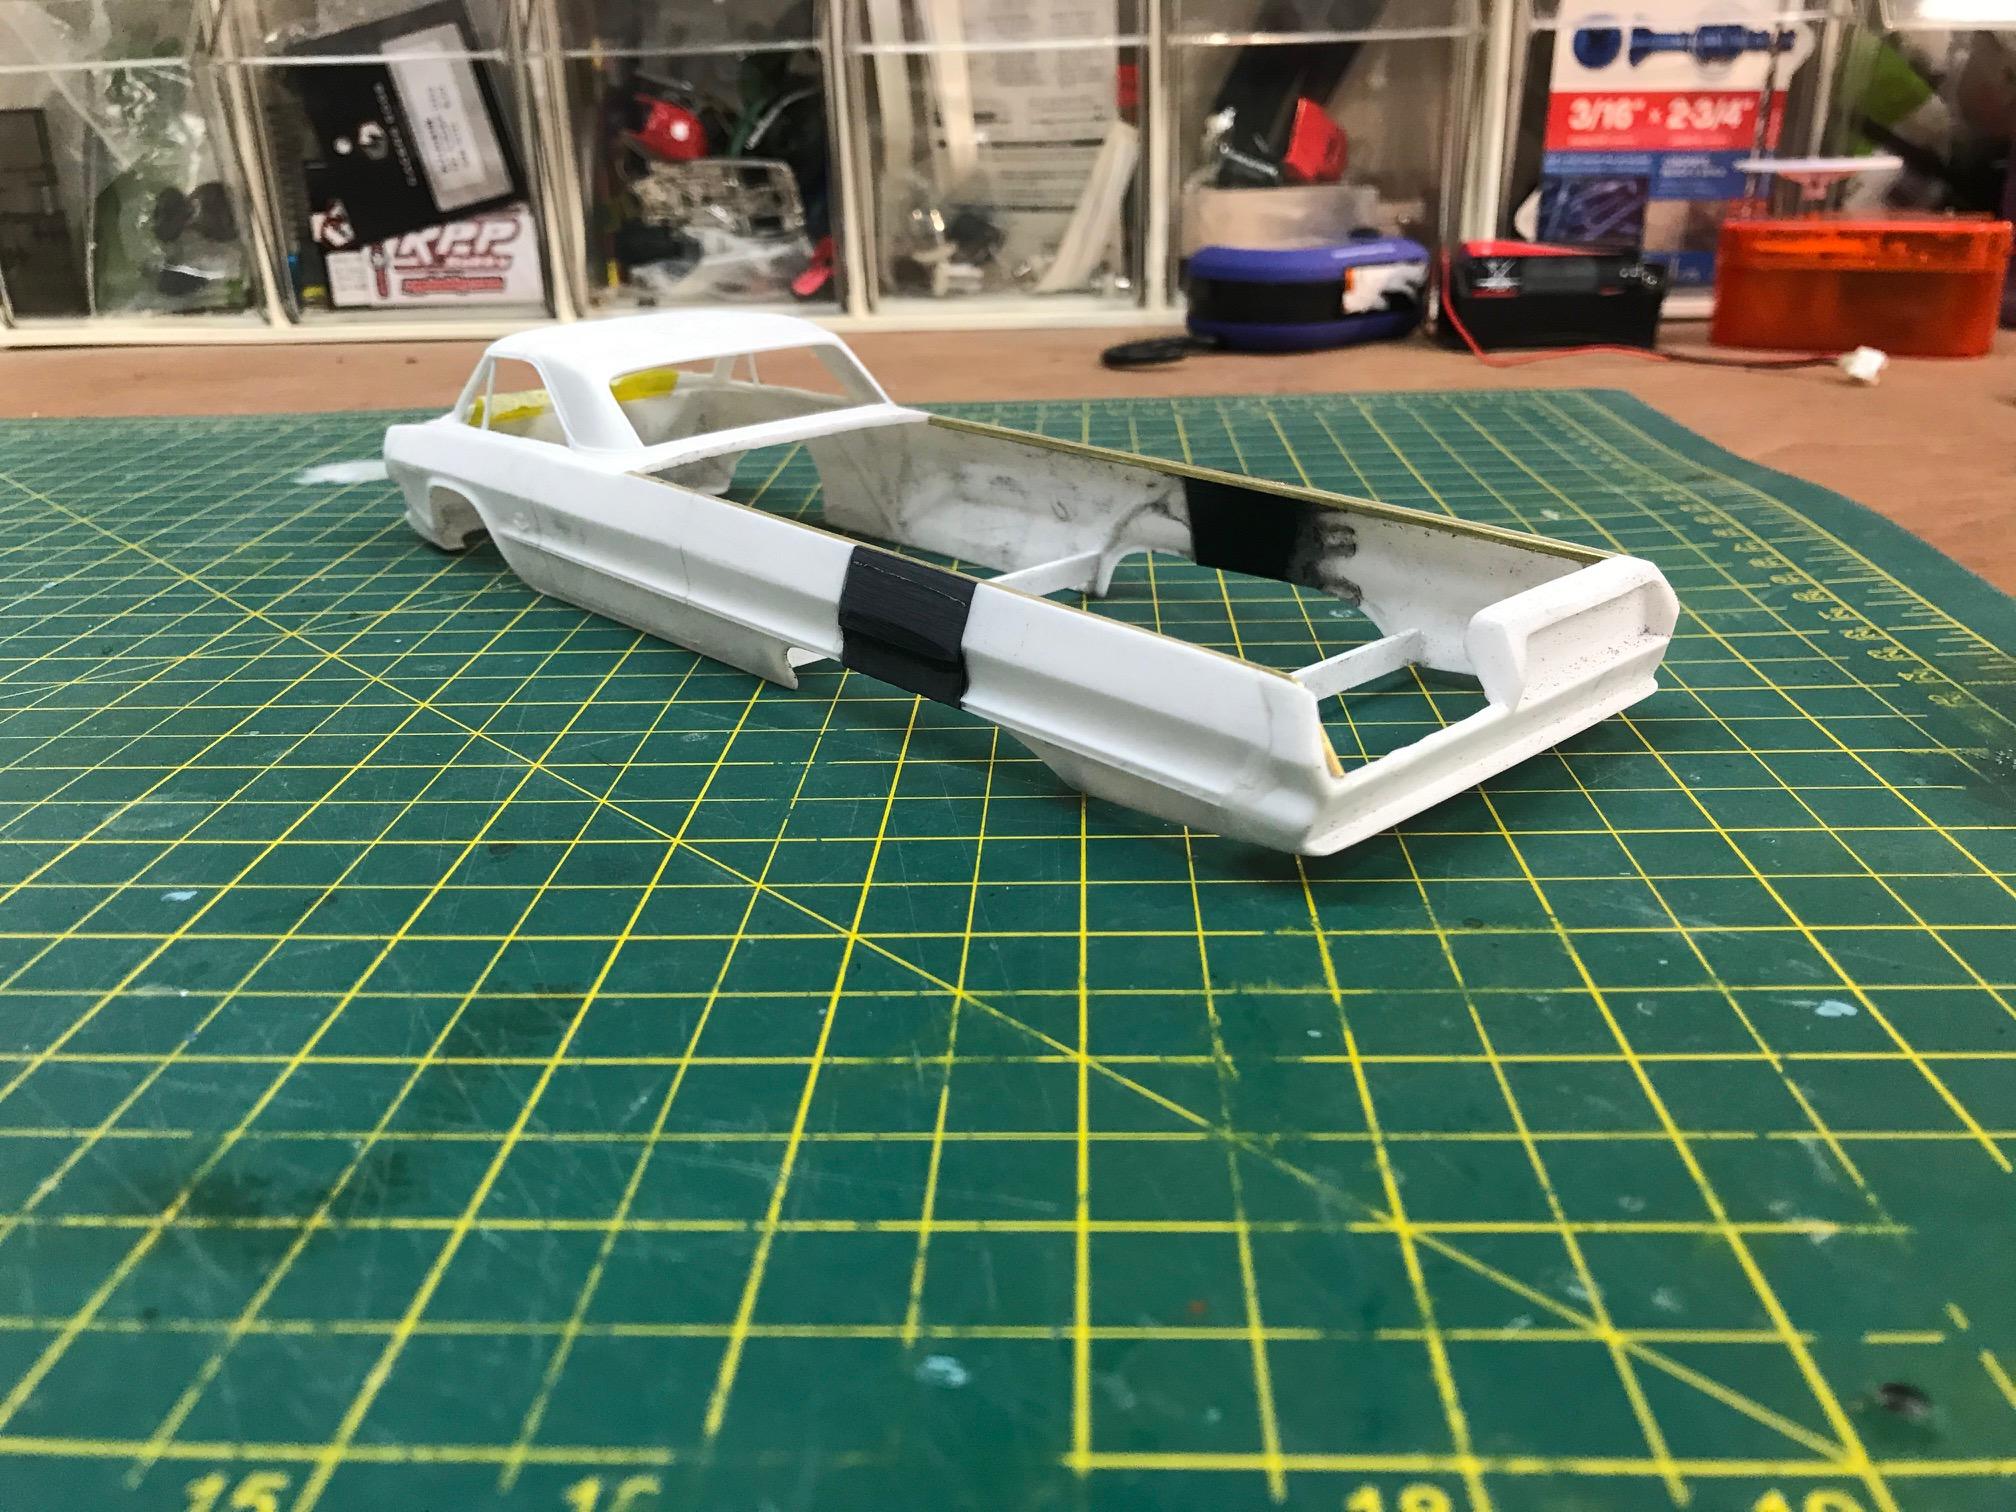
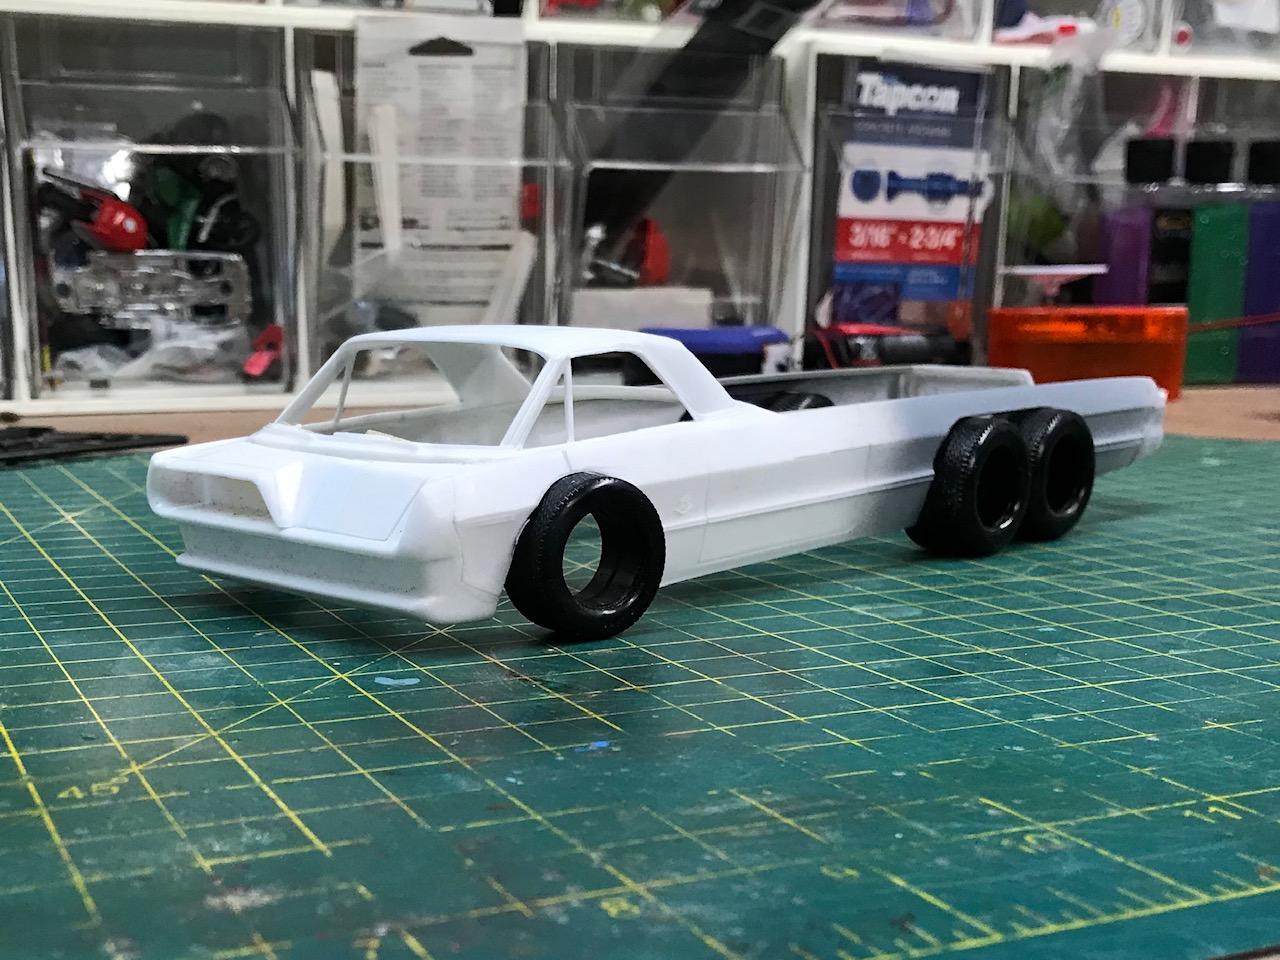
Wow you guys! I haven't checked this since Thursday, thank you for all the interest and comments!!! This one has been fun so far, most of my projects (model or 1:1) have been almost completely planned out on paper or in my head from the beginning... I'm really enjoying the more free flow nature of this one... its pretty relaxing to be honest. I'm not quite sure on color or door configuration yet, my original idea was for this to be a curbside... that's changing a bit now, and recent modifications will probably make it a front entry like Bucky had suggested. All those cab forwards are fantastic.. The bug and that Avanti have always been a favorites of mine... They look more correct that way than the "right way" It also cool to see that someone has done this with a 63 before...I don't remember it, but makes me wonder if I had seen it and stored it away somewhere in my grey matter. Thank you all for following along and I look forward to seeing everyone in New Jersey! Okay so an update... and a further spiral into madness... ? After looking at the proportions, measuring some kits and asking some friends to measure their Roth built ups, I came to the conclusion nothing was going to fit on this with out some additional length... welp.. here we go... Then reattach... plus an extra inch... or 25" in 1:1 Now is where it gets odd... the extra length needed more tires... So going tandem was an obvious choice. But then...I wanted to skew the time period of the build a bit, move it away from the Deora time period.. and more into that late sixties, early seventy's time... the time when almost every show car had cut up wheel wells, flares, and firestone or goodyear gold lines.. well... flares to come.... but... Its getting there... more ideas are flowing... thinking dual corvair powered and a chromed out showrod chassis on the back!
-
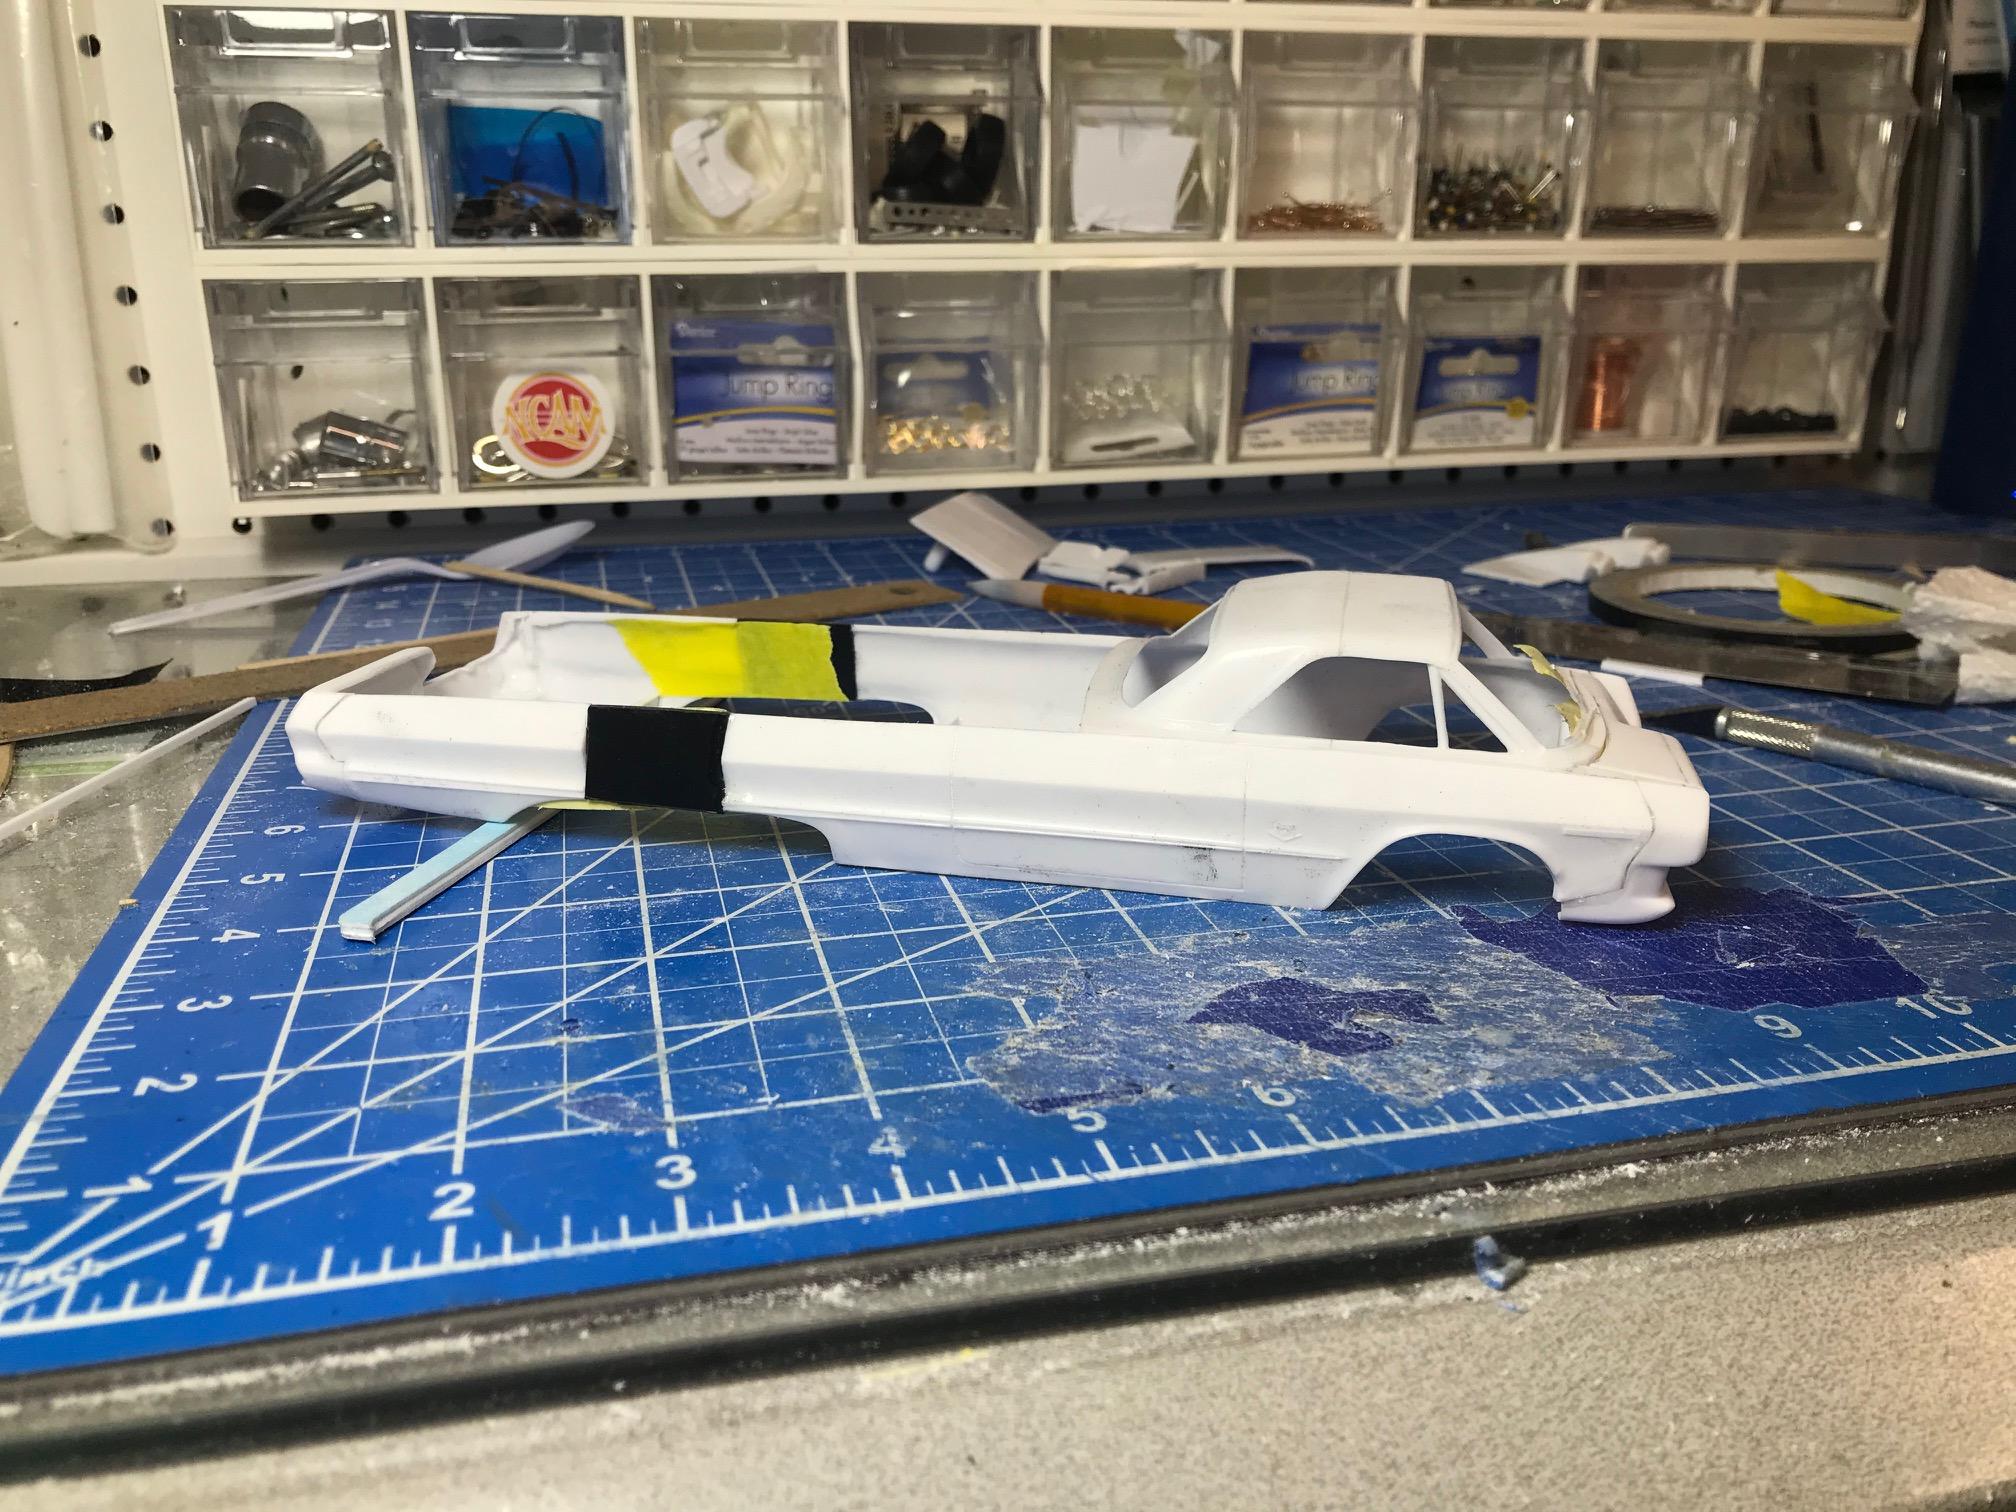
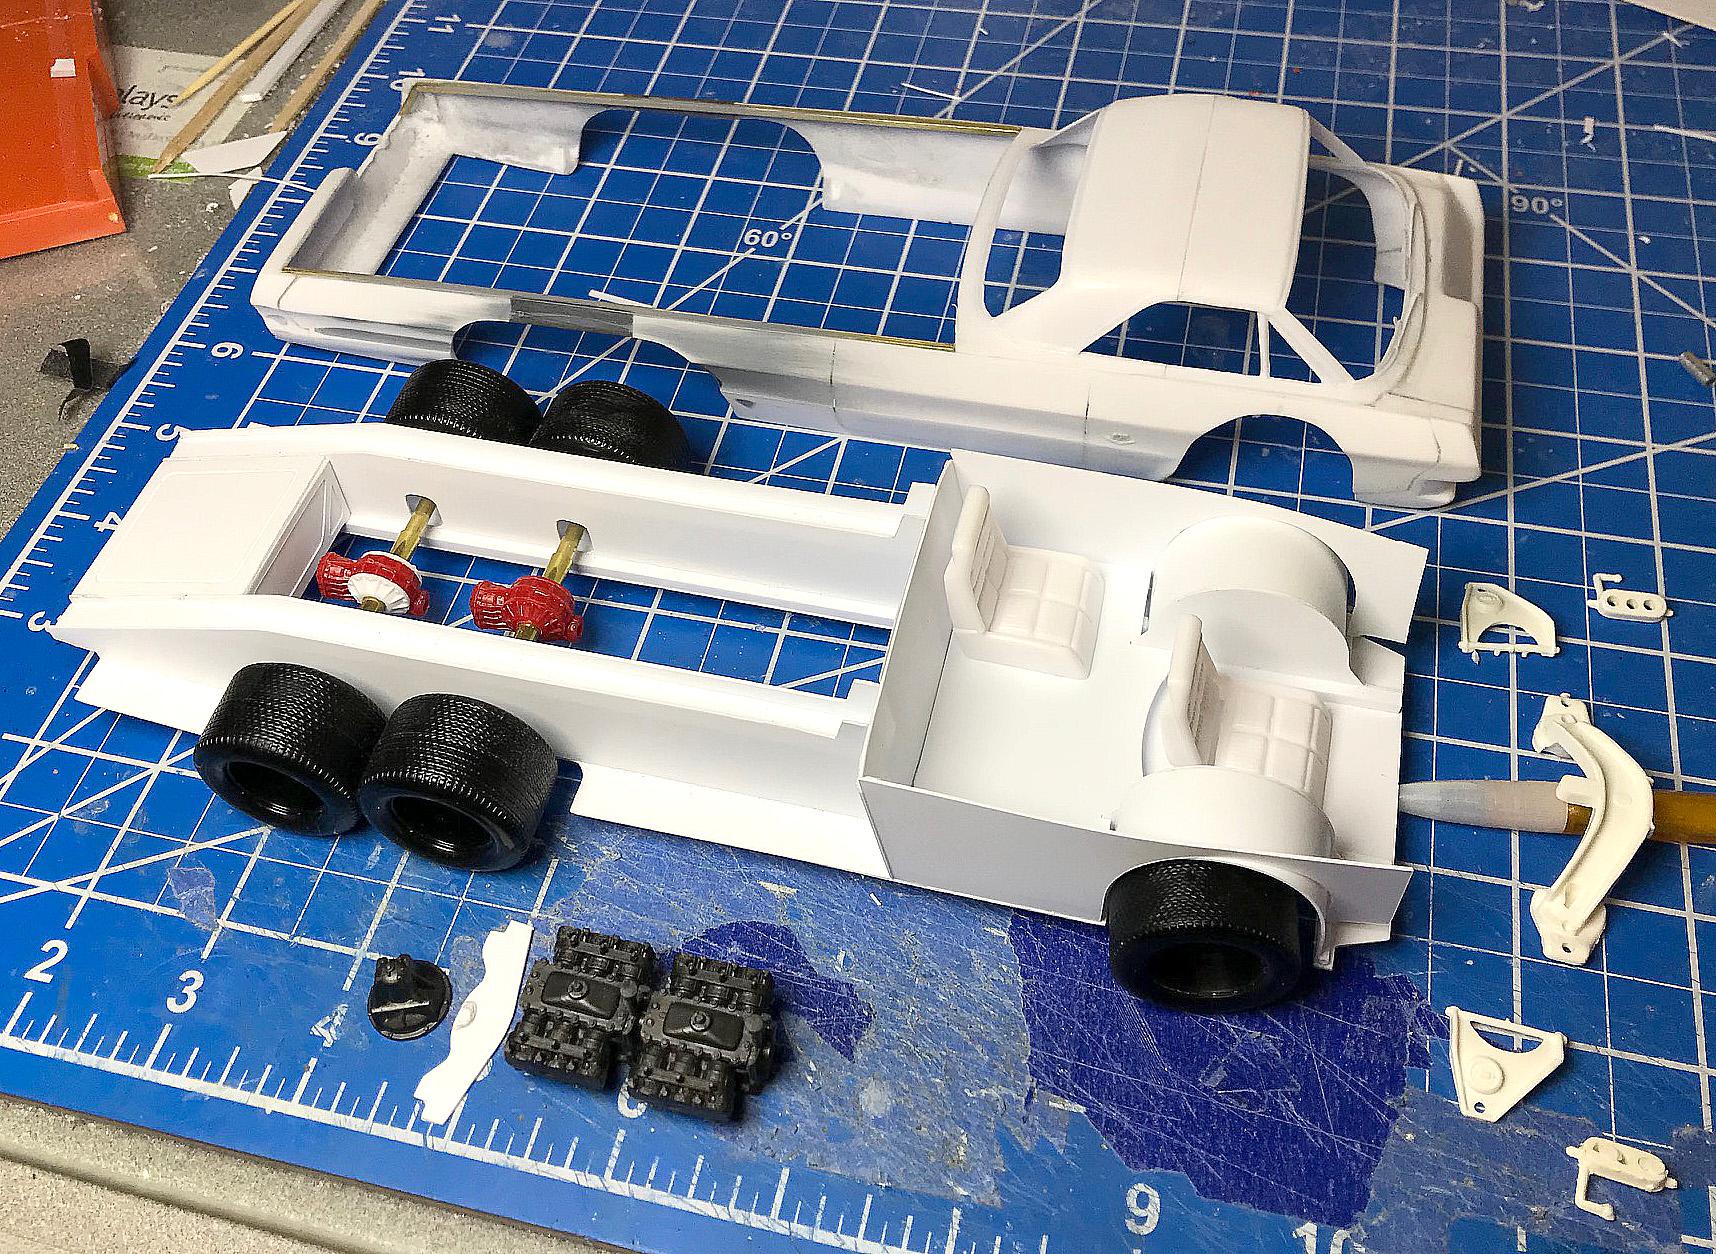
So the last thing I need is yet another WIP Thread... or Project.... but this one hit me as something I had to attempt. The Web/Internet theme for the 2020 NNL east is this newly re-issued 63 impala kit, this kit has the "advanced custom parts" and asymmetrical front and rear treatments. Upon seeing these currently and in past reissues, I have heard myself and others go "ewe, well there are parts no one will ever use" .. well... I decided to challenge myself to make something out of this for NNL East. My first though was an offset cab surf board hauler.. but then when I cut the roof off and set it back on in a Cab-Forward layout... something clicked... ShowRod Hauler! What if Ed Roth was given a 1963 Impala to customize as he wished to haul his various vehicles to shows... Maybe even keep the surf theme and toss a couple Surfites on there... Im not sure yet...but the ideas are flowing. Here is the current progress, A couple days into the fun... Front and rear treatments installed... roof removed... I shifted the asymmetrical portion of the grill/hood over approximately 1/4" to match the rear treatment.... it bothered me it wasnt the same. Then onto the roof.... removed 1-1/8" from the roof, reassembled and re-installed.
-
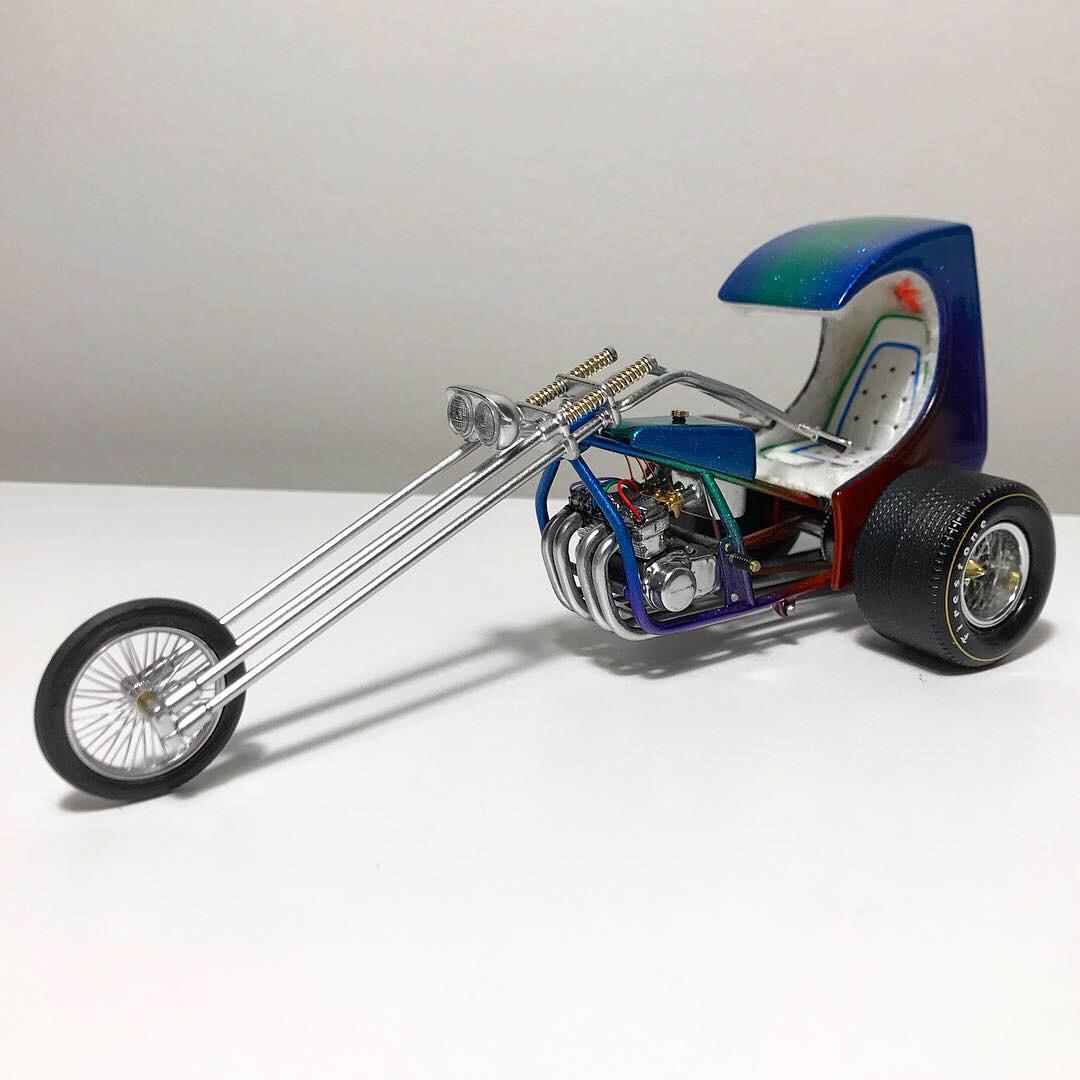
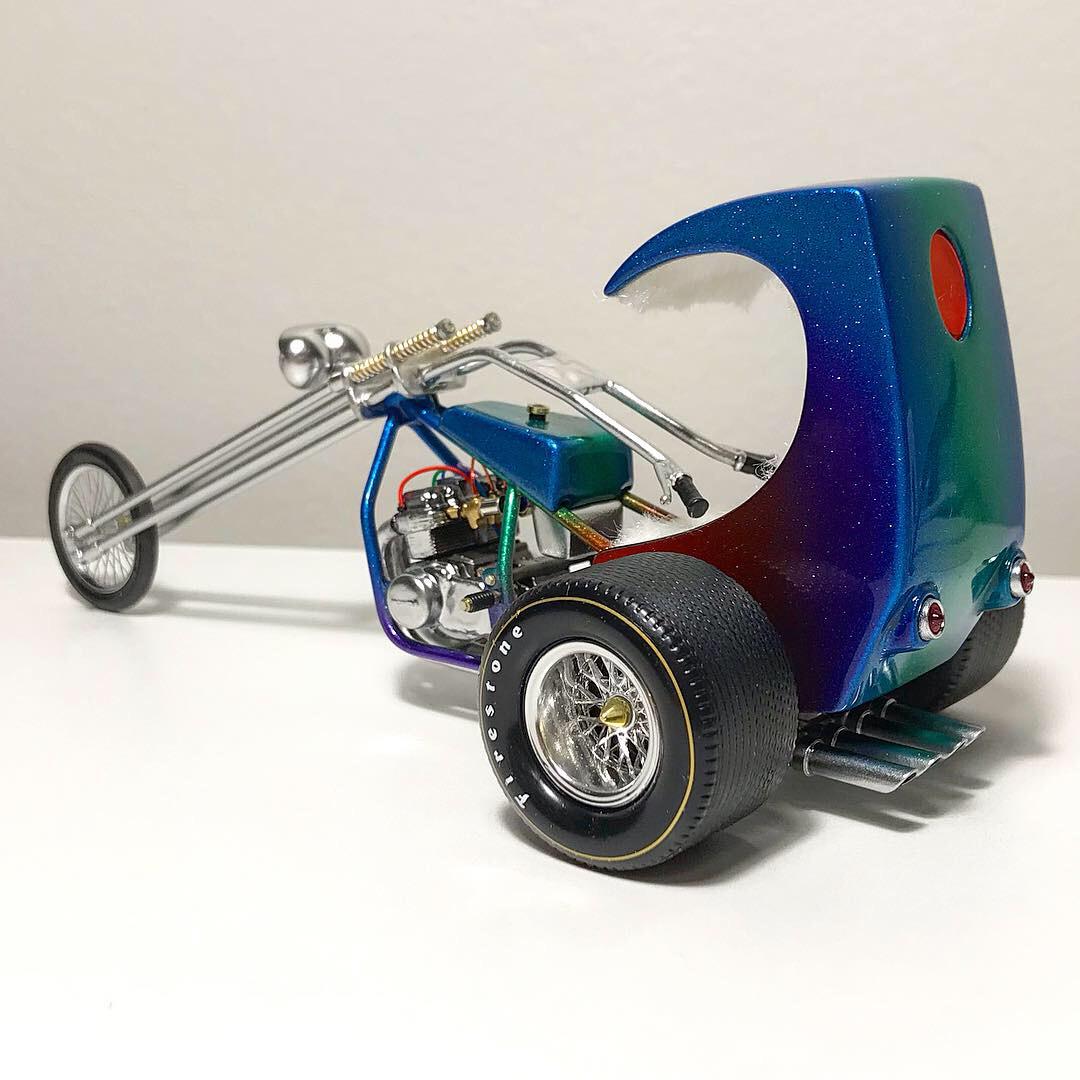
That MailBox trike kit is really fun... The engine is spectacular, with some minor detailing (plug wires, fuel lines and velocity stacks) it comes to life quite nicely. I'm excited to build a few more of the trikes, as well as the kit bashing opportunity.


.jpg.3b0eb74b3625bb5cef38bf4241c40a41.jpg)
.jpg.db6abb36fe11bd8aba4f5219415810a4.jpg)