BigTallDad
-
Posts
1,526 -
Joined
-
Last visited
Content Type
Profiles
Forums
Events
Gallery
Everything posted by BigTallDad
-

Decals bleeding through
BigTallDad replied to Super28's topic in Model Building Questions and Answers
At the risk of embarrassing myself, are you using clear or white (background) paper? -
I use kids' watercolors. You gradually add water, allowing you to control the viscosity. After it dries, the edge of a dampened business card can remove paint from unwanted areas. That technique also works well for dog dishes/wheel covers... The best parts: (1) if you totally screw up, soap & water cleans up the part totally; (2) the paints are CHEAP!

-
Absolutely stellar replication of the original! The only subtle difference I see is the thickness of the spokes on the wire wheels...at my age, eyesight, and Parkinson's I couldn't do it, but it's a thought for you if you choose to build another similar model.
-
‘50 Chevy jimmy flint stone chopped top
BigTallDad replied to Gerald Haney's topic in Model Building Questions and Answers
The windshield is flat, so create a template. Do you have any empty CD cases? Scratch-build the windshield, using them. -
Getting some bodies painted and ready for winter.
BigTallDad replied to Dragonhawk1066's topic in WIP: Model Cars
I'm in Florida, same situation. As it turns out, I'm getting ready to put some primer on an MPC '71 Pontiac Gran Prix tomorrow. -
You don't need a photo host on this site. I did a Print Screen, pasted it into MS Paint, selected the area, and pasted it below. You don't have much control over the size of the image, but that's not a big deal.
-
Welcome aboard. Your "Z" looks fabulous.
-
There are Molotow gold pens with varying nib sizes. I don't know how shiny they are https://www.dickblick.com/items/19910-9205/
-
Drilling holes in styrene rod
BigTallDad replied to Evil Appetite's topic in Model Building Questions and Answers
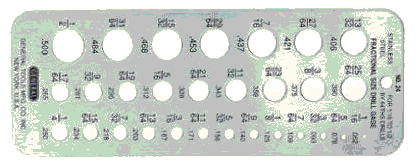
Get yourself a cheap plastic drill guide that is fractional (5/32, 3/16, etc.). They are available at almost any hardware store or home improvement center. Insert the styrene rod in the smallest hole that fits; this will be the inside diameter (ID) for the sleeve. The next larger hole then becomes the outside diameter (OD) of the sleeve that fits over the styrene. Each larger hole after that will fit over the previous sleeve (make sure the tubing is available in that size, however).
-
That's why I posted an alternative. Yes, it's an oldie but it's also a goodie (if you find one in decent shape).
-
Nope, it's camo...blends right in
-
Drilling holes in styrene rod
BigTallDad replied to Evil Appetite's topic in Model Building Questions and Answers
A scaled down version (fewer pieces of tube) also works well for drilling distributor nipples. The holes for the wires are always centered. -
The Burgess Vibro Tool is basically and engraving tool with a chuck; the chuck will hold round shanks and has slots to accommodate Xacto blades (or photo-etch saw blades). Mine has two speeds, and an adjustment for stroke-length. It works very well when cutting thick leather.
-
Advice on straightening a warped promo
BigTallDad replied to Modlbldr's topic in Model Building Questions and Answers
I've used a food dehydrator to straighten warped bodies. I make a jig that allows the body to end up in the proper position, clamp the body in the jig, and "cook" overnight in the dehydrator. Tray to place the clamps where they will not cause another warp, however, and allow the whole assembly to cool off naturally (no refrigerators, cold water, etc.). Your promo might require several iterations of the above approach. -
I use a vacu-form to make the front lens and the dome-shaped backer. Now that Molotow makes those nifty chrome pens, no more BMF for the headlights.
-
Do a search on Burgess Vibro Tool. I have one that was my father's
-
Here's one I did before LEDs became sophisticated. http://www.modelcarsmag.com/forums/topic/102446-my-55-chevy/
-
My flag is flying.
-
Imagine the size of the display case...
-
Very well done, sir! One of the interior shots has a box on the front seat; did you make a scaled-down version of the kit box?
-
Thank Goodness!!
BigTallDad replied to StevenGuthmiller's topic in General Automotive Talk (Trucks and Cars)
That rust will probably buff right out. -
You've turned a boring, four-door sedan into a real eye-popper!
-
'65 Goat-A-Mino Can Be Yours!
BigTallDad replied to Mike999's topic in General Automotive Talk (Trucks and Cars)
-
Stellar paint job, and the rest of the model is spot on (although I'm unsure about the sun visor pointing upwards). You can still do the wash using kids' water paint. Apply it, then wash off any excess with the edge of a damp business card
-
Looking good so far. As a minor suggestion, when posting pics of the WIP, use a less-cluttered background.