swede70
-
Posts
727 -
Joined
-
Last visited
Content Type
Profiles
Forums
Events
Gallery
Everything posted by swede70
-
Terrific! Sorry but happy as they say given 'now you know'! Mike K.
-
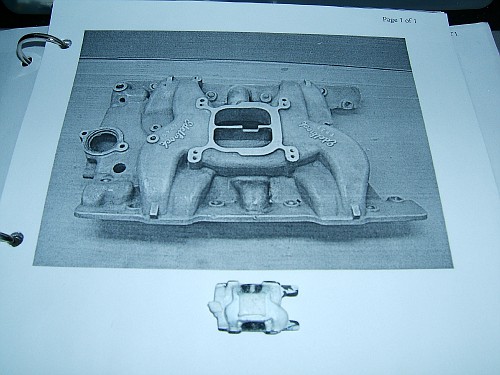
Greetings Harry and thank you for the further insight(s) shared... For perusing a copy of the Sports Car Club of America General Competition Rules 1971 edition, indeed - dry sump systems were legal for the coming season. The wording of such is as follows: "Any oil pan (sump), oil pump(s) or oil pick-up is allowed. Dry sump systems are permitted provided the oil tanks is located forward of the engine compartment firewall." It seems both the AMC Javelins as well as the Gray Ghost blended the oil tanks fitted into the structure of the firewall, while in the main, all was now permitted. In passing, another article that may be sought out not strictly period is the April 2000 issue of Car & Driver which has a Tony Swan-penned article within titled Return of the Gray Ghost. Across the space of it, Herb Adams relates in brief the history of the effort while also having been reacquainted with the car which had received a light mechanical refurbishment dating back to 1996. If my memory is to be trusted, Pontiac was the title sponsor of the Meadowbrook Historic Races at Waterford Hills Road Racing that year, and both happy and fortunate I was to see it then. For a few brief years a 'Trans Am Tour' made up of a few period cars came through the venue for it's historic weekend tied to the local concours event, but so soon the big cars (i.e. 02 Trans Am sedans, F5000, Can Am, and even the odd F1 car) effectively vanished from both the event and venue. Waterford Hills is a fairly tight club circuit, and hence maybe word spread that bigger cars wouldn't strictly be a home here? I'm not certain why matters faded a bit in the coming years, while organizational infighting and battles as to the makeup of the area concours scene, want of event sponsors, and declining economic times were surely factors. Oh, and just in passing, for a little work, know that the poster produced for the event was Trans-Am themed that year, and hence carries a bit of interest even as the Gray Ghost does not appear upon it. More to come... - Just some further aspects of the 1:18th build then... ...trying to accommodate the discreet engine set back, I tried to reproduce what was done. Some ERTL Authentics '67 Impala SS 427 parts were employed, while the scissor hood hinge assemblies will very likely be stolen and employed from this same tool. I couldn't find the correct intake off the shelf, and hence I created my own. Others would likely make quick work of this for employment of 3D printing technology, but alas, this was all I could do in the moment. ...and while a little constricted and limiting for unwanted structure looking further in, this is the trunk taking shape. A Firestone fuel cell was fitted with a pair of Holley fuel pumps mounted low and at the forward corners of the cell positioned largely out of sight here. In period photos mysterious housings are seen beneath the car in this general vicinity, while it was neat to discover what these surrounded for making an inspection of things. I took photos of everything and created said pockets/housings, although all that was done isn't strictly discernible here. Some material was cut away from the trunk floor to accommodate shock absorber service from the top, although at present I'm not sure I add such. Continuing then, dependent on the venue run, the fuel inlet could be shifted to either side of the car. With this in mind, a plug is always witnessed on the opposite side. And lastly, for paint removal I've tried to replicate Tempest taillights versus GTO units, while the vent system that otherwise takes up the space between what trim is/was retained won't be fun to do for I'm going to have to drill and file out what material is seen to proceed any further. Thanks for reviewing this update... Mike K./Swede70

-
Greetings Dr. Larry, I don't know if you discovered this, but for searching the Petersen Publishing/SEMA archives yet again, I stumbled upon much more than the two race photos seen before. The cataloging in this instance was better, hence try some combination of '1973 Pontiac Grand Am Grand (including such twice wouldn't be necessary) National Car' or try 'The Bill France Collection', although the latter search terms would likely involve a slog for what is likely a great many photos. No 'Herb Adams' reference, no 'Winston Cup' reference - but oodles of detailed b& w pictures of both the interior and how the car appeared under hood. Check out the O.E.M. steering wheel in particular! Needless to say, I was surprised and I sincerely hope you'll either know all about it and/or will discover this terrific spread of images thus. Good luck! Mike K./Swede70
-
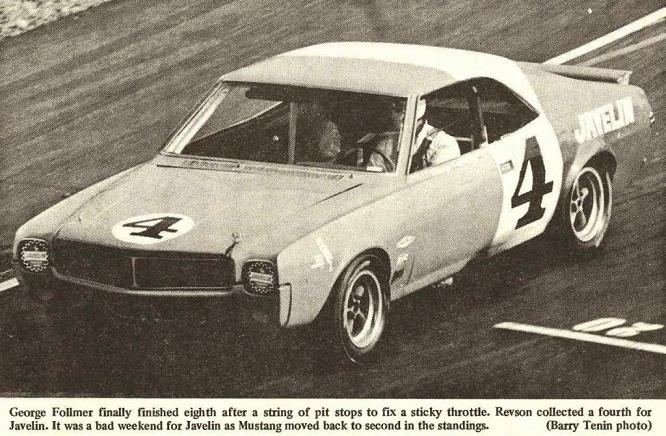
Thanks Harry - these are an unexpected thrill to see... I appears he's being afforded his thin fuel ration for what would turn out to be an abbreviated session. At least nothing was damaged! A. B. Shuman both wrote and photographed the well known story that appeared in the September, 1971 issue of Motor Trend titled Ask Herb's Wife If We Can Take Her Car Racing. For a brief run Shuman was allowed to make a quick and measured assessment of the vehicles potential on-track, having been reminded quietly though firmly by Herb Adams that the powerplant constituted the team's "...one good engine". Suitable chastened and yet agreeably curious as to what potential lay within, the journalist ventured out and gathered some impressions. All well and and good - until silence and no power. Had he unintentionally inflicted damage upon the car? Thankfully no - for instead it was revealed that he'd simply and literally run out of gas... The article remains the best period record of the genesis of the effort, including who was involved, technical specifications of the Gray Ghost, etc. Know that I really appreciate the privilege to witness the photographs, while quite a surprise then to warm up the computer and have these waiting. Mike K./Swede70
-
Very nice - a neat topic surely. Thanks for sharing and hoping here to follow... Mike K./Swede70
-
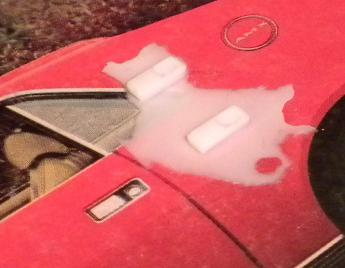
Thanks Harry for your careful and considerate fielding of my slate of questions... Indeed - I too have been busy on the new Petersen Publishing/SEMA Archive, although just as readily I could have missed it for not knowing about it. Thanks for your alert and guidance to this terrific resource so recently made available. 'Lime Rock Trans Am 1971' narrows in even further, although I've found that asking a lot more of the database in terms of adding search terms just stops it dead. The clearer image of the Gray Ghost seen underhood was sourced from the PP archives, while how different in quality it is from the so-so reproduction within the pages of the Motor Trend Lime Rock race report from their July 1971 issue! I'd really hoped earlier tonight to find other images that may have accompanied the A. B. Shuman-penned and photographed September 1971 Motor Trend article, although in sum I failed to. 'Shuman 1971' brought forth a wide range of motor racing event images, alas nothing at all in relation to the aforementioned feature. Still learning then, and hoping other approaches will turn up what's presently hidden... I've attached an image of the interior panel(s) on the car pre-restoration, this confirming your memory of what was. Sort of frightening to behold - hence glance quick! Of course, maybe I'm just seeing paint loss on what would be the surrounding metal work less the vinyl trim positioned further below? My disc drive is spinning madly, reading if you will what I burned onto one a few years back. Happily much is there that I couldn't strictly remember capturing. O.K. see: Thanks too for the art/description placard of the car when it's currently displayed. It's looks nice indeed, and kind of you to share and attach the same. Just in passing, I too was contacted by M.M. 'Mike' Matune in relation to the article for my brief visit to Brighton that day to capture photos, although in truth all I could offer up was good will for I could lend but little value to the cause. While somewhat close to Waterford Hills Road Racing, it would be a stretch to suggest I'm well connected in relation to the history of the track, etc. In sum, it was impressive what Matune stitched together and I was happy just to be afforded an oblique view of the creative process. Hopefully more to come. Again, my thanks... Mike K./Swede70
-
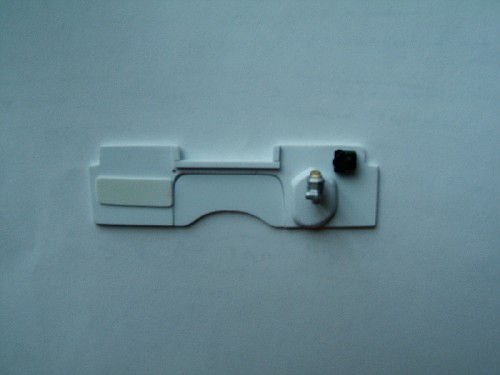
A few 1:18th project photos to share - if the system will cooperate and allow such... ...note the scratch built Lakewood explosive proof bell housing, as well as the odd and severely abbreviated sump. I'm not sure if I'll make up Ram Air IV heads consistent with matching the oval exhaust port detail otherwise desired. ...seen is a scratch built seat, the insulation along the floor, an aluminum bulkhead looking back, as well as what I believe to be shoulder harness pick up points on the parcel shelf. ...tedious, but note the aluminum dash overlay with the flag motif created for first taping out and then scrubbing each element in an alternating direction with a pencil eraser. M.K./Swede70
-
Thanks Harry and very pleased to note both your presence here and receptivity to questions posed... I've met David Barnes here in SE Michigan, have the book, and had both Herb Adams and him sign my copy - hence task accomplished! I too wished for more of a documentary tone to the tale articulated in Blood, Sweat & Gears, but then it wasn't my project. Barnes related recently that there has been interest evidenced in making such into a film, or that a film option had been purchased. We'll see then, while I too have the Dave Tom technical history of the cars and teams involved - thanks J.C./AFX for drawing my attention to such. Prior to the sale of the Gray Ghost to B. Hildebrand, I visited the car and the then-current owner in nearby Brighton, MI. where I met and conversed with Dave. I had in hand a somewhat crude iteration of the 1:18th scale model then, while I took maybe a hundred photos of the Gray Ghost which I burned on a disc and which likely were sent to Hildebrand as he mulled his potential purchase. It's a pretty rare thing for me to be introduced to people so-involved and so-invested, hence the experience from a few years ago rates as personally memorable. For thinking about your same-year Pontiac engine blue reference with regards to wheel and chassis finish on the later-season car, indeed - I think my choice of finish here is a bit too punchy and modern; i.e. it's almost fluorescent and not quite what is called for or needed. A lot of interior finish was flaking away when I visited the car, hence I discreetly gathered up some material evidence to illuminate a way forward. Further, I might well contact Eastwoods to inquire about '71 Pontiac engine enamel to find out what may be available. Thanks... - I've been scribbling questions down, hoping to keep them reasonably direct so as not to wholly tax your attentions for requiring lengthy answers. Others may well follow if such isn't too much to bear. In no particular order then... In early-season trim, would the Minilite wheels be finished in a semigloss high heat black less the machined outer lips? Other thoughts would be that brake dust may have altered or literally colored what is seen in period photographs, while a friend suggested maybe a Dow 7 coating or protective barrier was applied. Along with the application of blue on the undersides of the car, presumably debuted when the wheels were likewise refinished, I'd noted a differential cover painted orange. Was this a later update, or do you recall this as being correct? I didn't notice any evidence of either a transmission or differential cooler being run. Nor did I see any application of heat sensitive 'dots' that might relate what temperatures were being reached within in the style of some Mustang Trans Am entries I've seen. Are my impressions correct then? With regards to the glove compartment-mounted CDI unit, might you recall the original make or finish? I believe period Delco units were black with exposed metal fins, while Mallory units would be red with exposed fins as two options then. For comparing and contrasting materials I have in hand to period photos, was the front bumper subtly narrowed or 'veed'? In relation to the driver's seat, the original spec. seems to have been wholly fabricated from scratch. The abbreviated base and aluminum sides I can make out well enough, but was some structure reused or is disguised for the additions made? I thought it odd that the shoulder harness pick up points seemed located on the parcel shelf. In truth, I don't know if they'd actually be all that much longer if such were secured to the floor, but then again any insight shared would be appreciated. Before they were painted blue, do you recall if the panel work serving as inner fender liners up front was left natural as in being aluminum sheet trimmed and fitted for the purpose? - ...and just in passing, I was curious about the sophisticated effort to disguise the complexities of the oiling system; i.e. the discreetly hidden oil tank within the space of the firewall oriented towards the passenger's side footwell, the unusual pan design, the unique pump configuration and function, etc. With dry sump systems allowed for 1971 for pressure upon the SCCA by Penske in particular, is there something missing from the story that would reveal the basis for all the secrecy? I don't know the time line of when the effort was taken up by the team looking into the 1971 season, nor do I know when the SCCA revised it's rules regarding the use of anything but a wet sump system. Such admitted, I was hoping you might shed light on what was both decided on and designed. Again, thanks for all your fascinating insights. May those road racing types looking in profit from your contributions here. Mike K./Swede70
-
Really stunning and heart-stopping work seen here. Thanks for all you do... Mike K./Swede70
-
Very beautiful this - thanks for sharing. I really like the argent-finished Magnum 500's as they could be had in '69 on the BOSS 302, and I'm happy you opted to include this detail. Mike K./Swede70
-
1968 RKE/JRT SCCA Trans Am Javelin
swede70 replied to swede70's topic in WIP: Other Racing: Road Racing, Land Speed Racers
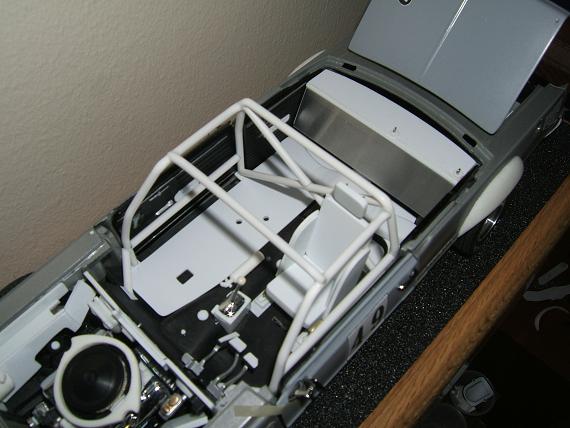
Greetings and thanks for the past interest displayed, What follow are some images relating how new SC/Rambler kit material was integrated into this build, along with some small scratch built fill panels to smooth things out. Shocks, a Panhard bar/track rod, and sway bar installation for the rear still need to be added, but so far - so coherent. Note I've done away with the slightly crude panel overlay on the back half of the interior here, with everything seen being simply a single panel thick. Thanks for reviewing this update. ...most of the added stuff intended for the rear of '68 Javelin chassis is seen here. ...more visible from the topside, one will note the SC/Rambler floor implant if you will, as well as the pair of scratch built panels for the floor that flesh out the profile already present there. Looking further forward, one sees sliver of further SC/Rambler driveshaft material mated to a pair of rectangular stock extensions stretched out to the sides. Also note that the rear bulkhead lifted from the original Jo-Han Trans Am Javelin tool bears slight extension along the bottom so that it can be installed tightly in a free standing sense, while to blend smoothly with what is below and beneath it, the panel has been opened up a bit with the base filed on an angle where it would contact the SC/Rambler part. ...all of the above in place. ...seen top down. ...at home with the cage worked up from before. ...the small fill panel with side extensions better witnessed. ...looking fairly decent even as the front end awaits and expects (!) help. ...the topic again to put matters and the impression made here together. Thanks for reviewing this most recent update... Mike K./Swede70
-
Indeed - these are wonderful. Glad you got one and at a super reasonable price too. It is your namesake by golly! Mike K.
-
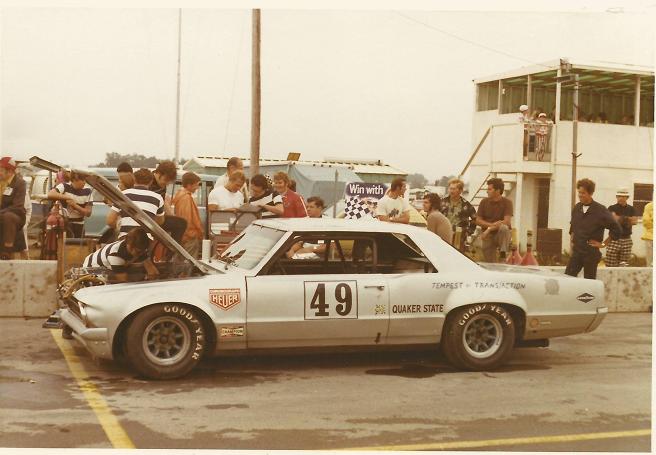
Thanks Harry for your most thorough review of the history of Gray Ghost both past and present. All that will read and review this thread doubtlessly envy your experience both on the team in-period, and in relation to the recently completed restoration and vintage race roll out of the topic... The most recent print treatment I'd known of was the M.M. 'Mike' Matune Jr. article published in Nov/Dec 2016/6 issue of Vintage Motorsports, while otherwise a single High Performance Pontiac article from the September 2012 issue constitute the best historical treatments as of late. The September 1971 issue of Motor Trend is vital, while these and scattered period stuff constitutes most of what I had to go on. I still wish there were more and better written treatments of the history of the series, and while photo reference tomes with brief blurbs help and are appreciated, better researched and more thorough records are most desired. I really appreciate your taking the time to flesh out what you could. I think of some recent Car Tech-published titles that at times seem a little raw and undisciplined, although I rather hear from unpracticed voices from the period across scenes than to never listen to what they can share for having been directly involved. By way of example, who wouldn't want to have the most recent history of Kar-Kraft by Charlie Henry on their shelves? On the other end of the spectrum, I really like the Chuck Cantwell (with Greg Kolasa) remembrance published by David Bull which is certainly a work of quality. If one is fascinated by factory-backed Shelby American/Shelby Racing Co. SCCA sedan racing across categories through the '68 season, the Cantwell publication titled simply Shelby Mustang GT350 is a must have. It would be a mistake to miss the period Trans Am content to be found within for simply assuming that material covered is restricted to the GT350/GT350R programs. As for the few period SCCA Trans Am titles available and/or slated to come, time passes, memories fade, and tales that might otherwise have been recorded may not be. At present I hardly want to look at updates of various FB vintage racing pages for fear of learning of who will have died next. A lot is being lost and just huge gaps will exist in relation to what once was. I've tried to collect all that I may, although a lot is scattered and demands of the enthusiast much persistence to build up a collection of primary materials. Sorry for the slip up in relation to the Rochester, MI. angle. I alternate between projects, hence focus is a challenge to maintain. Moving on, almost in an odd ceremonial sense, I tracked down the period home of Herb Adams to see if was still recognizable as per the September 1971 Motor Trend magazine treatment where the car is witnessed being serviced; i.e. the Gray Ghost with it's front clip off, kids bikes strewn about here and there, etc. Indeed - the house still stands and is about a mile or two from Waterford Hills Road Racing/Oakland County Sportsman's Club off of Dixie Hwy. which is relatively close by. Further, for tracking down the address of where inquiries should be mailed when the car was put up for sale with delivery after the M.I.S. race, I spied an indistinct apartment block near Somerset Mall (ahem - now the 'Collection'!) off Big Beaver/16 Mile Rd. Thank goodness the Camaro Research Group scans of Competition Press & Autoweek can make good the gaps in my own newsprint collection, otherwise I'd be toast. Jon Mello does so much for us across that fine online resource. For a comprehensive sweep of the '71 season that was rooted in period race reports, etc. do see: http://www.camaros.org/forum/index.php?topic=9705.0;all To read both the September 1971 Motor Trend article Ask Herb's Wife If We Can Take Her Car Racing as well as a team profile found within the pages of the Michigan International Speedway race program from that season, further see: http://www.camaros.org/forum/index.php?topic=8227.msg77157#msg77157 ...the early season configuration then. The post coupe framework is still seen (soon to be cut out), as are the Minilite wheels with spokes finished in black. Notice too the transition from the smaller GOODYEAR tire lettering/i.d. seen here to the larger 'T.V tire' lettering on the sidewalls coming into use as the season progressed. Just in brief, my 1:25th effort will be finished to replicate a late-season car, while the 1:18th will very likely be done as a Mid-Ohio entry with the earlier wheel finish. I don't have enough material to strictly nail how the interior was finished but for record of the spray bomb finish (in blue then) witnessed across it pre-restoration, but will aim to strike a reasonable balance for how I proceed forward. I might opt to leave the interior and underside a touch rough given it was a car indicating 70K miles and driven around SE Michigan in all-seasons no less, while I'd guess the oblong fiberglass patch panel has been removed from the passenger's side floor by now! Scruffy perhaps, and most unusual for a vintage topic. Again, I really appreciate the detailed knowledge you possess and have taken the time to share here... Mike K./Swede70
-
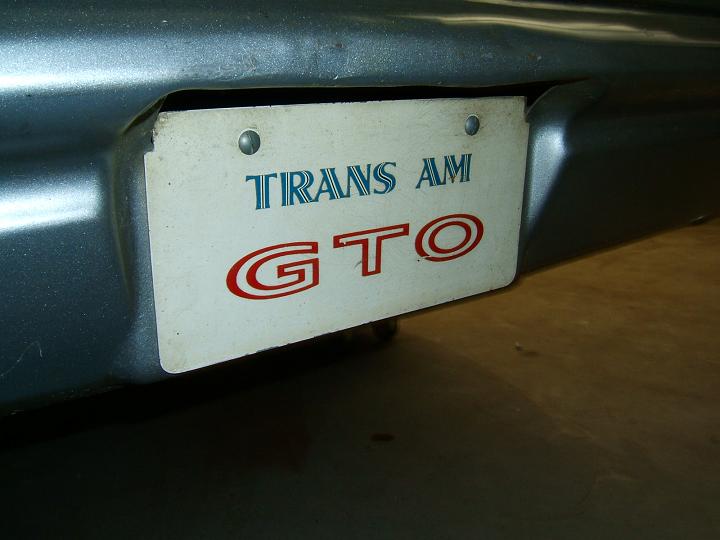
Excellent - I'll review matters again and get back to you consistent with trying to help out. For long I couldn't find many photos to aid the process of determining what was run or strictly could be done. This said, time passes and material surfaces that hitherto couldn't be referenced, hence for all evidence to the contrary, some things do improve in this life. I'm pretty sure the 'Tempest by Trans/Action' seen on the flanks of the late-season photo reproduced above didn't make it, while the stylized 'Bob Tullius' i.d. sometimes appearing on the roof was slated here to be stolen from an old Fred Cady Group 44 Jaguar/British Leyland waterslide sheet which also affords a few Quaker State Oil options for clearer lettering, and alternate sizes too. Sorry I can't reverse the digits on '44' when I type such to be fully respectful! I suspect in-period Tullius just showed up to drive the car and carried a decal on this person for just the occasion. Also and while most builders might not strictly miss it, for long the car wore a Casper the Friendly Ghost motif on each respective C-pillar after it was sold and ran A-production. In truth I can't consider such vital, but maybe locals would? And in a toss away sense, black and white Goodyear 'diamond' logos again seen on the late-season image aren't all that common and would be appreciated. Moving along, the O.E.M. vinyl tape graphics simply reading GTO across the back right and done in black might come from a MPC '71 GTO rerelease trusting I've saved and isolated such. Continuing, an obscure decal from an obscure local firm known as Diamond Racing Pistons, typically placed on the hood corners as a pair and being mostly orange, would also be sought. This one is likely impossible given I can't come up with the graphics. Then-situated in Mt. Clemens, MI. and sometimes identified as 'Diamond Racing Engines', you'd think I could do better given the locale of where this firm conducted business is not more then six or seven miles away from where I sit! Nice work on the sheet, while especially impressed I am with the hood graphics you worked up for the late-season look given all photo reference available shows such at harsh angles. Thanks for all you do and did... - ...oh, and here would be a close-up of a license plate done up with what was likely a mix of period Trans Am and maybe GTO Judge art. The pit lane scene is from St. Jovite, while the clearer image is from the car before it was recently restored. Kind thanks again... Mike K./Swede70
-
1968 RKE/JRT SCCA Trans Am Javelin
swede70 replied to swede70's topic in WIP: Other Racing: Road Racing, Land Speed Racers
Thanks for the notice regarding such as 'extra eyeballs' being alert to things that might appeal is always much appreciated. Kind regards... Mike K./Swede70 -
Very nice - I really like the choices you've made; i.e. the discreet weathering that rates as just enough and no more, the terrific dash and interior floor, etc. Anxious to chart your further progress then... Mike K./Swede70
-
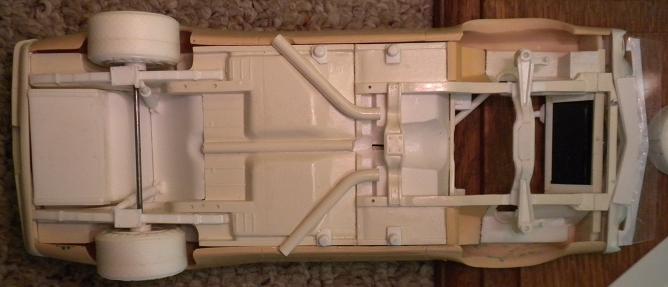
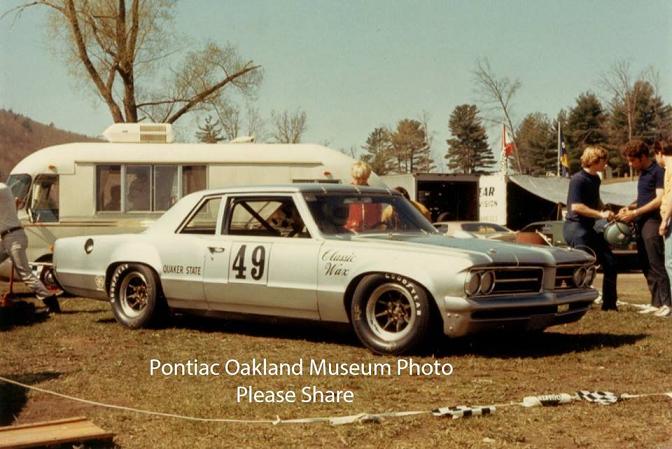
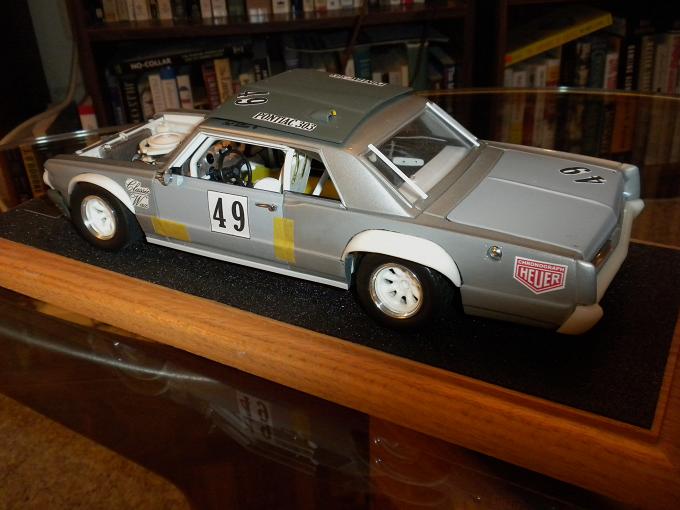
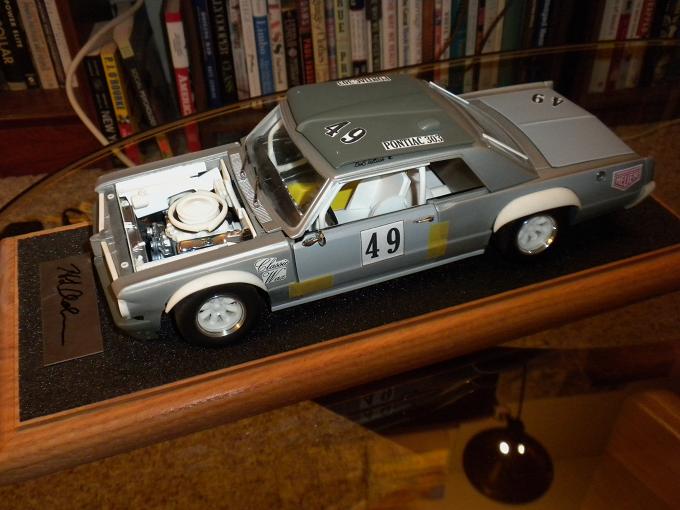
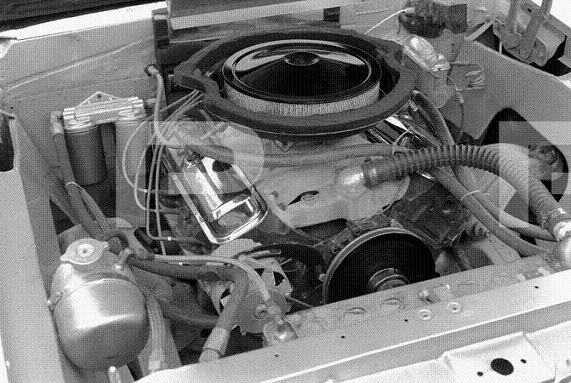
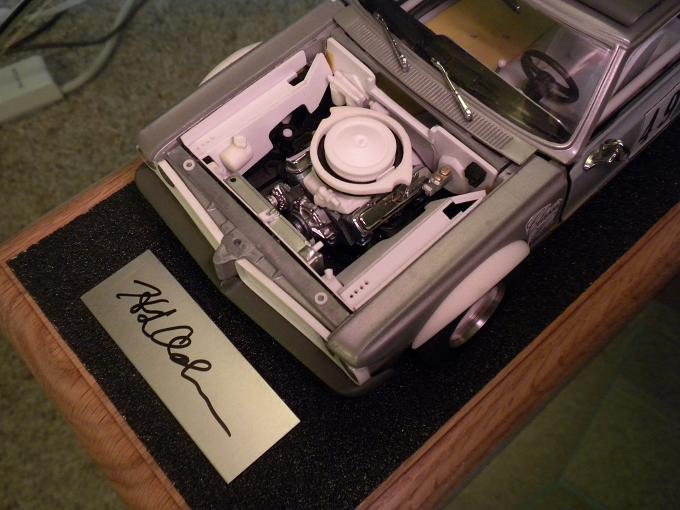
Greetings, I only have a few projects, although most exist as two-thirds finished mock-ups begging for slight sorting and of course - paint and final assembly. What follows would be a brief record of what are a pair of scale models of the oddball Herb Adams 'Gray Ghost' SCCA Trans Am '64 Tempest, the entry run with fleeting success in the 1971 series. At a glance something of a joke effort, nevertheless the project was undertaken by skilled Pontiac engineers in their spare time, embodying considerable thought even as it was packaged in a decidedly odd wrapper. Based in nearby Rochester, MI. (an error this - see below. M.K.), the team and the history of such has personal interest, while a rare opportunity afforded to me to make an inspection of the actual racer before it was restored recently prompted me to take on first a 1:25th scale project, and later a 1:18th diecast-based project even as a subpage on this board exists for such. I'll try to toss out things I did consistent with lending value to anyone attempting a like-project, although don't register shock if things go silent. More text will be afforded to the 1:25th project here, while if I do more with the 1:18th diecast effort, a new thread charting progress will emerge and take form there. Thanks... ...this would be the topic late-season in 1971. Obviously not your typical 5.0 liter svelte road racing sedan, as a positive it didn't have parallel leaf springs holding matters up in the rear. ...this would constitute my much-massaged 1:25th scale project. The body, bumpers, tail light lenses and decals are from a Scale Coachworks release of which maybe 50-70 examples were made. The shell is based on the old AMT annual release, while the model was sold with what would seems to have been a Modelhaus '64 Tempest hood which would be sans faux hood scoops otherwise witnessed on a like-year GTO. Should one compare this photo to other examples of the Scale Coachworks body online, one will note that I've filed off a lot of material consistent with reshaping the openings and softening the flares to come up with what is seen. On a happy note, it can be said that I didn't have to add anything here, with the as-delivered shell only requiring a lot of referral to period photos to largely make right. Other things discerned and in brief then. Tires are ancient MPC Goodyear Blue Streak NASCAR tires in the same size front to rear. Wheels are resin clones of Jo-Han Javelin-sourced Minilites with turned aluminum outer rims sporting a taper. Grilles are Lindberg items, while the interior panels and dash are sourced from the same '64 GTO tool. The chassis is from a recent vintage AMT '66 Oldsmobile 442 which at least tosses in a good B.O.P. rear end if nothing more. The engine is a mix of recent Pontiac kit releases consistent with coming up with better than the ancient MPC rendition of the 400 c.i.d. Pontiac. The actual car ran a 303, although this based upon the heavy tall deck block topped with Ram Air IV heads. The oiling system on the actual car is very interesting indeed. Although some discreet exterior lettering is missing on the as-supplied decal sheet, in the main the Scale Coachworks decal art is well thought out. If you happen to chance across a body or whole transkit on sale , harbor an interest in vintage SCCA Trans Am topics, etc., do consider gathering it up for it's an honest effort of something special. ...just in brief then, this is my much modified 1:18th scale Sun Star '64 GTO telegraphing as a '64 Tempest for a great deal of work. The cast-in metal faux hood scoops were filed down by hand and gone over with a sanding block for about a month to afford the profile seen here. The effort was nothing short of ghastly... This would be a much cleaner rendition of a July '71 Motor Trend race report under hood image taken at the Lime Rock event - the first of the season then. The picture was found on the new PP/SEMA online archive which I recommend to everyone like-inclined. The engine is quite basic from a glance at the exterior, with an old Edelbrock RD4 dual-plane intake, just a single 4 BBL as per the rules, etc. ...with mostly scratch built under hood paneling, plus scratch built intake and hand-sculpted flares. The left side grille was cast in resin and done twice over to avoid use of the standard model grille otherwise found on the right that bears the expected 'GTO' identification, while the headlamp block out plates are polished aluminum rod wafers cut to fit. Uber time-consuming all this, while the scribble noticed is that of one Herb Adams who I met briefly at an area book signing. Mr. Adams was able to inspect the model, and I hope bless it in a scale-model sense... ...rear three-quarter then, with lightly glued on renditions of decal art to come consistent with me getting a bearing on what I'm doing. O.K. - no more diecast stuff here then! Thanks for reviewing this post and thread. Mike K./Swede70
-
Indeed - I'll start a new thread, although consistent with something part of a theme with regards to Herb Adams and Co., here would be a single short succession of photos. Replies regarding this might be better attached to a separate thread. Indeed - a brace of H.L. Mencken books were spied behind one of my projects. Pleased you caught that! I have two projects of the old Gray Ghost Trans Am '64 Tempest going, one in 1:25th scale based upon the Scale Coachworks transkit, the other based on a 1:18th Sun Star diecast model given that modifying such is what I normally do. I started with the smaller plastic kit, while for access to the 1:1 topic prompted me to splurge and gather up the larger model. It's really rare for me to be allowed to inspect a period racer close-in, hence what would seem a duplication of effort. Anything spied in white is either a resin clone of something or scratch built. Short descriptions (big intake of breath here given I often overdo it) follow: ...the topic late-season in 1971. ...a 1:25th scale Scale Coachworks resin-bodied Gray Ghost with Lindberg interior panels, a AMT '66 Olds 442 chassis, and a bitsa Pontiac engine beneath an old Modelhaus hood. ...the Sun Star 'Ghost with much scratch built. The taped-on markings are preliminary decal art in-process. ...the topic underhood at Lime Rock '71. From the new PP/SEMA archive, and a clearer version of what showed up in Motor Trend in-period. This is the best period photo bar none, although if you'd like I'd be happy to send along other images of smaller assemblies taken close-in even as they reflect what the vehicle was like in 2011 or so. ...my model with revised 1:18th GMP '70 Judge 'power'. Underhood panelwork is scratch built then. ...rear three-quarter - and I'm done! No more dwelling on me then. Love the Herb Adams connection, while the scribble on the plaque is his when I briefly met him at a local book signing. He was able to see the model, and in a scale-sense, bless the effort. Thanks and I really like the NASCAR Grand Am effort Dr. Larry is working up here. Mike K./Swede70
-
I tried to edit my post seen above to pump up the content. I think I took about 150 Gray Ghost pictures when I was on the scene, hence other detail photographs are at my beck and call if only I sift through them carefully enough. As for the 1:1 car, for quite some time the G.G. was quietly resting in a garage in nearby Brighton, MI., and for some exchange of messages, I was invited out to record everything I could with my digital camera, calipers, etc. Gosh - the fellow even put the 1:1 car on jackstands so that I could further pour over it. A terrific and rare experience this was as I'm sure you'll agree. As to my projects, I worried that it would be tacky to dilute focus from your own work for posting my own stuff on what is your thread. Say 'please' and I could be persuaded to gingerly post some. Mike K./Swede70
-
1968 RKE/JRT SCCA Trans Am Javelin
swede70 replied to swede70's topic in WIP: Other Racing: Road Racing, Land Speed Racers
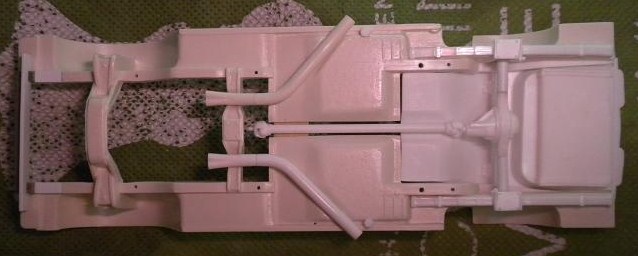
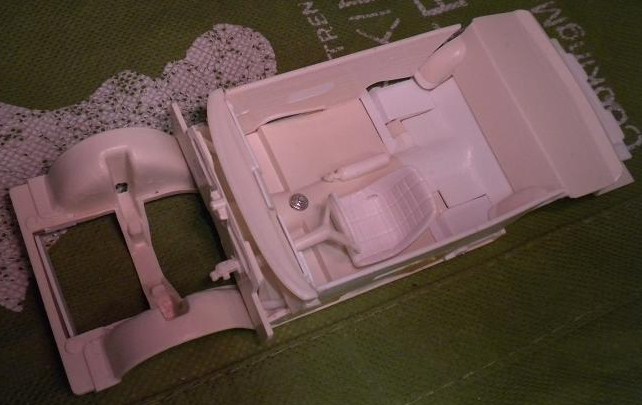
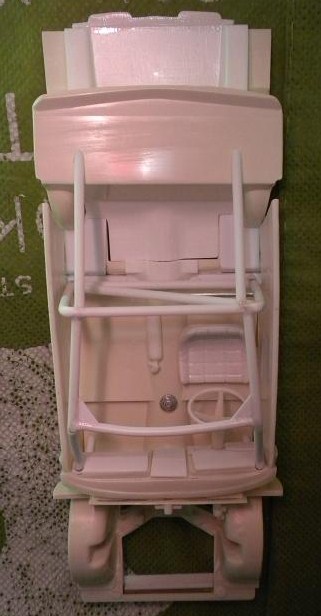
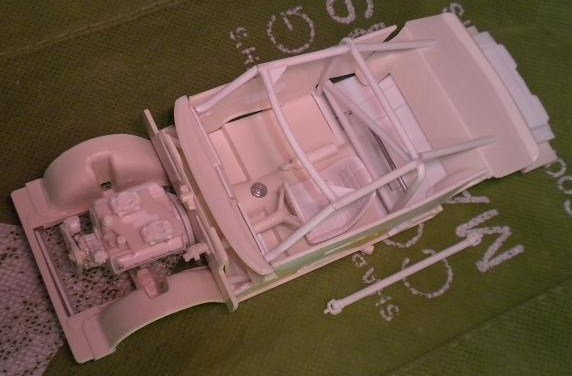
Greetings, My Testor's-issue SC/Rambler parts car arrived, hence I was able to cut into the chassis and trunk castings to prepare something for implantation into my '68 RKE Javelin. Seen below is some experimentation in this direction. ...this is my late-'70 season chassis again, while note how the floor pan still utilizes the old kit material where mufflers might otherwise be expected on the standard production car. At the time I fitted the SC/Rambler parts seen, I didn't strictly make use of all the material availed so that the surface transition would be as smooth as was later judged possible. A better effort is seen below even as a few parts are absent... Regarding the late-'70 chassis again, note the now-priceless Rebel Machine front suspension fitted plus subframe rail 'implants' to clean up the damage for removing the axle location 'blocks'. Also note the angled radiator installation that appeared on the Penske-constructed AMC Trans Am Javelins, here utilizing an old 1:24th Monogram NASCAR core. Lastly, the white resin tire masters seen on the back which are slightly wider than standard MPC Goodyear Stock Car Specials, modified here to look a bit better on the '70 and later Trans Am Javelin. Same tread, same sidewall, just doubled up in resin to come up with the added width then... ...this a mock up on an existing SS/AMX chassis using the parts bin stuff that just arrived. Notice I've used all the material I could get from the SC/Rambler floor between the rear frame rails. A gap is seen given there just isn't enough material to bridge things, hence happy I am that I made a low-risk test of sorts here. I expect to leave things a bit longer and grind off the faint strengthening ribs seen on the standard Jo-Han race chassis to blend things effectively. Notice too that if one spends enough time filing down the top of the frame rails and carefully fitting the rear hump half to the forward half of said hump, matters can be tightened up considerably as contrasted to what is discerned on the late-'70 effort shown further up this post. ...and lastly, it's pretty common to see the neat flush American Motors exterior door handles drown under a layer of primer, a layer of paint, a subsequent layer of clear and finally foil. Trying to combat this dilemma, I thought that maybe if I trimmed some very clean handles from a junk shell and created a mold to cast duplicate apart and away from the build, perhaps hope would exist to finish them with greater delicacy and care. The idea is to seek to have these plated, then apply a wash of Testor's Model Master Magnesium Buffing, and then lastly, apply some semi-gloss clear with the intent of coming up with something good to simply drop onto the work. Filing out flush door handles on a shell isn't fun, but if something like these can be finished to a high standard before anything is strictly carved out of the body, then the effort might be worth it. Thanks for skimming this most recent update. Mike K./Swede70
-
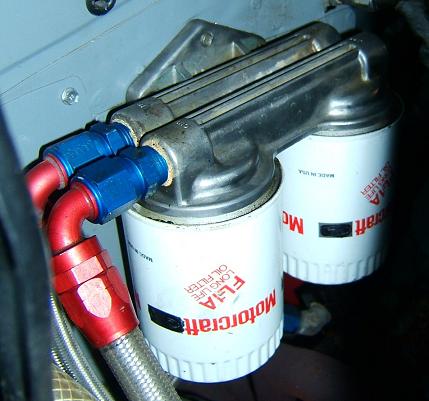
Looks great - very agreeable progress right across the chassis. Looking forward to more then... Oh - and as usual and after the fact, here would be some close-in pictures of the remote filter mount sporting the pair of filters. Locally I was afforded the opportunity to pour over the Herb Adams Gray Ghost ''71 Trans Am '64 Tempest before it was restored, hence the both the photos and their implied relevance. I have a pair of projects going in relation to the 'Ghost in differing scales, although just in the moment, I thought I could plug in these images should they be of value to you. Mike K./Swede70
-
Looks pretty decent. It's nice to think that some of these parts store premiums are improving and that some intrepid searching can turn up good quality items for little. Thanks for sharing... Mike K./Swede70
-
Good - glad to help in some small way. For searching the same PP archive, a long series of '73 Daytona 500 images turn up, while one has the topic shown nearly face on whilst on the banking. It's in color, and while efforts to link you to a particular image via a URL haven't really translated to value, search '1973 NASCAR' or perhaps '1973 Daytona' and I'm confident you will find it. Thanks... Mike K./Swede70
-
1968 RKE/JRT SCCA Trans Am Javelin
swede70 replied to swede70's topic in WIP: Other Racing: Road Racing, Land Speed Racers
Thanks for the kind displays of interest, Not knowing quite where to post this, I very recently stumbled onto the new Petersen Publishing SEMA Archive accessible online. Used to reviewing material on the David Friedman Collection/Benson Ford Research Center and well as the Rev's Collection/Stanford University, for carefully sifting photos on the PP archive, suddenly it seems my online capabilities have been improved by a third. Certainly a great many photos to support this project have been found, while if coverage for what you care about in turn is afforded, why not try? In particular, for restricting my search to something as simple as '1968 Trans Am', a half dozen underhood image of the Ronnie Kaplan Javelins taken at the Riverside Mission Bell 250 were uncovered that answer quite a few questions I'd harbored. Now I know that the cowl induction vents cut into the top of the firewall weren't covered for conversion to the late-season fresh air system and aluminum air intake 'box' run, that the oil blowby breathers were painted black and mounted at a certain angle, etc. Do consider giving the utility an inspection, although understand that the search term function is limited in it's power given the cataloging of the images isn't very deep or comprehensive. A fair amount is misfiled and misidentified, so if you in turn have the insight to share to help them relabel what requires such, then consider doing this too given we all can't be expert concerning everything. In short, the value you quietly lend to the scene today may be quietly rewarded to you tomorrow. See then: https://archive.petersen.org/pages/search.php Mike K./Swede70 -
Neat topic - I hope to follow along with your progress. Mike K./Swede70


.JPG.87b9695bb25e0dbf2b096d02b8eed2ba.JPG)


.JPG.d0afb9401f8183089ad0c6e1b7d98e2f.JPG)