Chariots of Fire
-
Posts
2,782 -
Joined
-
Last visited
Content Type
Profiles
Forums
Events
Gallery
Everything posted by Chariots of Fire
-
 What kind of resin are you using? The resin I'm using does get warm as it cures and if the mold is cool it takes longer for the resin to set.
 -
Bare Metal Foil
Chariots of Fire replied to crazyjim's topic in Model Building Questions and Answers
Hi, Peter. The BMF seems to have varied a lot. The first foil was indeed the best for stretch characteristics. The foil now does seem much brighter than the old stuff. The Ultra Brite was a lot like the "black chrome" they put out. It was like tin foil, it curled up and never did adhere well. I still use the BMF they put out now when I have to and it will stretch some. Now and again there are some adhesive issues but it can be corrected with burnishing and a clean surface to apply it to. -
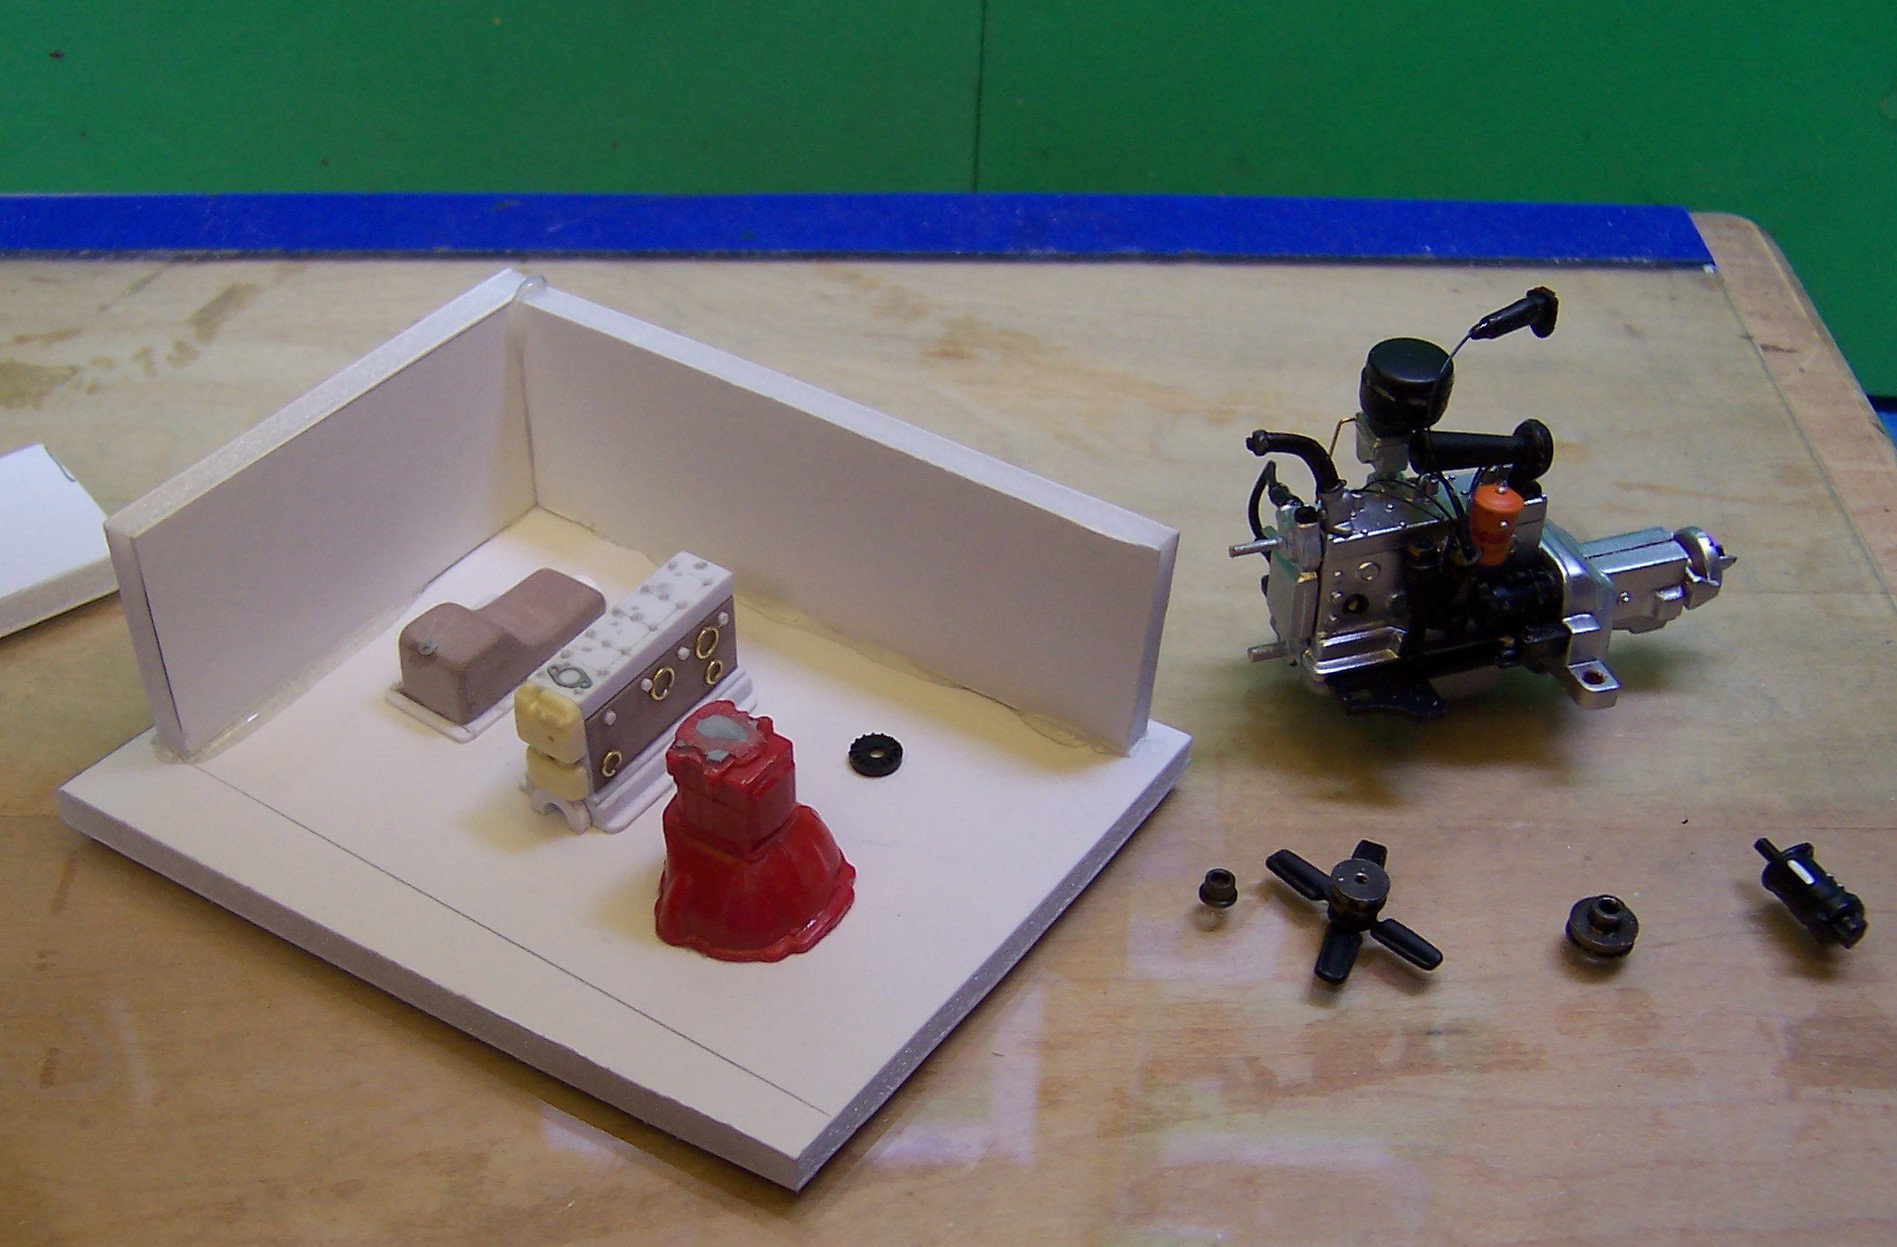
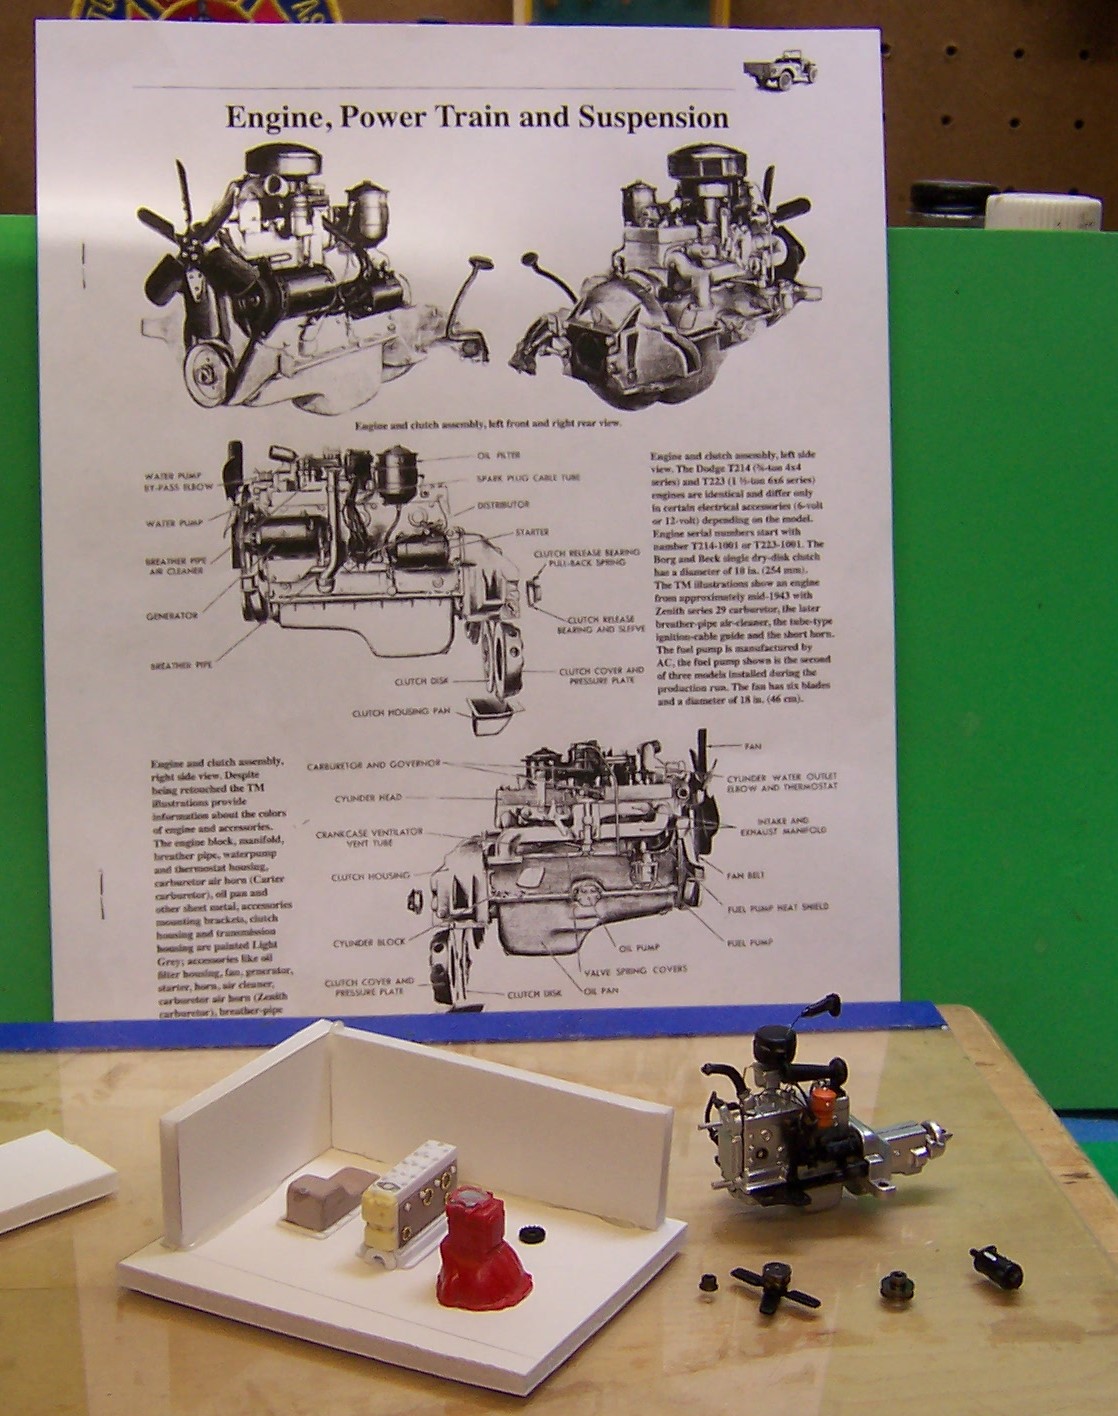
A bit of an update for work done on the engine. Danbury Mint made a nice looking 1/25 scale 1941 Dodge pickup with a 6 cylinder engine. I took the diecast apart and removed the engine for sizing. Since I plan on making two WC-51's I wanted two engines that were alike. But with only one diecast that I did not want to surrender, it only made sense to copy it. That is what is in the partially completed box in the photos below. Using measurements of the diecast engine as a basis I built up the block and oil pan. In addition to the diecast, a page in a technical manual had photos of the engine as put together and in side views. The diecast engine is good for some things but not all as a study of the photos revealed. So the photos are the real source of what the final result will be. RTV has been ordered and as soon as it comes in, the mold will be filled over each of the components. From there is it only a matter of adding the details but the big ticket items of the engine will be identical. The bell housing and transmission came from the parts box and is actually from a small Ford V-8. The shape is similar, not the same as in the photos but close enough as most of it will be in back of the firewall and below the floorboards. The small round disk is a piece that was at the front end of the diecast generator. It is actually finned so it was included for casting. The oil pan is made of Ren Shape as is the center of the engine block. Sheet stock was used in other places. The diecast engine has very nice pulleys but I will turn those for each of the new engines and retain the originals to put the diecast engine back together. Here's the page out of the technical manual. It shows that there are some differences with the diecast so I'm going with the photo references as much as I can. For the mold box I'm using foam illustration board and putting it together with hot glue. The interior will be sprayed with mold release to make sure that the parts come out easily. It takes a good 4-6 hours for the RTV to set up properly but the quality of the mold is typically very good. The only thing to make sure of is that when the RTV is poured, there are no air bubbles that get trapped. That is eliminated by using a stick to move the liquid RTV around for a few minutes after it is poured.

-
I'll use some plastic hex strip stock for the bolts on the locking rings. I don't even have the trailer any more. It went to Hawaii like the Class 325 did!
-
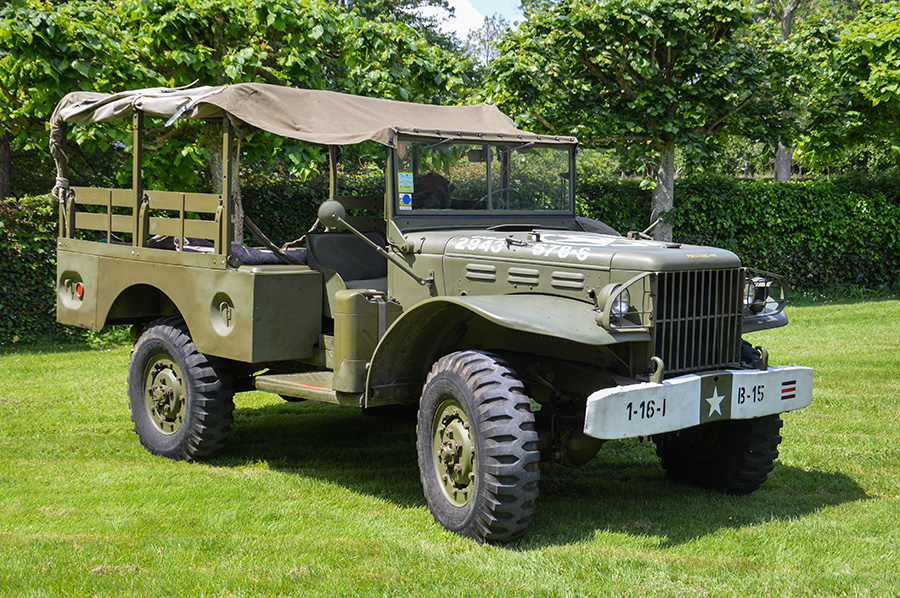
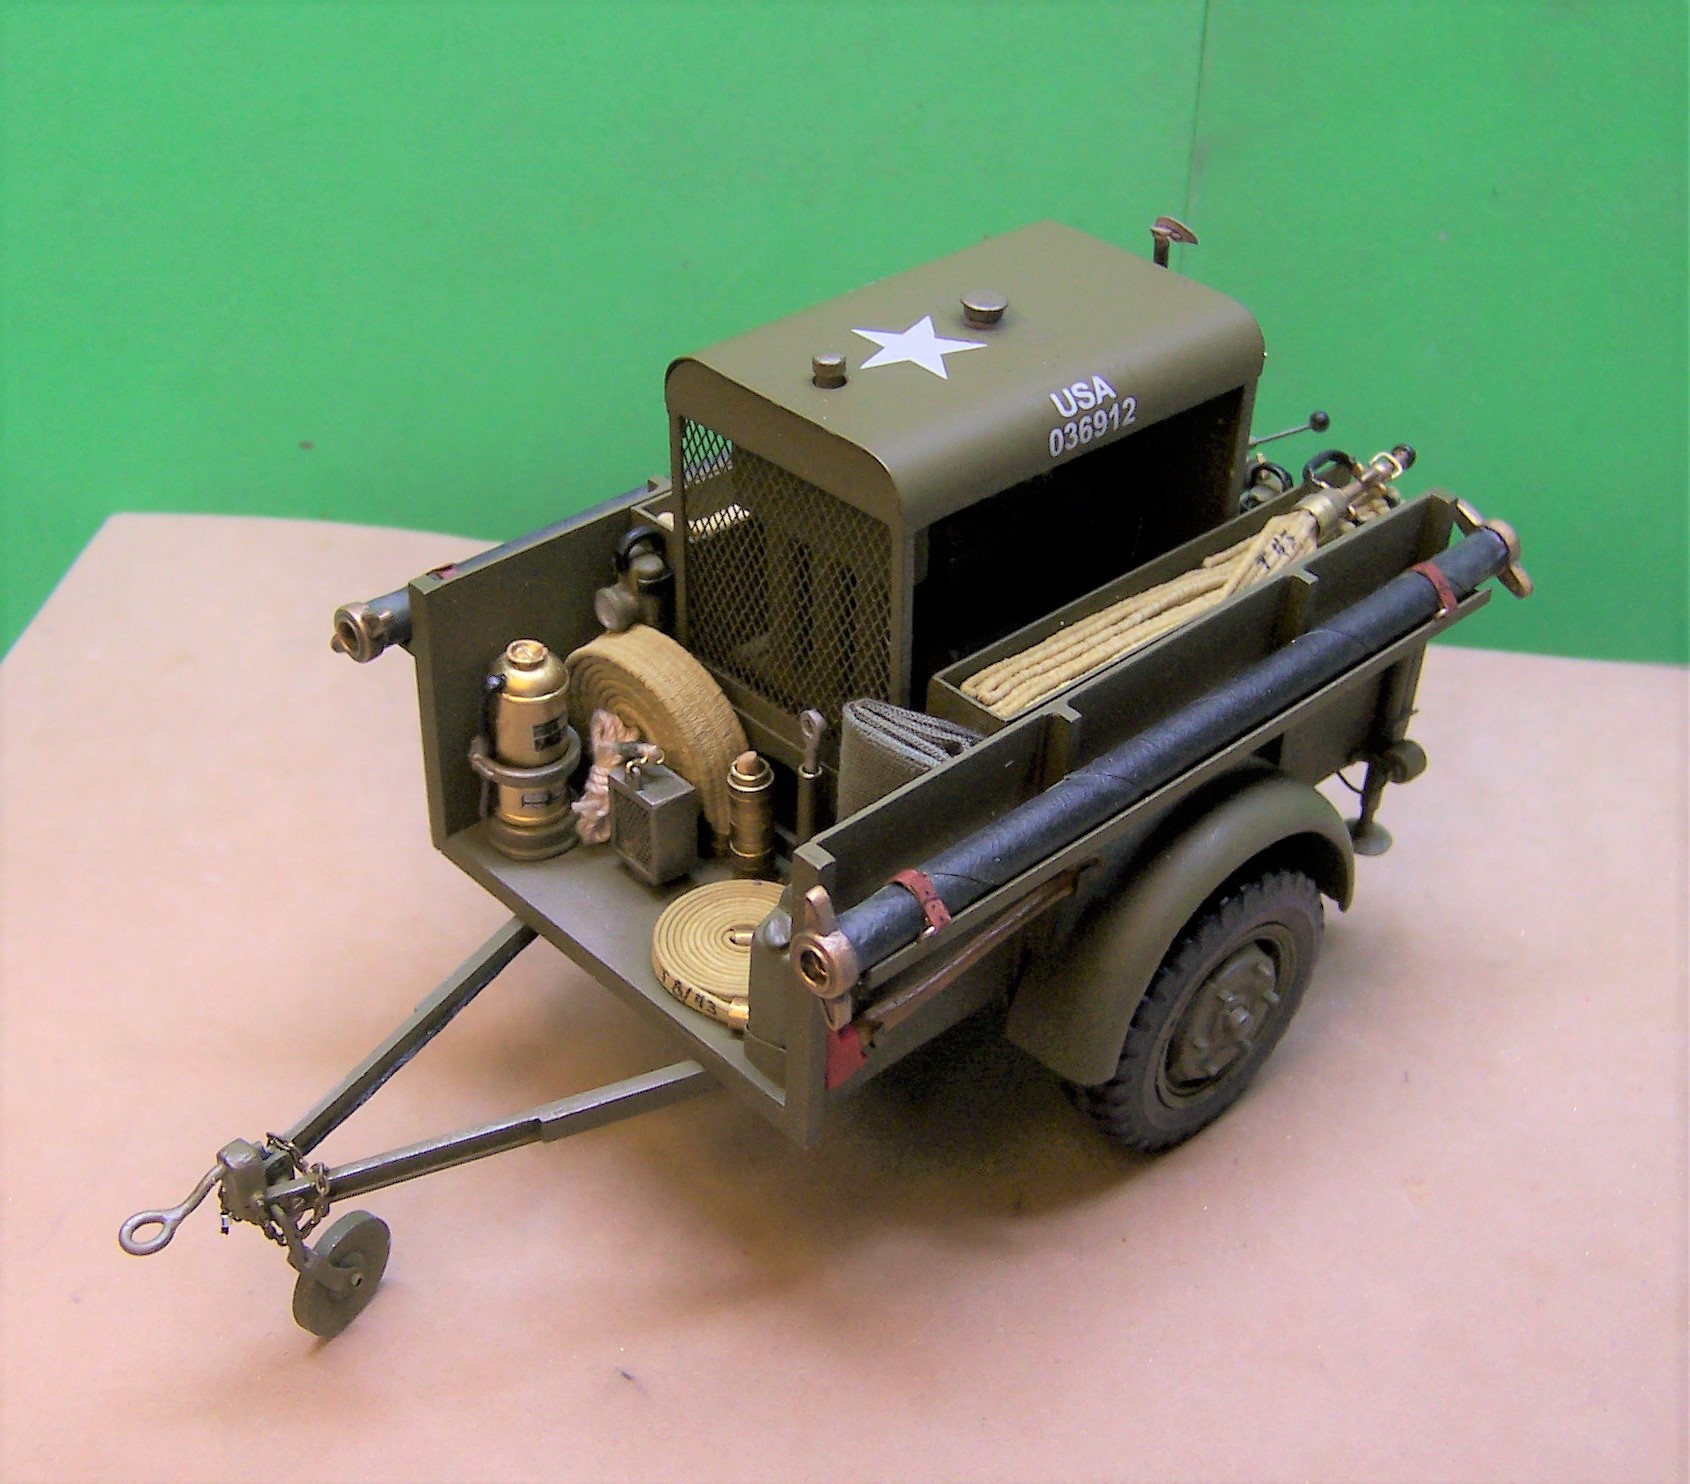
This is the start of a new project. This forum does not ordinarily deal in military subject matter but this is still a 3/4 ton truck no matter what it might be used for. The WC-51 is the result of some early WW II era experimenting and planning for a 3/4 ton rated truck that would take the place of some half-ton rigs that were not quite rugged enough for heavier work. It saw service during the war in all of the theaters of action and had many different roles. One of them was to be a tow vehicle for the Class 1000 fire pump trailers used by the Army Fire Fighting Platoons. Since I have already built the trailer it is now time to focus on its hauler. This is a restored one and is a basic rig that will be the basis for the model. Here is the start. From technical manuals and photos the frame was drawn to 1:25 scale with paper prints glued to 0.040" Evergreen sheet stock. Once cut out and sanded down, 0.020" x 0.125" strip stock was glued to the top and bottom edges as flanges. The frame in the foreground has been modified from the one in back because I made a mistake in the frame width. The one in back needs to be cut and widened out both in front and back. Springs are made of soldered brass strips. The tires and wheels came from an Ertl 1:25 scale Dodge Power Wagon diecast. I used the tires and wheels as masters, created molds and cast copies. The thin disks in front are locking rings that were made from an aluminum lathe turned master and then cast. They go on the outside of the wheels. The tires are 9.00x16's and the locking ring helps to hold them on the rim. The WC carries a spare tire on the driver's side running board. Thus the 5th tire. The differentials were also cast and have been drilled out for brass axles. Larger axle sections will be added along with the hubs for the wheels. Will post additional photos as work progresses.
-
Hey, Dave! We are only about 15 miles from each other! Ever visit Centerline in Hyannis?
-
Autocar dumper
Chariots of Fire replied to 1959scudetto's topic in Model Trucks: Big Rigs and Heavy Equipment
Agreed, Gareth. One of the most prevalent issues I have found in weathering is that it can be overdone very easily. I've tried studying where various types of weathering should be placed based on real vehicles in real work situations and for older vehicles that have been weathered by the sun where most of the changes take place. It's a fun study. The military modelers have perfected weathering using a variety of techniques so check out IPMS if you are interested and see what kind of information they have. -
I don't think it matters what you use to cut the frame. Once cut each piece will have to be trued up by sanding and squaring. I use a Dremel with a thin carbide cutoff wheel and then clean up edges with a sanding block. The other important part is making sure that the frame ends up being the same length overall when put back together. That means some trial and error fitting unless you are able to make perfect cuts in each piece. JMHO!
-
Looks like you have hit the nail on the head! The real one shows that you have!!
-
Autocar dumper
Chariots of Fire replied to 1959scudetto's topic in Model Trucks: Big Rigs and Heavy Equipment
Thanks, Helmut. I've seen some really outstanding military models done with a brush and it was impossible to tell that they were not airbrushed, the finish was so smooth. It's too bad that paints today are not made with the durability and quality that they once had. -
Autocar dumper
Chariots of Fire replied to 1959scudetto's topic in Model Trucks: Big Rigs and Heavy Equipment
If that cab and hood is an example of brush painting, that is outstanding! What kind of paint and what brushes did you use? -
I like Duplicolor paints. Prime first to get out all the flaws that don't show up on the bare plastic. Then sand and fill in bad spots or sand down high spots. Prime again and sand. Do that until the primer is smooth. Wash in warm soapy water and let air dry. Then start the color coats. Duplicolor sprays very fine and is at a good pressure just coming from the can. It also has an adjustable nozzle that lets you paint a fan type spray either horizontal or vertical. It comes vertical and that's the way I keep it. Sand the first coat down. Spray again to catch the areas that didn't get it the first time. Let dry and sand without going through the color. Wash, air dry and give a coat or two that covers well. Let it dry and polish it out with Novus.?
-
power wagon lettering
Chariots of Fire replied to Paul Payne's topic in Model Building Questions and Answers
I did the PW decals a long time ago. I may still have them in the CAD file for the ALPS. Will get back and let you guys know. -
1966 F-100 , Moebius
Chariots of Fire replied to JET.'s topic in WIP: Model Trucks: Pickups, Vans, SUVs, Light Commercial
That is about the best weathering I have ever seen. Show's that you know where it happens. Nice subtle stuff, not to heavy, in just the right places.? -
A Mack and a Snorkel
Chariots of Fire replied to Chariots of Fire's topic in WIP: Model Trucks: Big Rigs and Heavy Equipment
Yesterday and today I worked on the front bumper using the smashed one as a guide. I was able to glue the pieces back together for the size and shape but there was no way to attach it to the front of the truck. These Corgi rigs have been around a while but it is amazing how brittle the plastic is that was used in the construction. It reminds me of the old bakelite stuff that was used in model trains back in the day. I made the replacement bumper from brass sheet and strip stock. The strip stock was annealed to soften it some for bending and was curved using a template from the old bumper. Then the bent strip was soldered to a piece of thin sheet stock. Once soldered together the edges were ground away to final shape and size. On top of the bumper I put a piece of stainless treadplate given to me by a fellow modeler. It is wonderful stuff but is ultra thin and only cuts with a pair of aircraft type shears. I cut away as much as I could without distorting it and then used the dremel and cutoff wheel to eat away at the edges. The final shape was done with a file. This material is peculiar in that it does not bond to CA or epoxy. I tried both and it just came off. I finally settled on contact cement and that seemed to work, although I did have a corner pull up a bit. A small amount of contact cement was eased between the brass top and the stainless and then it was clamped until set. The face of the Mack bumper has three chrome bars that run horizontally to the outside edges. Small brass wire was soldered to the bumper face to represent these bars. The bumper was given a coat of etching primer and then BMF was put over the entire bumper face. Next was a coat of red paint. After the paint was dry I removed the paint from the bars to reveal the BMF. They look decent as chrome strips like the real one. Having to make up the bumper, it was a good opportunity to salvage the two hooks from the old bumper, attach them after holes were drilled in the top of the bumper and then make up a Federal Q2B siren. That was turned from aluminum rod and with some decals for the slots in the outside of the siren and a decal face it is a good representation (IMHO!!). Lastly some 3M white tape was added to the sides of the platform to represent the heat shield. With the work done, the rig will go back to the builder's shops for finish of the body and to add some other details of the Mack Snorkel.
-
A Mack and a Snorkel
Chariots of Fire replied to Chariots of Fire's topic in WIP: Model Trucks: Big Rigs and Heavy Equipment
I just got an update on the project. The recipient of the project got his Springfield Mack via an outside source and it came with a completely smashed front bumper. So now the Chariots of Fire shops have to build a new bumper for the rig.?️☺️ -
There are a variety of ways. Depends on how fancy you want to get and what type of gages you want to reproduce. 1. Take a photo of the real gage and scale it down to where you could punch out the gage face. I used to take photos with a 50mm lens and stand away about 15 feet when I took the photo. Printing the photos out on a 4x6 sheet gave the size of the gage in 2/25 scale. 2. Go to Model Car Garage and purchase gage faces and photoetch bezels for particular cars or get the variety pack. 3. Make them on a cad program and print them out. Make bezels out of aluminum tubing.
-
A Mack and a Snorkel
Chariots of Fire replied to Chariots of Fire's topic in WIP: Model Trucks: Big Rigs and Heavy Equipment
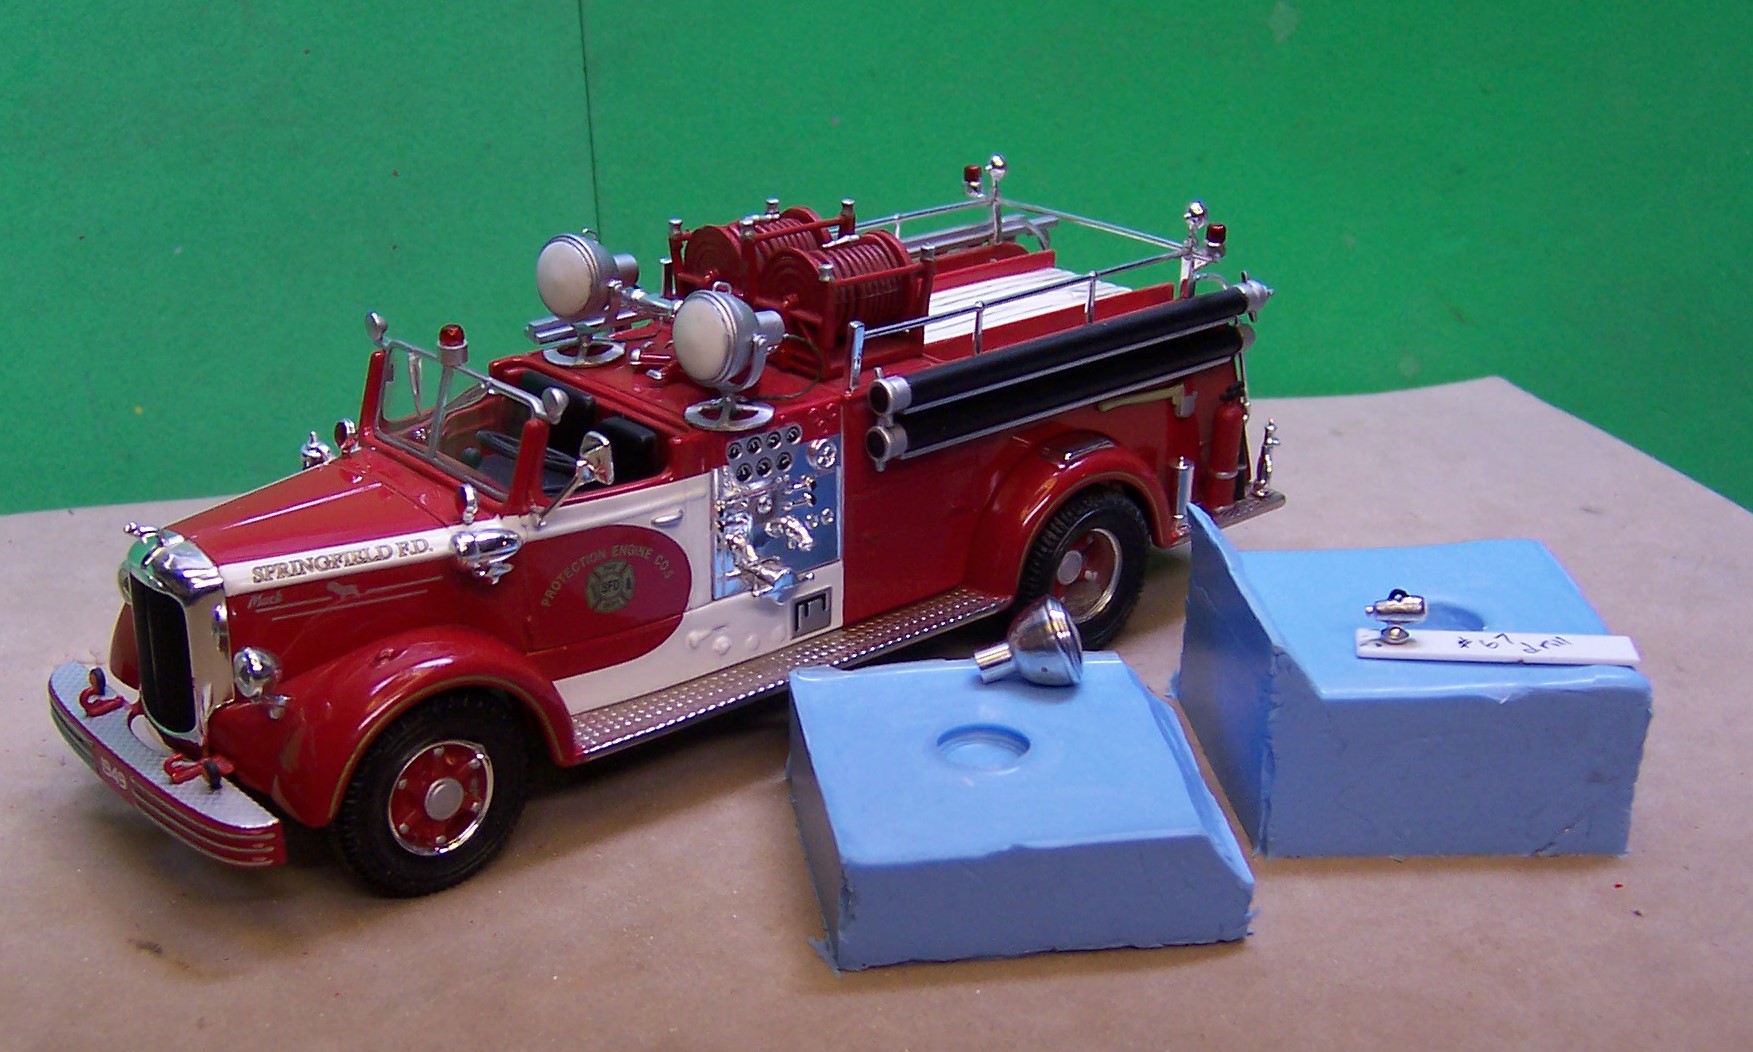
Two last items were needed to complete my end of the project. Two Crouse-Hind lights in 1/50 scale were needed along with one more Deitz light for the platform. A master spotlight was turned from aluminum rod and a mold was then made of RTV. Two resin castings were made. The light bases are made of brass. Bare metal foil was placed over the lens and trimmed. Then each light was primed and given a coat of aluminum paint. After the paint dried the BMF was peeled off to show the translucent (casting resin) lens. A piece of thread was added to the rear of each light for the electric cord. The Deitz light was made from 1/8" diameter brass rod. The base and light itself were turned separately and then soldered together. The light was painted silver with a white dot for the lens. it will be mounted on the corner of the platform opposite the one already made. The spotlights are mounted on the pumper just to show the relative size. On the final rig the deck gun would not be there allowing more room for each light.
-
A Mack and a Snorkel
Chariots of Fire replied to Chariots of Fire's topic in WIP: Model Trucks: Big Rigs and Heavy Equipment
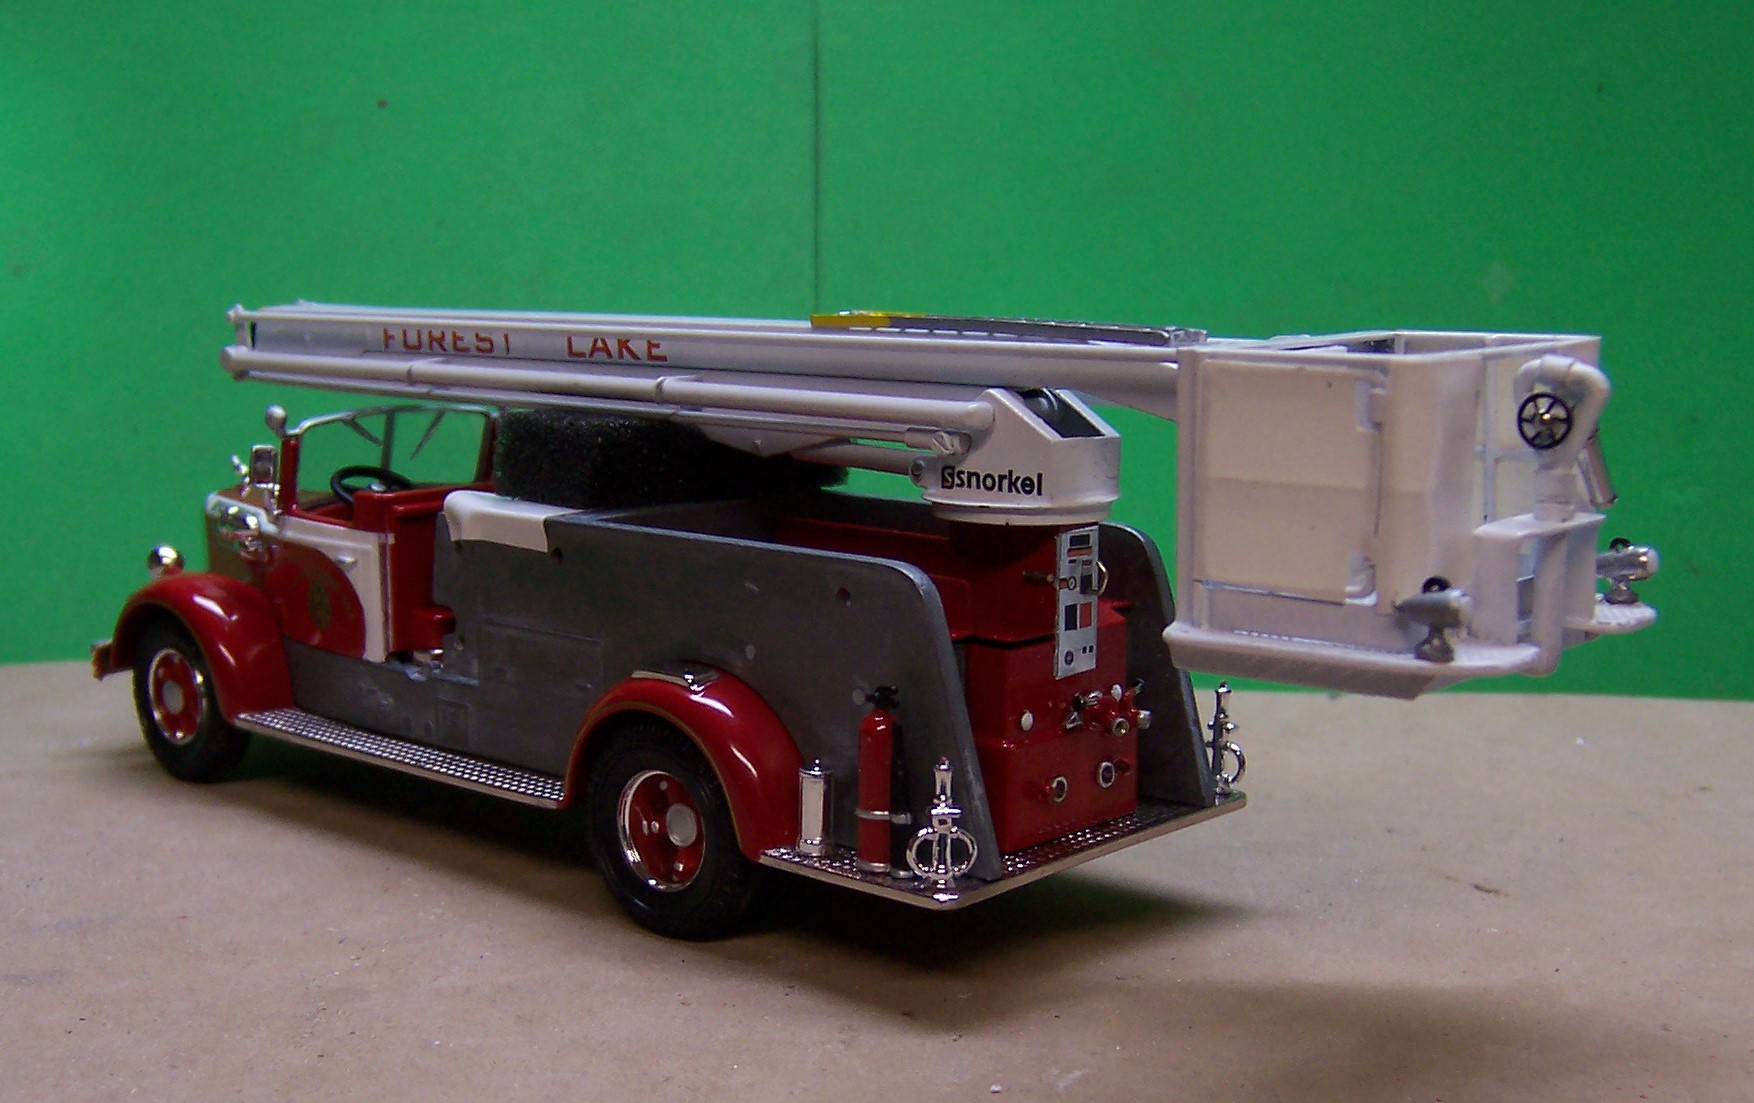
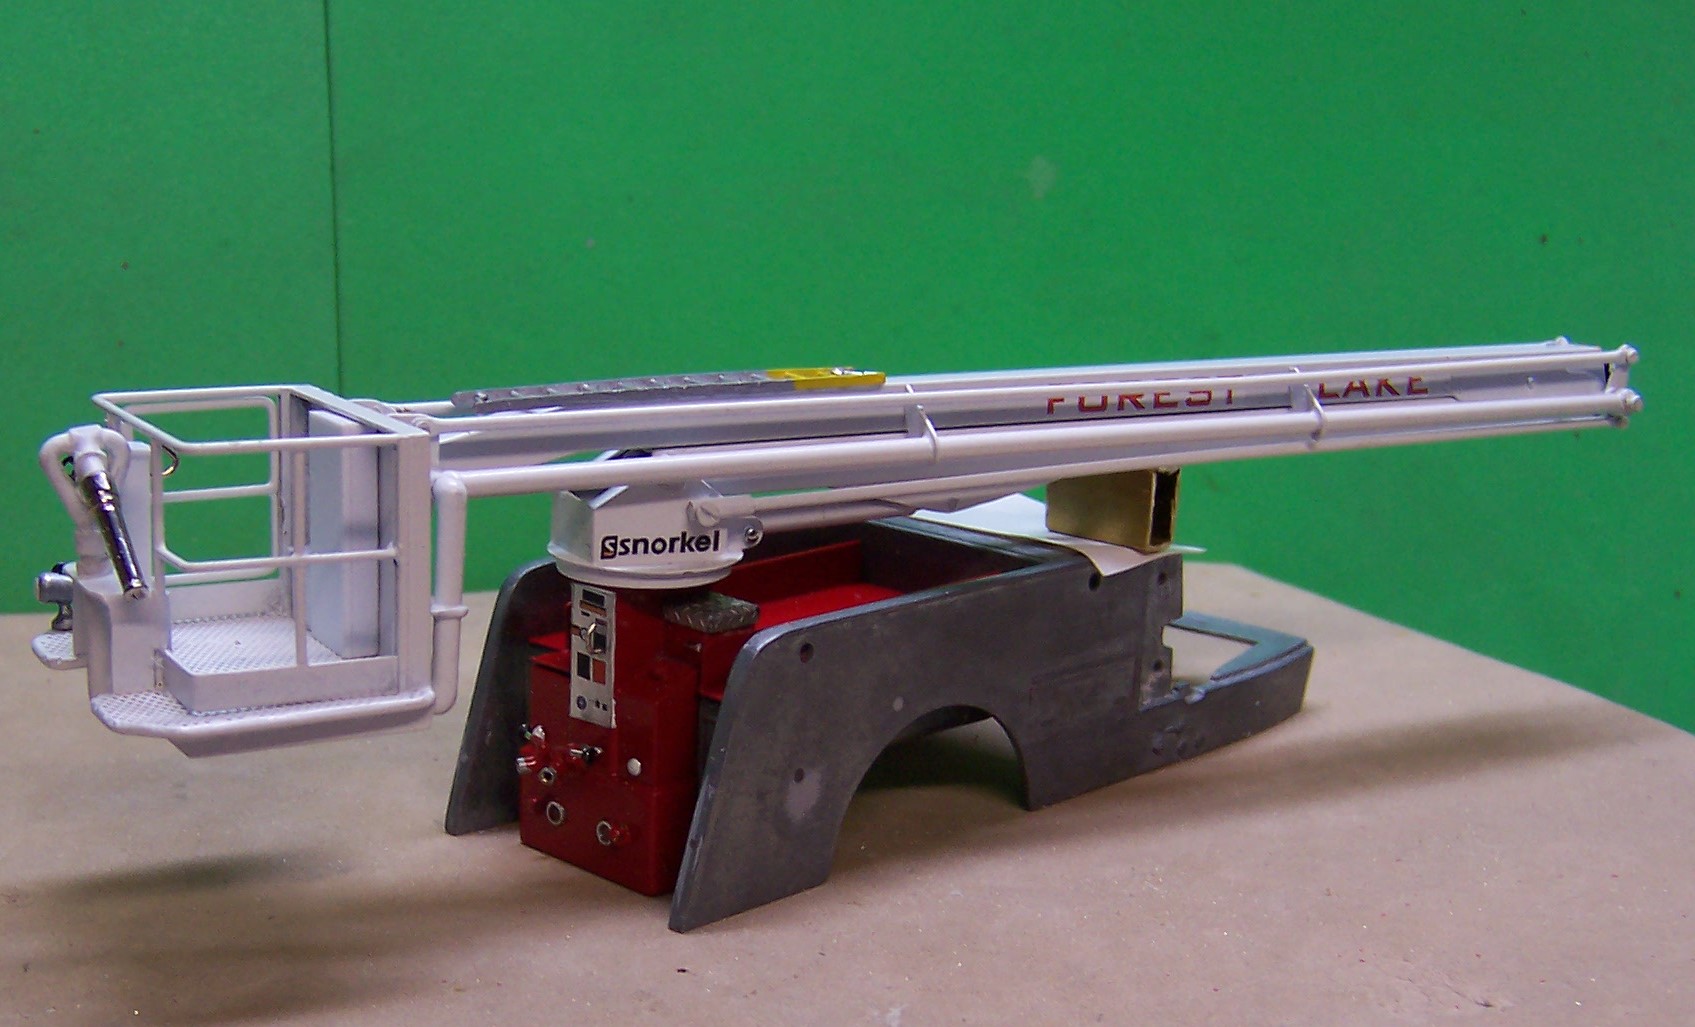
The snorkel is done and has been delivered for eventual mounting on the back of a completed Mack L. One small Deitz light has to be made for the corner of the platform but that's about it.
-
IH Paystar 5000 4x4
Chariots of Fire replied to DRIPTROIT 71's topic in WIP: Model Trucks: Big Rigs and Heavy Equipment
I was thinking the same thing, Jeff!? -
A Mack and a Snorkel
Chariots of Fire replied to Chariots of Fire's topic in WIP: Model Trucks: Big Rigs and Heavy Equipment
I've got some vinegar left over from cleaning a Model A carburetor. Maybe that's a good bet. Will try it out. Thanks for the suggestion! -
A Mack and a Snorkel
Chariots of Fire replied to Chariots of Fire's topic in WIP: Model Trucks: Big Rigs and Heavy Equipment
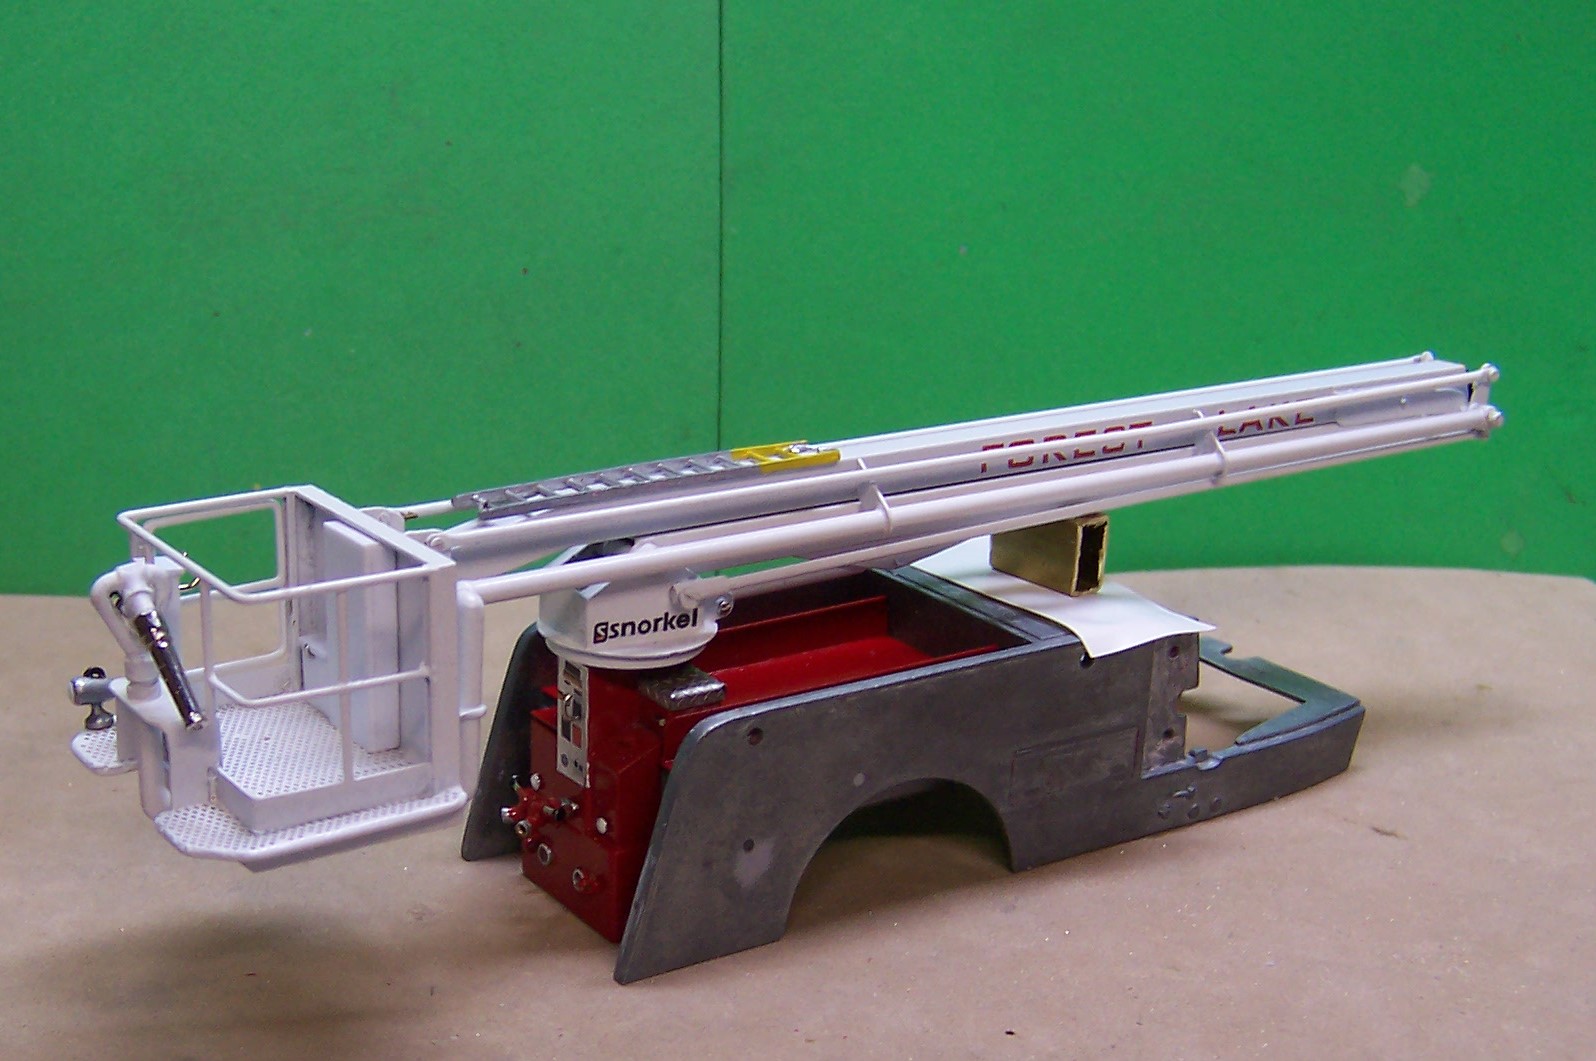
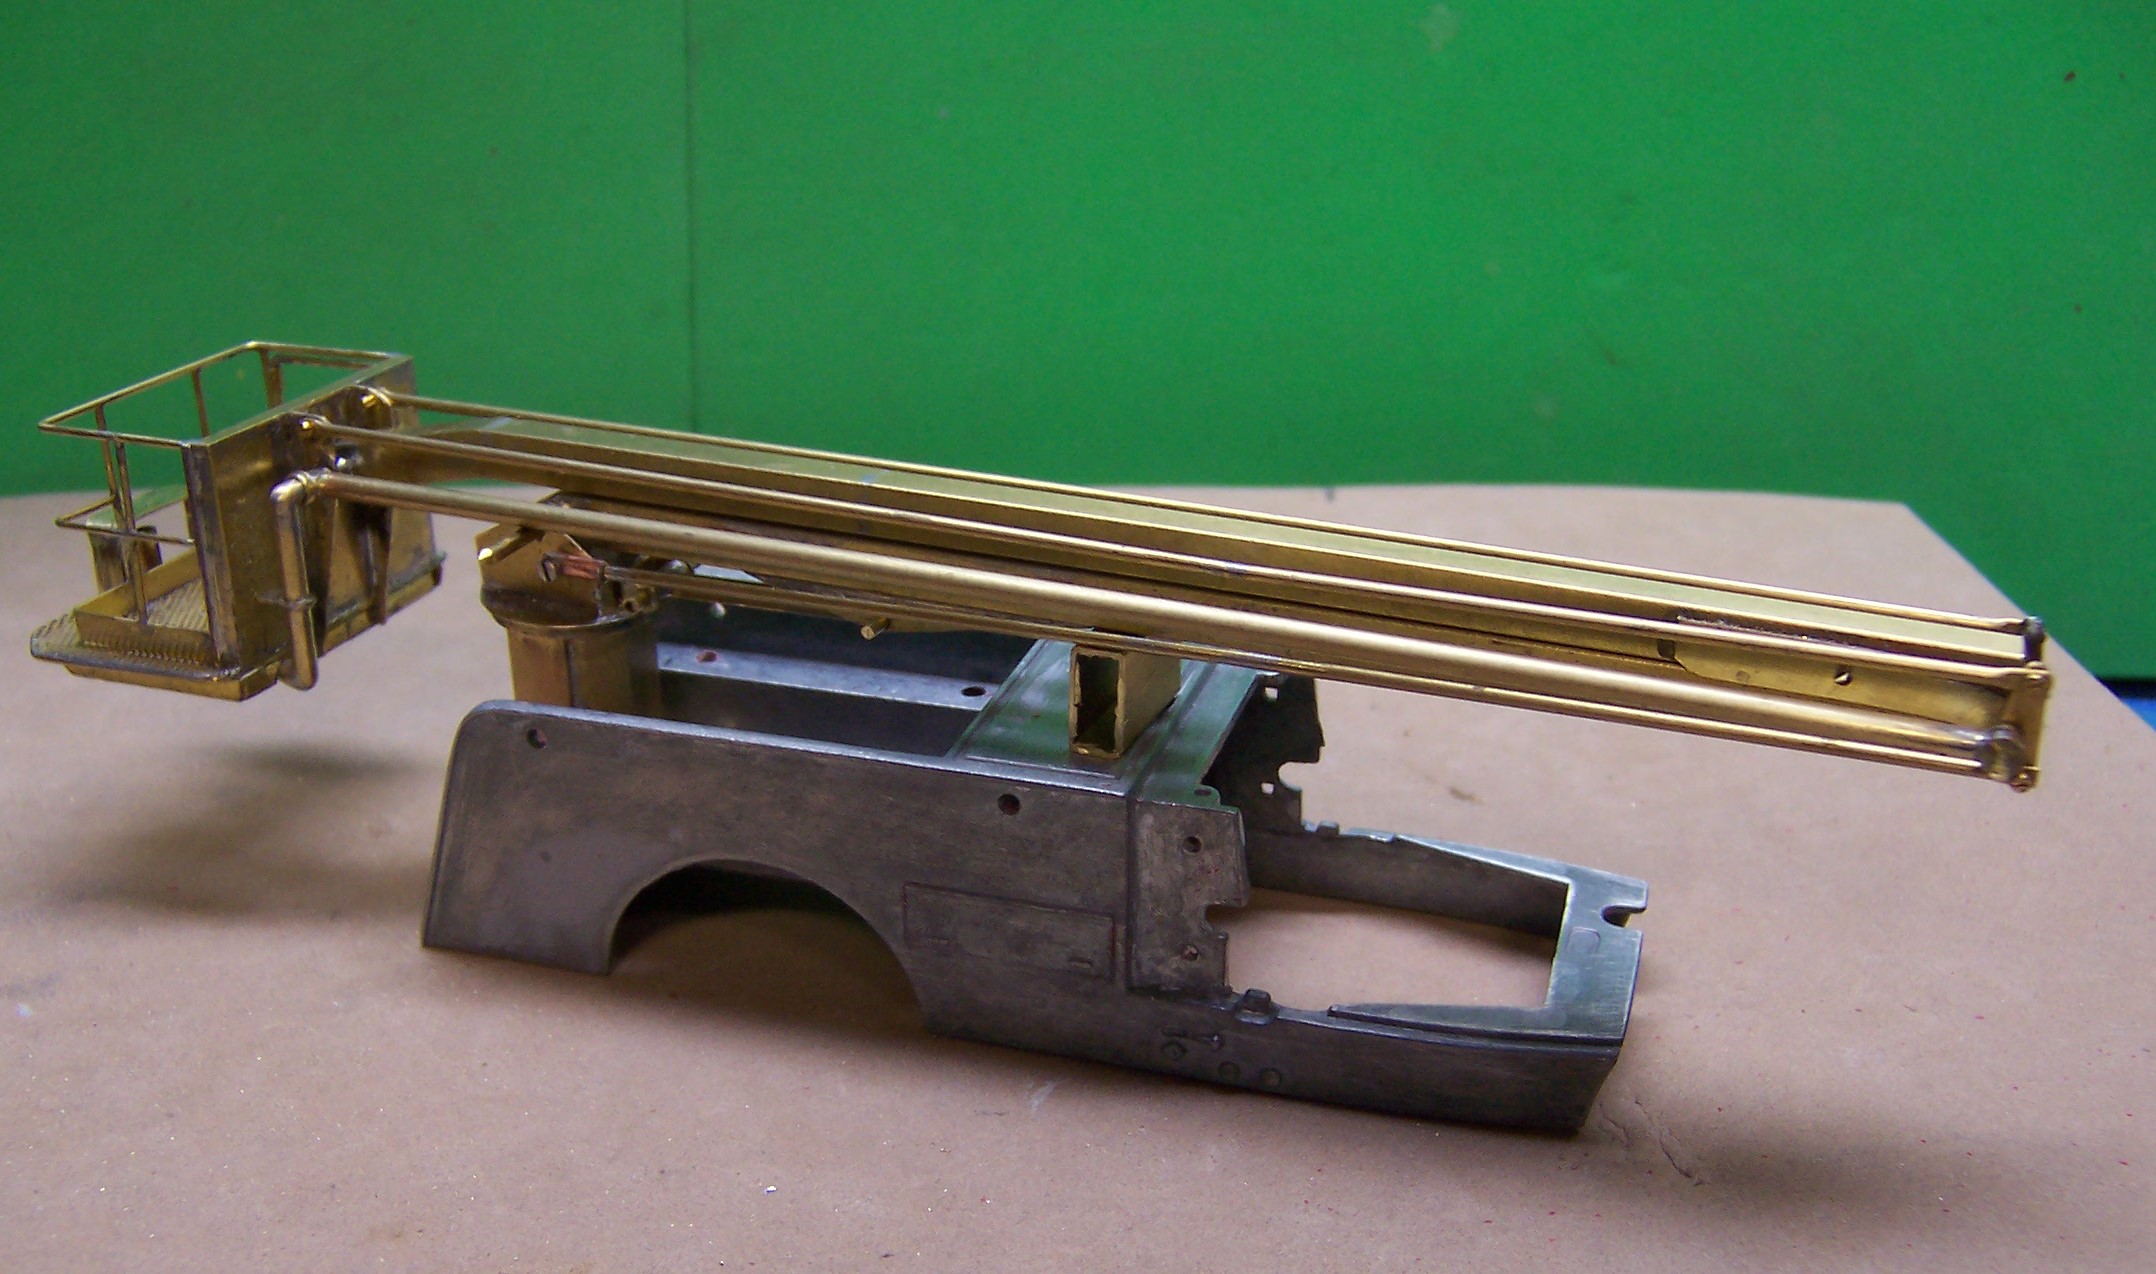
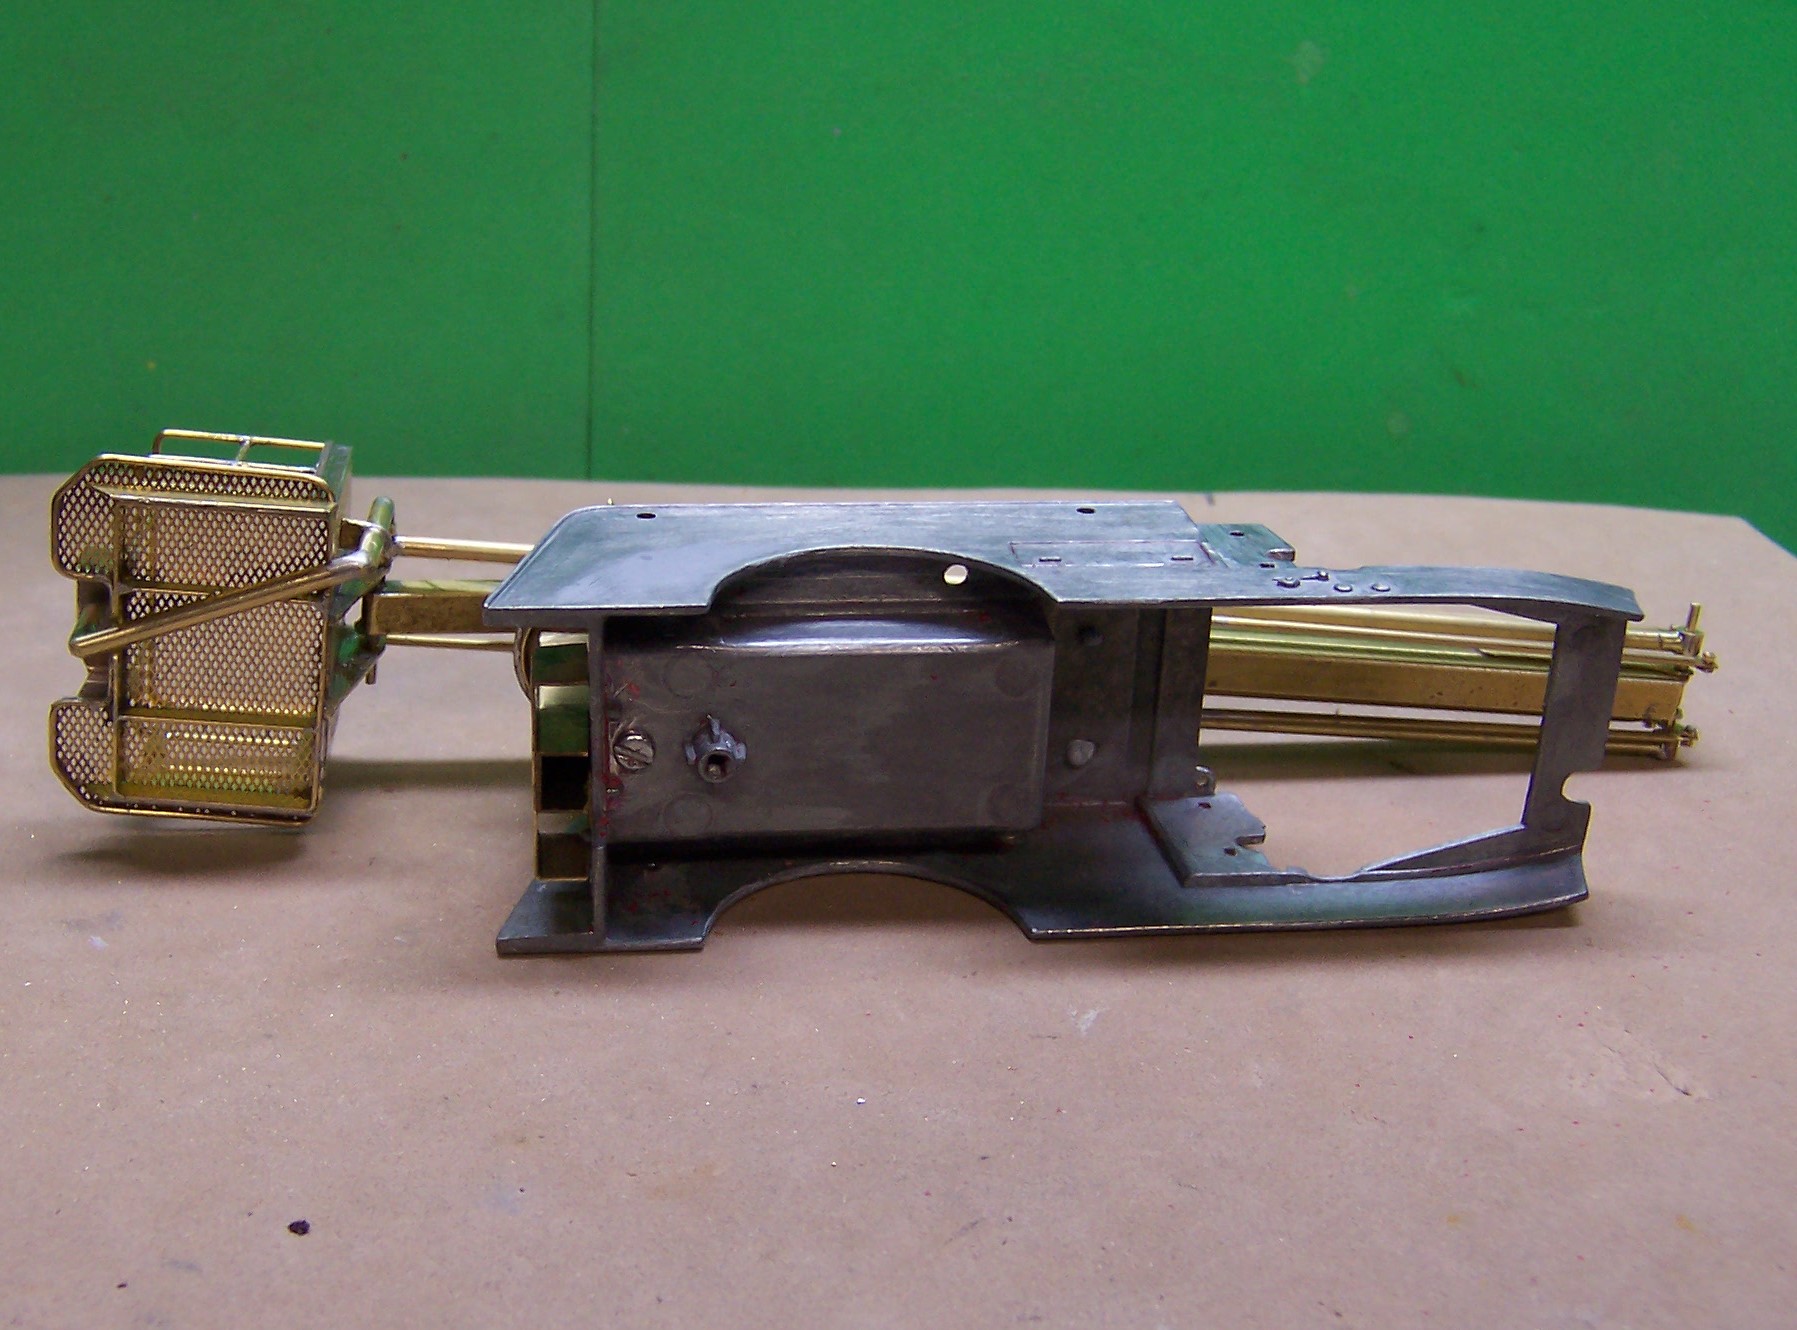
Yes, a lot of brass but it has been a fun project so far. Figuring out what to solder and where has been a bit of a challenge but it has worked. A small amount of work left to do such as the braces for the long sections of waterway. Then I think it is close to being ready for some paint. The biggest problem I have had with brass is that it does not hold paint that well. It tends to chip and wear easily. I've tried etching primer but that is not foolproof. I do have to plate the two hydraulic pistons but I have the plating solution for that. -
A Mack and a Snorkel
Chariots of Fire replied to Chariots of Fire's topic in WIP: Model Trucks: Big Rigs and Heavy Equipment
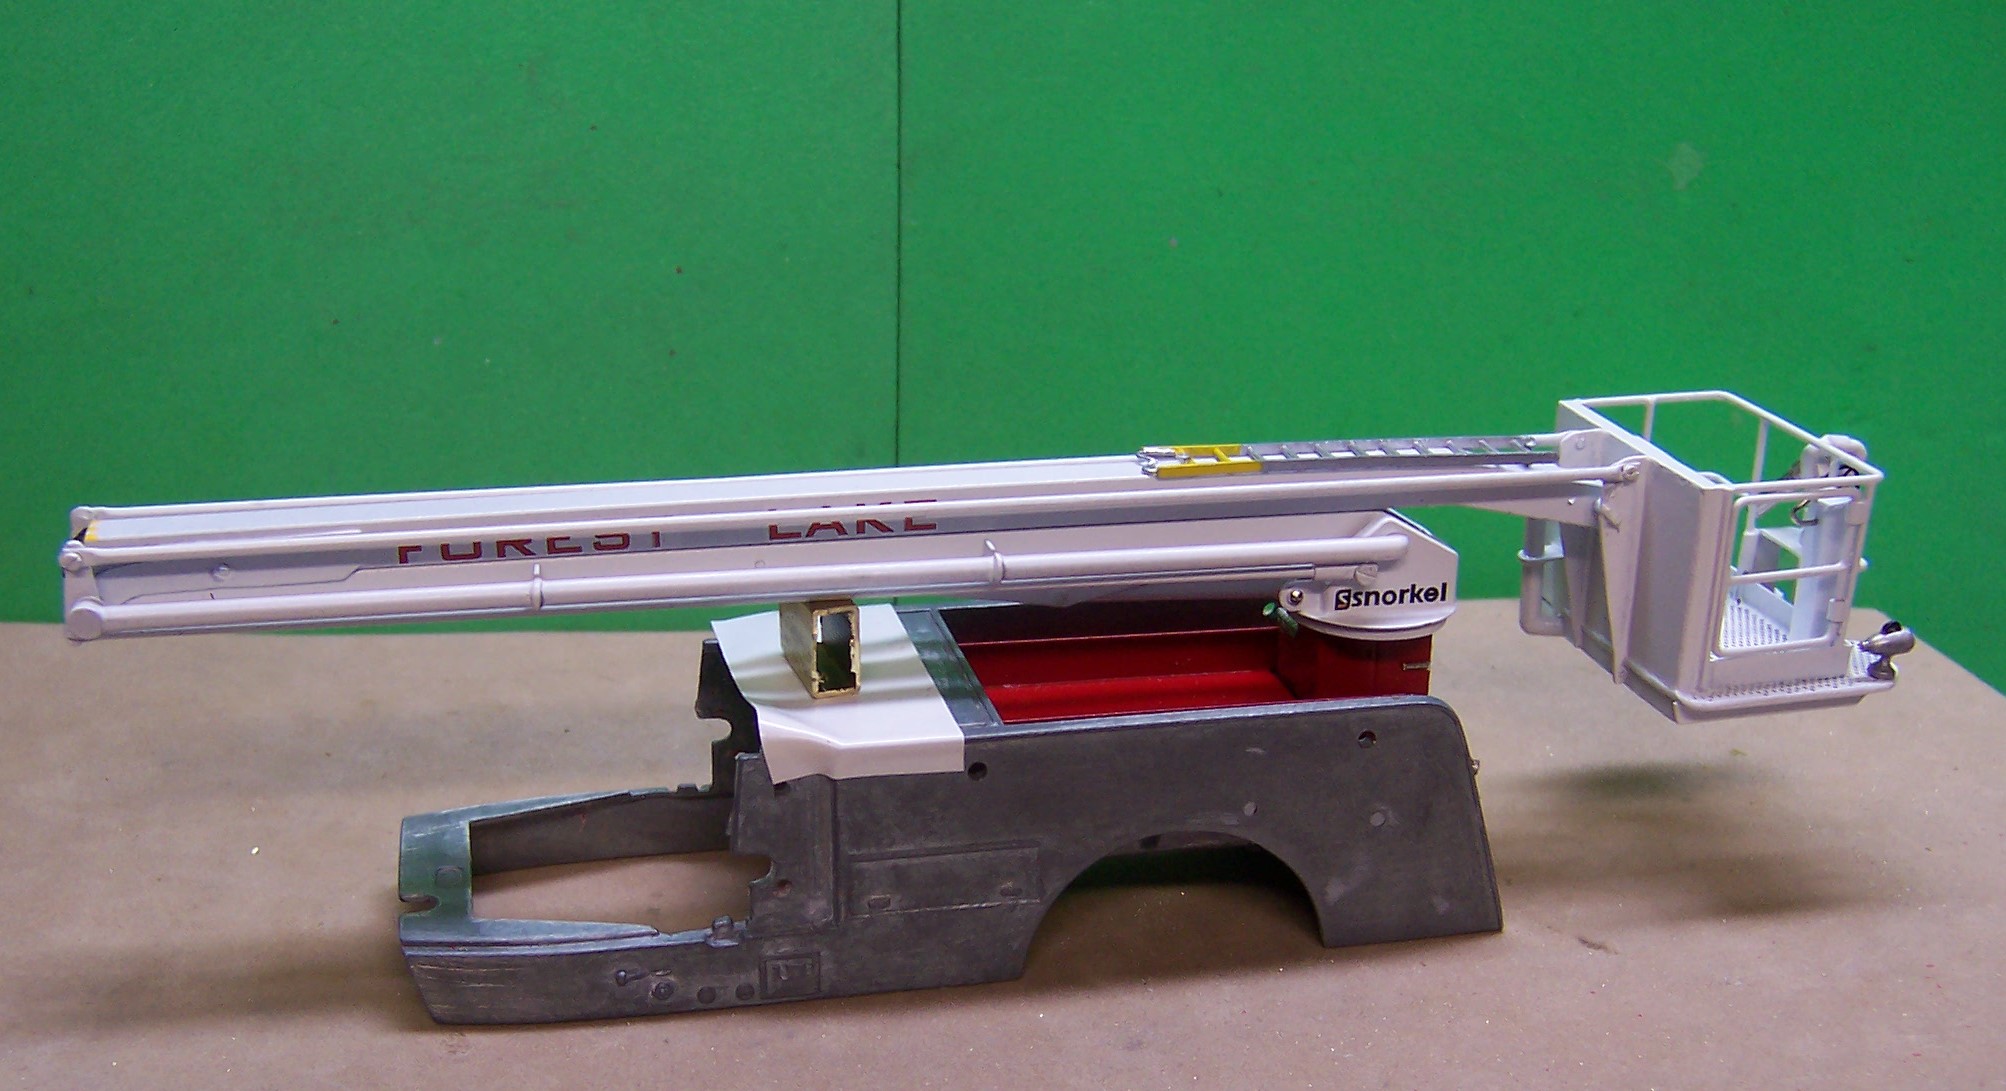
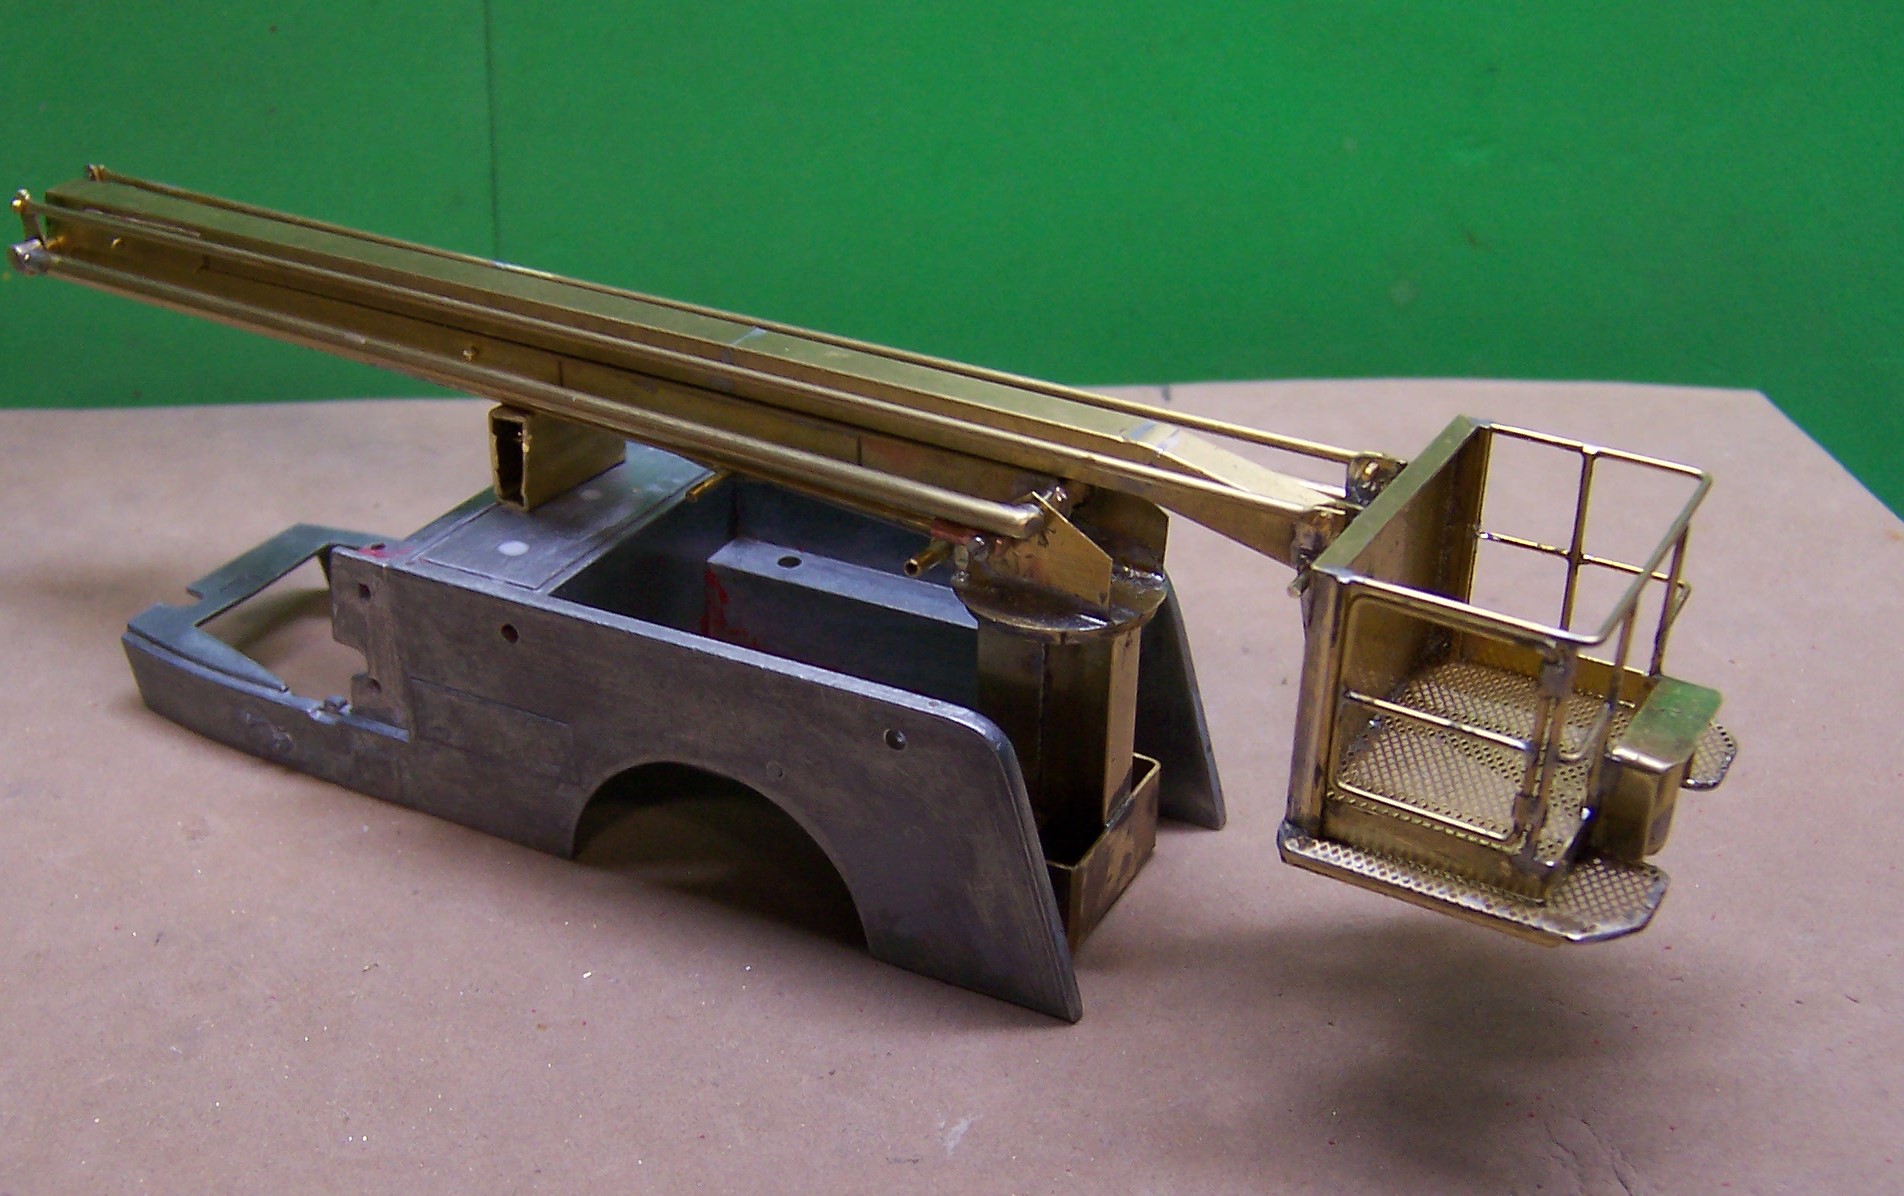
More work completed on the Snorkel. The base is completed and the riser for the deck gun has been extended. It's almost ready for paint. The base will be red while the boom and turntable part and basket will be white.
-
A Mack and a Snorkel
Chariots of Fire replied to Chariots of Fire's topic in WIP: Model Trucks: Big Rigs and Heavy Equipment
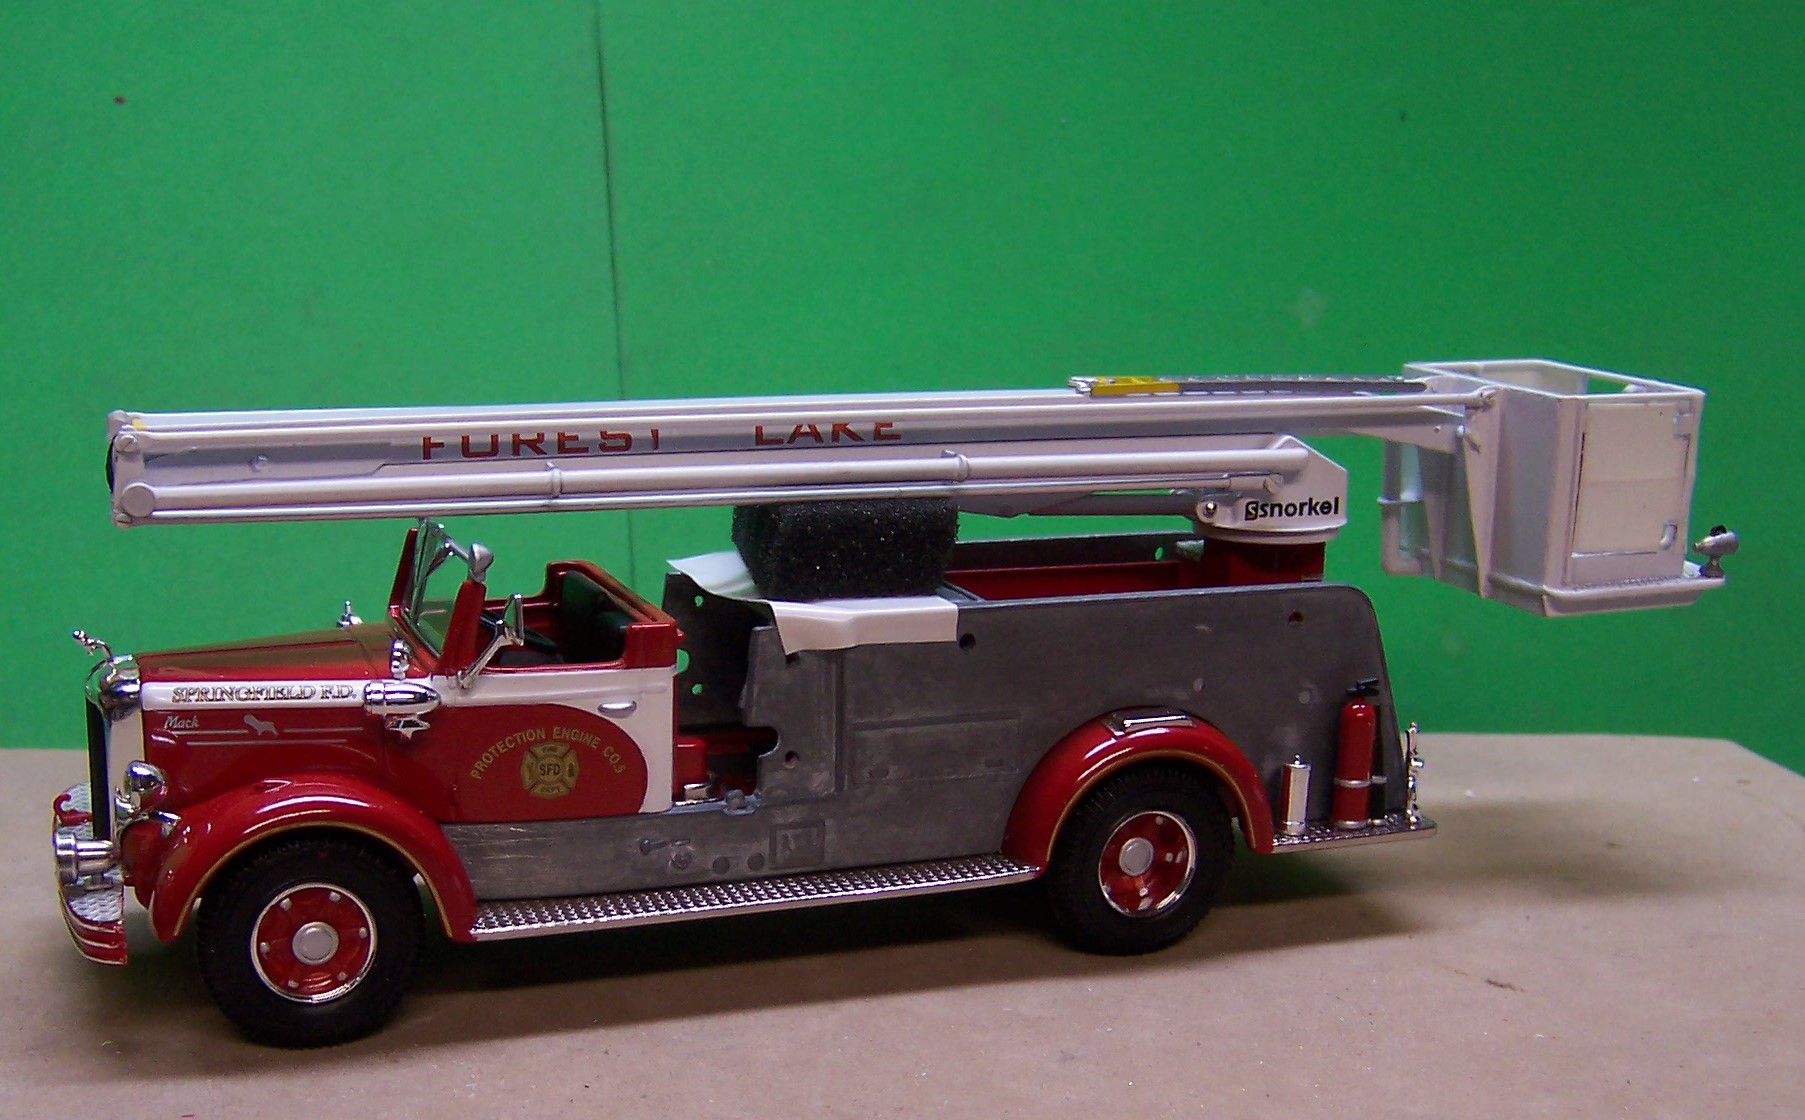
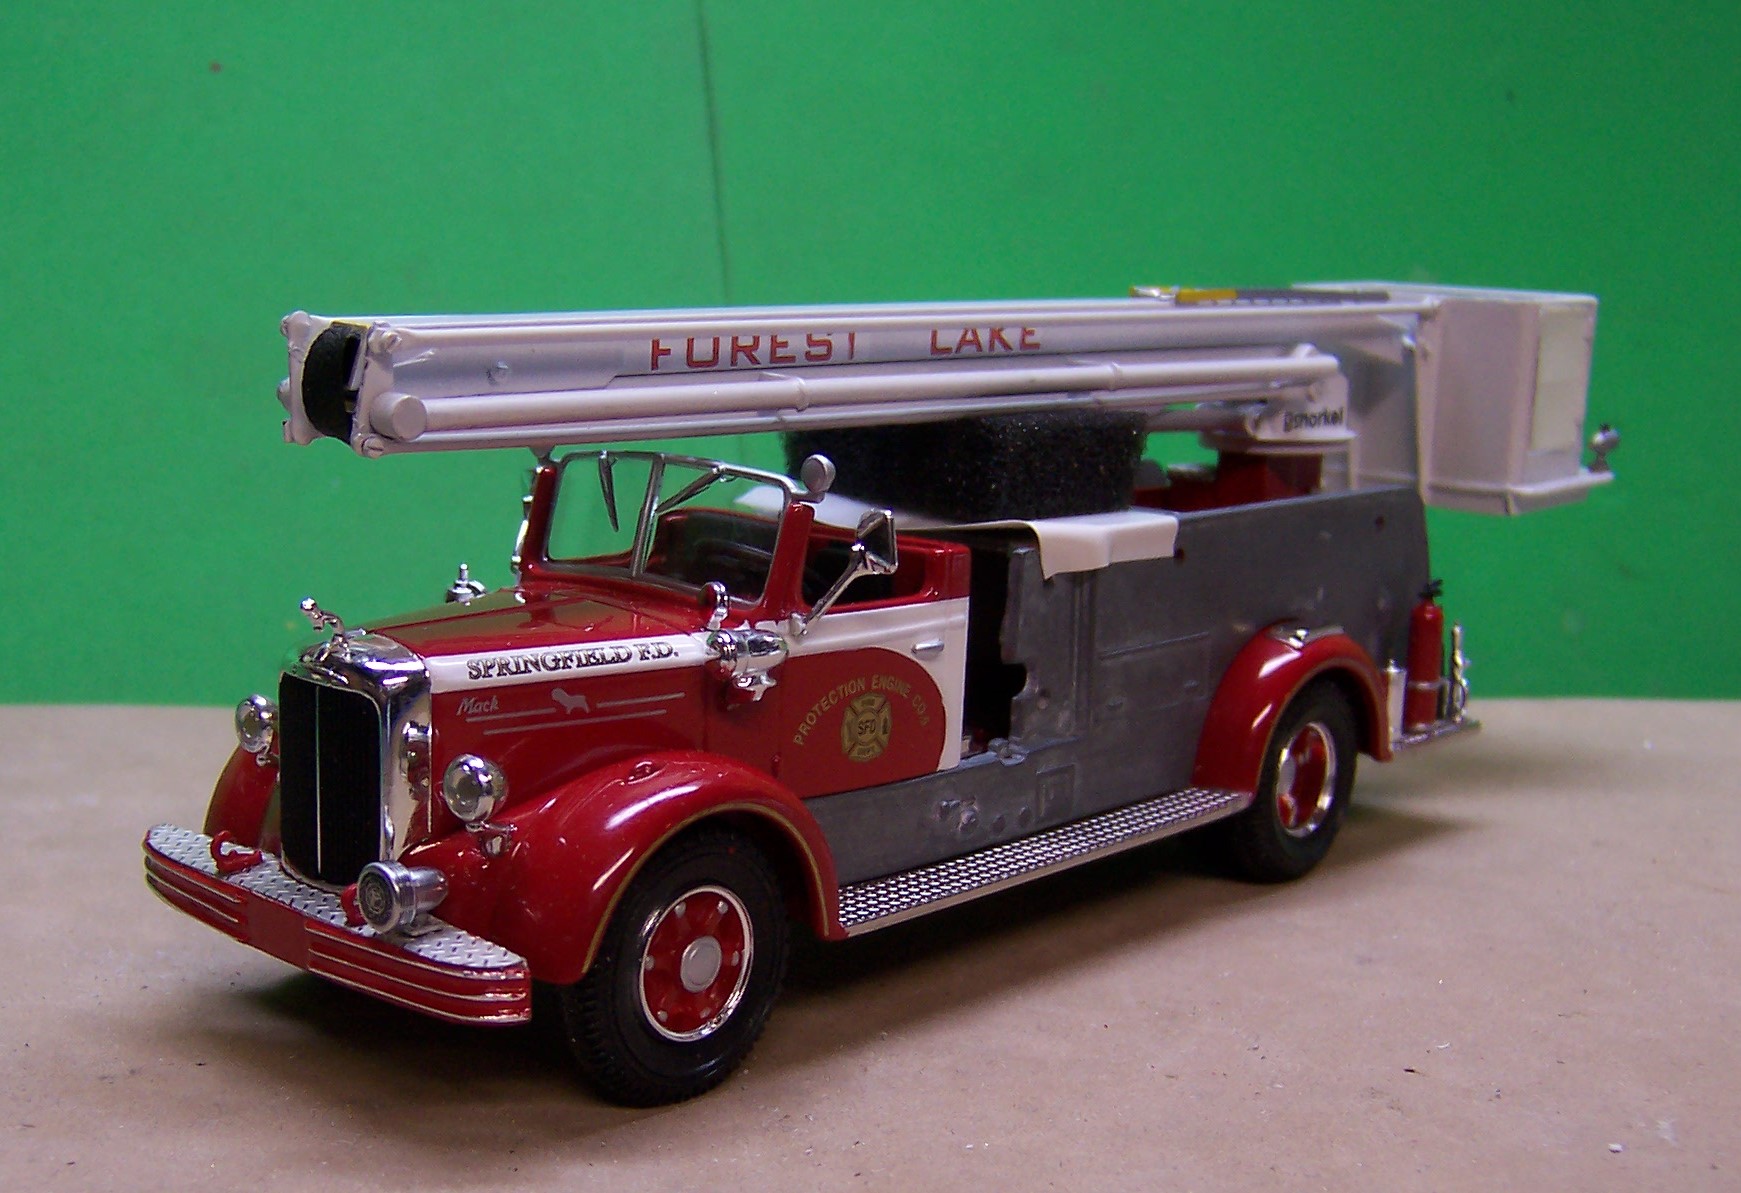
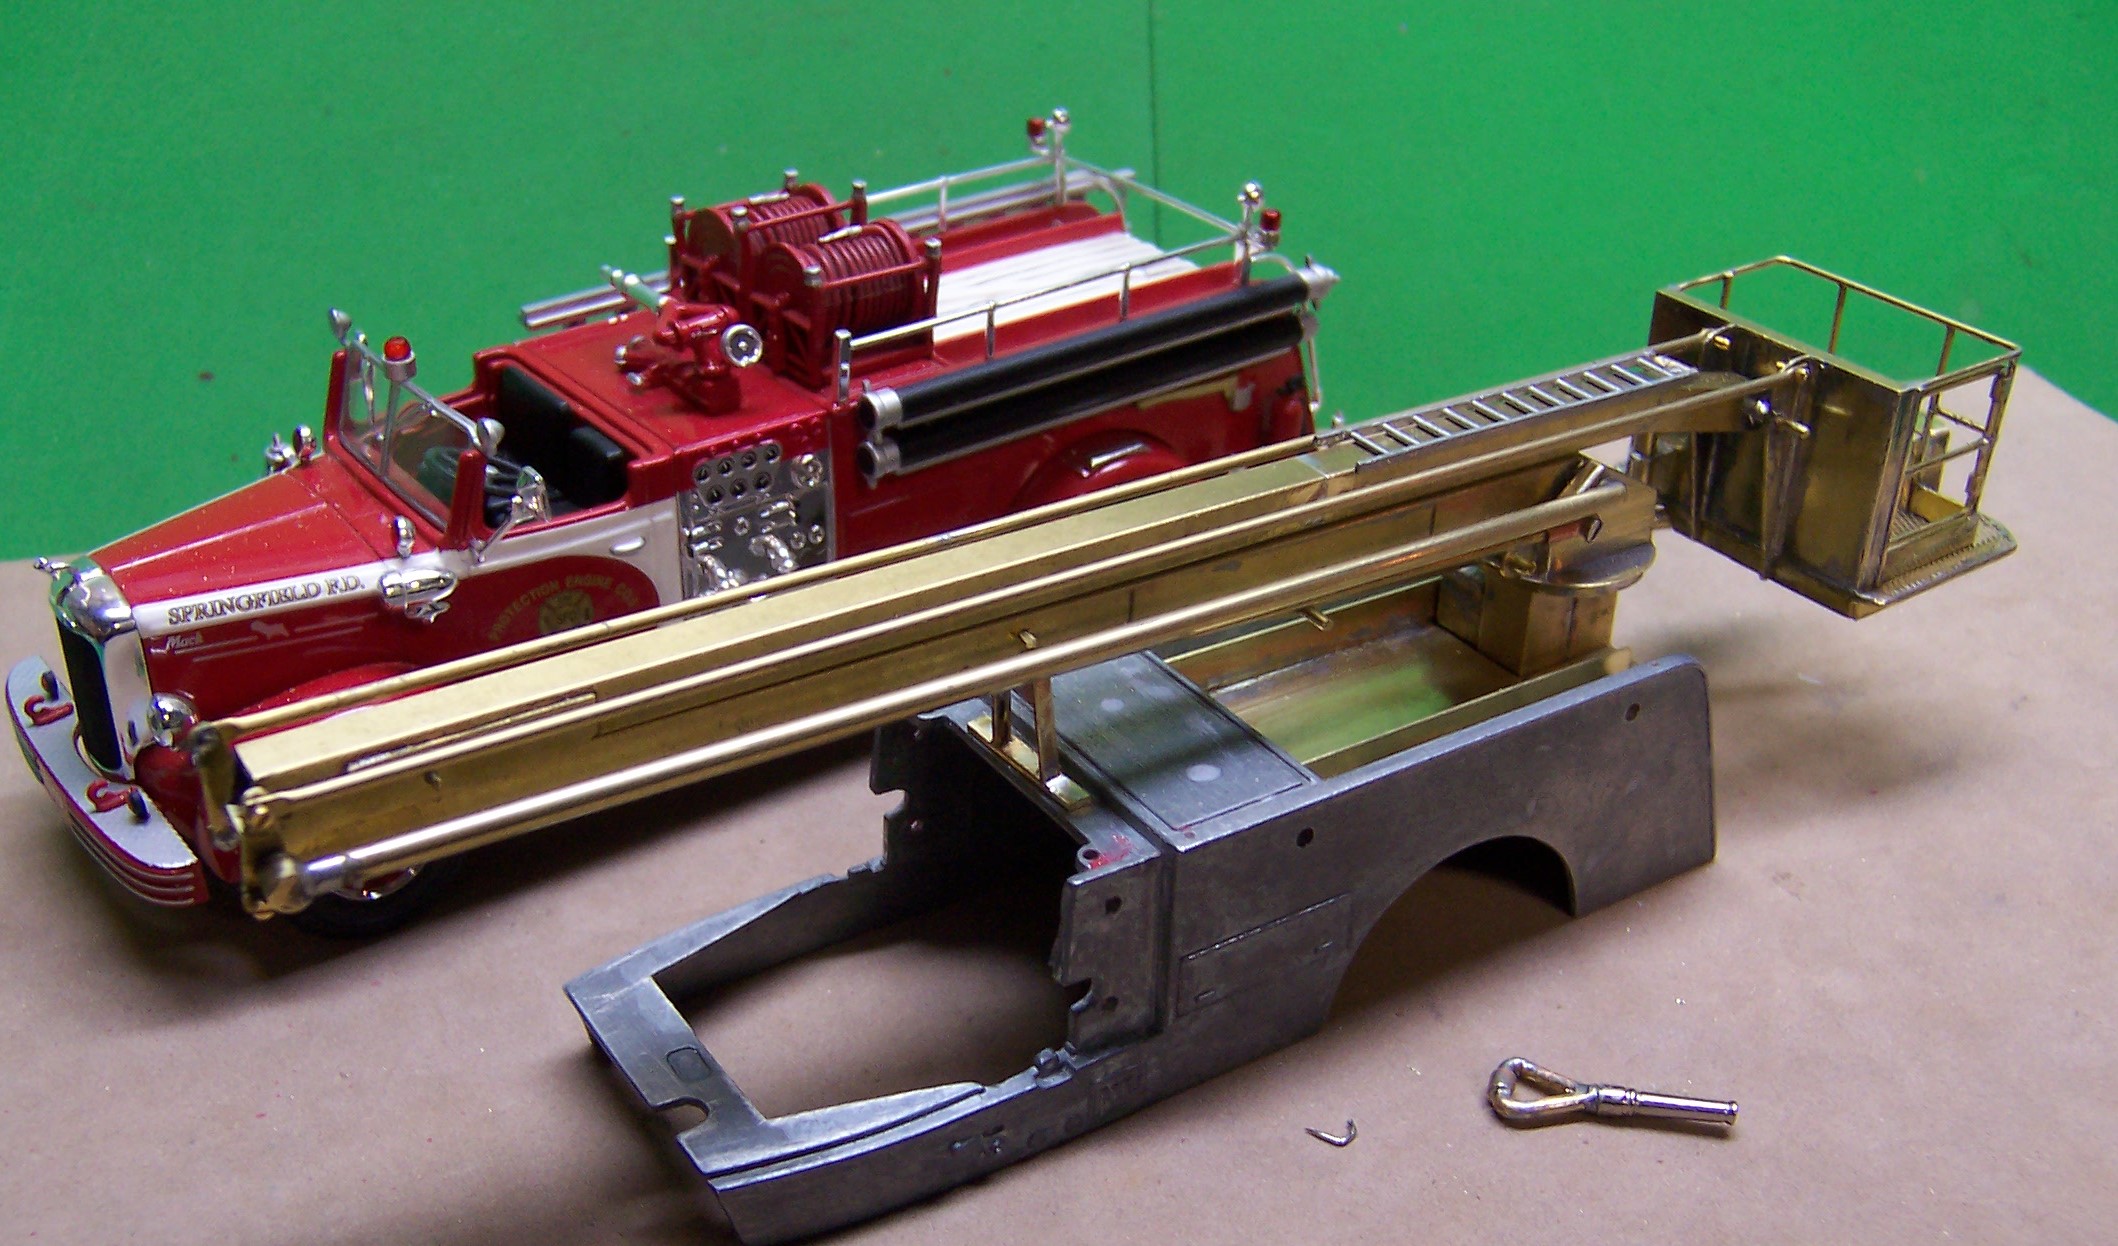
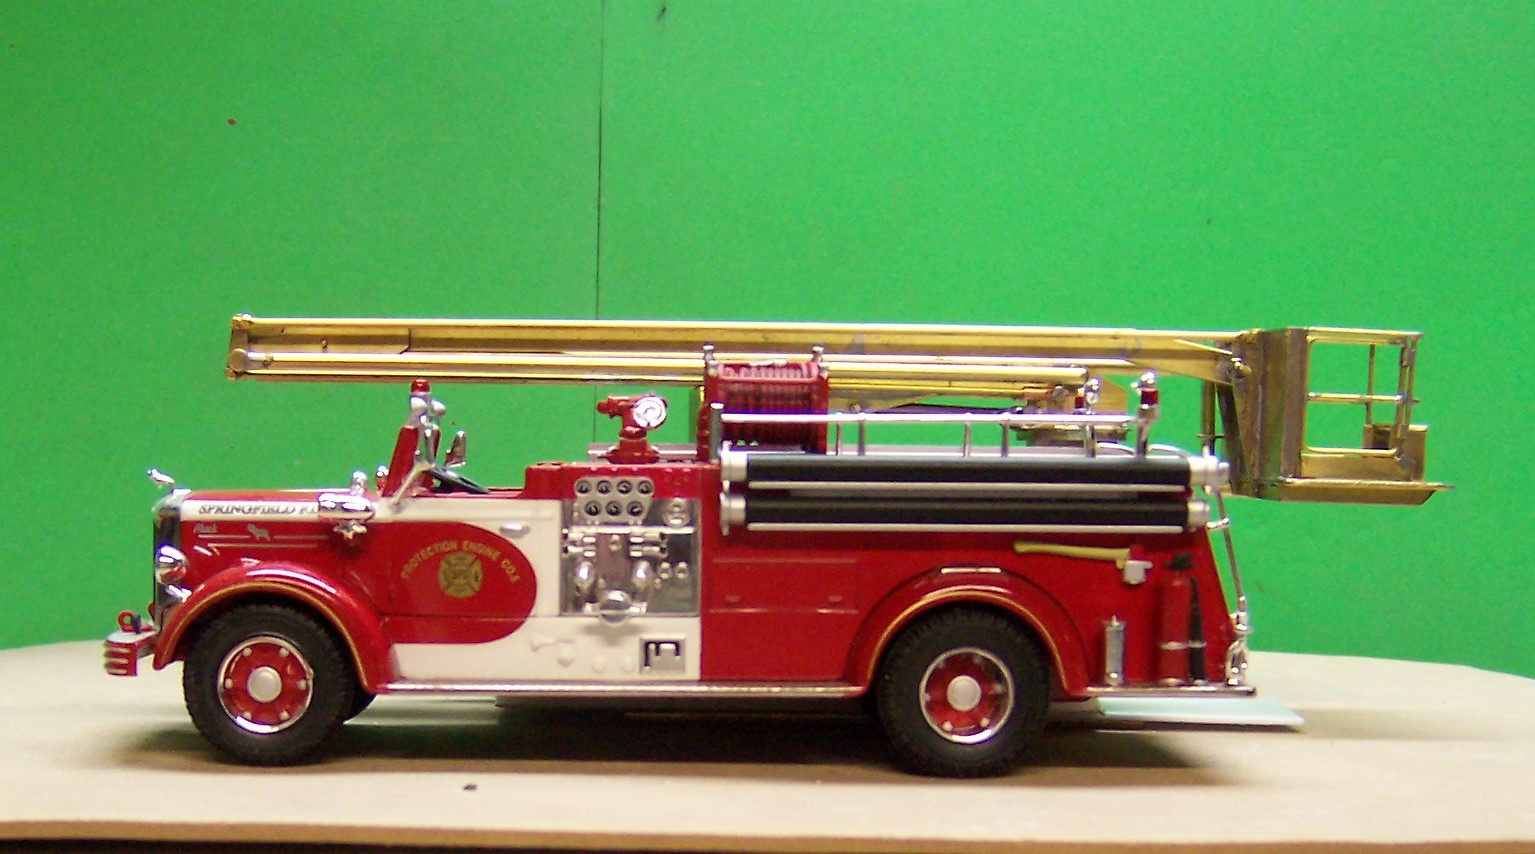
Got some more work done. The basic construction is done. The waterway is complete to the basket where a deck gun would be mounted. The base of the snorkel has been screwed to the bed of the new body from the bottom. The rest of the base work can now be done knowing that it fits snugly into place. To get an idea of how the model will look I set the new body behind another Mack L and then took the photo at eye level. The boom appears to be lower than the beacon on the top of the Springfield windshield but I think that is just perspective with the boom being in the background. Getting closer to paint time but not yet.?
-
A Mack and a Snorkel
Chariots of Fire replied to Chariots of Fire's topic in WIP: Model Trucks: Big Rigs and Heavy Equipment
More study that actual engineering I think. Fortunately I have the photos but I also have a 1/32 scale Franklin Mint Snorkel that I can also look at and see how thing work together. Once I got started much of it came together quite smoothly.