89AKurt
-
Posts
8,429 -
Joined
-
Last visited
Content Type
Profiles
Forums
Events
Gallery
Everything posted by 89AKurt
-

Italeri: Ferrari 275 N.A.R.T. - Thomas Crown Affair
89AKurt replied to 89AKurt's topic in Model Cars
Thank you! Oh yea, appreciate meeting you. ? -
That kit looks much better than another brand I built last century, gave it to someone in trade for resin parts. Wish you the best, health and inspiration for building.
-
25 Window VW/Porsche Microbus
89AKurt replied to 89AKurt's topic in WIP: Model Trucks: Pickups, Vans, SUVs, Light Commercial
Uh oh, have a Moderator's attention, no pressure here. ? I know, right? When the bug bites, it's deep! Thanks. So when I ponder such a project, I don't keep track of time, because it's usually when I'm going to sleep. I think using the canvas section (leaning against the box) for a frame, cutting the center out, cutting down the A-pillars, removing the side glass pillars, is the plan. May have to shorten the length too. You know it! ? -
A SERIOUS PUBLIC SAFETY ANNOUNCEMENT
89AKurt replied to Ace-Garageguy's topic in The Off-Topic Lounge
I know right? I could expound on the concept, but would be labeled Politically Incorrect. ? -
Thanks for the high praise! Godspeed for all..... Thank you very much. This project did not take as much time, as other ones I have done. I break down each detail as a separate project, that helps me focus. I have many future projects, about 300 years worth.
-
1948 Chevrolet Canopy Express
89AKurt replied to 89AKurt's topic in Model Trucks: Pickups, Vans, SUVs, Light Commercial
Thank you very much! Girls play with doll houses..... ? -
Italeri: Ferrari 275 N.A.R.T. - Thomas Crown Affair
89AKurt replied to 89AKurt's topic in Model Cars
Thank you so much! Appreciate your comment! Kind regards (stole that from your tag line ?). WOW, really blushing here with all the kind comments. ? (wait, "hugging face" probably not acceptable nowadays) Thank you very much! Bless you, and everyone for leaving comments. -
, MINI Cooper heaven!
-
Looks great, like the updated look! Love the subject, built a Cabrio last century and sold. Very nice kits. This just makes me want to open the stash up and look, and dream of building.....
-
Thank you! Appreciate it. Appreciate your support and comments during the build! Aw shucks, thank you!
-
A SERIOUS PUBLIC SAFETY ANNOUNCEMENT
89AKurt replied to Ace-Garageguy's topic in The Off-Topic Lounge
Has anyone noticed WARNING labels are on everything? Electrical cords have giant sticker labels nowadays. I think we are to the point of ignoring them, so that's the excuse I'll make up for this Darwin Awards contender. Also note how the Lamebrain Media reported it, will leave it there. -
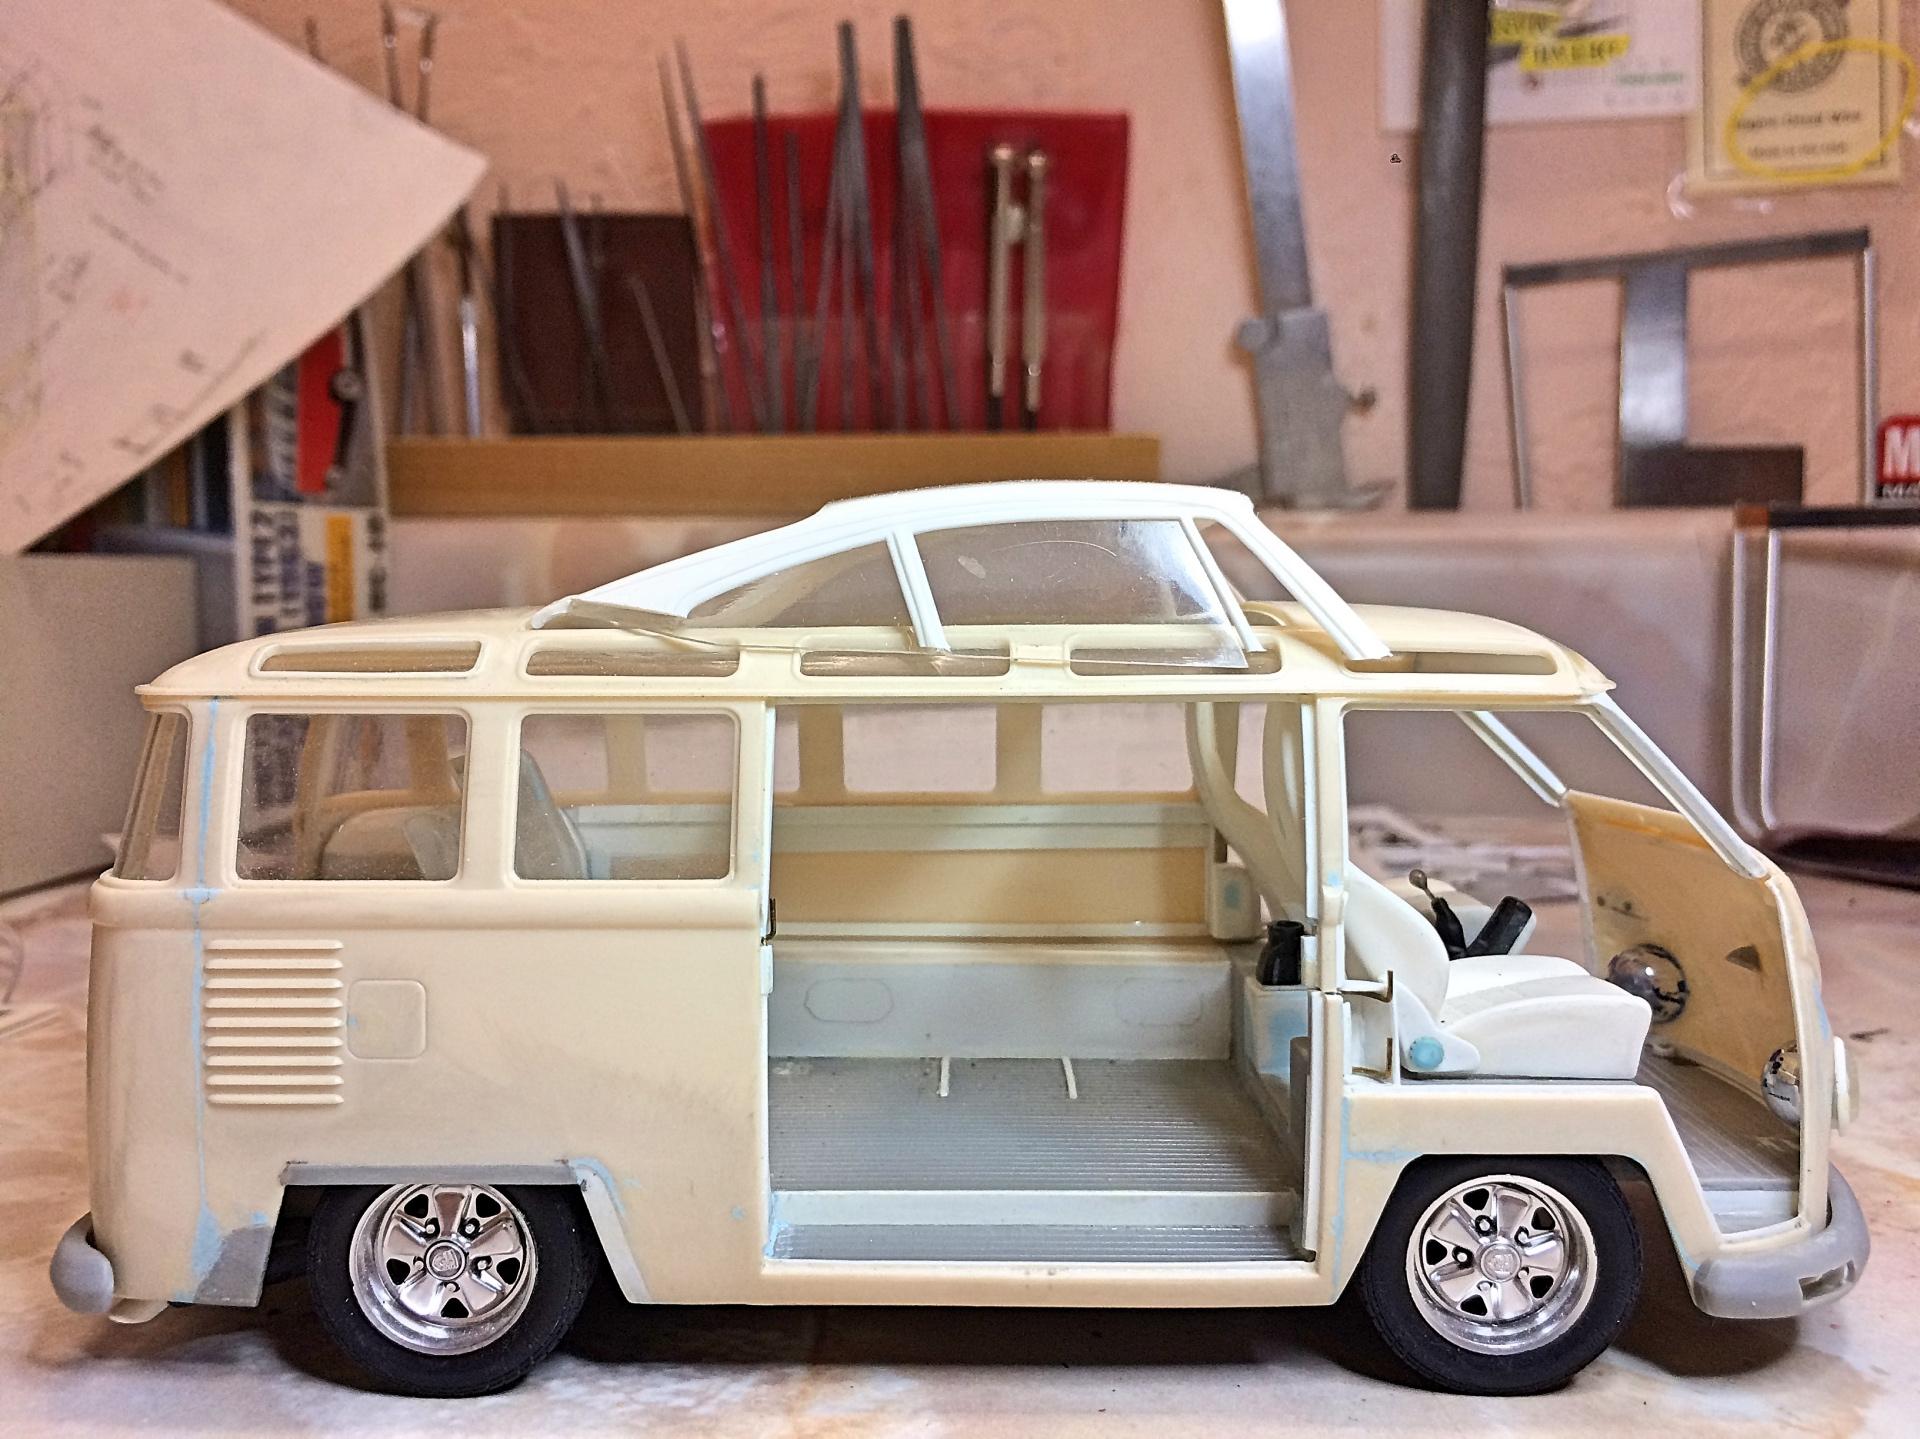
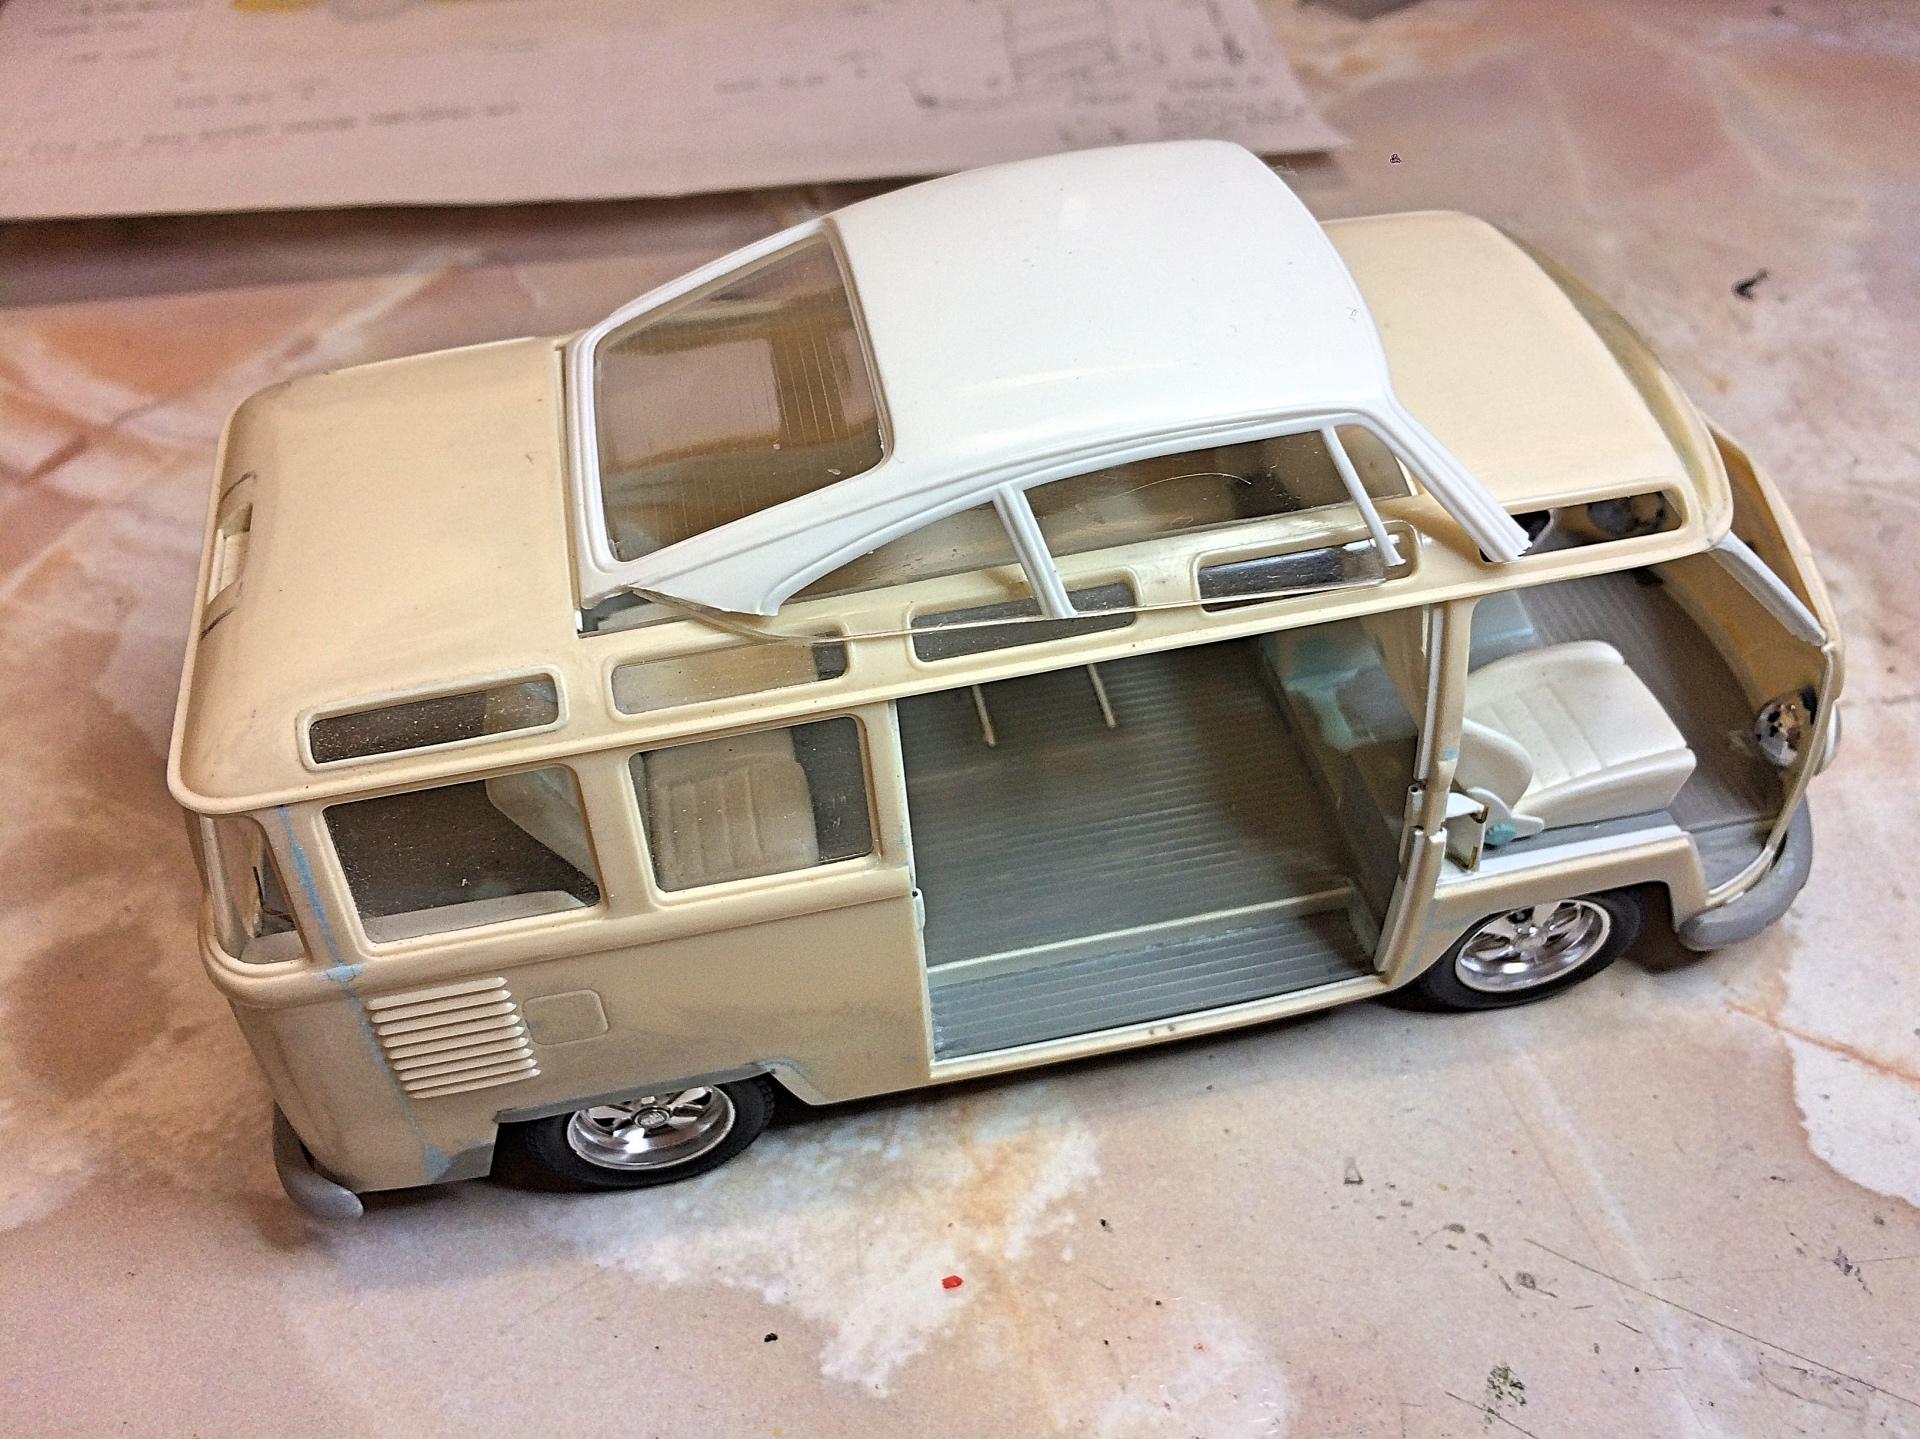
Resurrecting a project started in January 2003, based on the very nice Hasegawa VW Microbus Type 2 kit. I had left over parts from building a Fujimi Porsche 911 Slantnose Turbo kit-bashed with the Tamiya 911 Speedster. Made it this far without taking digital pictures of the process, so the run-down of what was done: Bus: Opened all doors, front doors are suicide with doubled-acting wire hinges. Made new panels using epoxy putty, which warped the doors so need to fix that. Side doors are also double-acting wire hinges. I'm reconsidering the hinges since I have discovered fusee chain, used on the Ferrari N.A.R.T. The engine lid for the 911 grill replaces the original access, no engine detail inside. Slanted back the windshield, re-profiled the roof using epoxy putty. The spare tire cover that was inside, is now under the front. Adding the third brake light, like it was taken from a Ford Econoline van. Reason for changing the window number, added two more of the Safari windows at the back, thus 25 Window. Adding the Porsche roof should revise to a higher number, depending on what I do with the side glass. Porsche parts: Have used the headlights, turn signals in the bumper, door mirrors, dash, seats (back seat is modified with a similar cushion pattern), Fuches wheels and Pirelli tires, and engine bottom. The Speedster had 3 seats, one was laid back for under the cover, separated and hinged so it's adjustable, and Captain swivels, and can be taken out. The dash has been modified to fit, have 3 pedal arms ready for photo-etch pads. The exhaust is modified using copper wire, will redo the tips using stainless steel tubing. The shifter console has a second parking brake that is intended to lock the front wheels, for showing off with burn-outs. The roof is from the Fujimi Slantnose project, I had been debating what to do for the roof, didn't really want to do the canvas fold/sliding thing, so this will become a carbon-fiber unit similar to a Westfalia camper unit. First thing to do is fix the A-pillars and the one B-pillar that are broken, reinforced with wire (as I did for the Ferrari N.A.R.T. Spyder windshield frame). One thing that stopped me, was knowing the giant VW emblem was going to cause problems for painting, have made resin copies, will grind off, problem solved. Designing a cool looking interior cabinet along the side with an awesome sound system, I have no clue about that stuff so need to research, have speaker grills and mesh salvaged from electronic devices. The interior needs window framing, can't just stick the glass in, so that will be new pieces, thinking of covering with carbon-fiber decal, might hinge some of the side windows. The back windows have the cage protectors, the kit has decals which would look really cheesy, so will *have to* make from wire, the back seat has wire too. Needs a steering shaft/box added. Have the crazy idea to use LED lights that came in junk mail from car dealers, with fiber optic runs to lights, very ambitious and crazy. ? I have a Coke cooler to put in now. ? Since I finished three projects recently, I couldn't let the dust settle. ? Will be thinking of a nickname...... Pictures taken long ago: When I got inspired with the LED lighting idea: When I was casting RTV and resin, used up some rubber: After finishing the '69 Chevy pickup, cleaned up the bench (I know, hard to believe): The latest idea, the Westfalia camper style roof. The interior: This little monster is getting finished! ?

-
Appreciate all the scratch-building you are doing! You want better exterior door handles?
-
Thank you. I saw one of those promos at a model show swap, price was ?.
-
? I tried! When I was packing up the box with left-over parts, discovered I forgot to put the dipstick back in! Impossible now, the real thing bends a lot. Also got the owner's manual on the seat.
-
Thank you. It wouldn't get any looks at a car show. ? Appreciate your comment. Yea, I burned through this project! Driving off into the sunset......
-
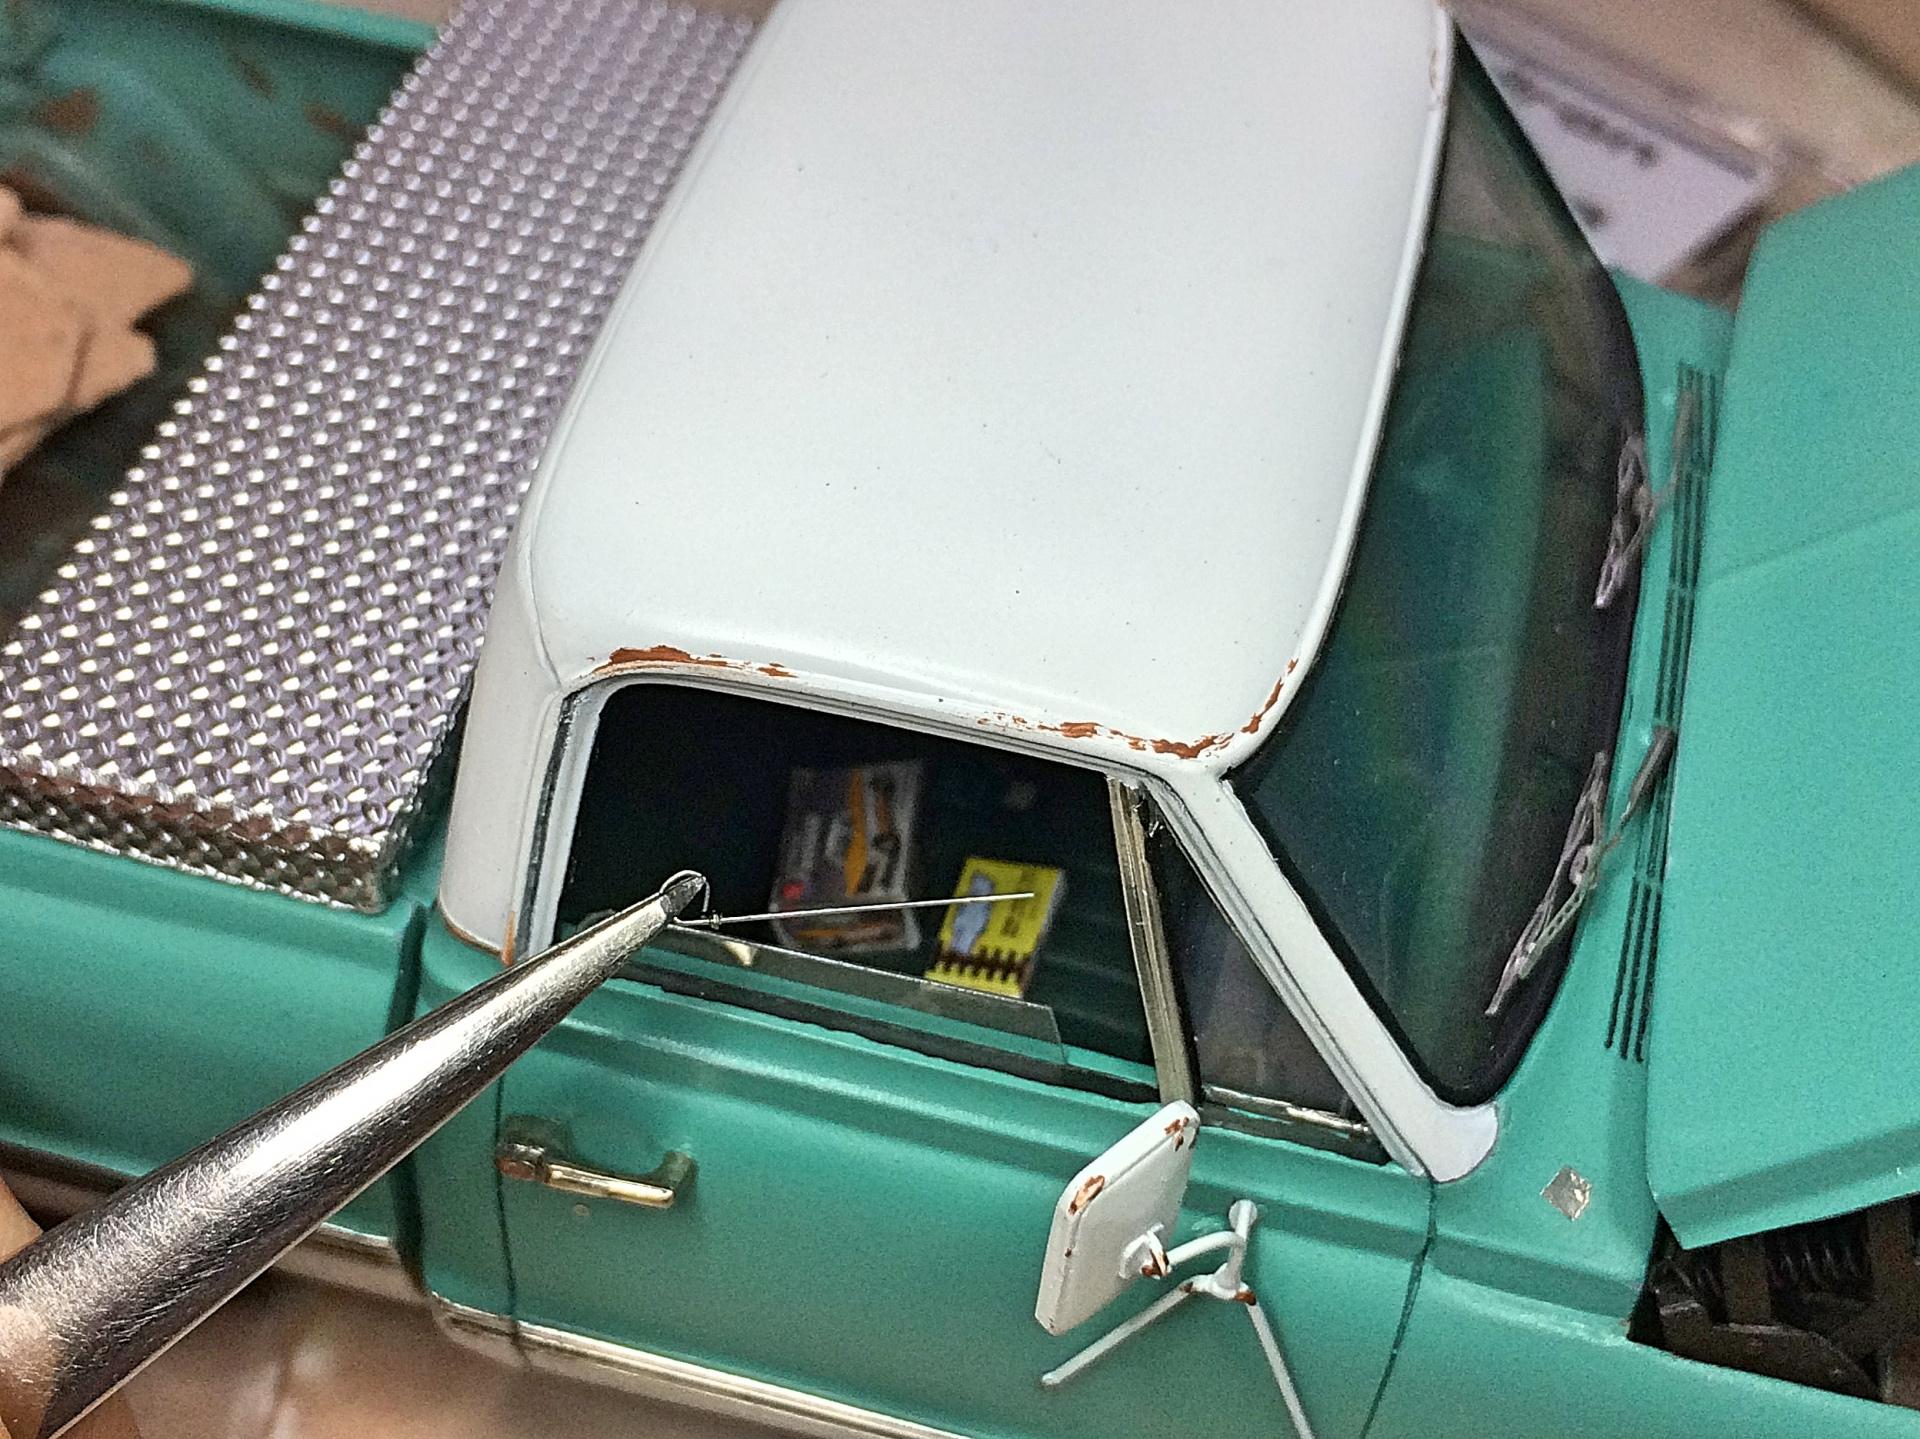
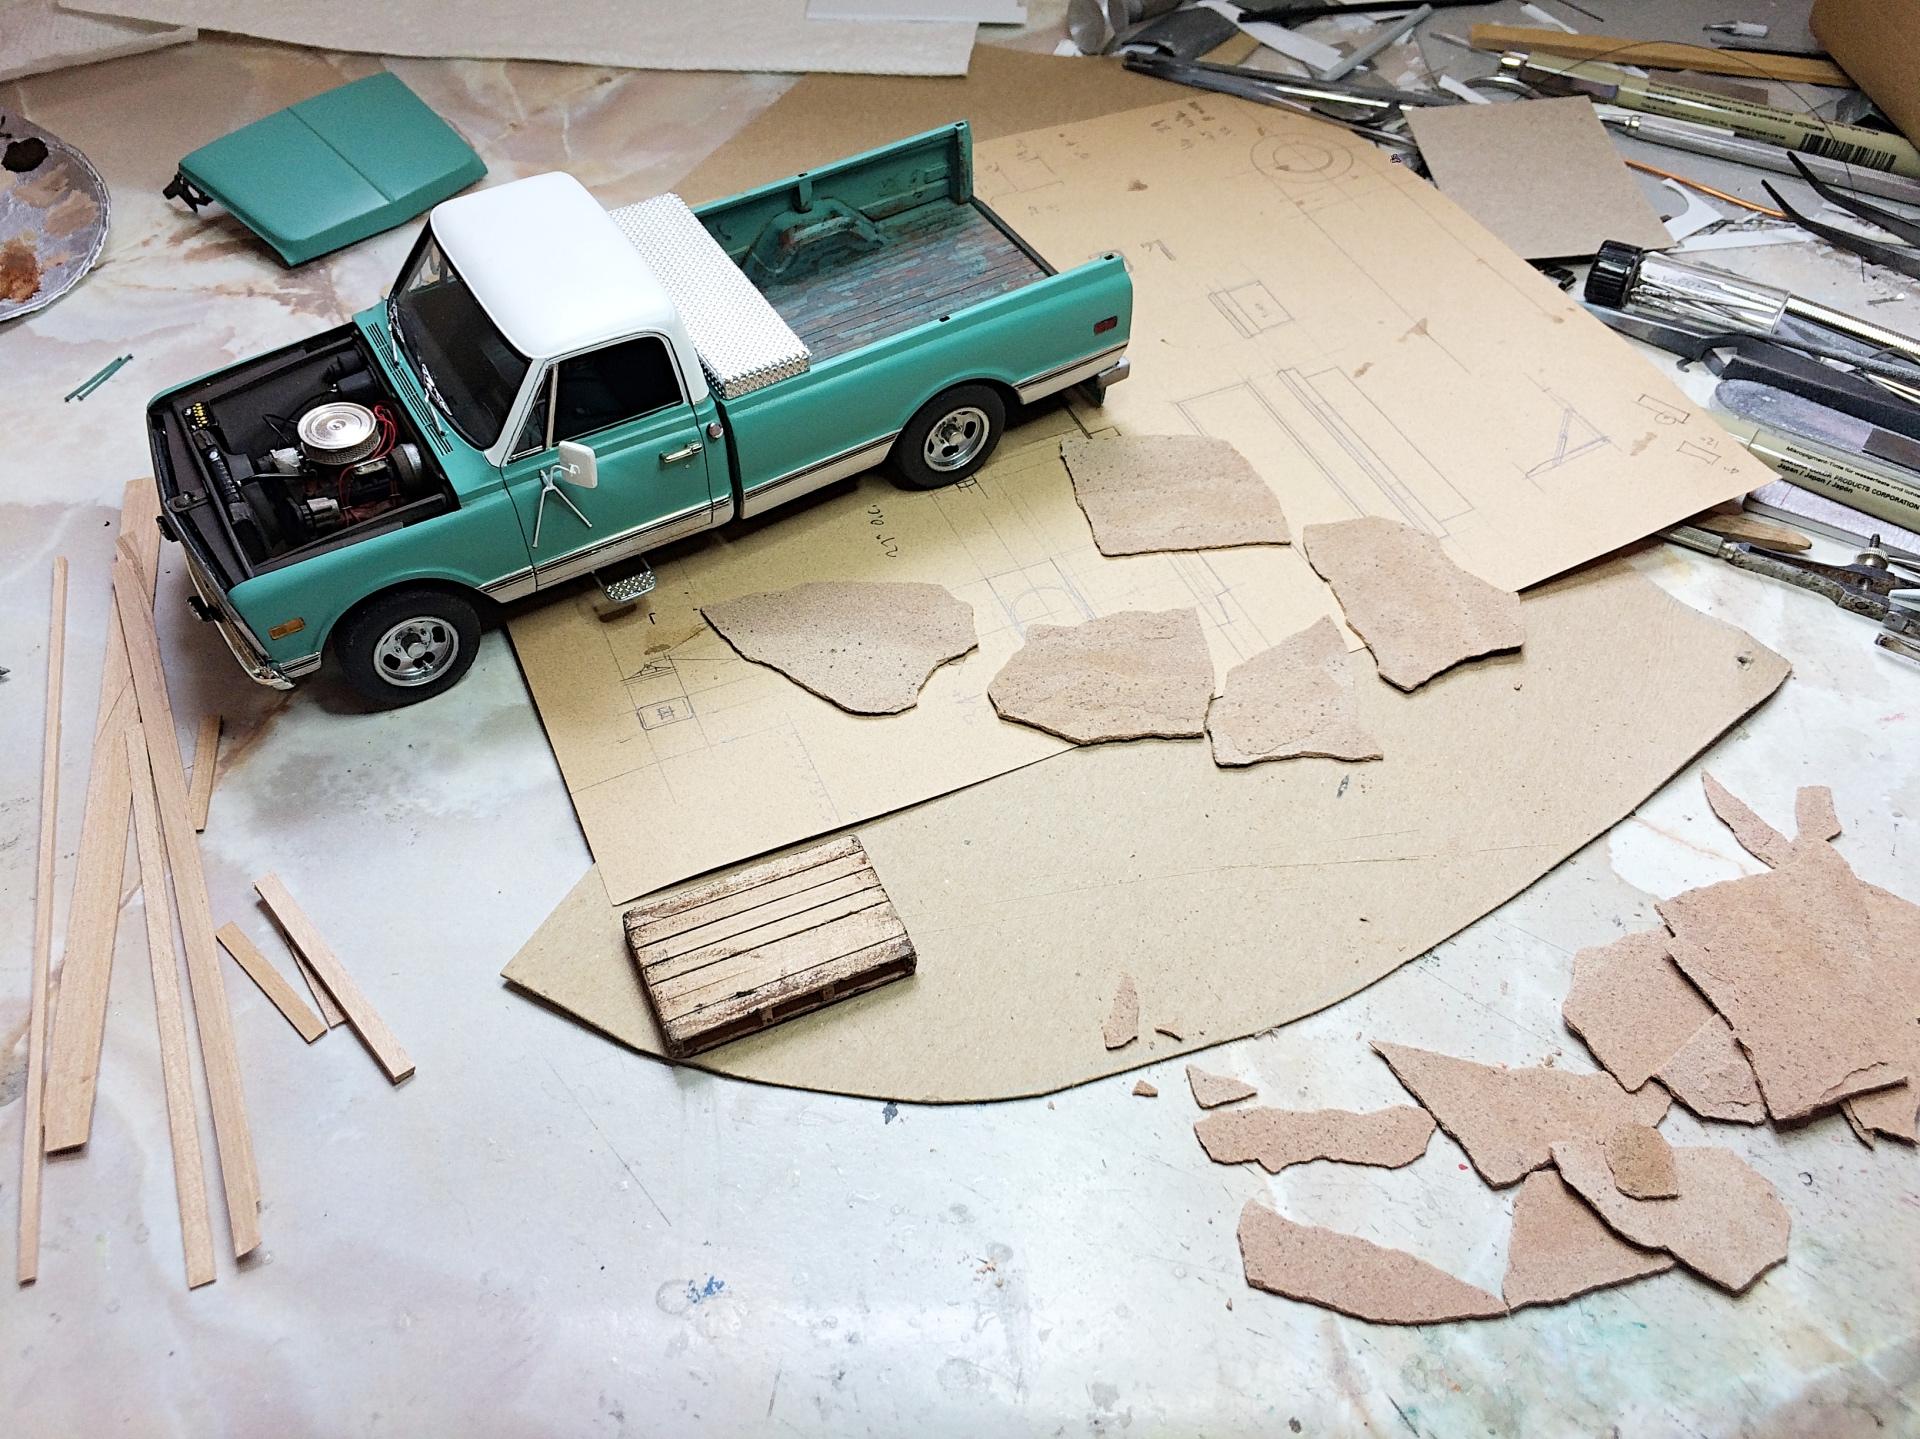
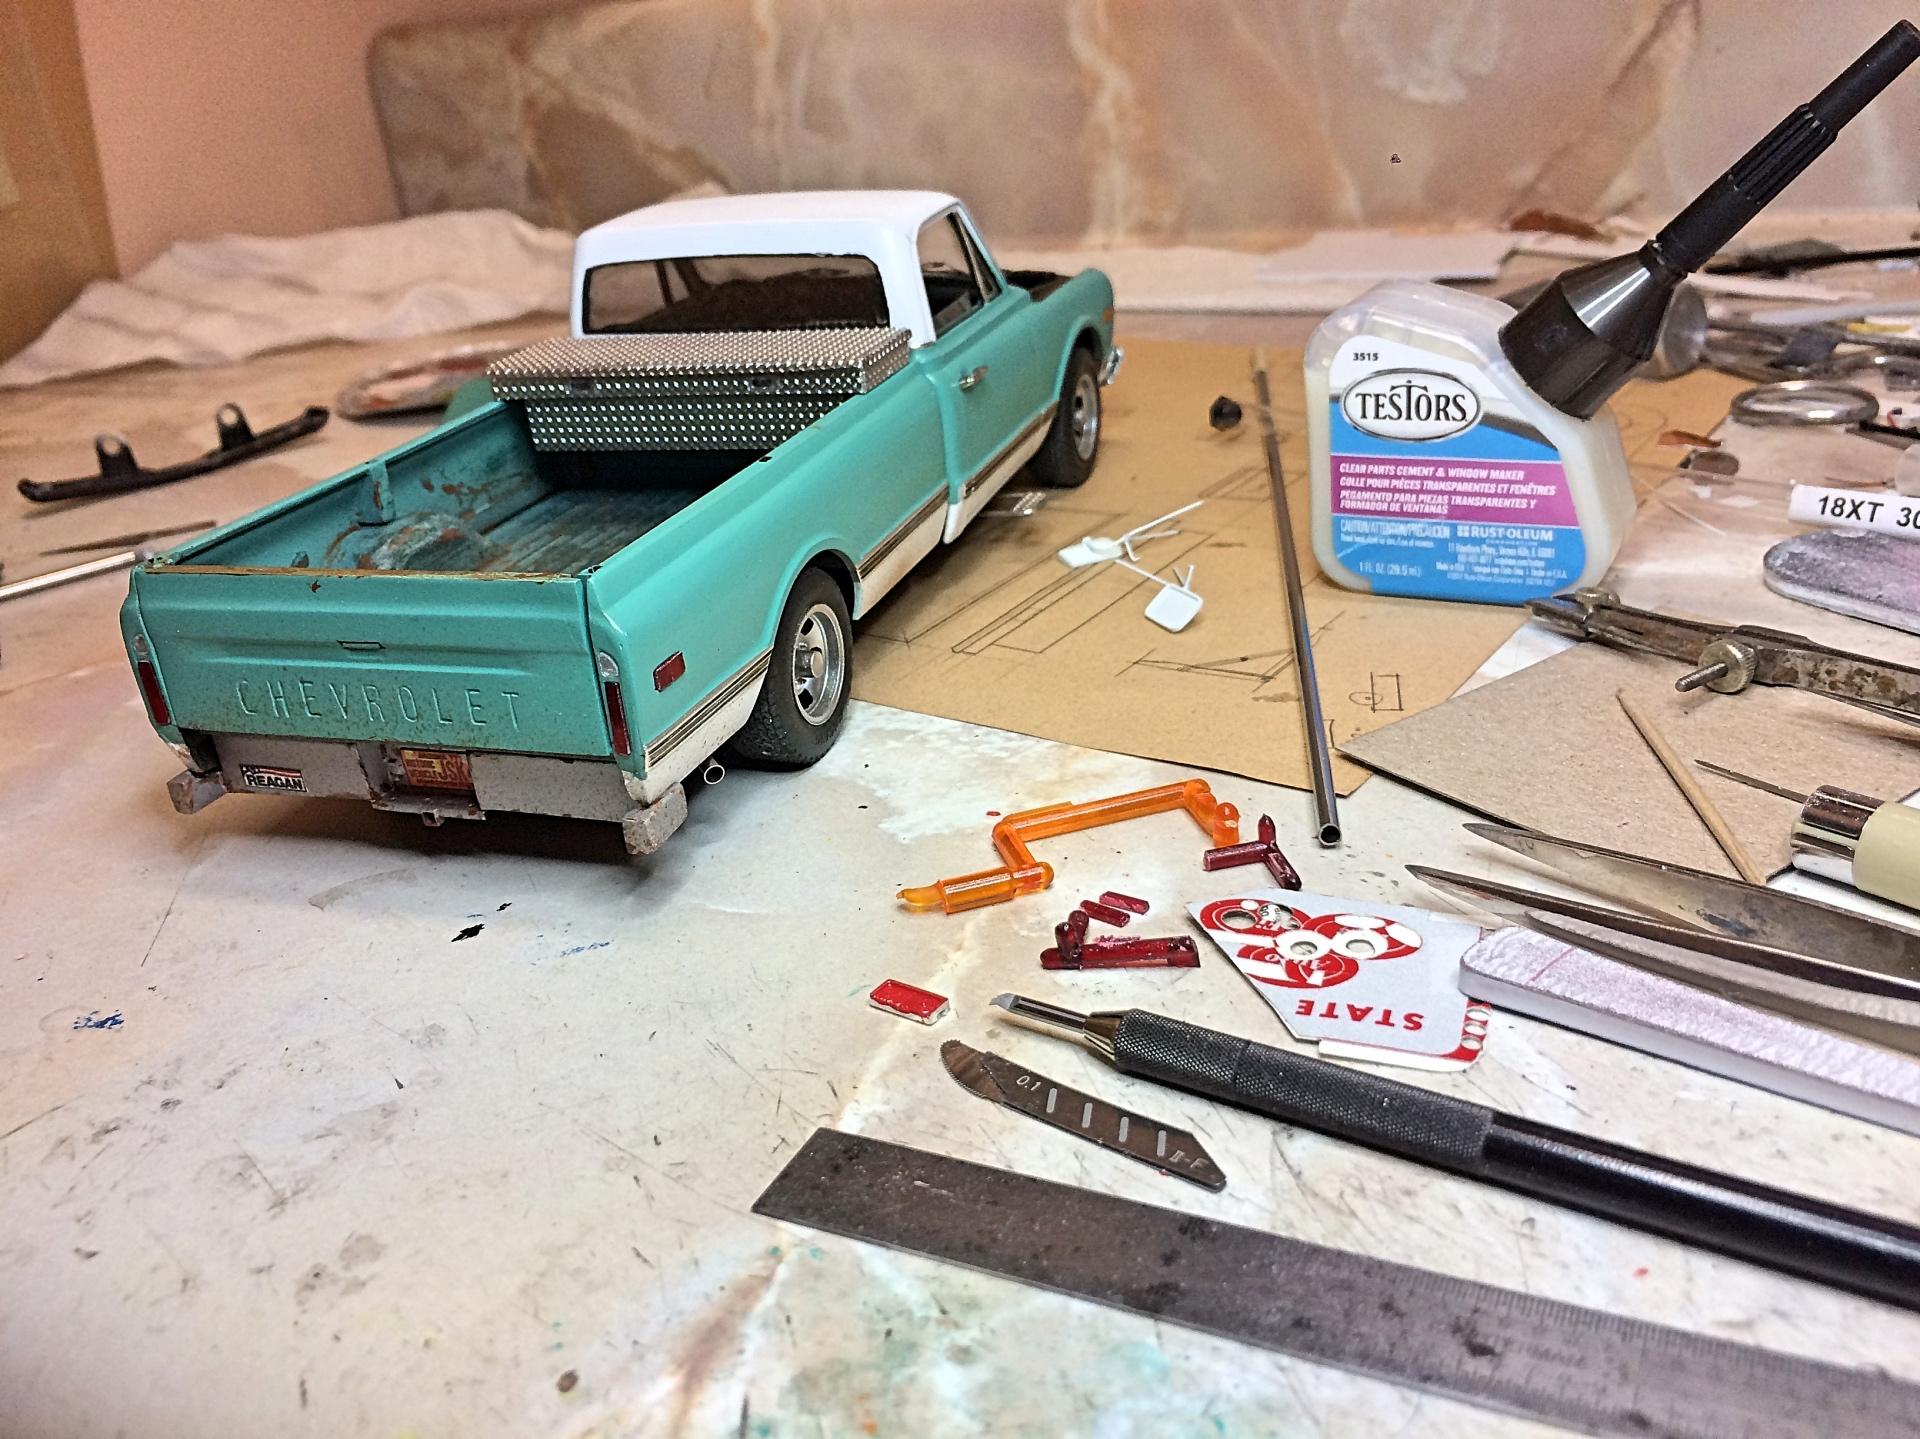
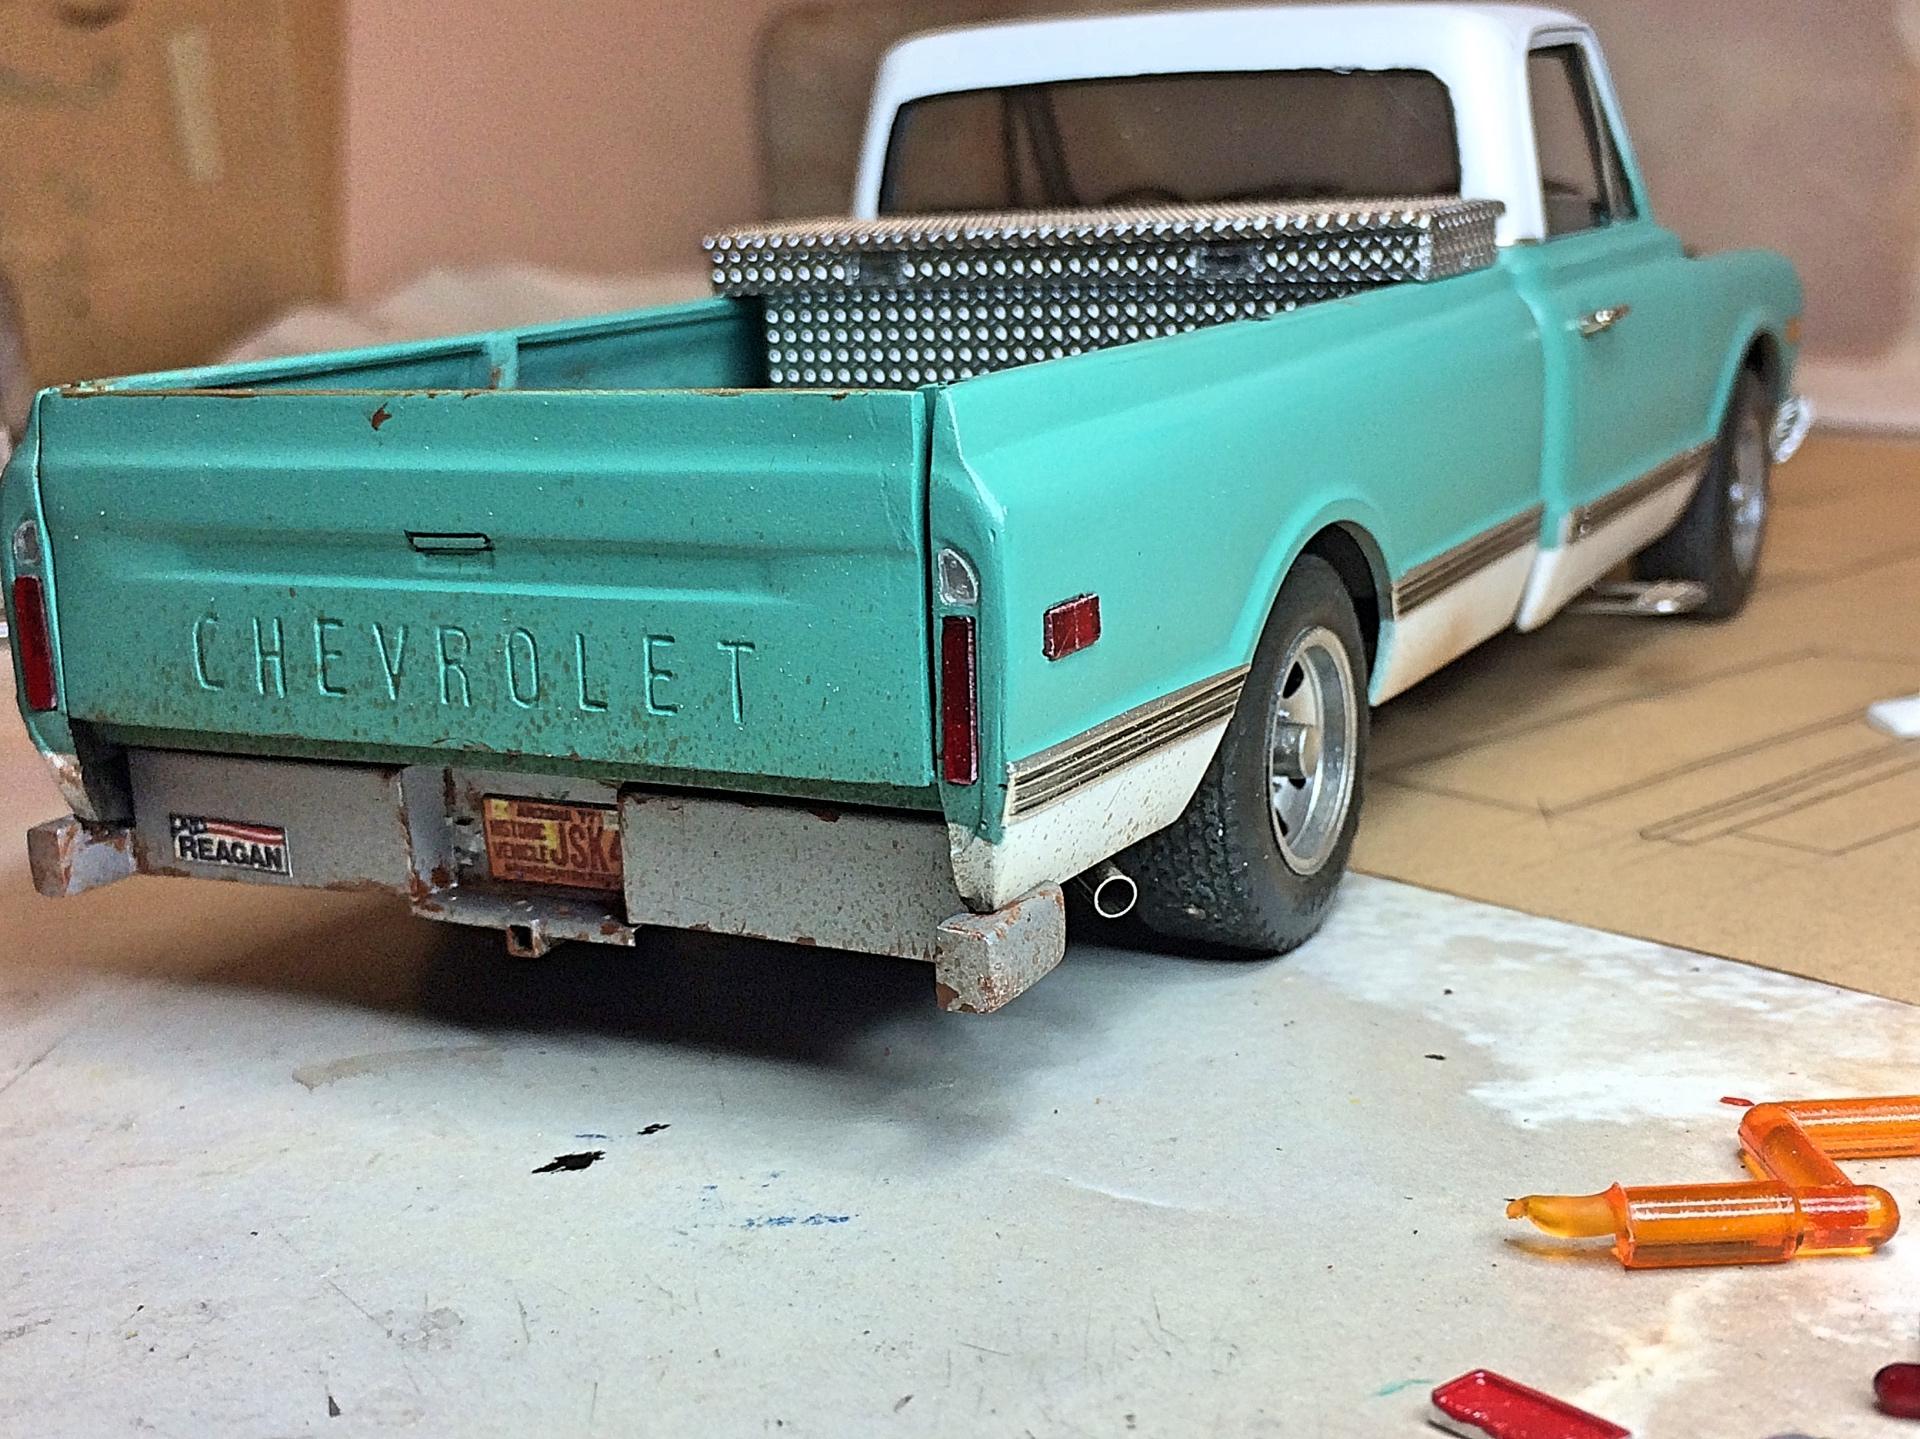
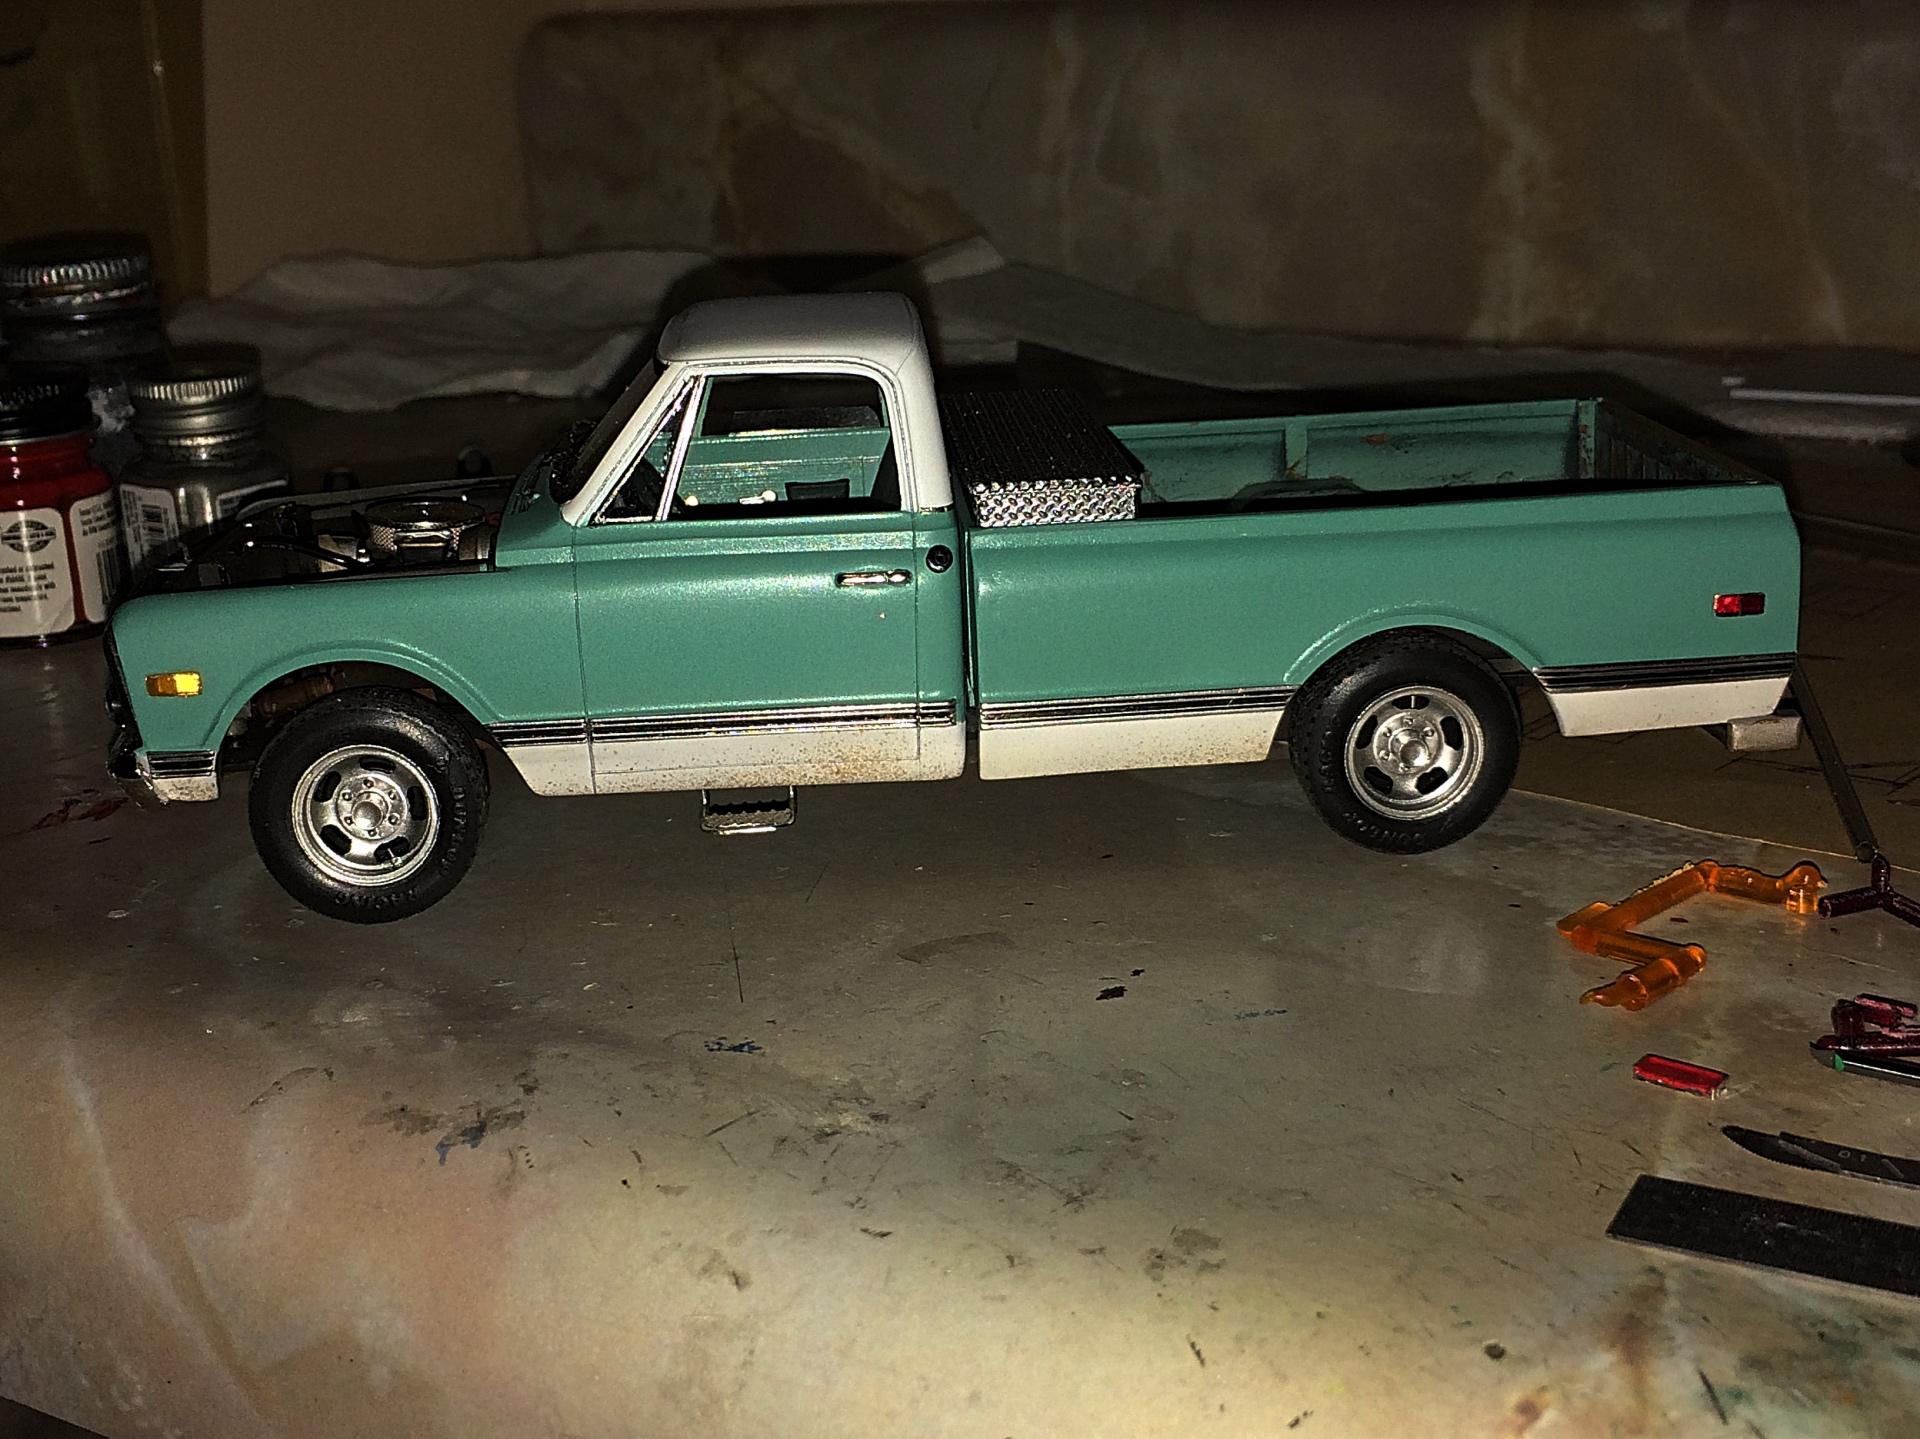
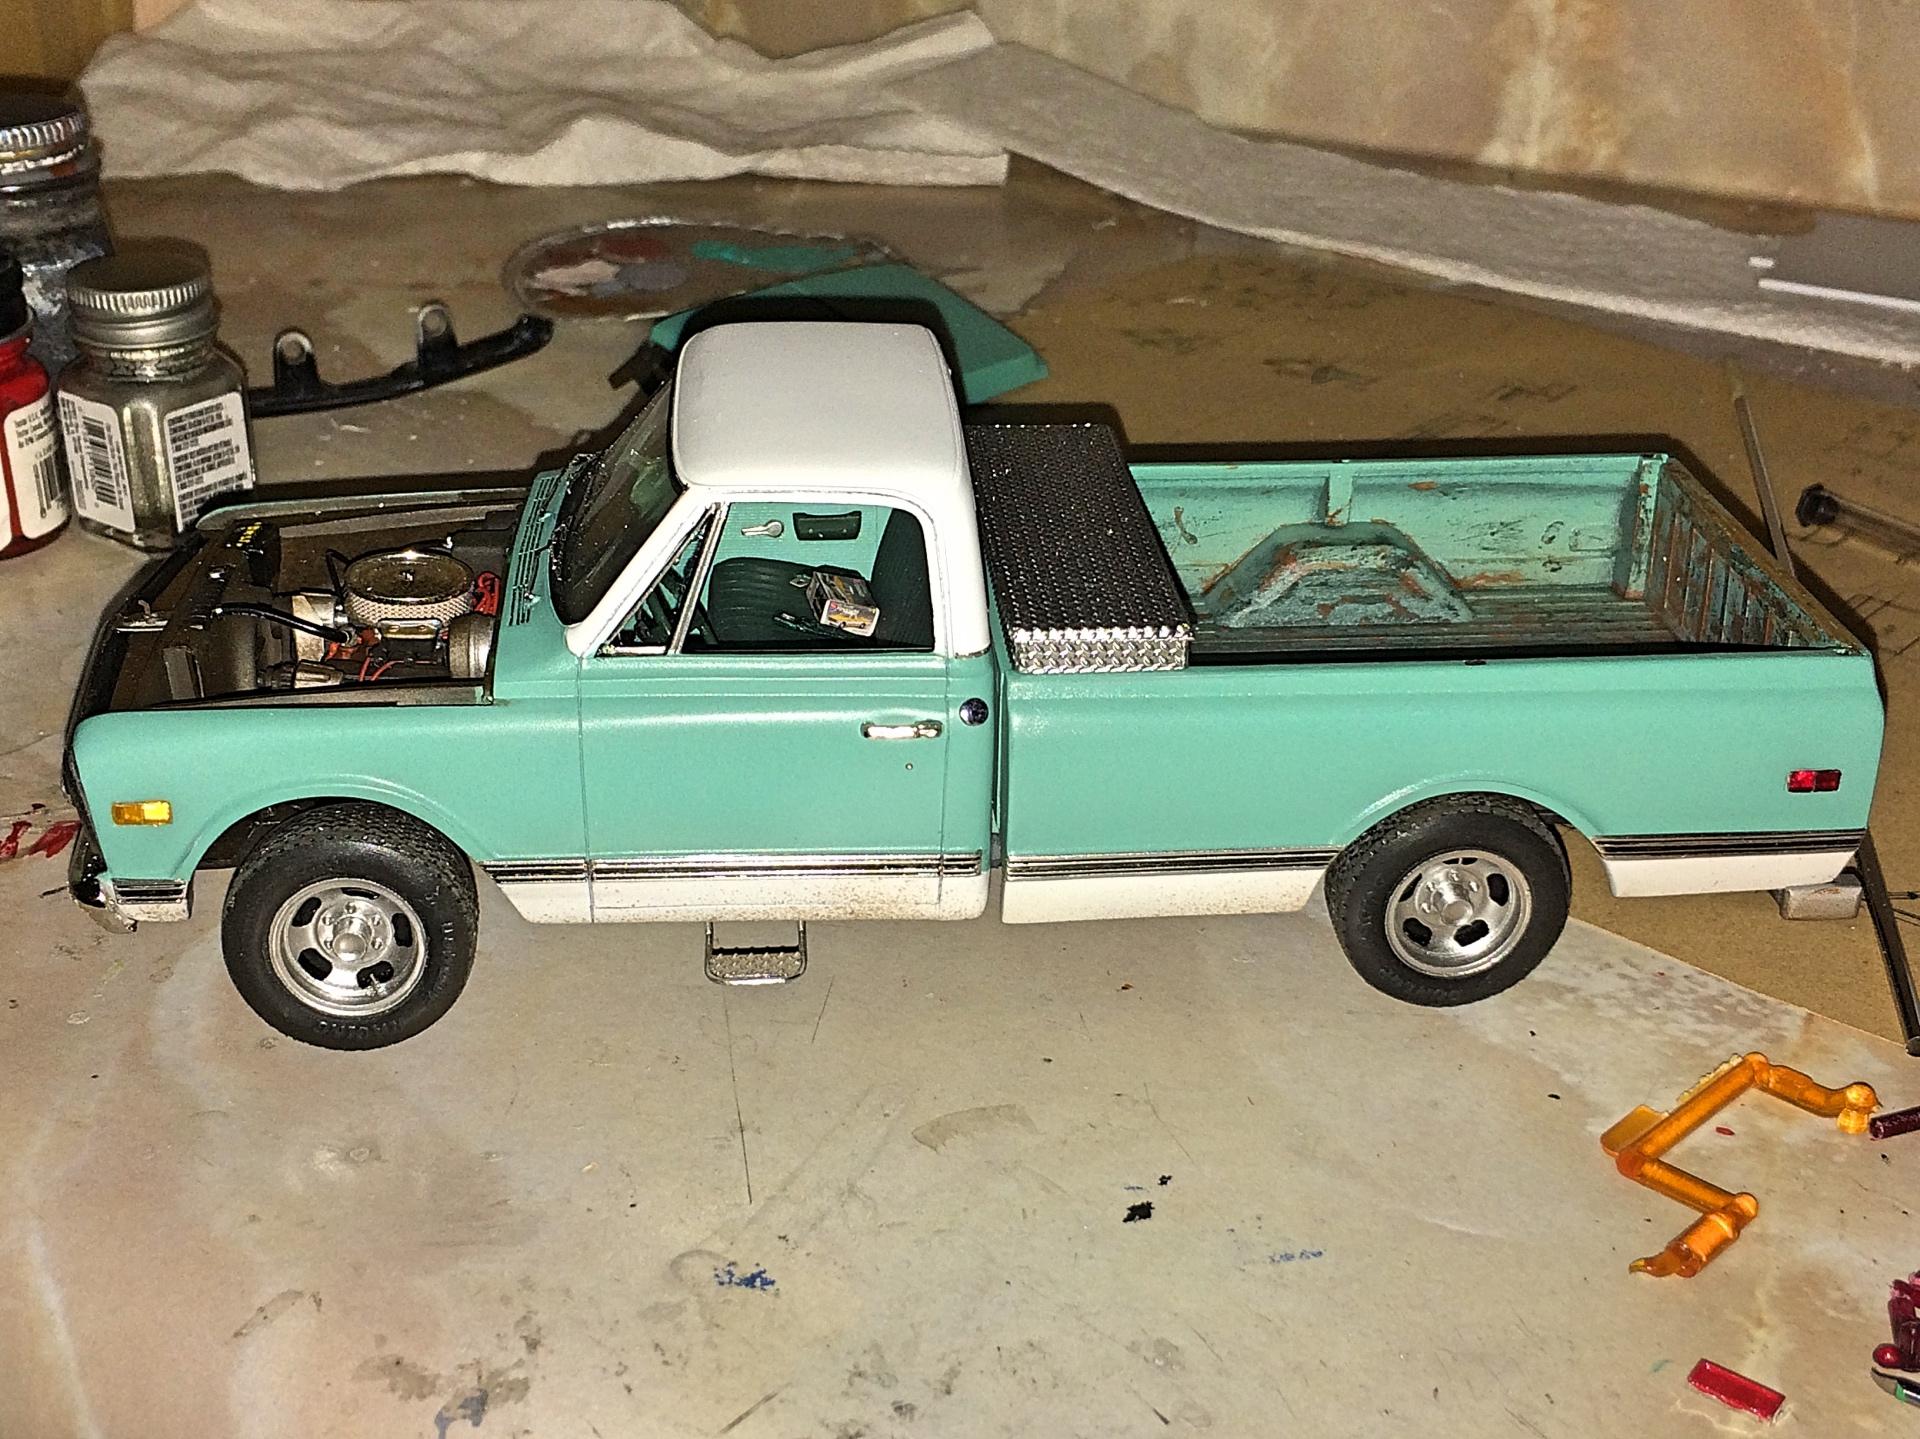
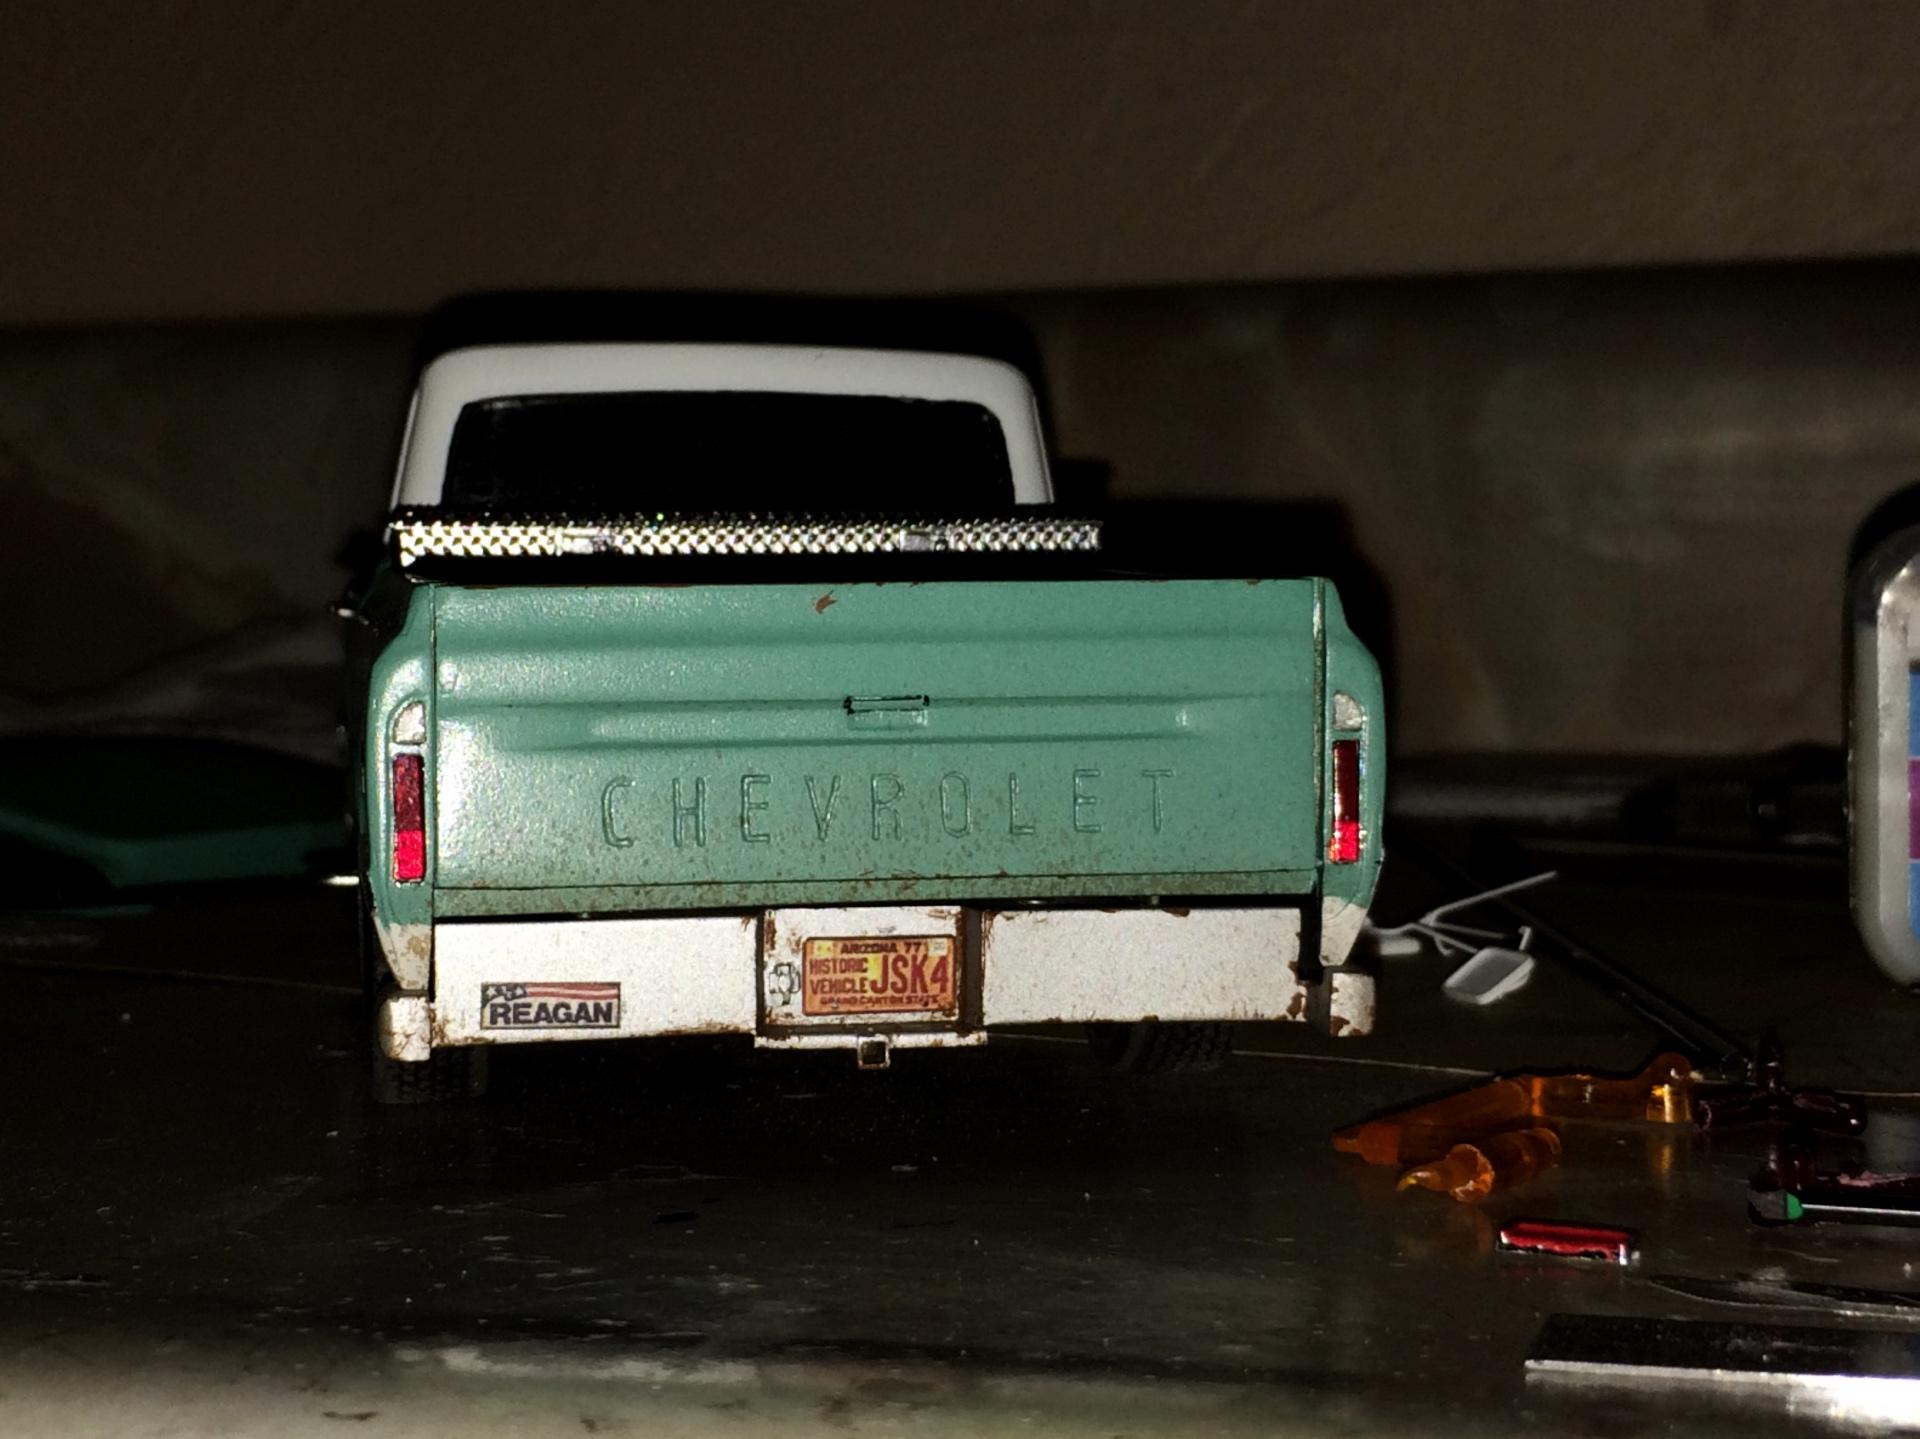
AMT's 1972 Chevrolet Cheyenne Pickup. I used to own a 1969, standard model without the fancy interior and extra side trim, it was sold in Safford, AZ and still had the Protecto plate in the Owner's Manual, bought from a friend whose grandpa was the original owner, made an agreement to sell back when he had the money, but he died, nephew contacted me to buy it back. It worked on a ranch, so it had the strange back bumper, it had been repainted after the front right corner was wrecked, I removed the saddle tanks, plastic bed liner, and chromed bed edge protectors, so off the bat it's not really an accurate replica. I took other liberties, some things if I fixed it up sort of things, and not doing the air-conditioning parts. WIP: AMT - 1969 Chevrolet pickup: The Green Barge I made several pieces such as the the taillight section, tailgate, bench seat, door panels, toolbox, etc that I could sell resin copies of. Fireball Modelworks resin slotted mag wheels, with tires from the Italeri Ferrari 275. Splash paint. The real truck, first day I drove it: Day I sold it: My studio, 1968 pickup. Someday will build that.
-
1948 Chevrolet Canopy Express
89AKurt replied to 89AKurt's topic in Model Trucks: Pickups, Vans, SUVs, Light Commercial
Thank you so much! I know right? I have trouble making perfect street rods. -
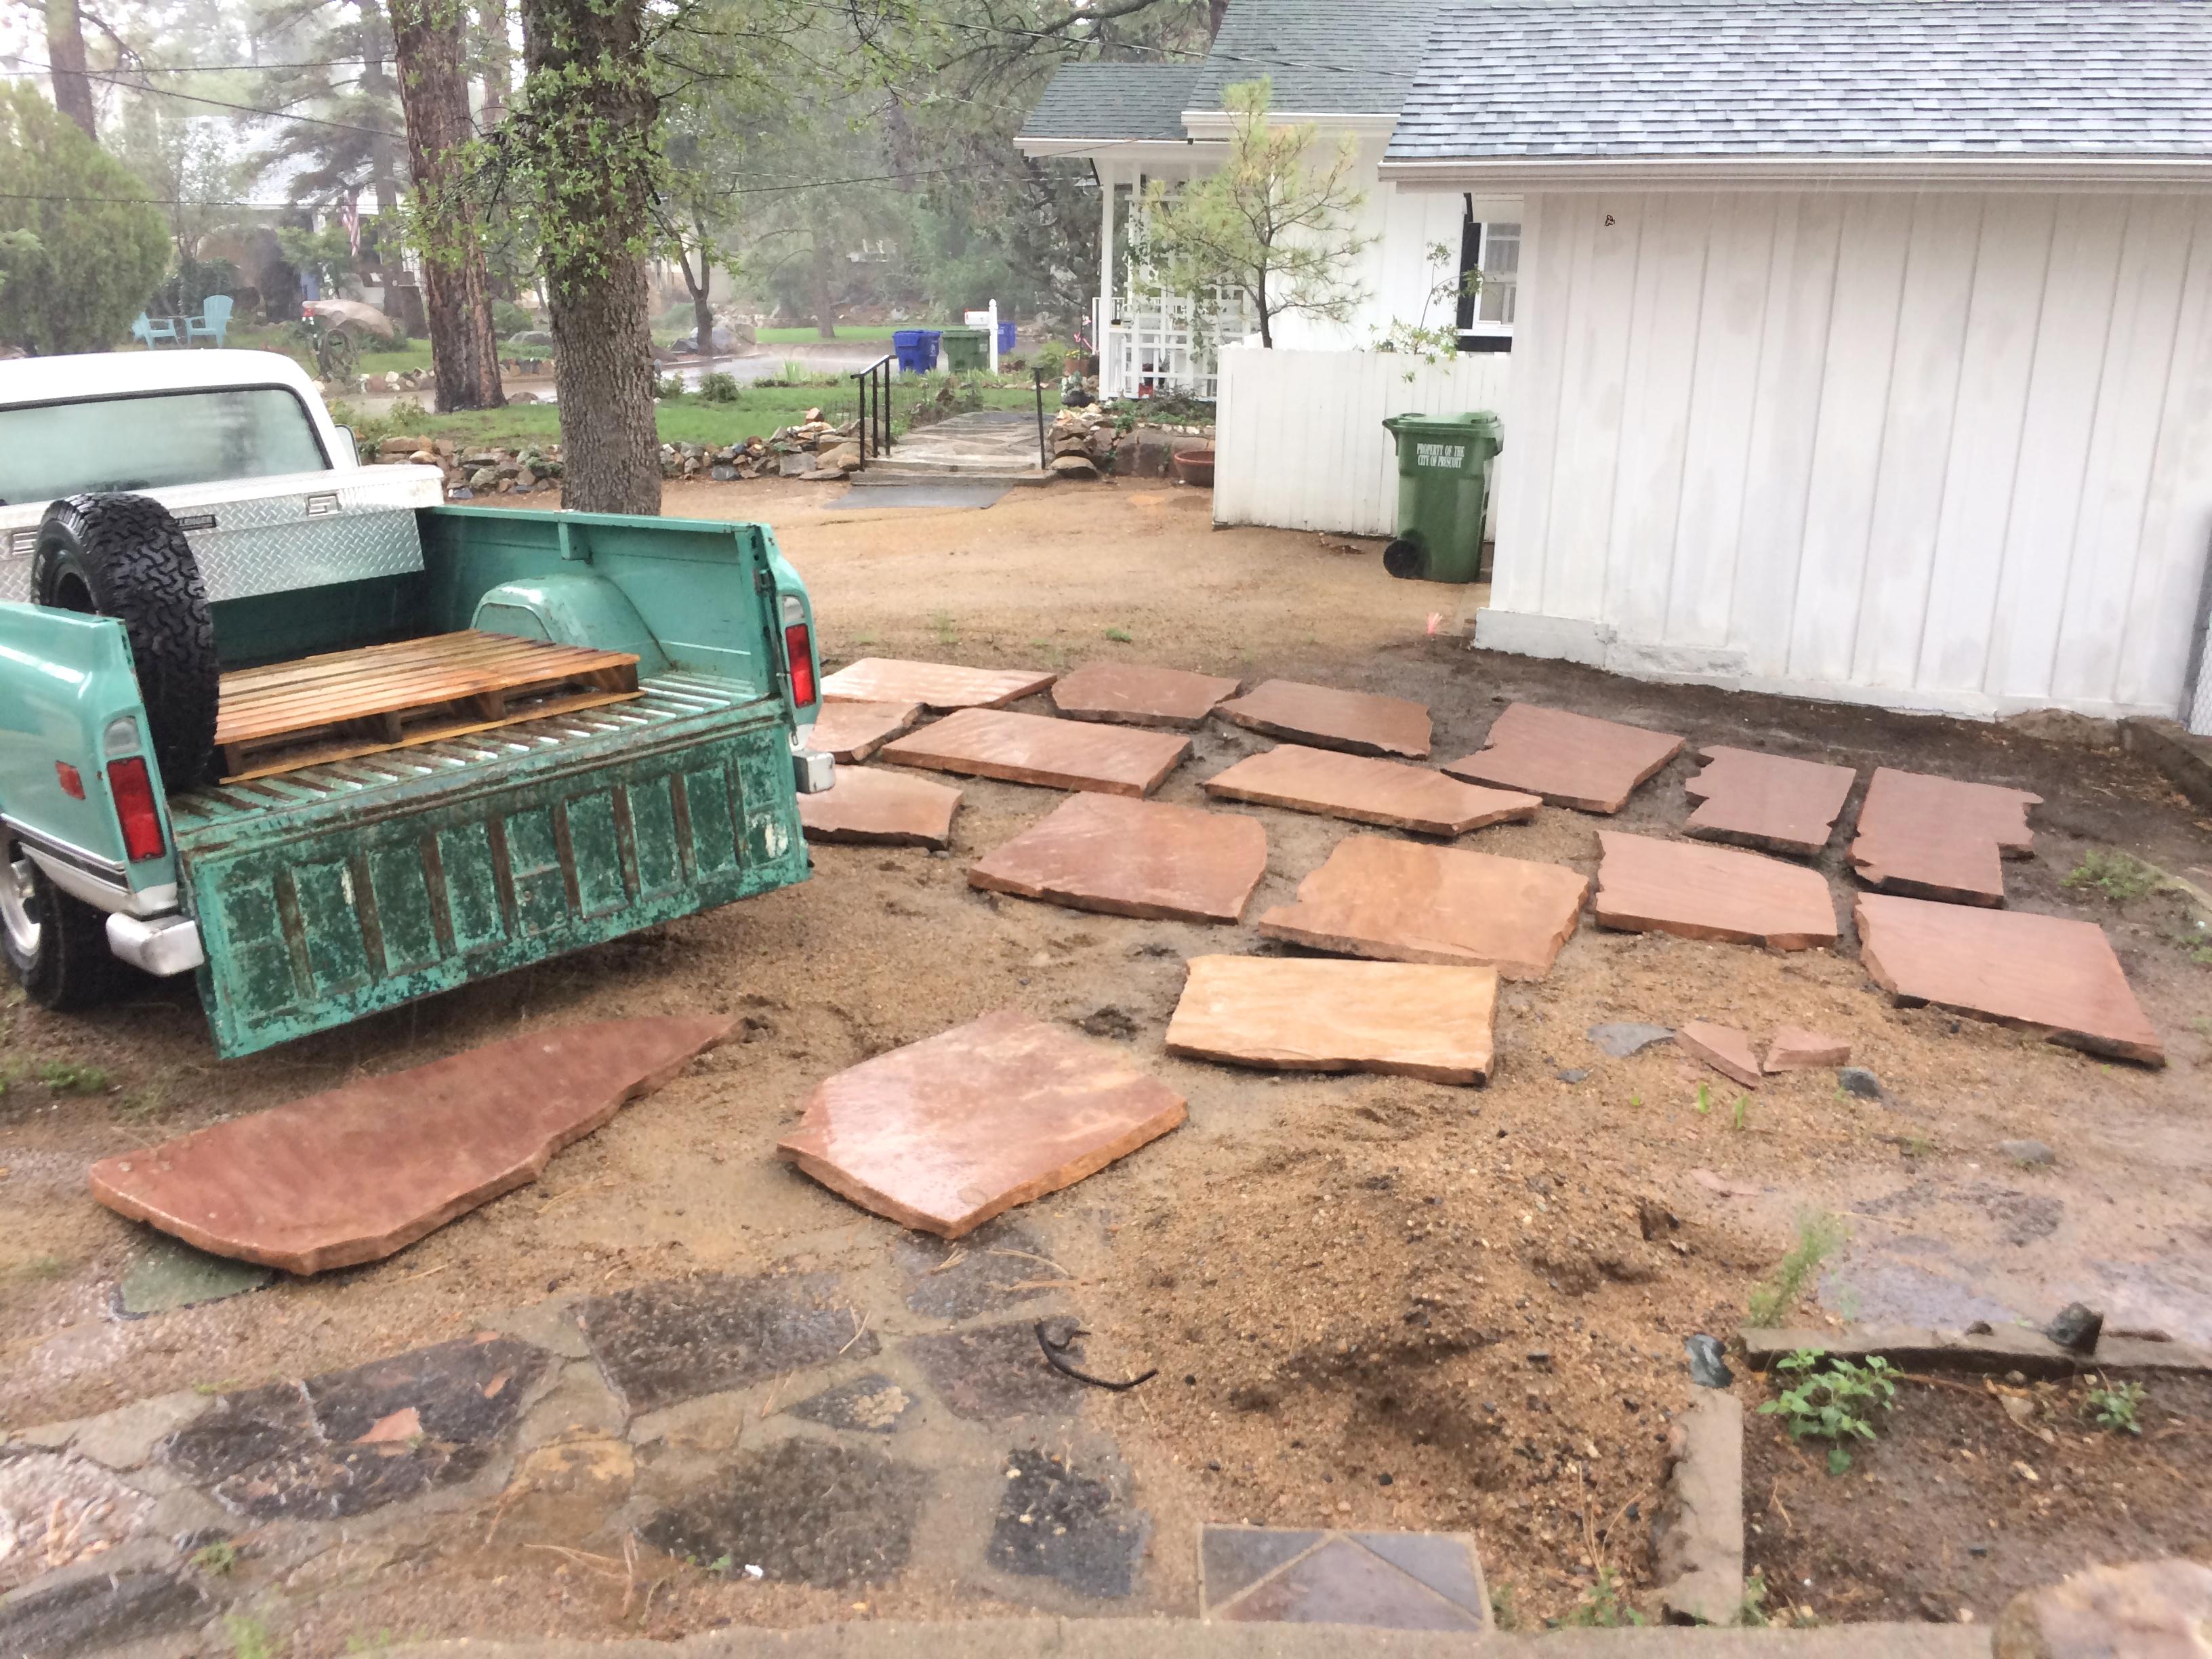
Oh good, you spotted the model box! ? Check out my final details. Yes this is .... DONE! I went out to my patio and picked up some exfoliated flagstone. Made the pallet from some scrap Alder which has a fine grain that is to scale (unlike Pine or Cedar). That truck helped me build my undocumented wife's flagstone patio. Also glued the mirrors on, used AAA Insurance sticker for the mirror face. The very last detail was to flatten the tires. Oops, not having a spare tire is driving me crazy now, was thinking of asking Fireball Modelworks if I can get only one wheel, he has some other cool parts that I'm tempted to get anyway. ?
-
Was hoping you would build it. ? I built this several years ago. ?
-
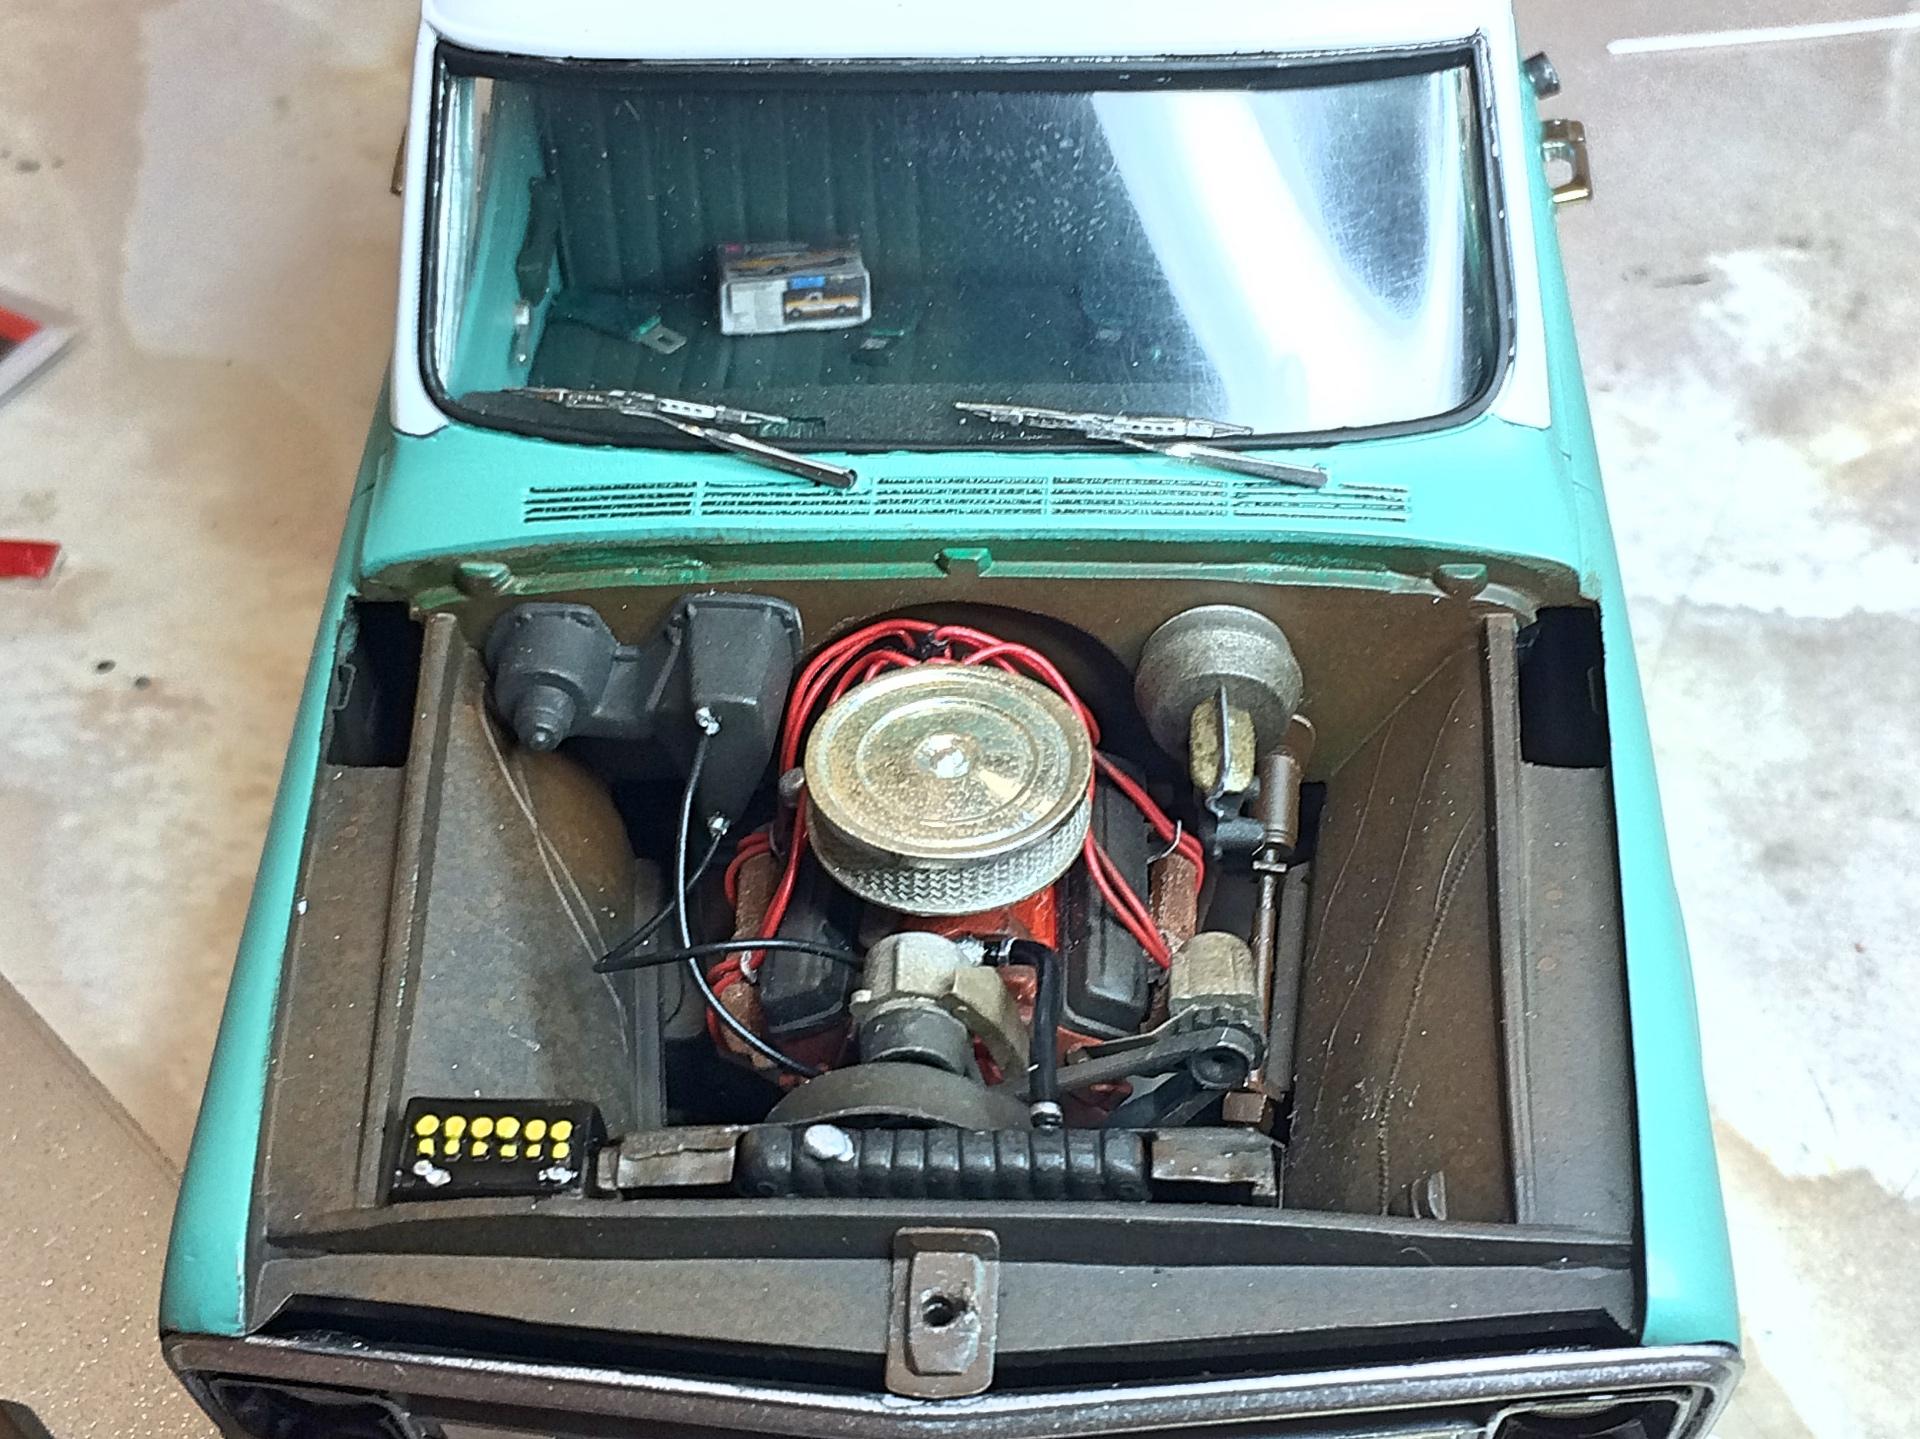
Thanks. Hard to miss with white. ? The green is a perfect match too. Thank you. Owning the truck grew on me, it was a random acquisition (long story). Another reason I don't care if AMT does a reissue, the sloppy assembly of bed, body to chassis leaves opportunity for error. It's first load. ? Added details to the engine bay, the steering shaft/box, heater and radiator hoses, fan shroud. The other detail is the Detail Master wipers, the execution is a royal PITA, the photo-etch is incredibly fine and detailed, first time I tried to make one was a disaster. But over the years, got the tools such as pliers, and the really cool tool is the bender, made a HUGE difference. But the arms are still a pain to bend, because the sides go to a point. Anyway, still a 100% improvement over the molded on wipers. Used food package for the vent and back window glass, and added a tint film to the back window. Lights are made from colored clear sprue, the flat part with the numbers, which were sanded off. Used the Tamiya scribe, a photo-etch saw, and Testors canopy glue. Used the Farmers Insurance sticker for the reflectors. The backup lenses are a Porsche 911 turn signal cut in half. The lenses never sat in the bucket straight on the real truck either. ? Added the stainless steel tubing exhaust tip. Pictures taken with the flash.
-
Italeri: Ferrari 275 N.A.R.T. - Thomas Crown Affair
89AKurt replied to 89AKurt's topic in Model Cars
Thank you very much! ? Thank you. Aw shucks, thank you very much too! ? -
1948 Chevrolet Canopy Express
89AKurt replied to 89AKurt's topic in Model Trucks: Pickups, Vans, SUVs, Light Commercial
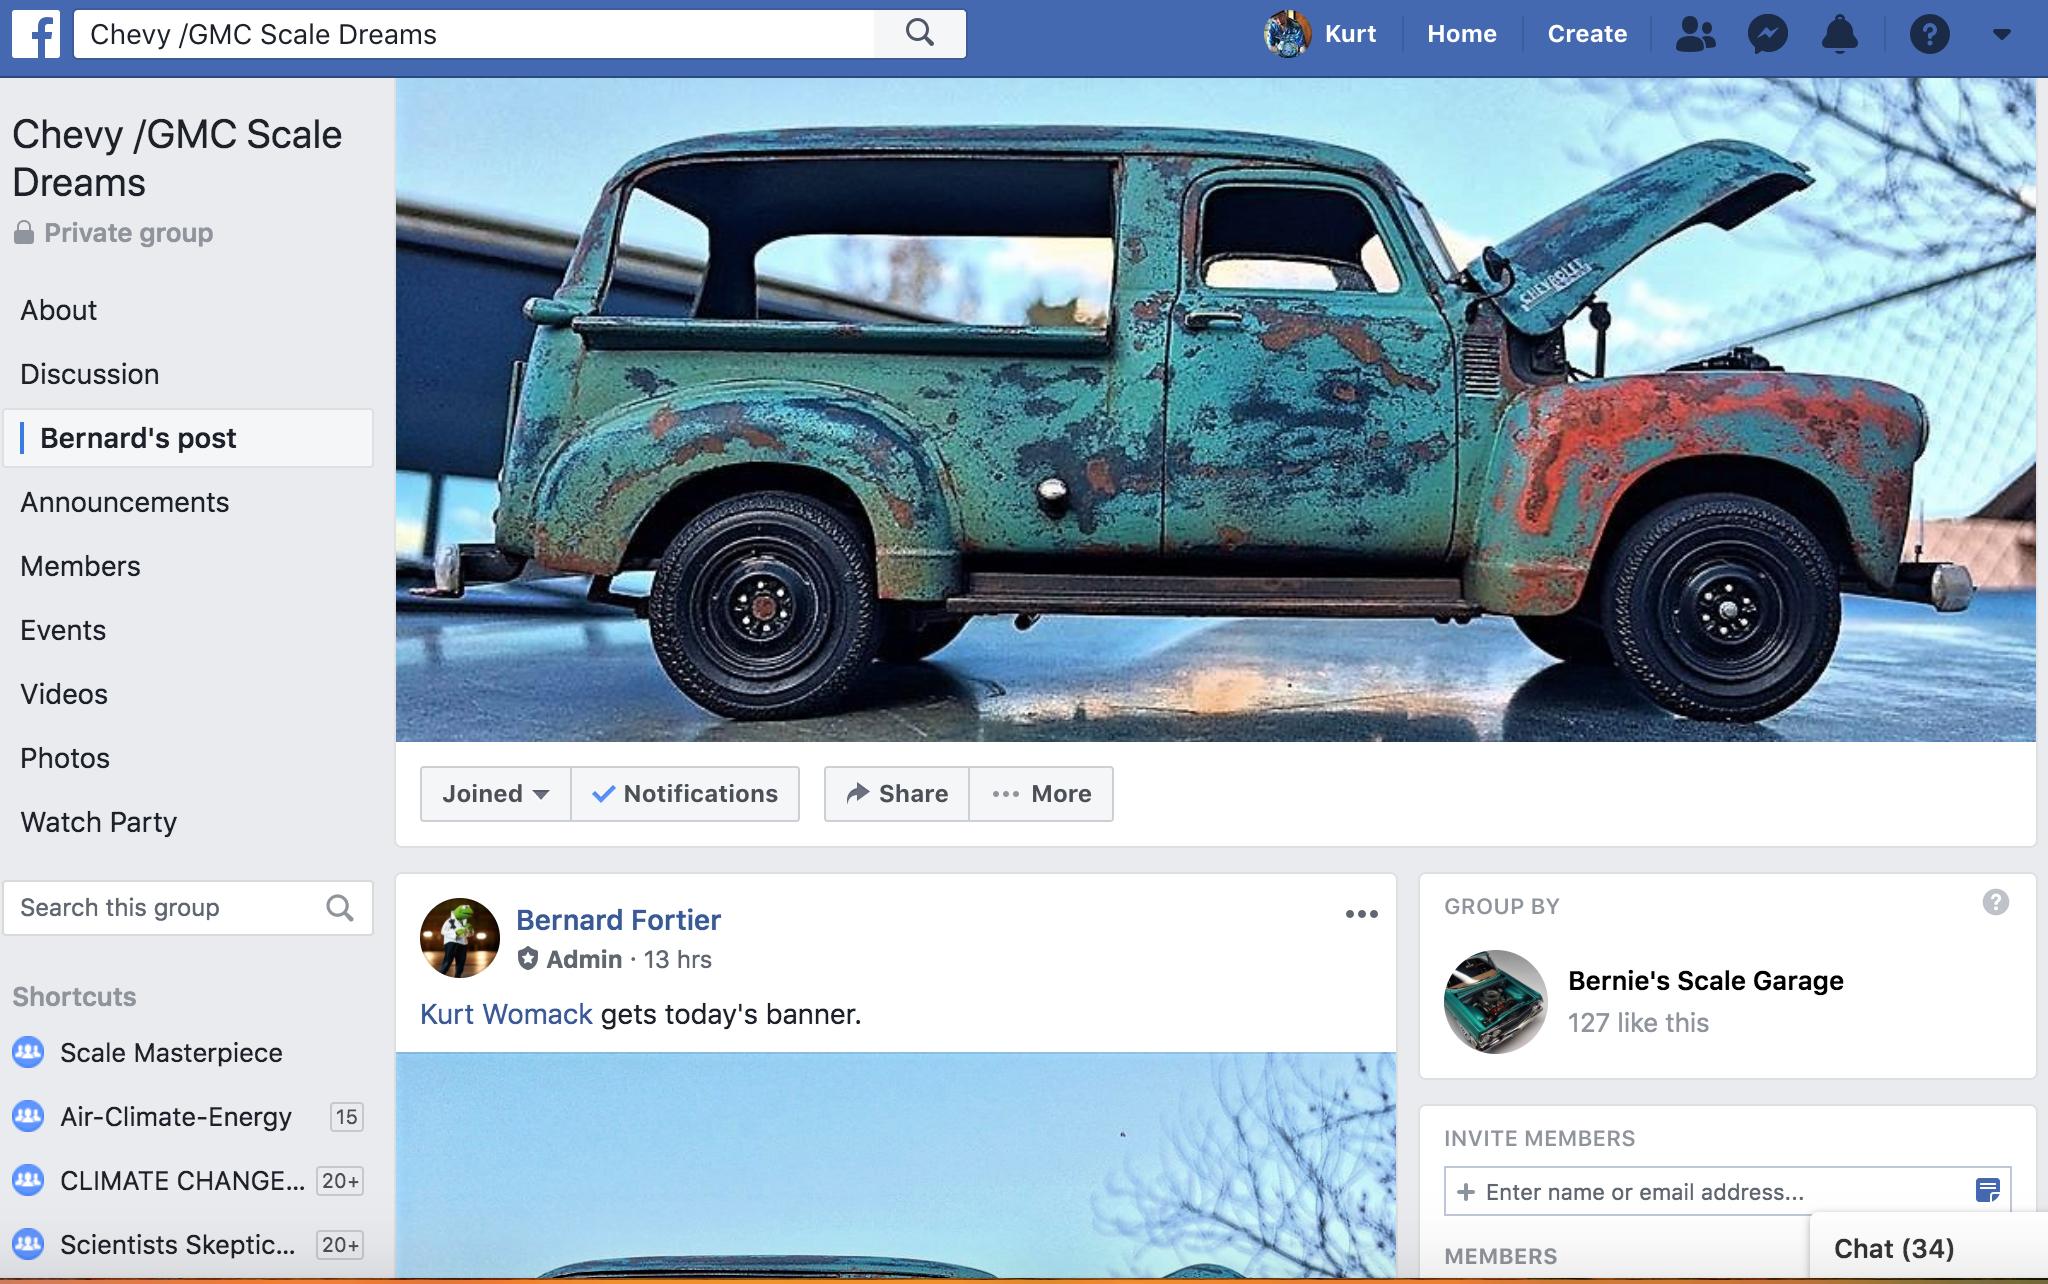
Wow, thank you very much! The Administrator on this Fakebook group must have liked it too. ?
-
I built the Ford J-car and can attest to the challenging assembly of IMC kits, no wonder they went out of business. Looks good!
-
I picked up an original release of that kit, which ended up with an engine, the Porndy. For a vintage curbside, it's a nice model, so you will enjoy it.