Misha
-
Posts
1,014 -
Joined
-
Last visited
Content Type
Profiles
Forums
Events
Gallery
Everything posted by Misha
-
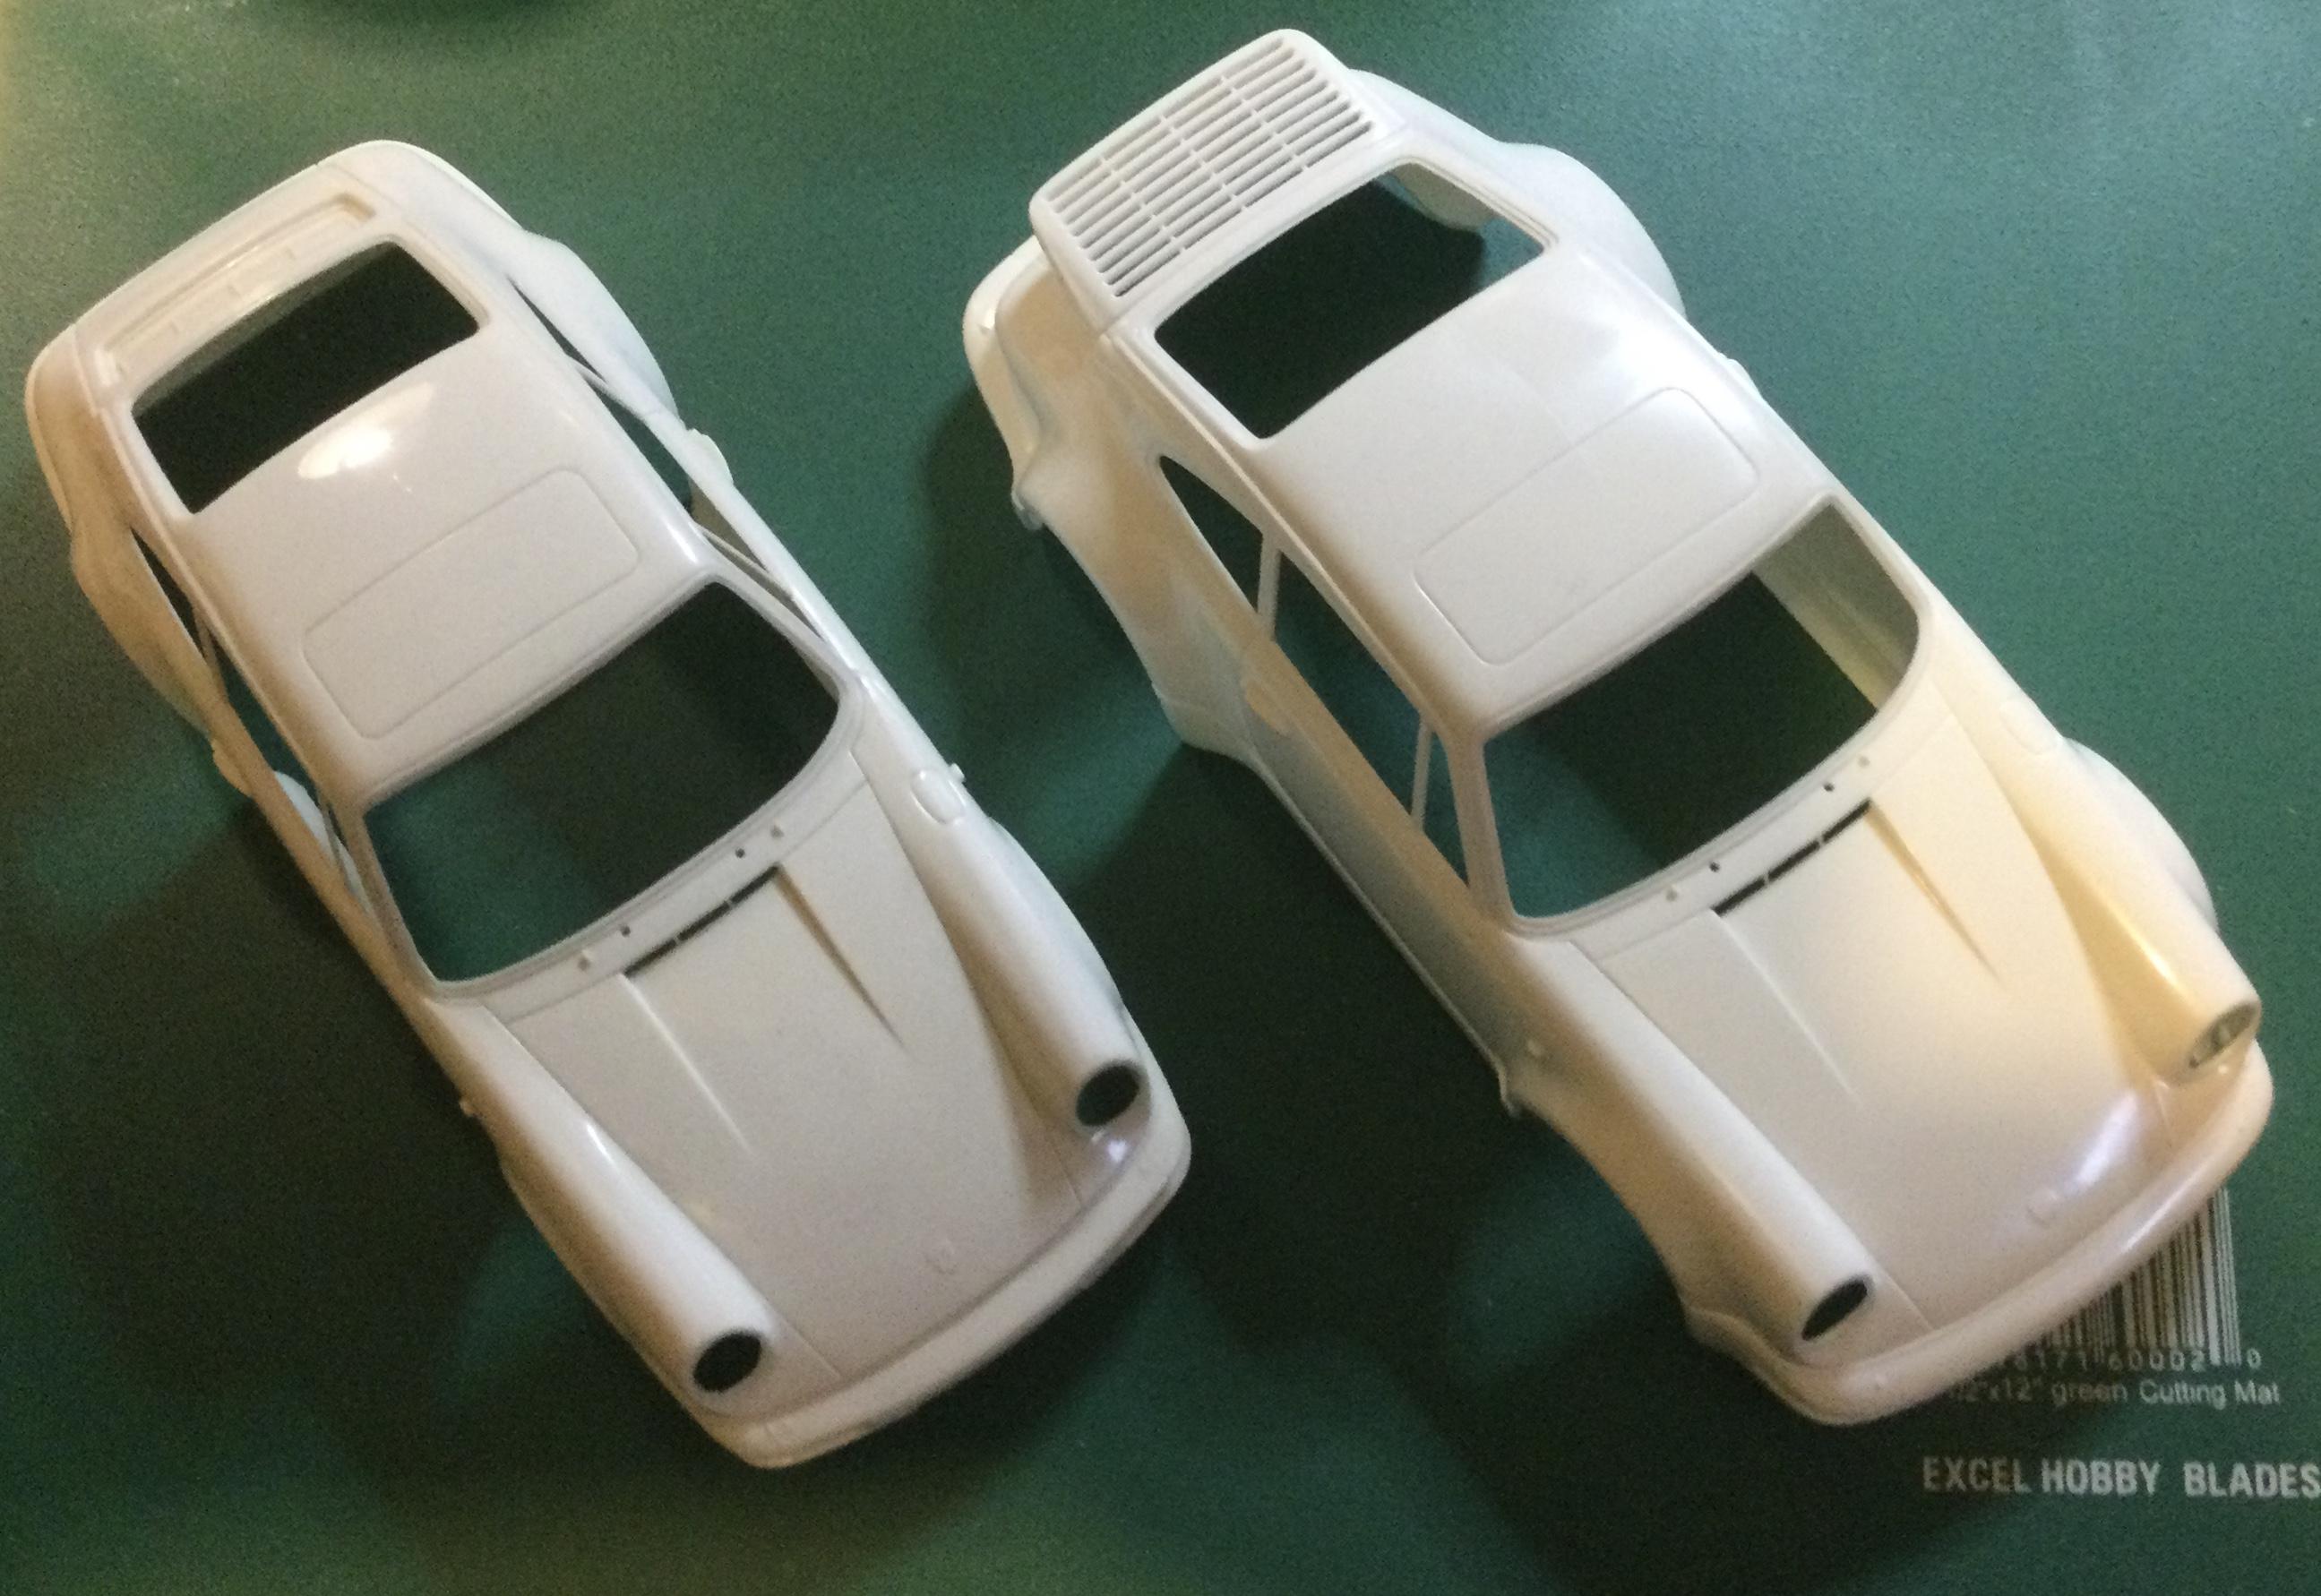
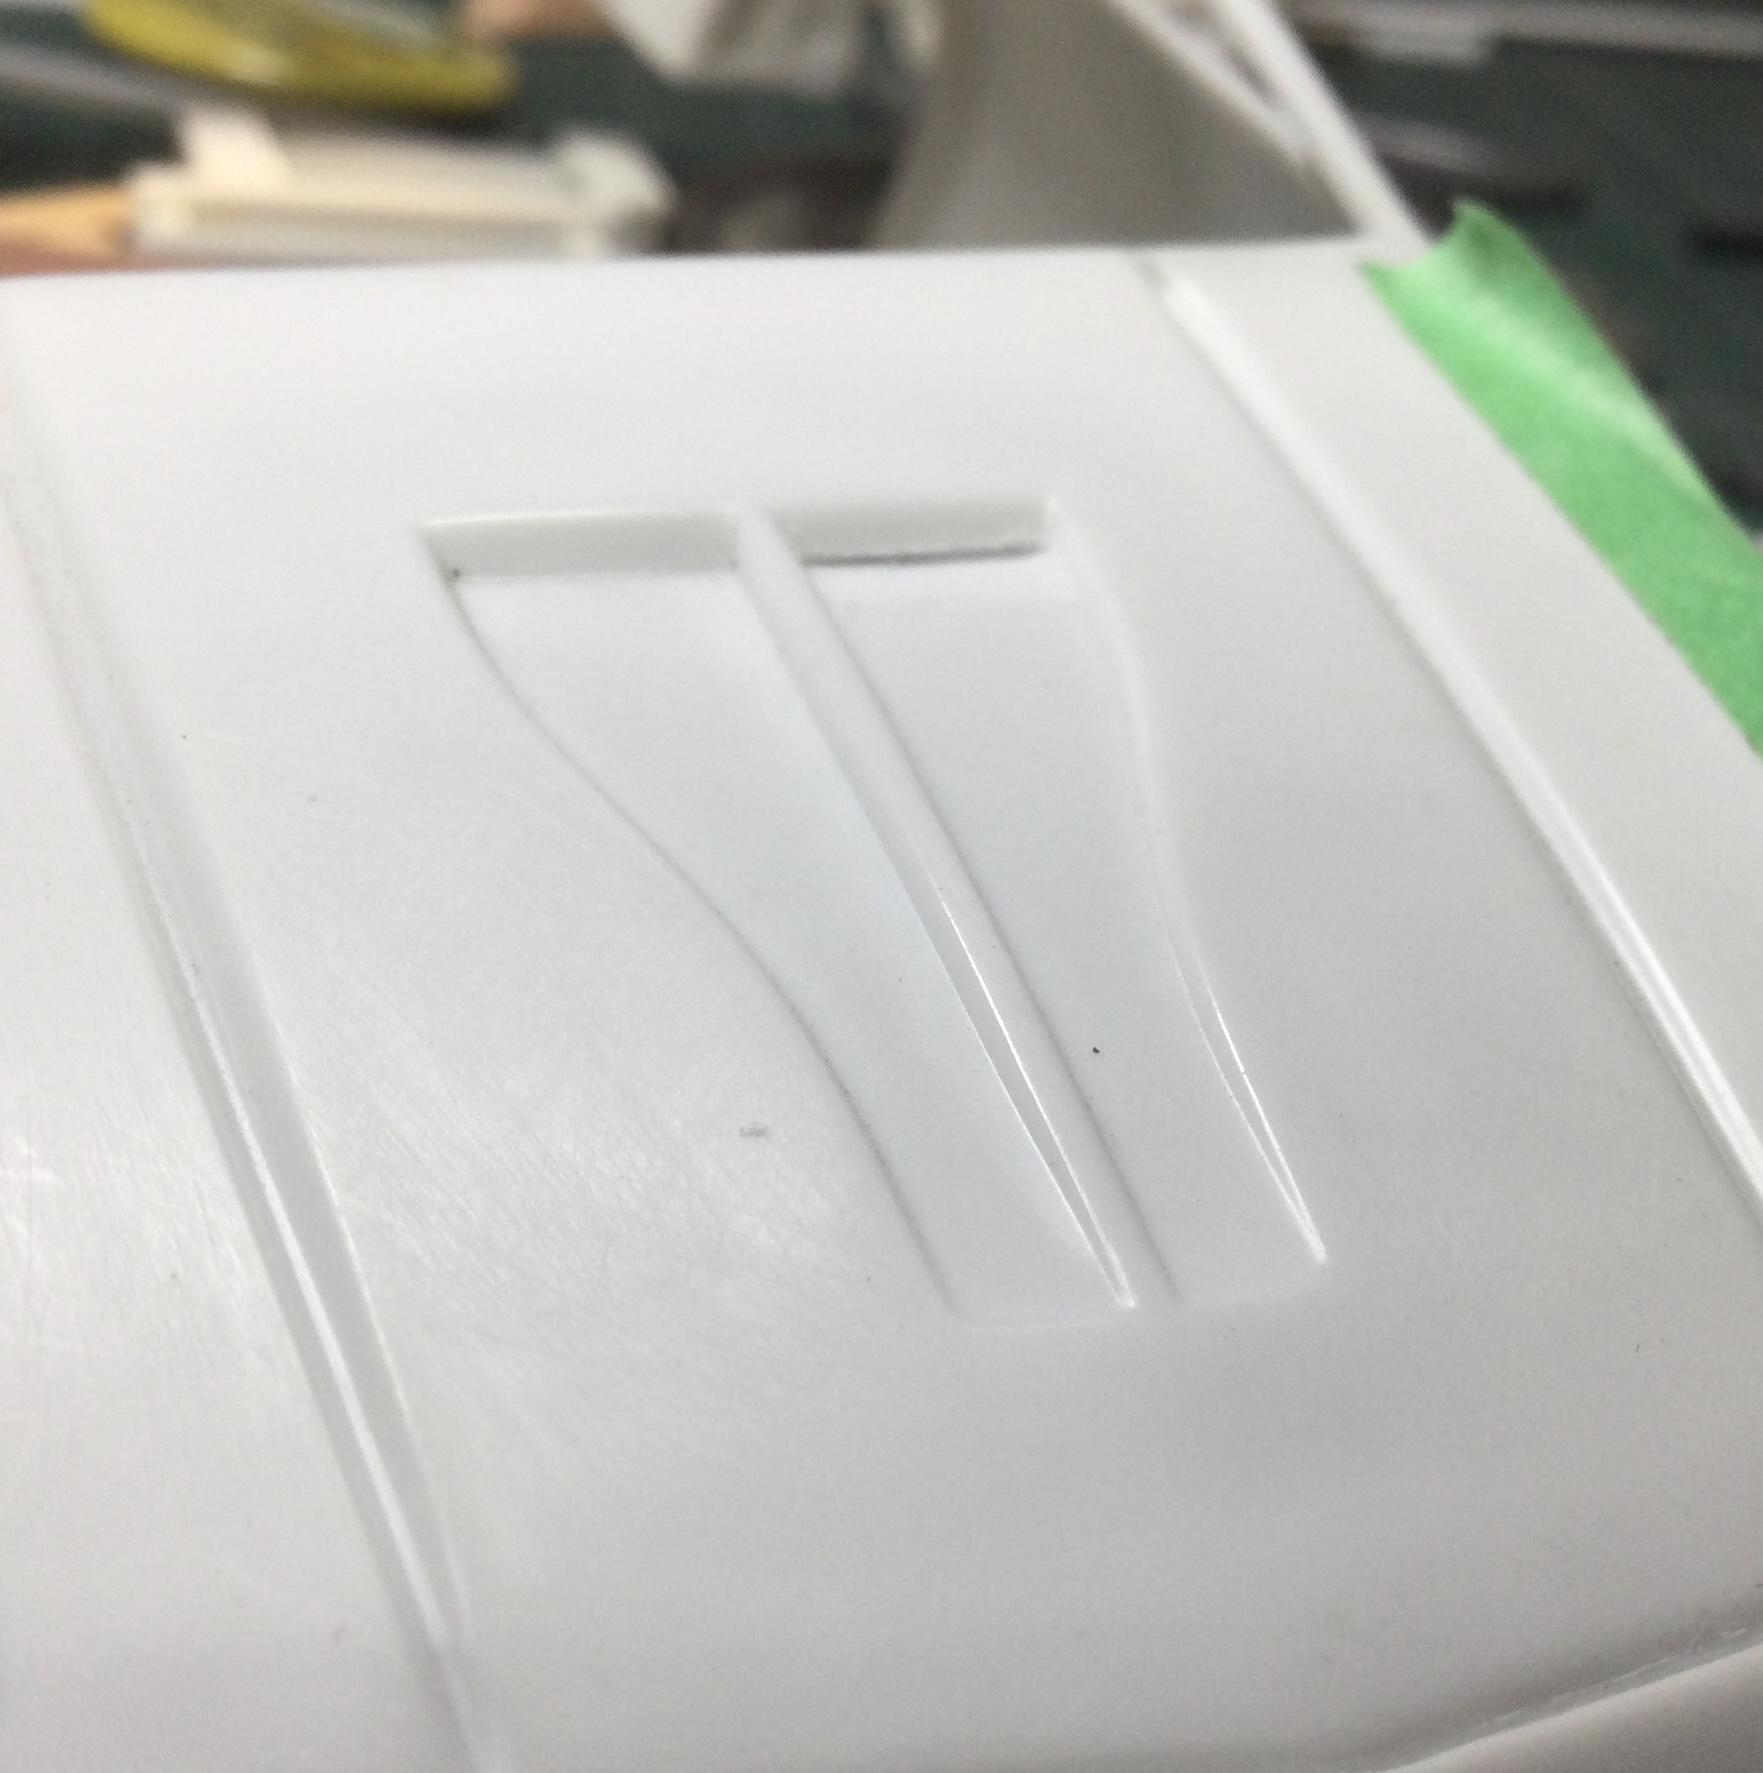
I recently added the 92 Carrera Cup and the 911 3.8 RSR by Fujimi to my stash. Upon looking at photos of the 1:1 racers there is no evidence of a sunroof, yet Fujimi has included them. Even the thought of a comp vehicle having the extra weight and mechanics of one seems out-of-place. Will my first task be filling in the seams to produce a full roof? I think so... Cheers Misha

-
This will be another great ride Steve! I’ll chime in with Snake regarding the B post as it does appear to be a bit extreme. Here are a couple of photos off the web... The next one may be of interest to you, while a two door, it does have a great look as a hardtop. I, like many others, enjoy watching your builds and this one promises to be intriguing! Looking forward to the day when they can be enjoyed in person. Cheers Misha PS I’m still drooling over your Olds build!
-
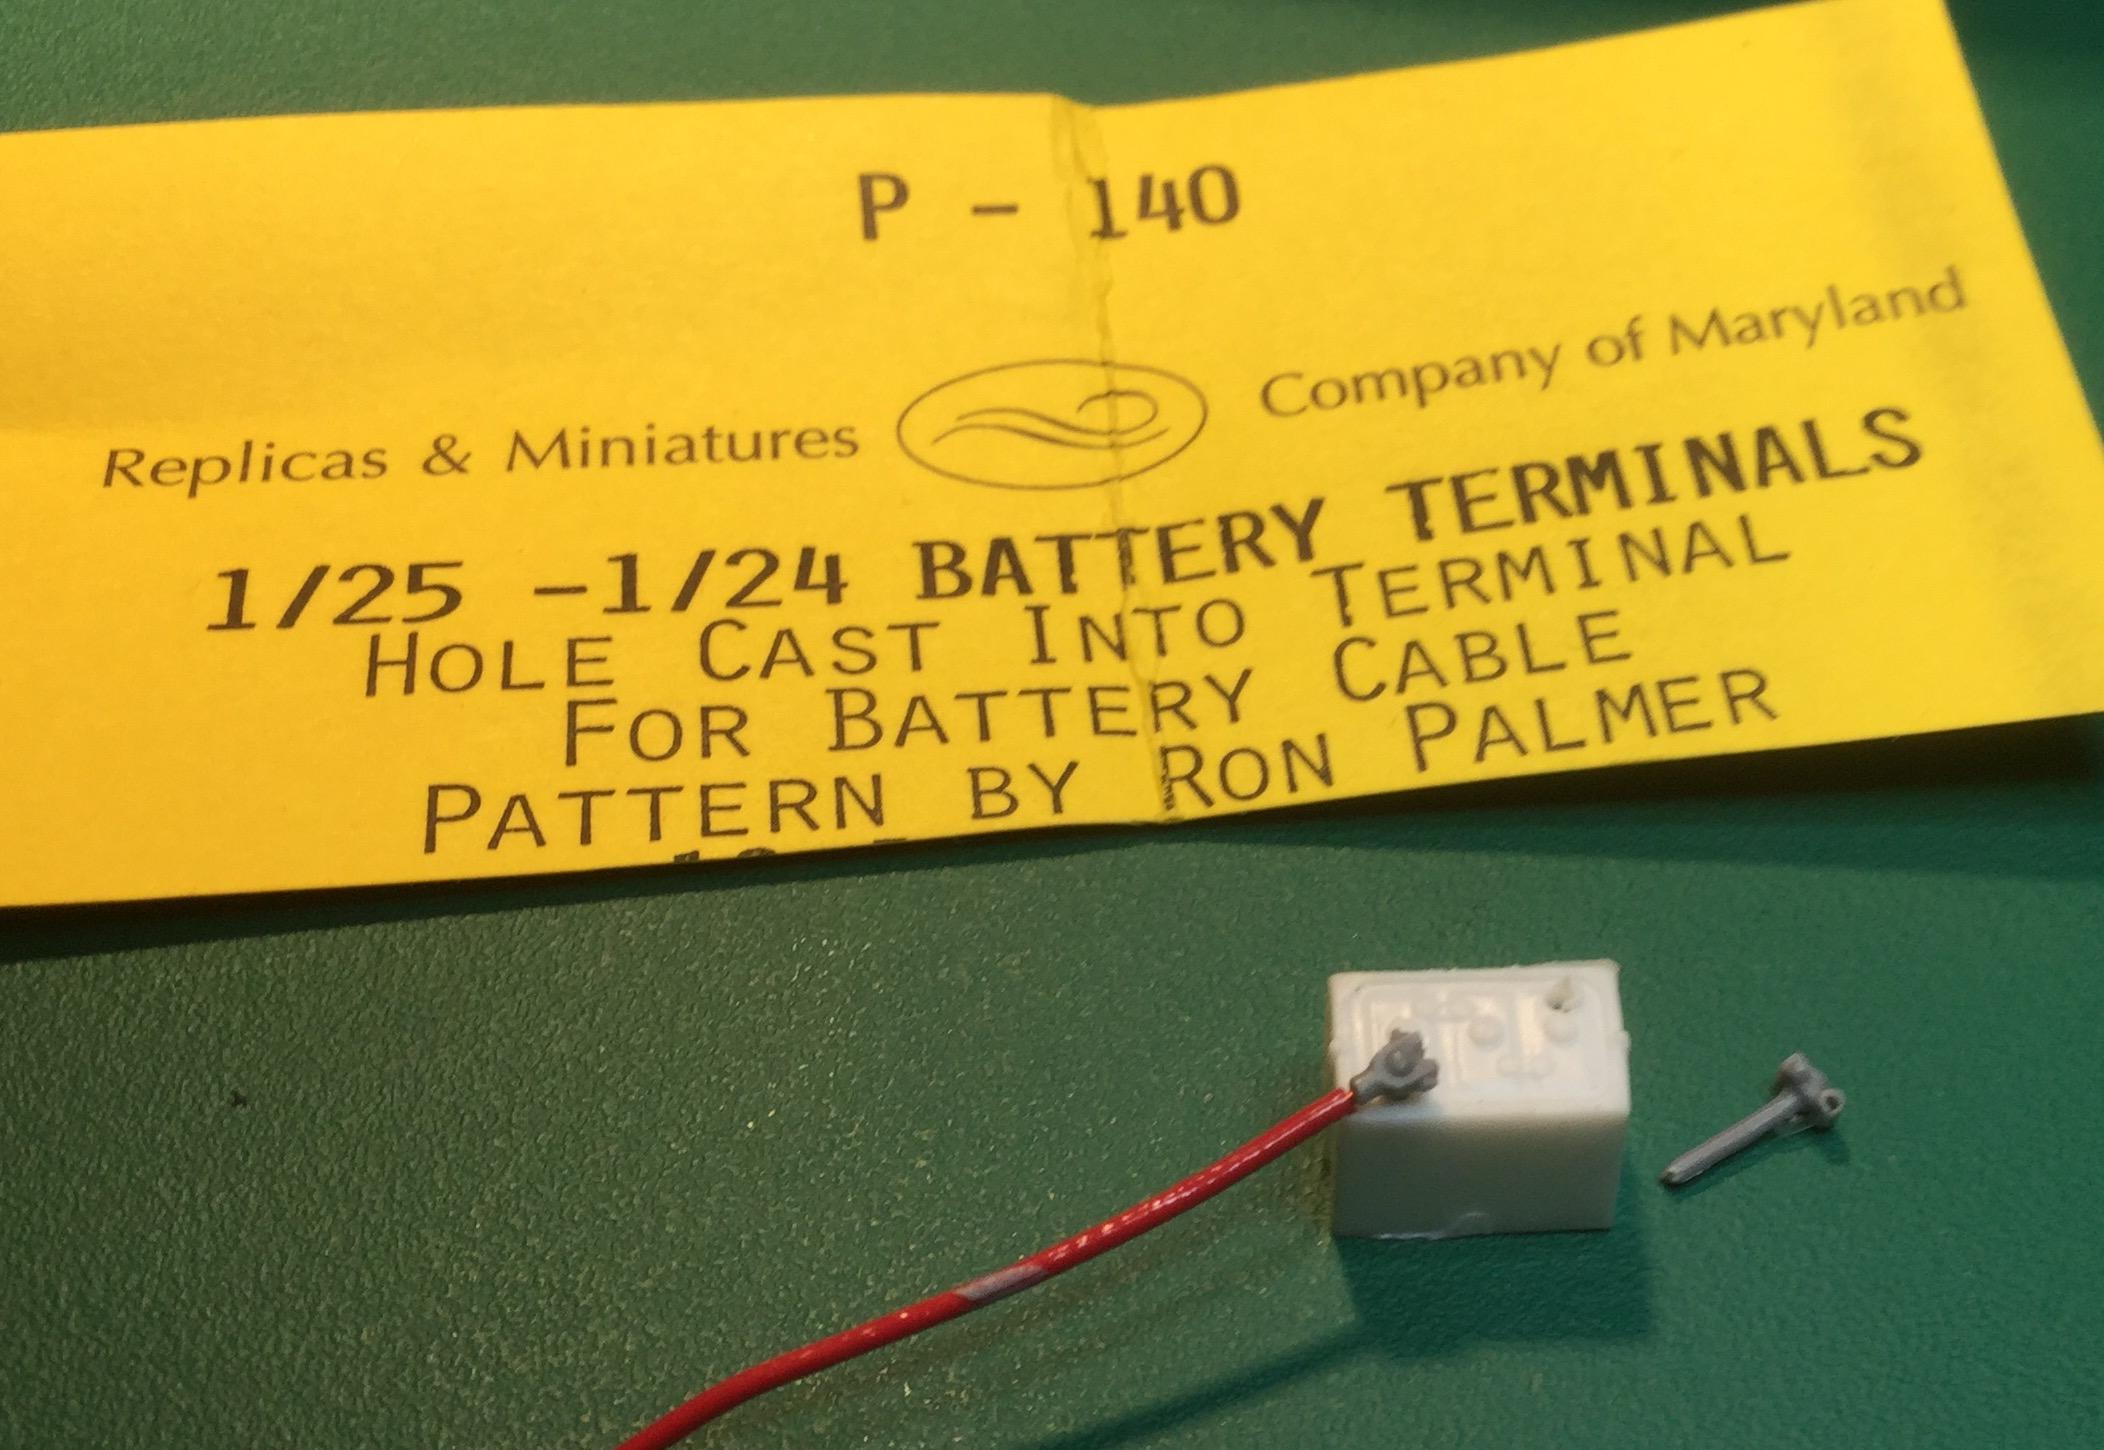
I have found that R&M offer the best battery cable ends, much better than the PE by MCG as they are not flat. The resin ends also have a hole predrilled making installation a snap. Cheers Misha
-
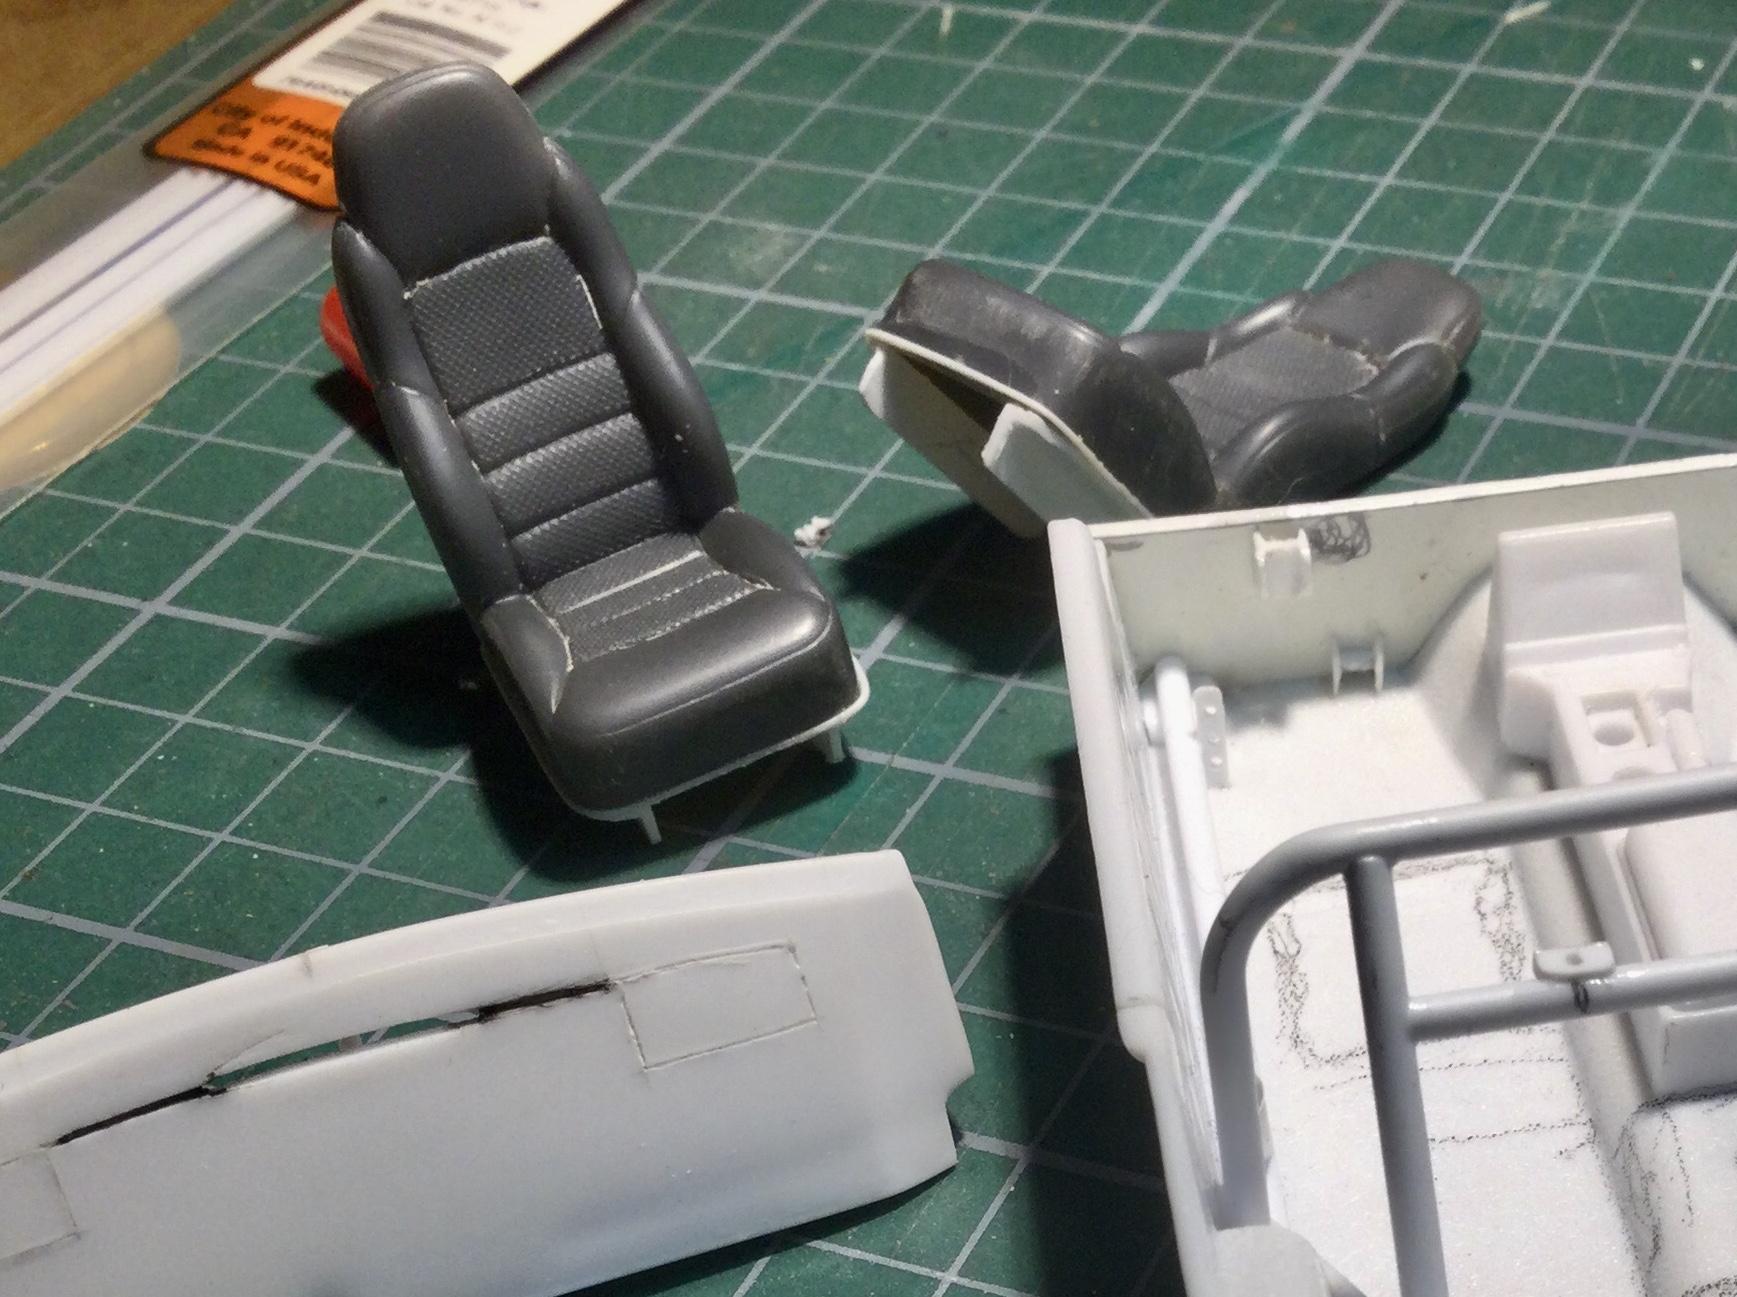
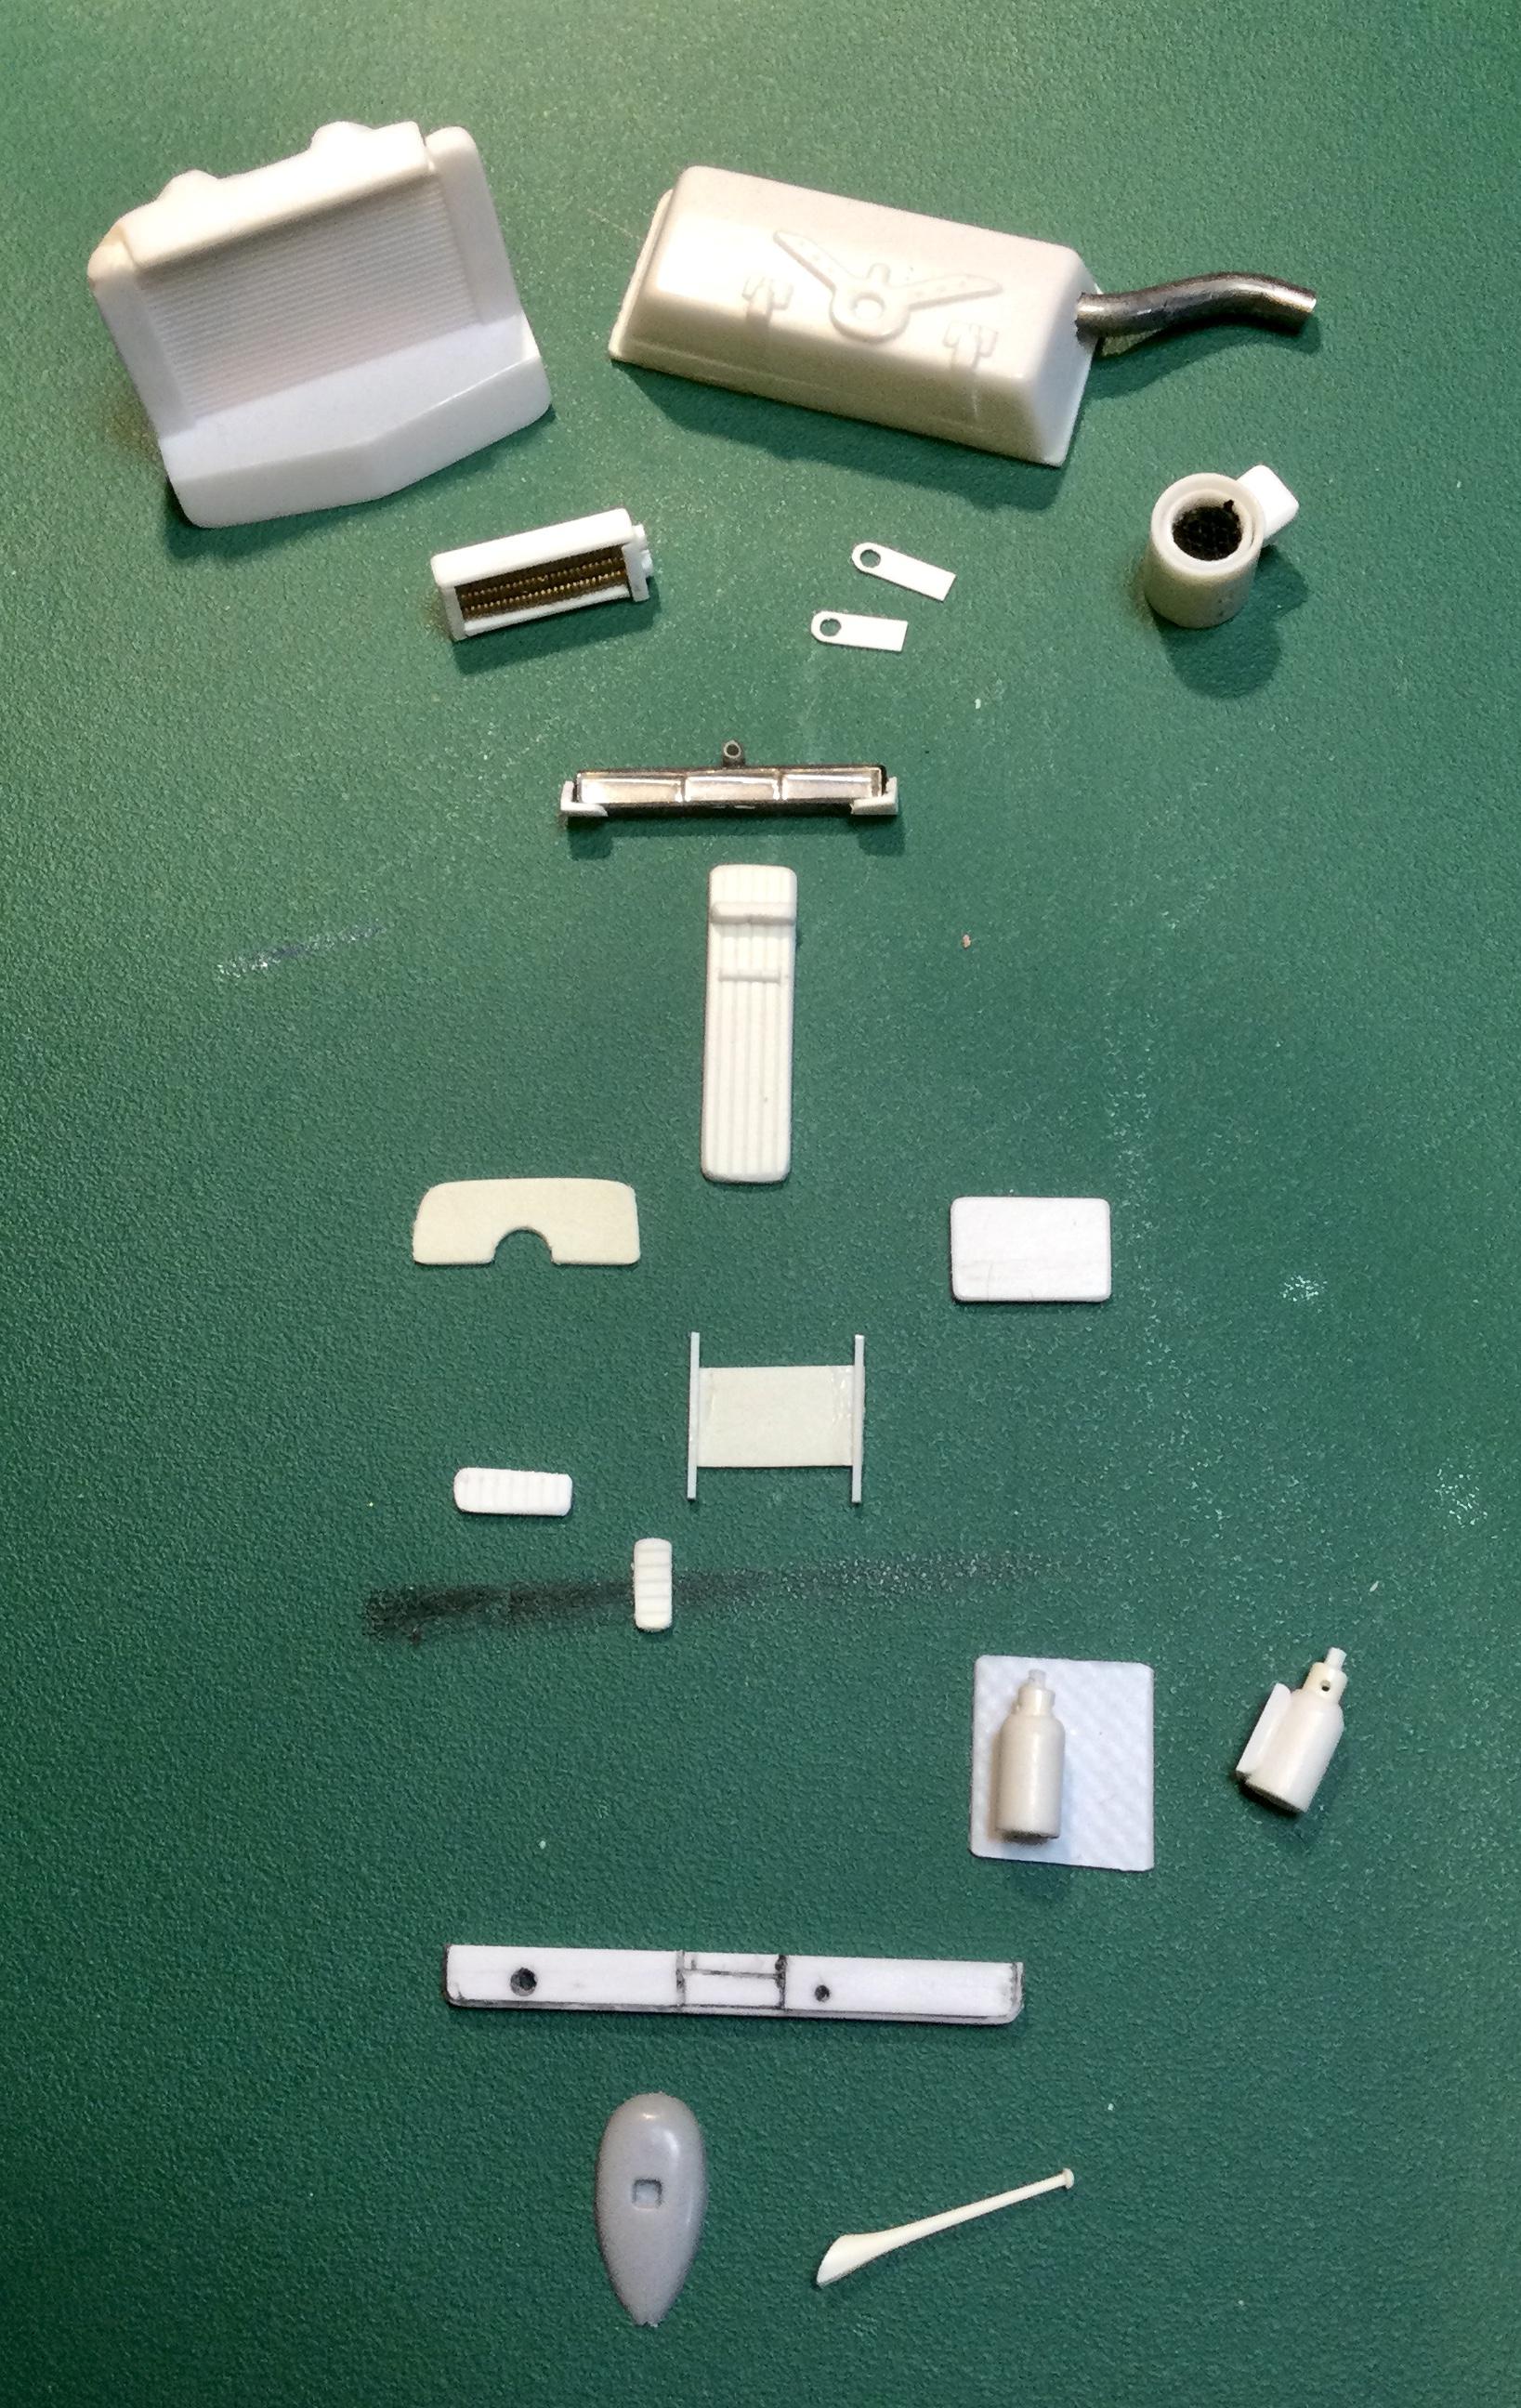
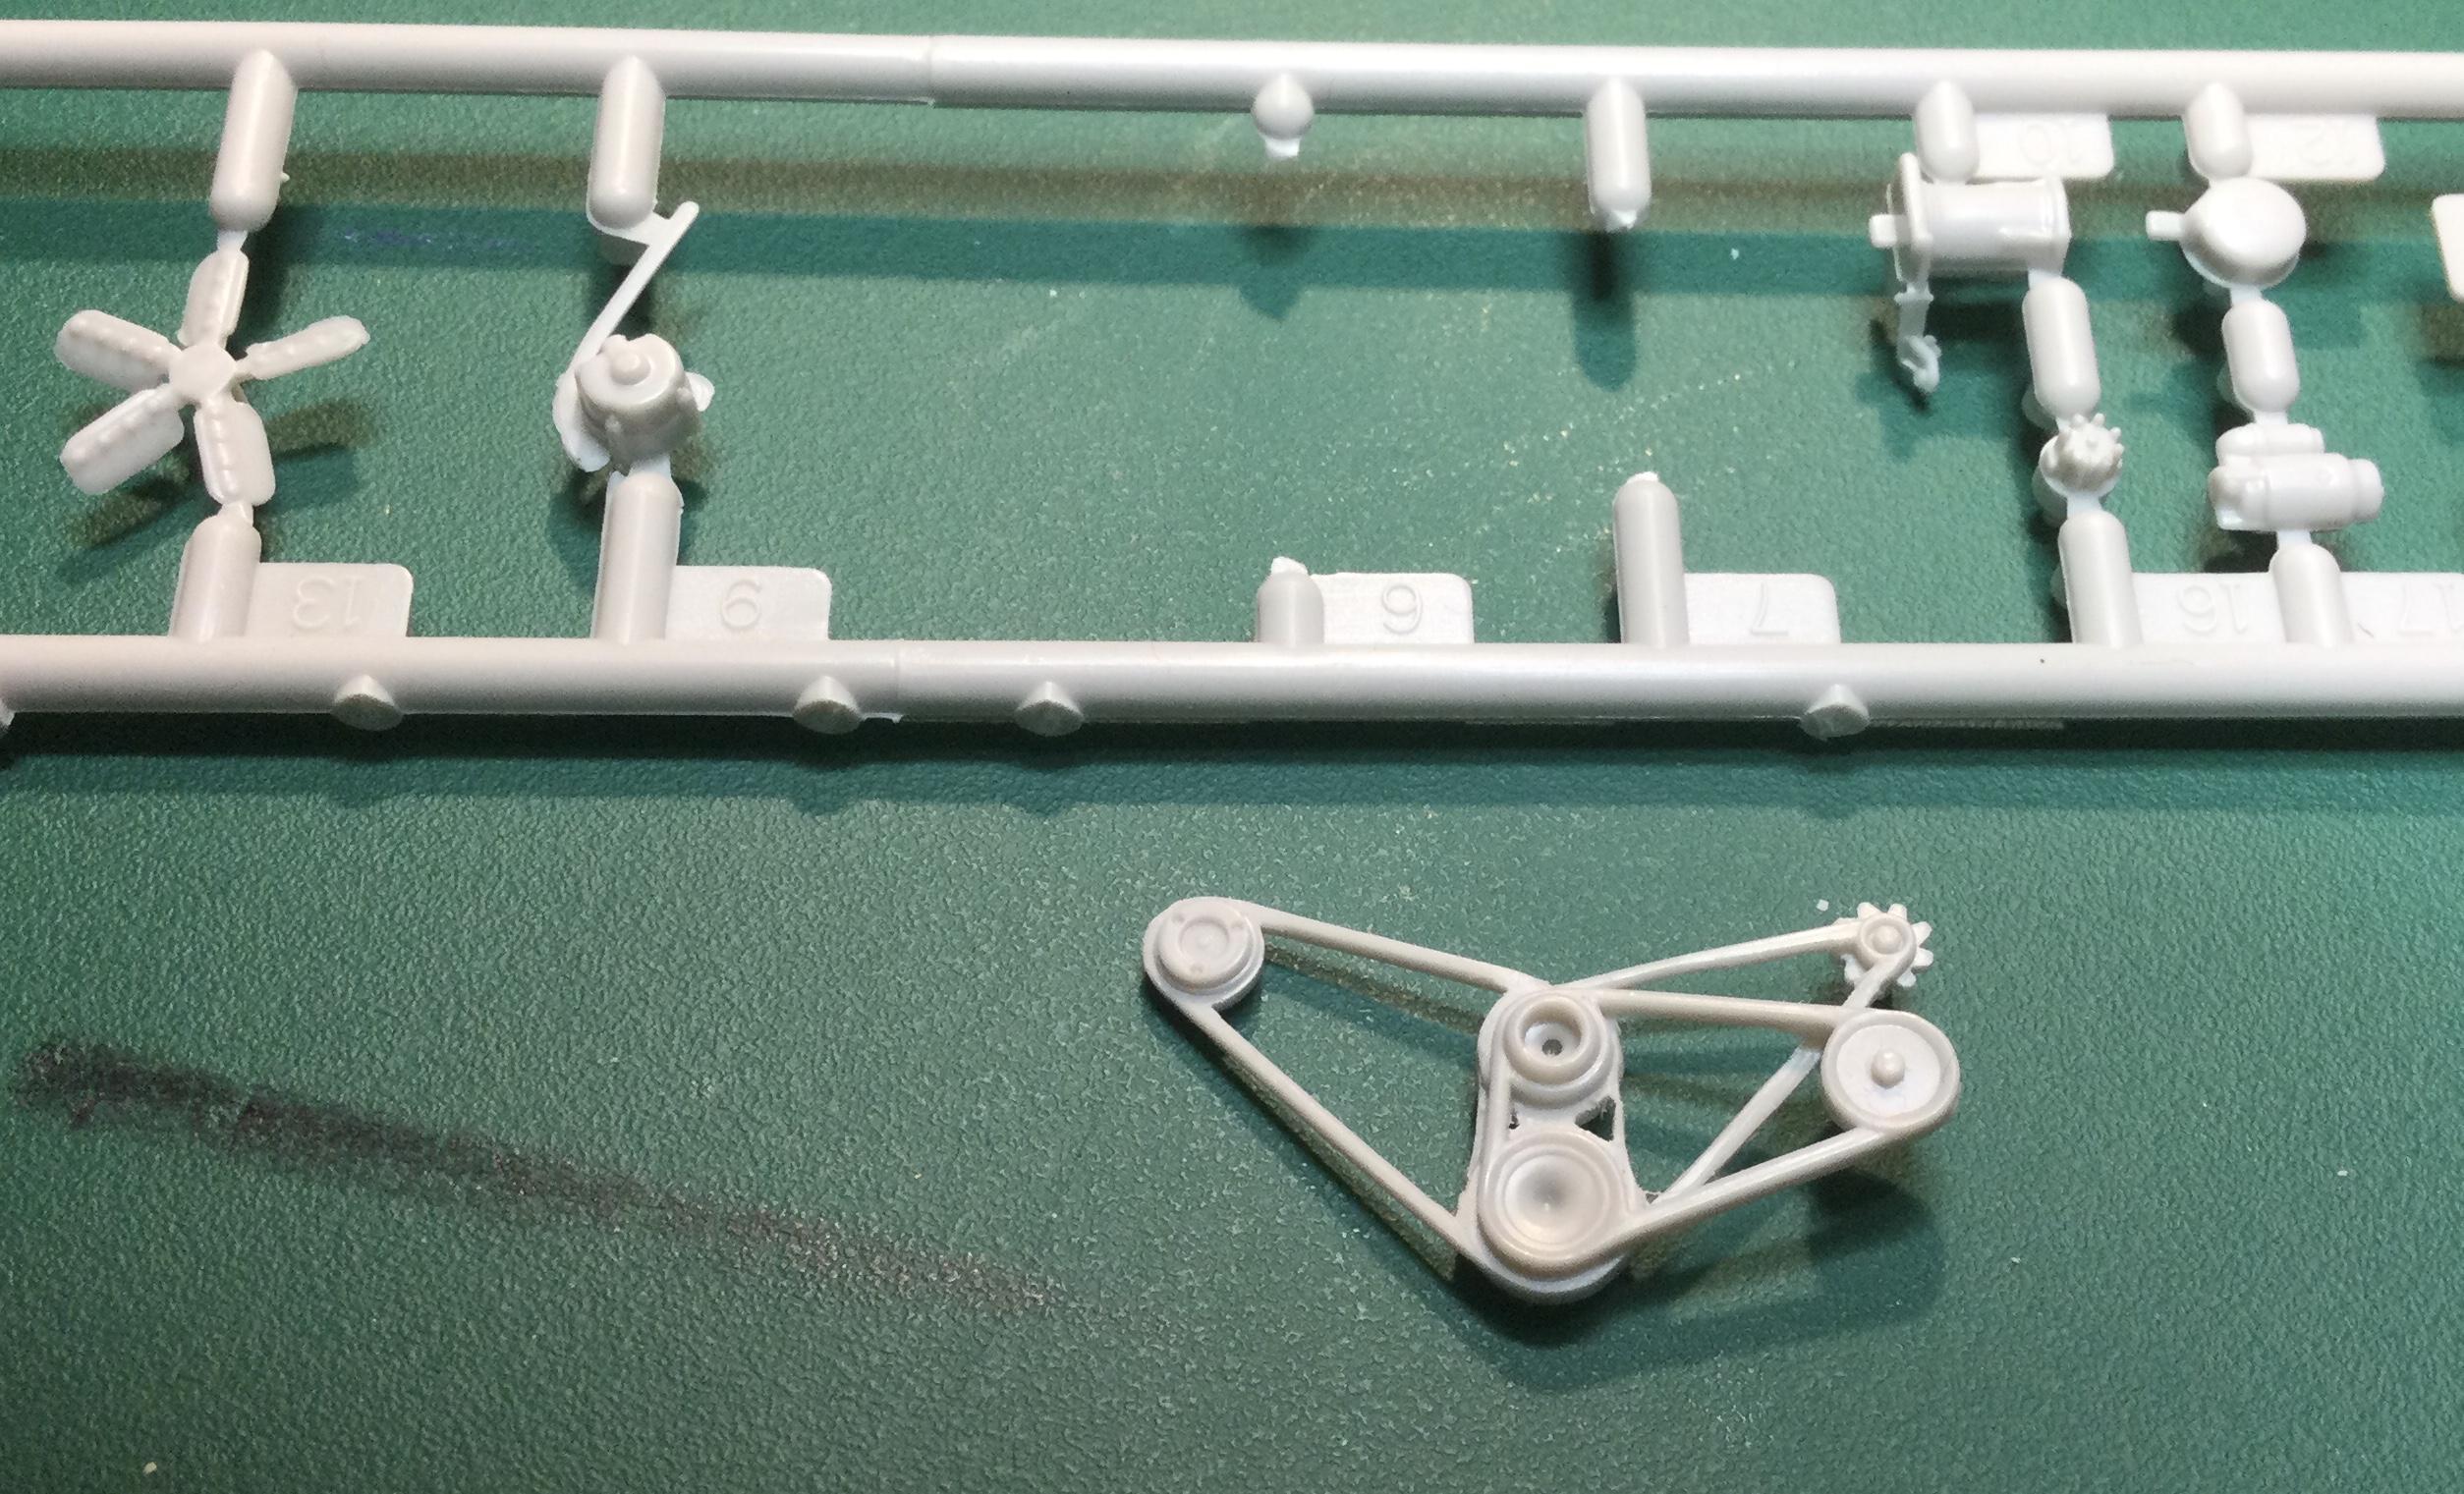
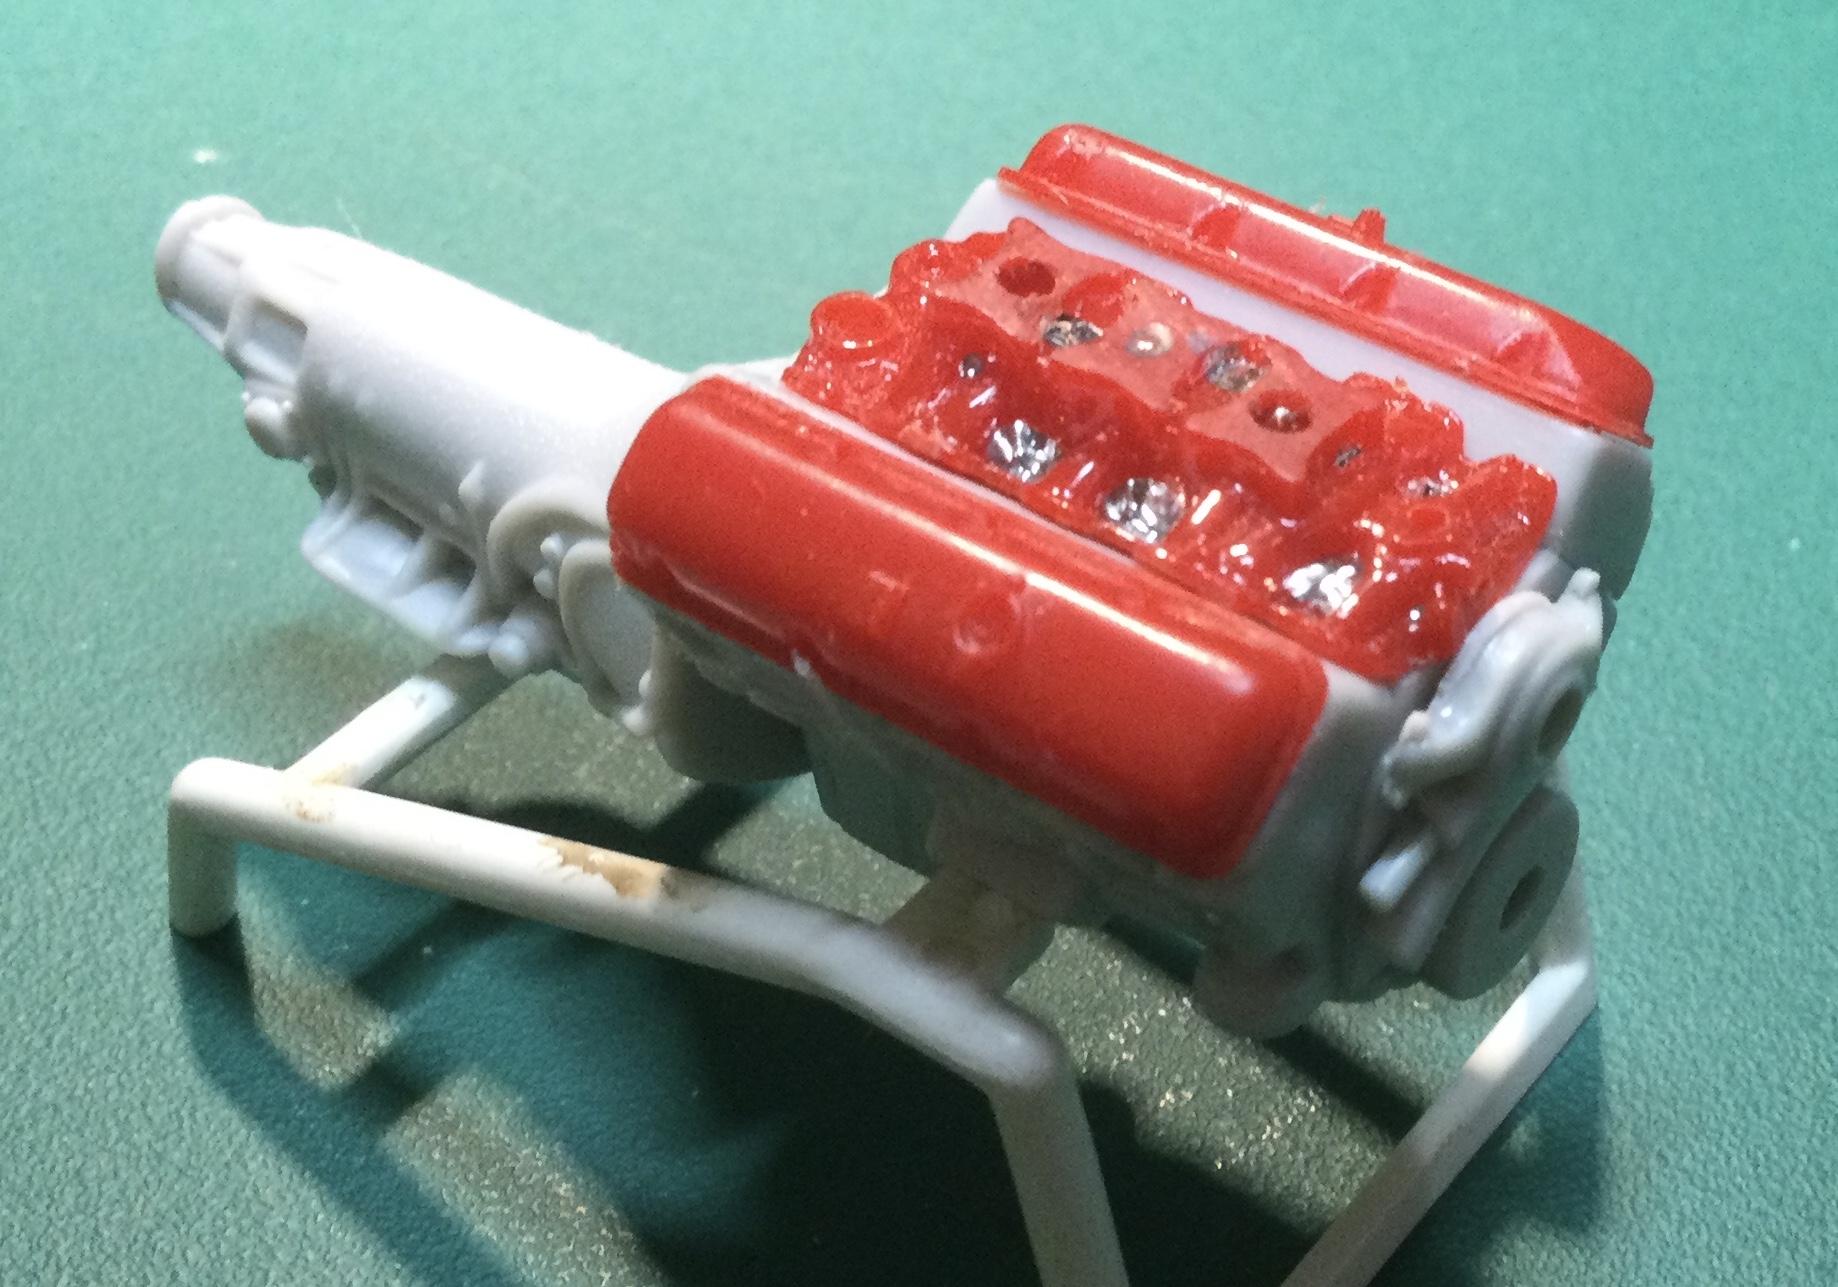
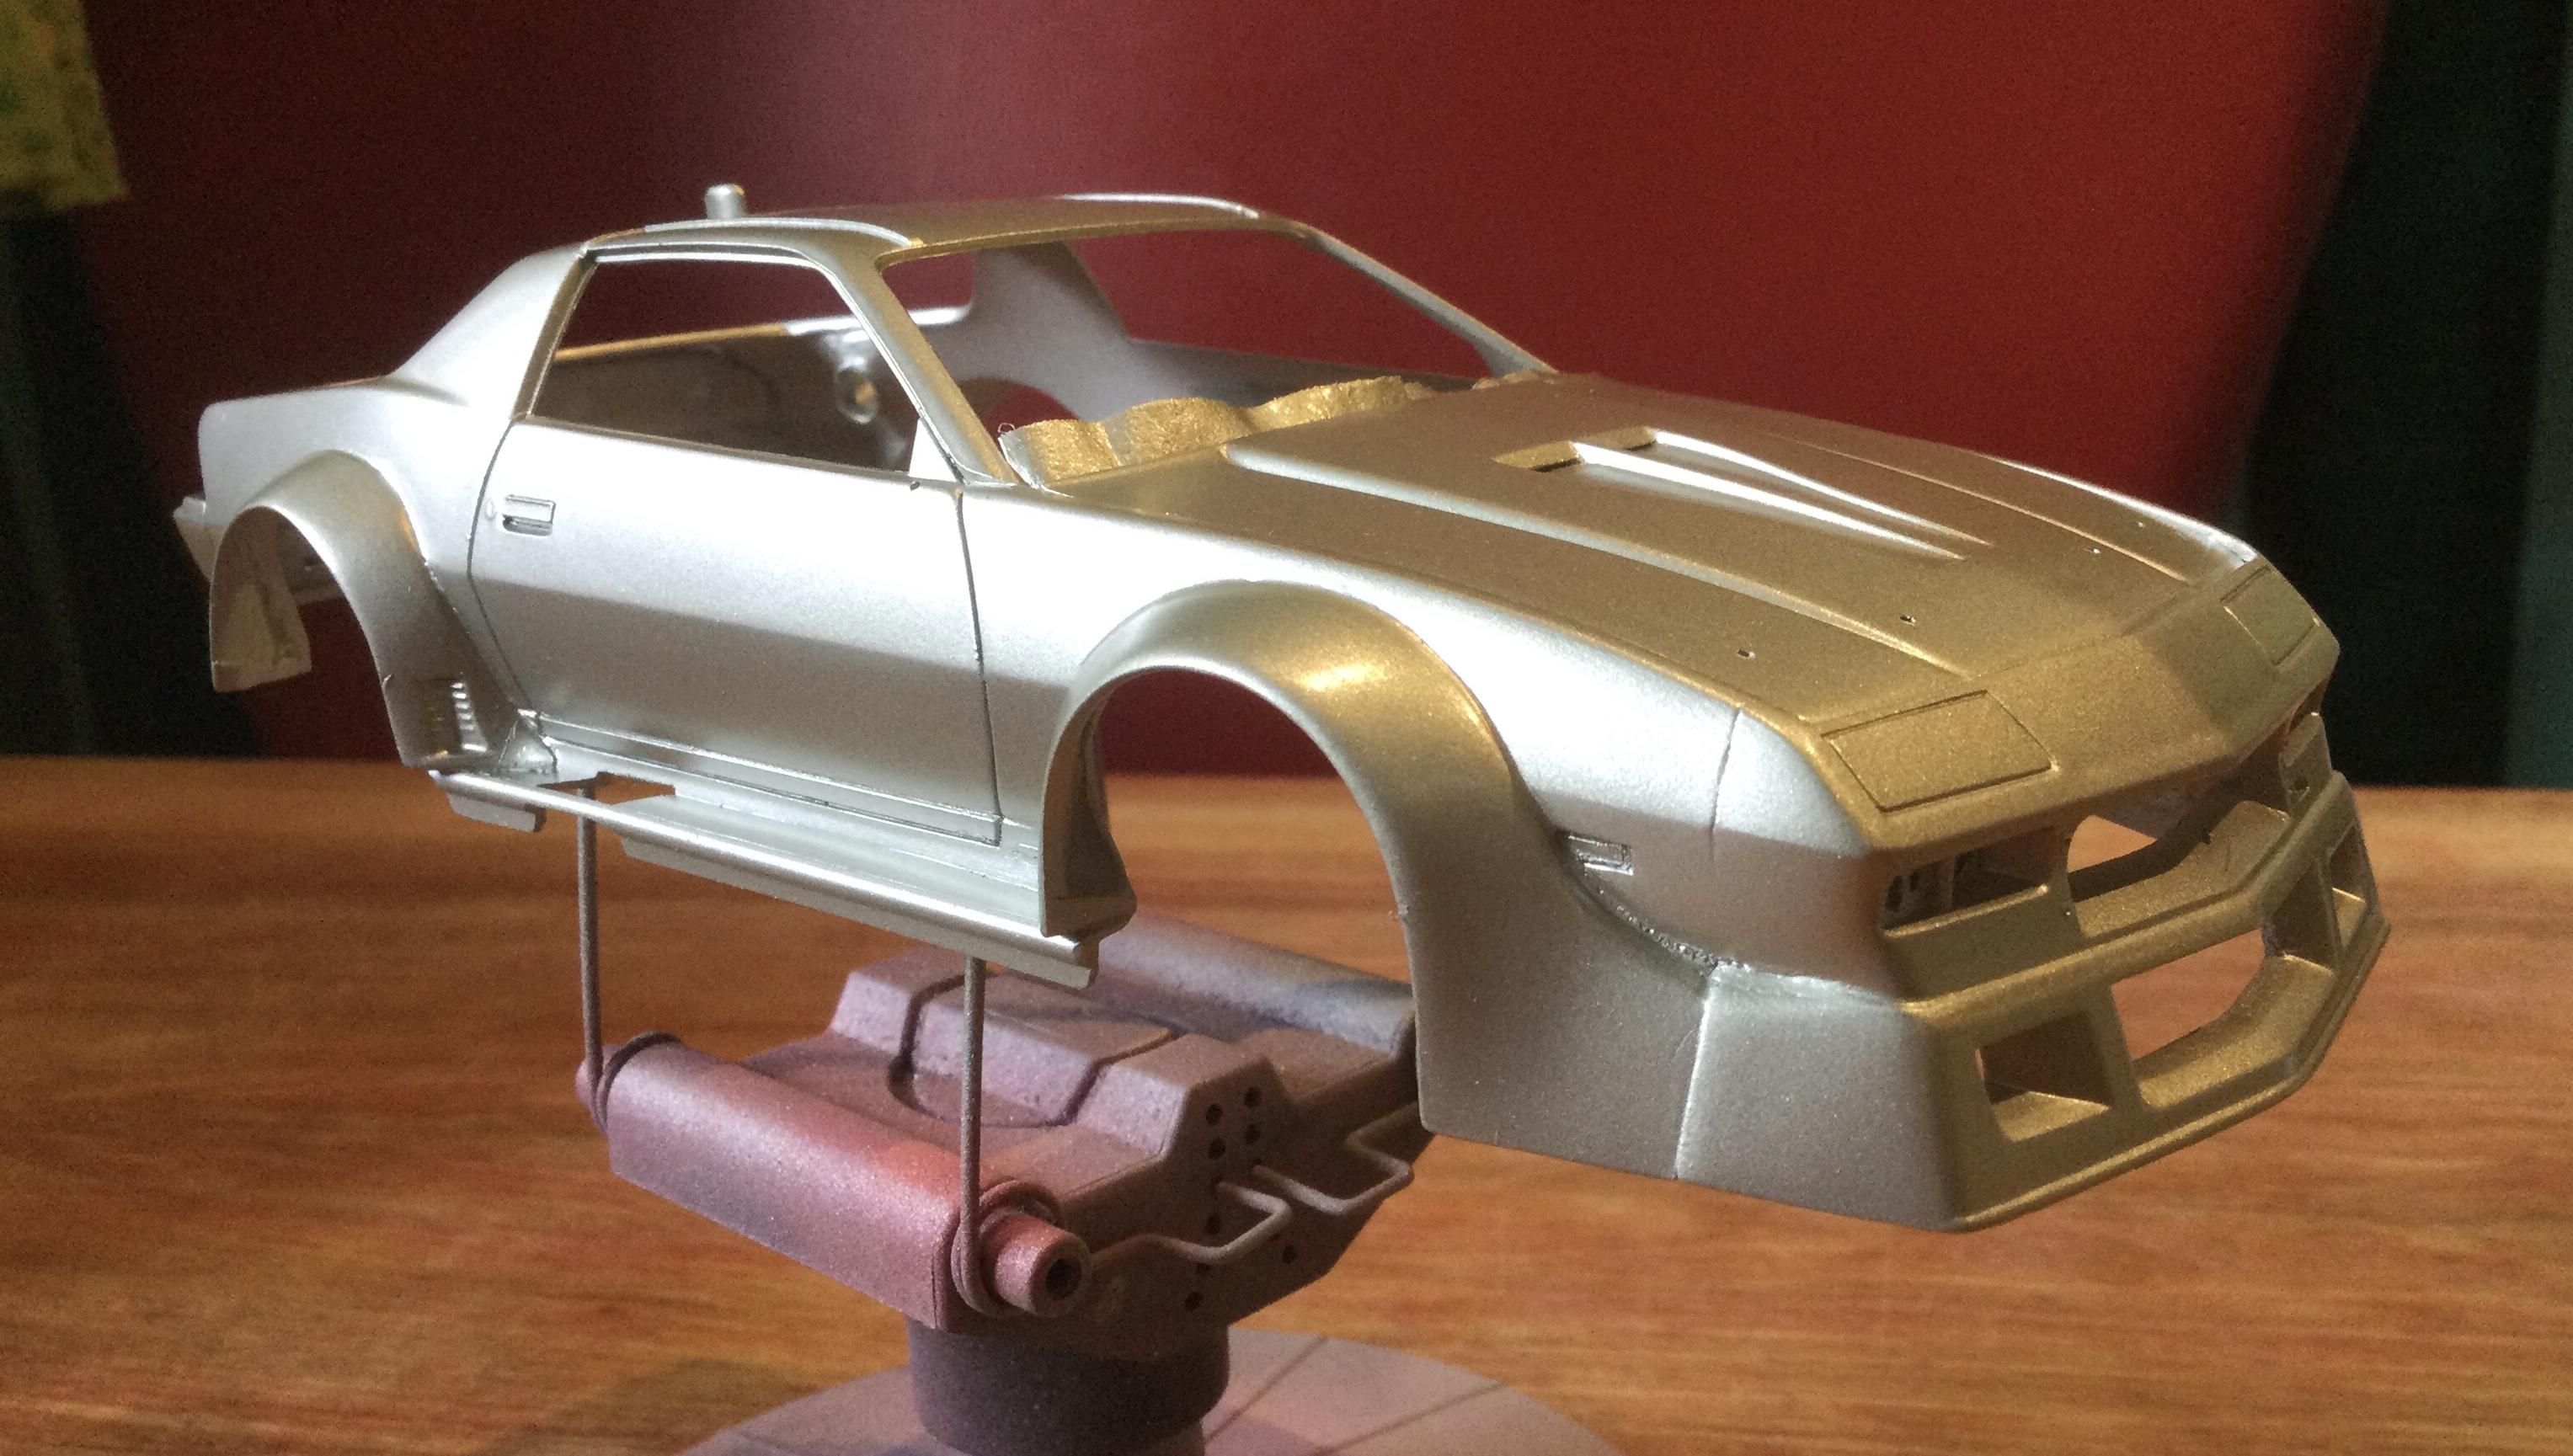
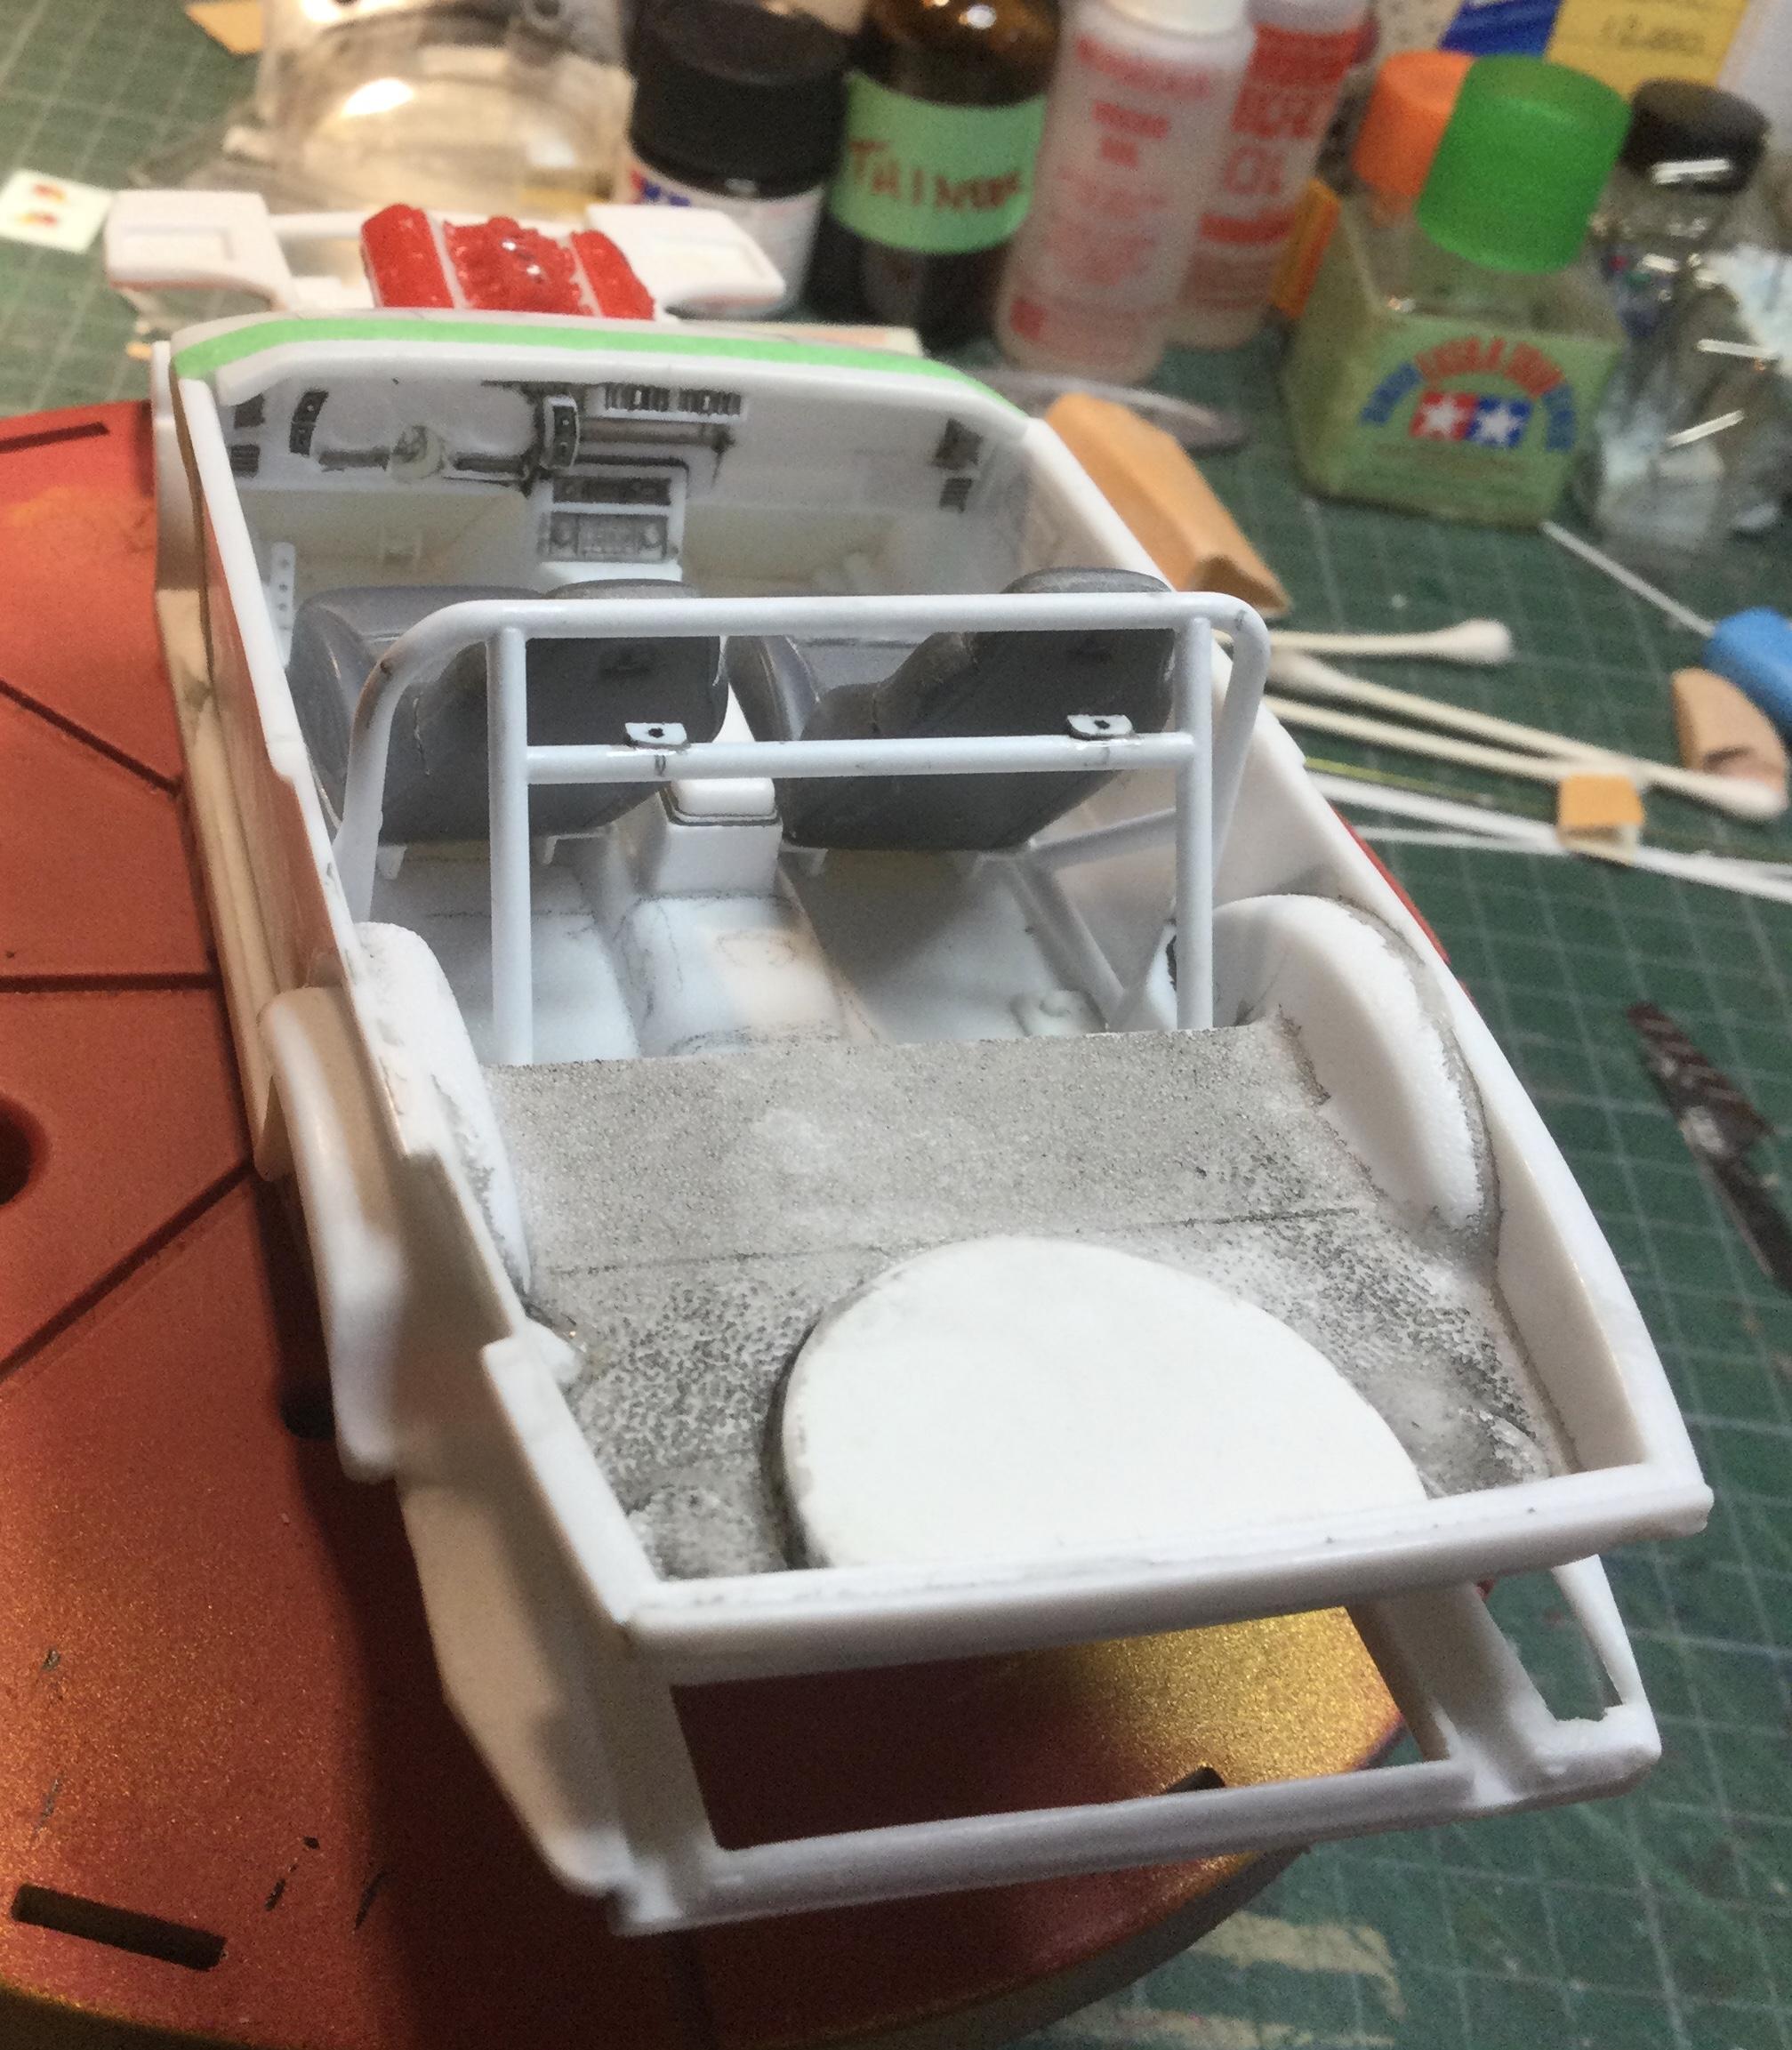
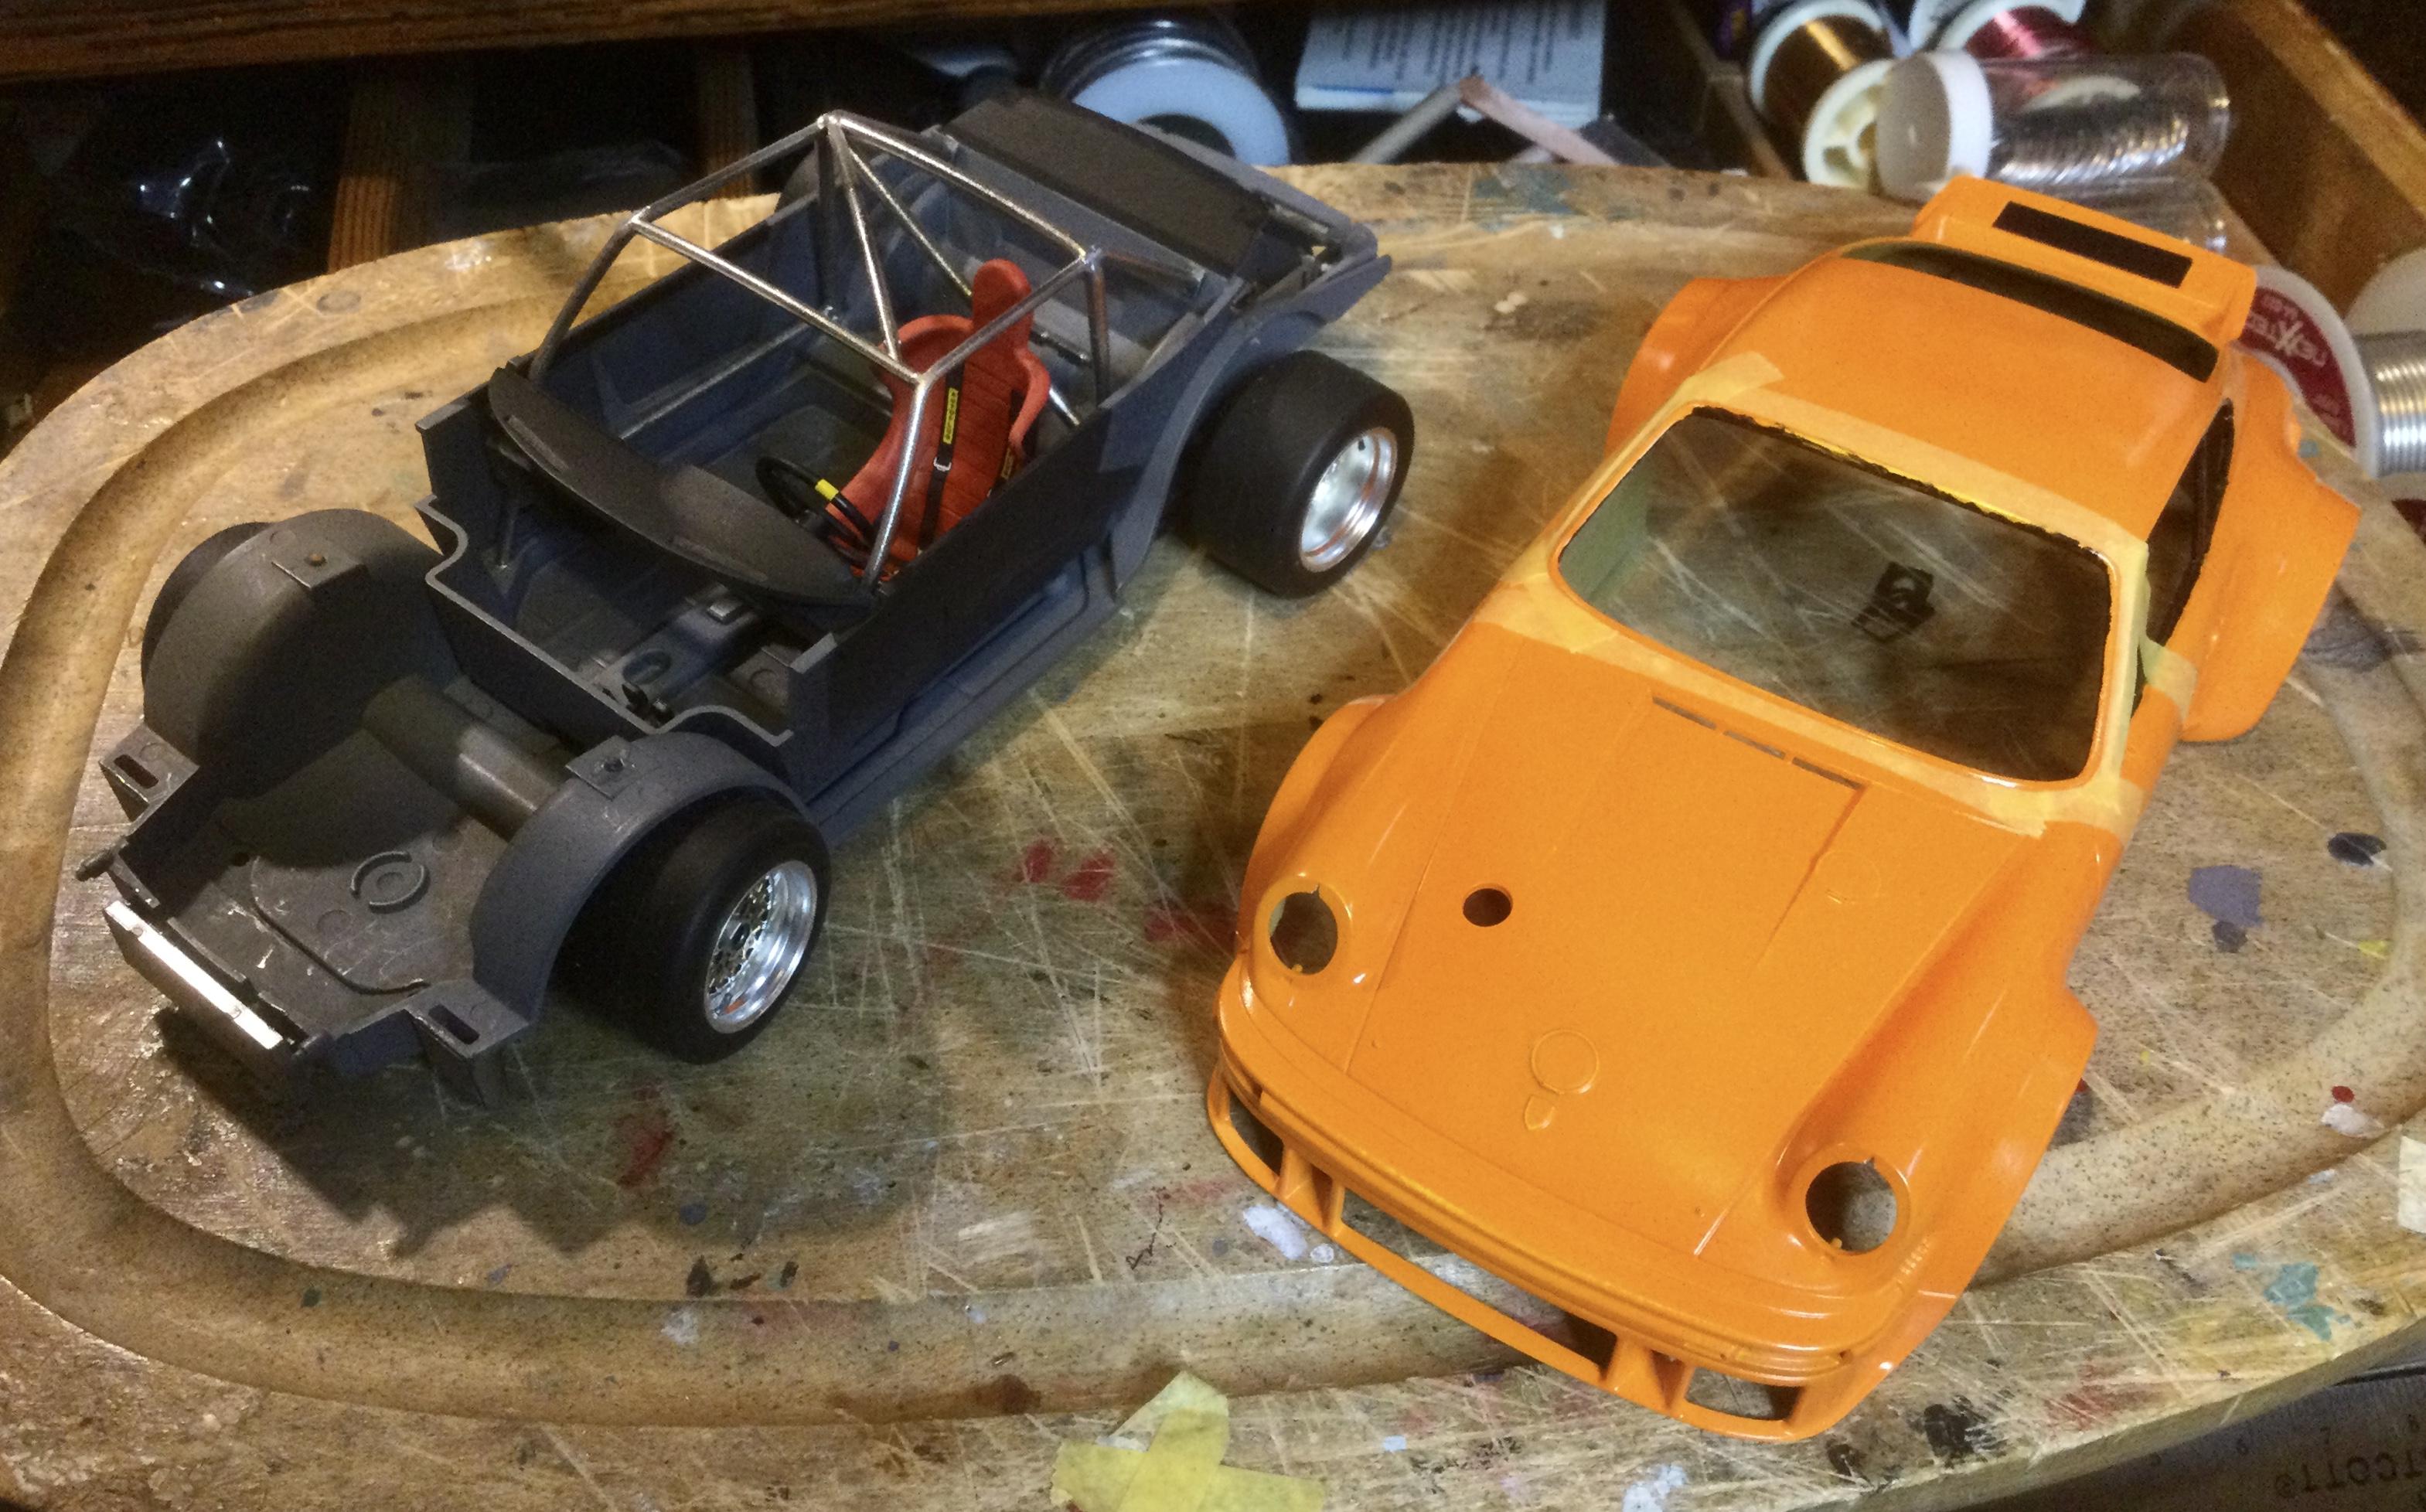
Been busy with this build of the IMSA Camaro between sessions spent on my Porsche 934 RSR. Most of the time has been spent on scratch building interior details and getting the body to the primer stage. Opened up the slits at the bottom of the faux Naca scoops on the hood. The kit provides very good detail on the underside of the hood for the ram air install. Also scribed over panel lines to make them deeper and applied Tamiya black panel line wash. Used that wash quite liberally in the interior to increase the depth of the detail. Some of the added detail on the interior included a dead pedal for the driver’s left foot, hanger for brake and gas pedals, belt attachment points on the roll bar. Panel lines on the seats and shoulder harness access were added. This shot displays the various additions planned for the build. At the top the the radiator is shown with the scratch built engine oil cooler below it. It will eventually be in the grill recess in front of the rad, along with a tranny cooler. On the right is the new gas tank. Only the leading edge will be visible due to a rear belly pan. Directly below are the tow hooks and a rear differential cooler. The centre section features interior bits and pieces. A WINK mirror with radar and a video camera mounted below it was based on a NASCAR kit piece. The overhead console houses controls and system indicators. On the left is the new digital instrument panel with an iPad next to it. In the centre is the console mounted nav and back up screen. Brake and gas pedals follow with the fire bottles and its mount. The bar houses the rear central brake light along with radar and video looking out the rear window. The final two items are a roof antenna and rear window radar pod. The engine for the Camaro is a 1967 Vette L-71 featuring the triple deuce carb set up. I’m using the big block out of the AMT 68 El Camino as it offers an automatic with all the accessory belts with PS, AC, Alt including attachment brackets. For the intake and valve covers I raided the R/M 67 Vette roadster. The engine has been mocked up and appears to fit well with chassis and interior. This brings to to this morning when I primed the body and completed the Champagne Gold TS 75 top coat. The front roof section will receive a white vinyl treatment. Overall quite satisfied with the construction & paint process. All comments are welcome! Cheers Misha
-

AMT Retro Deluxe '53 Studebaker Customizing Kit
Misha replied to FordRodnKustom's topic in Car Kit News & Reviews
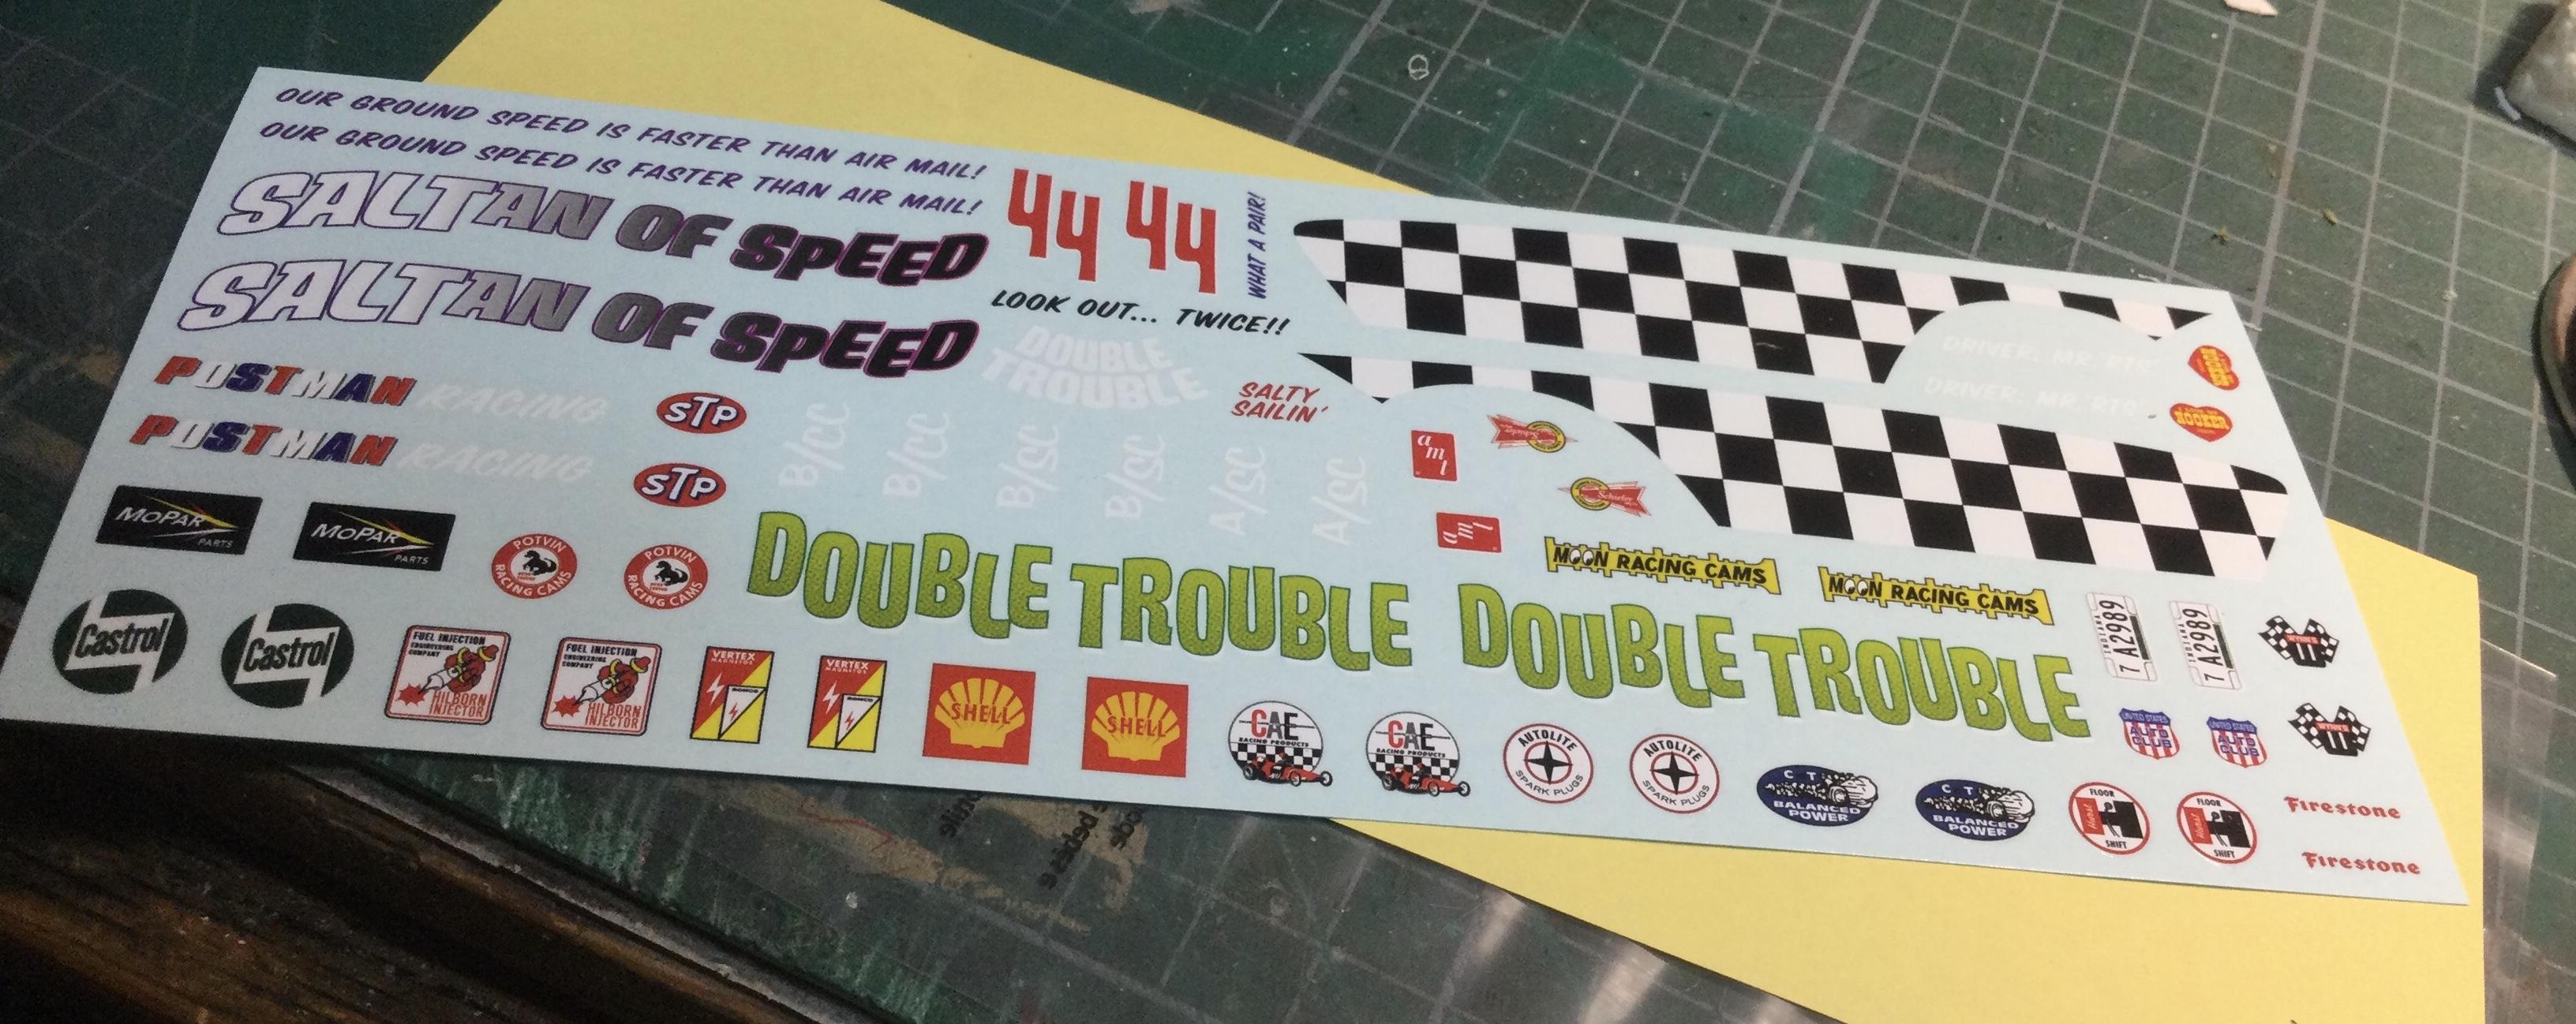
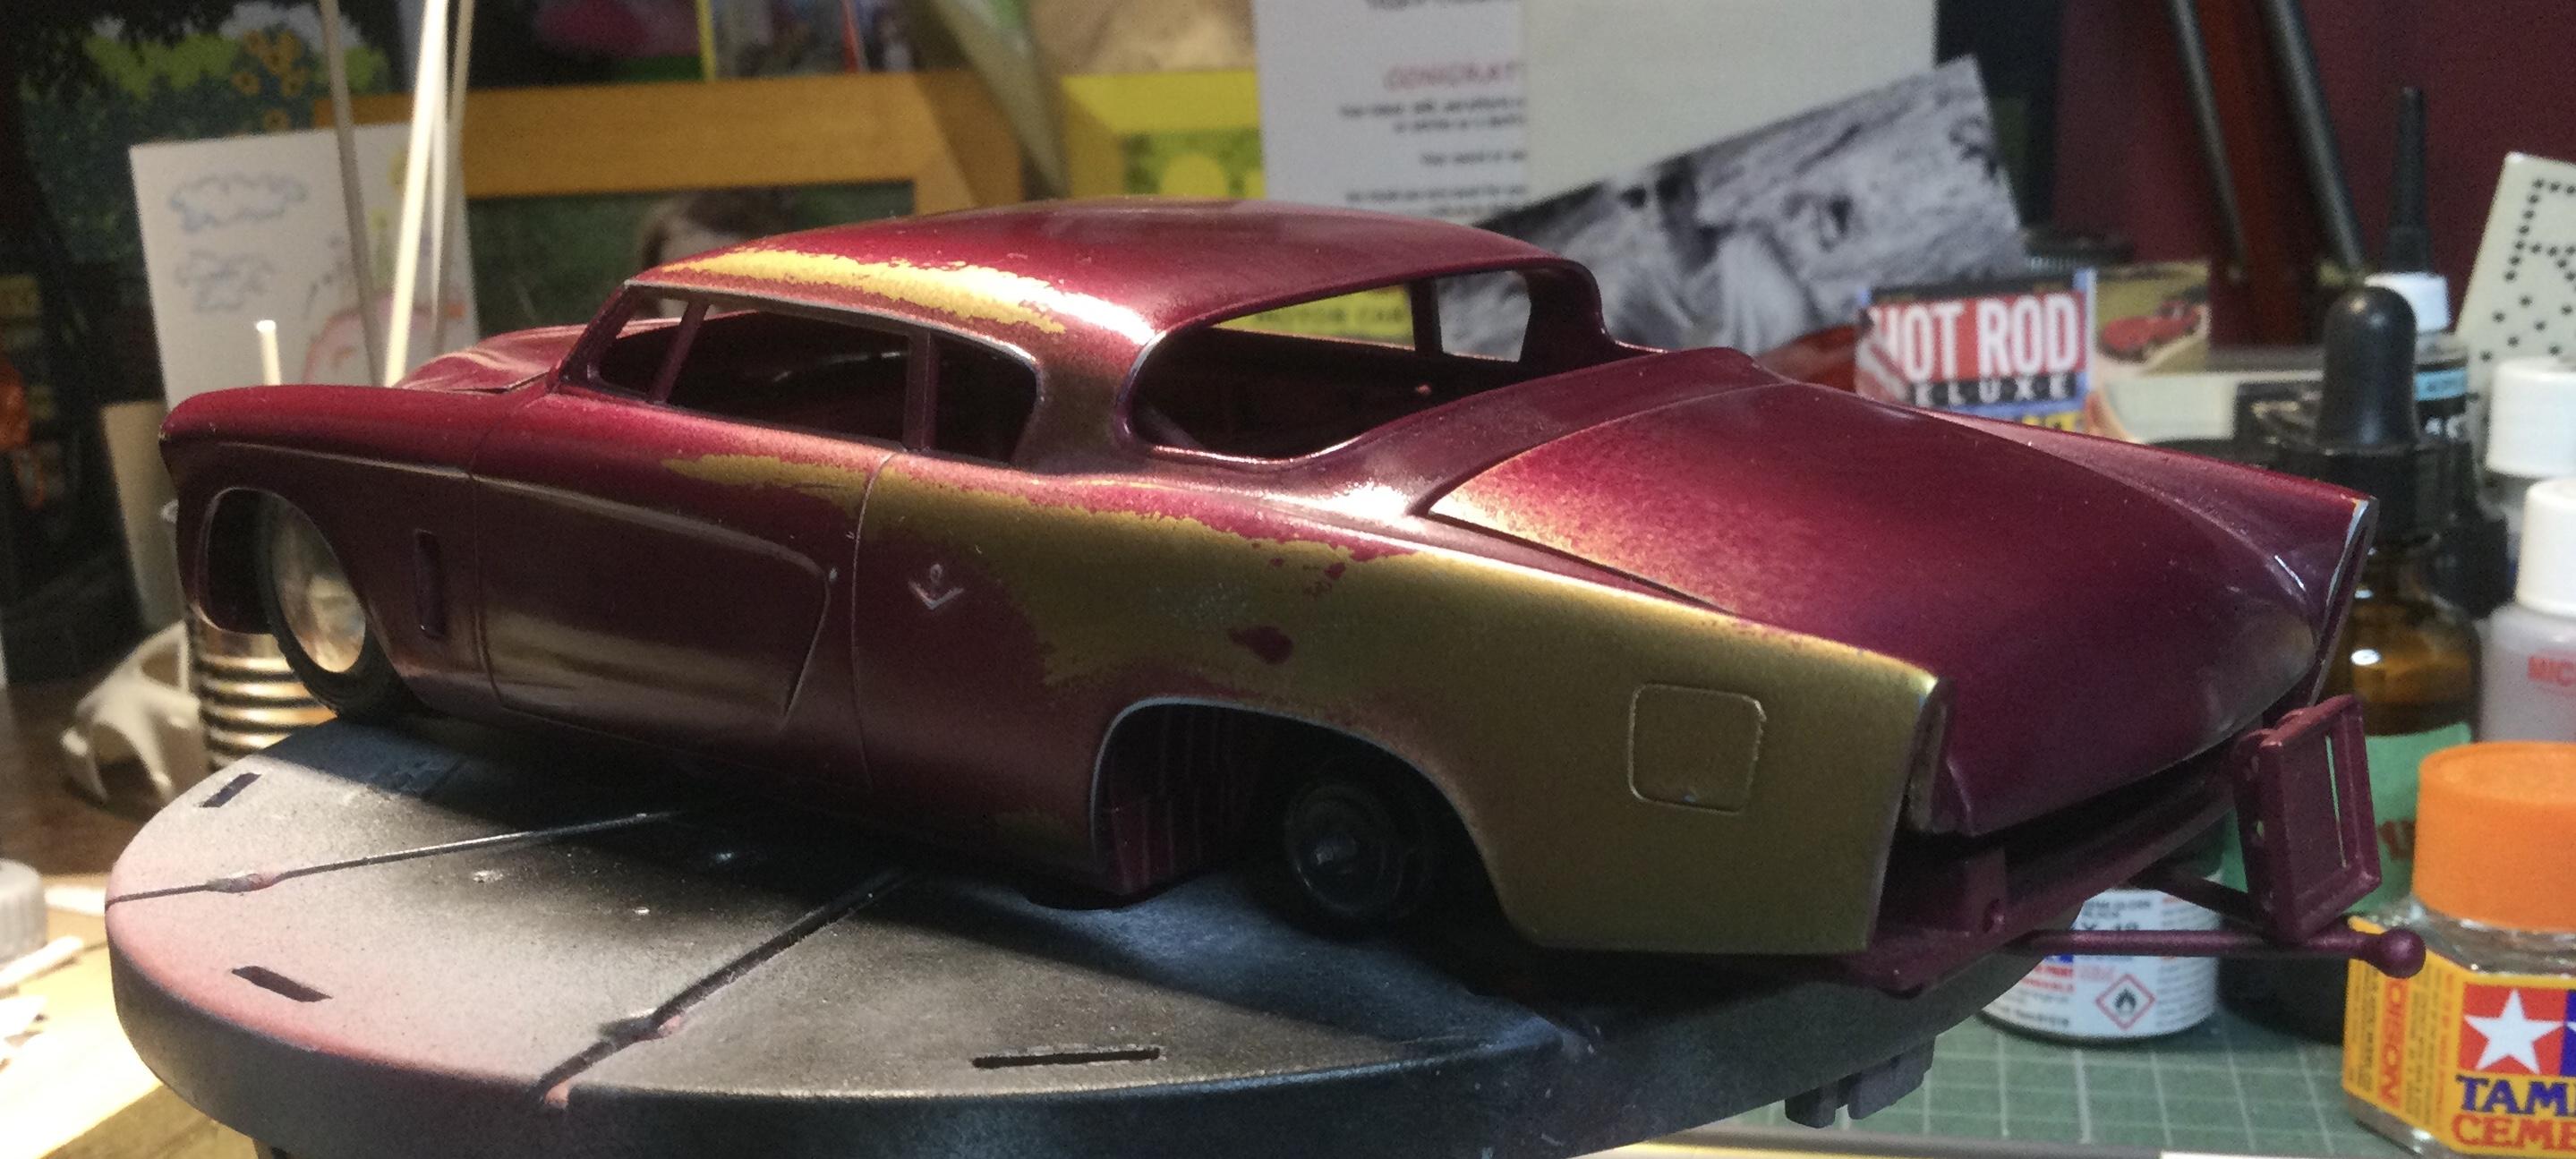
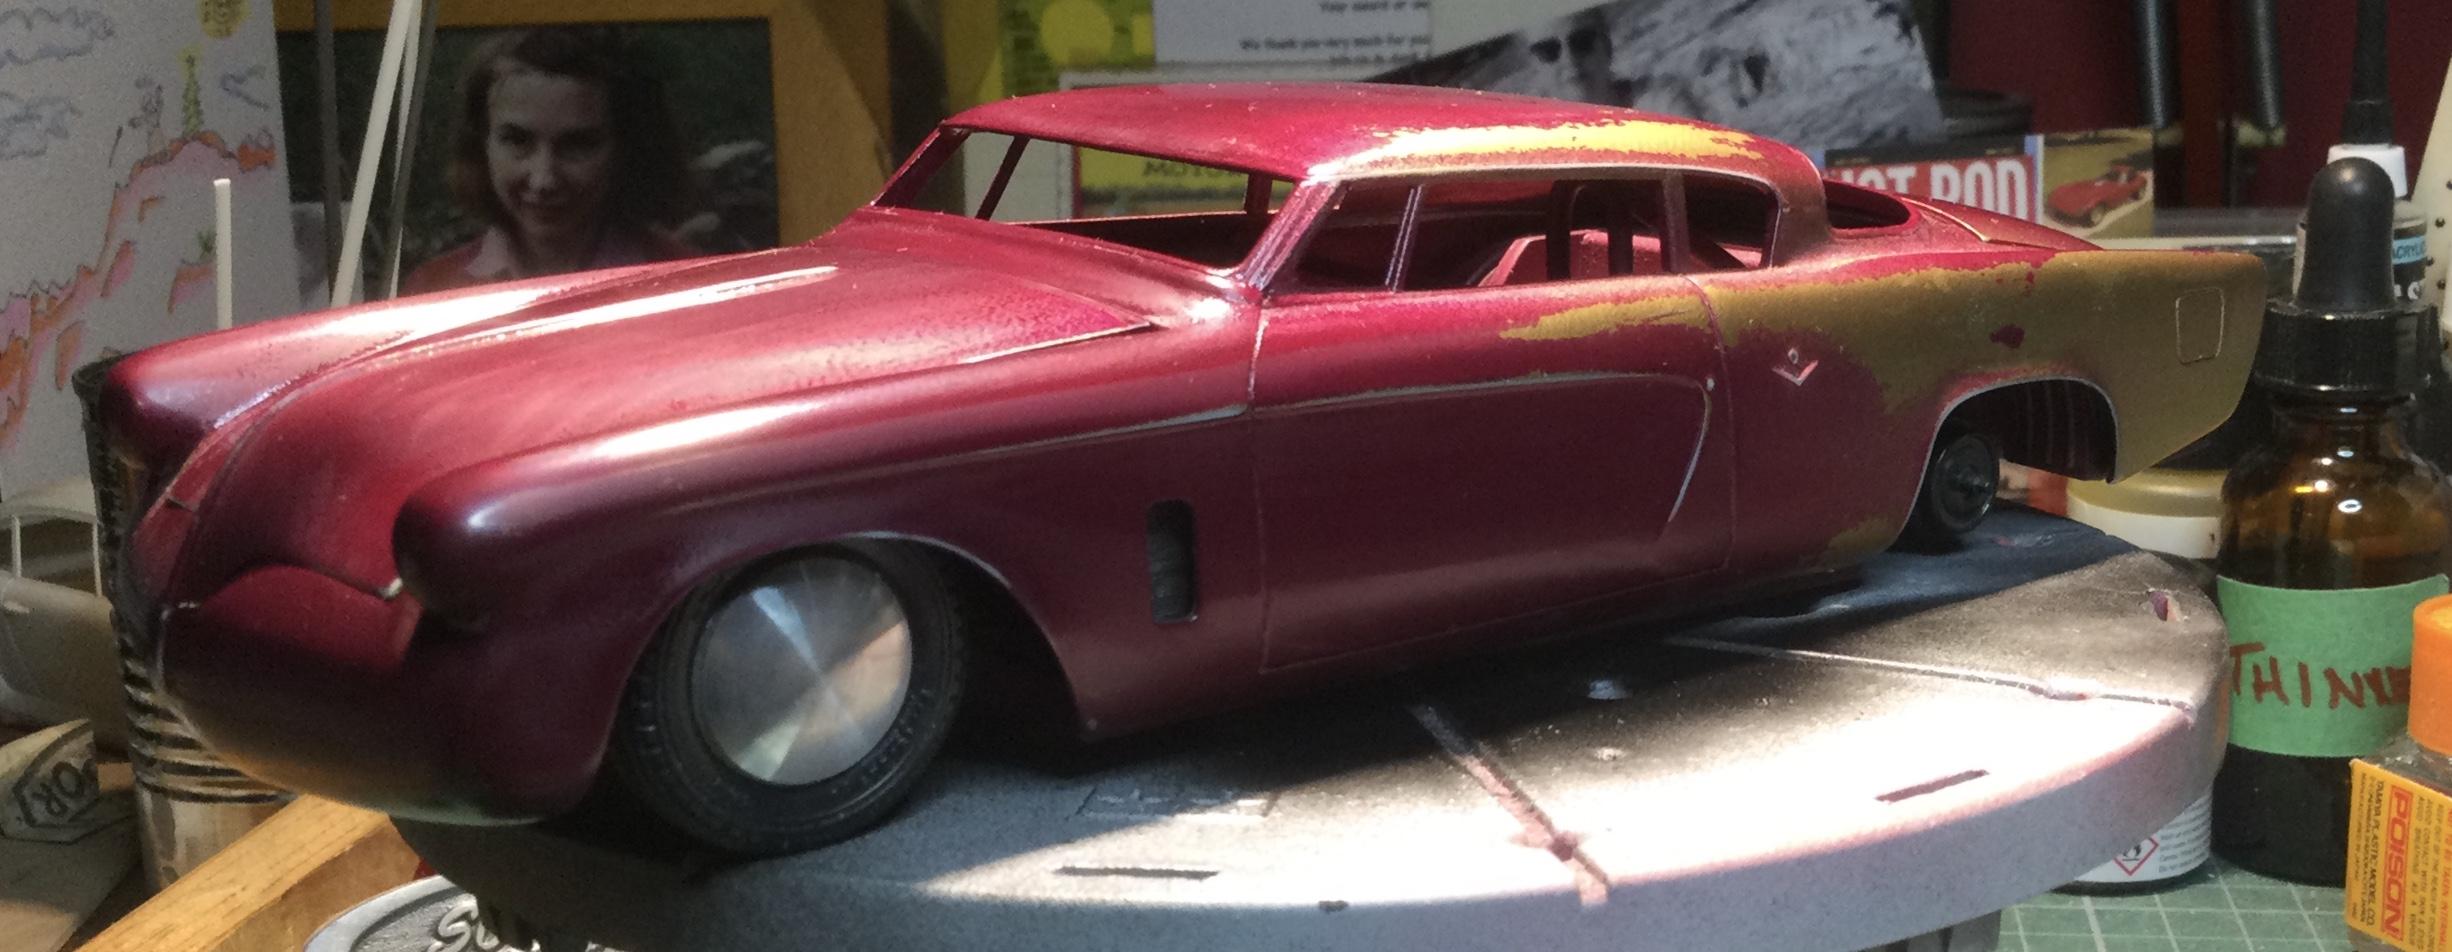
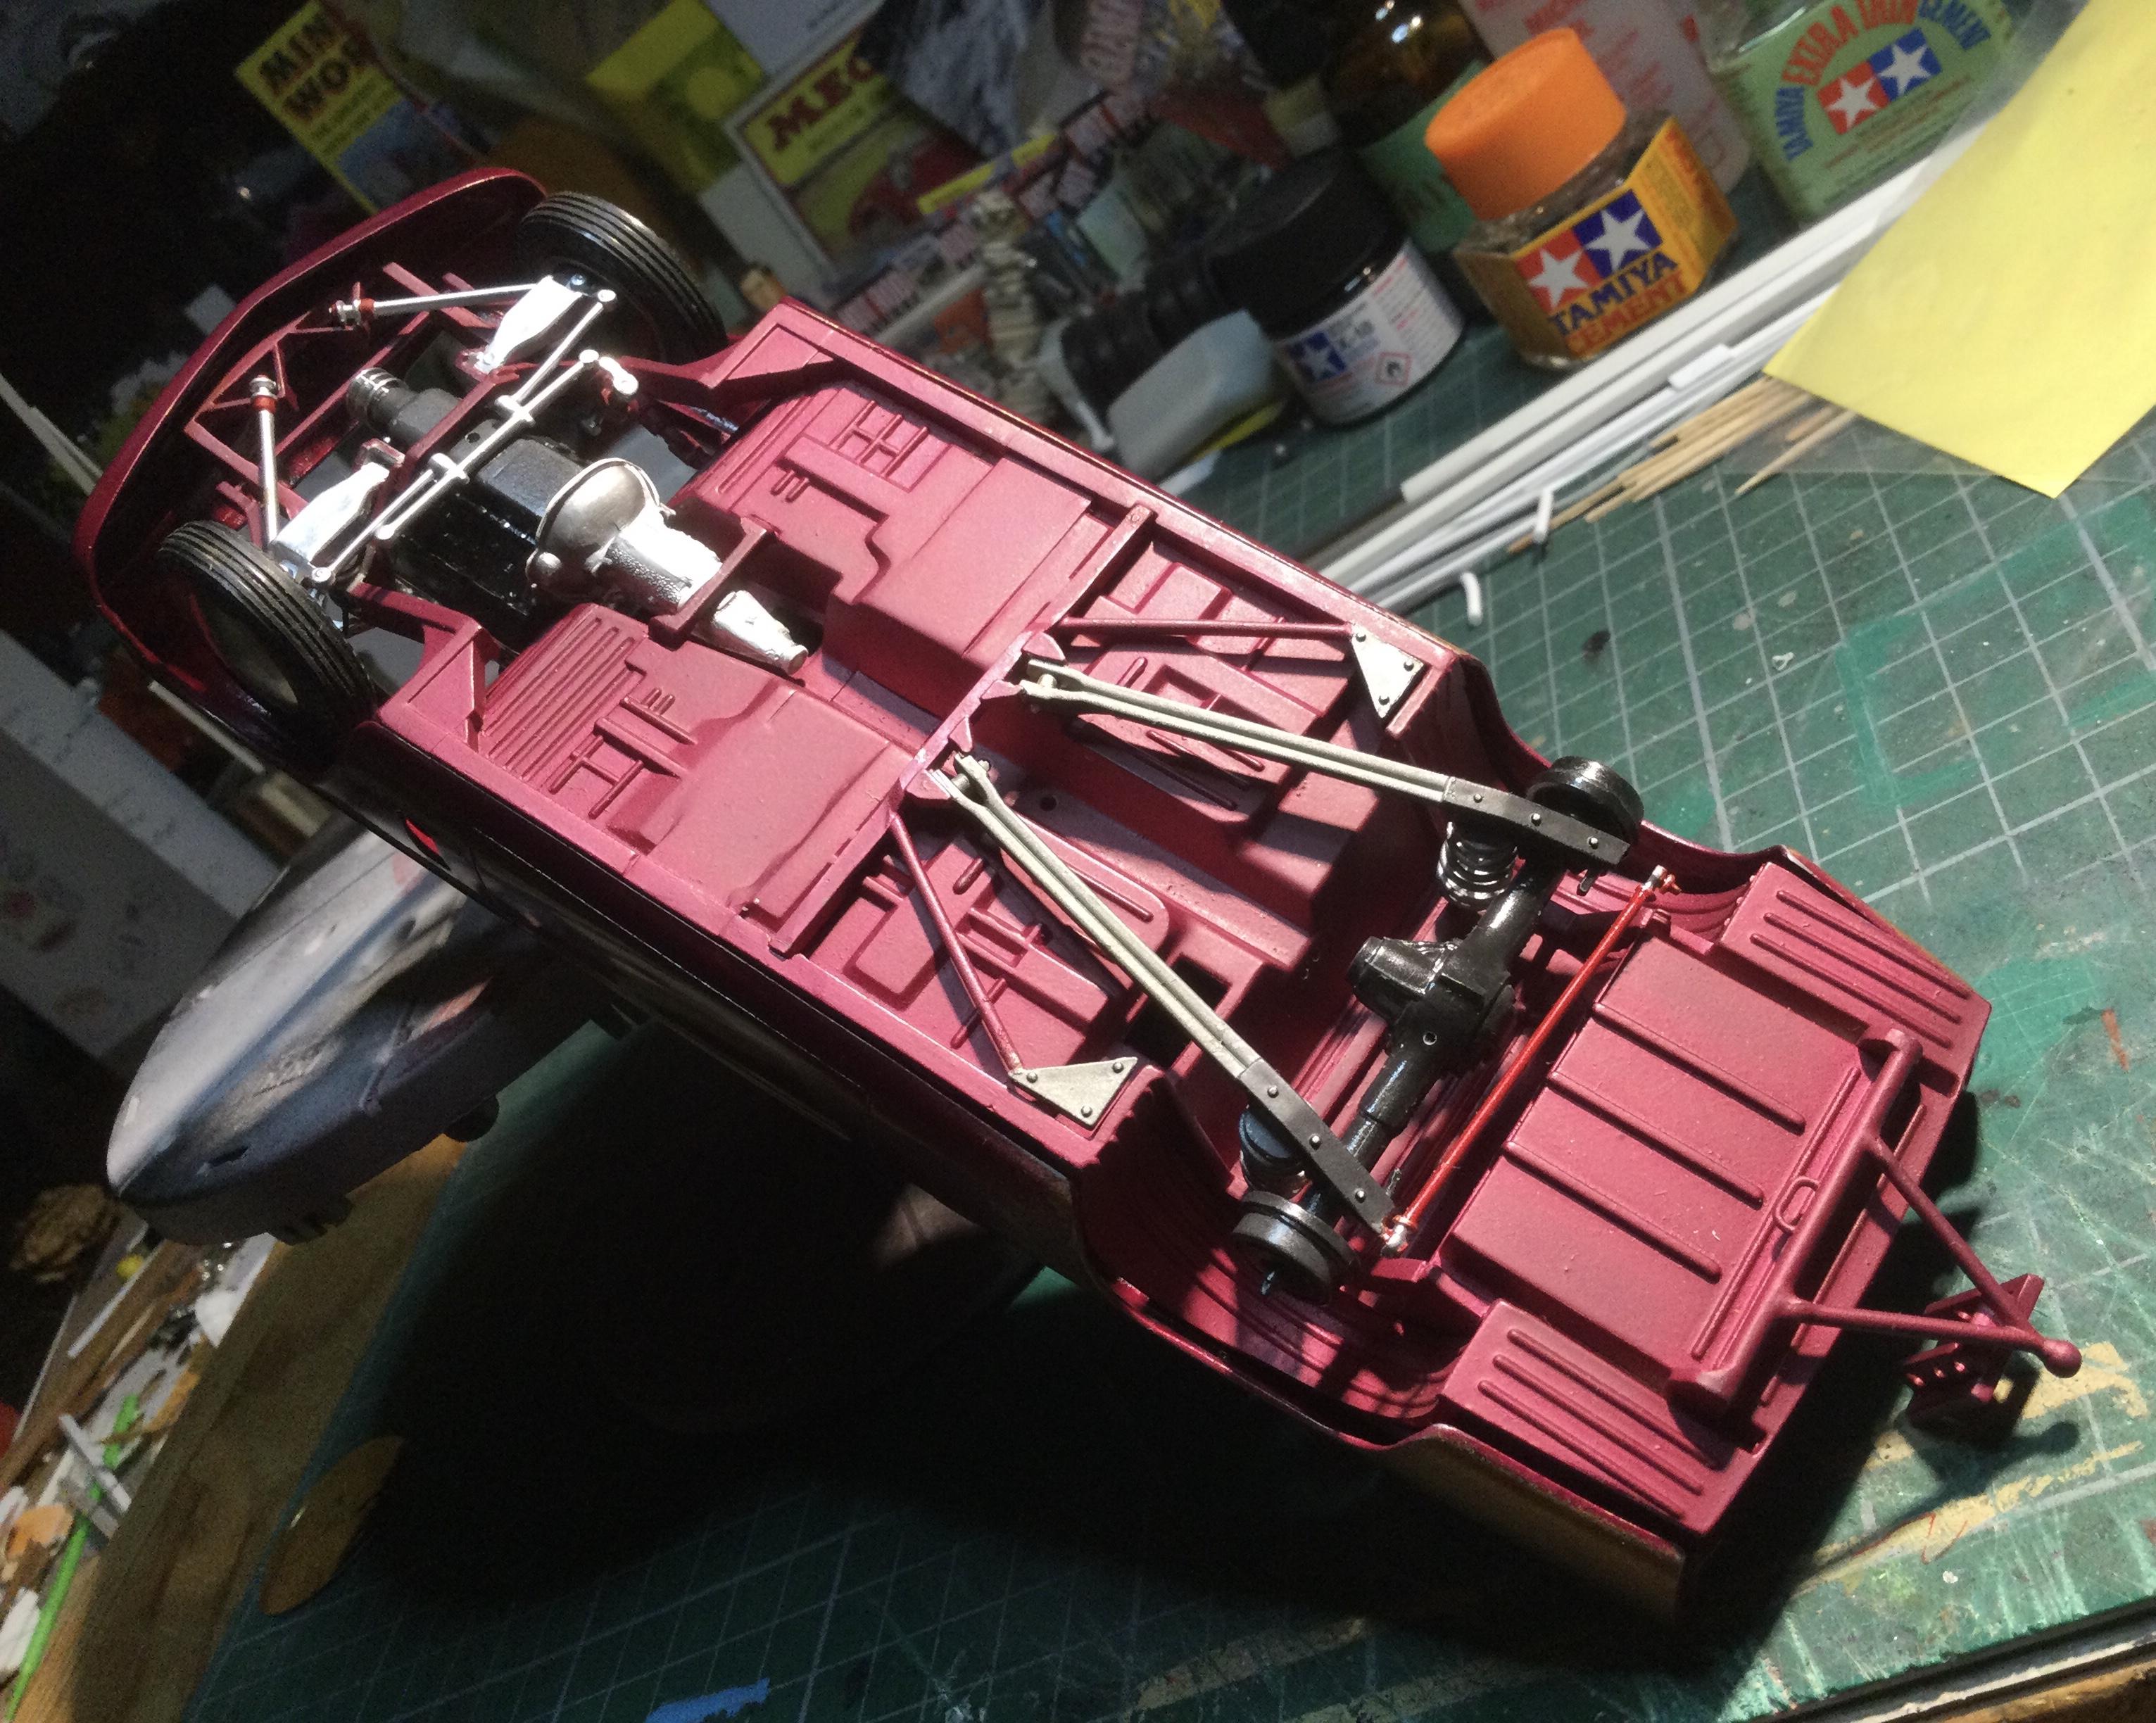
53 Studebaker Starliner Past week I picked up the tin box edition of the 53 Stude that was irresistible even though I have a couple in the stash and a long stalled WIP project. The main reason was the stamp illustration, a fine piece of work and a tribute to Raymond Lowey. The other reason sharing the same birth date, 1953 it was also what turned me onto cars at about the age of five when one of Dad’s draughtsmen drove up in one, a shape that was distinctive in the 50s with its flowing aero curves and clean, unadorned with little chrome... that was it for me, a gearhead for ever. Perhaps the biggest surprise in the new re-release is the great decal sheet. As a kid I built a couple of these, one using the Mr. Speed decals. I mourned the absence of those in the future releases until AMT came out with the “ vintage” release, including the original decal sheet markings! With the latest release the side coves feature a checkerboard pattern instead. I had already begun my Bonnie’ Stude build employing a NASCAR chassis with the chopped top modified to a B post model. Yet with the mods especially around the front fender side air inlets, the Mr. Speed decals didn’t really fit. Bingo! The new sheet is perfect for what I have I have in mind. In addition, what at first appeared to be a somewhat botched paint job will now be kept with the additional “Saltan of Speed” graphic matching the paint finish. This latest update is just what was needed to get the Bonnie’ back on the workbench! Cheers Misha
-
Mercedes Outlaws & Hot Rods
Misha replied to 89AKurt's topic in General Automotive Talk (Trucks and Cars)
Short video featuring Magnus Walker with a replica of the Red Pig, now in silver.... the Silber Sau! https://youtu.be/161T5pfzddA Cheers Misha -
Now, that’s a really cool ? idea Gerald! Looking forward to more... Cheers Misha
-
"Bring Out Your Dead" Completion Build--ROUND 2 Is On!
Misha replied to Snake45's topic in WIP: Model Cars
Thanks Steve, glad to hear it’s still available. In the past my local source has been Industrial Plastics in Victoria, they had it in quart sizes! I don’t get out much, but they do have an outlet in the Valley here that I’ll check out. I was first introduced to it with aircraft models using it for canopies, works quite well using the complete system, failing that there’s always Future. All the best Misha -
Good paint scheme Philip. Curbsides such as these offer a different challenge, as interiors and mostly exterior detail becomes the focus. Hasegawa, Fujimi, and Tamiya offer amazing detail and quality molding of the various road racers. At my age I’ve become more accustomed to build these as greater detailing with paint, P/E, and weathering become more of a challenge and the time to completion is greatly shortened. I would encourage your build as you’re off to a great start with an original scheme, as these Porsches were run by many privateers. Cheers Misha
-
"Bring Out Your Dead" Completion Build--ROUND 2 Is On!
Misha replied to Snake45's topic in WIP: Model Cars
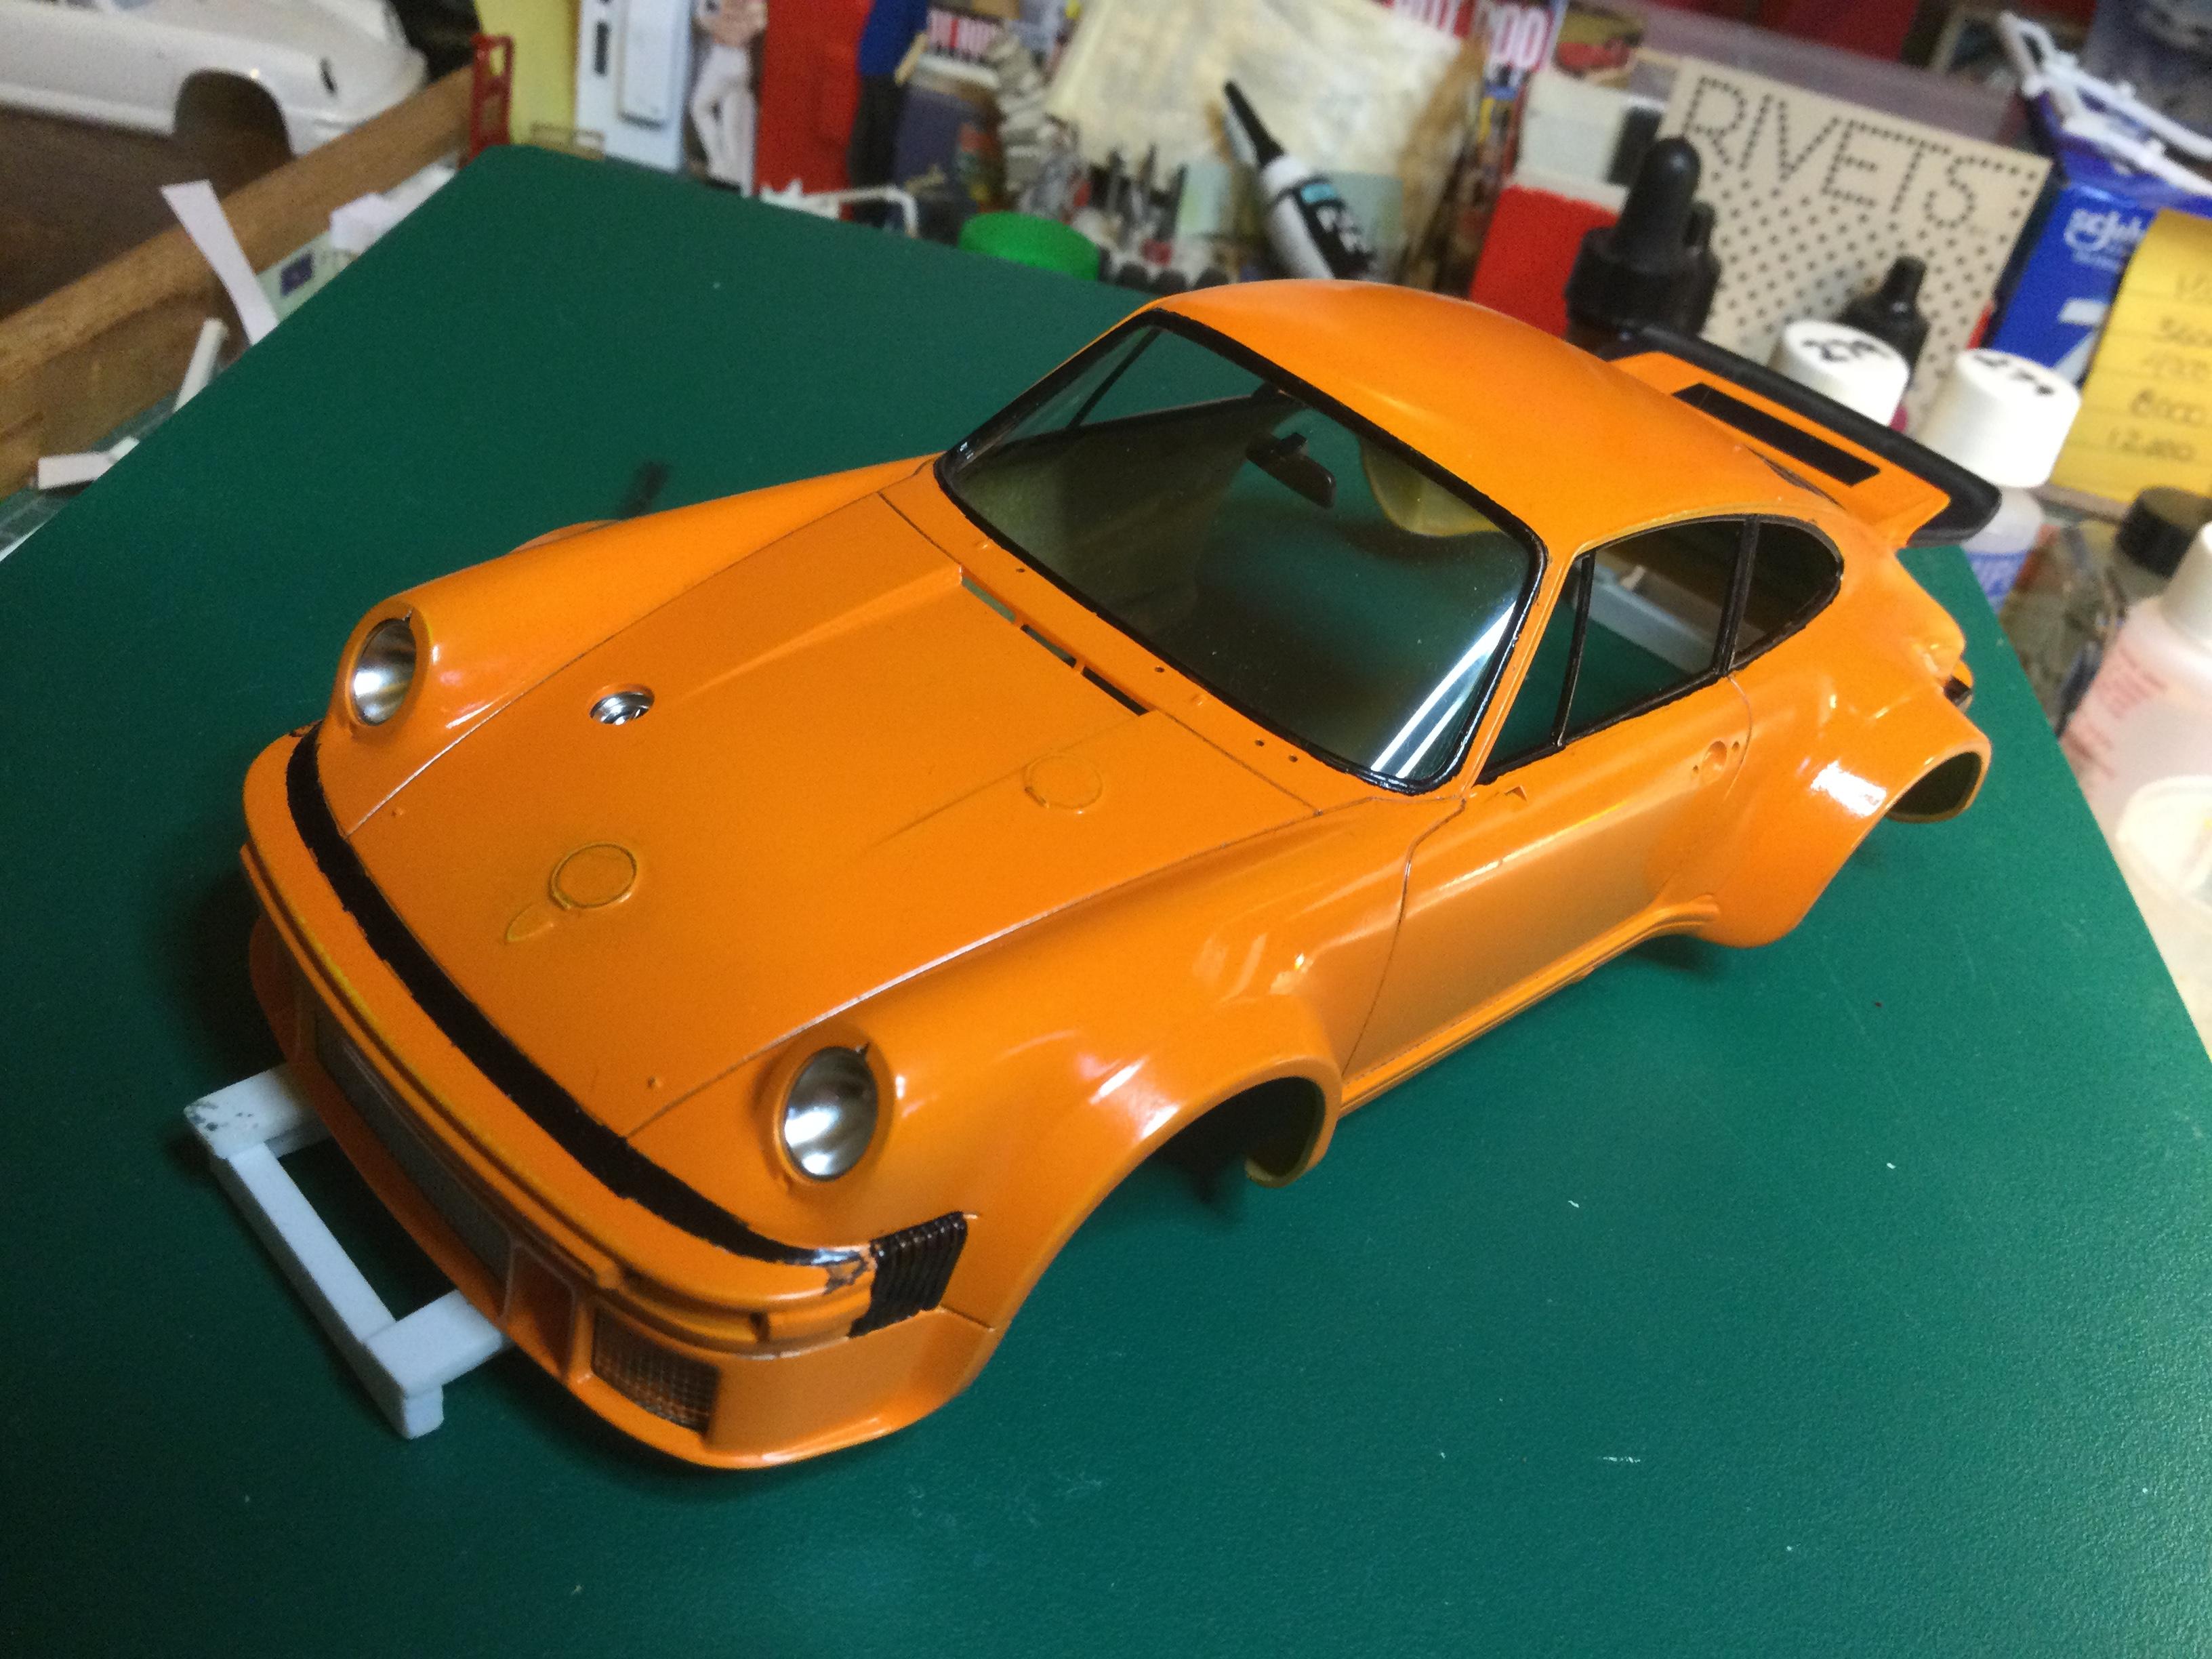
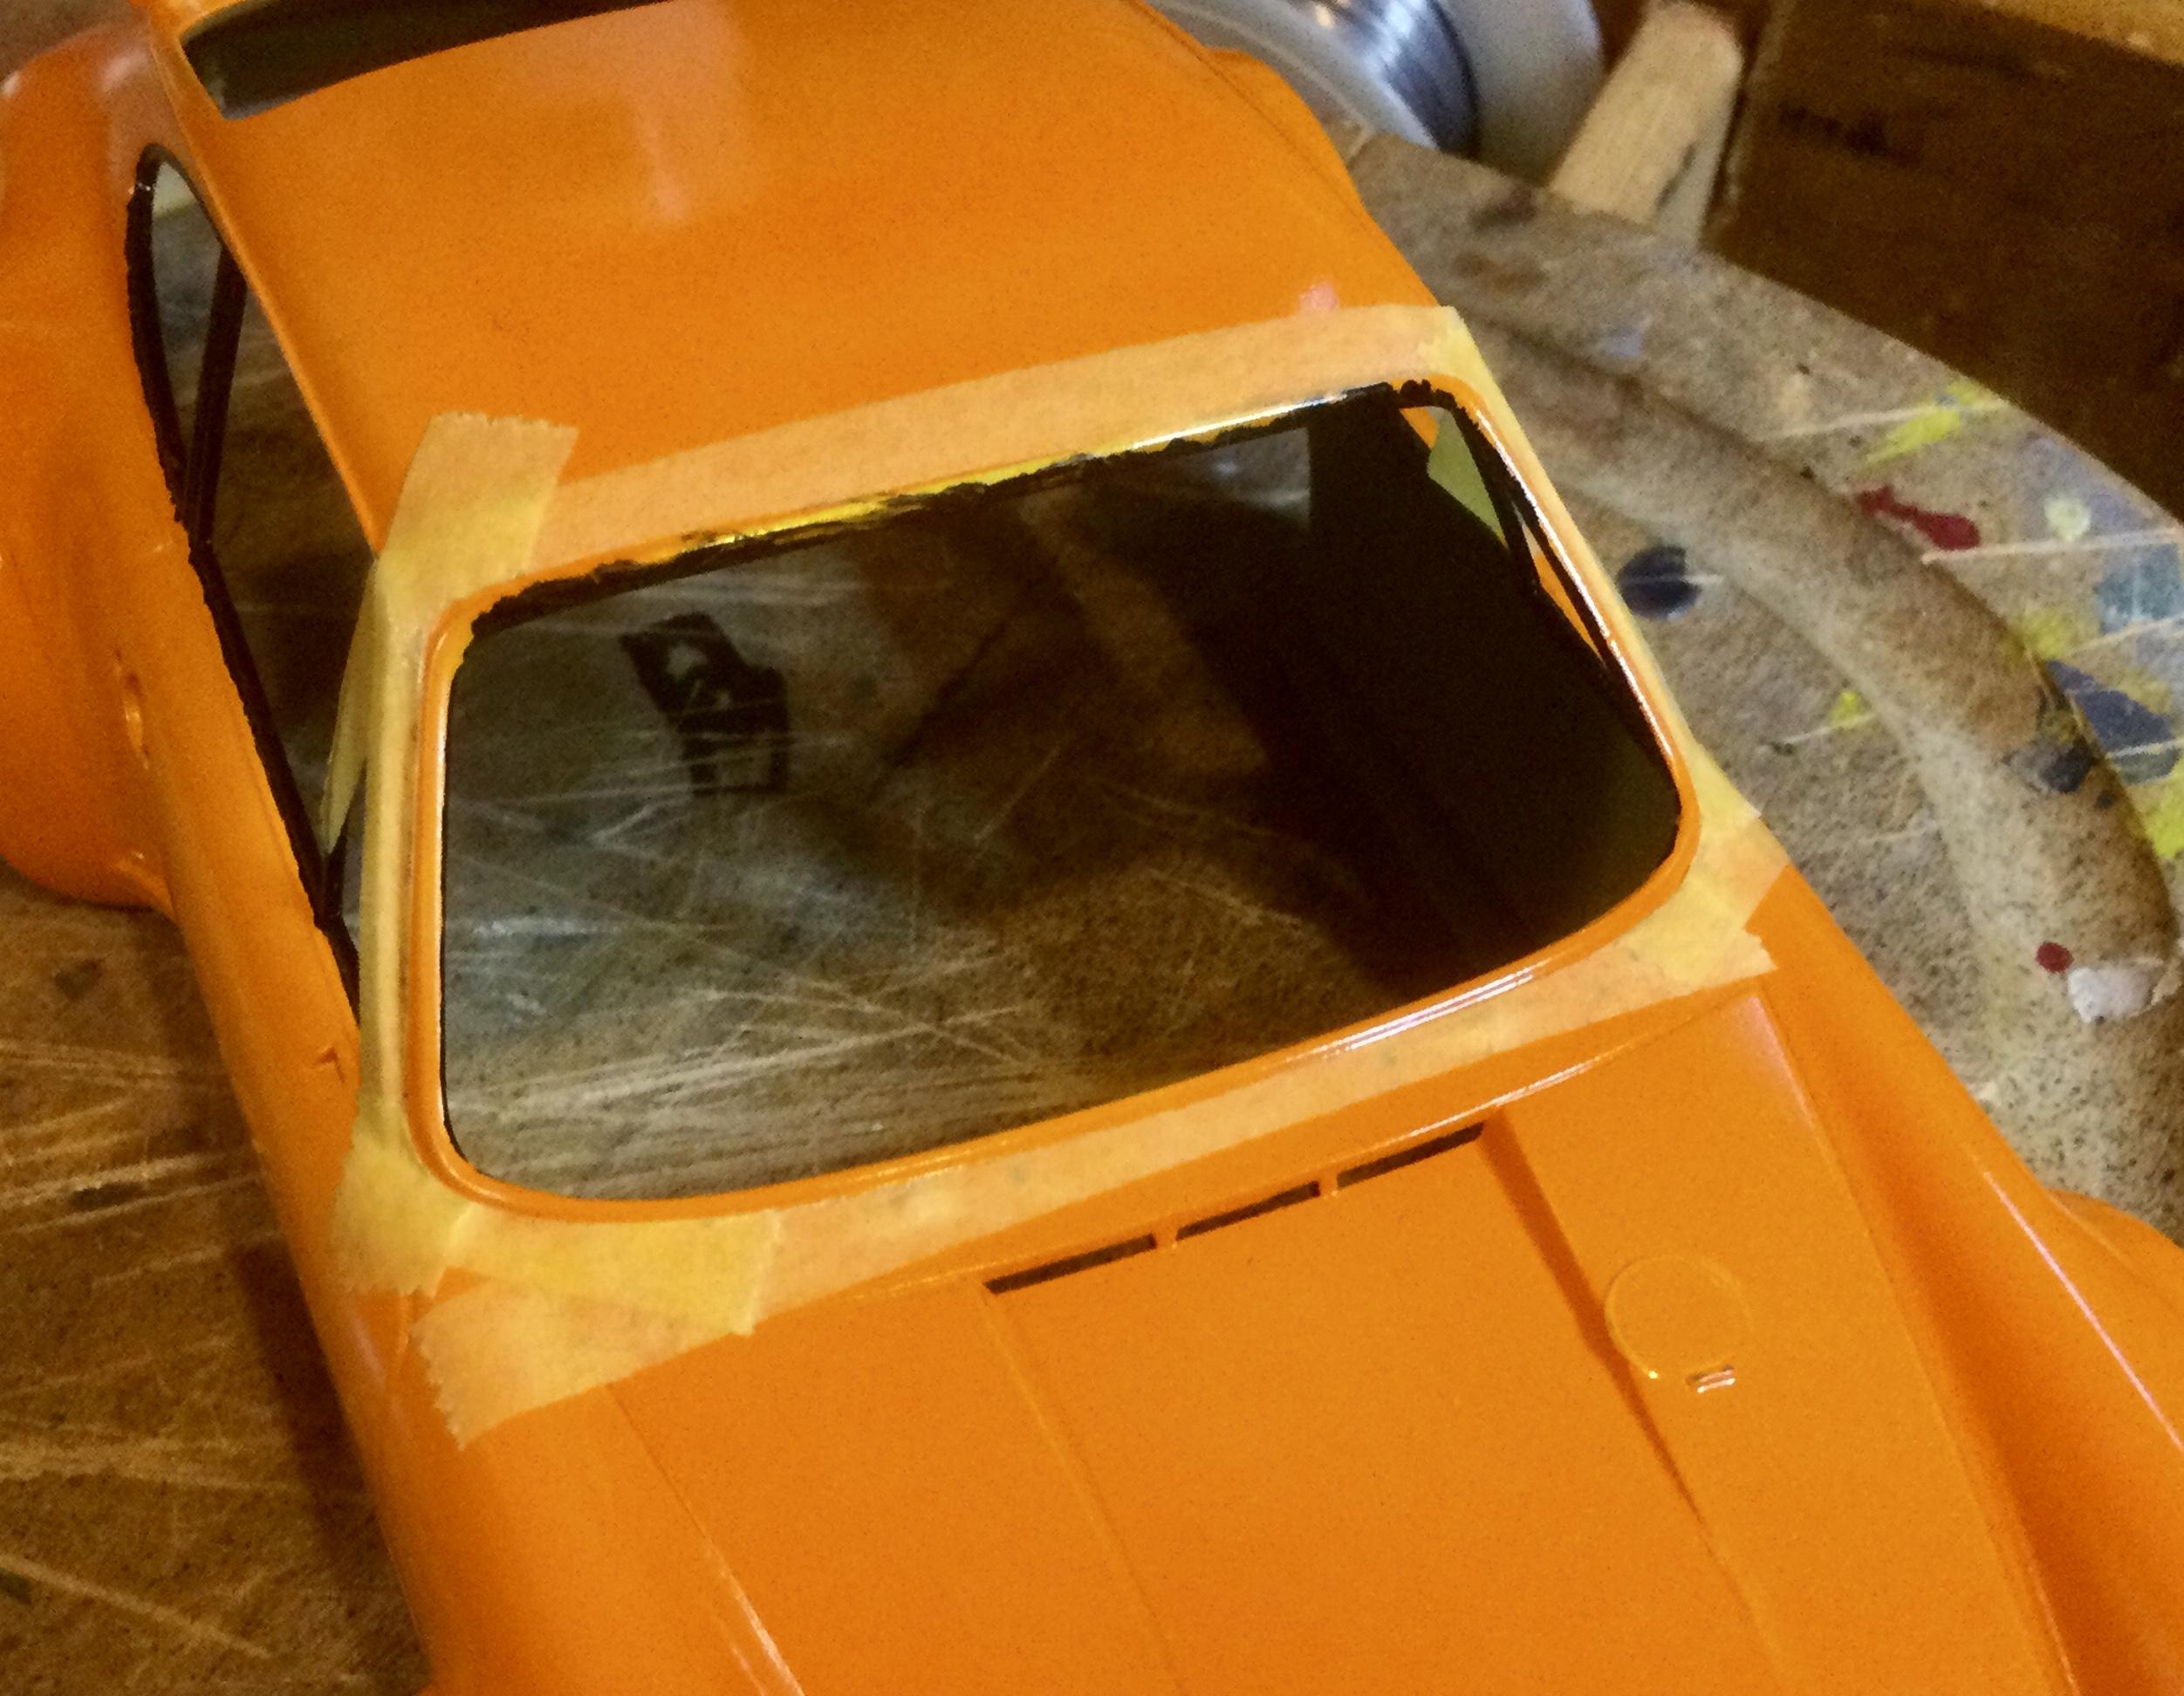
A quick update on today’s progress... Most of the time at the bench was spent on getting the glazing done, and waiting for epoxy to cure, step by step. I found Tamiya’s quality top-notch for molding very clear, due to thinness, transparency with an amazing fit and tolerances, as the side windows match up perfectly on the A pillar! Overall, if taken with loads of patience, it is a very pleasing result. I have had problems with the rear window all through the build, from scratching the fine surface when I was removing the sprue burr, polishing it out with have dried Novus 2 (can you even get this stuff anymore?), to stringing epoxy threads with near abandon before realizing my mistake, oy vey. This just furthers my story line of a 934 that has seen track duty and hasn’t seen the inside of a resto shop, best viewed at three plus feet! See what happens tomorrow... Comments and hints are most welcome, Cheers, Misha
-
Lotus Indy car or Offy Indy car reissue possibility?
Misha replied to Amtronic's topic in Car Kit News & Reviews
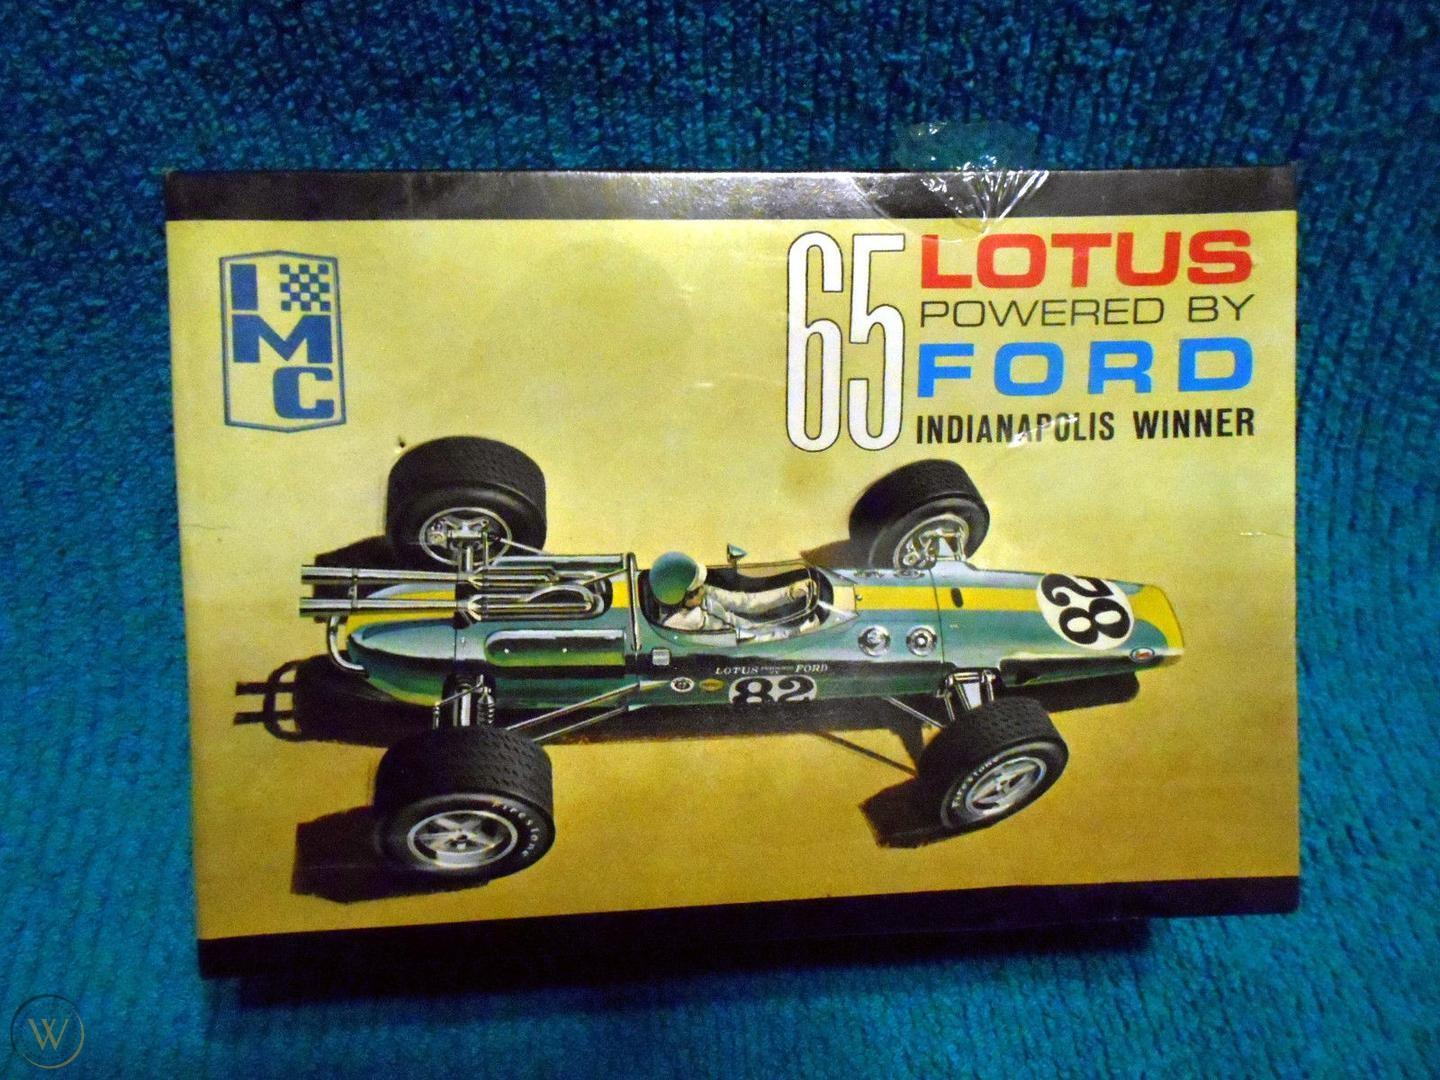
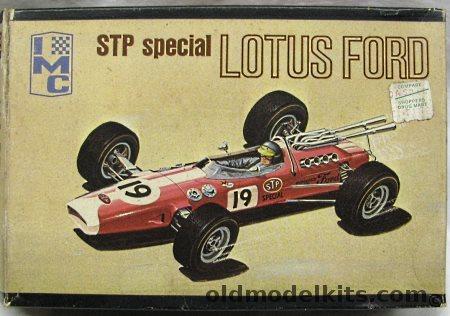
I would welcome a repop of the Indy 500 Combo, even as separate kits by themselves. The roadster is of particular interest being the last of its kind. In addition, what happened to the molds for the IMC versions of the Lotus. Most of the IMC kits have resurfaced in one form or another, yet these two are absent and rarely show up on the vintage market. These are historically significant race cars and ought to enjoy a fair amount of support from the modelling community. To add to its sales potential they could offer a Coca-Cola version! ? Cheers Misha
-
"Bring Out Your Dead" Completion Build--ROUND 2 Is On!
Misha replied to Snake45's topic in WIP: Model Cars
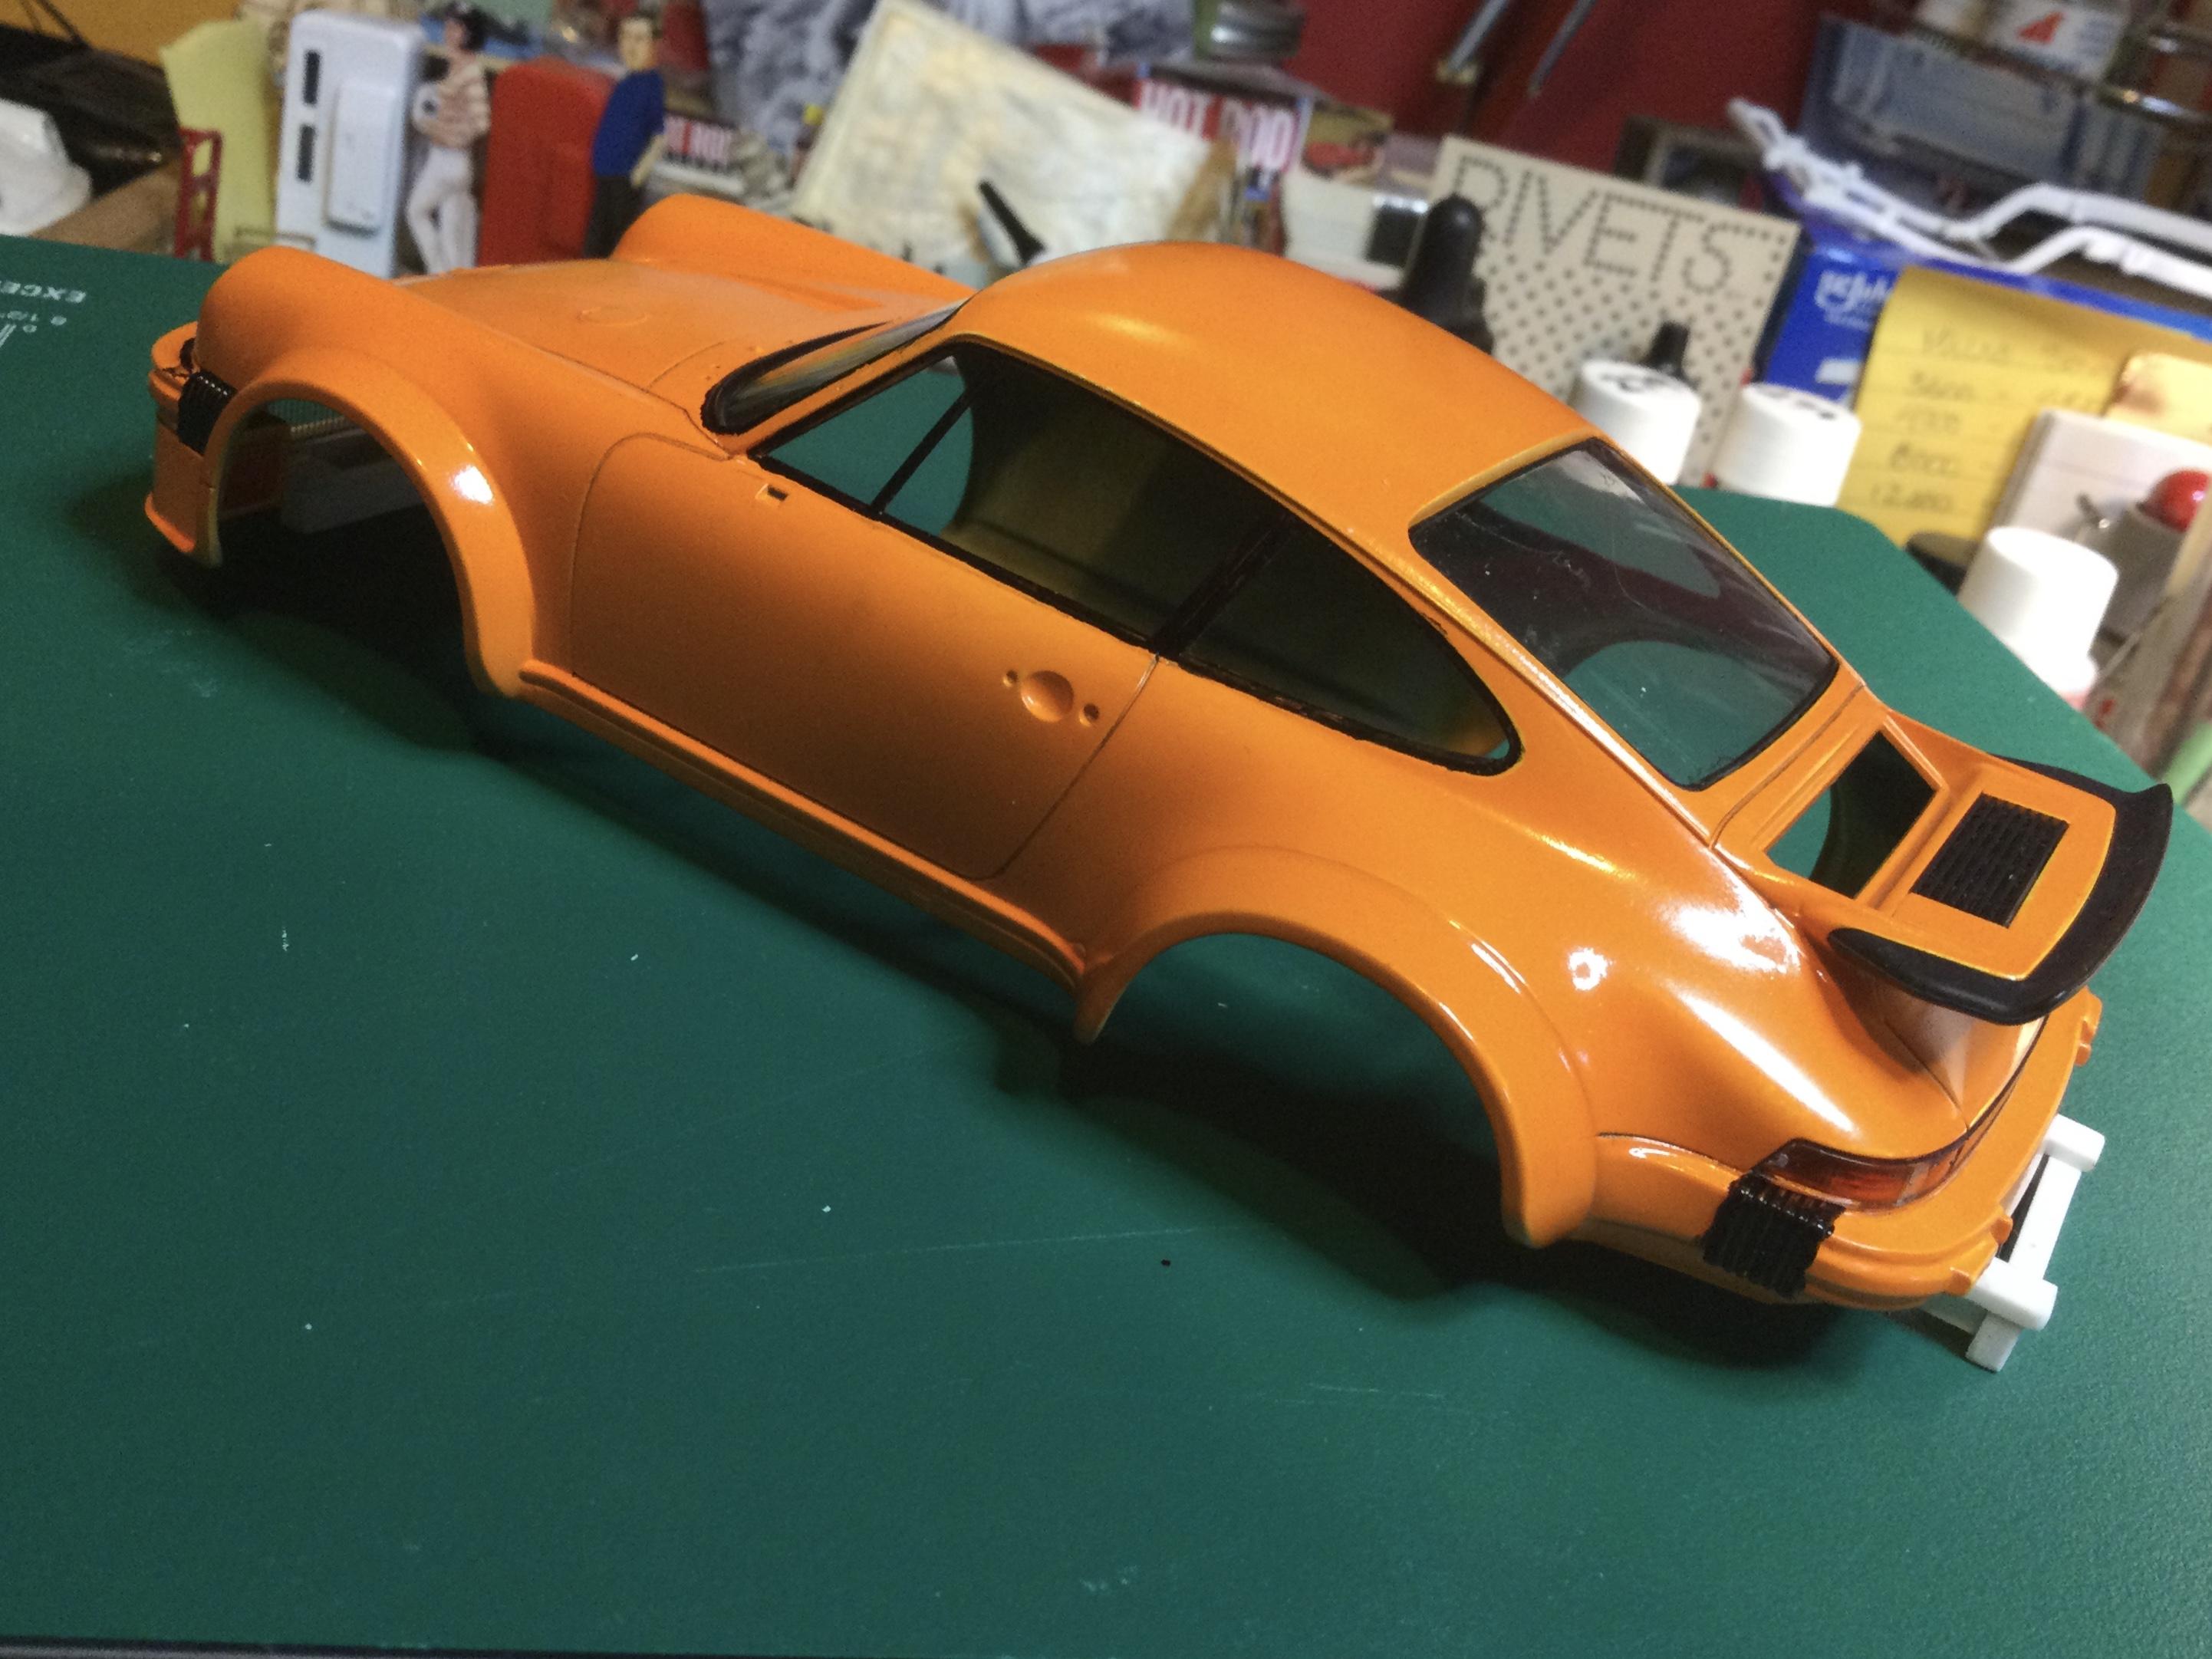
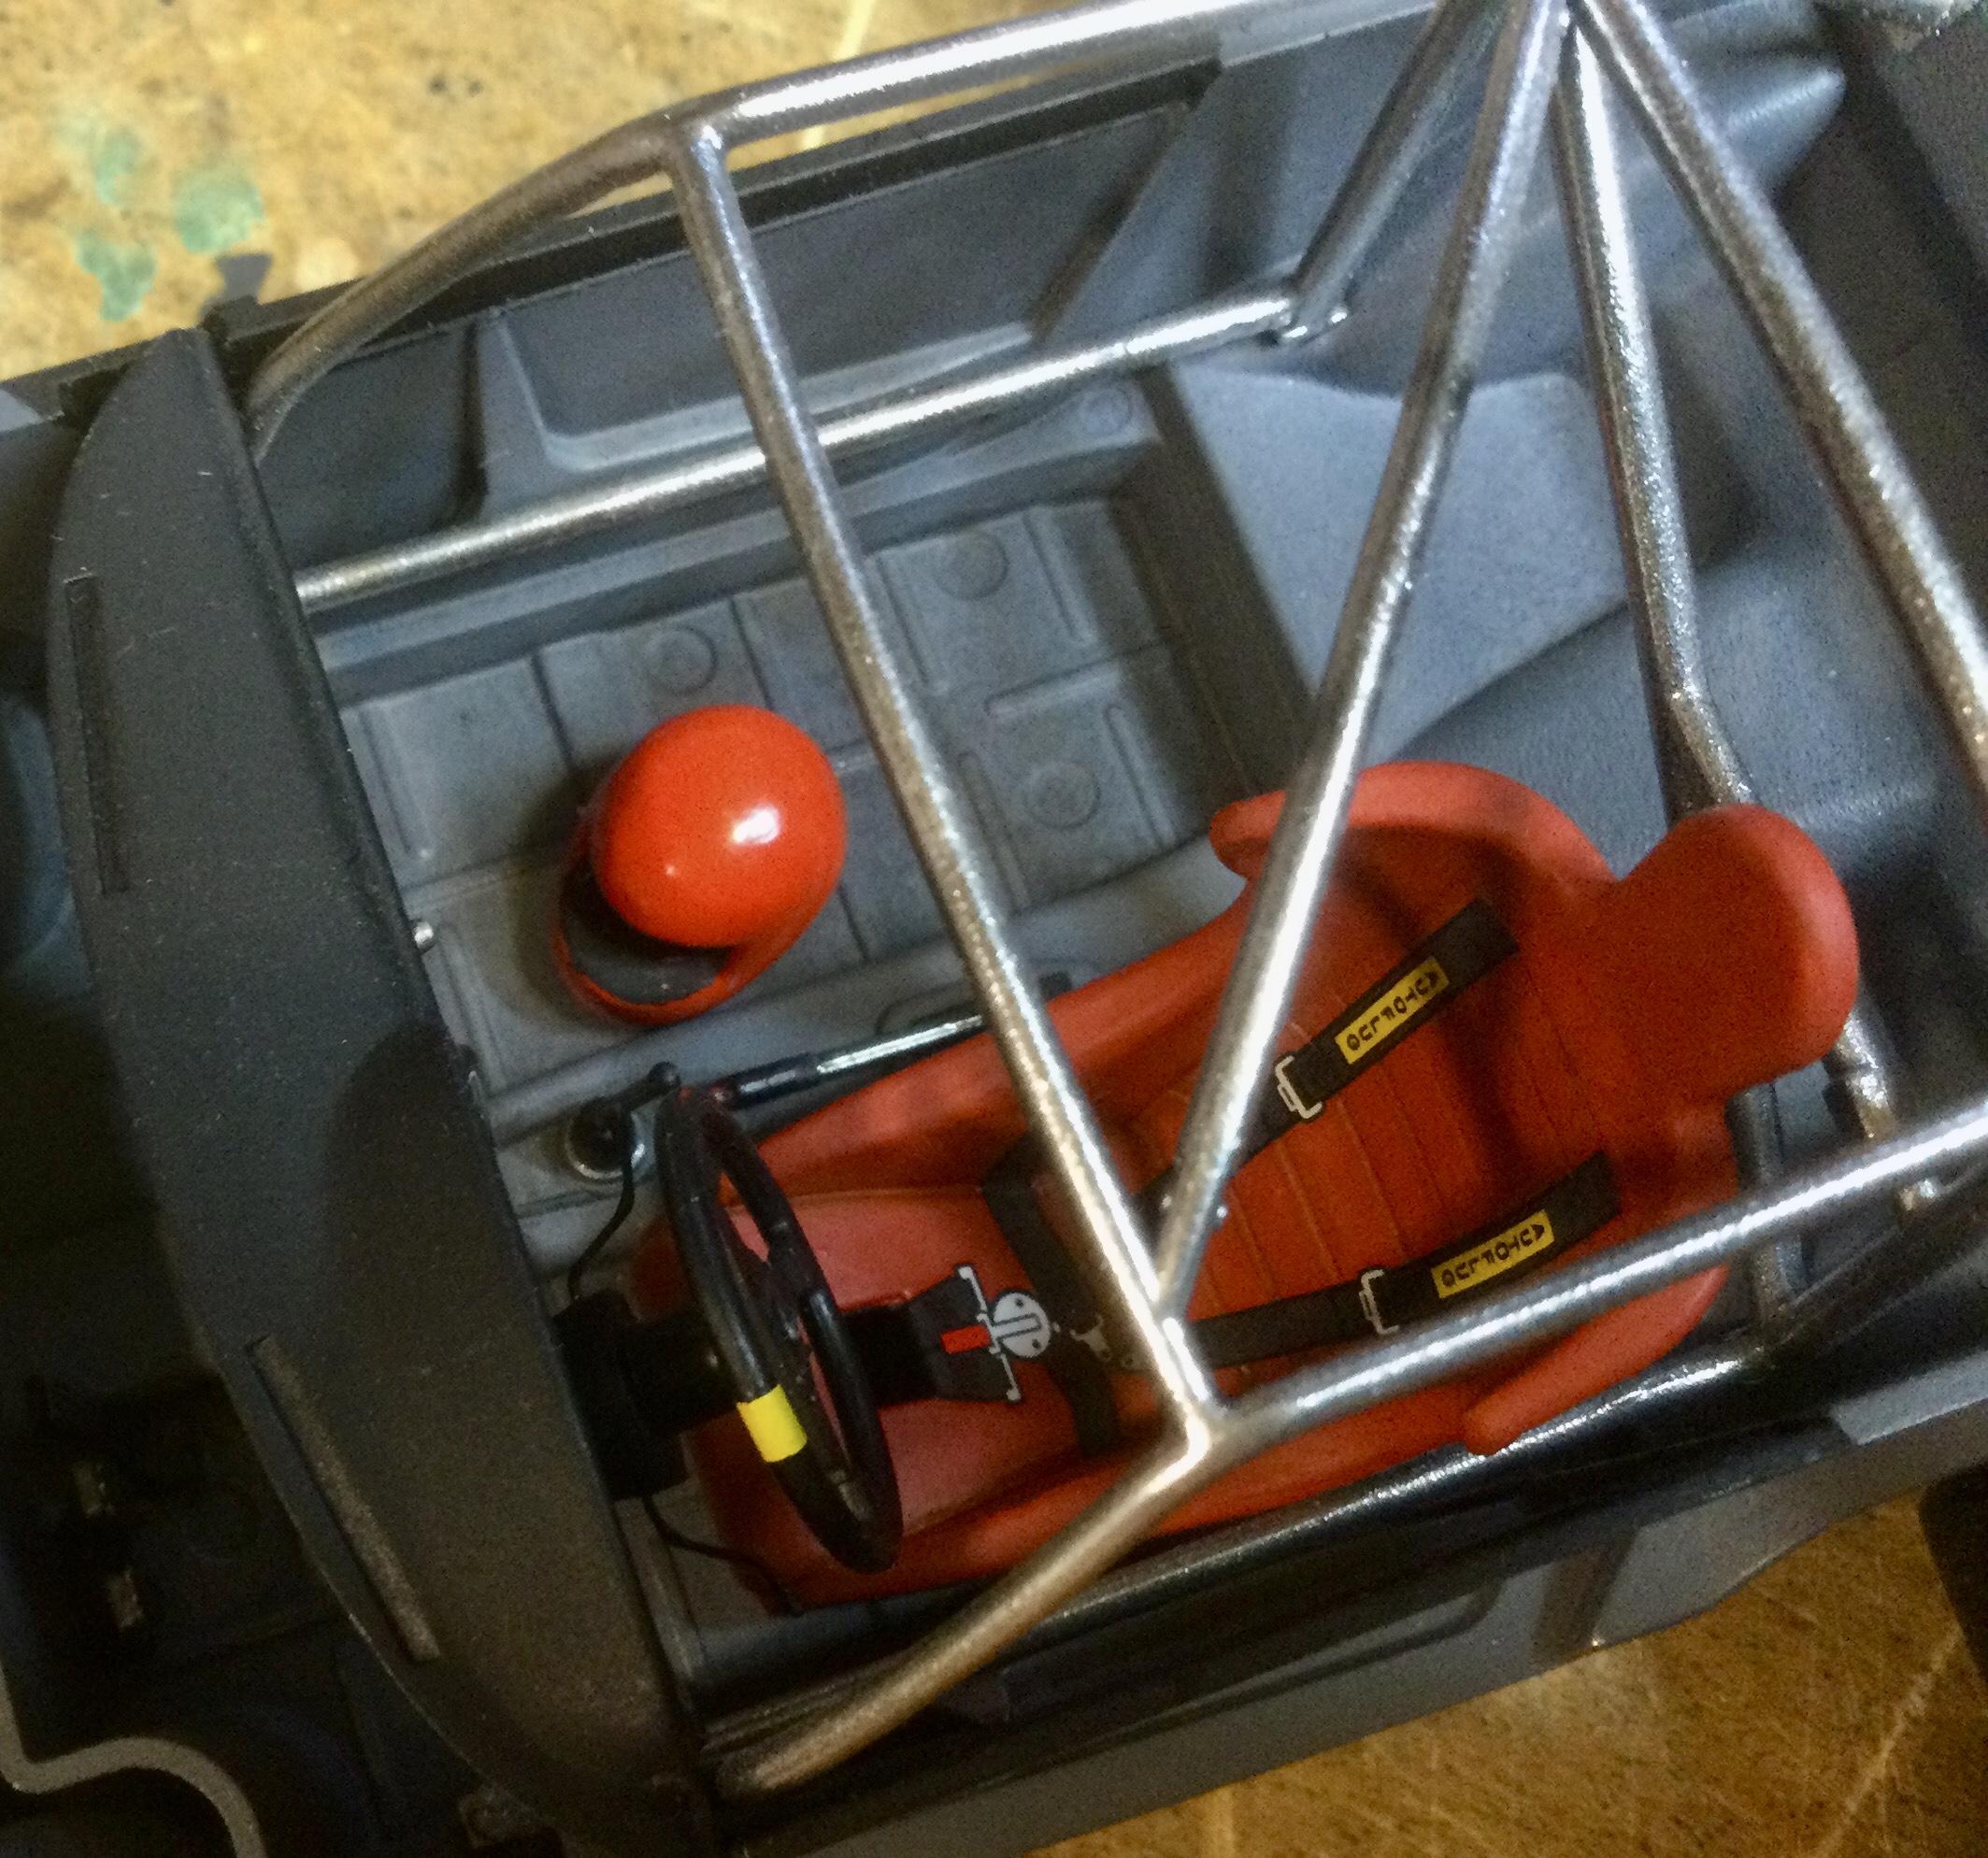
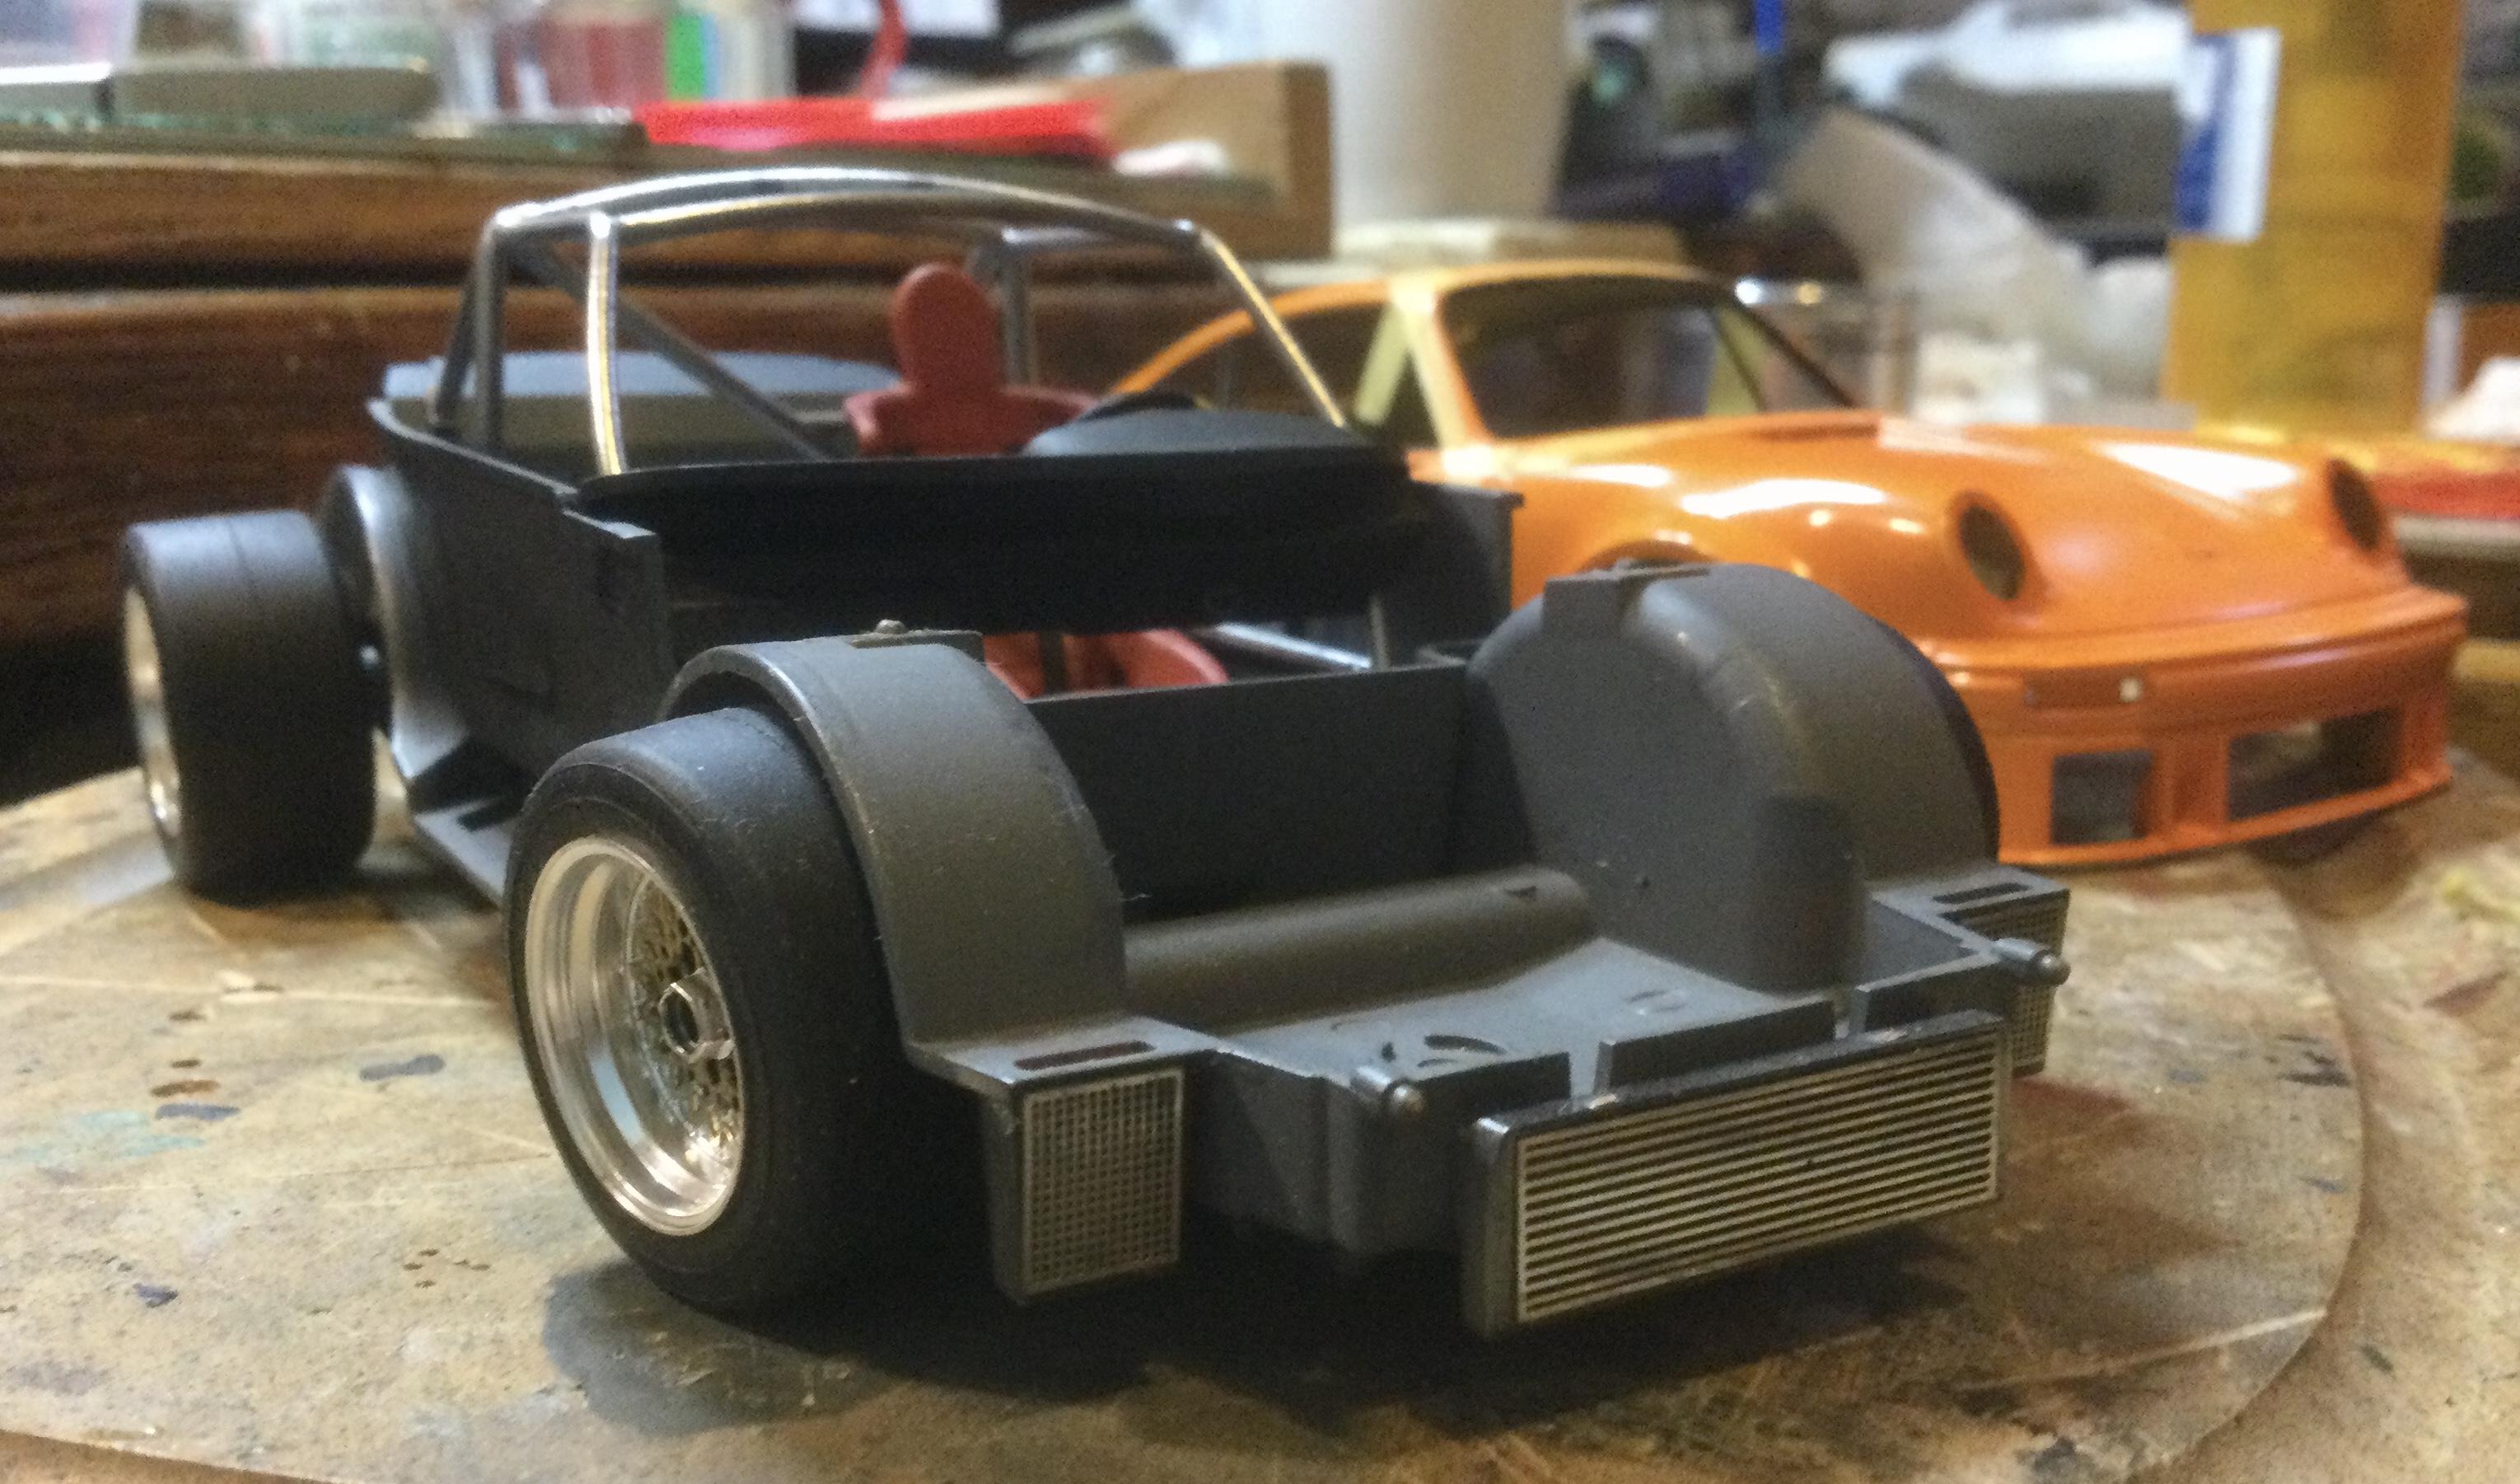
Hi everyone, here’s an update on my Porsche 934 RSR The black trim continues to be a problem for me, with a lot of touch ups required. I decided to mask the front filler strip between the leading edge of the front hood and the bumper. Rather than masking the entire body I chose to brush on the TS 29. A bit rougher texture than air brushing as a result. Going to use some Windex for cleaning up the black, followed by some body colour touchups. I still have an old sheet of BMF in black that I’ll give a try for the remaining bumper strips and lower body side trim. Also installed the headlight shells and front grills for the oil cooler and brake ducts. A few steps closer. At the rear the full width light panel was installed.There are still a lot of little detail items and decals to be applied, hopefully the pace will pick up. Be glad to see it in the cabinets; looking at it from three feet away! Cheers Misha
-
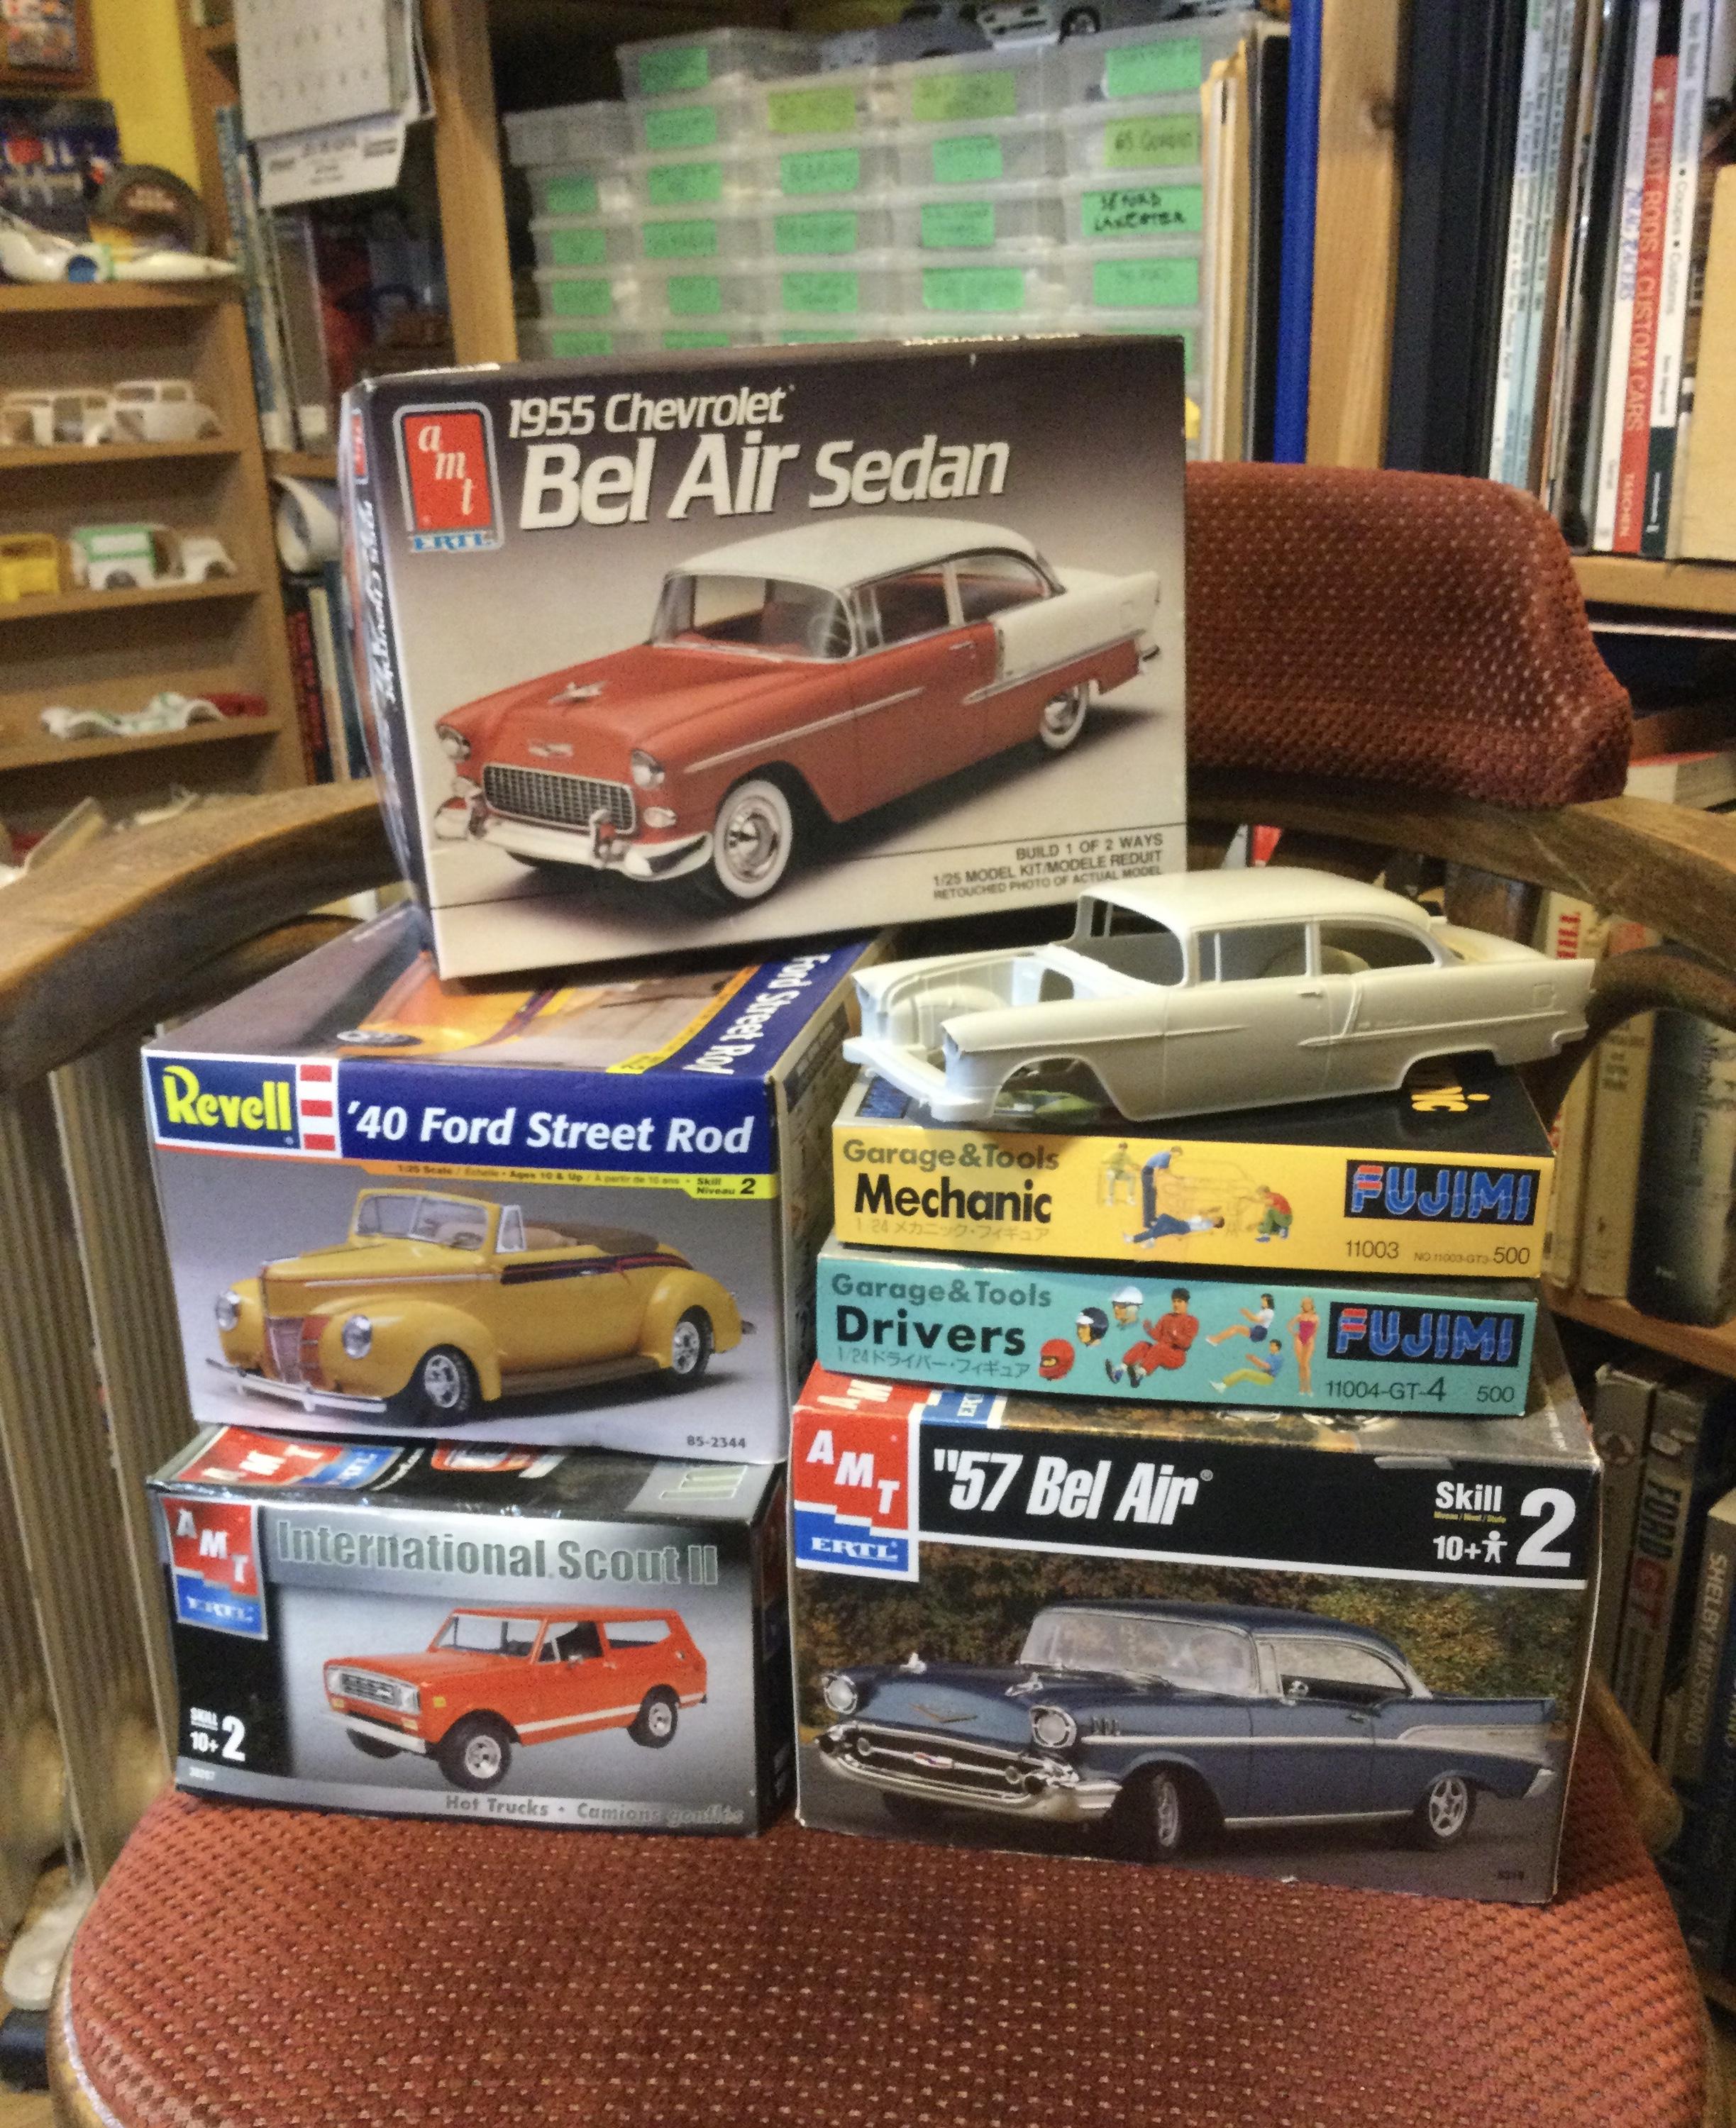
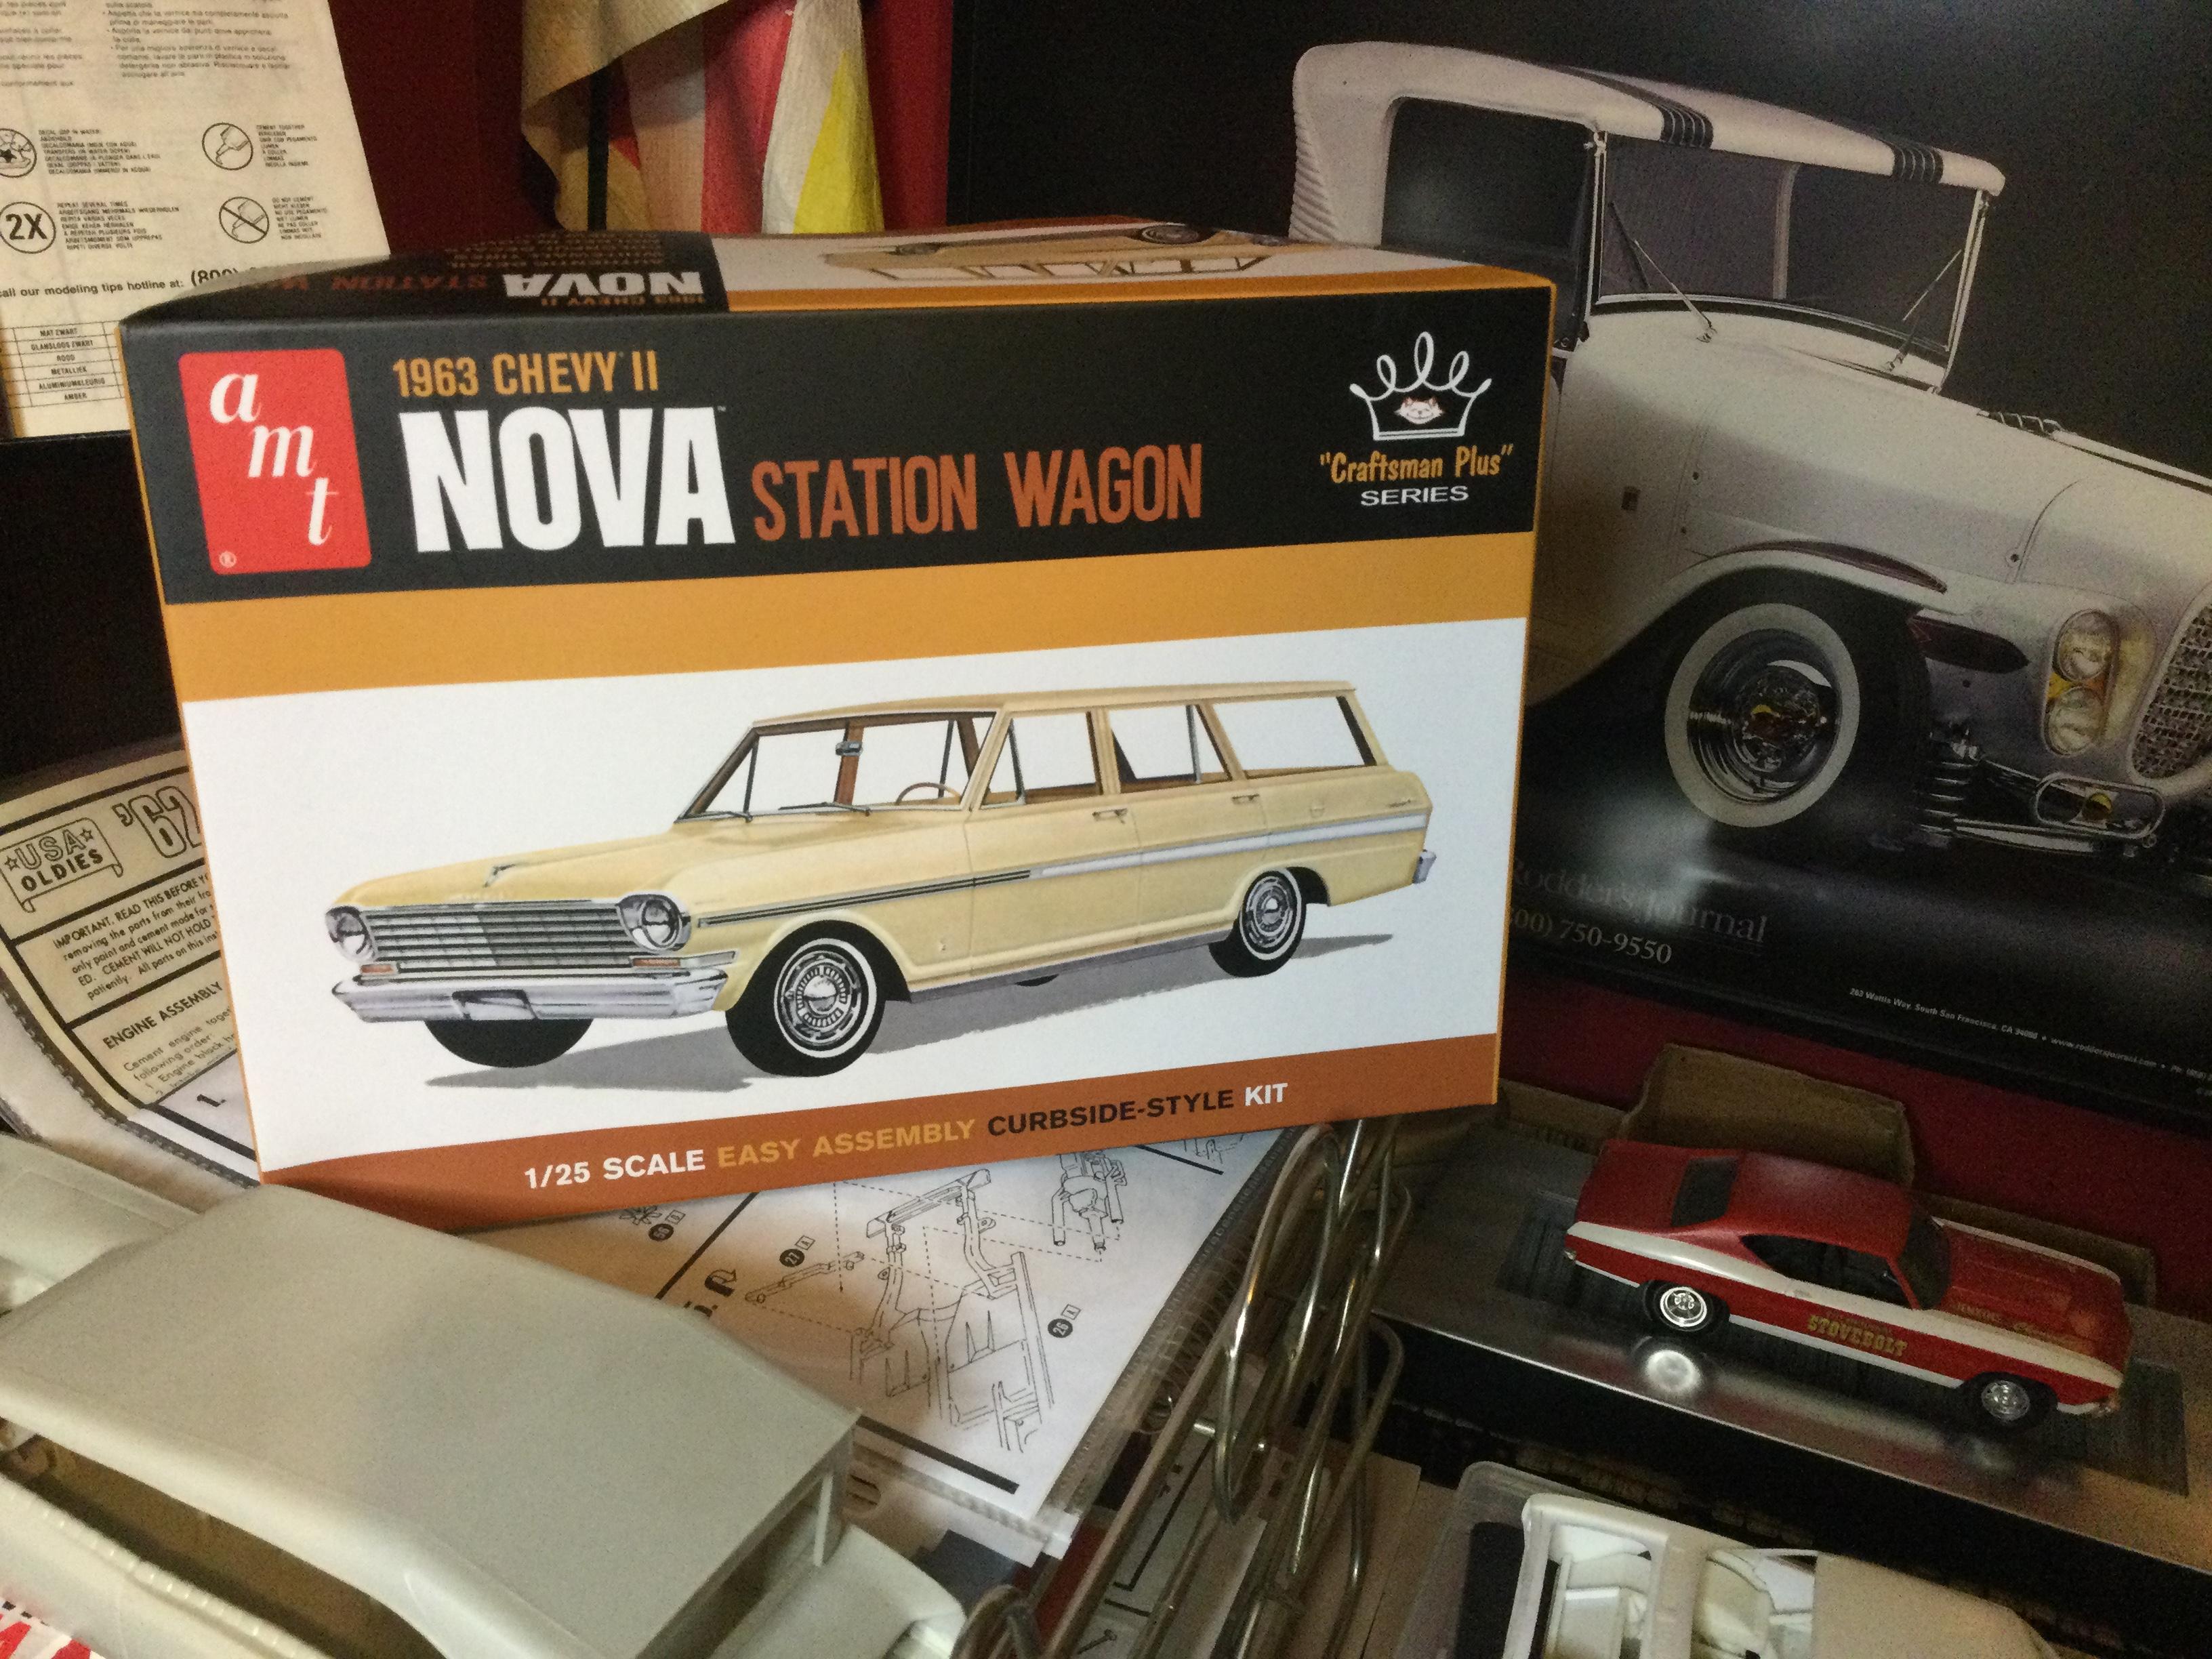
Whatcha Get? Over the weekend I visited our local hobby shop in the Valley and my kit stash at a our storage locker. Been visiting the stash a bit more often, as new tools are somewhat scarce these days. Speaking of somewhat new and improved, I picked up the 63 Chevy II that is causing excitement amongst us. Overall a decent kit that is welcome. It does have some drawbacks, firstly being a curbside, yet lately, perhaps of age, I have built a few of the recent curbsides such as the 57 Belair, and the Ford Raptor that provided a decent challenge to my paint and weathering skills on the chassis plates. To the kit’s merits the body is separate from the hood allowing for easier kitbashing, notwithstanding the molded in engine bay interfering with the 66 Nova kit. Another welcome feature is a separate bottom end engine plate, making painting much easier. The major drawback is the interior tub that lacks decent door detail and a molded-in-place front bench seat while the rear seat is separate. The visit to the stash produced a few finds for now to keep things flowing. The 55 will be built to then current Jr. Stock specs. I had forgotten that this is based upon the Nomad kit for its underpinnings... maybe later on a Gasser version? The 57 is a much detailed kit by comparison to the early 60s Trophy Series. Three versions of induction are offered, with great detail to all the small bits. The 40 Ford ragtop is another well detailed kit with modern running gear powered by a current Flathead V8. The raised top is another hook for me, as it offers such a “Cruiser” style to the body. The odd choice was the Scout, a kit that may be described as a “dog-of-a-kit” yet still has some appeal, after all I did buy it! This one will require some thought, likely along the lines of a competitive vehicle... Baja 1000! The two Fujimi figure kits I chose just for interest, we’ll see where that leads diorama wise. Cheers Misha
-
What Kits Were Molded in Green?
Misha replied to Snake45's topic in General Automotive Talk (Trucks and Cars)
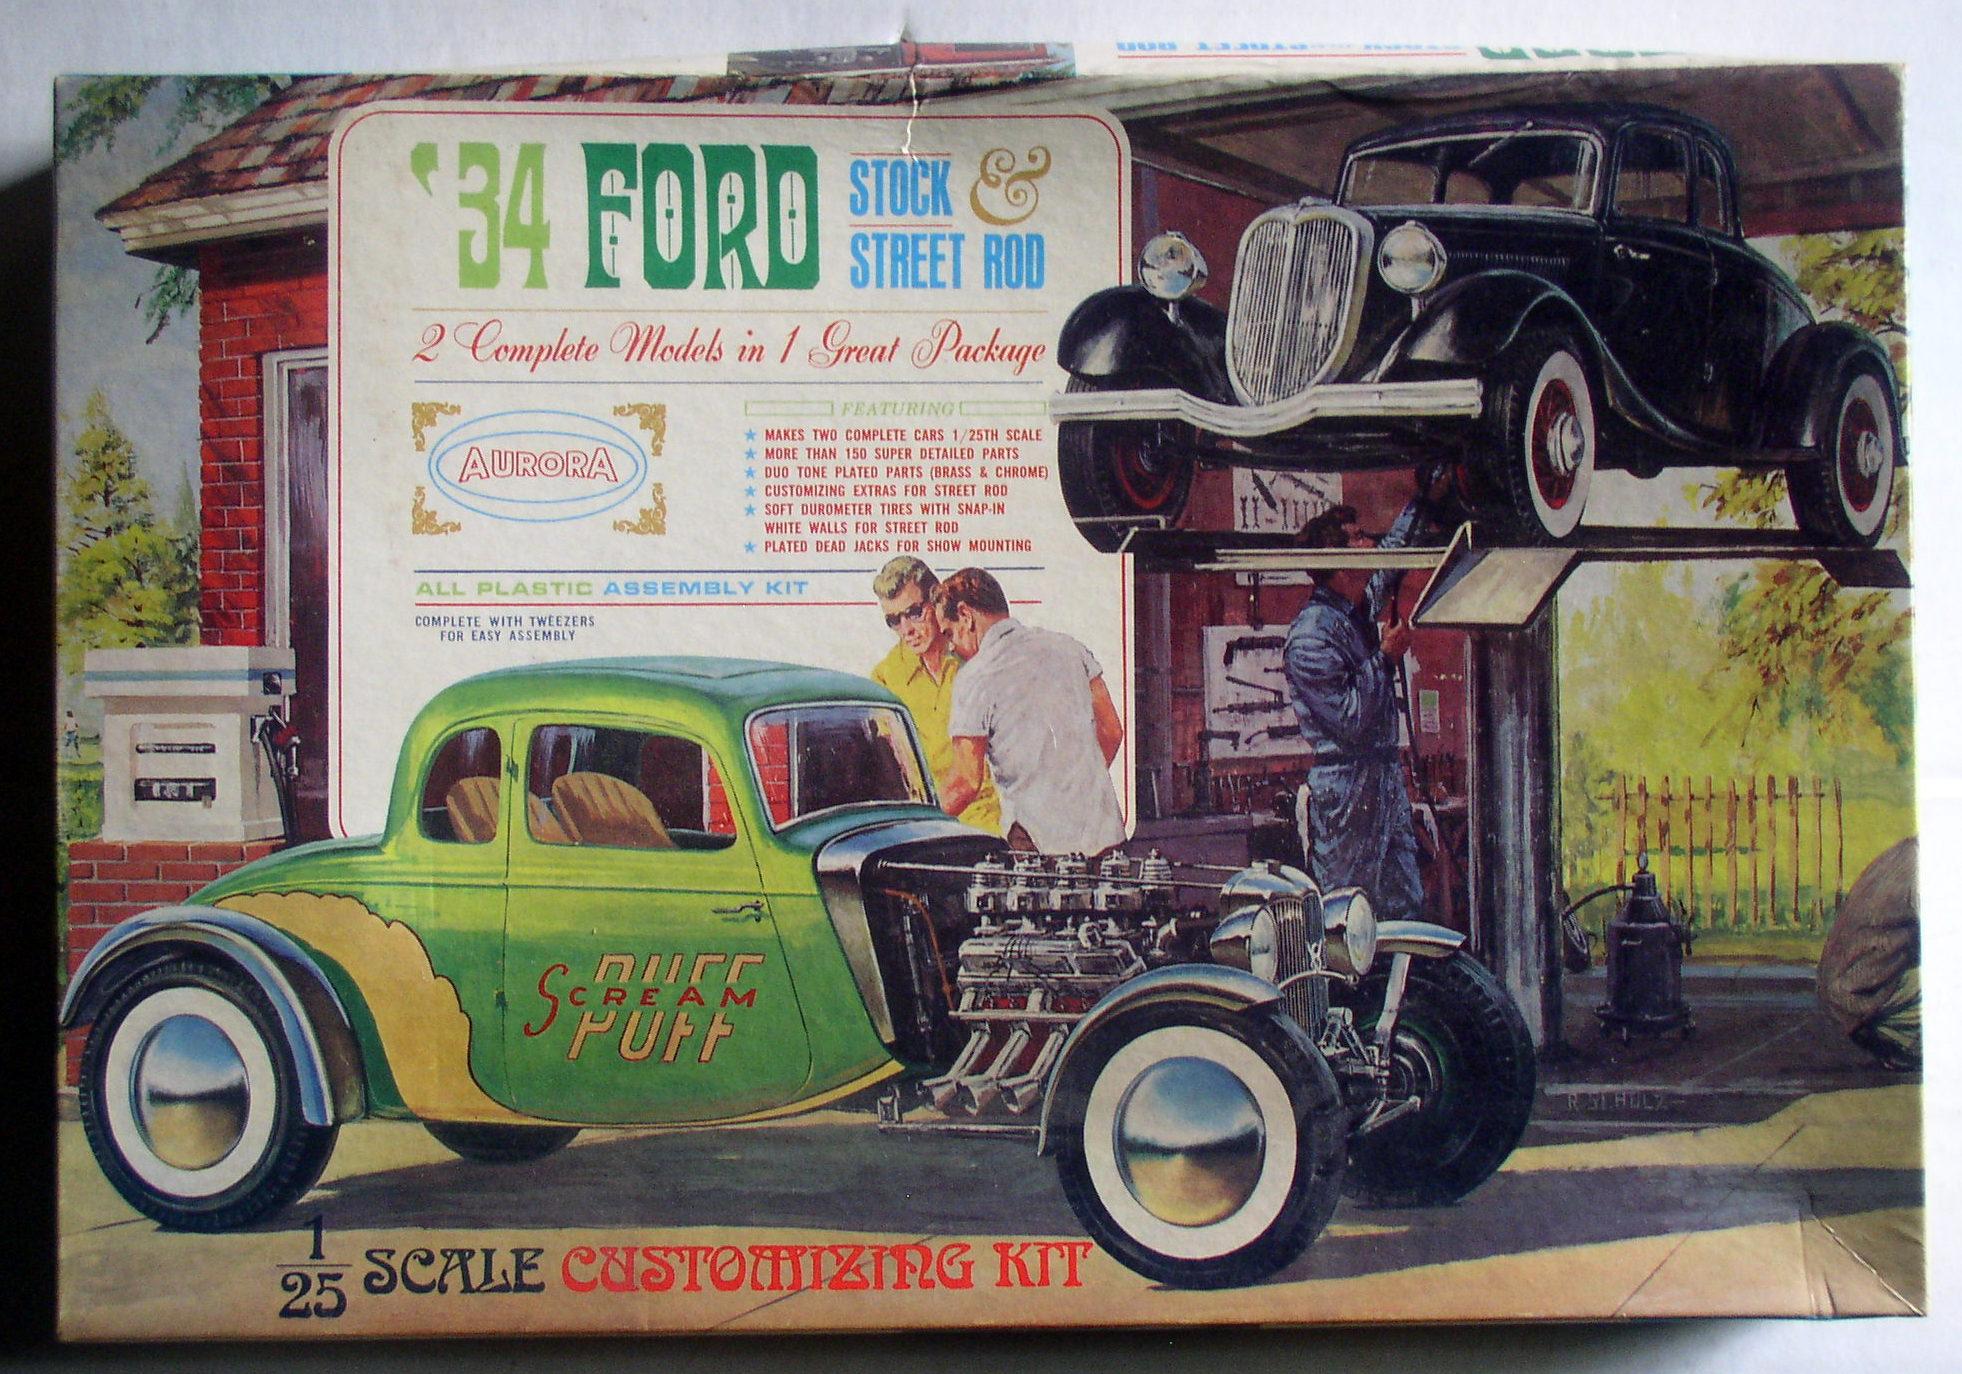
Not sure if anyone has mentioned the following kit as some photos have disappeared in the thread. As a very young kid this Aurora kit of the 34 Ford was one of my first models. The hot rod version was molded in green and I still have a couple of small bits in a parts pile from nearly 60 years ago!
-
Congrats Kurt, your build is really ”Imprezzive”! Looking at your Thule pod, with its front beam and sprouting antennas reminded me of an avionics or jamming pod slung under the wing of an F-16. It’s a great way to disguise any electronics package that may be inside, such as an active radar detector that frys radar guns perhaps? Great build with the engine detail and overall weathering, great motivation for the rest of us, Cheers Misha
-
"Bring Out Your Dead" Completion Build--ROUND 2 Is On!
Misha replied to Snake45's topic in WIP: Model Cars
A few more steps today, the interior mock up just needs to be fixed inplace. Also epoxied the renegade front wheel assembly and using the posable steering the Porsche is heading port side, matching the steering wheel’s yellow stripe. The body is now masked for completing the black trim around the windscreen. Will also do the back black trim with a brush as well. We’ll see what tomorrow brings... thanks for checking. Cheers Misha
-
Moving to an airbrush will significantly improve your future builds although there is a learning curve involved. Perhaps the first decision to make is whether to get a single action or dual action airbrush. The difference is in the trigger operation, the single action allows the paint and air to come out in a consistent spray while the dual action allows you separate controls over air delivery and paint resulting in greater control. Even for beginners I suggest obtaining a dual action, it may be a bit more tricky in the beginning, yet it will provide greater satisfaction in the end. I find the that the Paasche VL to be a good starting point with ease of cleaning and operation. Perhaps the key is to practice on file cards to obtain control and familiarity with paint to thinner ratios in mixing, aiming for a consistency of 2% milk. The other ingredient is a decent compressor that allows you to regulate air preassure, as that is the other variable in achieving a good finish. Look for a compressor with a storage tank, as that eliminates the pulsing action of typical diaphragm compressor. There are many tutorials available on youtube to help you along. Wishing you success, as this will improve your work by applying paint finishes that are in scale with the model. Cheers Misha
-
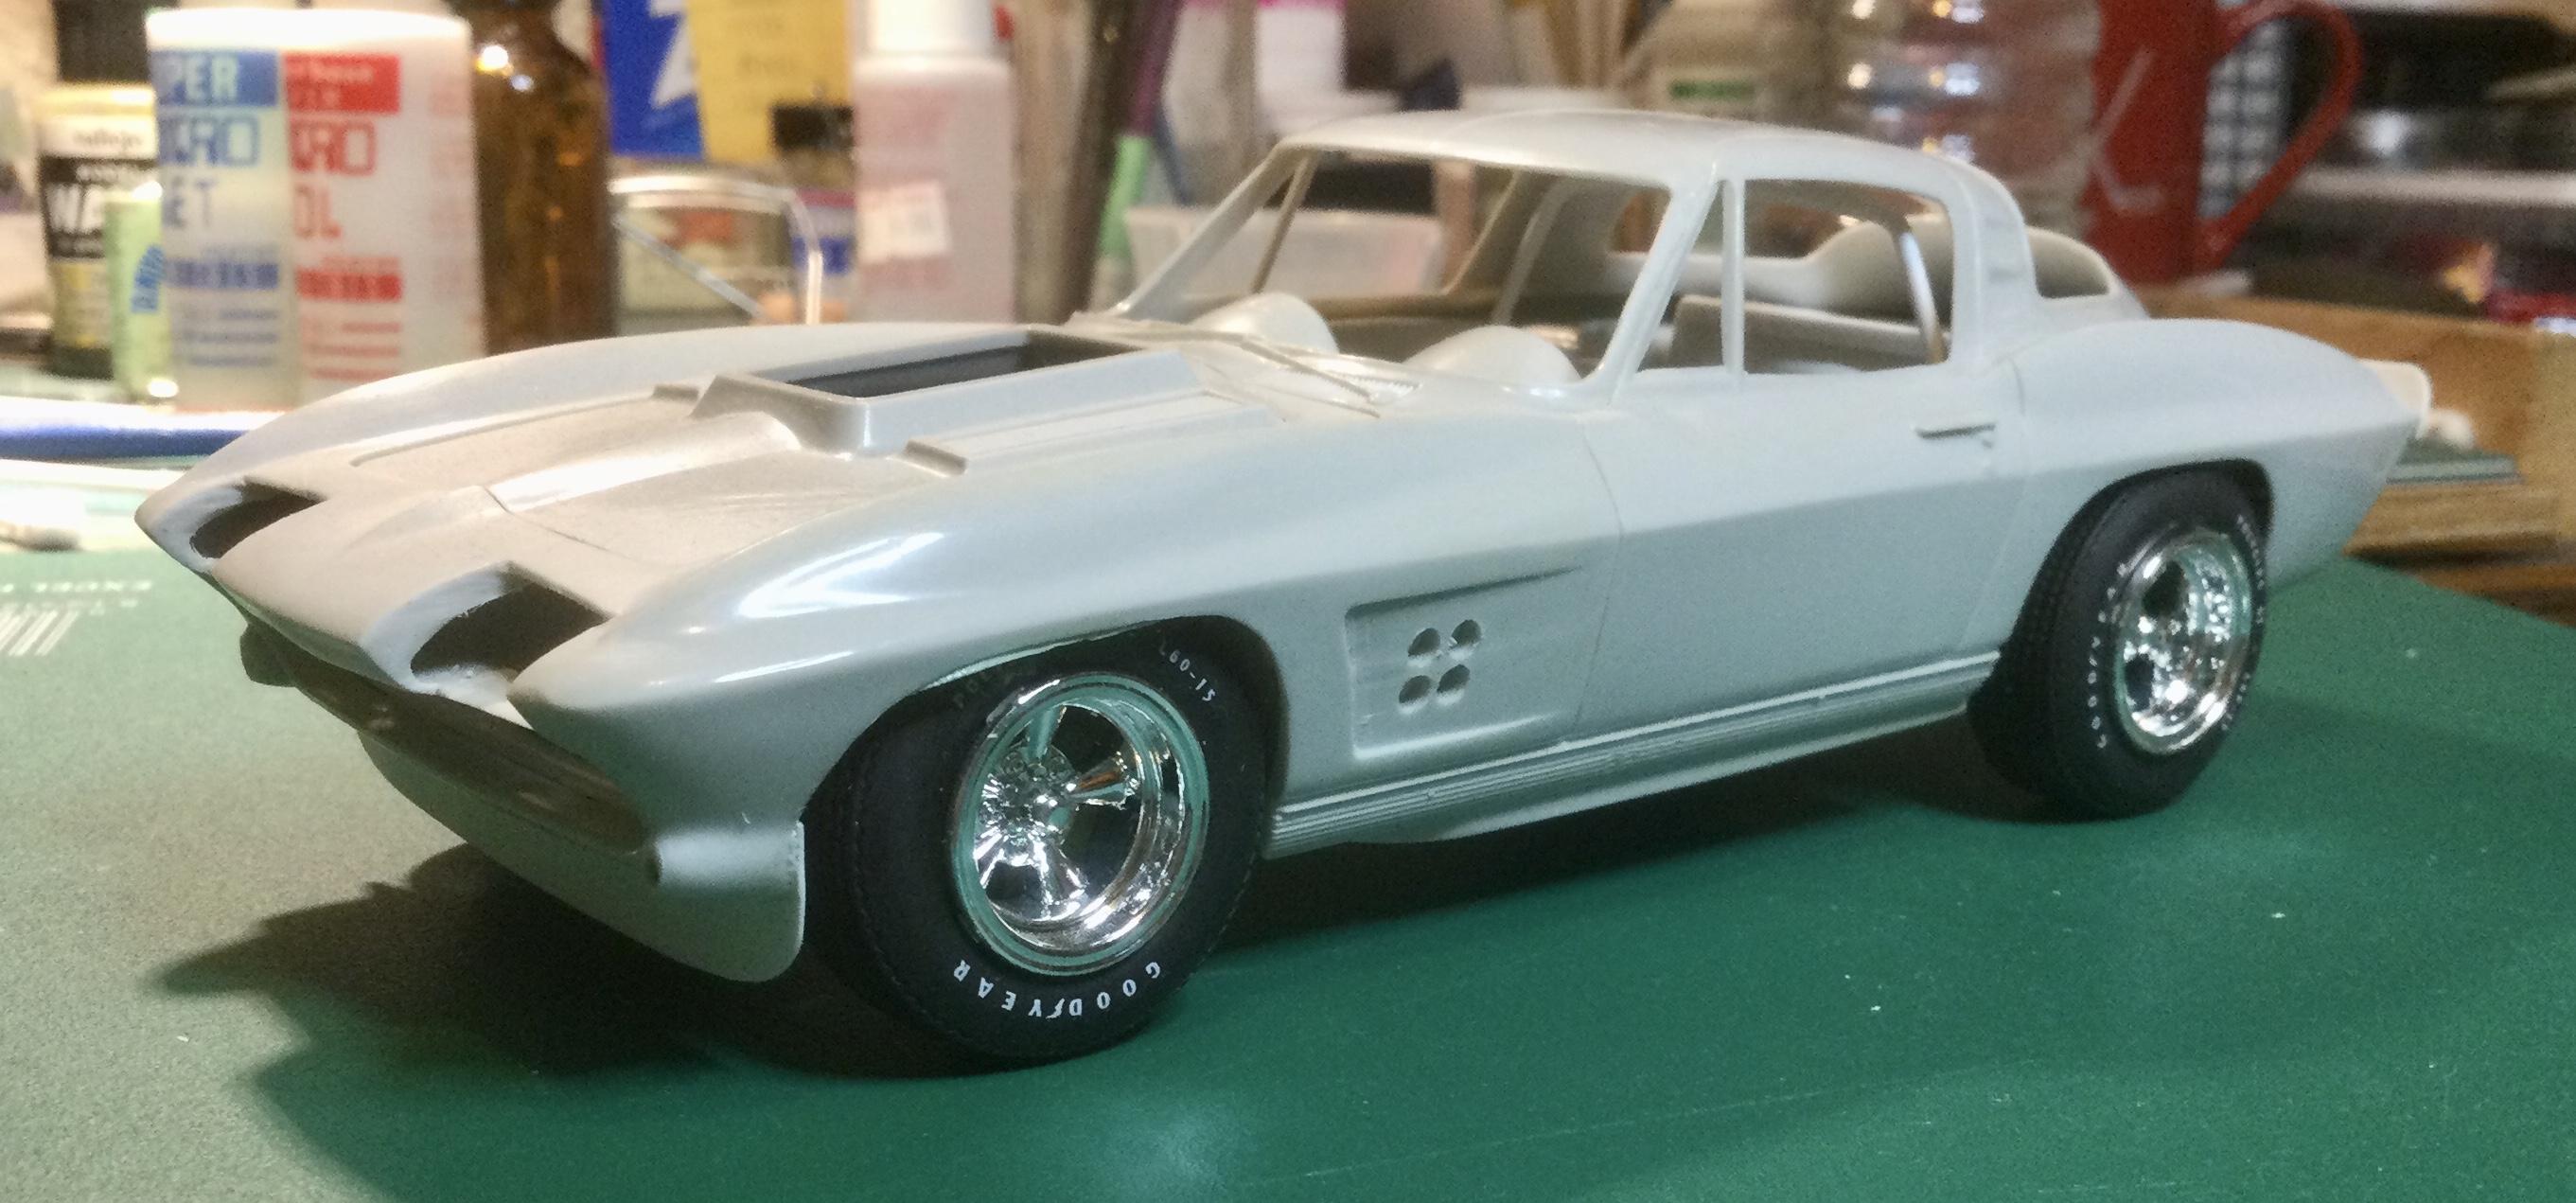
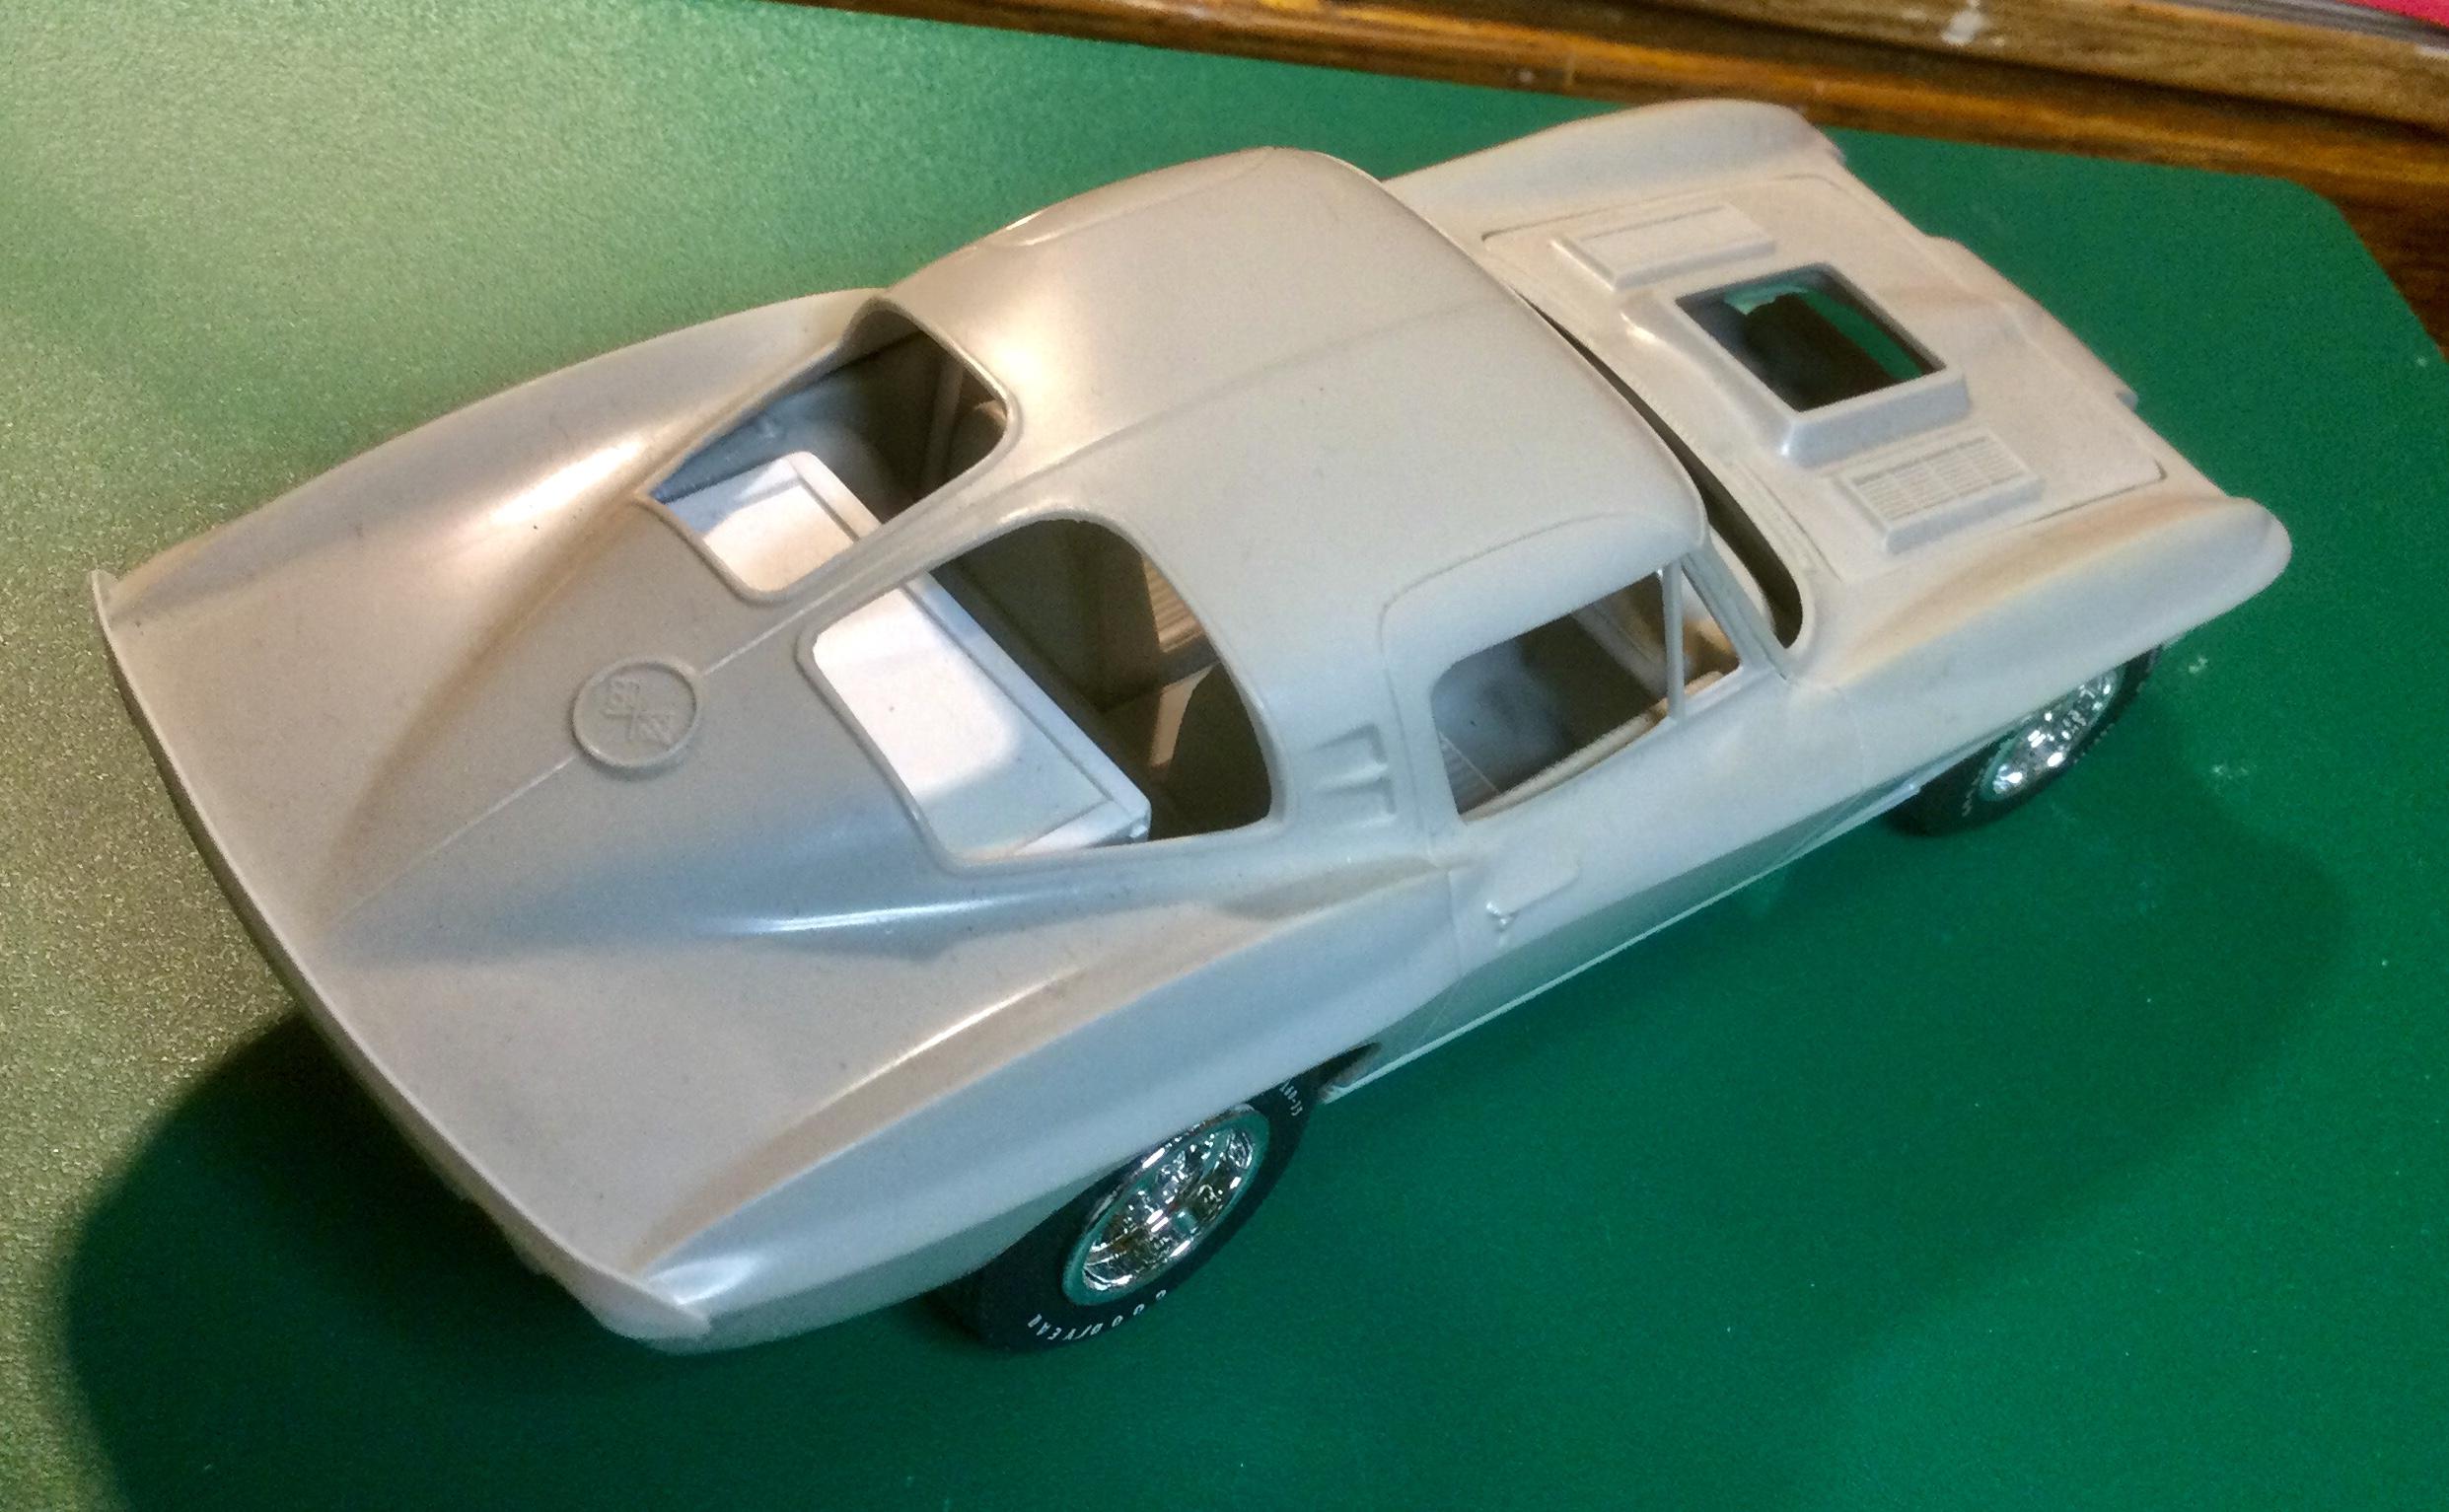
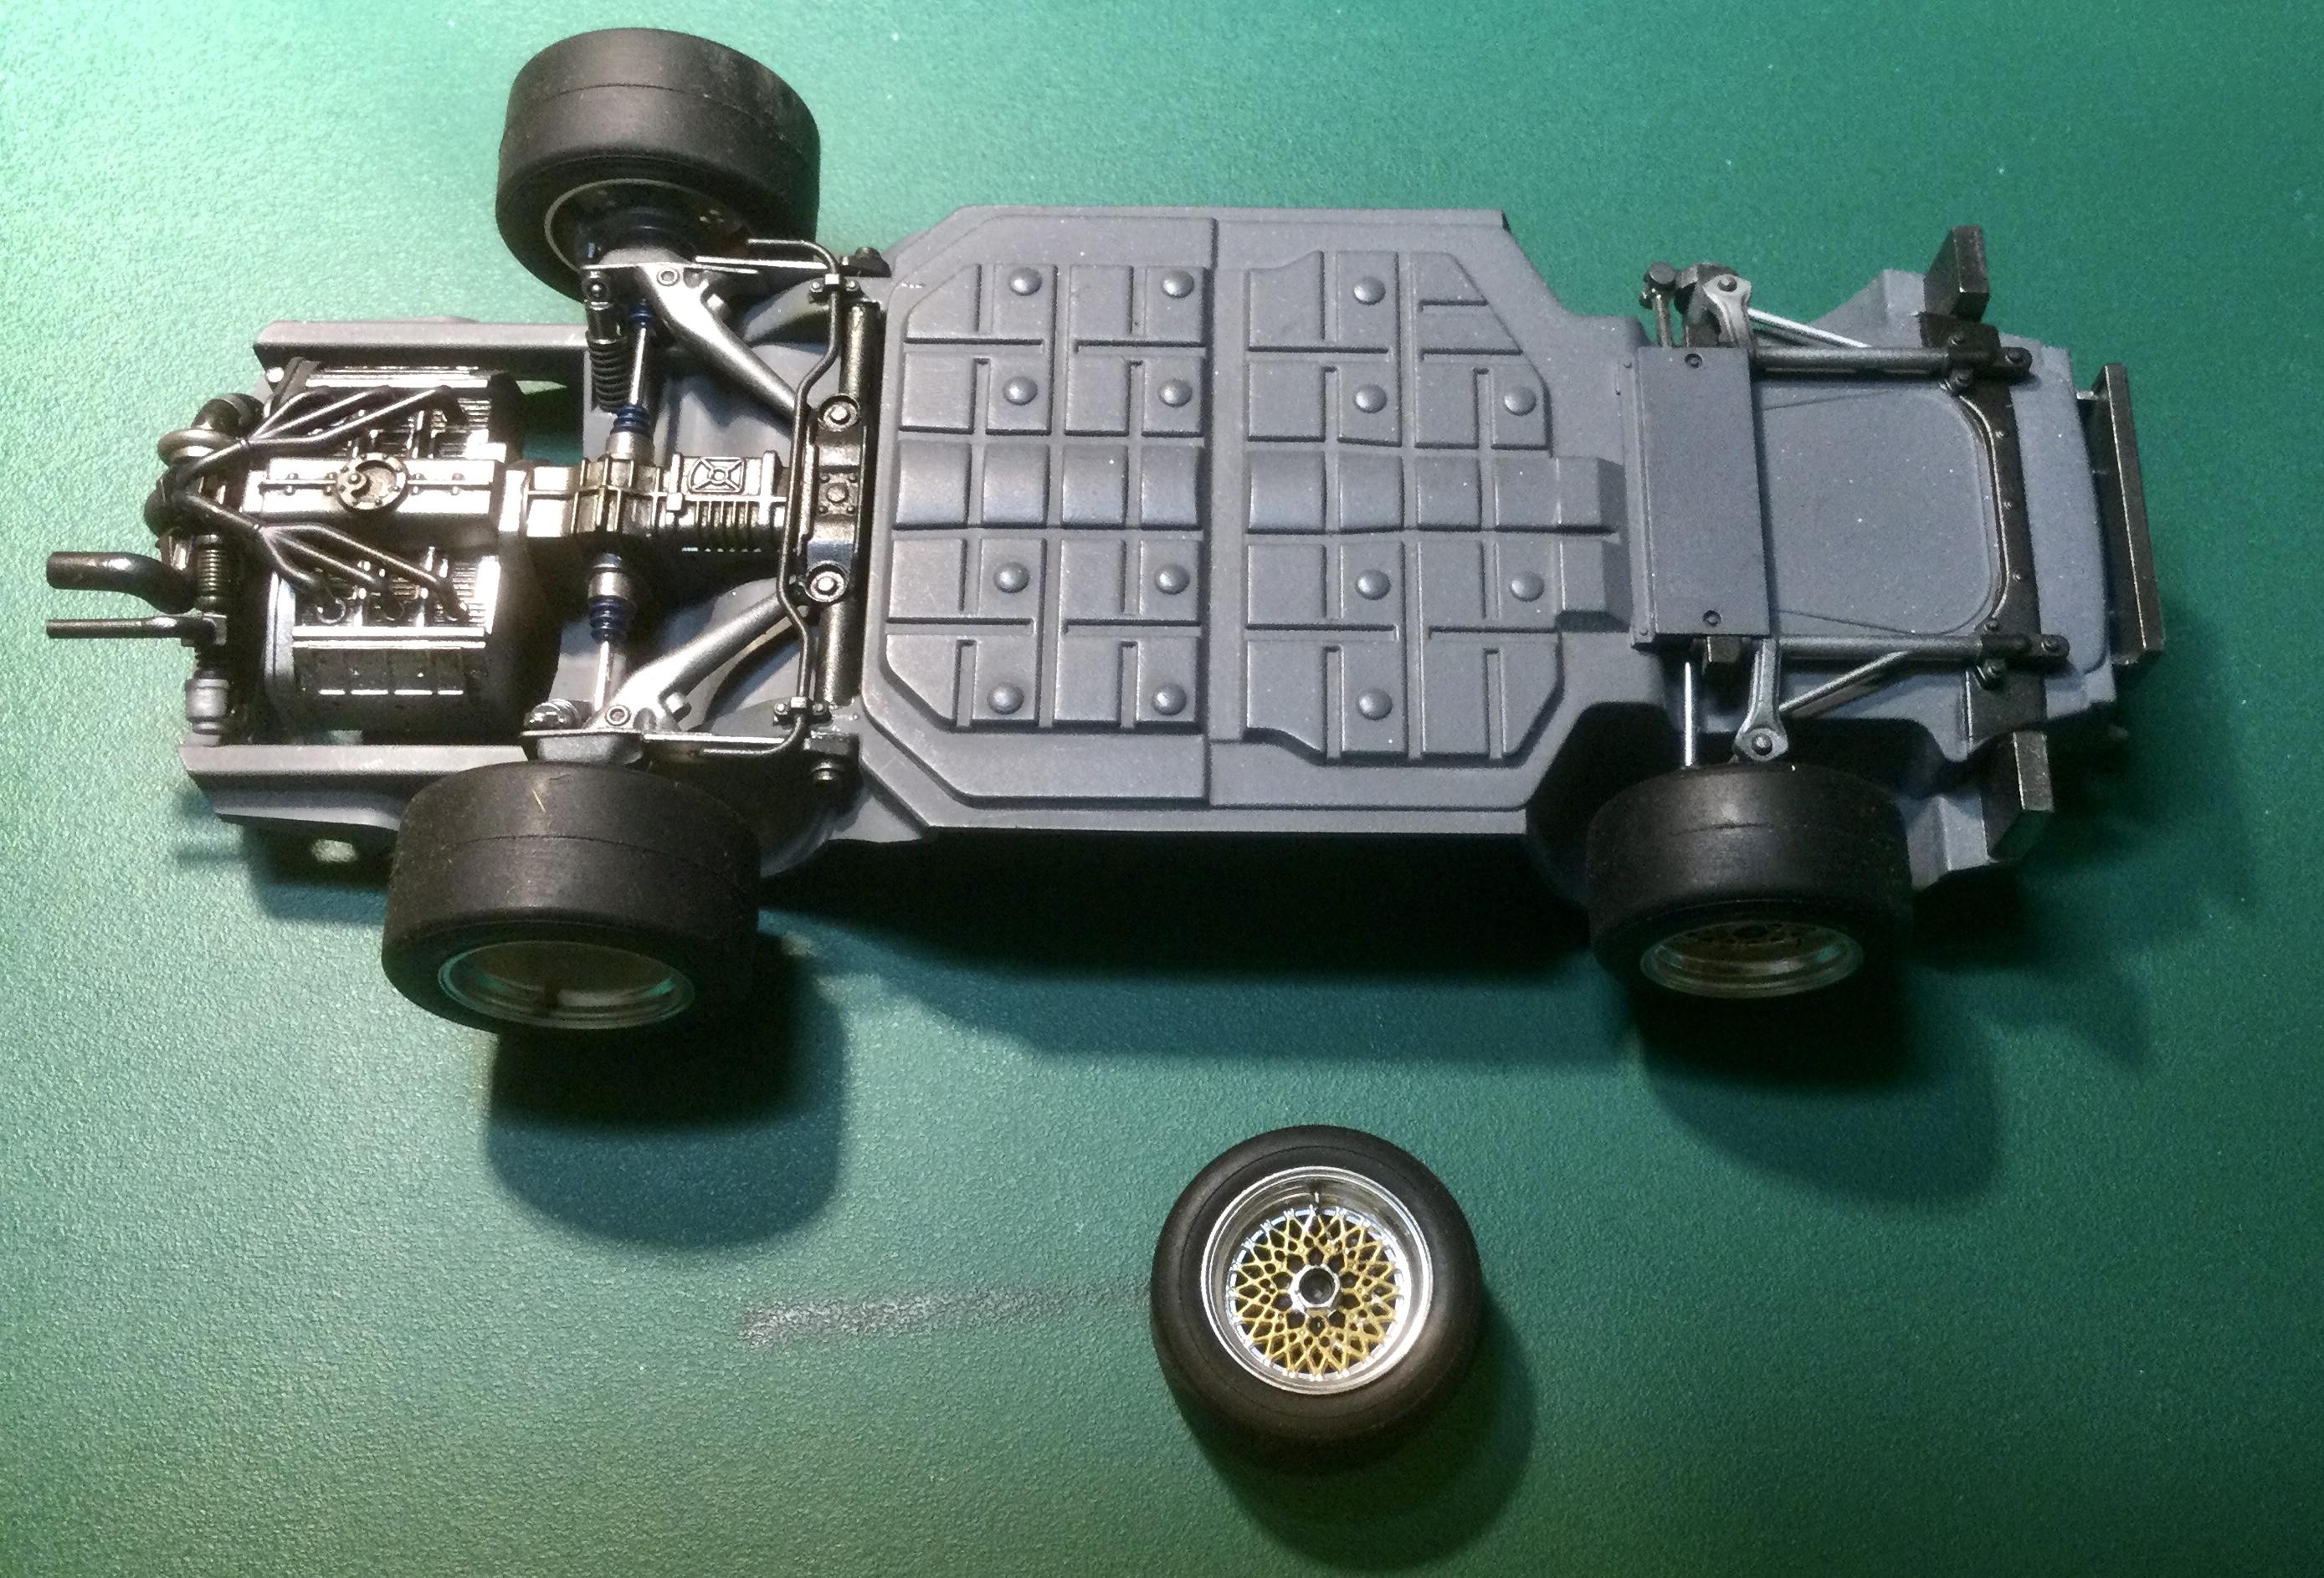
1964 SCCA Corvette W.I.P.
Misha replied to MarkJ's topic in WIP: Other Racing: Road Racing, Land Speed Racers
Hi Mark, Well, this was a build that sitting somewhat on the back burner for me, yet with all the current interest in split-window builds on the Forum, I ought to start a thread. Hope you won’t mind a couple of shots of where I’m at in mock up stage. Are you going to use the kit chassis or swap it out? Cheers Misha
-
"Bring Out Your Dead" Completion Build--ROUND 2 Is On!
Misha replied to Snake45's topic in WIP: Model Cars
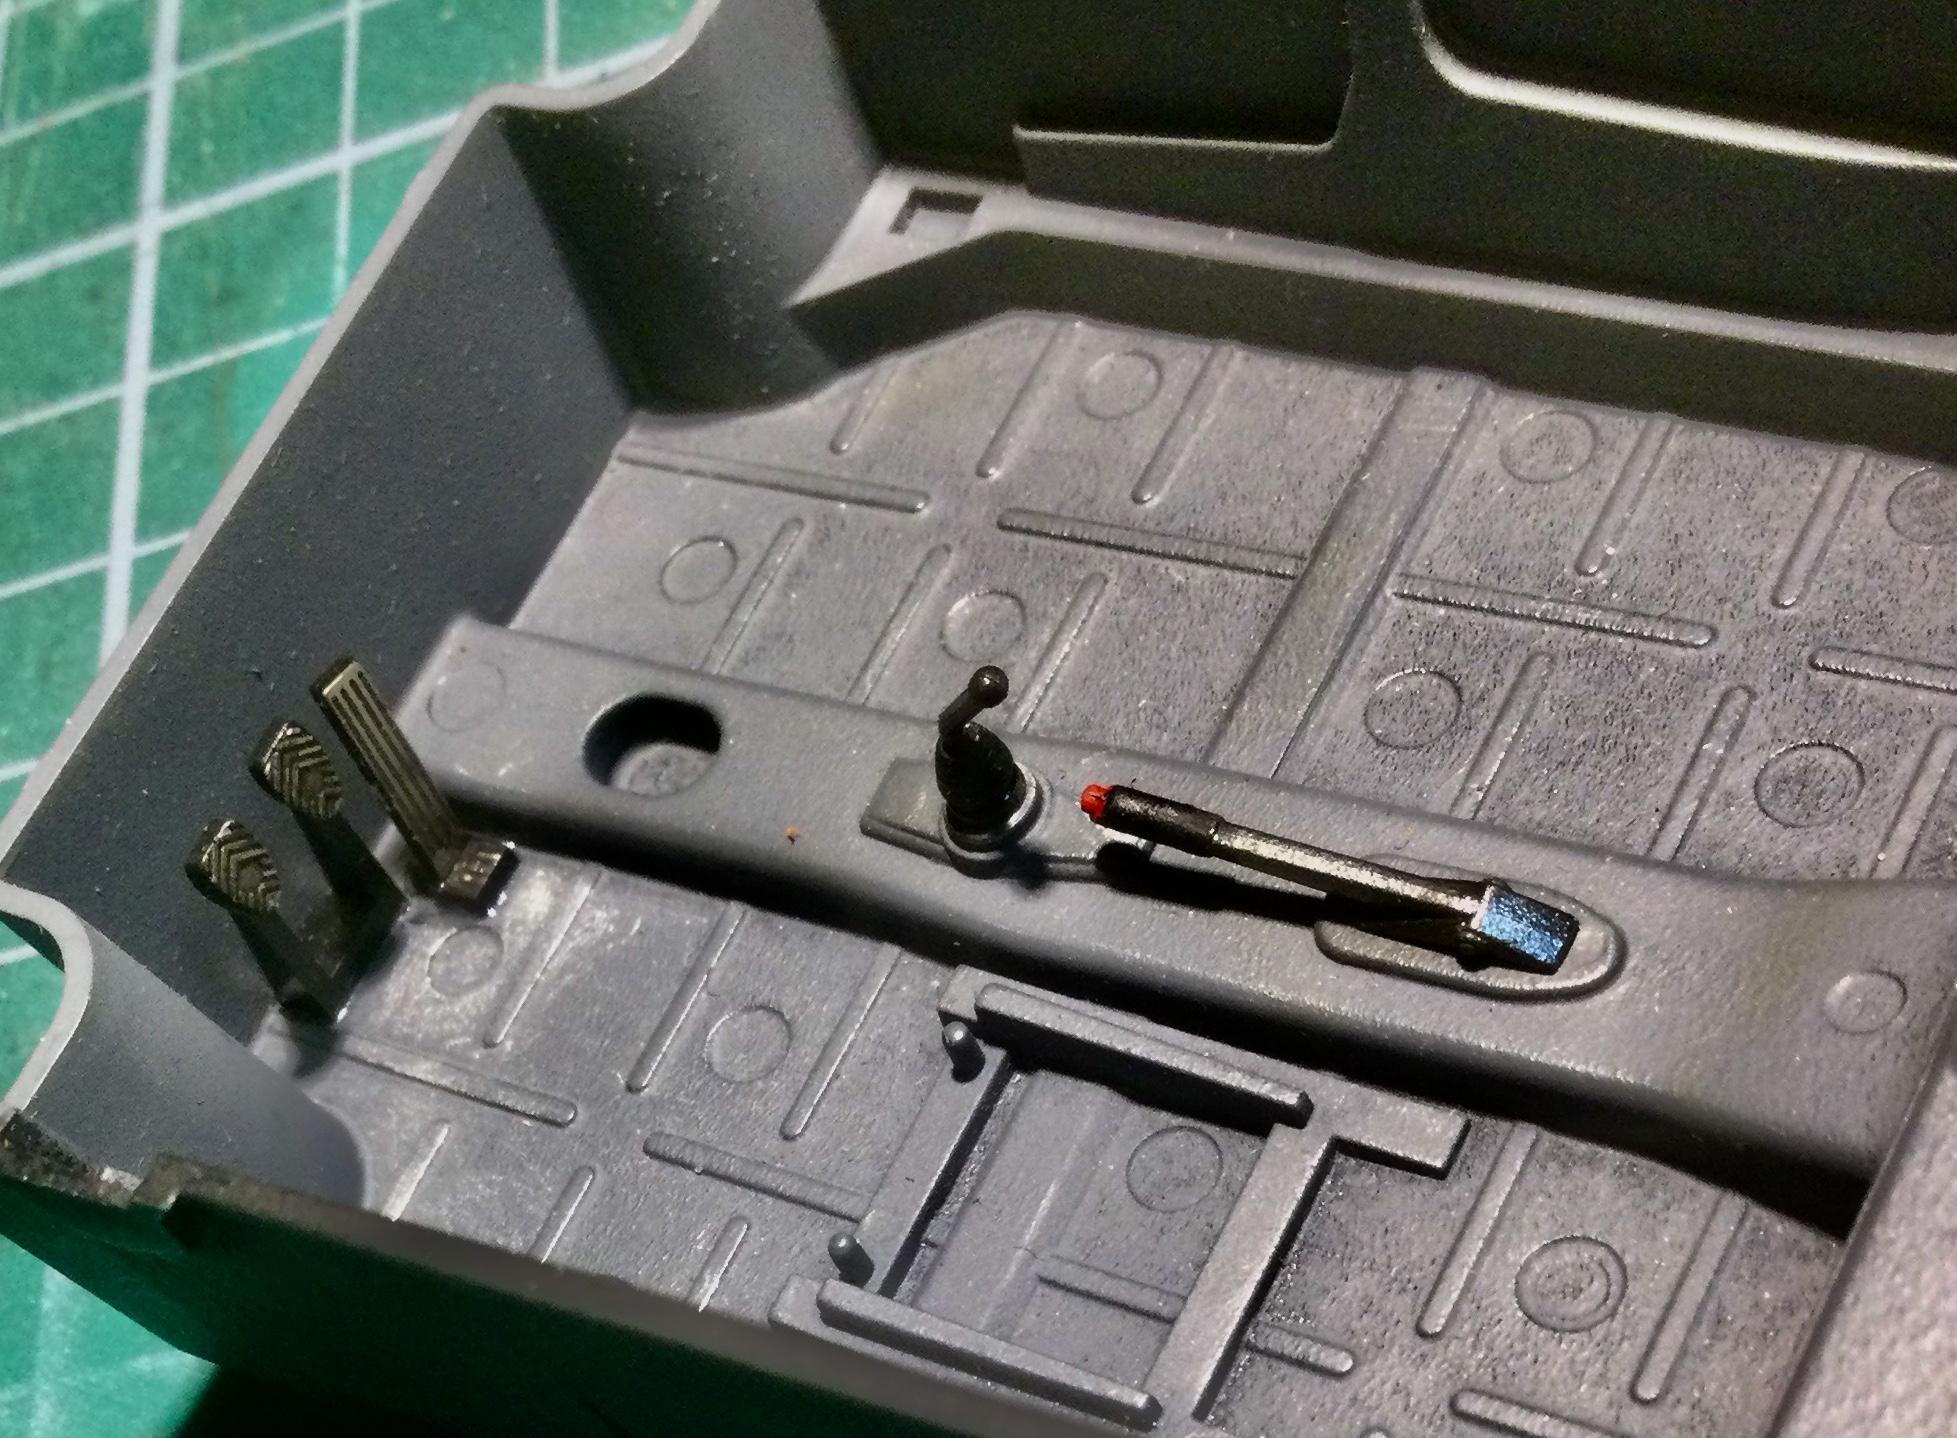
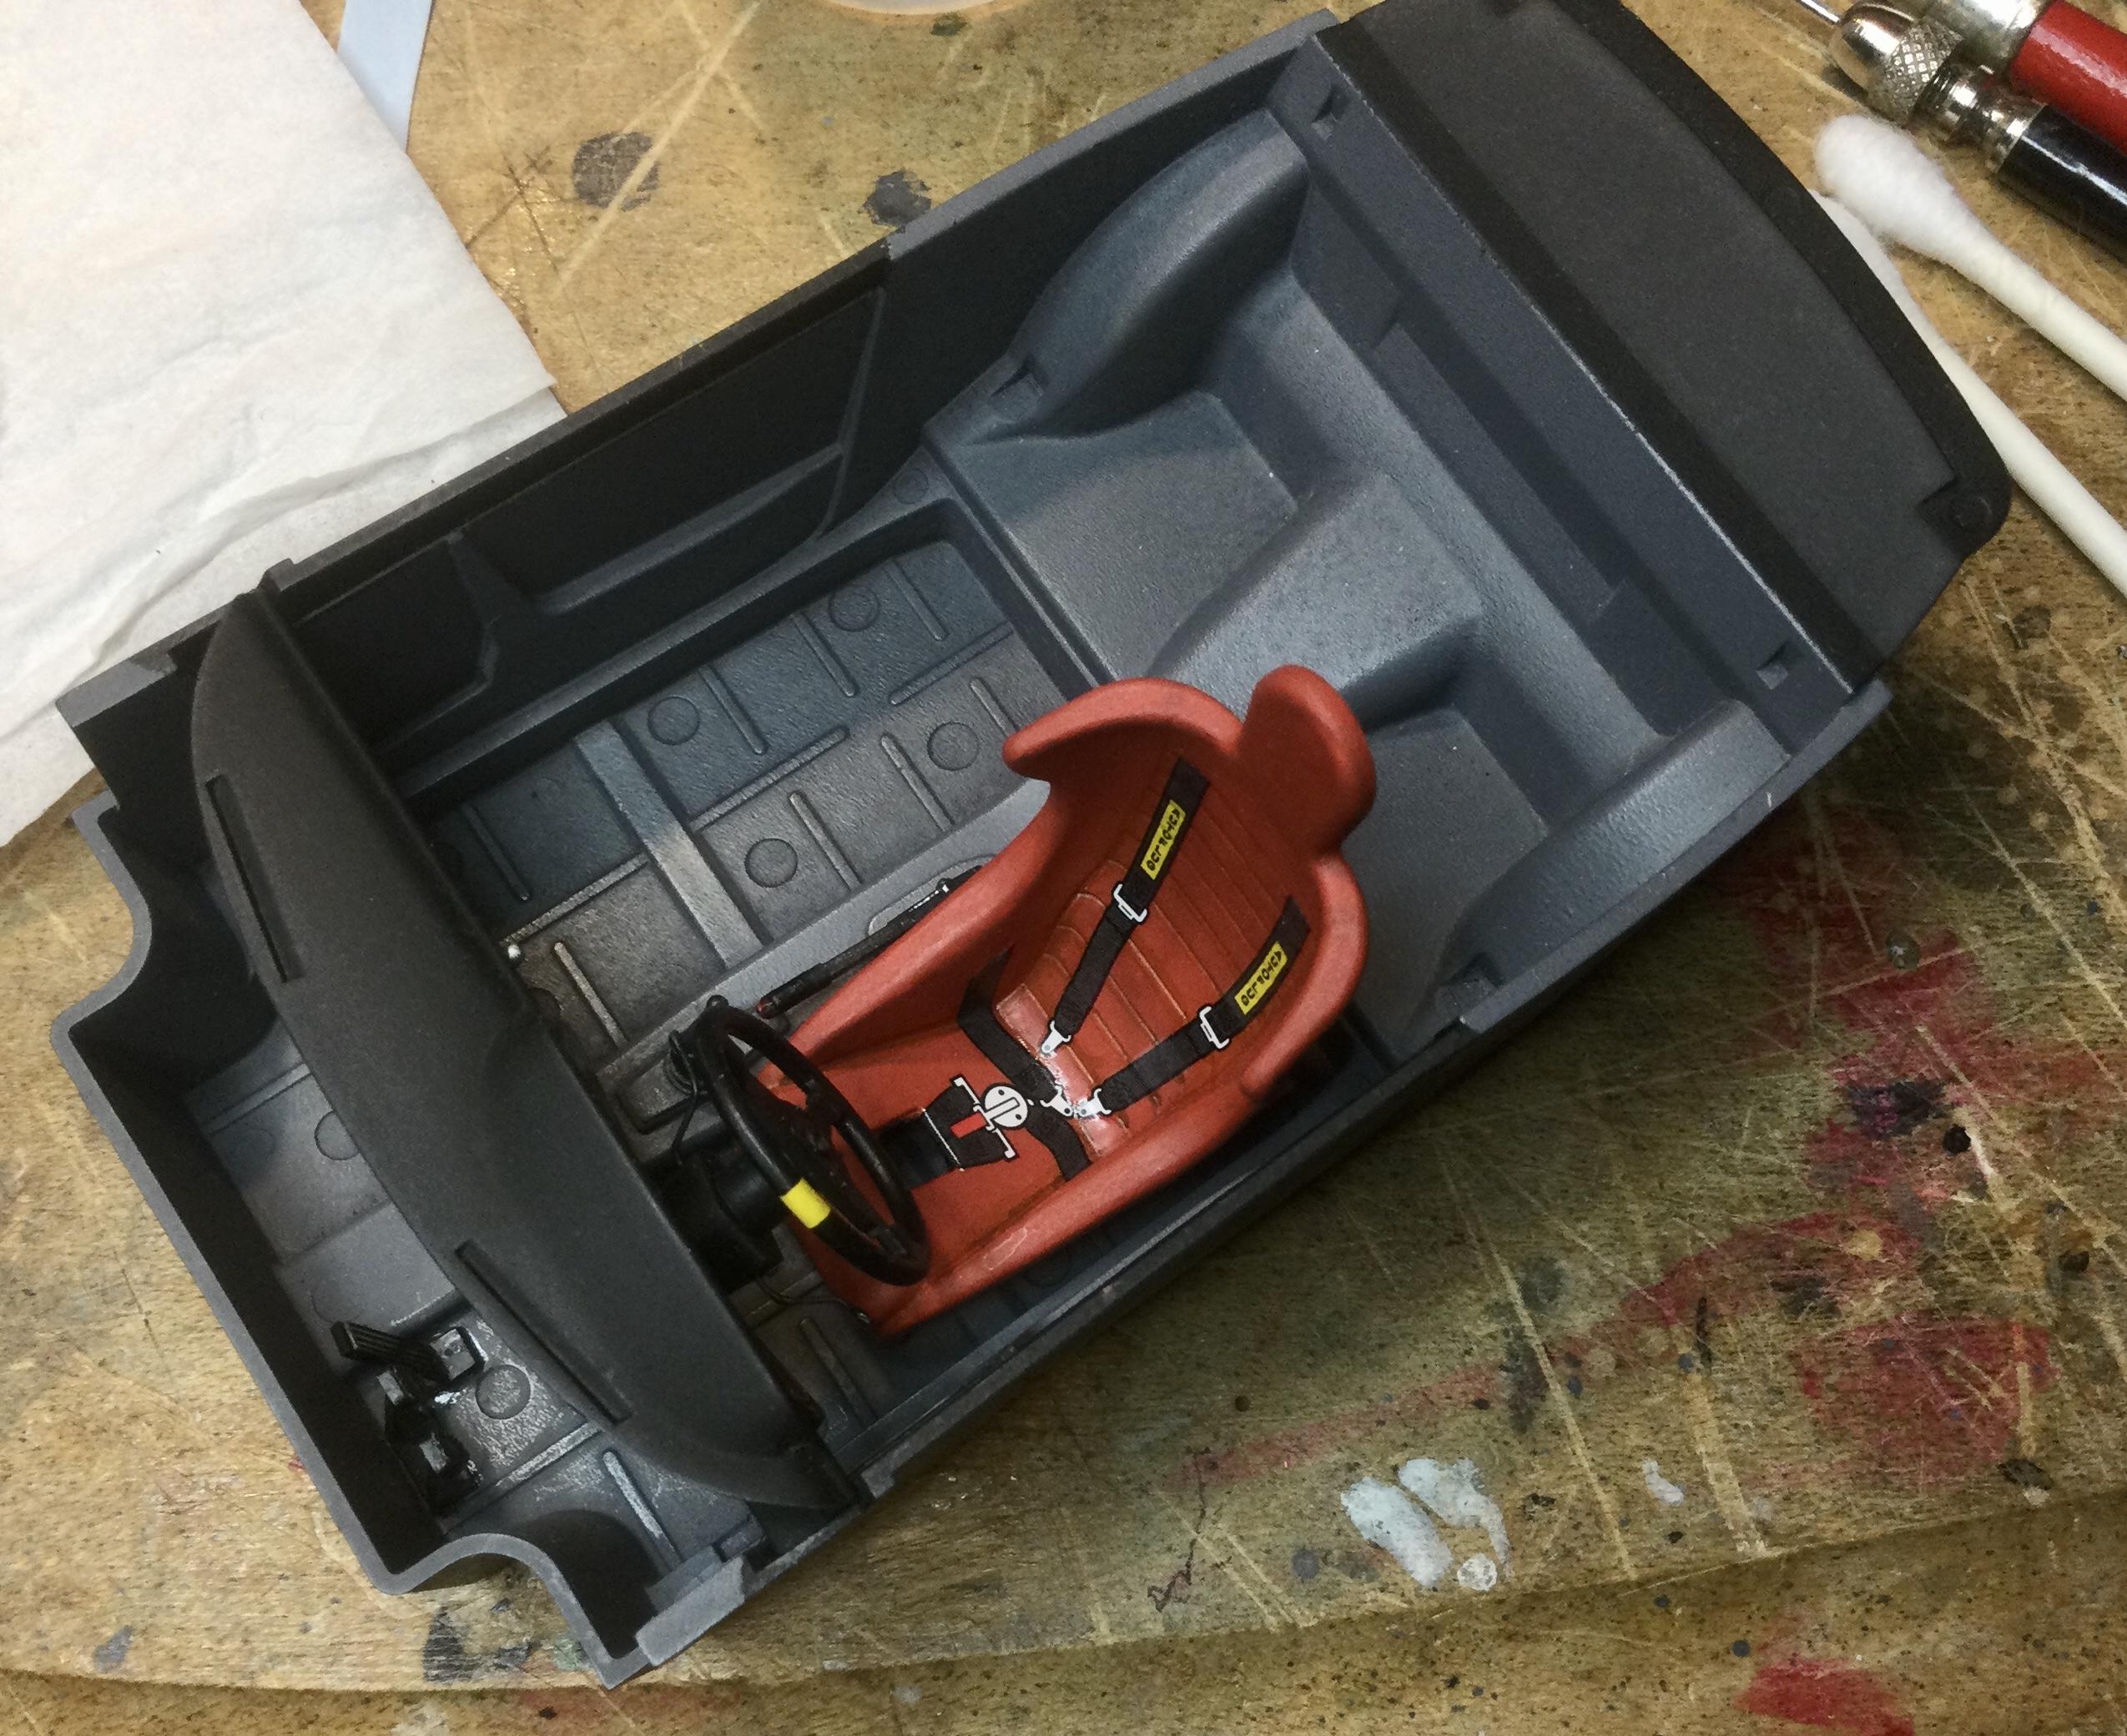
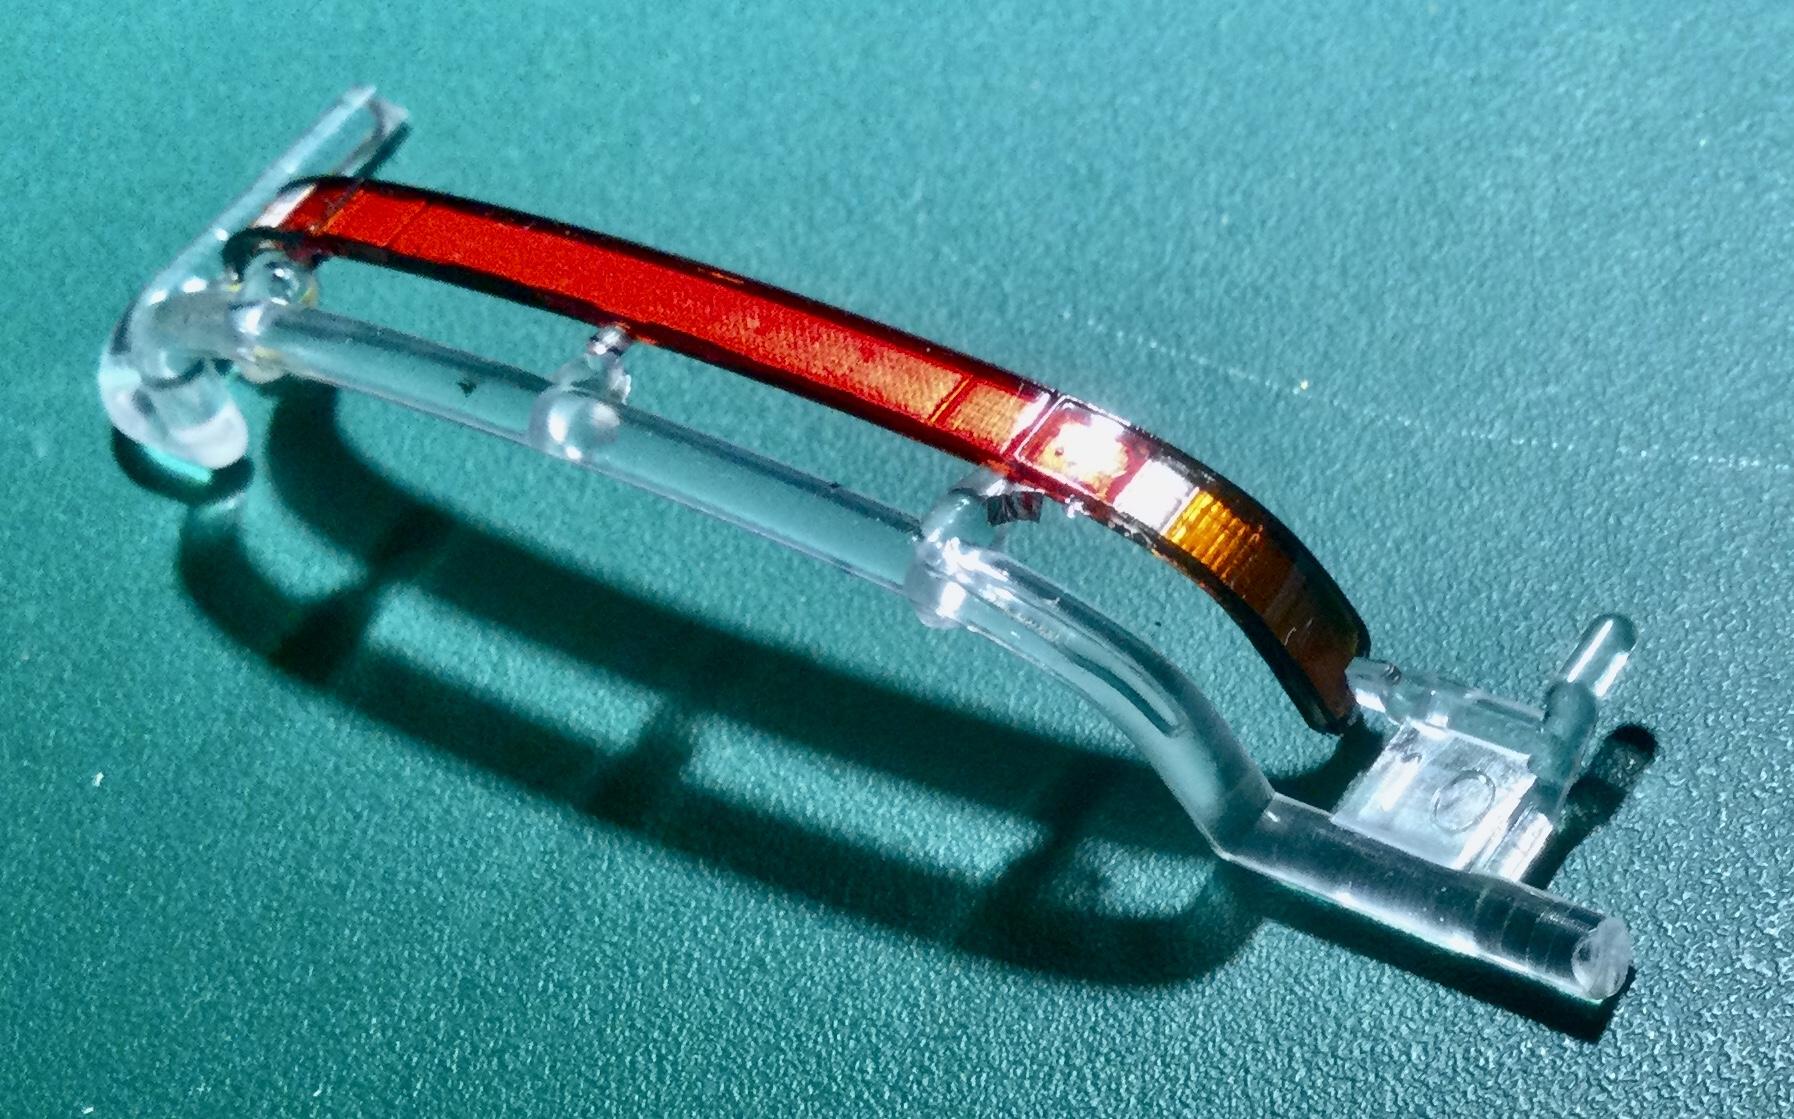
Update on the 934 RSR Porsche: Spent some time getting the interior tub prepped for assembly. Applied gentle weathering through the use of dry brushing with metallics to indica wear especially the driver’s footwell, followed by a wash over certain areas to create depth. Also applied a wash to the orange leather on the seat before applying the decal seat belts. (Note that in the photo showing the great P/E pedals, the floor hasn’t been treated to a wash yet; compare the pan in the other two snapshots.) There is still the roll bar assembly to go in. It’s already built and treated to a chrome finish. That will complete the interior tub. There is still a lot of detailing and construction on the body. To be followed by more decals on the body. The window trim done with the Micron pens turned out to be a disaster. After two days of drying, all the worked was easily wiped clean with a q-tip! Went back to the tried and true bottle and paint brush. Using a small chisel point brush I completed both side, including the interior trim. The remainder of the black body trim I’m going to mask and use the air brush, with the expectation of better results with these shakey ole hands. All of that ought to bring me close to gettin’ her done! Thanks for looking and commenting, cheers Misha
-
1961 Ranchero in 24hrs
Misha replied to Sam I Am's topic in WIP: Model Trucks: Pickups, Vans, SUVs, Light Commercial
Both you and Tom are doing ? great, it’s neat to see your progress. Great subject as well, will look sharp! Cheers Misha -
24 hr build--MPC The Super Judge Funny Car
Misha replied to Modlbldr's topic in WIP: Drag Racing Models
That’s great progress Tom, I’ll be following.... Cheers Misha -
"Bring Out Your Dead" Completion Build--ROUND 2 Is On!
Misha replied to Snake45's topic in WIP: Model Cars
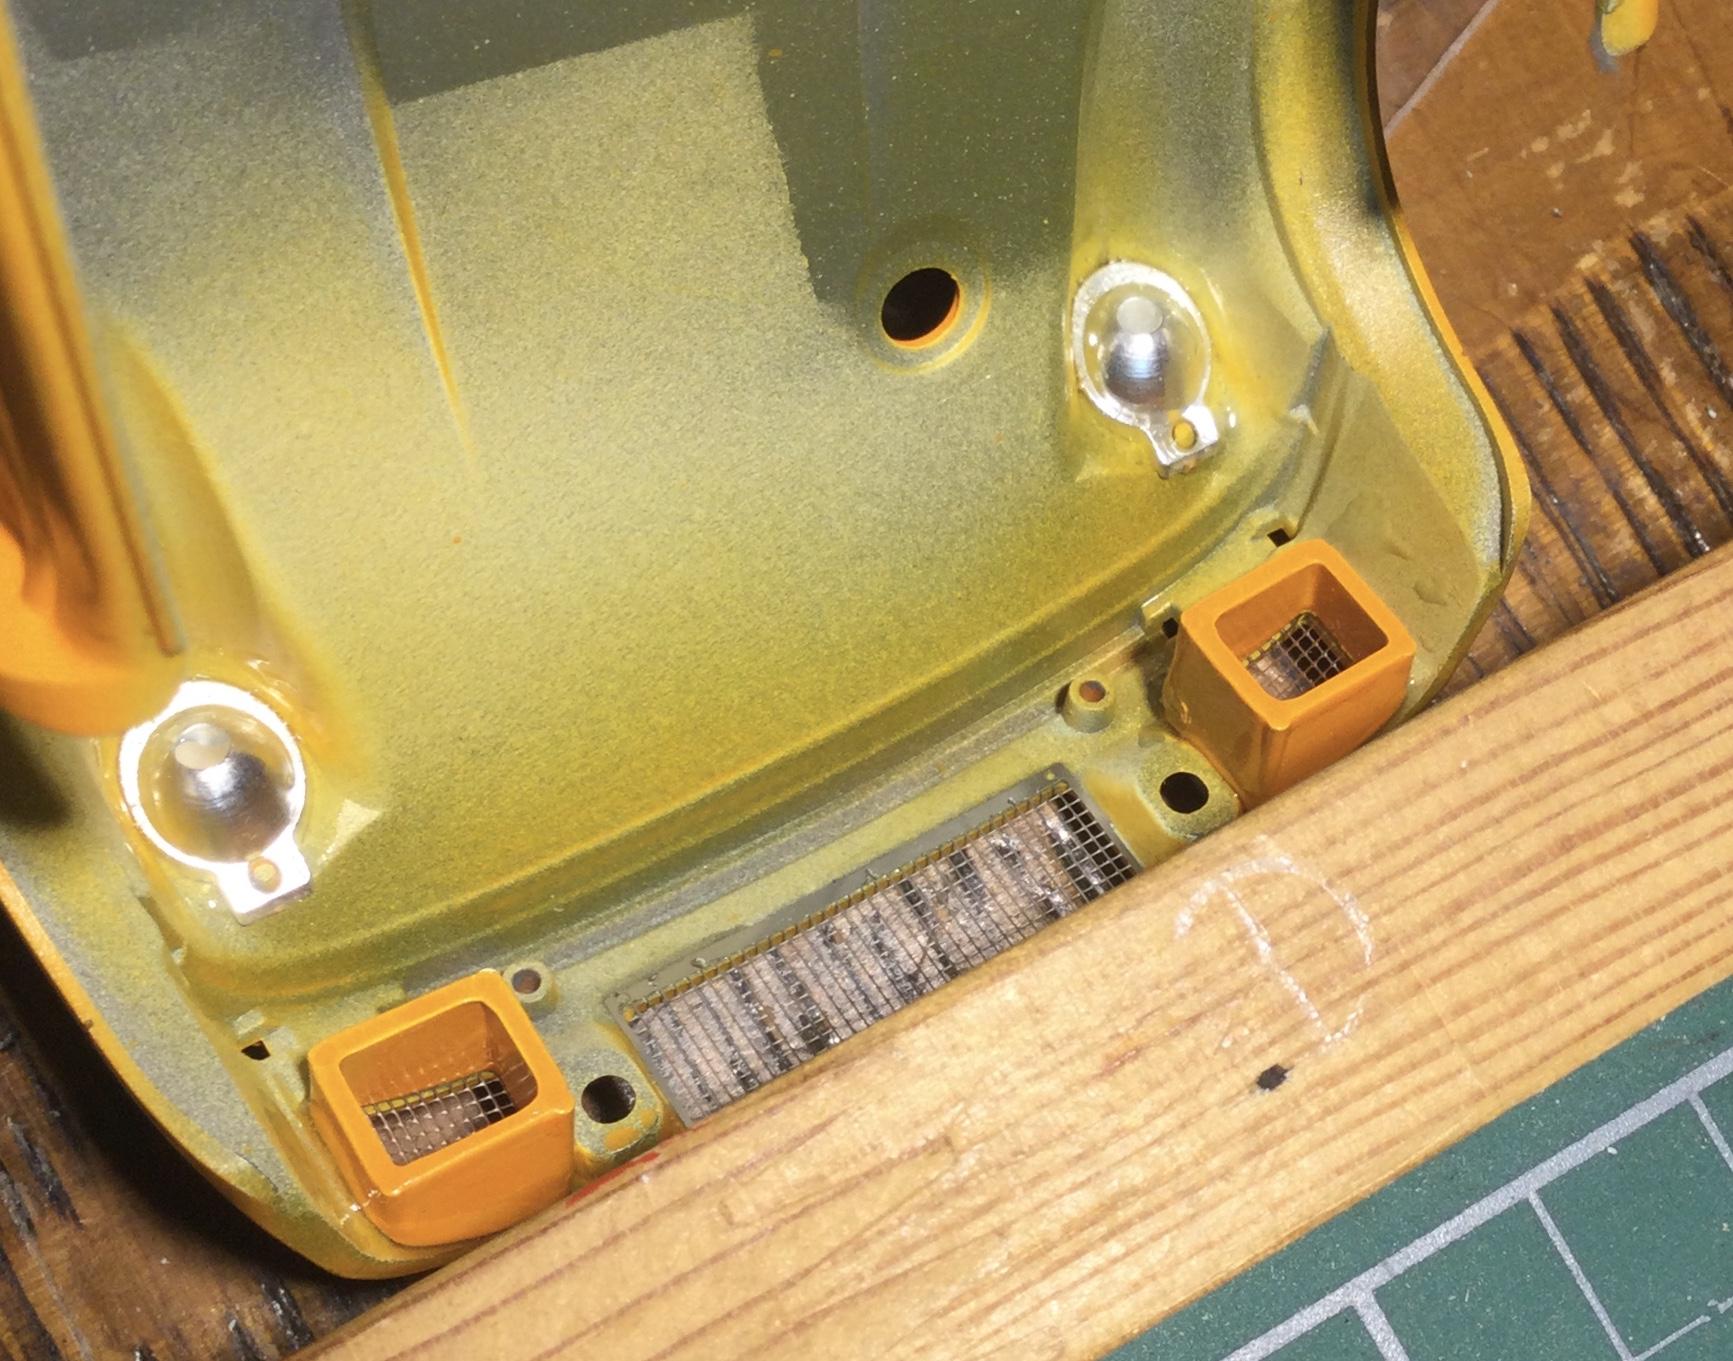
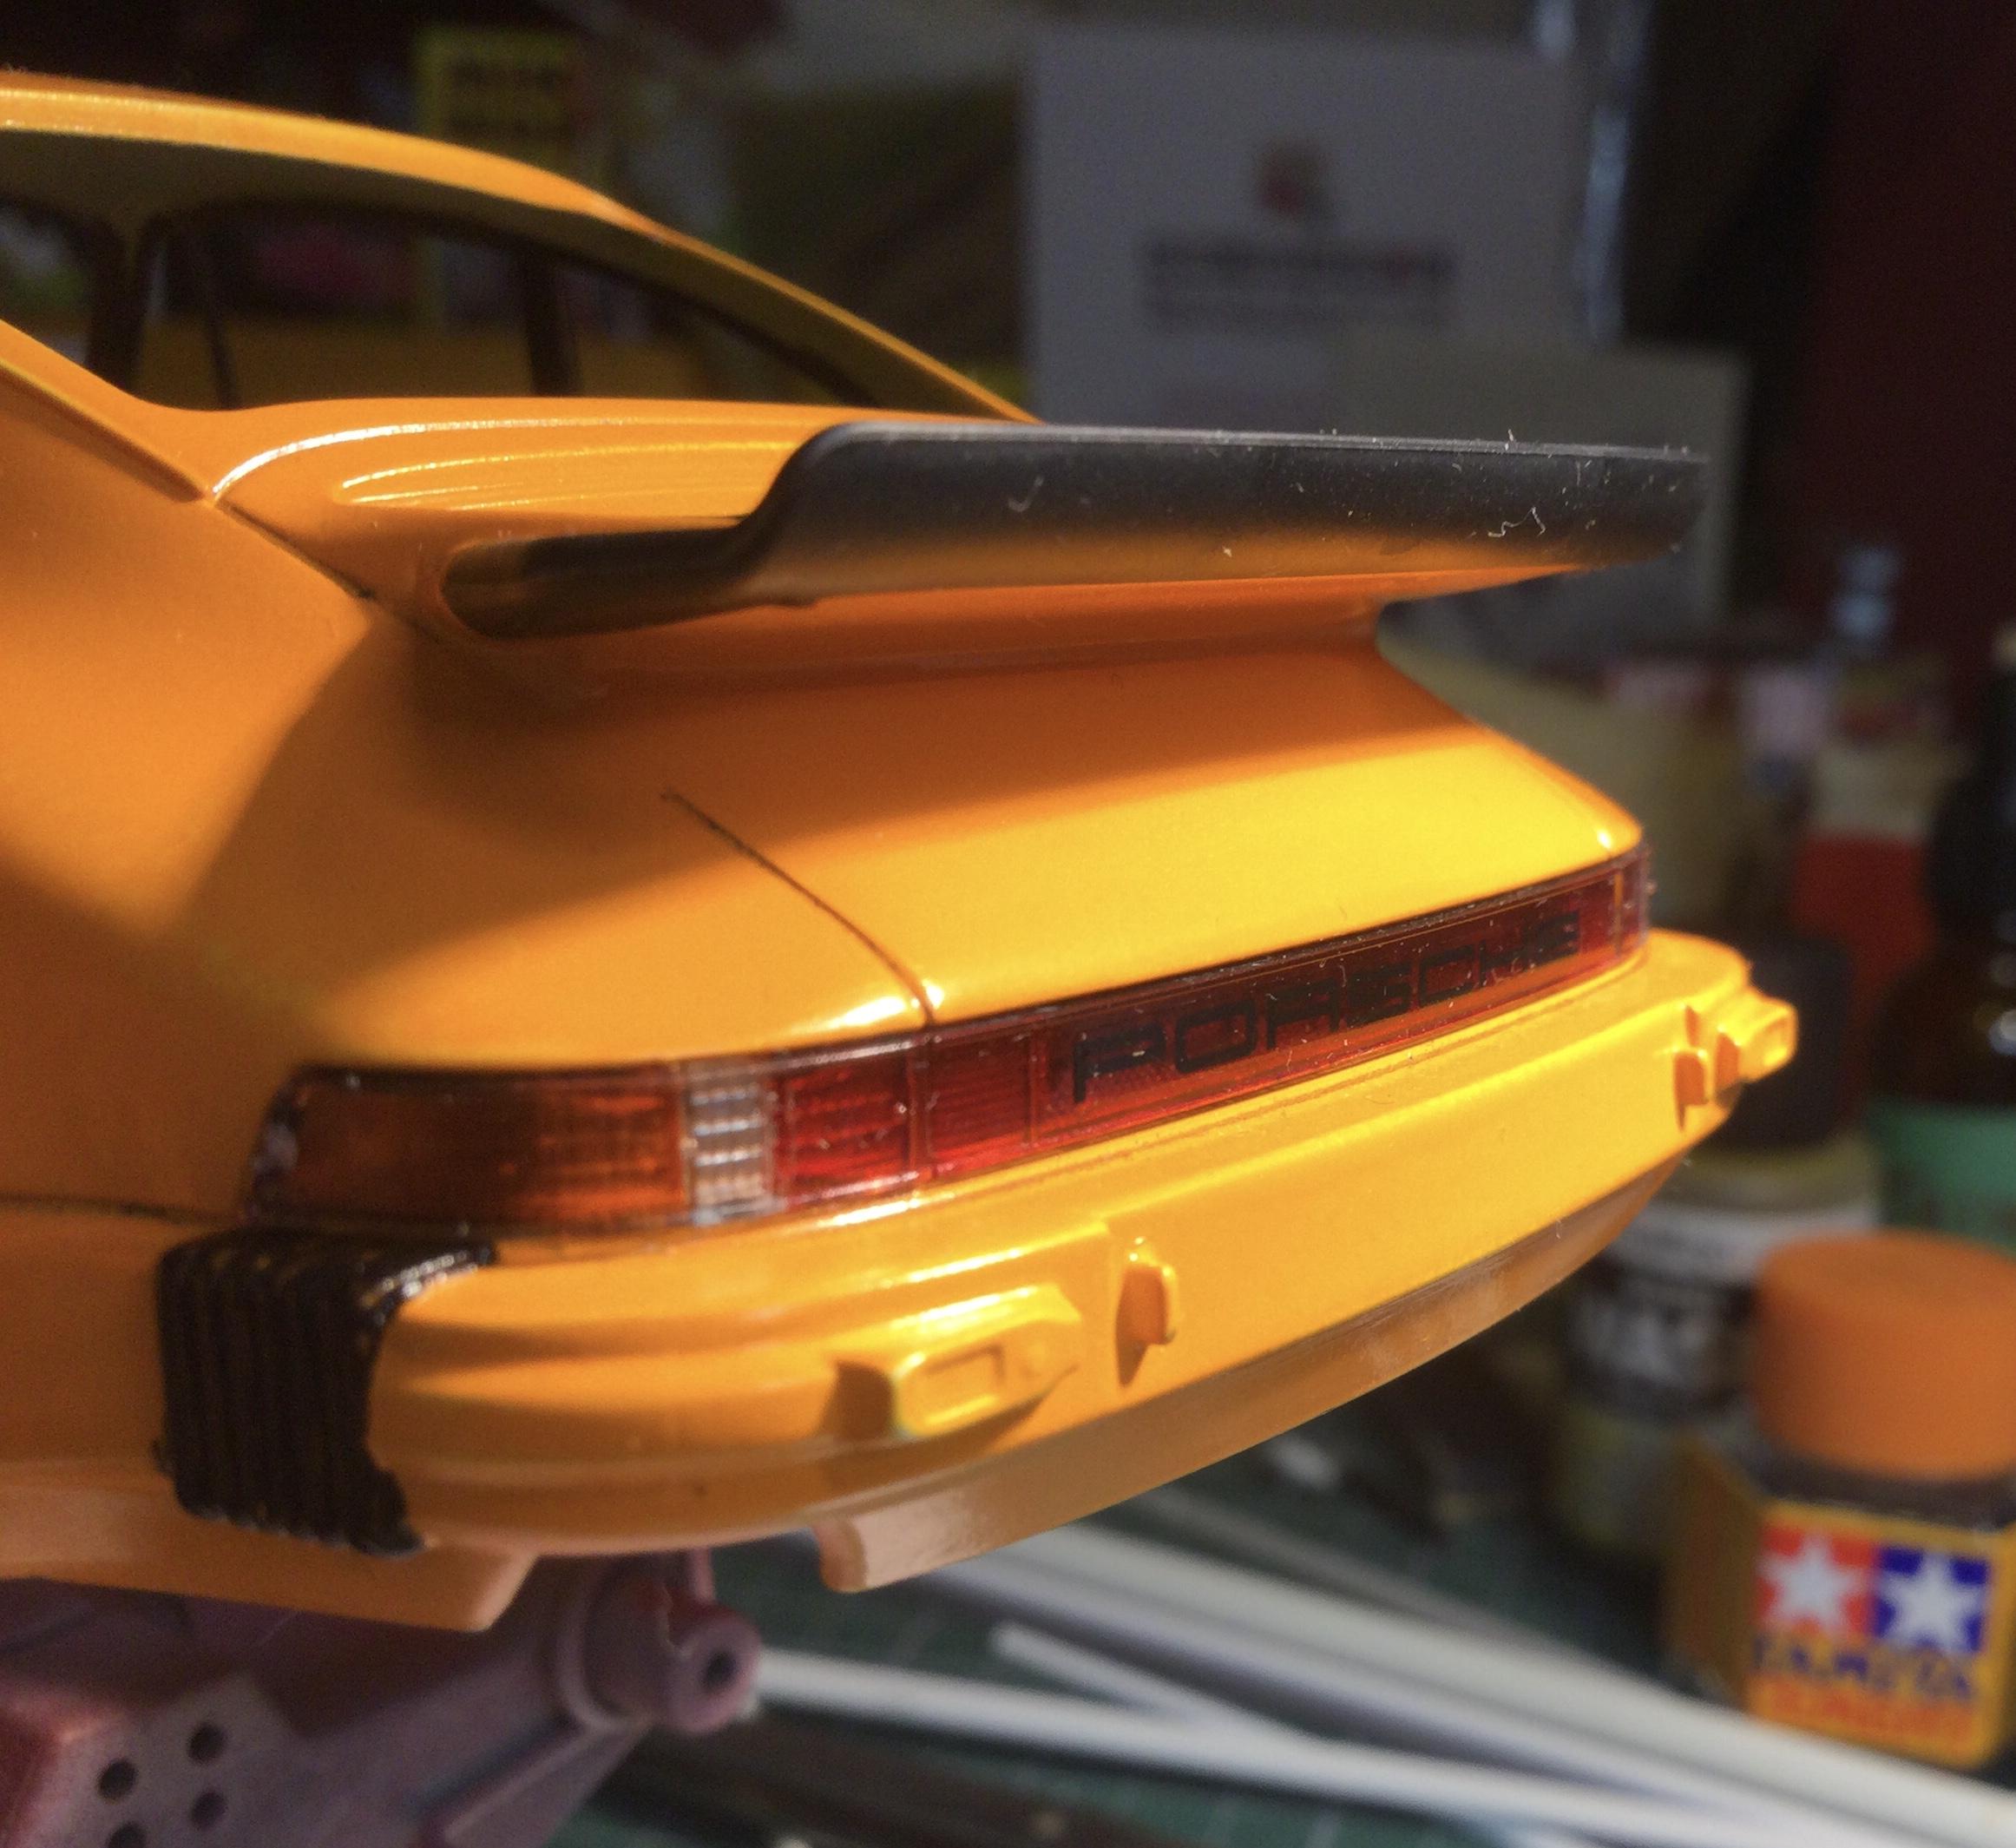
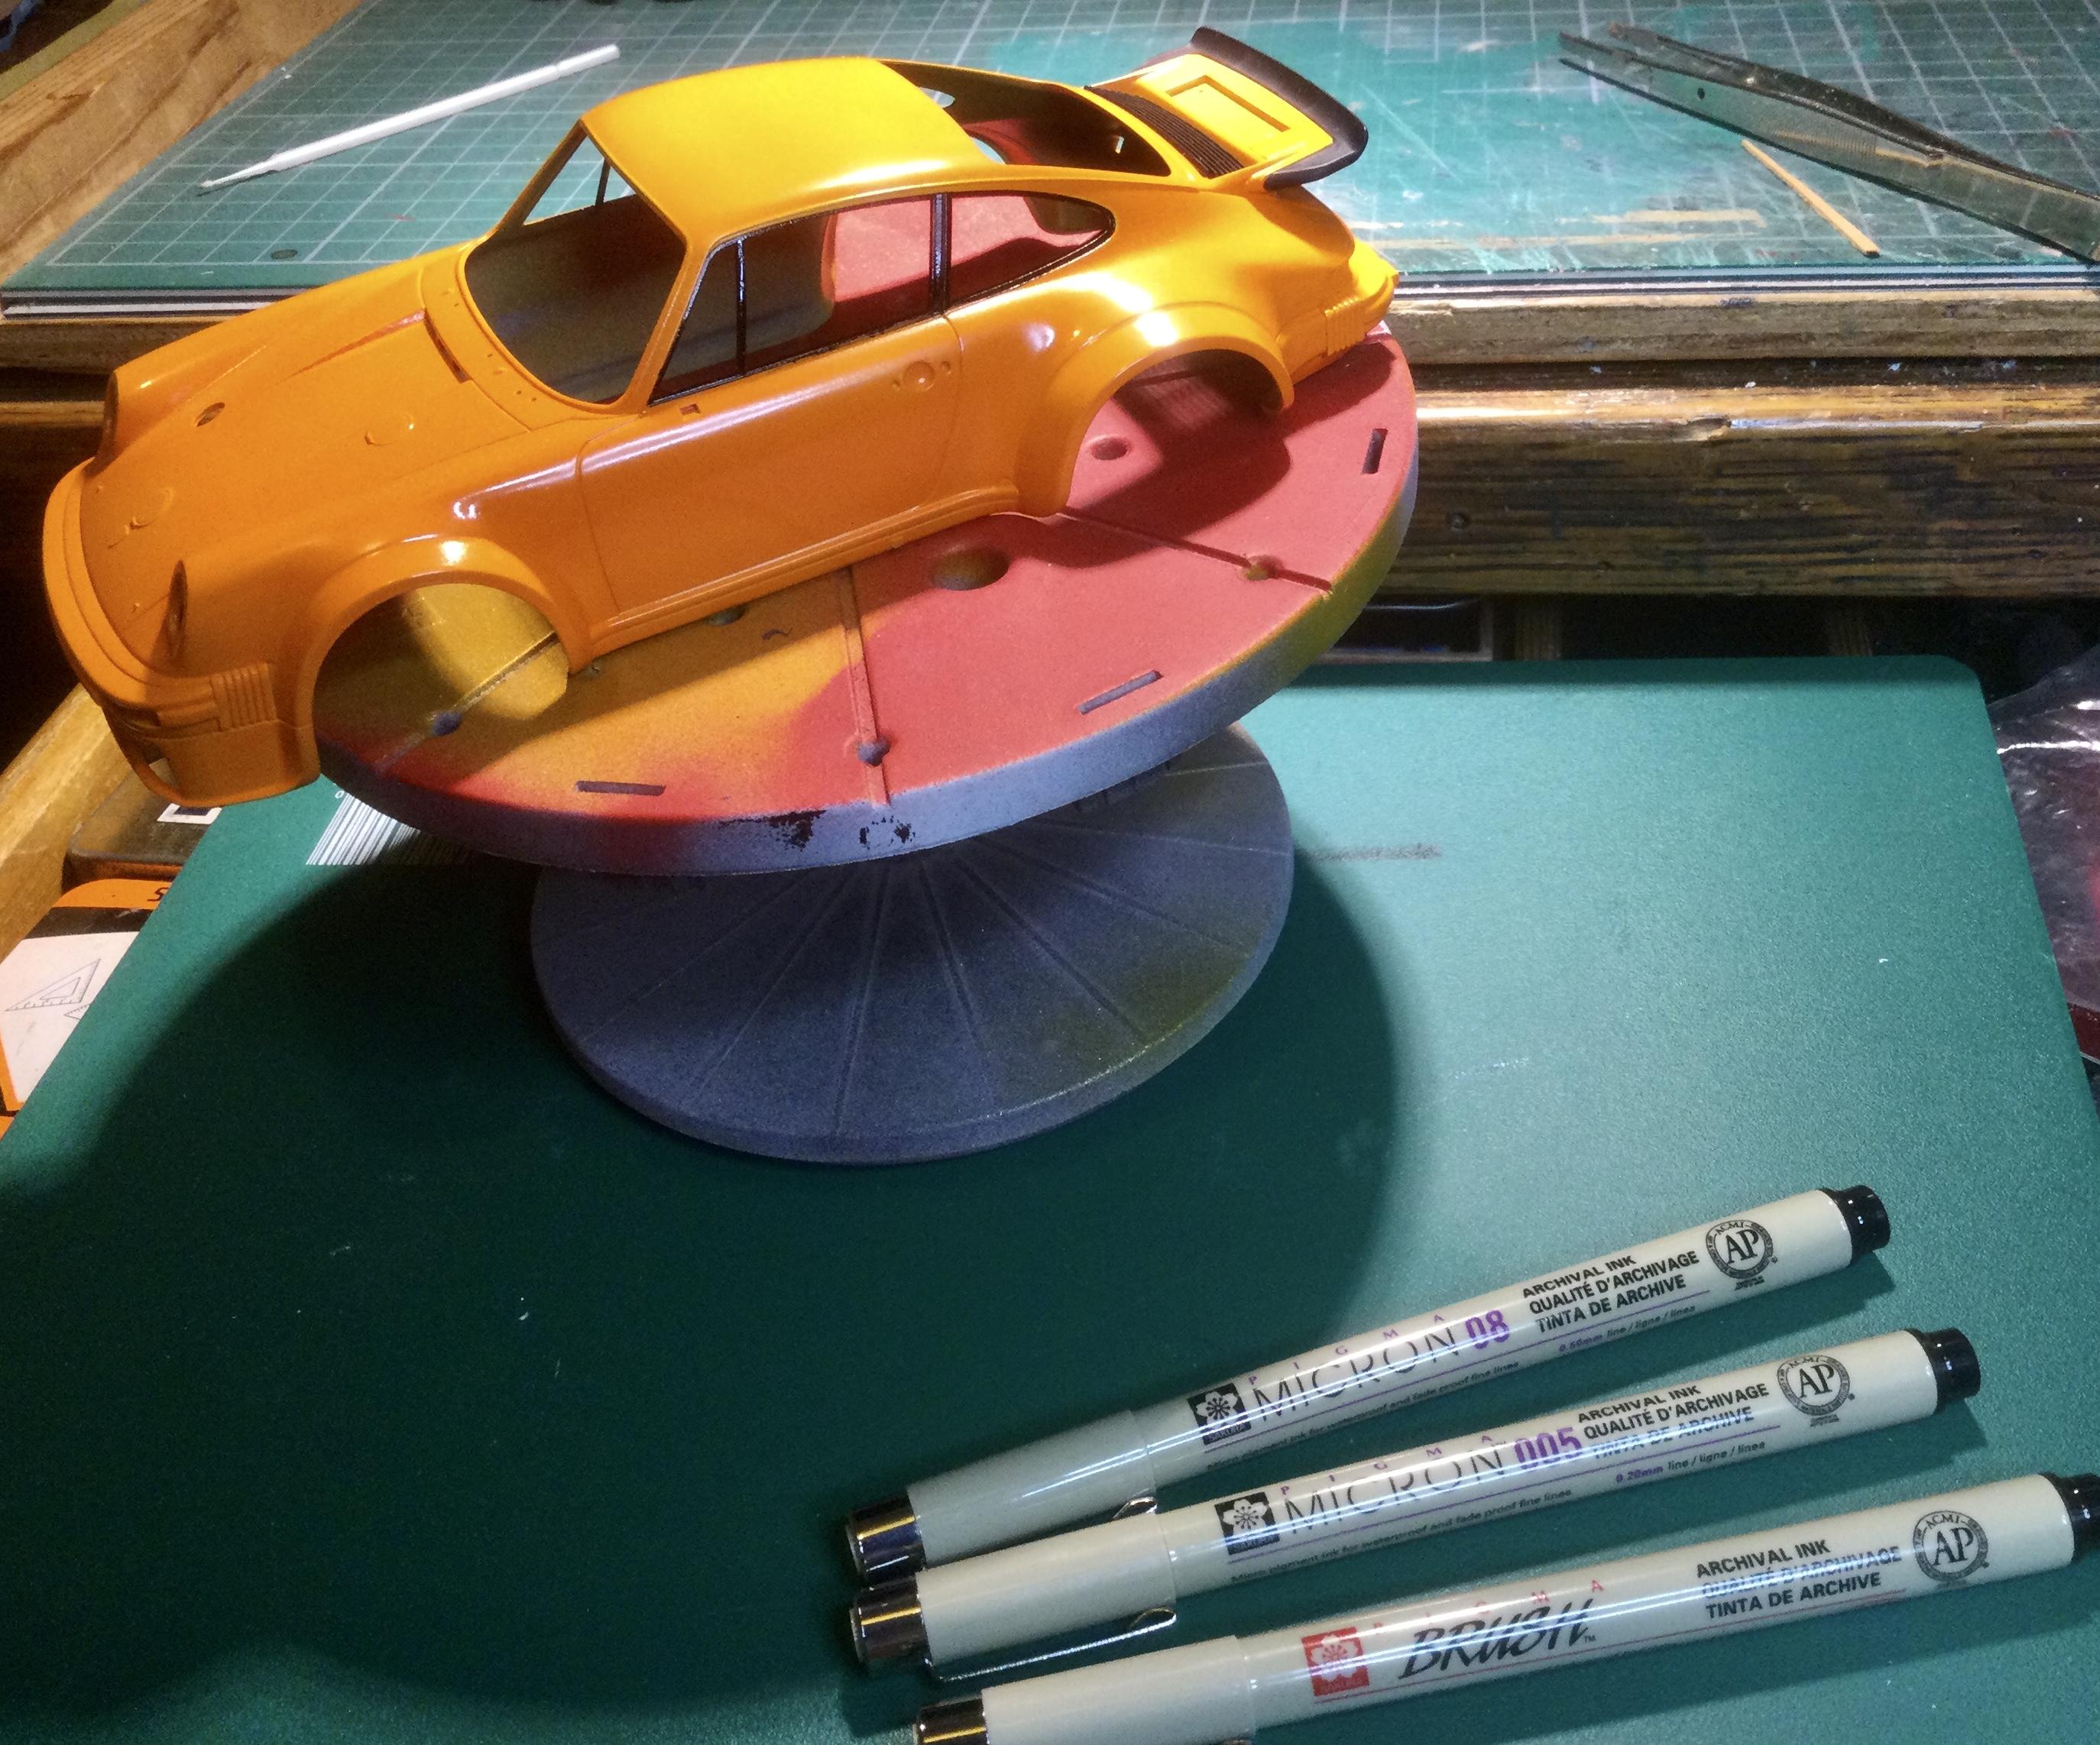
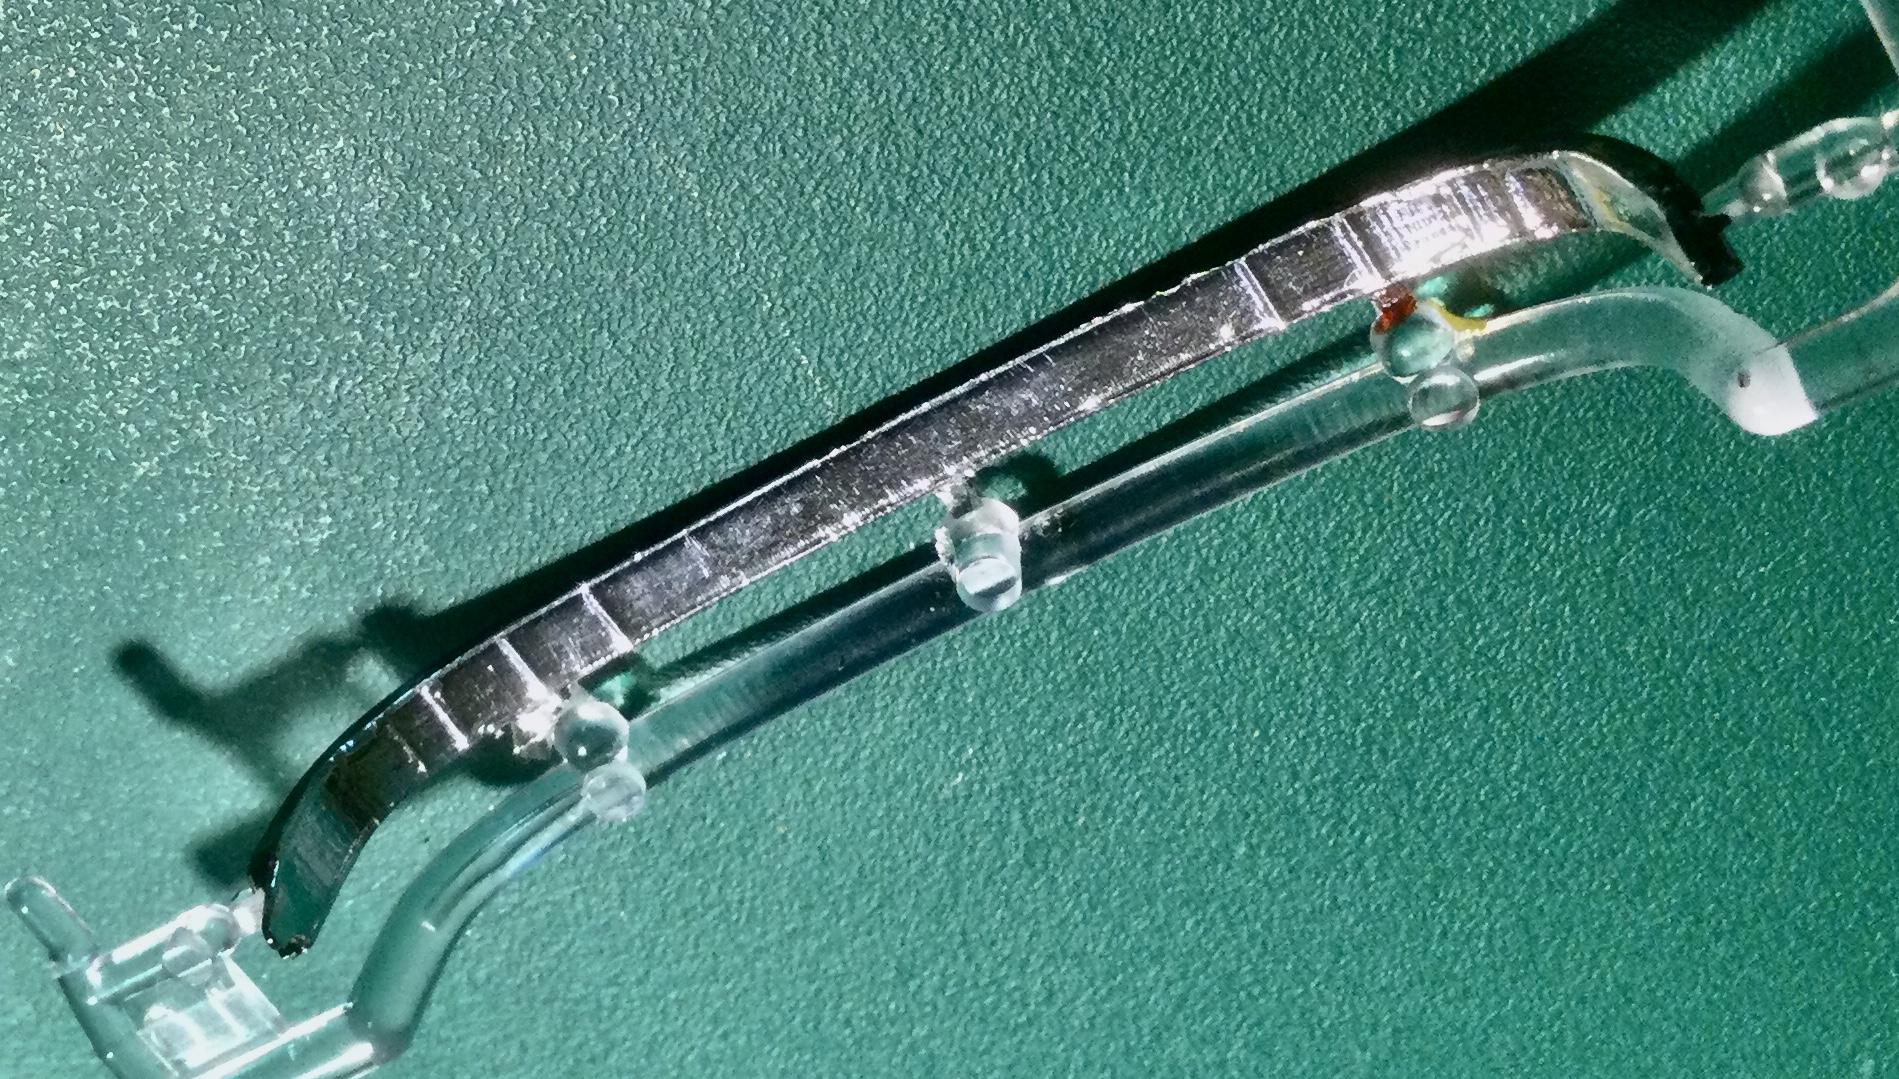
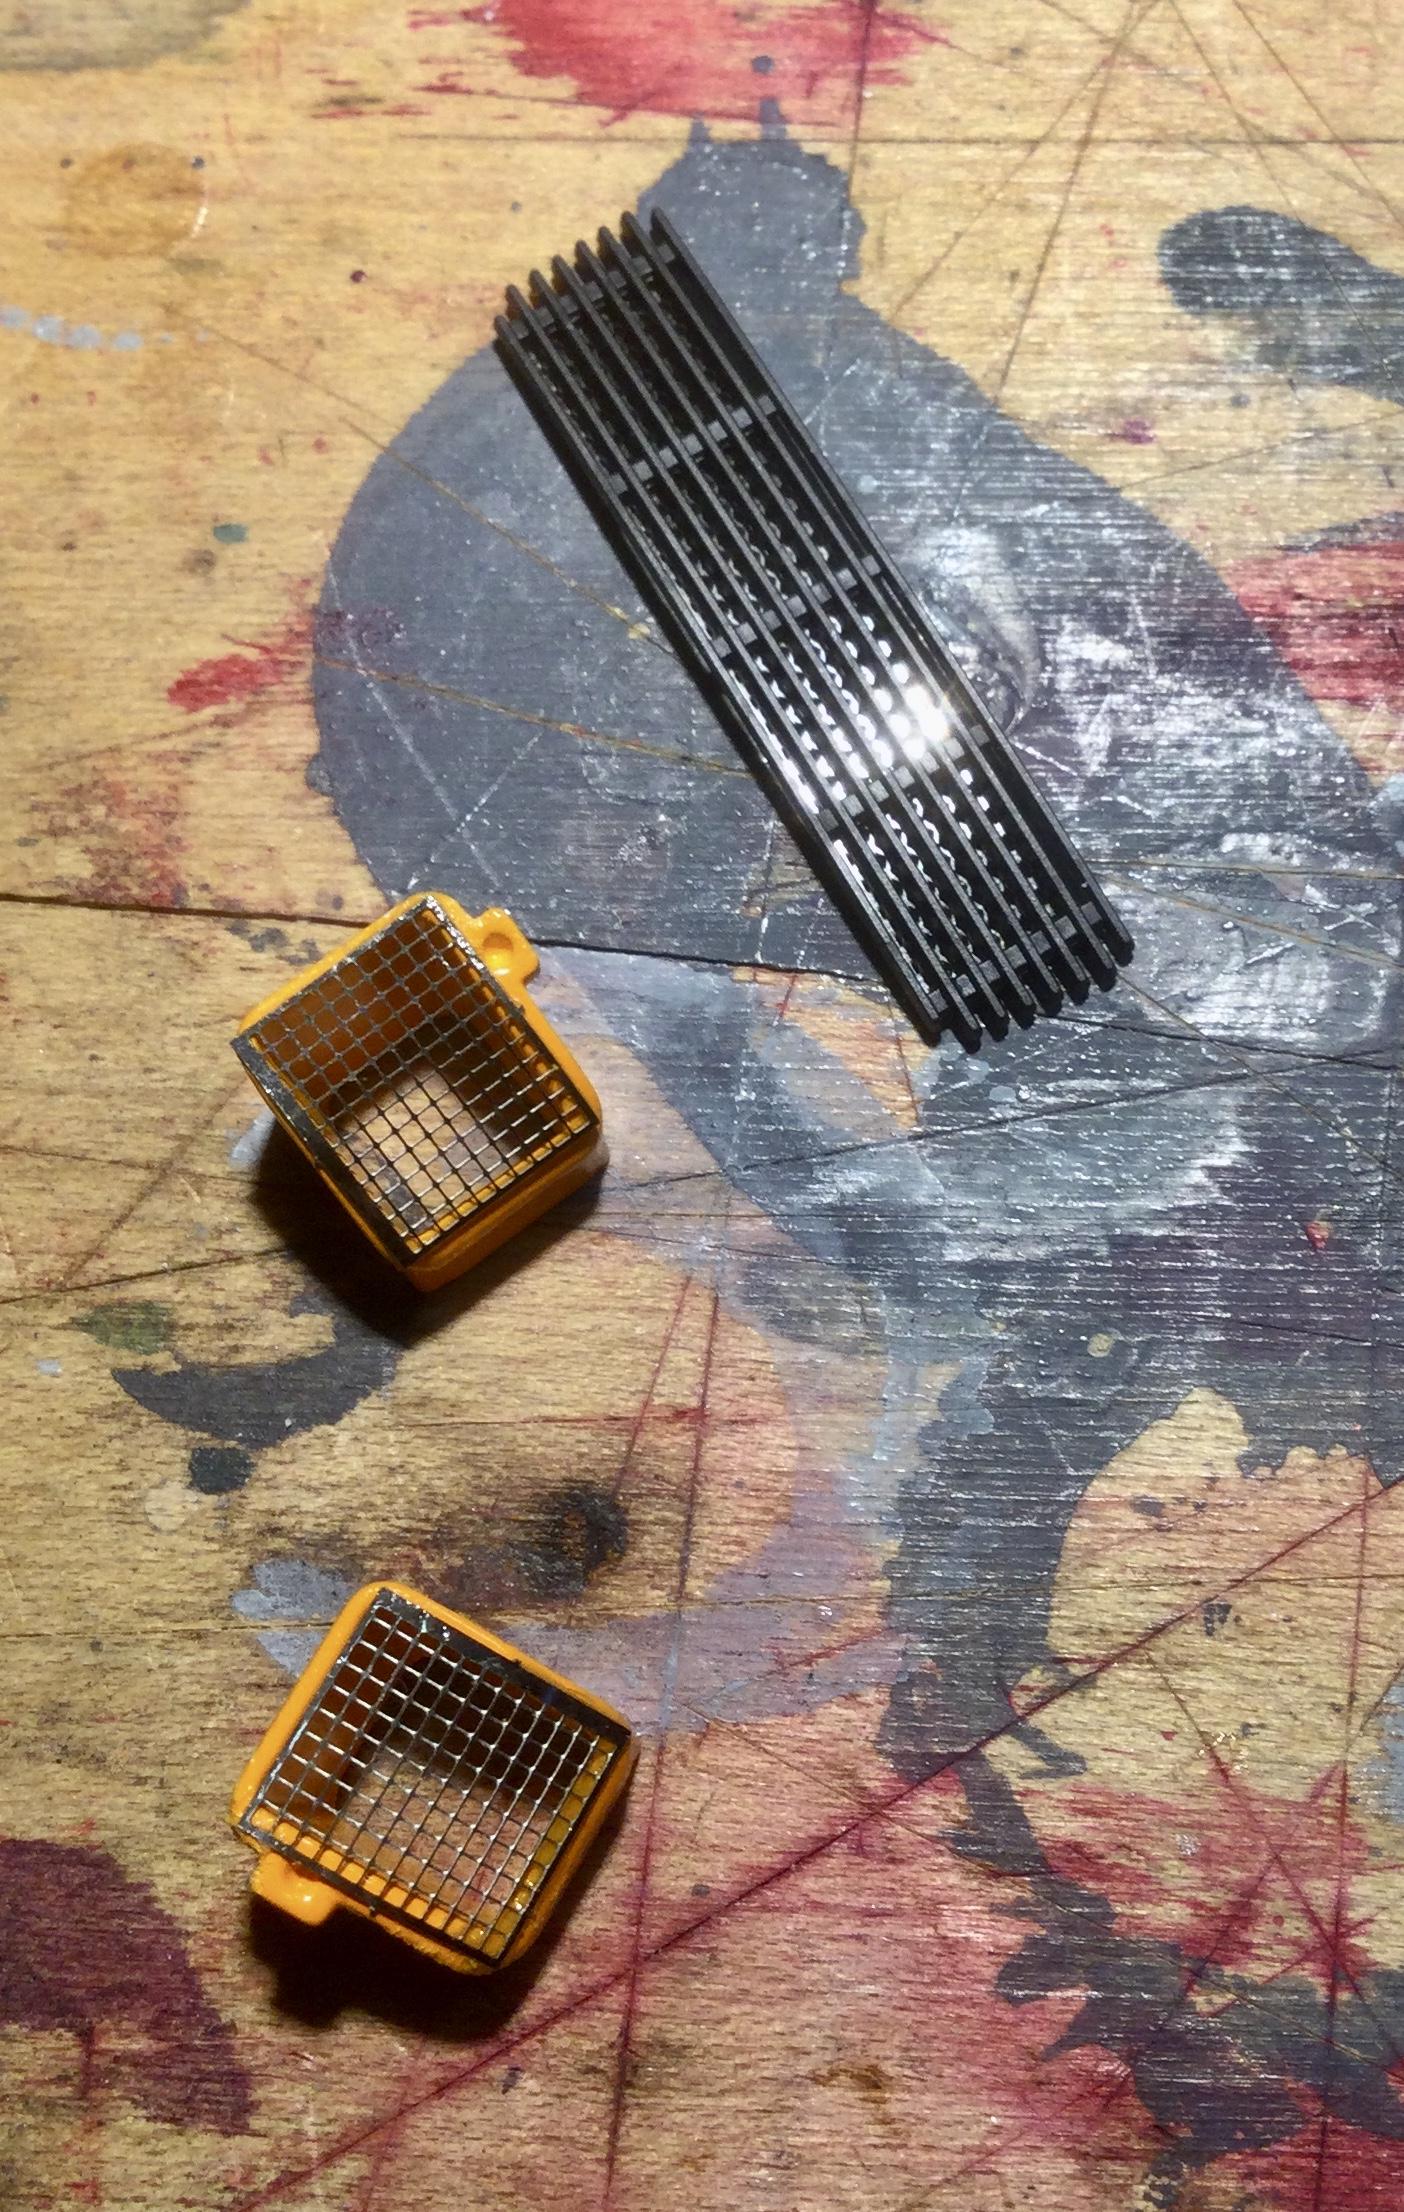
Porsche 934 RSR This finally made its way to the bench, hard to believe the last time I touched it was back in 2007. Getting back to this project has also reignited my Stuttgart focus, pulling out other 911s in the stash and reading two excellent books. Today I finally faced my block in beginning to complete the 934. While I don’t mind working with BMF, black semi-gloss trim is panic time for me. So began blackening the side frames with mixed results using the Micron markers. Still have the passenger side to do and then plenty of touch ups... takes quite awhile to dry, challenging my patience. The rest I now plan to mask and hit with X-18! Had a look at other bits to complete and re-familiarize myself with the build. The kit provides an excellent P/E fret with a multitude of screens, pedals, mirror faces, hood pins and other bits. I added the black rubber lines around the rear tail lights. Previously clear red and orange with silver for the back ups was used to colour the transparent kit piece. Afterwards BMF was applied to the back to provide a reflective surface. The chassis is a detailed curbside pan which benefits from paint detailing. I need to repair the front tire and install the plug wires to complete it. Thanks for looking in, Onwards..... Cheers Misha
-
Congrats Lee on a really clean build with a great finish! Also like the colour combo of tan and gold. Perhaps the split window being the most iconic of all the Vettes. Cheers Misha
-
1964 SCCA Corvette W.I.P.
Misha replied to MarkJ's topic in WIP: Other Racing: Road Racing, Land Speed Racers
Hi Mark, I’ve been following your build with interest. You are doing great modifications and scratchbuilding with this kit. Your trunk treatment really moves the Vette of a stocker version, really nice job! There is a lot to be said for building “in the spirit of” or a “what if” model where fidelity to the prototype is secondary to recreating a vision. I have one on the go, same kit that I’m modifying into one of the tanker versions having increased fuel and being built to my vision. Cheers Misha -
Great job on the overall look! Most impressive is your chrome work, more so since it was all masked and sprayed! What did you use for the chrome, Molotow? Cheers Misha