Misha
-
Posts
1,014 -
Joined
-
Last visited
Content Type
Profiles
Forums
Events
Gallery
Everything posted by Misha
-
El Magnifico! That is such sweet eye candy John, another beautiful build for your collection. Thanks for posting it, cheers Misha
-

Ford GT40 GT/102
Misha replied to Dave B's topic in WIP: Other Racing: Road Racing, Land Speed Racers
I really like what you have been doing with the slot car bodies! Your finished 109 looks great and I’m looking forward to this build. It’s such a treat to see the earlier GT versions. Cheers Misha -
Your construction of the interior side panels looks great! Glad you are doing it as it adds so much to the kit’s sparse tub. Also agree with ditching the skirts, shame to hide those mags. It’s really coming alng nicely, cheers Misha
-
Wow Steve, a beautiful build! The front grill, the deep red colour, engine detail, the interior, all the working bits. Sure enjoyed following along. Plus it is a great departure from how most of these kits are built. Cheers Misha... will you be joining our Zoom meeting this Thursday?
-
"Bring Out Your Dead" Completion Build--ROUND 2 Is On!
Misha replied to Snake45's topic in WIP: Model Cars
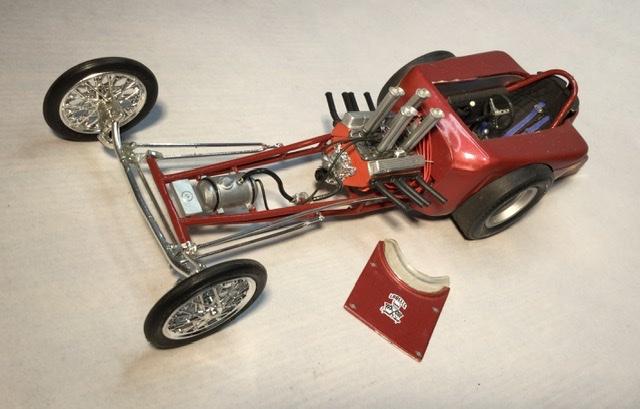
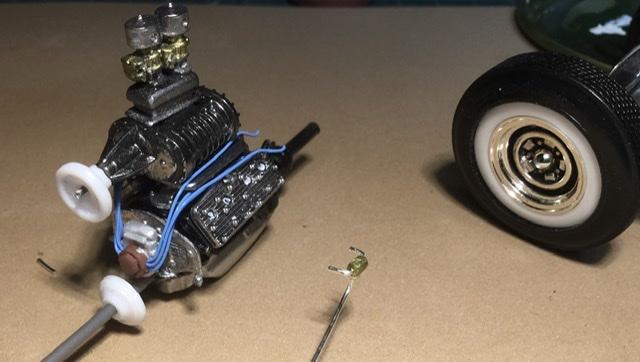
Hi everyone, great progress continuing on all the projects! Just a brief update, spent most of the afternoon on further engine detail. Even in my late 60s I’m still able to thread my way thru the wiring having begun installing the boots and the wire connecting the coil to the distributor. Also added a harmonic balancer on the crankshaft end, along with the pulleys including the blower pulley. Still planning out the alternator install as part of the tension pulley off the blower. Put a wash on the Strombergs and intake. Getting a bit further on the interior detail, planning and making templates... more later. Cheers Misha
-
I also have the tin box edition sitting on the shelf, it does come with a photo booklet that is helpful in seeing some detail. Both are very simple kits that cry out for extra detail. They will be in capable hands Dann! Over the years I have seen a few excellent builds, so I’ll be following developments. Cheers Misha
-
I agree, great colour combo, the under hood shot is neat with the red fenders. A good clean build of a terrific kit. Using the chassis under my old Johan 68. Cheers Misha
-
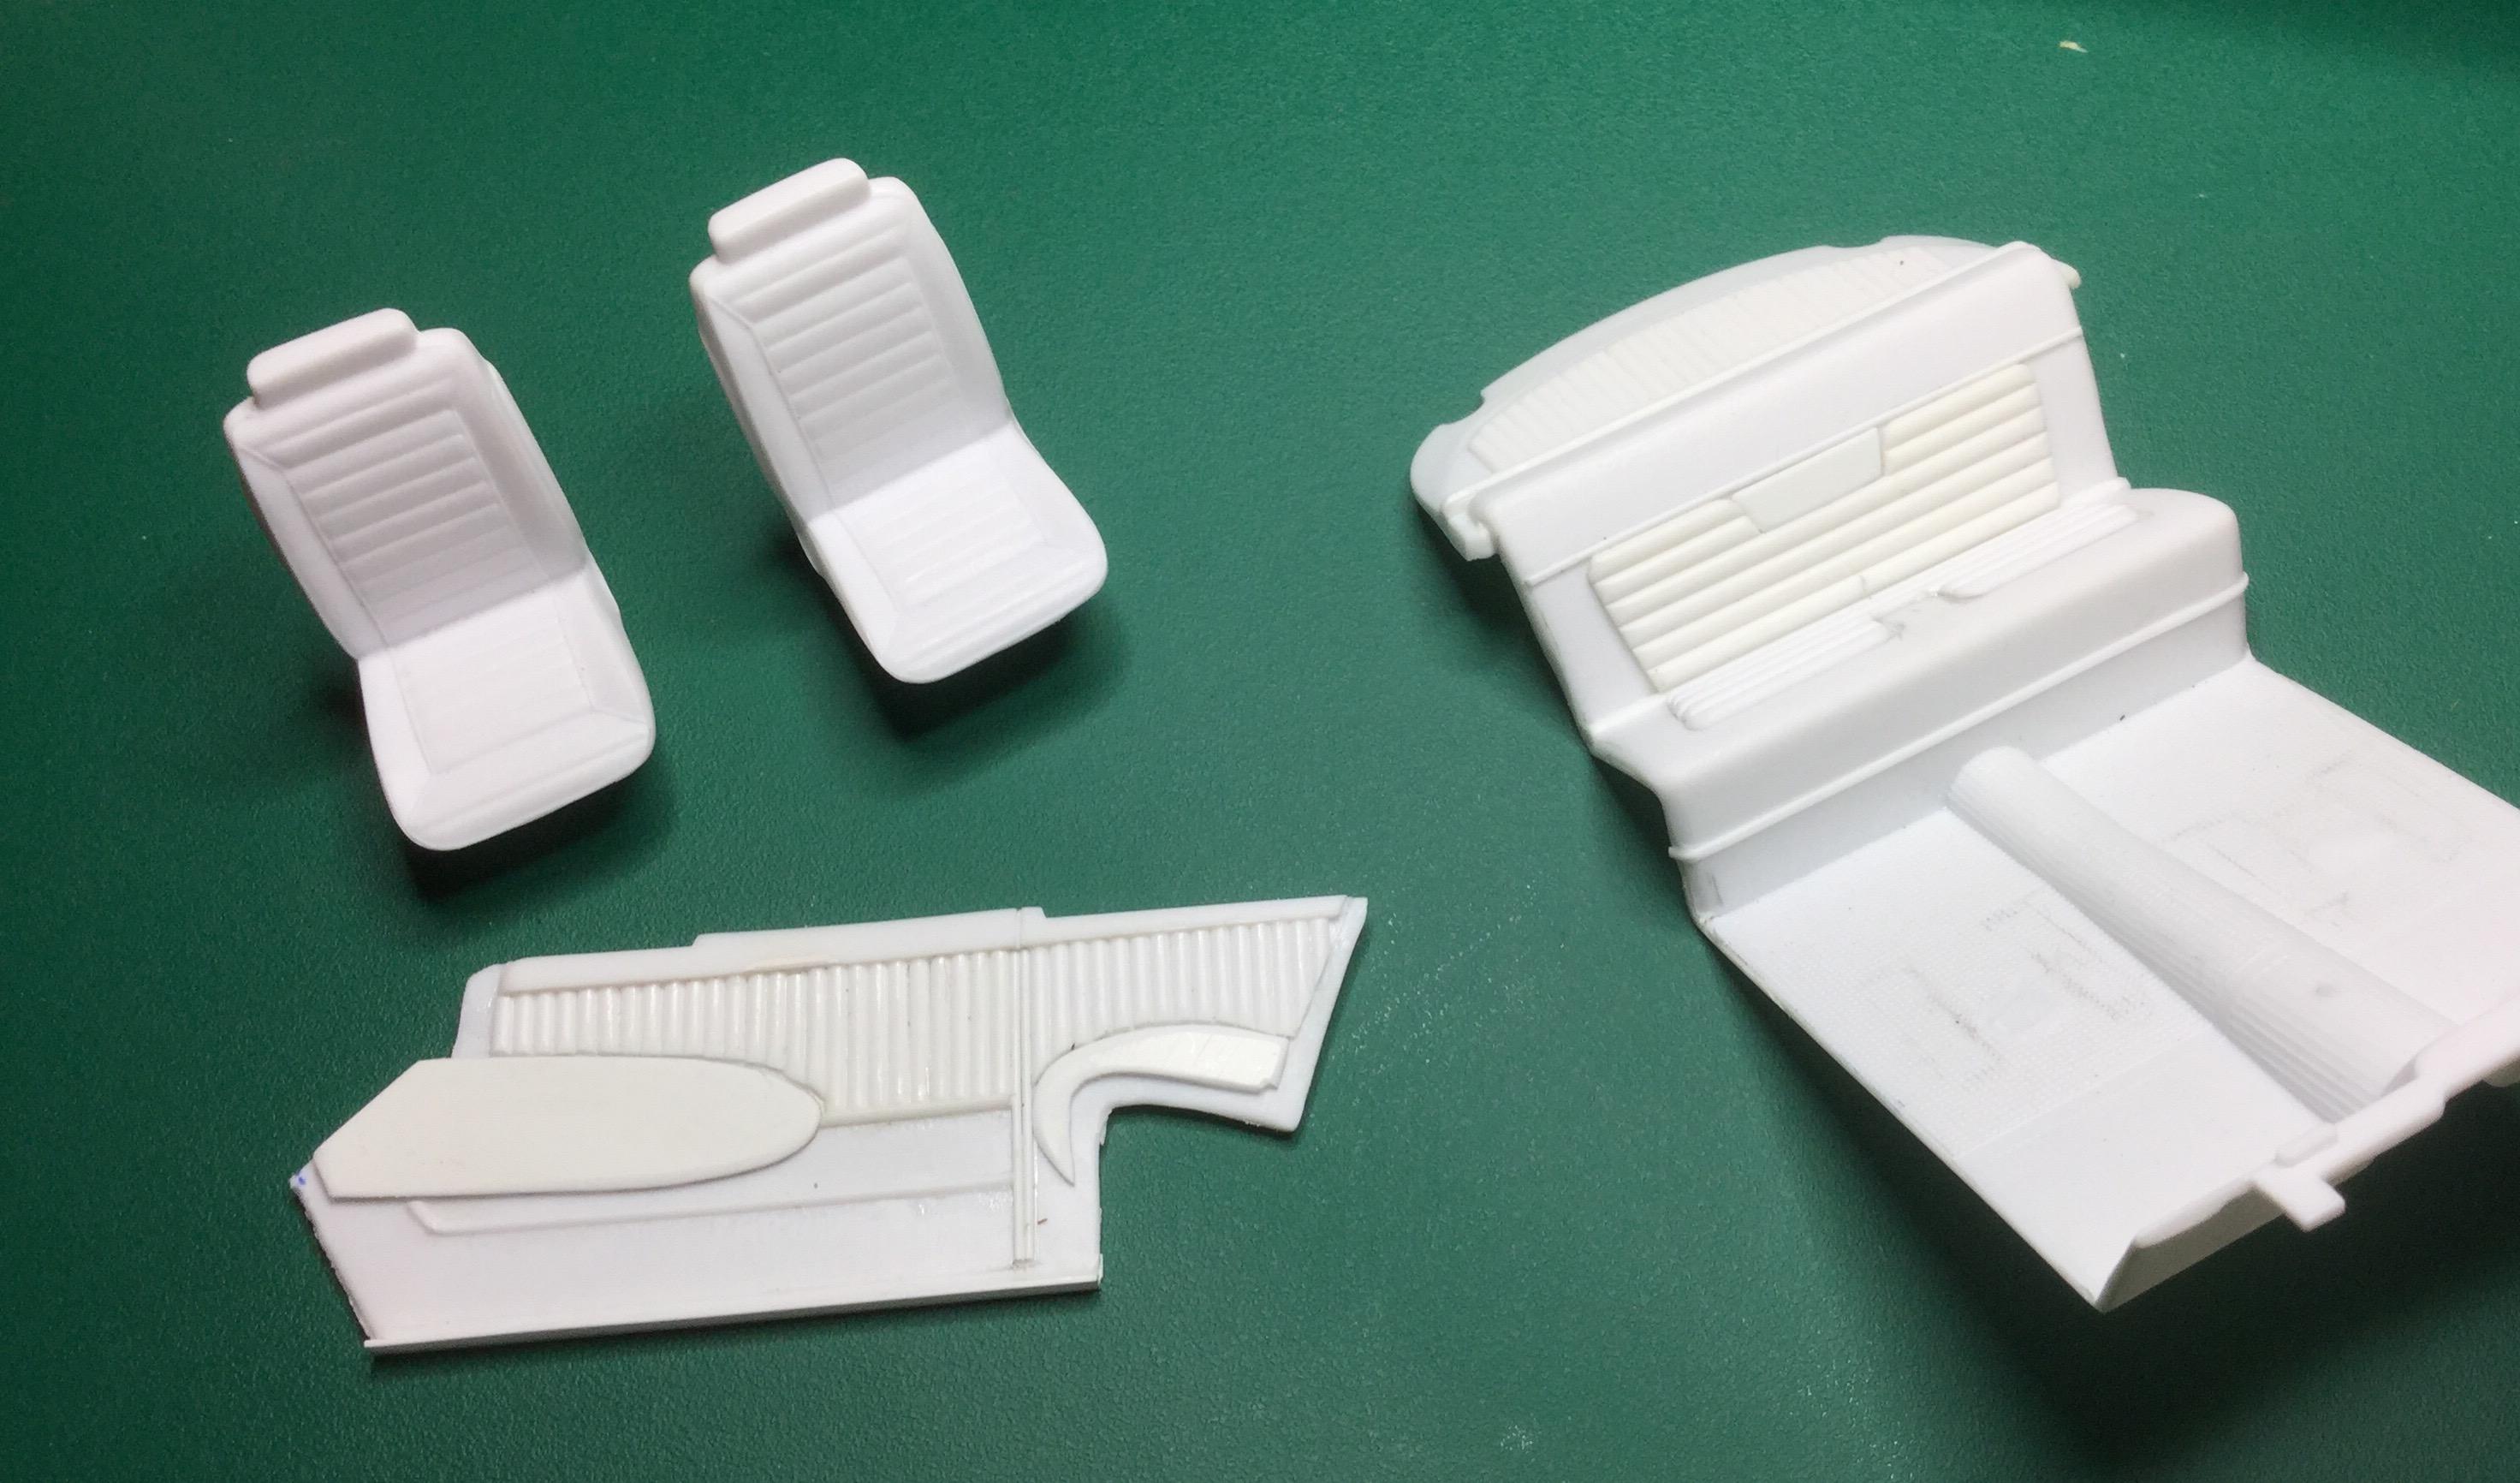
That’s looking good TJ. Did you also do the bottom of the interior tub? Depending on how ambitious one is, the interior tub is begging for greater detail to the point I sawed off the side and switched them side to side with greater detail scratchbuilt into them. Pleats were added to rear seat and rear shelf with 64 Fairlane buckets. Following along, Cheers Misha
-
"Bring Out Your Dead" Completion Build--ROUND 2 Is On!
Misha replied to Snake45's topic in WIP: Model Cars
Thanks Tom, I’ll keep it in mind if I run into any glitches.My paint room is small has an easily accessible window to the outside. Cheers Misha Well Steve, after many years of trying to determine whether to build my own or to purchase one, I decided on the Pace model based on reviews here on the forum and then was convinced by speaking with Bob Pace himself when I placed my order. I did place my order with him just as the pandemic struck and as a result my delivery time was nearly three months to get it to the Island instead of the anticipated few weeks. It is unfortunate that up here in Canada we are subject to shipping and brokerage fees along with our weaker dollar. It is somewhat fortunate that Pace booths, having a bang on design, are relatively inexpensive apart from the previous comments. It is good value for the Canadian Loonie, yet it is not inexpensive, I would still recommend one (24” with light and separate switches, the nicer one). Cheers Misha -
La Belle Speed Shop, California 1963
-
1959 Cadillac Eldorado Seville in Georgian Blue Poly
Misha replied to YBlock292's topic in Model Cars
A classic Caddy colour Ludwig, congrats on a gorgeous build. Cheers Misha -
Glad to se that that you are building your losses Johnny! It’s a chance to further improve your previous builds, plus it’s such a great combo. Will you be building a trailer as well? Be following, cheers Misha
-
Always enjoy seeing another Shoebox build TJ! I’m about to use TS-59 on my current build, looking forward to yours. Cheers Misha
-
"Bring Out Your Dead" Completion Build--ROUND 2 Is On!
Misha replied to Snake45's topic in WIP: Model Cars
Thanks Steve, I’m hoping to have a lot more time to spend on building now. Also have to set up my new Pace Spray Booth in the paint room, so that will allow me to speed up with my air brushing. Cheers Misha -
"Bring Out Your Dead" Completion Build--ROUND 2 Is On!
Misha replied to Snake45's topic in WIP: Model Cars
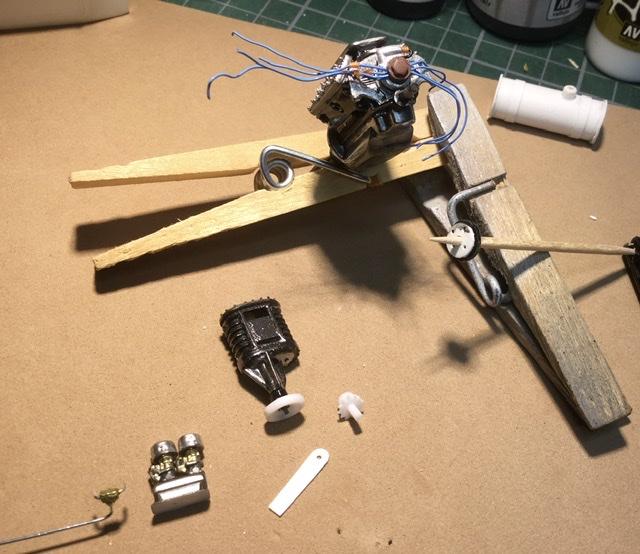
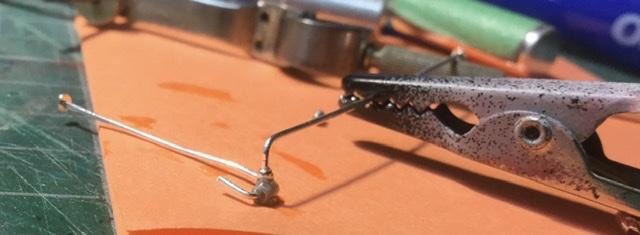
Tall “T” Update... A somewhat overdue update, yet the Pacific Nor’West rains have just begun, yard work has decreased with the result of more workbench time! Been working on the interior with detailing the upholstered panels, and creating the door and window details on the inside. All along I’ve been planning the painting procedure. More on all that later. Today worked on the Flattie V8-60 by getting the dual Strombergs mounted on the scratch-built intake along with the fuel lines. I use a lot of jewelry items such as crimps and the straight lengths of fine wire that holds its shape. Made the T-join with a small length of hollow plastic tube and CA. Been using the Vallejo metallics for fine brush painting of details. The major engine components were treated to Alclad metallics with a wash. The main task has been to ensure that it will all fit within the chassis and body cowl! Did a quick mock up of the engine with blower pulley and harmonic balancer being positioned in the chassis, looks to be ? okay... More later... cheers Misha
-
Heller Alfa Romeo 1750cc Zagato
Misha replied to PatW's topic in Other Racing: Road Racing, Salt Flat Racers
That’s a really good looking build Pat! Speaking of it being an old kit, I purchased one back in the early 80s and began assembly until life intervened and it was shelved. Seeing your build has spurned me to take it down off the shelf and have a look. Perhaps we’ll see another one finished. Congrats and cheers Misha -
Martini Porsche 911GT3R
Misha replied to Rich Chernosky's topic in Other Racing: Road Racing, Salt Flat Racers
Beautiful execution on the scheme, always great to see a Porsche with a Martini scheme. Congrats Rich, cheers Misha -
Very sharp looking Steve! Gorgeous deep colour, chassis and interior detail top notch, it all adds up to a terrific build that will be a fine addition to ypur collection. Can hardly wait to see it in person. Congrats, Misha
-
Airfix 1/72 P51
Misha replied to Doug 1061's topic in All The Rest: Motorcycles, Aviation, Military, Sci-Fi, Figures
Great to see P-51, you’ve done an excellent job with the paint and decals. As a kid In the early 60s I built many Airfix kits as they were plentiful, inexpensive and offered a good looking model. With the recent resurgence of Airfix kits with new tooling they have become even more attractive. Awhile ago I stocked up on the new issues and they await my getting to them. Congrats Doug on a fine build, cheers Misha -
I’m on board too! ?
-
Thanks for sharing your photo technique, it sure is effective. I would like to try it myself. Cheers Misha
-
That’s a great build John and your photos enhance it by revealing the underside. Did you use a mirror with a dark background to reflect? Cheers Misha
-
Great to see a long term project completed Tom, congrats. I followed your WIP thread with great interest as it was a challenging project with chopping the top plus the extra interior details you added. I was curious about the above photos as it seems there are raindrops on the body? I hope to follow your example and finish up on some of my decades old projects, cheers Misha
-
1966 Chevrolet Chevelle SS Hardtop in Lemonwood Yellow
Misha replied to Tommy124's topic in Model Cars
Back in September of ‘65 at the time of the new model presentations, I lusted after a Chevelle with the exact same colour and trim! Your excellent build certainly brought back memories! I ended up getting a Corvair Monza with the 140 hp which I soon had repainted in Hugger Orange. Congrats on a very fine build, cheers Misha -
Great looking build Greg! Especially like your execution and finish of the vinyl top. The hot yellow really suits the Charger and the roof makes it complete. Followed your WIP build, thanks for sharing. Cheers Misha