Misha
-
Posts
1,014 -
Joined
-
Last visited
Content Type
Profiles
Forums
Events
Gallery
Everything posted by Misha
-

"Bring Out Your Dead" Completion Build--ROUND 2 Is On!
Misha replied to Snake45's topic in WIP: Model Cars
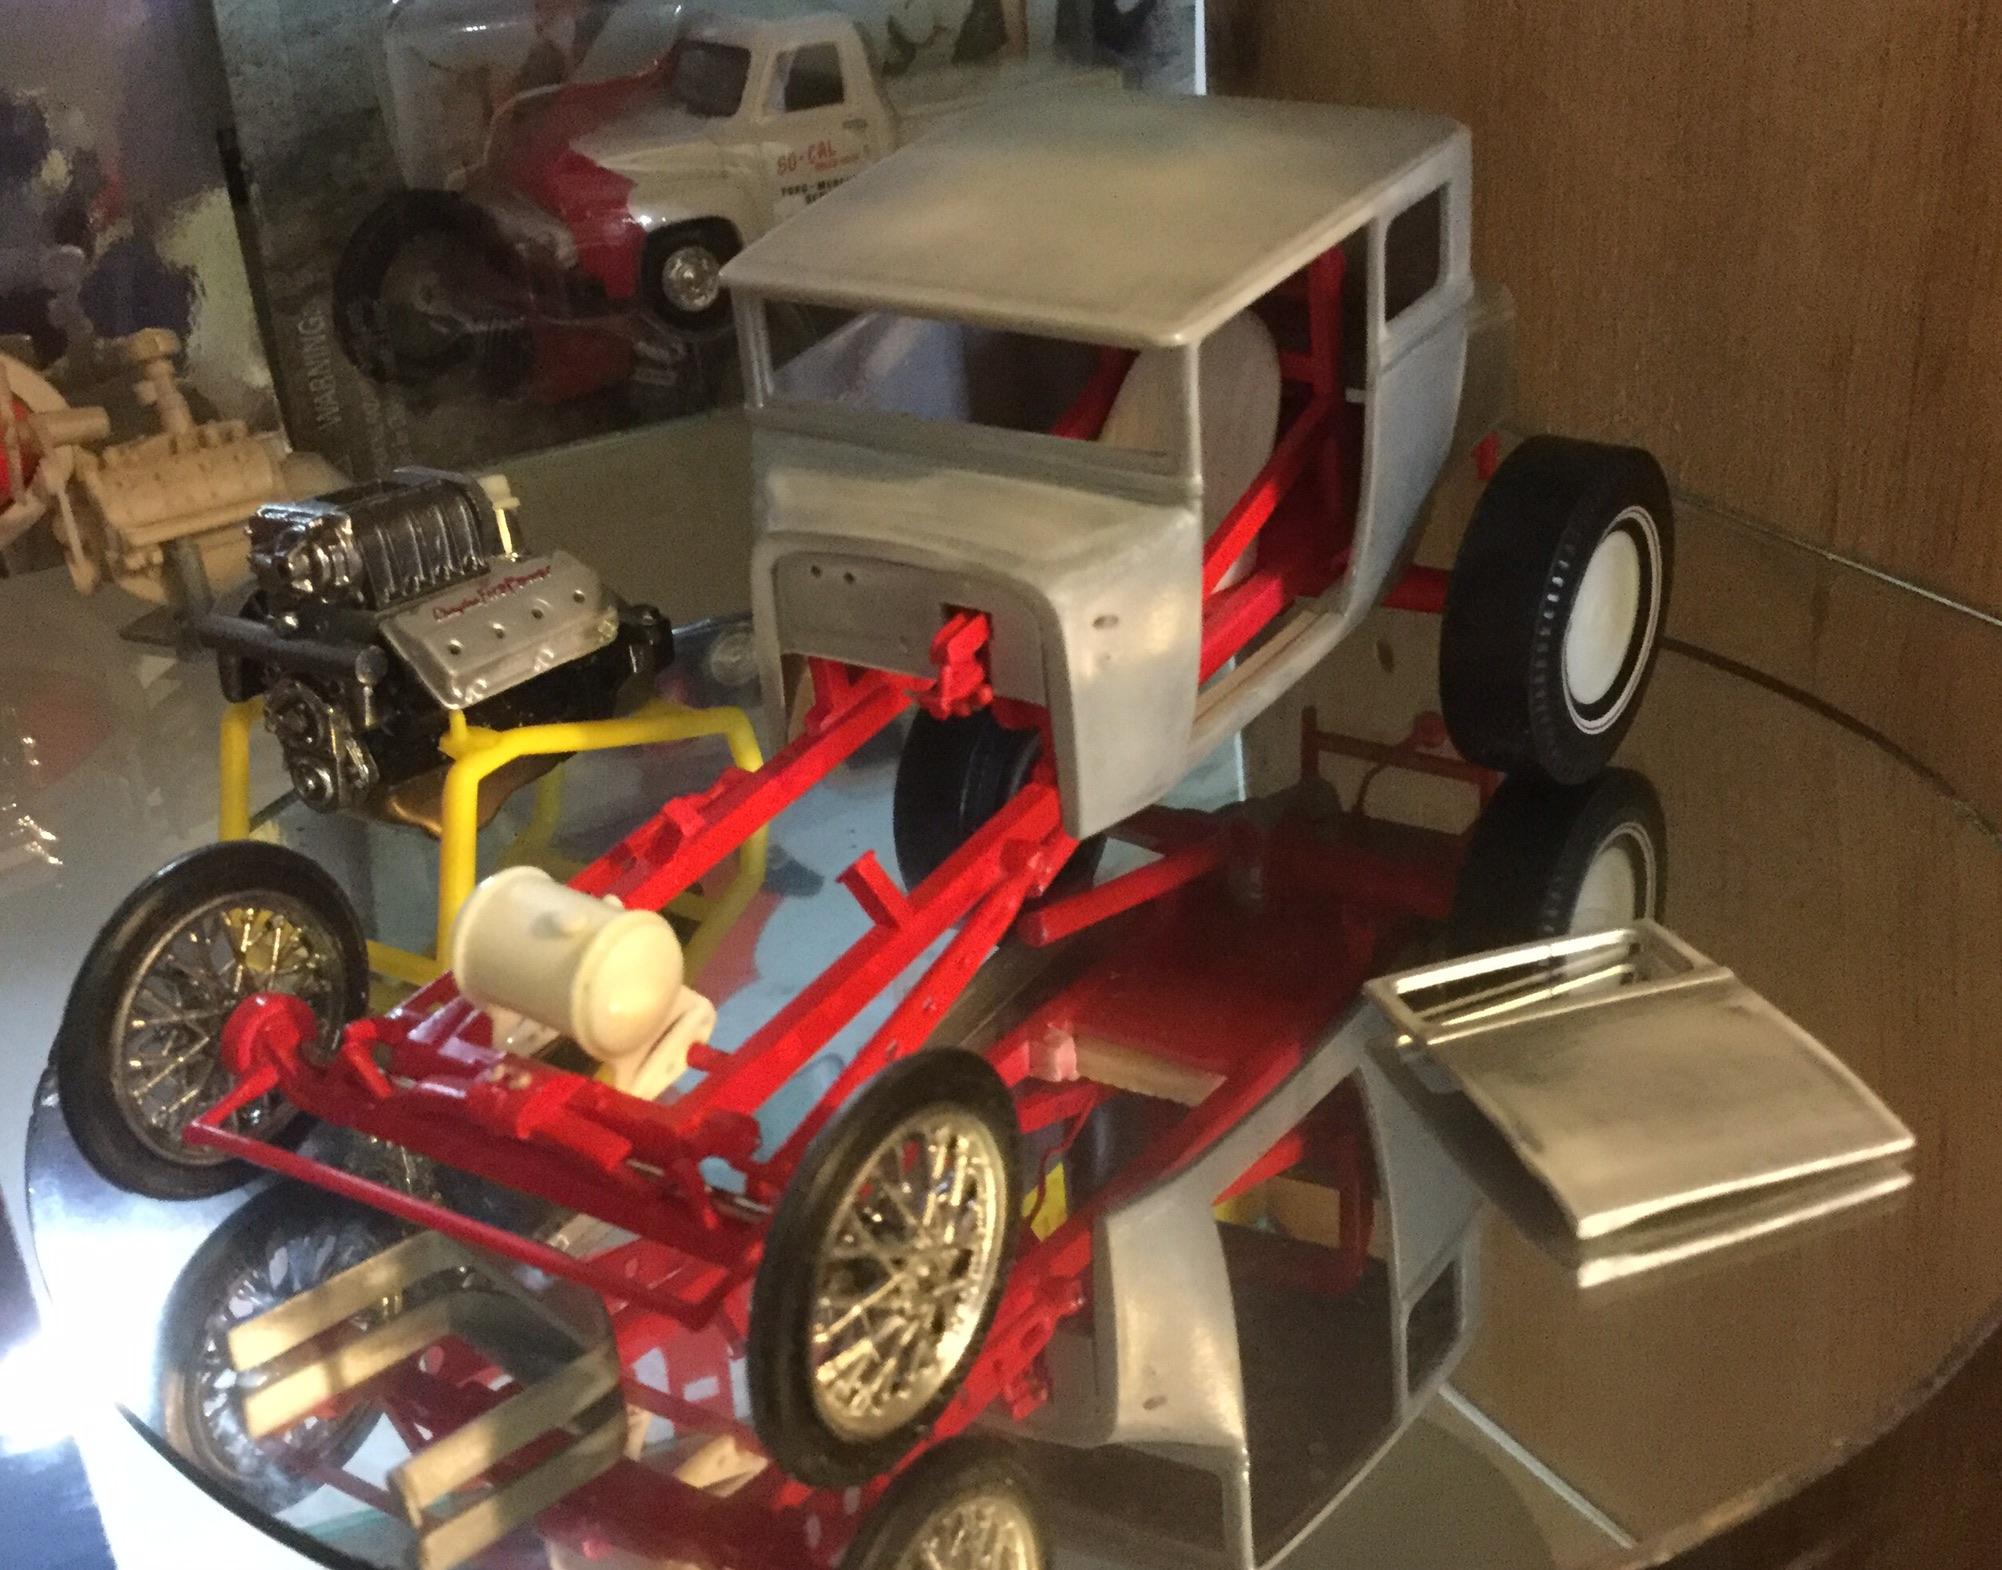
Congrats to all the participants on this round, it’s great to see such a high percentage of completed builds! I’m really enjoying the BOYD thread, having completed two long standing projects and I’m on for the next round. I would like to complete a build that was last touched in April of 2014, seven years ago, of a Chopped T Altered. It is based on the DD kit utilizing the altered chassis with the Hemi and mounting the chopped T body with a candy red paint scheme. Been awhile since the above photo and I don’t remember whether the silver base was enamel or lacquer, so to be safe I’m leaning to using an enamel base for the Alclad candy red which is also enamel based I believe. I had some trouble with the initial silver coat and that was what brought the build to a stop. So count me in Snake, cheers Misha
-
That has turned out great Sam. All your patient work is paying off, congrats! Cheers Misha
-
Being chased by javelina at nite!
-
Hi Kurt, actually there will be two systems in place with a civilian single exhaust exiting the rear fascia being switched with a wireless solenoid gate between the open exhausts, which, to help “stealth” are exiting on the passenger side. Also note tow hook attachment, just in case! The plan is to appear like a “secretary’s ride” from a distance. Once stopped, the time spent is a huge penalty, so evade detection by modern means (including a spotter aircraft) and go like stink when it’s safe. To help night time high speed runs the car will be equipped with forward and rearward infra-red radar. Cheers Misha PS watched B-J auction yesterday while at the workbench, made me home sick for Scottsdale...
-
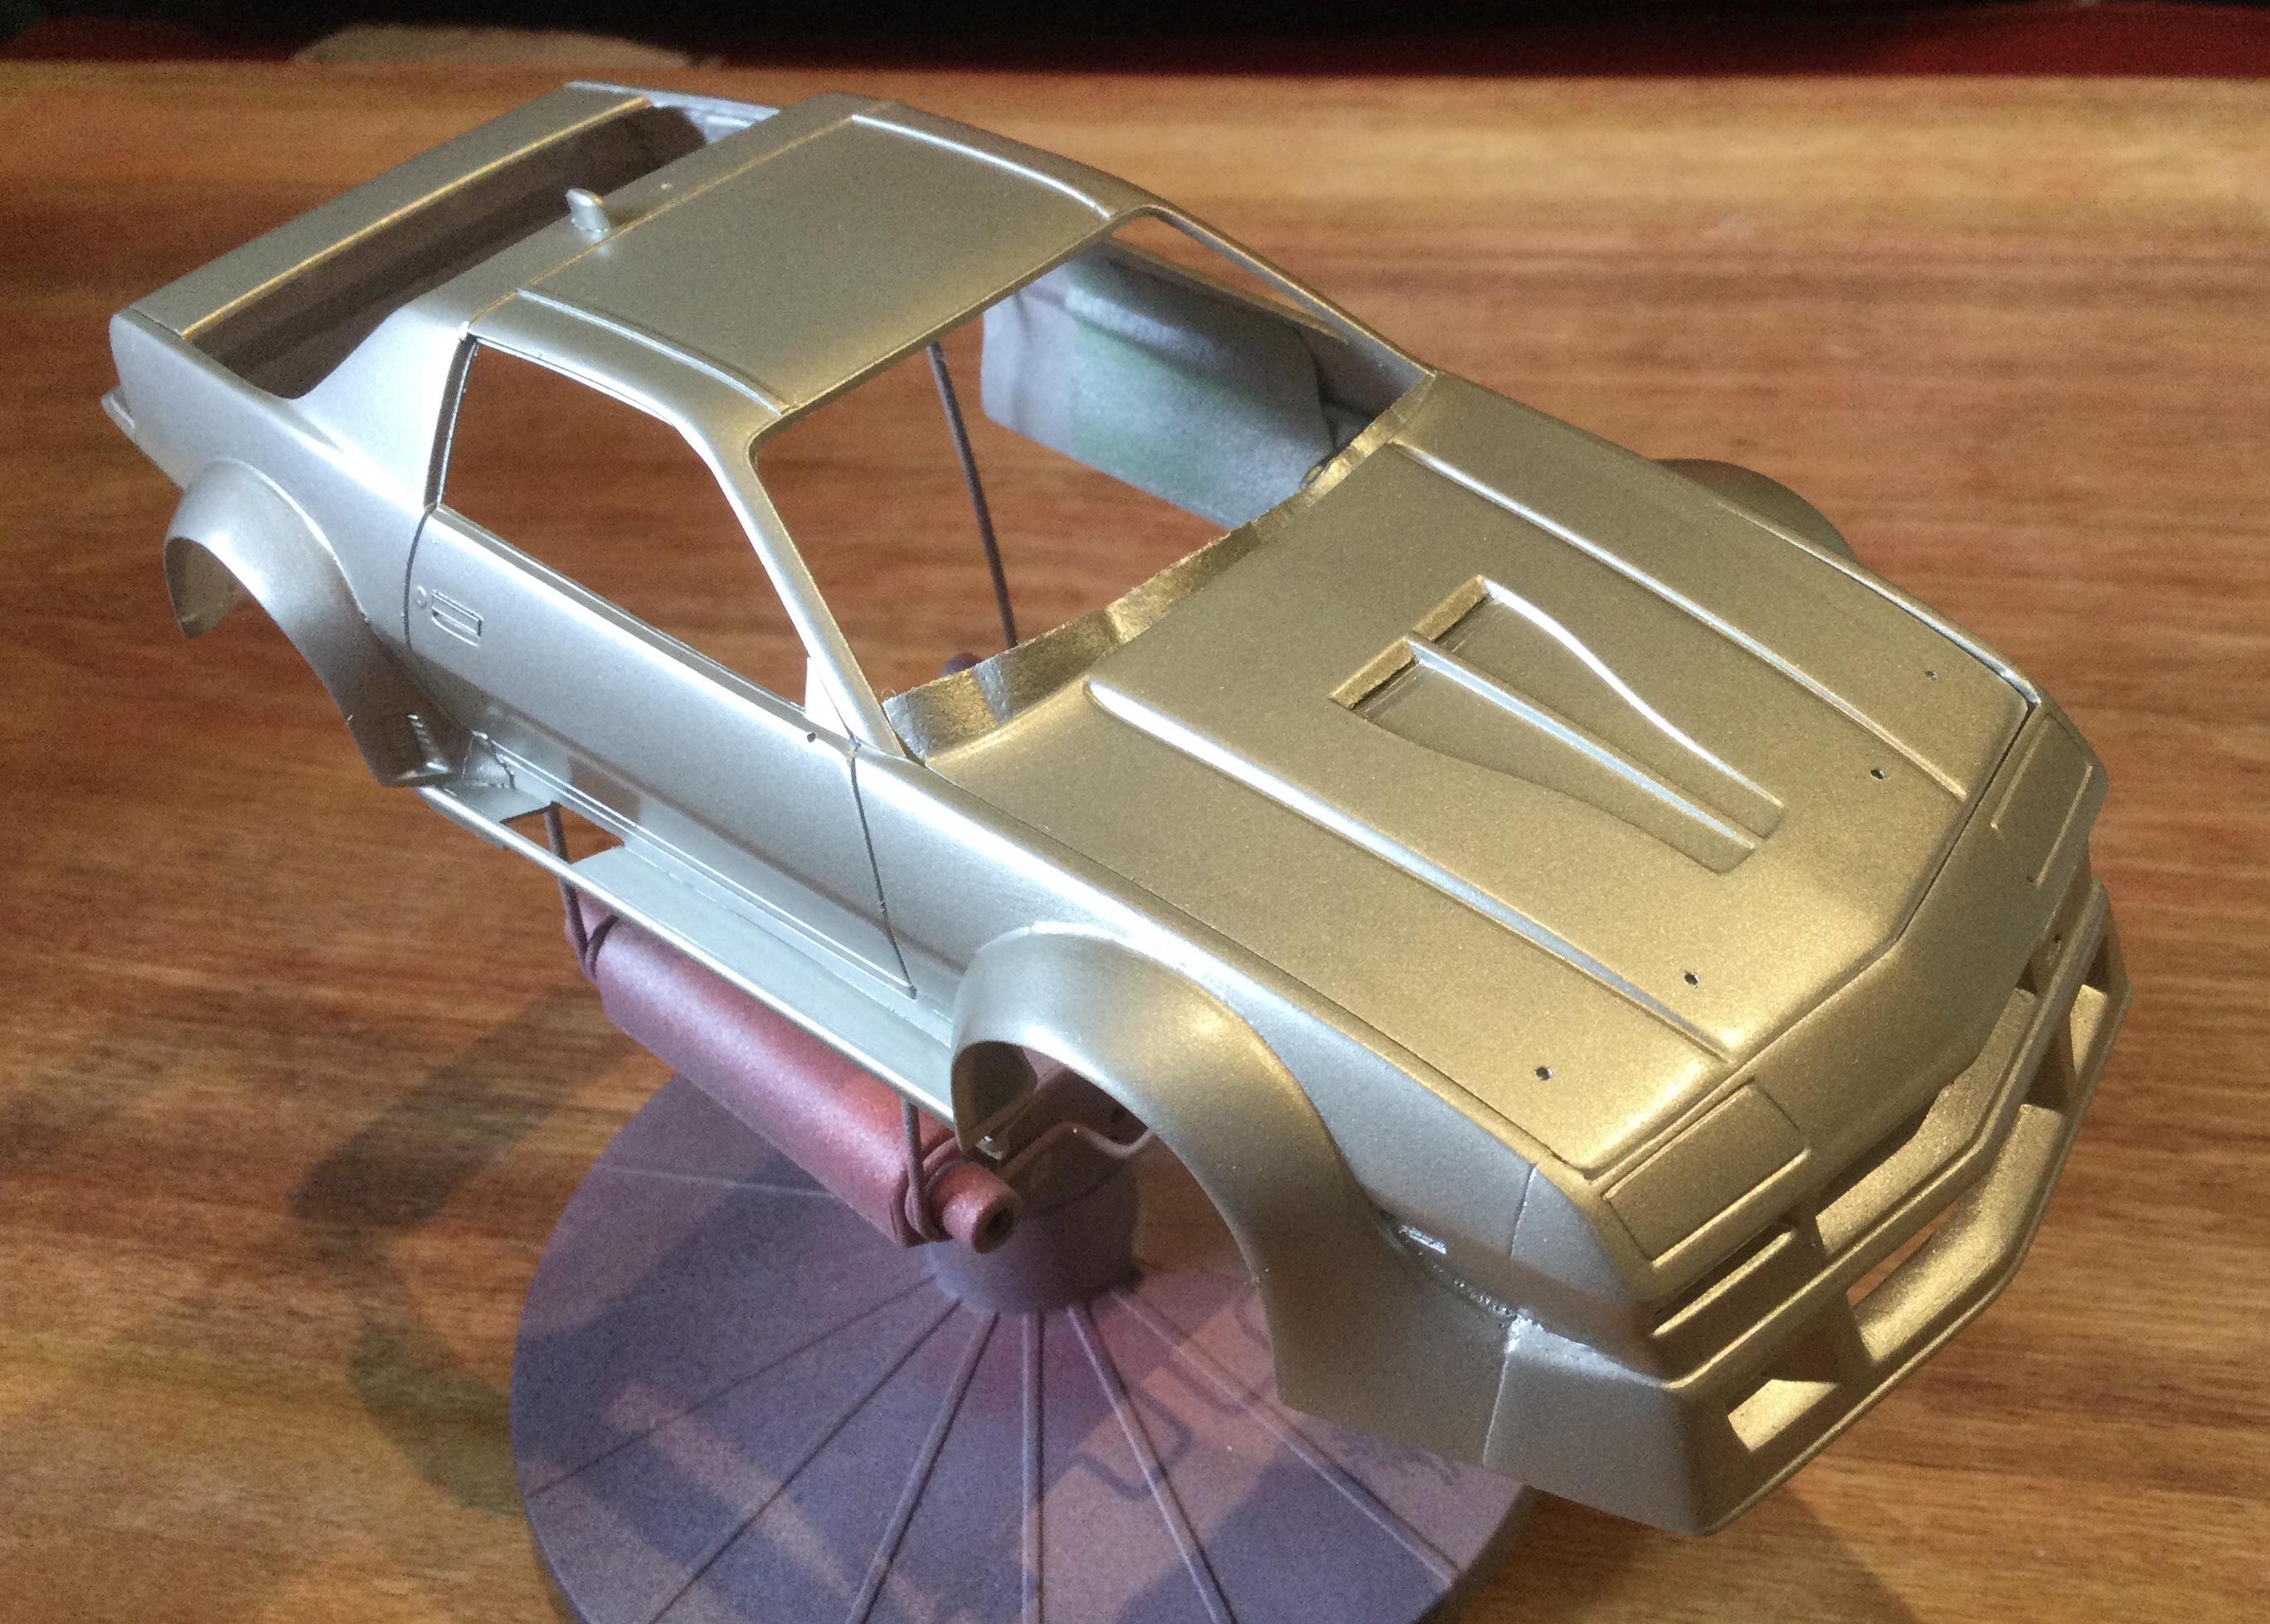
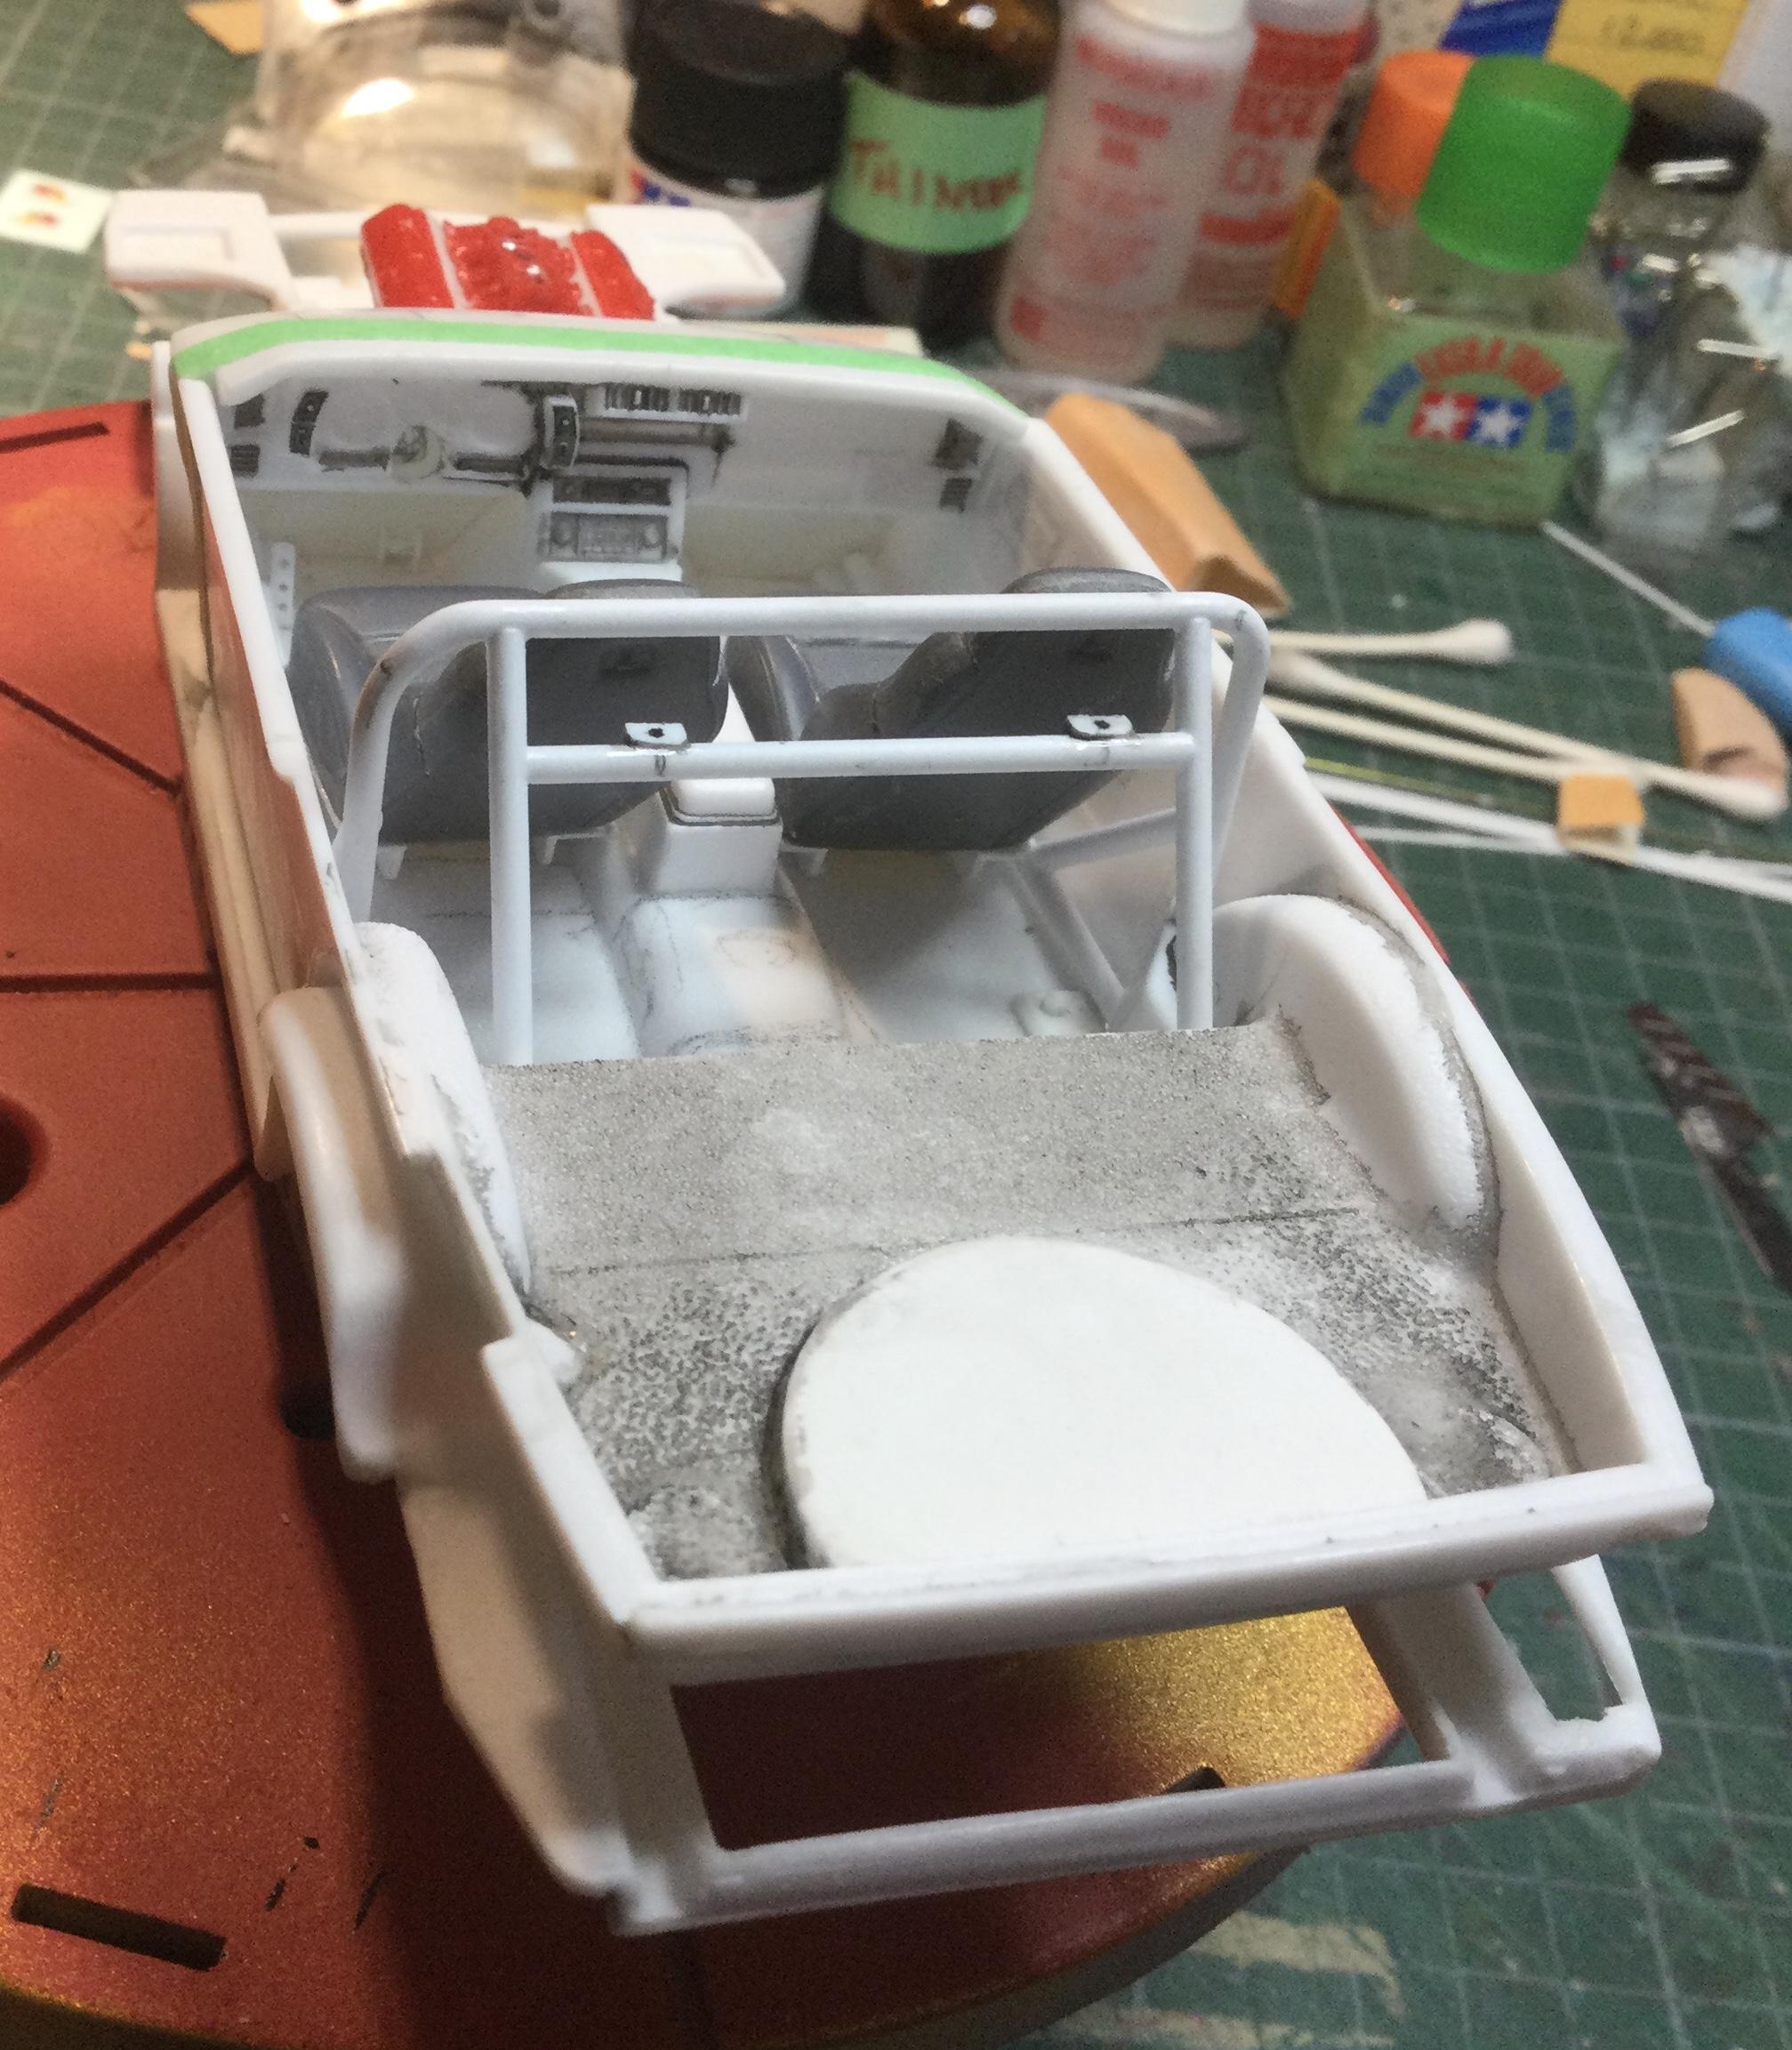
An overdue update on my IMSA Camaro build... Been spending time scratchbuilding and modifying parts for the interior of the Camaro. As stealth is a key component the car will be equipped with cutting edge electronics to detect and evade! In addition the bare bones interior requires some greater detail, such door panel armrests and road going amenities, such as a cooler for drinks and snacks! Most of the time has been spent masking and painting. The body now has its Champagne Gold colour with a light yellow vinyl top. The engine bay is in semi-gloss black awaiting more paint detail. The chassis plate received a panel wash before the grey primer coat and is on its way. The primed interior also had a wash applied before the colour is sprayed. Overall I’m pleased with the progress. While I have used Tamiya masking tape in the past, this is the first time I have used it exclusively, avoiding the green and blue tapes and found it made for a much better seal with no paint creep. Just need to stock up on it. I’ve also switched to using Tamiya paints exclusively for bodies and Vallejo for interiors, both brush and air. Cheers for now, Misha
-
Isn’t this the original old Aurora kit, certainly looks like it on the sprues. Monogram had a one piece shell of the 904 which did double duty as their slot car as well. Seems odd to see the Hasegawa label attached to this re-release. Cheers Misha
-
Perhaps the most recent offender of flat earth reflectors is the 63 Nova wagon, the only real major defect with that kit. Good to see the various remedies, thanks Misha
-
1964 SCCA Corvette W.I.P.
Misha replied to MarkJ's topic in WIP: Other Racing: Road Racing, Land Speed Racers
Another option for the engine, following up on Josh’s suggestion, would be to use the premixed washes from Tamiya (enamel based) or the range of Vellejo washes (acrylic based) that are applied with a brush. It would deepen the recesses and create greater depth to the engine. Cheers Misha -
A great build Jim of an iconic roadster! I have always thought of doing one and similar to Alan have been collecting bits and pieces. Seeing your build has spurned me on, even have the Scott blower on order from Norm. This is a challenging build to create a replica and you are very inventive with your solutions and techniques, a real inspiration. Cheers Misha
-
70 Plymouth HEMI GTX 1/25 Scale
Misha replied to AmericanMuscleFan's topic in WIP: Drag Racing Models
Francis, your work and artistry just blows me away! Wonderful to see the photos all together, please do continue to display your other builds. All these years I have marvelled at the machining skills and equipment required and even now in my late 60s the thought comes up of trying to have a go at it. Merci & Cheers Misha -
Great body work Sam! Quite a job to restore it having to reproduce the window framing and rear quarters, especially on a kit that one has already completed. Your rebuild will be a much better looking representation of the vintage Falcon. Your discovery of the black plastic underneath reminded me of having the original kit way back as a kid, shortly after the dinosaurs disappeared. Be following your work, cheers Misha
-
"Bring Out Your Dead" Completion Build--ROUND 2 Is On!
Misha replied to Snake45's topic in WIP: Model Cars
Thanks Tom! I’m intrigued by your kit bash of the Stude and the Merc. The two fit together very well as well as being of the same vintage. Hope to see some more of your progress on it. Cheers Misha -
Thanks Ed, while the build did require thought & patience there was also a lot of trial & error. For the complete build check out my WIP thread... Cheers Misha
-
"Bring Out Your Dead" Completion Build--ROUND 2 Is On!
Misha replied to Snake45's topic in WIP: Model Cars
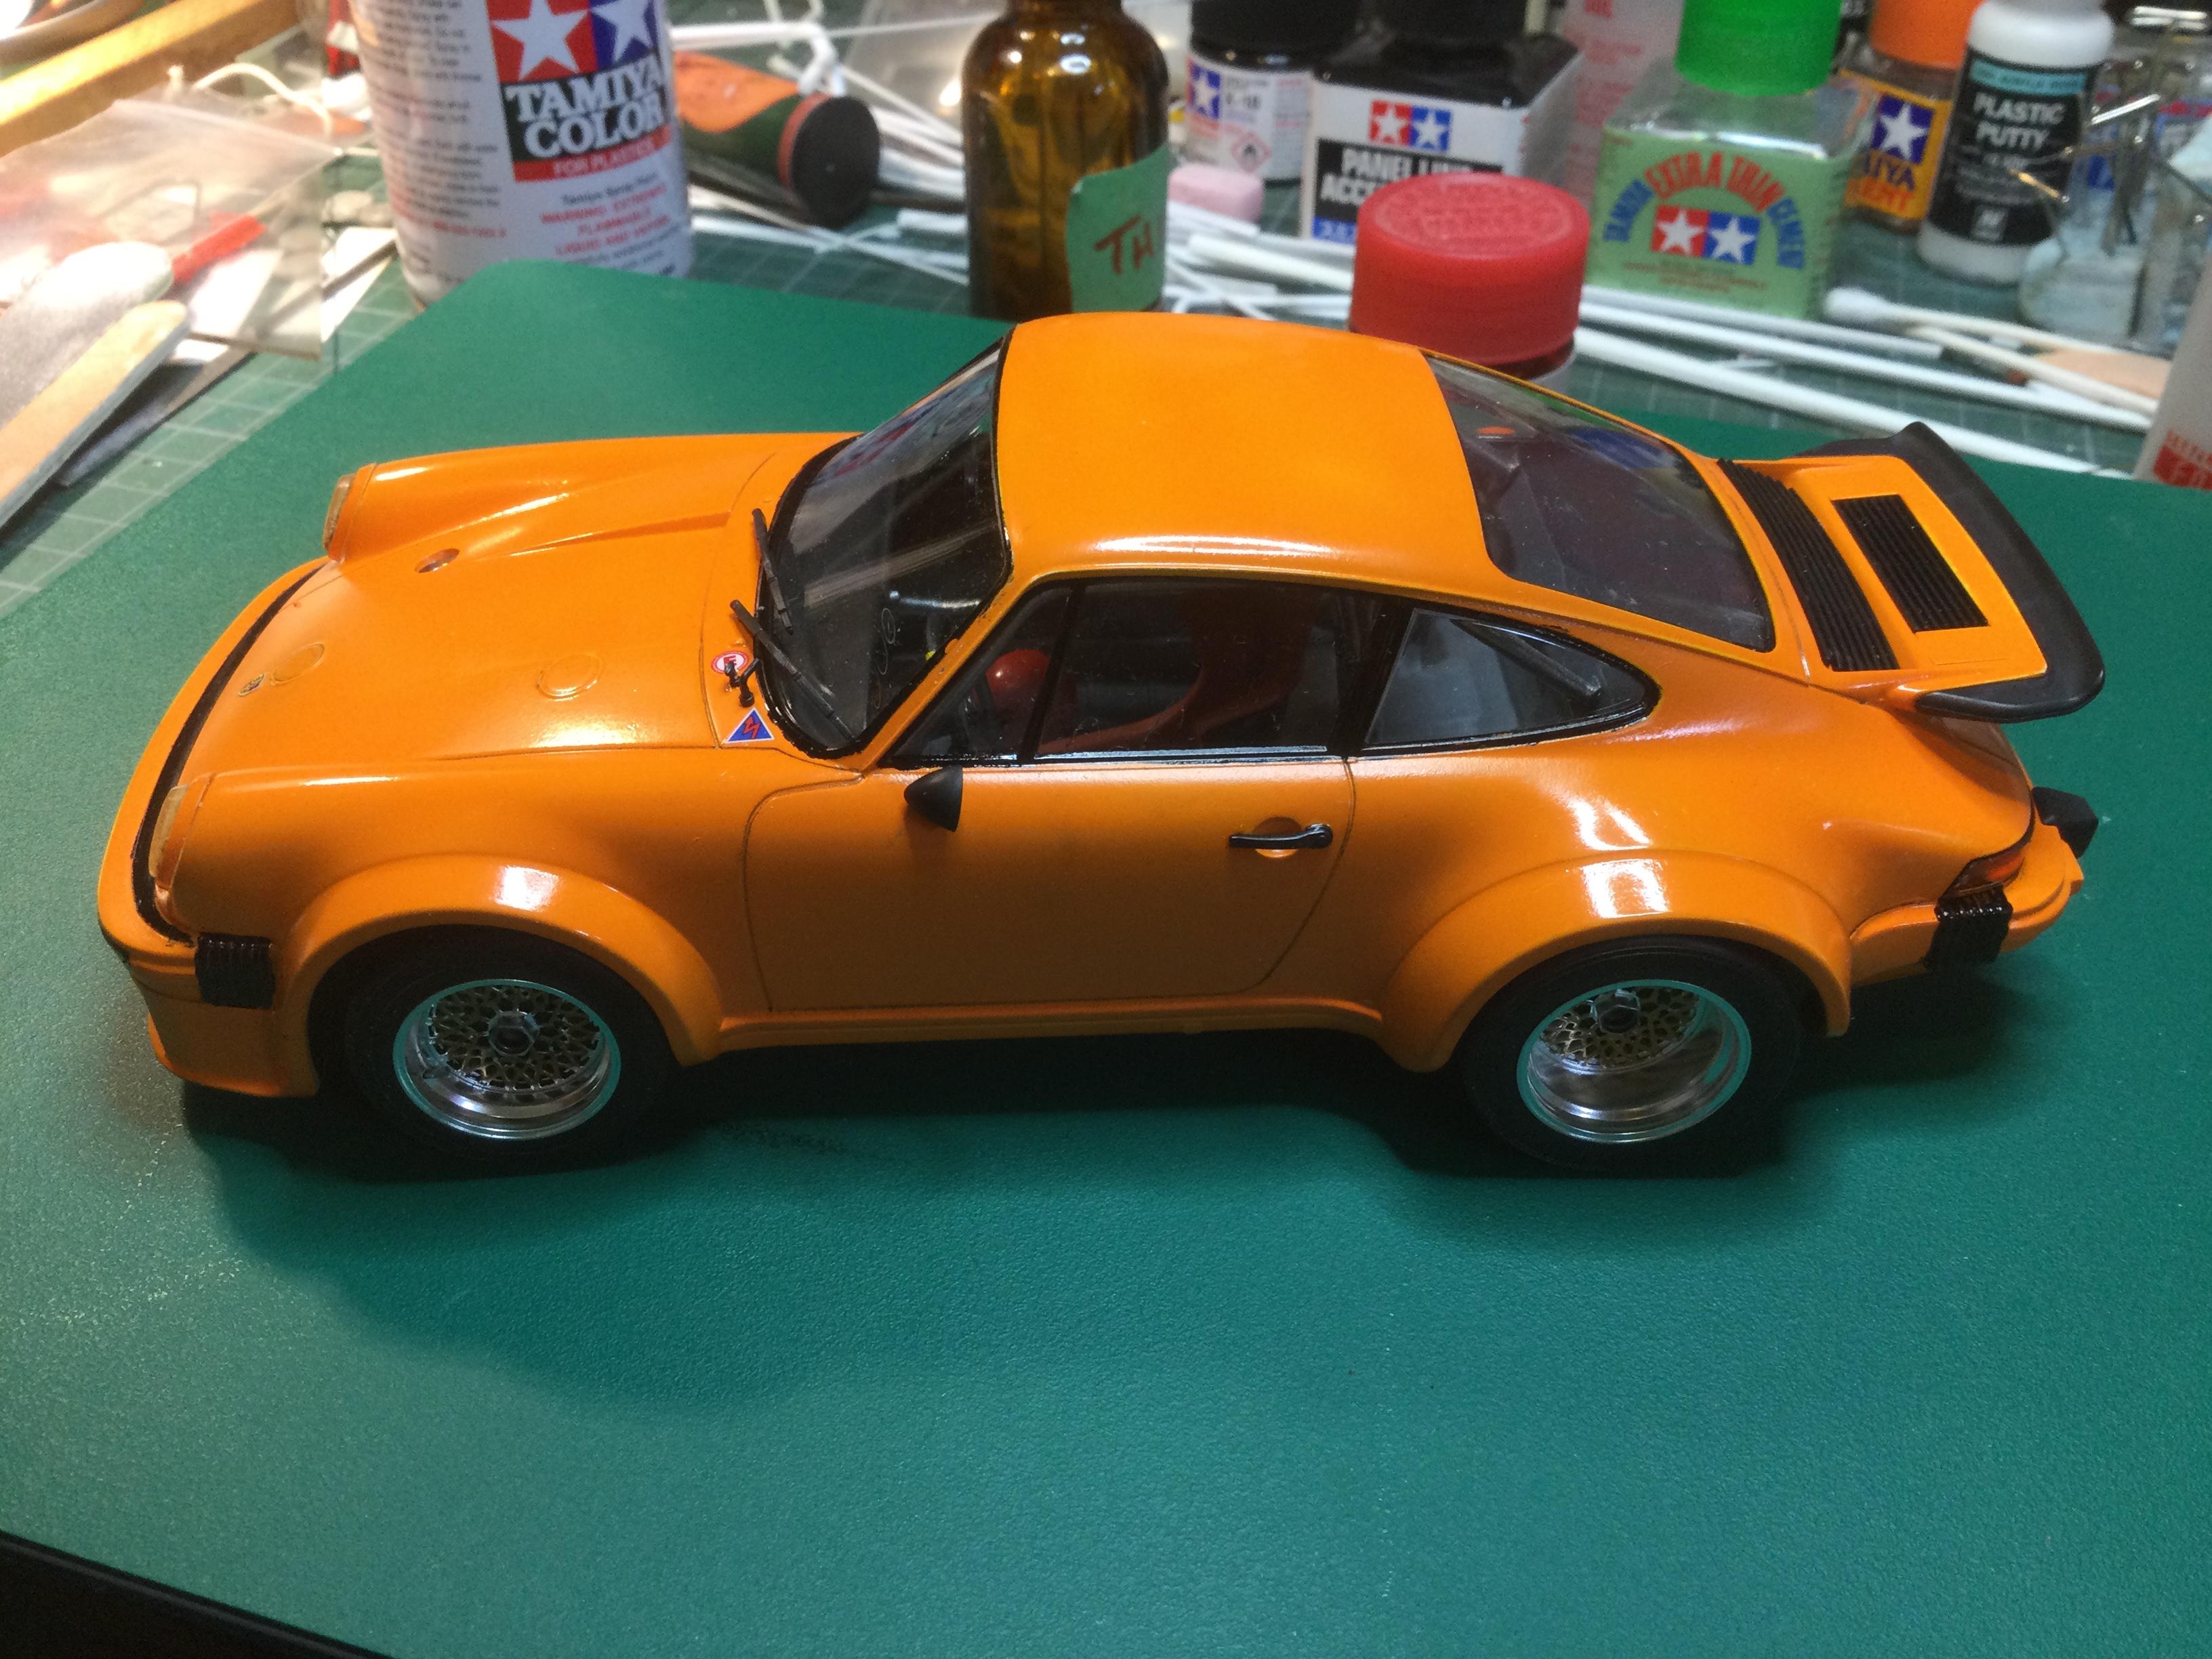
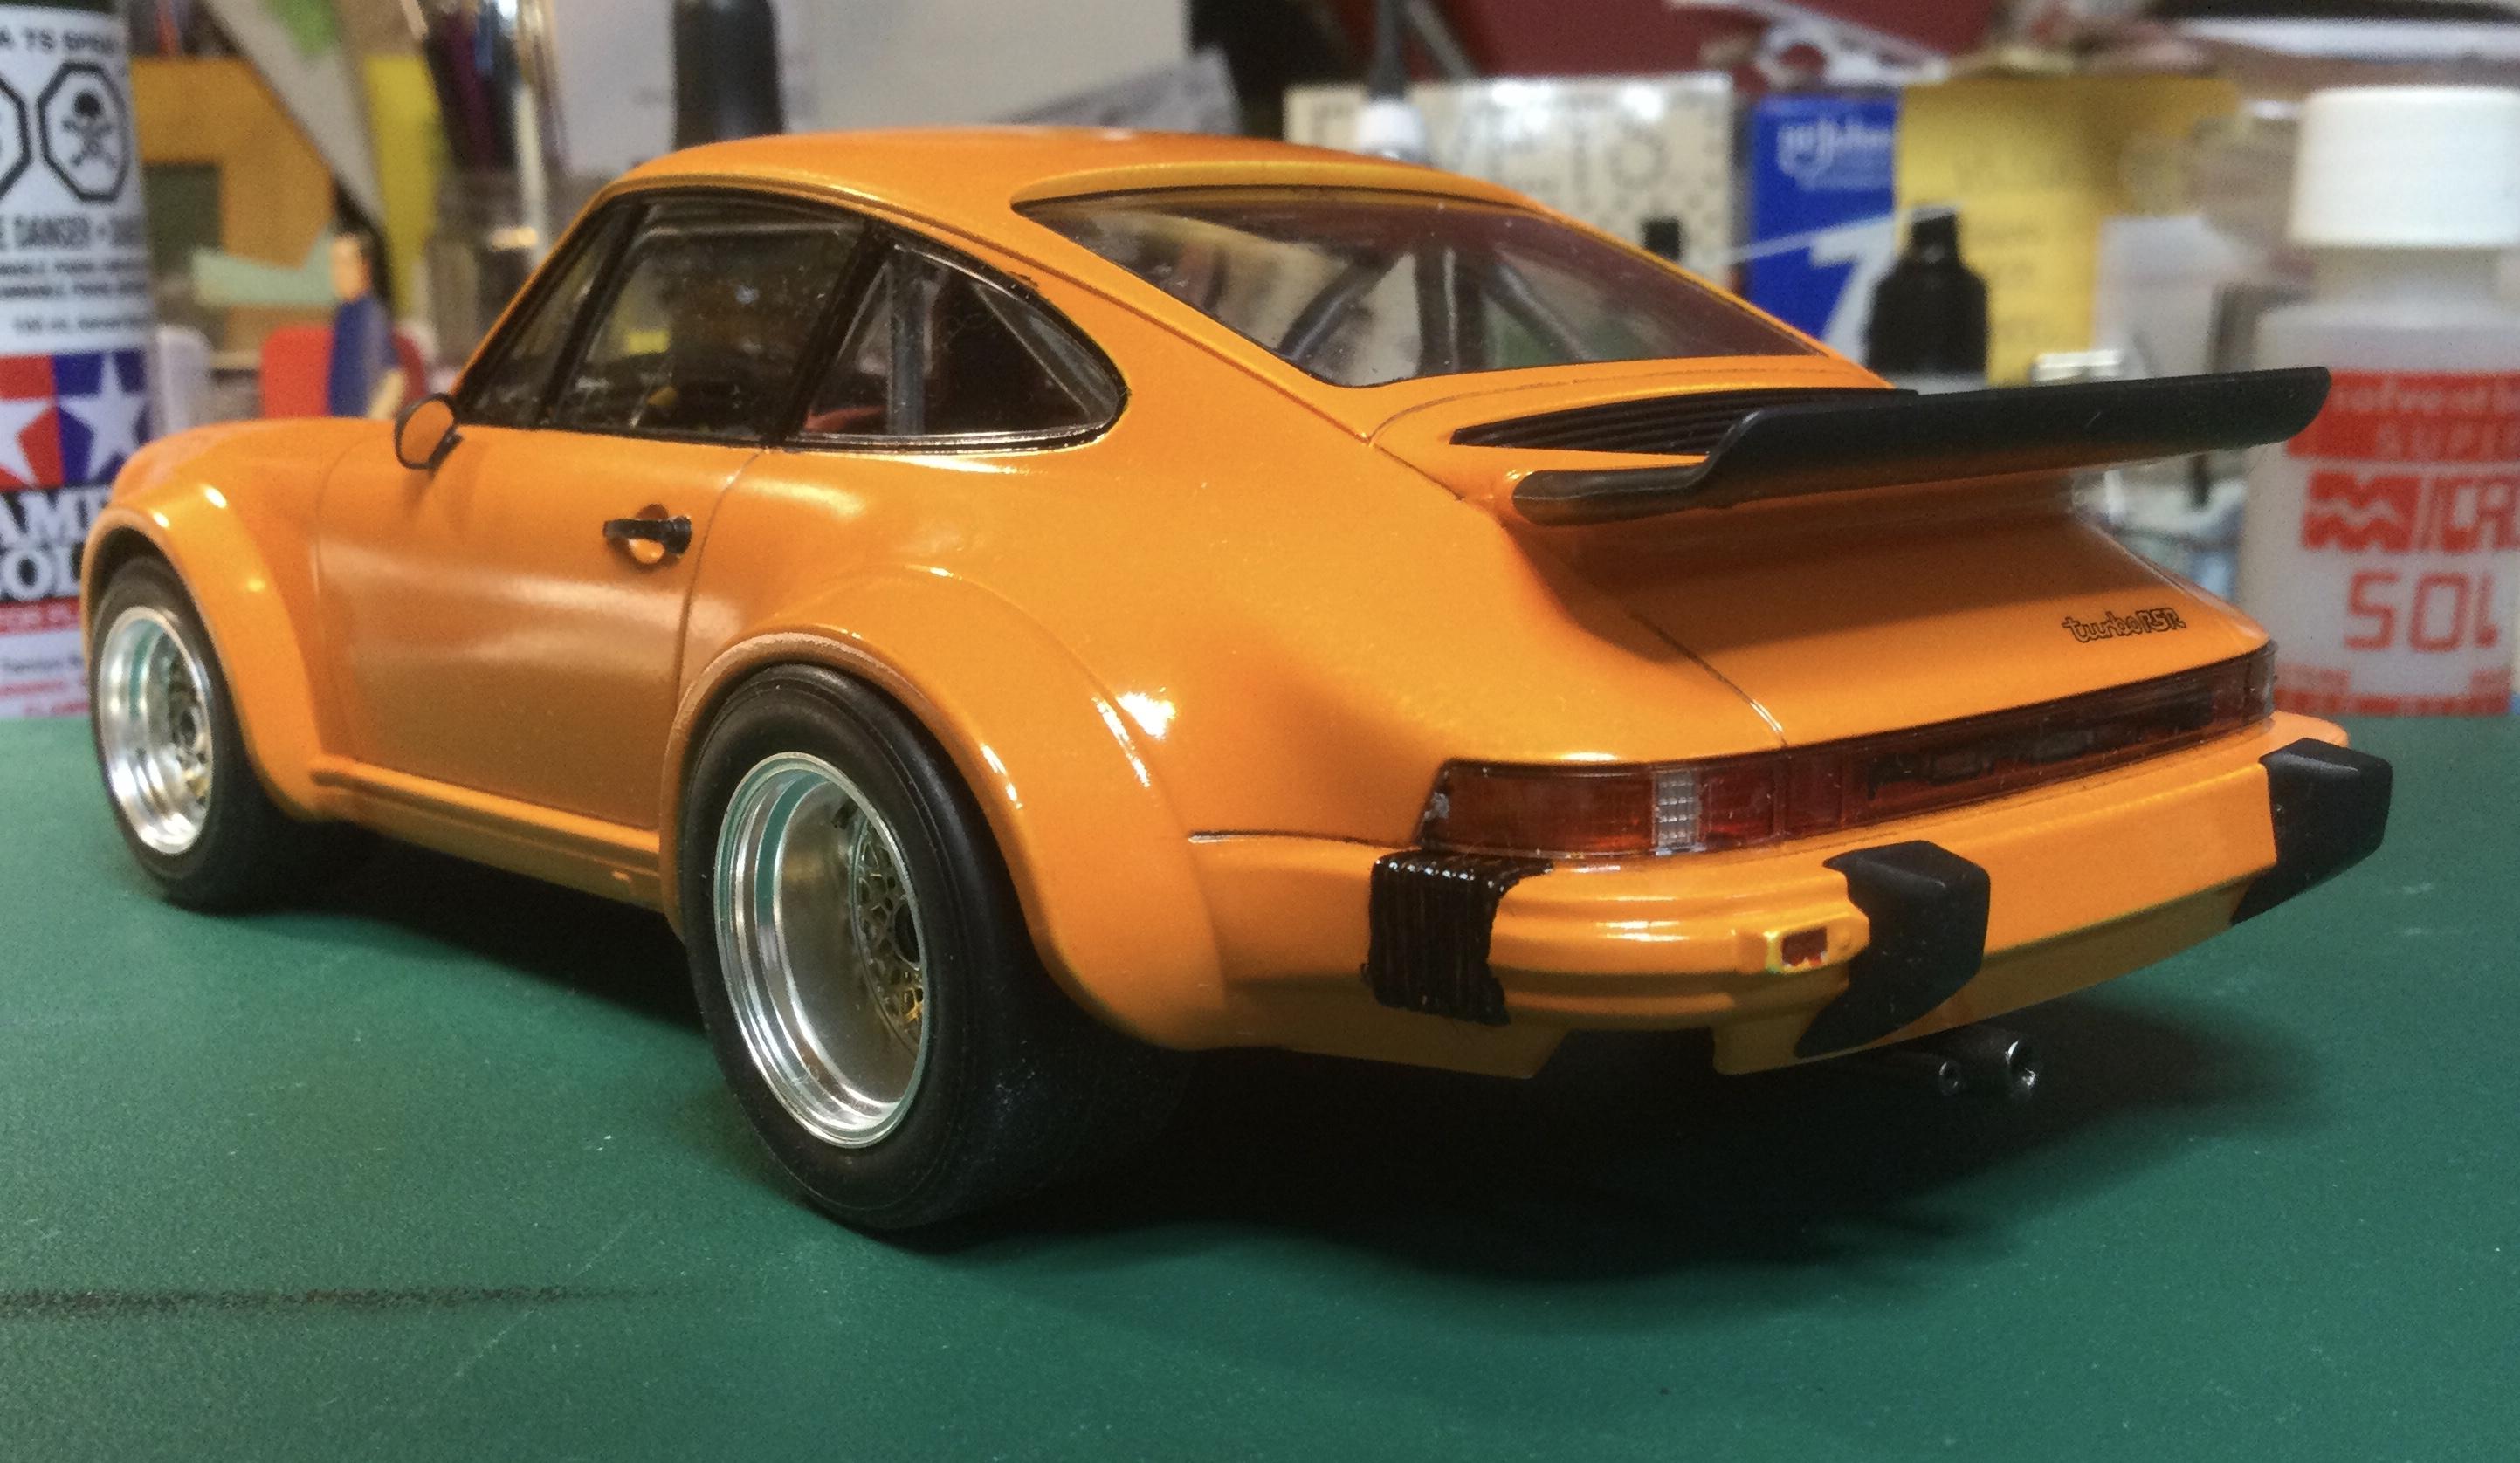
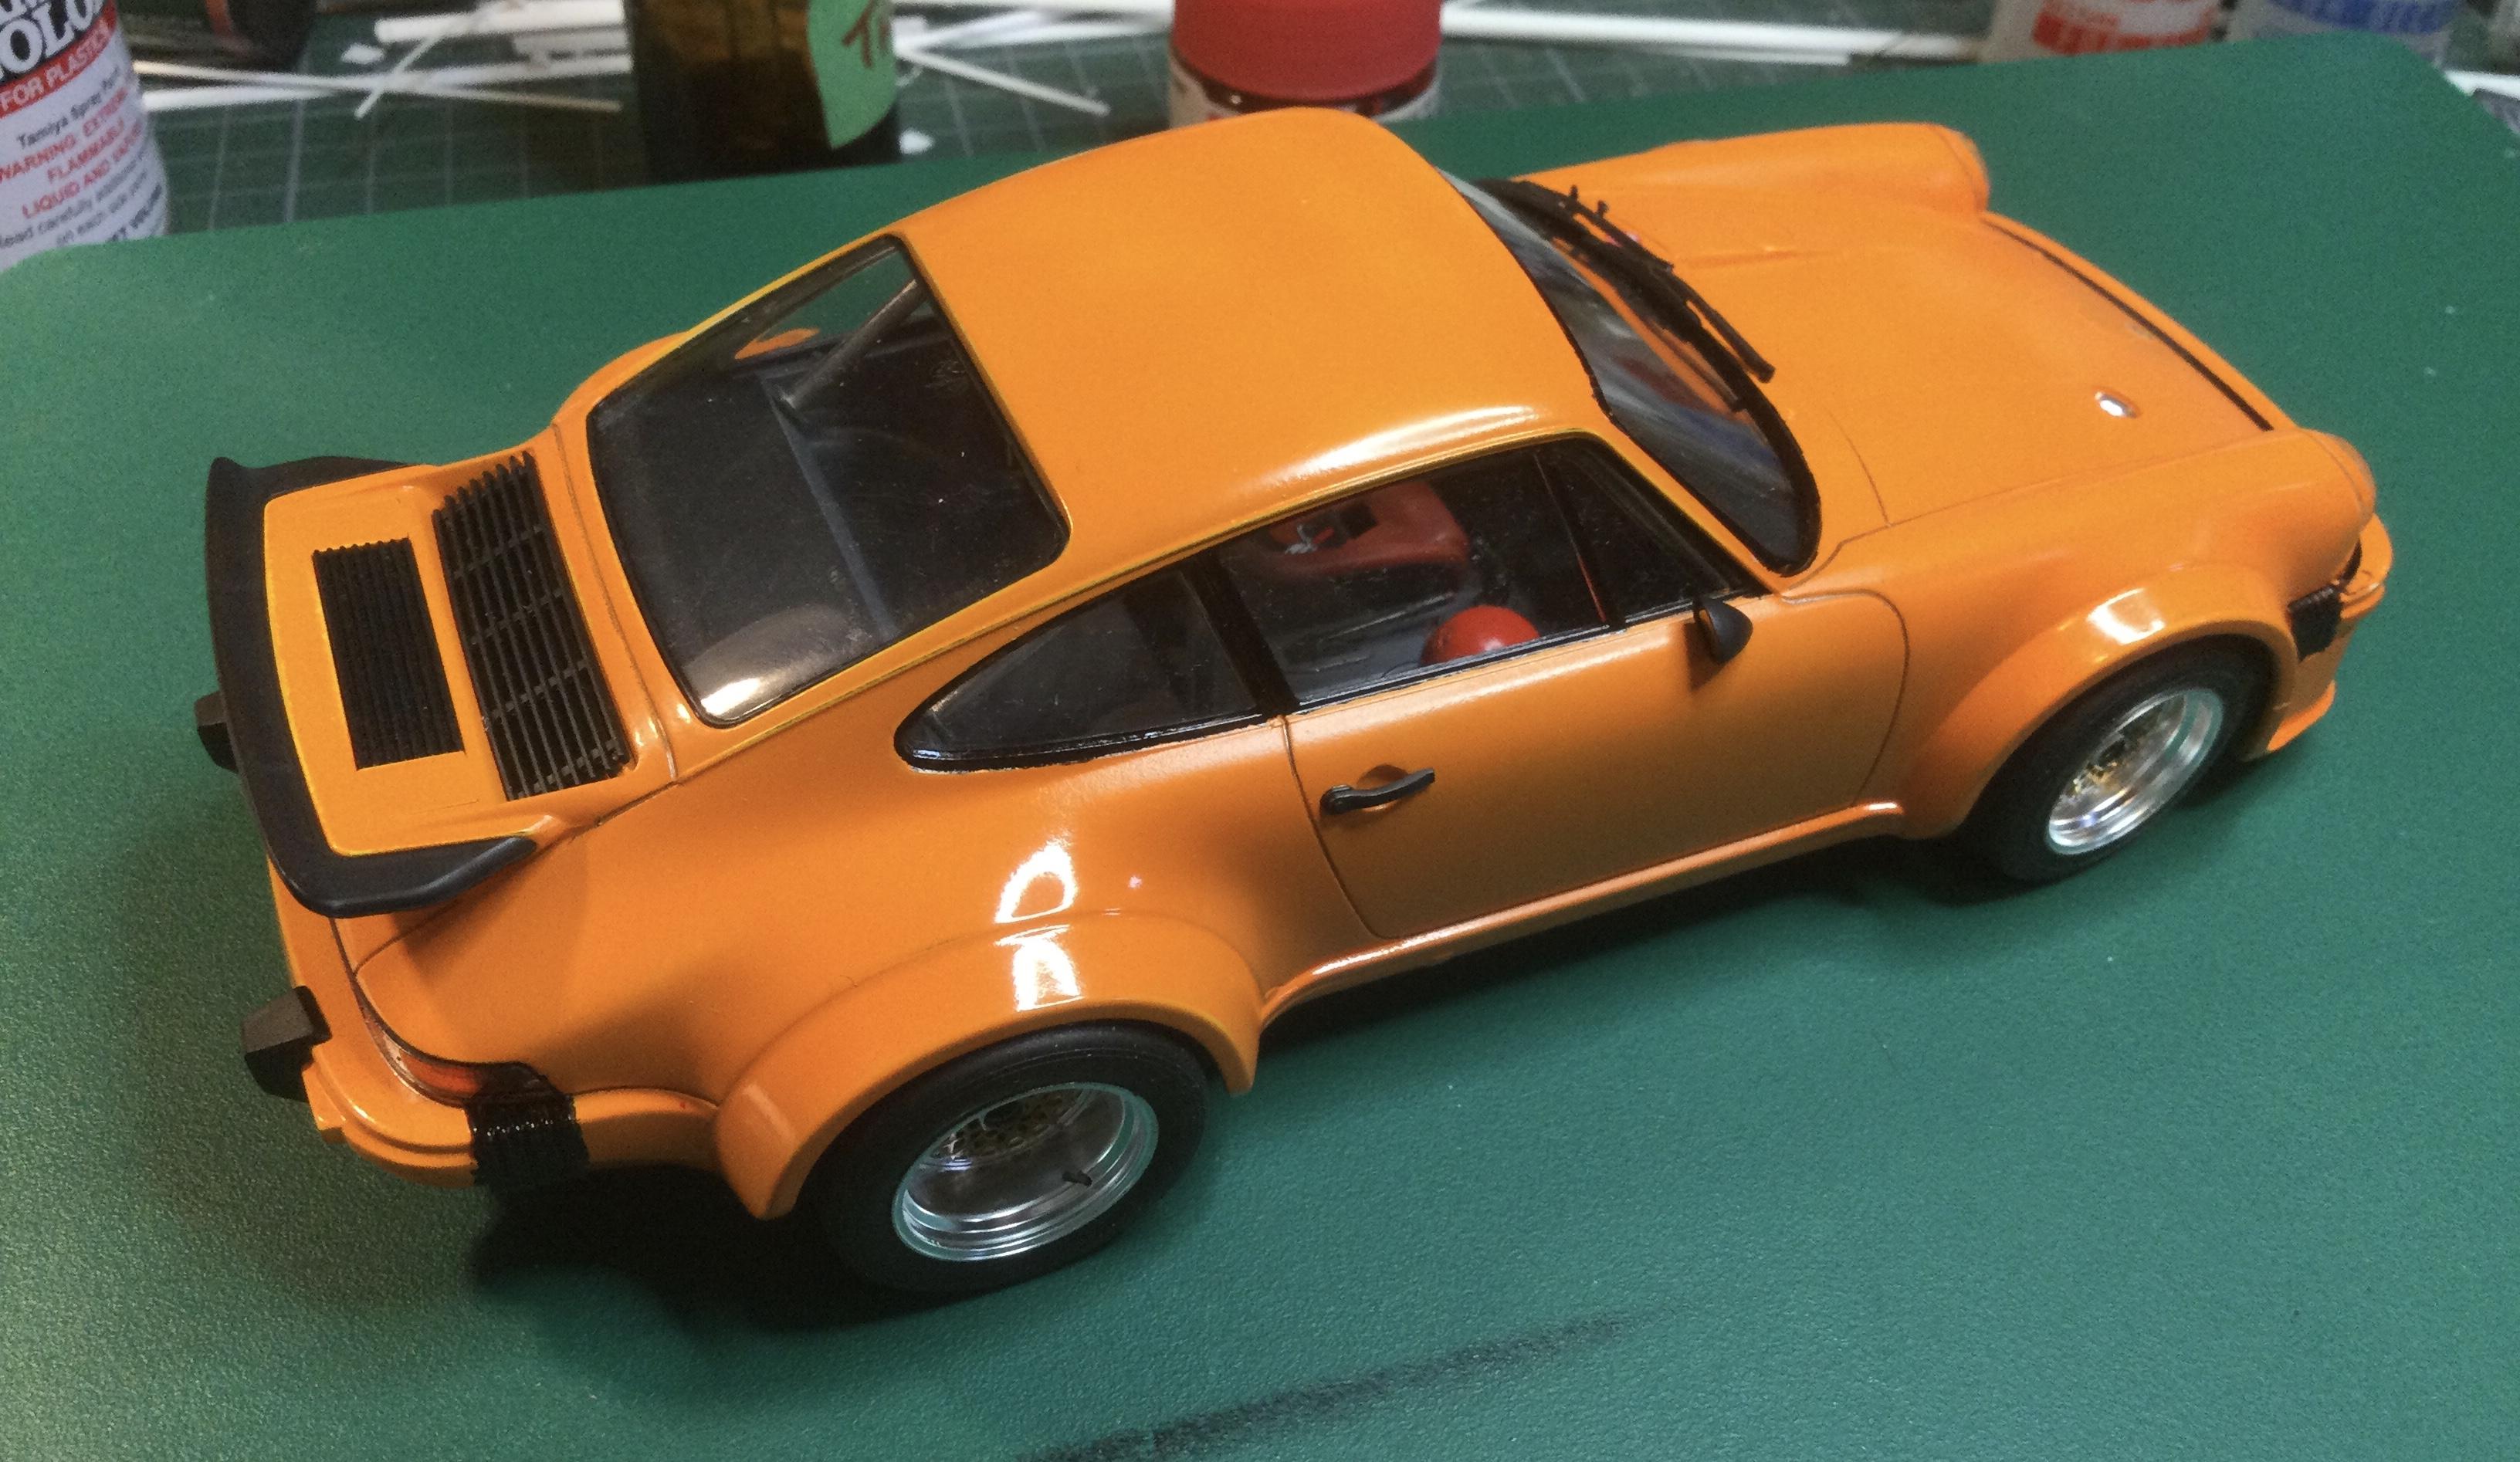
Spent Sunday afternoon with the finishing touches on the 934 RSR beginning with decaling, installing headlights and lenses, and all the tiny bits such as wipers, door handles and mirrors. Overall a great kit from Tamiya as always, yet one that has offered me a number of challenges, the biggest one is all the traditional 911 back trim! After all the problems I encountered I finally watched a number of 911 builds on You Tube and discovered the errors of my way. It actually is best to mask everything and airbrush the semi-gloss black. As it is, I’m happy with how far I got with it and calling it done. Now I’m antsy to start another Porsche. This is my second completion under the BOYD banner and I imagine it won’t be the last either. It’s a great way to get those nearly done items off the bench and into the case! Thanks again Snake for the inspiration. Cheers Misha
-
Thanks Michael, it required a shoe horn to fit the 302 into the frame. I had to split the tranny to get it to fit in around the cross member. Added a tranny cooler, just above the transmission in the photo. The front end is from the R/M deuce with a kit modified rear end. Alclad provided the metallic finishes. Cheers Misha
-
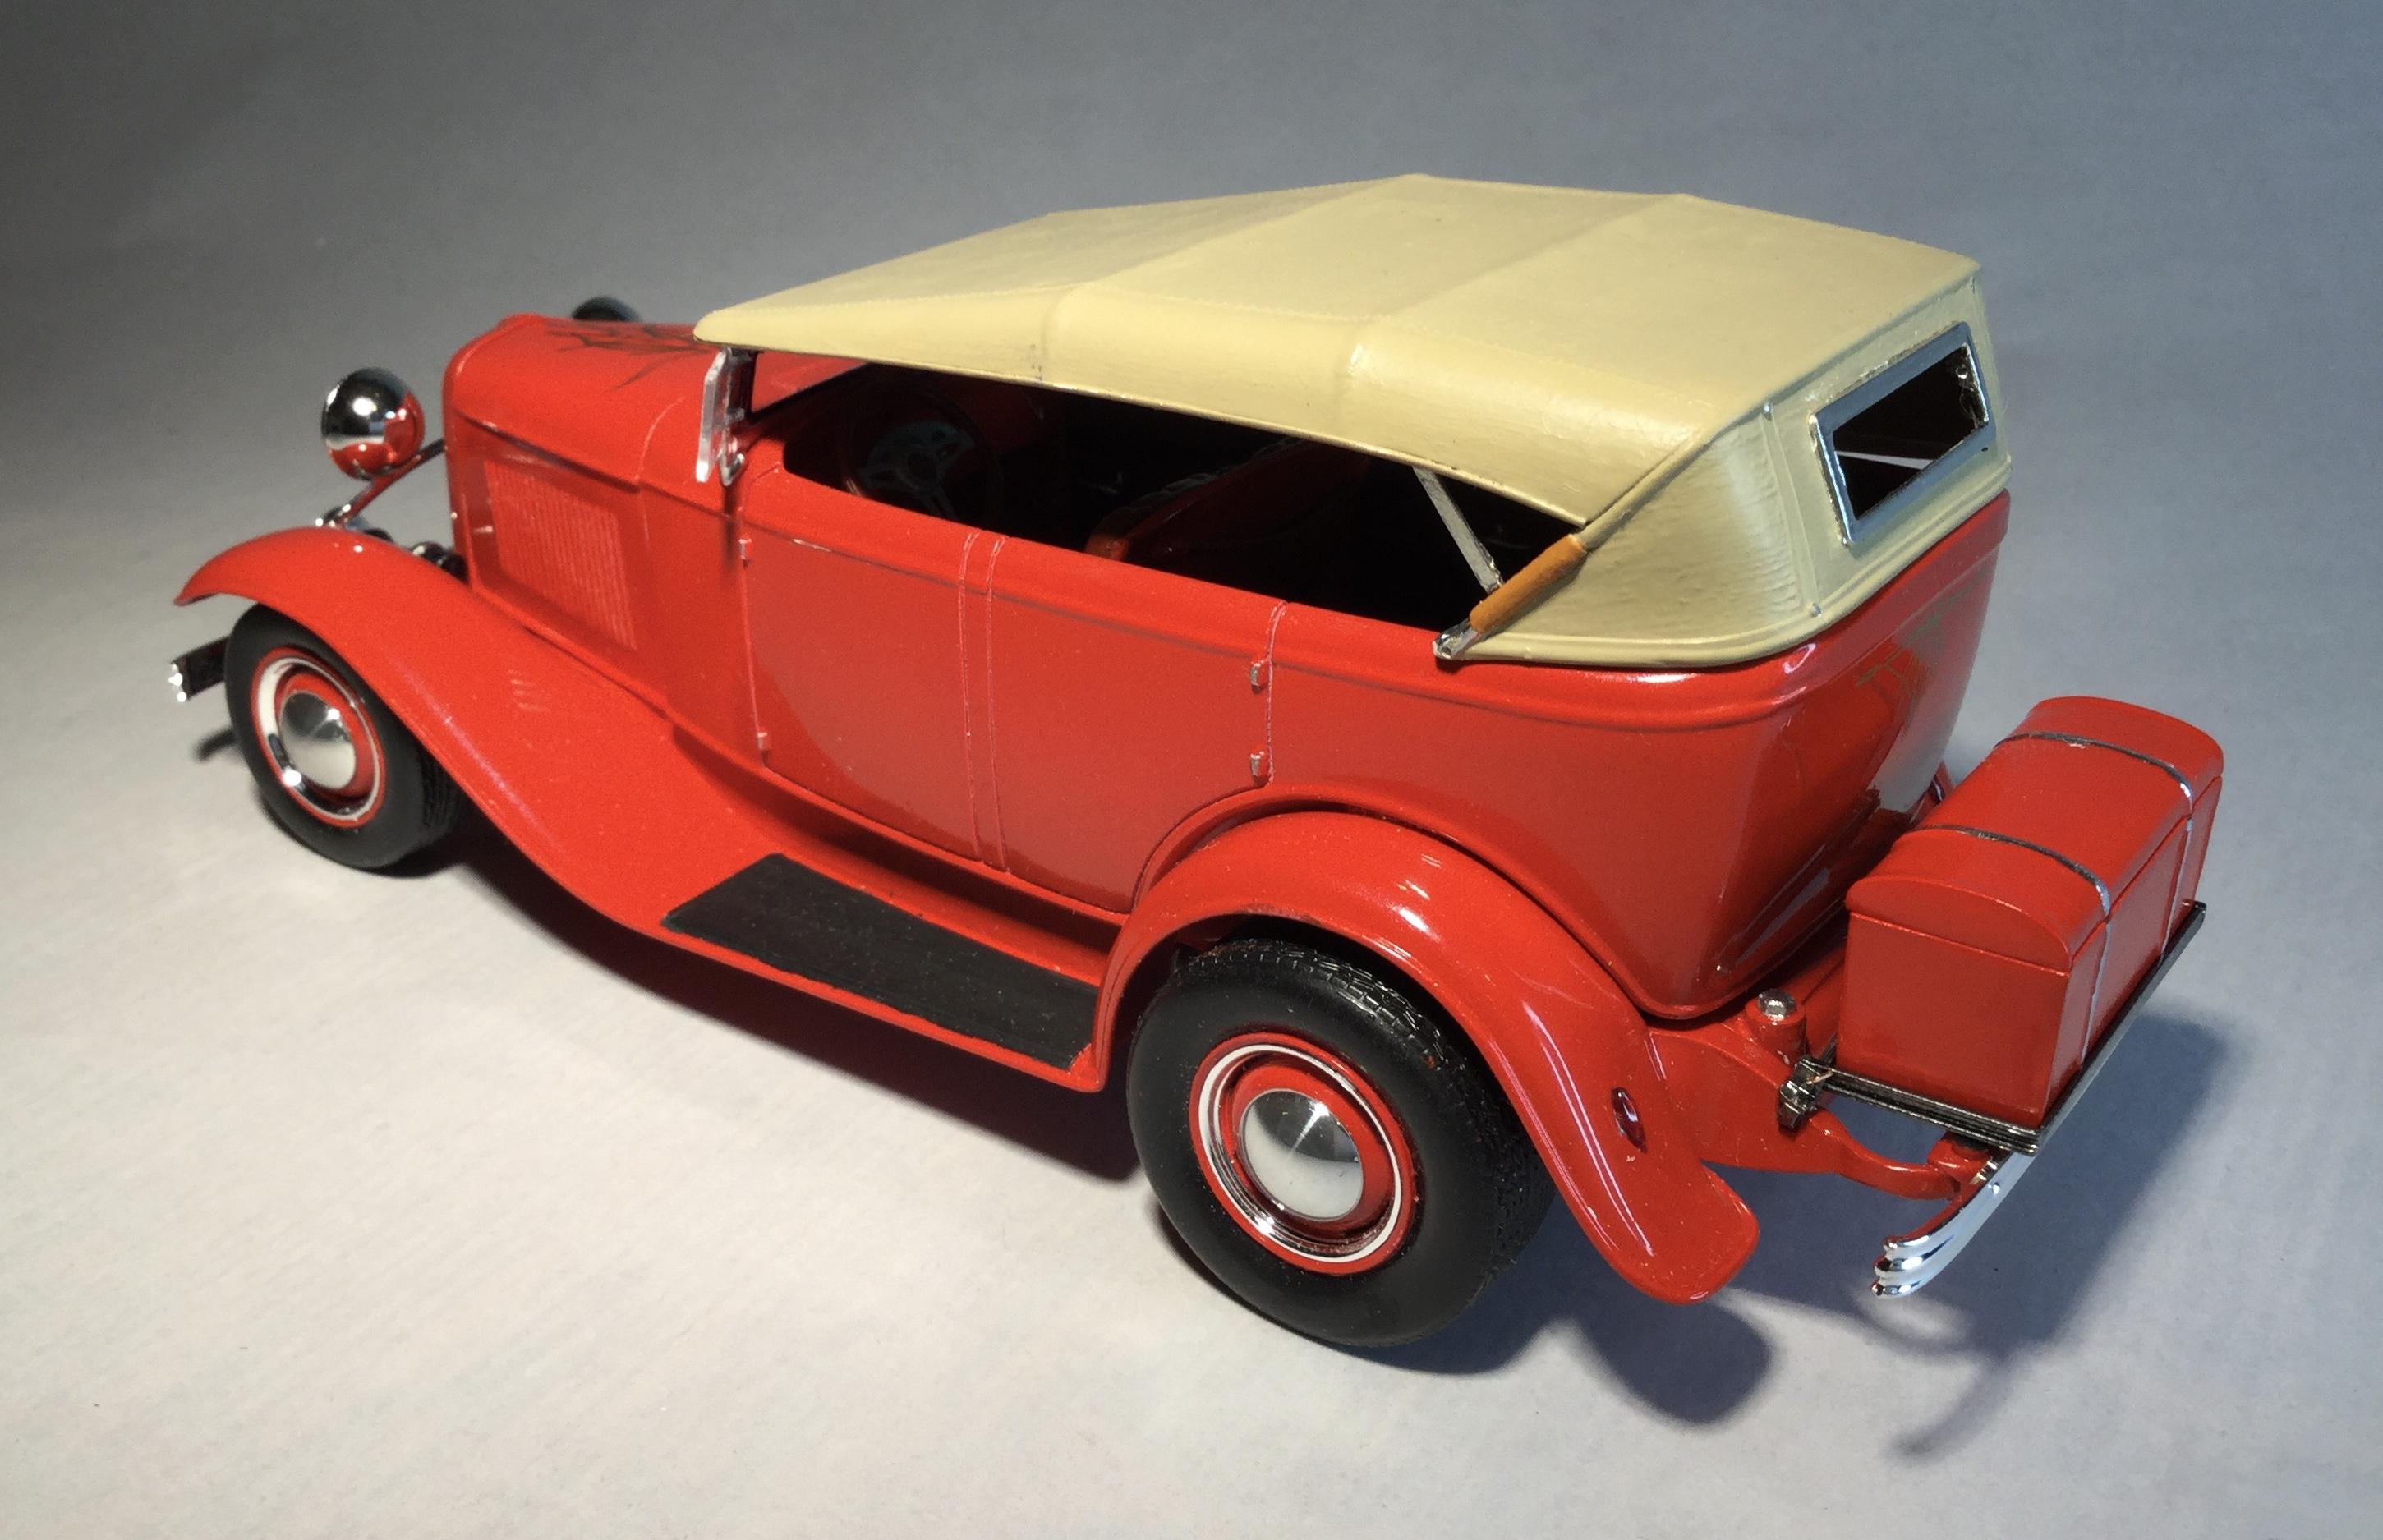
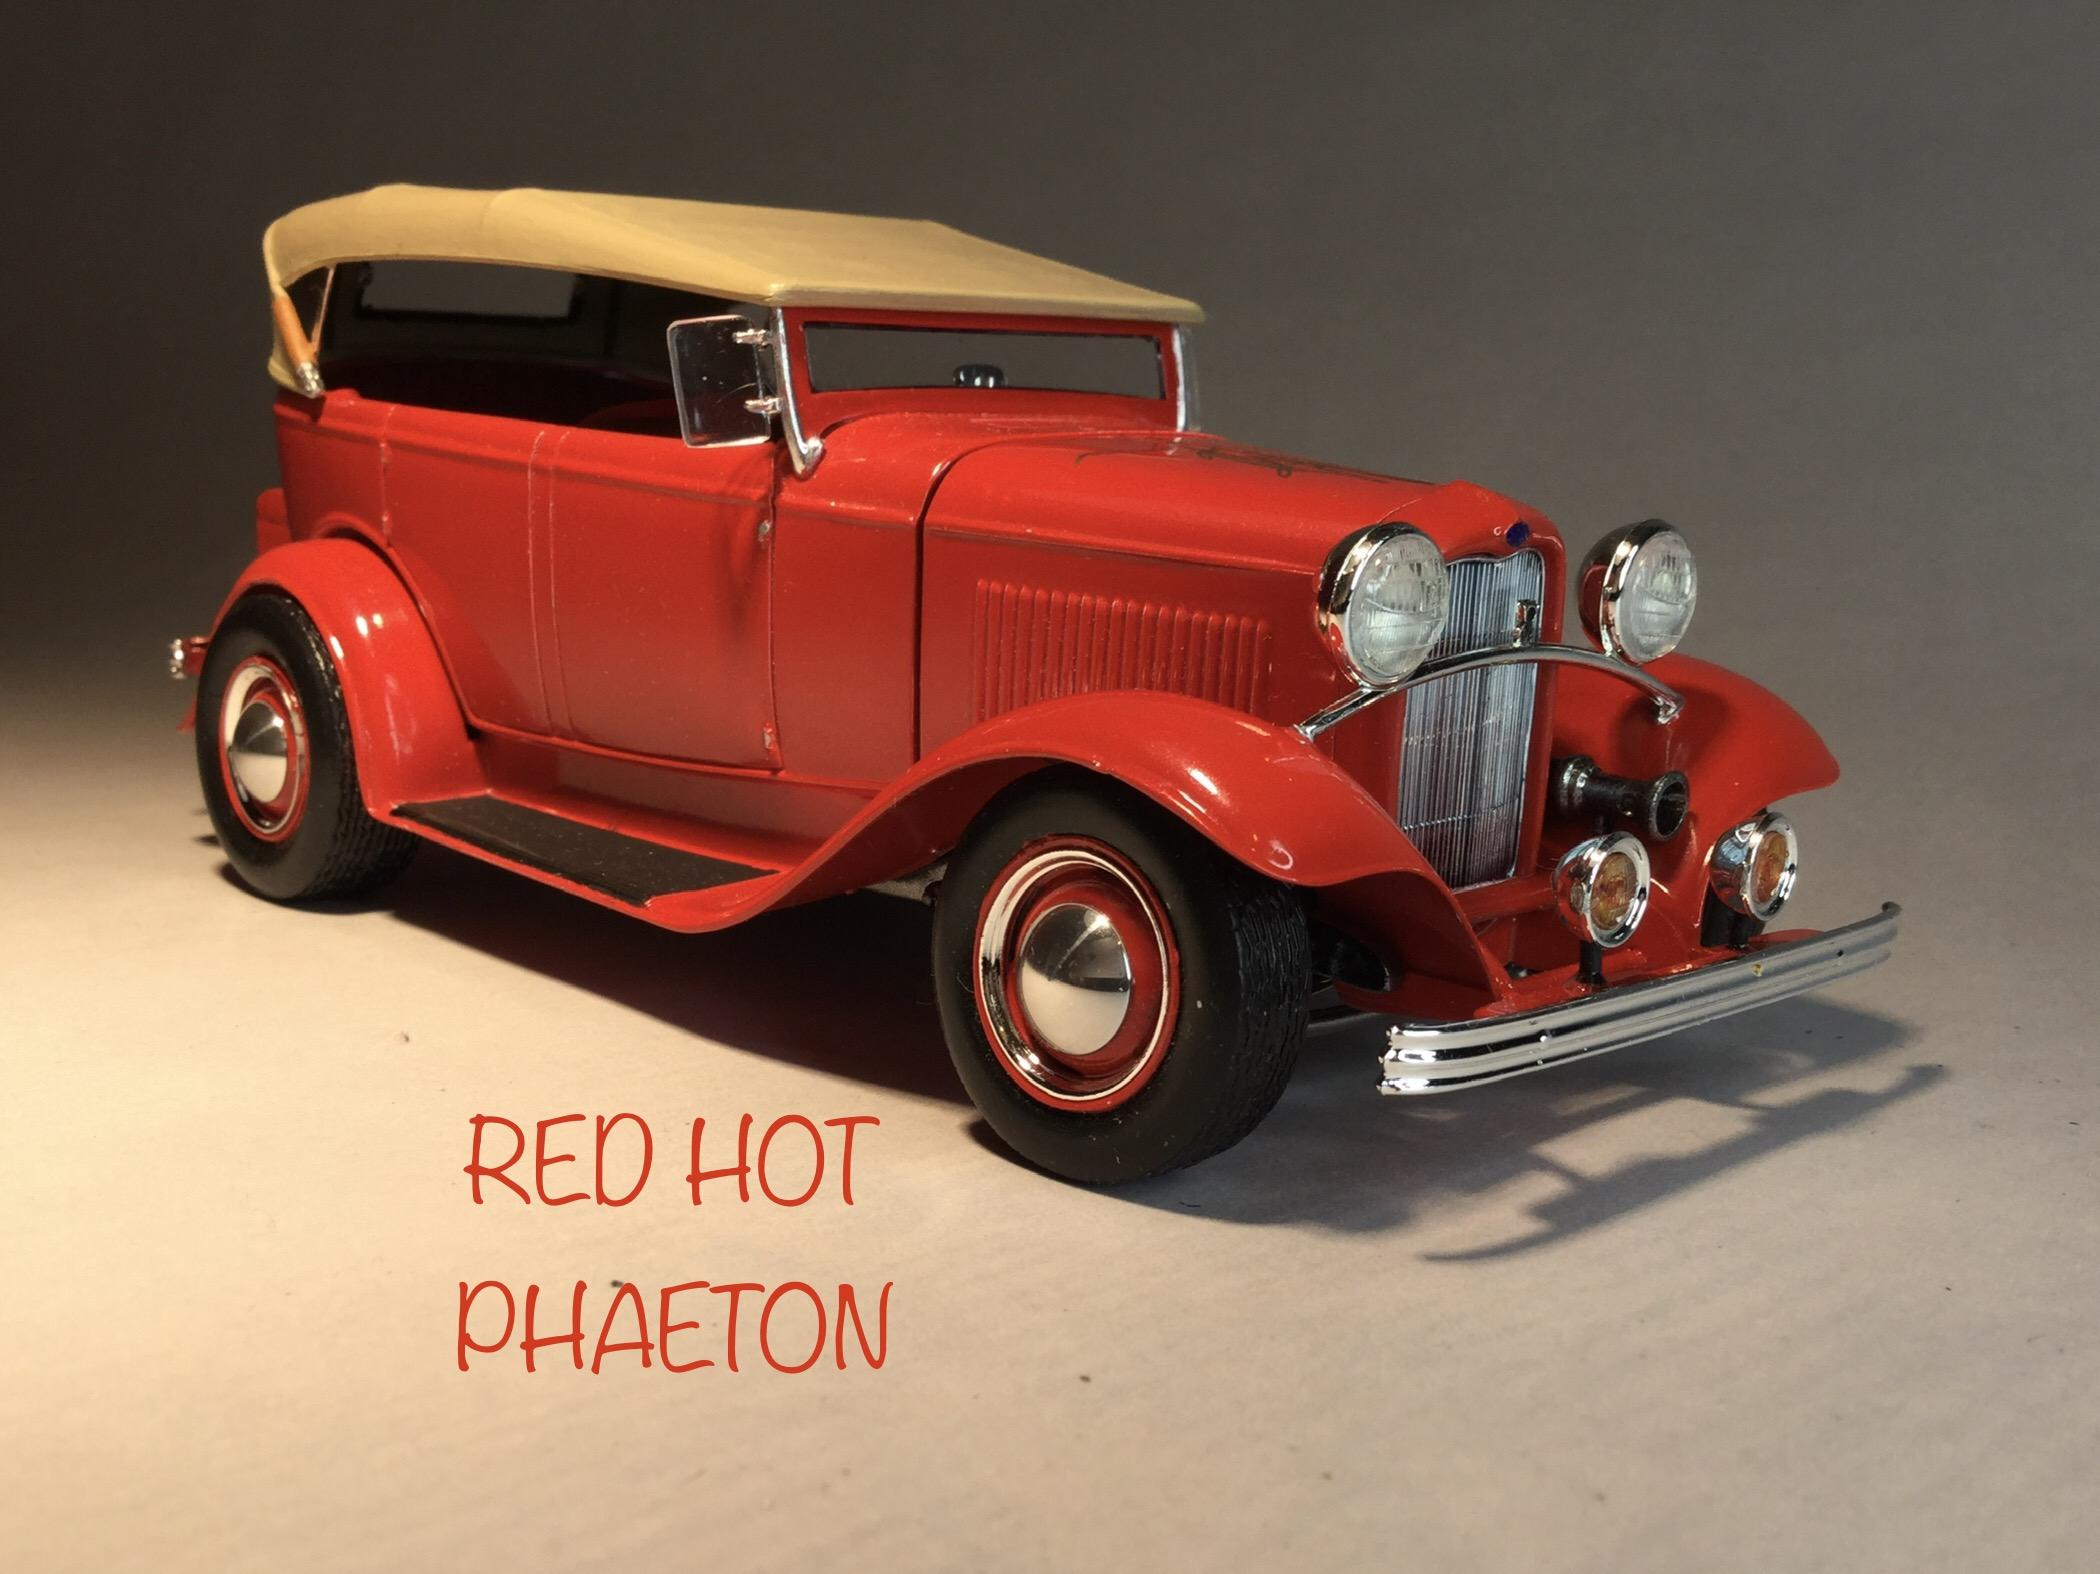
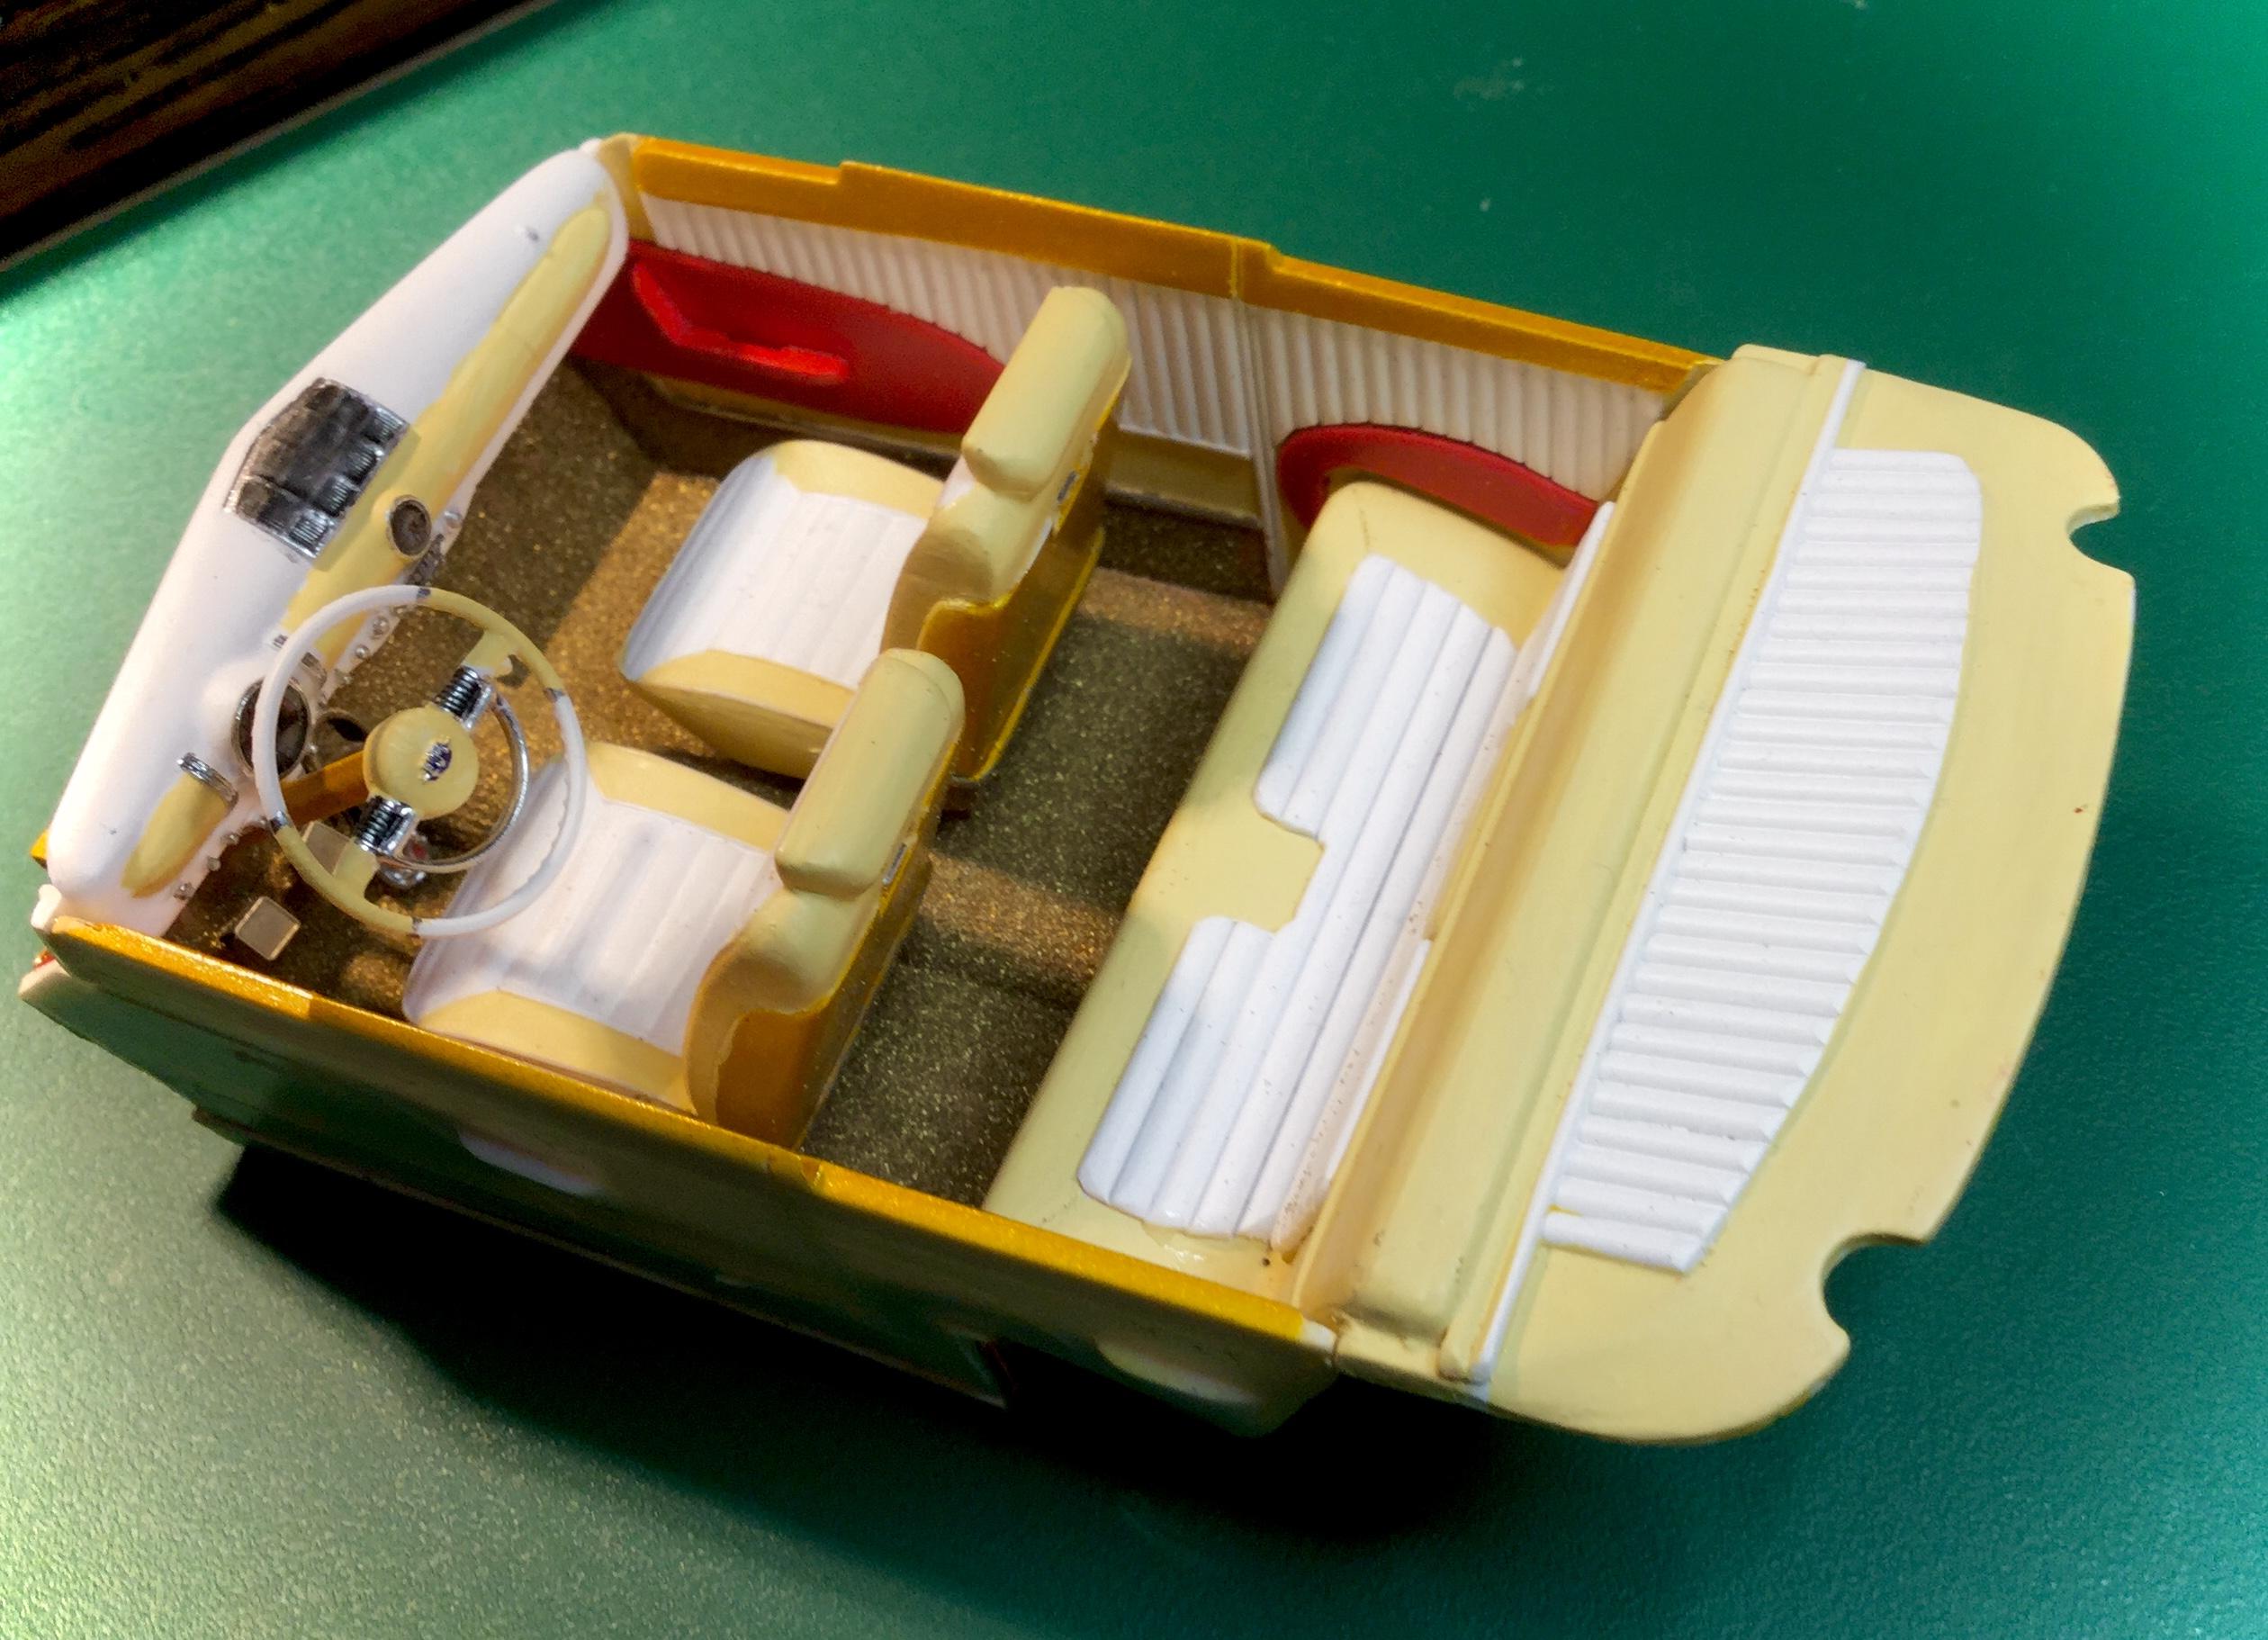
I built the Red Hot Phaeton using the AMT body, fenders and chassis combined with the R/M front suspension and small block Ford. The rear rack operates and was scratchbuilt. The interior was modified to add extra detail to the plain kit provided tub. A major omission in the kit is the metal support behind the front seat. Overall a decent kit to use as a basis for further work. Cheers Misha
-
Pair of 2018 IMSA & PWC Mustang GT4's
Misha replied to JP Models's topic in WIP: Other Racing: Road Racing, Land Speed Racers
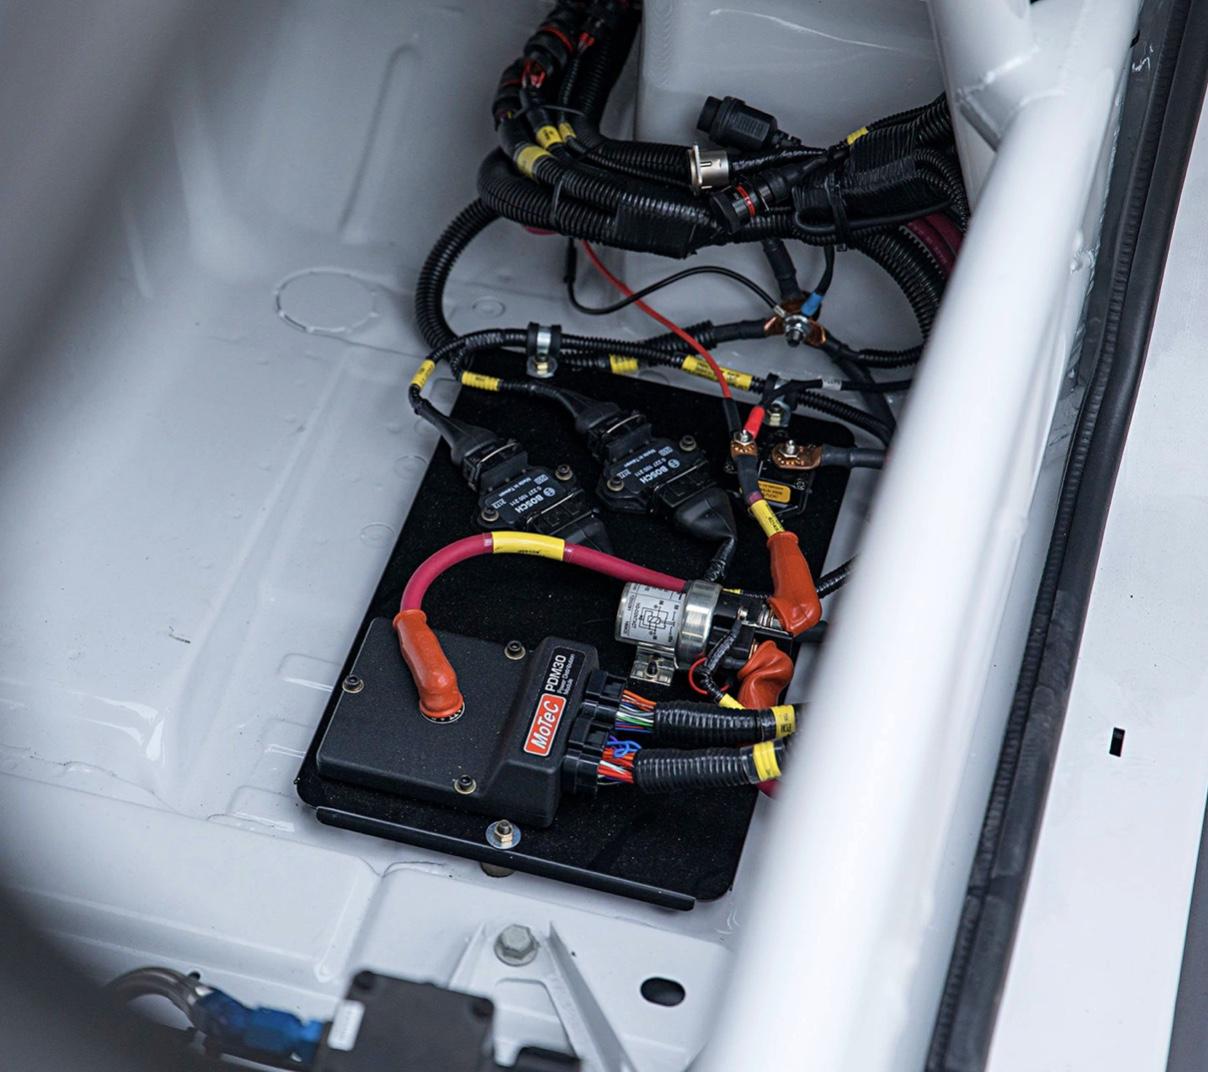
Great interior detail shots JP, makes the wiring much more understandable. I was wondering if the cables behind the seat would also be fastened down, or do they lay loose? Cheers Misha -
Pair of 2018 IMSA & PWC Mustang GT4's
Misha replied to JP Models's topic in WIP: Other Racing: Road Racing, Land Speed Racers
Your interior is really looking great JP! It’s encouraging me to start on my kit. Cheers Misha -
Hi Steve, this build keeps getting better and better! Slice ‘n’ dice ? Cheers Misha
-
I followed a similar route Jeff when building my Shoebox by installing a Y Block from the R/M 57 Ford. When it came to the interior I rebuilt the door cards due to the near total lack of detail in the kit piece. Perhaps this may inspire some thoughts on how to approach your build... The 49 Ford has always been a favourite, Cheers Misha
-
Pair of 2018 IMSA & PWC Mustang GT4's
Misha replied to JP Models's topic in WIP: Other Racing: Road Racing, Land Speed Racers
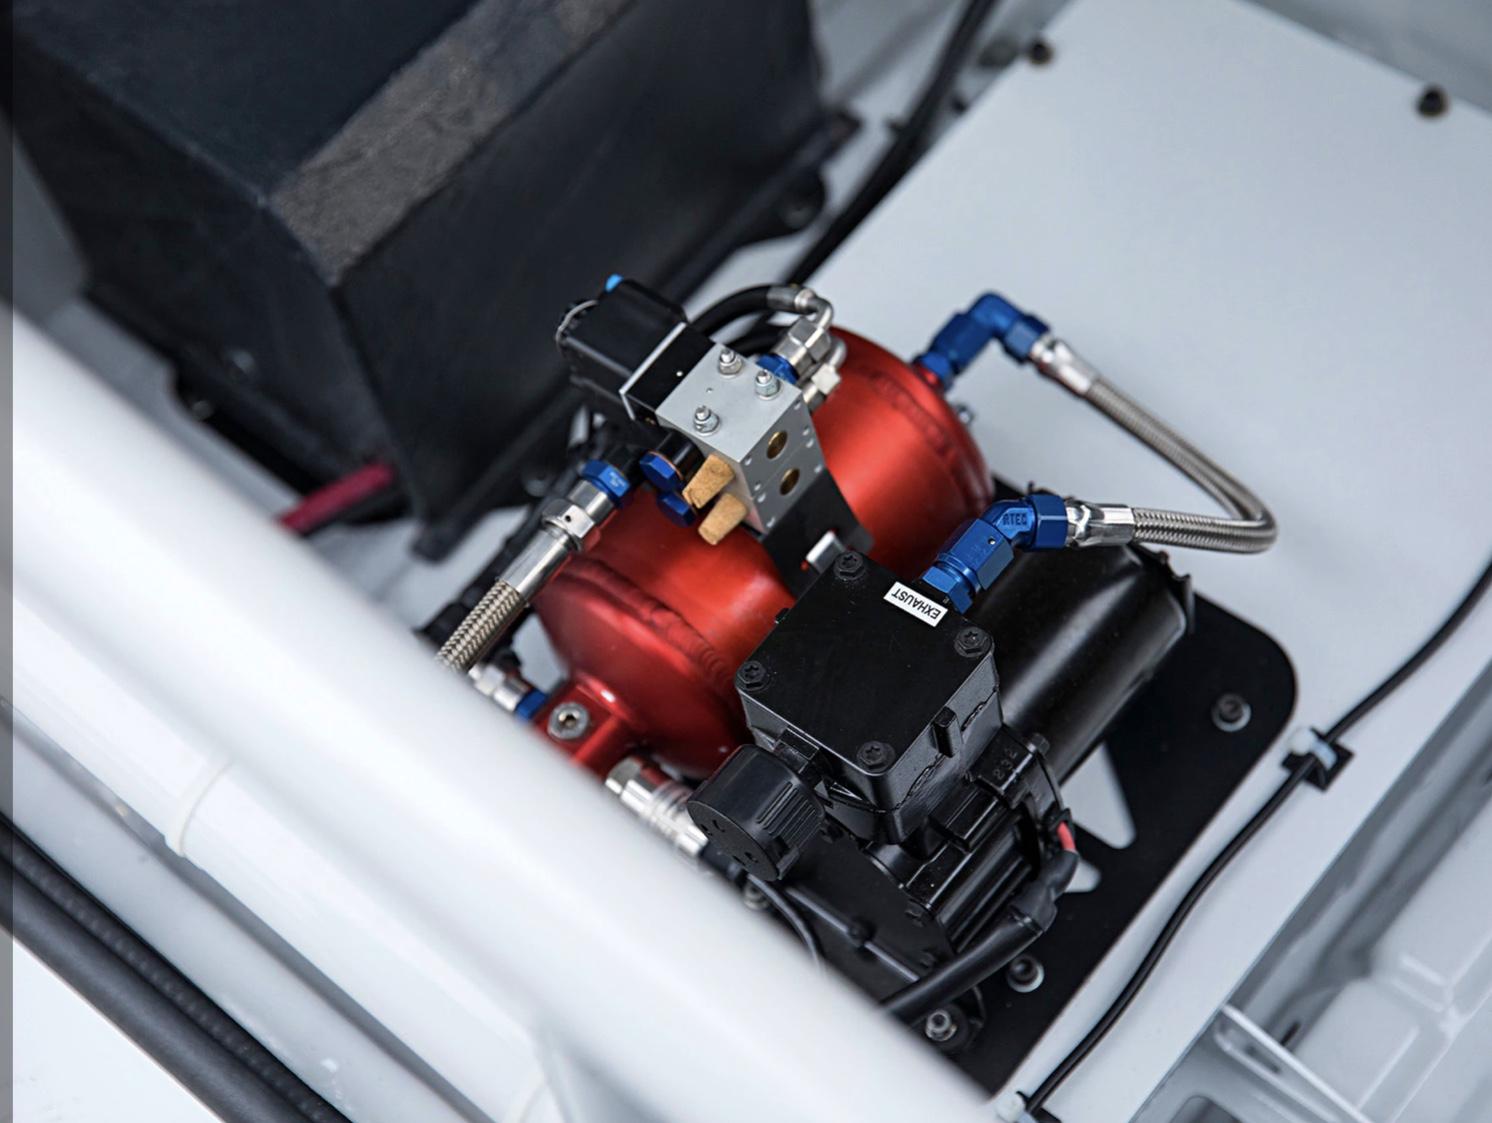
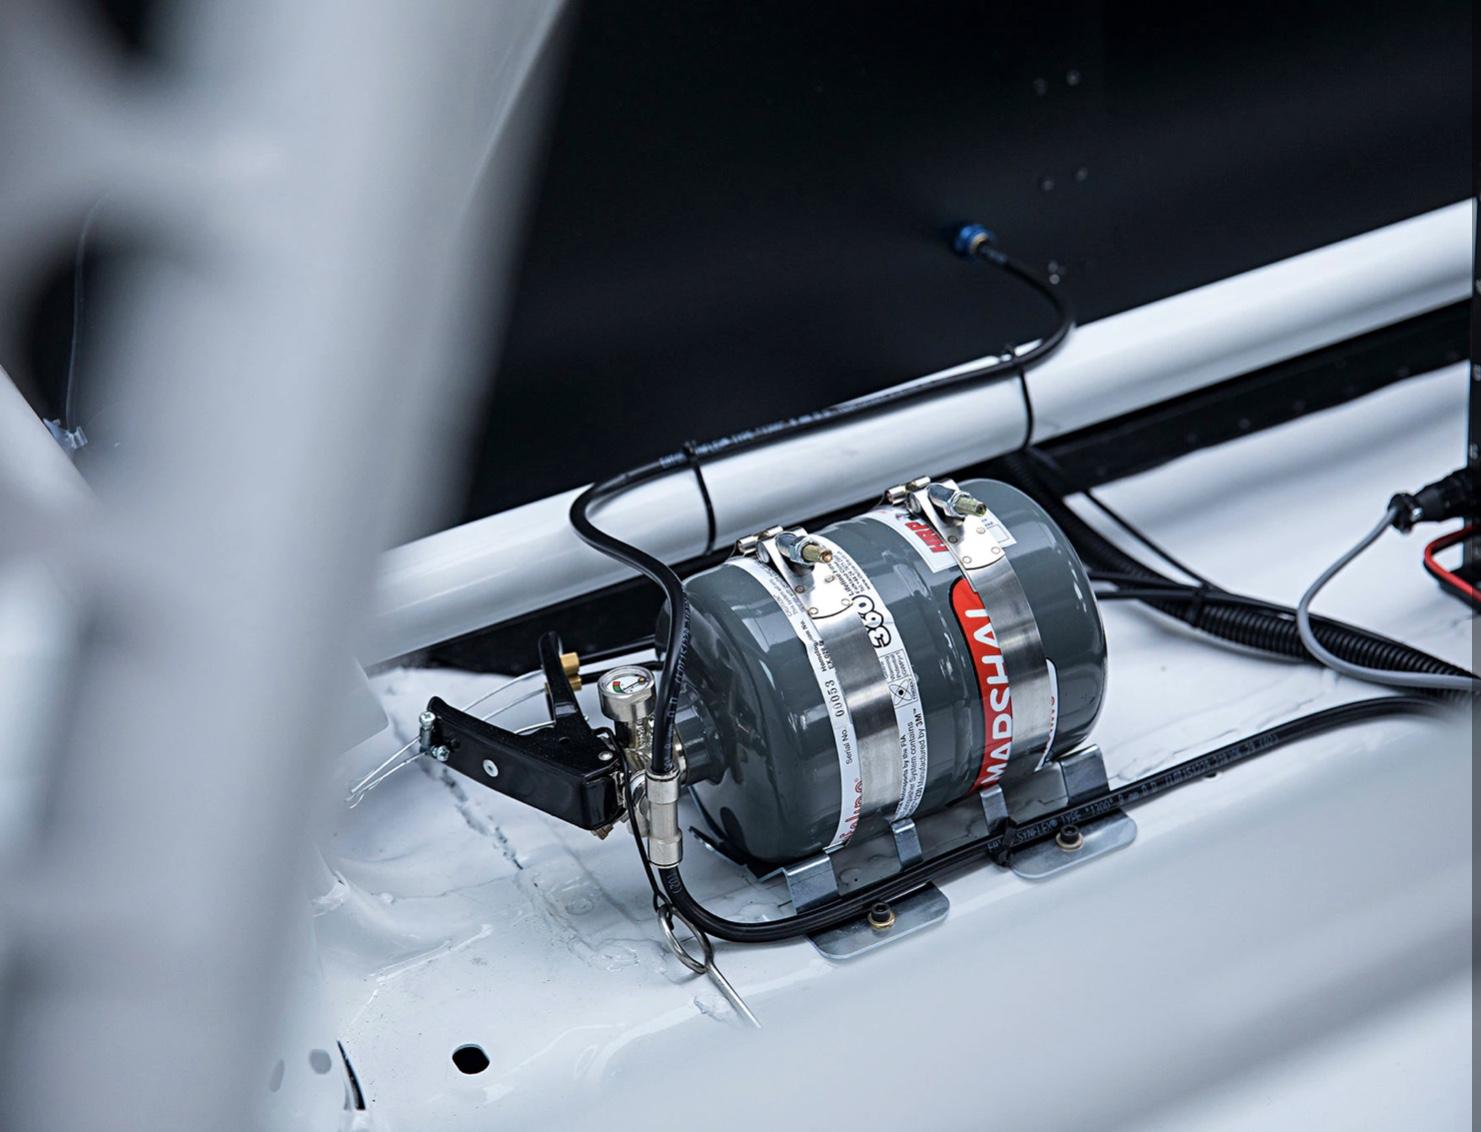
Thanks for the links, the middle one is quite detailed ? The photo below is from the interior and I believe Tamiya includes it, what is it? The next one I’m unsure if it may be in the trunk, again what is it? The last photo appears to be the battery top, which I believe is in the trunk. Thanks again, Misha
-
Pair of 2018 IMSA & PWC Mustang GT4's
Misha replied to JP Models's topic in WIP: Other Racing: Road Racing, Land Speed Racers
Great paint and detail work JP! I’ve been waiting to start my build as I’ve been searching for good details on the wiring of the interior components and their correct identification. The Tamiya instructions fail to call out the parts by name. Have you had better luck with interior references? I’ll be keeping up with your build, Cheers Misha -
That’s a great solution by just cutting out the cushion portion while the rest stays in place, thanx for the hint. I think I even remember now seeing your original post. Jc would you post a link to that thread? Thanz Misha
-
That’s looking great Alex. The detail painting of the interior, plus the chrome, really makes it pop! How did you do the metallic finishes, paint or BMF? The blue-on-blue combo will really look fine on this 409... Cheers Misha
-
For a dual seater!? I agree JC, odd thing with the RSR kit they include an interior with the rear seats molded in, thankfully they include a set of Recaros in addition to a single comp style seat, along with a minimal roll cage missing the door cross braces. A mishmash for sure. Cheers Misha