Rich Chernosky
-
Posts
2,107 -
Joined
-
Last visited
Content Type
Profiles
Forums
Events
Gallery
Everything posted by Rich Chernosky
-
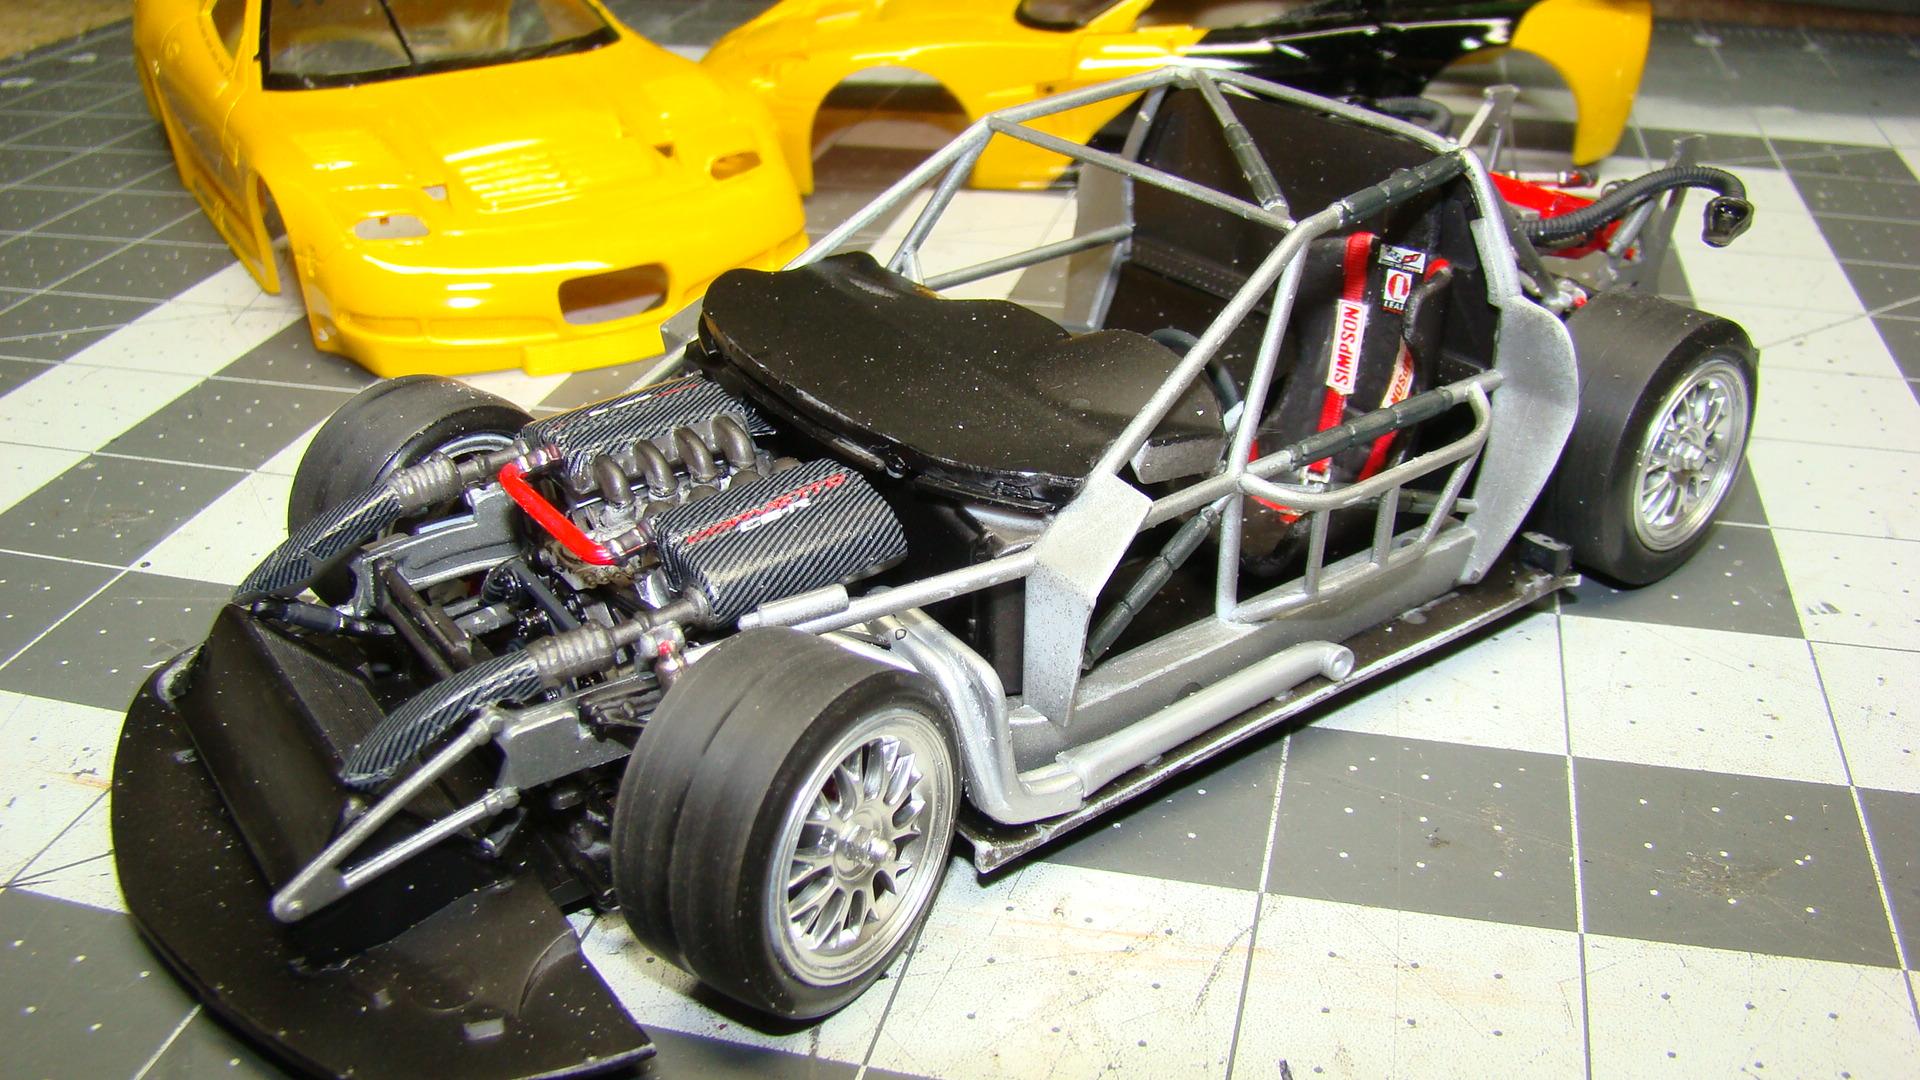
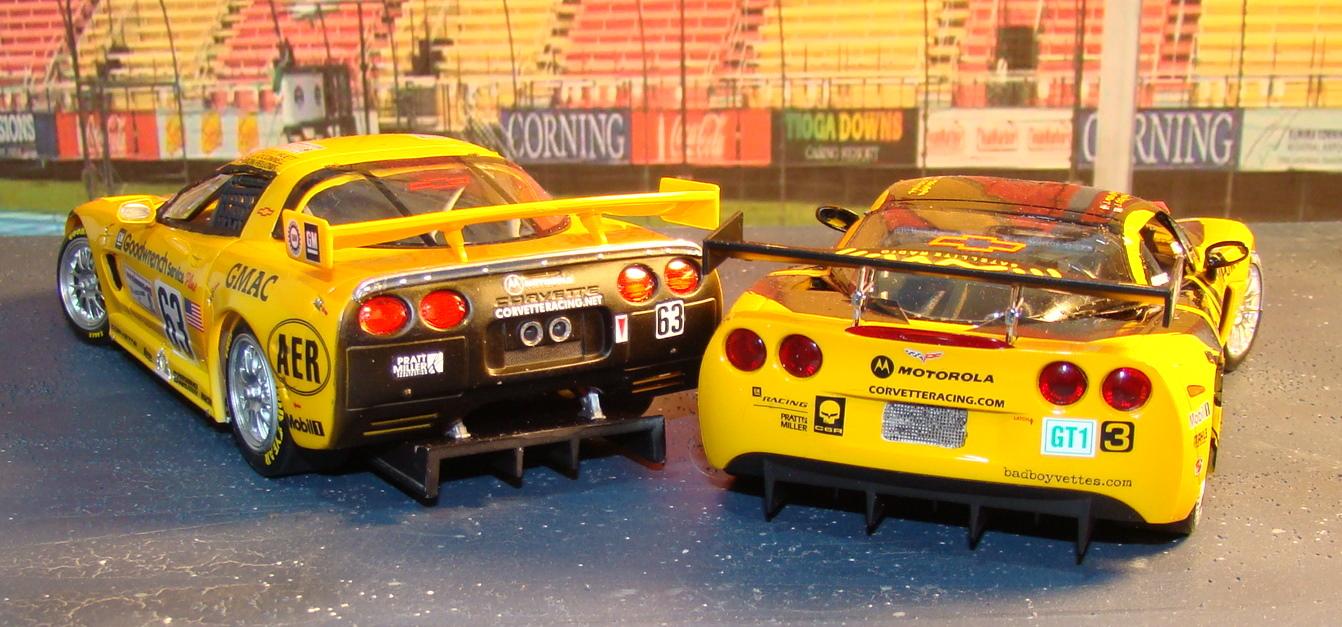
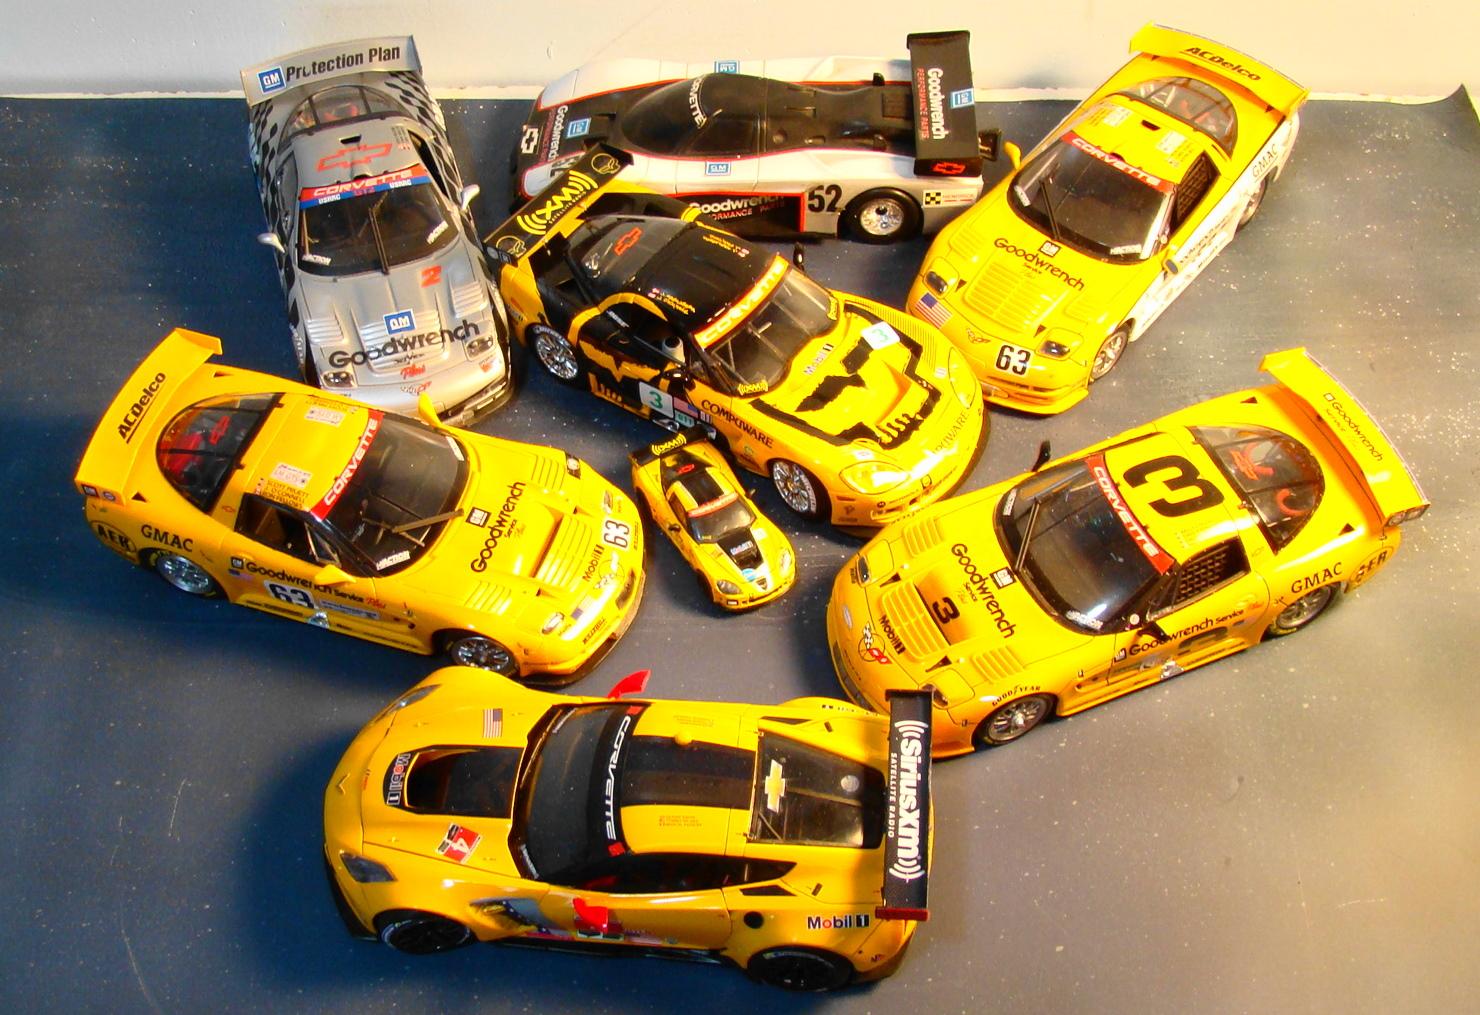
Another two at once build. Both Revell kits that were painted the same base color..Tamiya TS-34 Camel Yellow. This was done to match the rest of my Corvettes that are also pictured here. The subjects of this build are the 2001 LeMans entry C5R and the Bad Boy Corvette that was entered at the last 2007 ALMS Laguna Seca event. Although both kits had a lot of similar painting to be done the similarity ended there. Considering they were both Revell kits they were vastly different. That's because one was a Revell of Germany (C5R) and the other a domestic release (C6R) Much more information in the picture captions. Thanks for looking. . Chassis on the C5R. Very well detailed engine and interior. For some unknown reason the hood was molded shut. Thought about opening it but cutting around the cowl and hood vents seemed daunting. So I made the whole body removable and then there is this picture. Rear veiw ov the C5R chassis and even more detail. Most of this is visible through the rear window. Chassis on the C6R. Very basice engine that is mostly covered by the intake. Hood is removable on this model ...but why. I thought the interior of the C6R was pretty decent so I took this shot. Body is removable on this build too. Both builds complete. Made the wheels steer on both and lowered the front stance slightly. Bad Boy Vette decals were from Scale Motorsports and they went on very nicely. Rear end of both cars showsdifferent approach to the diffuser and other details. The C6R had one of its radiators in the rear. Note the two pins at the bottom of the body. There are two on the other side and they insert into the chassis bottom to hold the body in place. This was necessary as the body did not fully drop onto the chassis. A common problem as gluing was never going to hold. Also note the black ribbon decal on the left front fender. This was done to honor Dale Earnhardt Sr who drove this car at the Daytona 24 Hours and tragically lost his life at the Daytona 500 Nascar race. Those hood vents were a lot of fun to open. Special Bad Boyvette graphics. The yellow in the decals did not match the Tamiya TS-34. I mixed Tamiya clear yellow and orange and thinned it slightly. Two thin coats and they came up on color. I did not plan this from the beginning but luckily solved the problem...whew!1 The wholle tribe of endurance racing Corvettes. All of these are Revell kits with the exception of the GTP Corvette in the back. Believe it or not this is a toy I found at a flea market and is a fair representation of the model.. I have the very rare Quik Skins resin kit of this car in the works. The 1/64 diecast of the C6R is a Green Light release and is pretty darn accurate.

- 18 replies
-
- 12
-

-
- 1/24 revell
- lemans
- (and 1 more)
-
BMW M3 E30 fujimi
Rich Chernosky replied to DON2000's topic in Other Racing: Road Racing, Salt Flat Racers
Beautiful Beemer -
Nice job Bruce
-
NuNu BMW M6 GT3
Rich Chernosky replied to Peter Lombardo's topic in Other Racing: Road Racing, Salt Flat Racers
Peter...these are already pretty cool kits ...but you have gone way beyond that. Very nice job. -
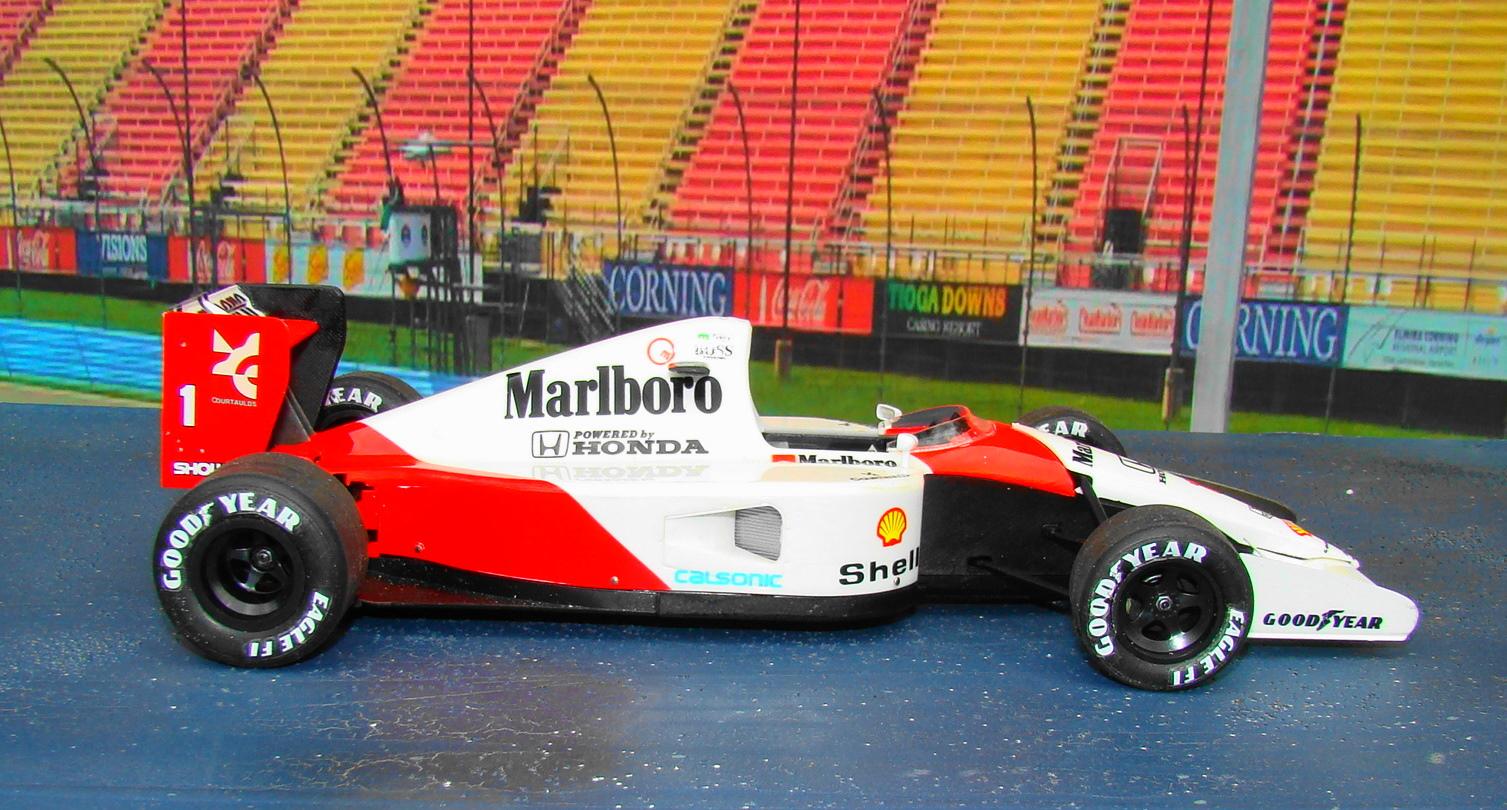
1991 Mclaren MP4/6
Rich Chernosky replied to Rich Chernosky's topic in Other Racing: Road Racing, Salt Flat Racers
-
1991 Mclaren MP4/6
Rich Chernosky replied to Rich Chernosky's topic in Other Racing: Road Racing, Salt Flat Racers
-
Really nice work Noel. Very creative too. A worthy model and great addition to any Bugatti fan. Well done. Gerald Wingrove was the ultimate modeler. I had a friend who met him and saw some of his work in person. He said he was "frighteningly talented"
-
Mario..I have this kit built and you are right ..it was a joy to build. And you have done is wonderful job on it as well as all the other models there.
-
I rarely if ever prime under Tamiya. And I use a LOT of it. Tamiya is made for plastic. Try stripping Tamiya off plastic after it has cured (about 10 days) if you are worried about adhesion. On another note you will get a higher shine with less coats if you paint Tamiya over a smooth shiny surface. Prep work for me includes sanding down mold lines then shining the plastic back up, then a good scrub with a soft toothbrush and scouring powder to remove mold release and oils. Most of my work is airbrushed so I don't have very heavy coats.
-
1991 Mclaren MP4/6
Rich Chernosky replied to Rich Chernosky's topic in Other Racing: Road Racing, Salt Flat Racers
-
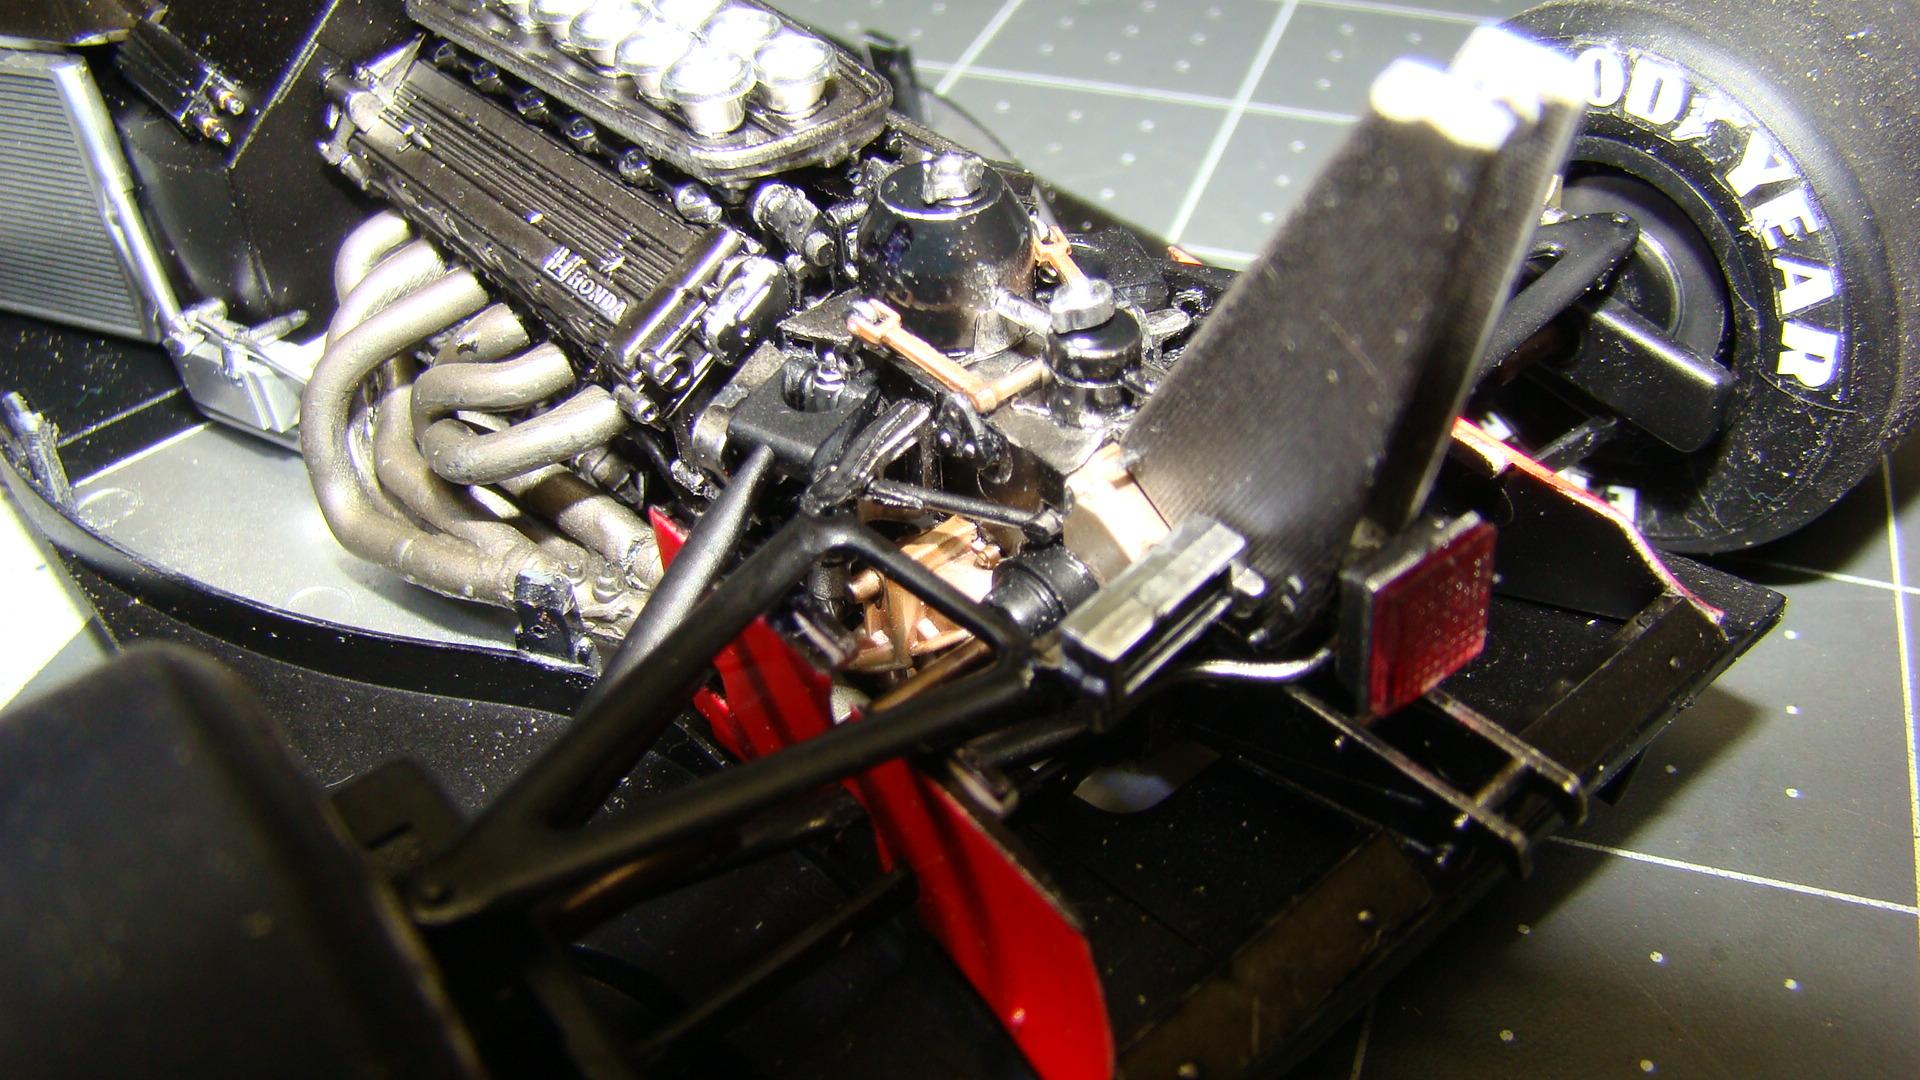
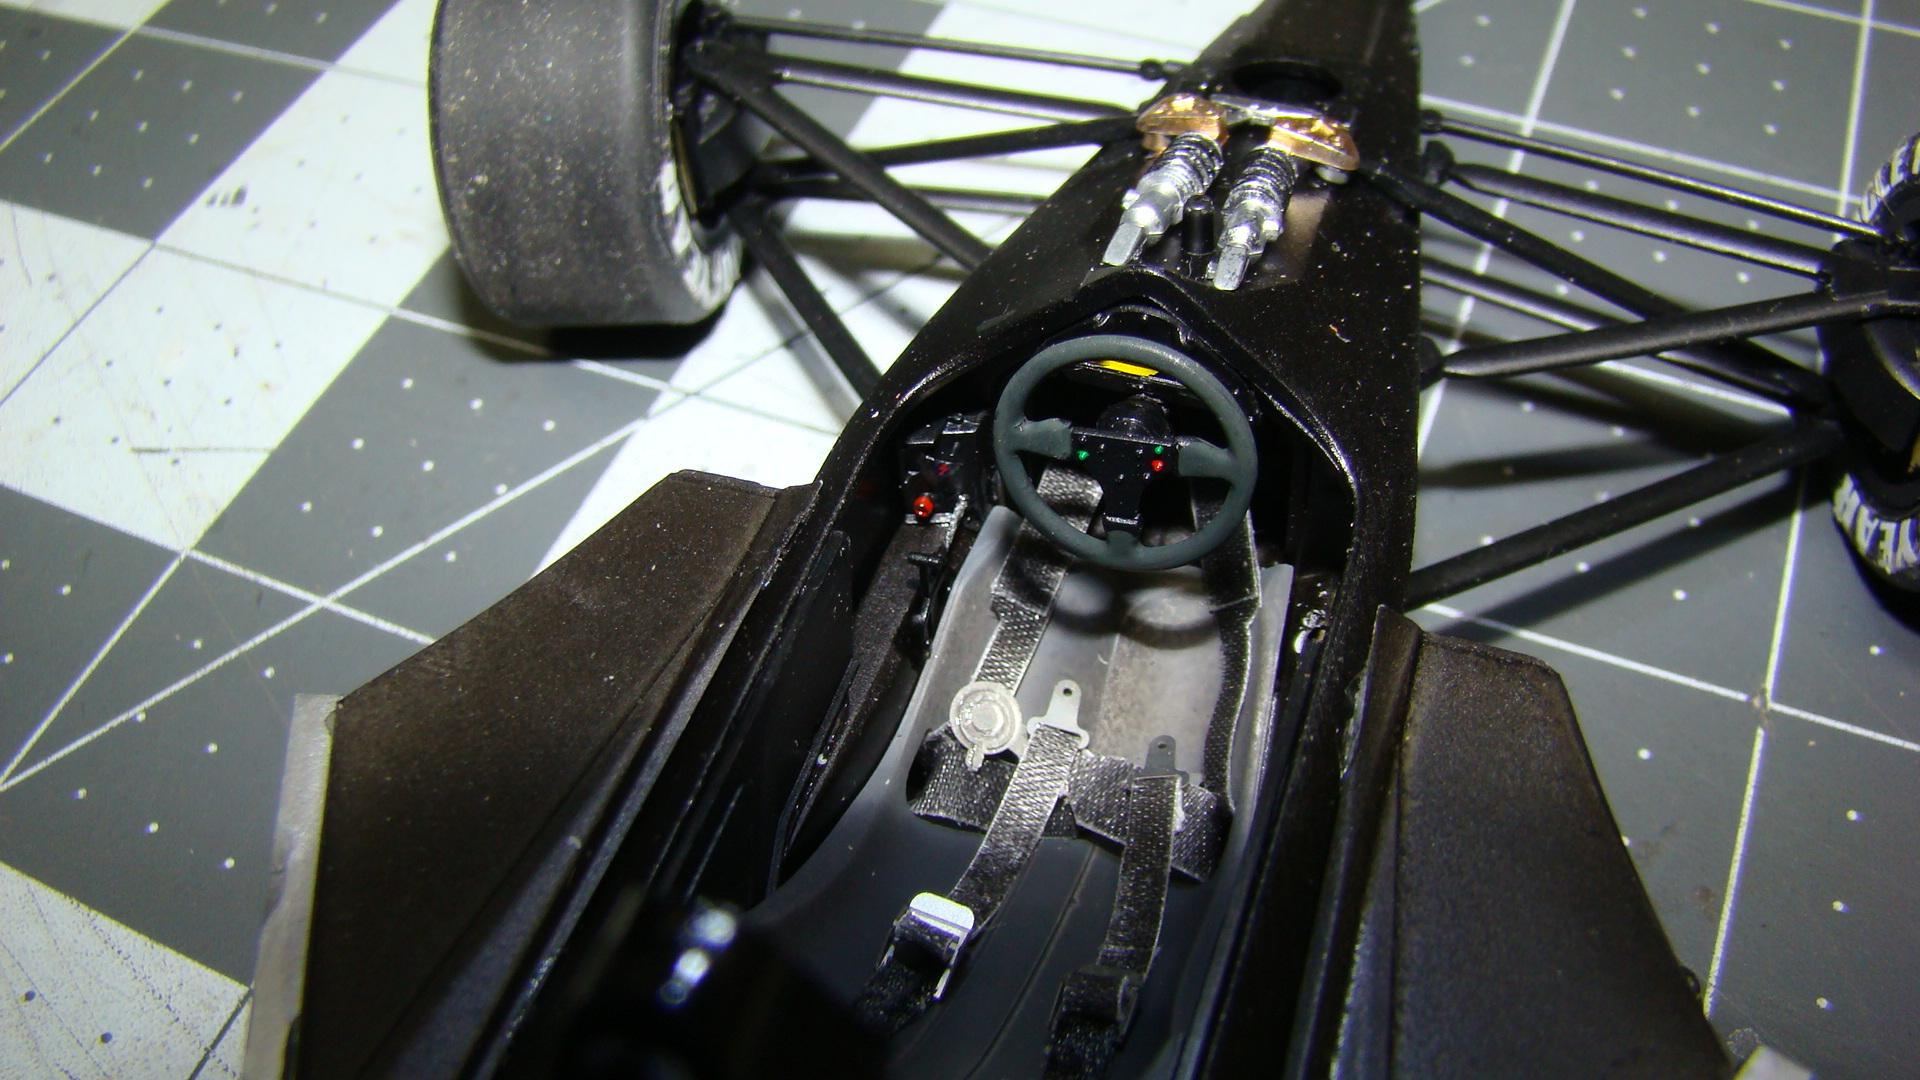
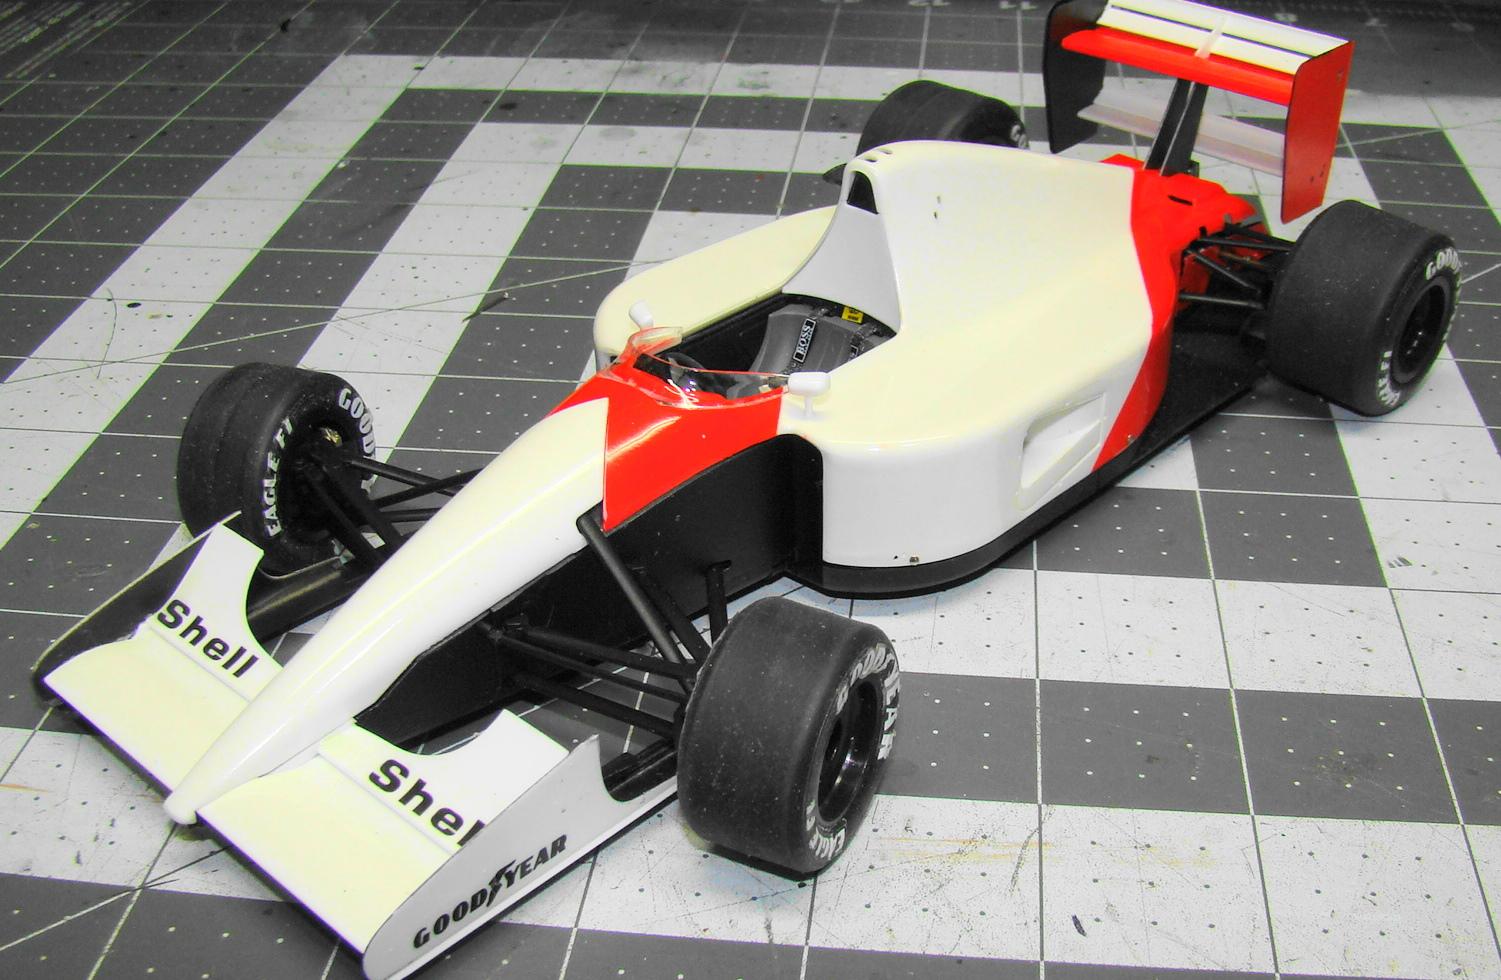
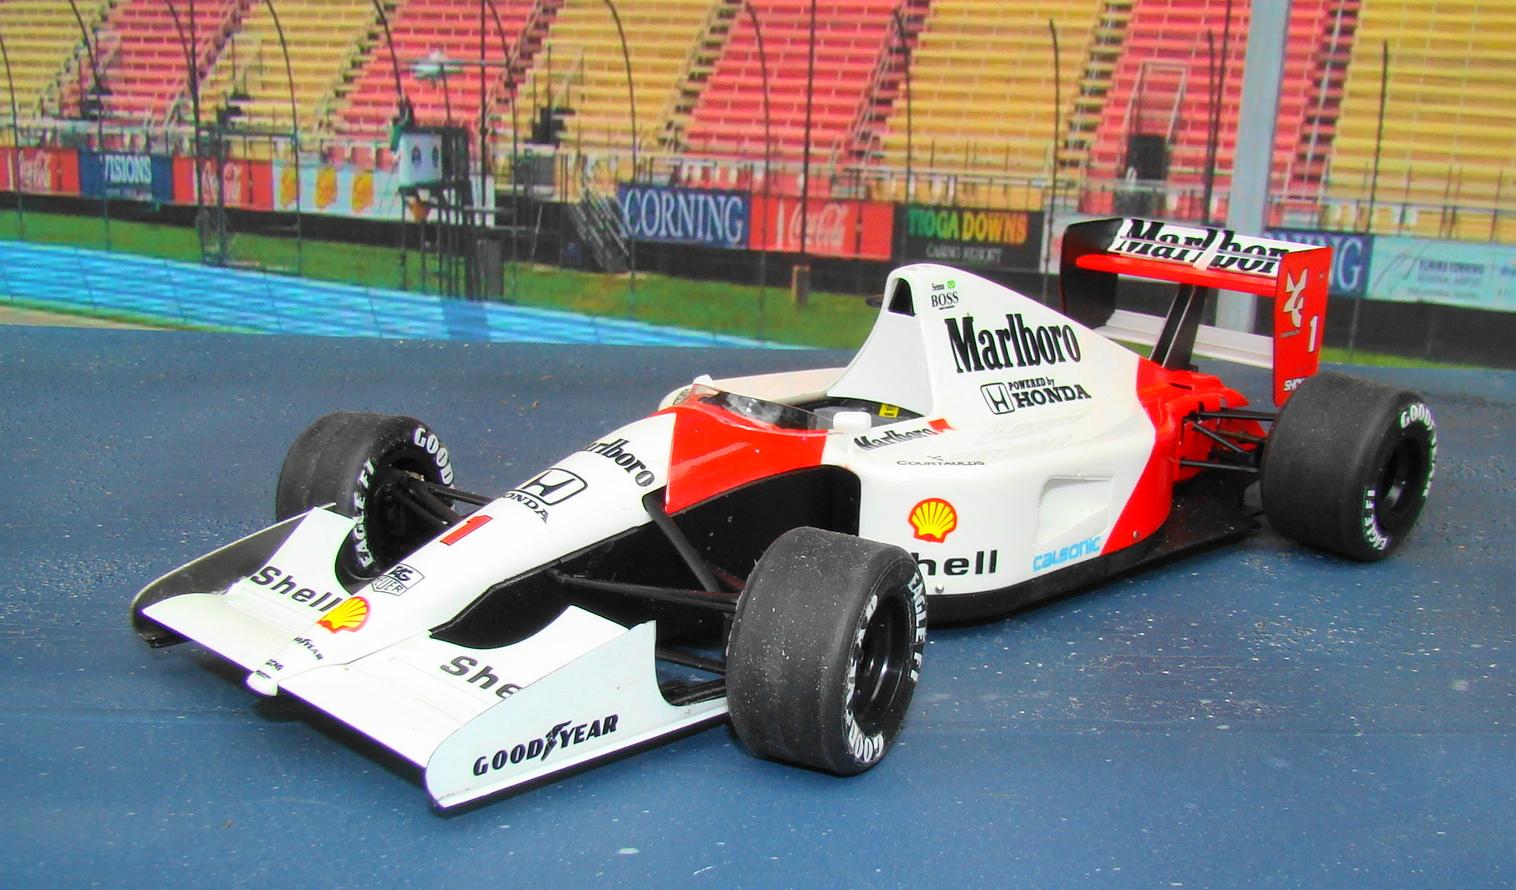
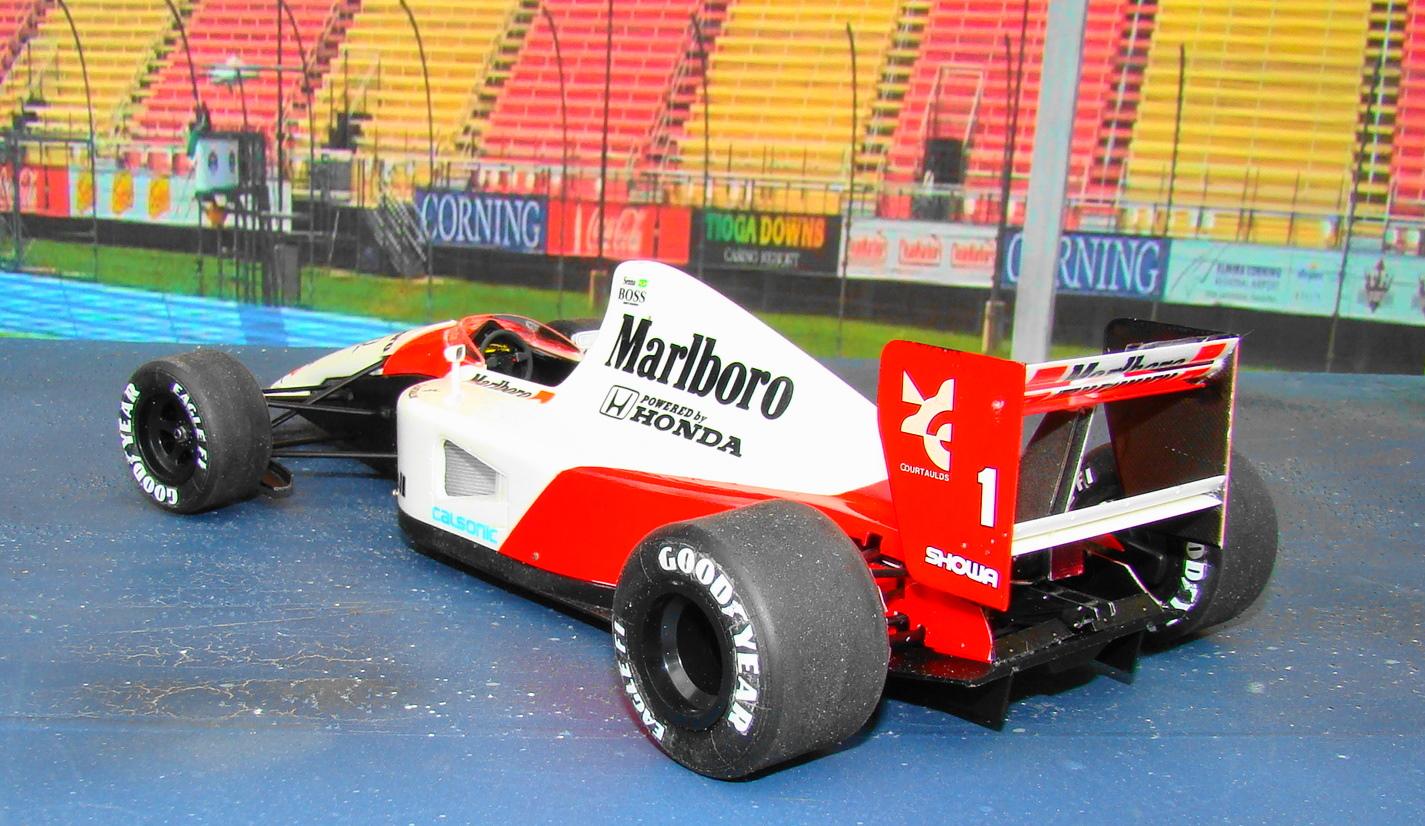
This is Fujimi's 1/20 Mclaren MP4/7 that powered Ayrton Senna to his third World Championship. Car was powered by Honda's V-12 and was the last car to win a wolrd title with this engine configuration and a manual transmission. Model is painted in Tamiya YS-26 white and Tamiya TS-36 Flourescent red over TS14 orange. I have done several Fujimi 1/20 F-1's and enjoyed them all. This one was the fussiest one by far and much careful work had to be done to get it right. Glad this is over but am still very happy with the results. More comments below the pictures. There was so muchdetail and many tiny parts that made this engine assembly very fussy. The exhaust was particularly troublesome and ahd to be re-engineered. I was so stressed that I decided there was enough detail there for now and didn't add any lines or other detail. Body is completly removable and that can be done at a later date. For now I just wanted to be done. Interior was faily well detail and the seatbelts came with the kit, Thought I would take a picture of the car without most of its decals to show off the very clean lines of the car. Notice the three chrome buttons along the bottom of the body. These represent the Dzus buttons that attach the body to the chassis. In reality they are pins inserted into posts glued to the chassis bottom (visible is the first engine pic) and they serve the same purpose. This is typical of F-1 kits with flat bottom chassis as they are just a little warped and tend to spring apart. This solution got a better fit without having to glue which is iffy at best. Finished car on its wheels. The suspension was very fussy but it all fit right in the end. Got lucky and all four tires touch without any adjustments. Rear veiw. Rear wing was a real bear to glue together. Top mounting had to be re-'engineered and the wing struts had to be pinned to the transmission. Glue points were very small and vague and were never going to hold. Body fit surprisingly well in the back. The only real addition to this kit were the after market tobacco decals...which were exceptional.
-
Harry, that's a great little kit and you did a bang up job on it. Really like all the little details and the interior is cool.
-
Maserati A6GCS Chassis #2076
Rich Chernosky replied to Dave B's topic in Other Racing: Road Racing, Salt Flat Racers
Beautiful build Dave. A lot of creativity and hard work are obvious here. Sad to see it written off but you have preserved it in scale so it is not lost. The history of the car just adds to this build...thanks. -
Alan Mann Racing F3L/P68
Rich Chernosky replied to Dave B's topic in WIP: Other Racing: Road Racing, Land Speed Racers
Dave...now you really have my attention. I posted a 1/32 Airfix build of this car a couple of years back. I think one of the major resin companies made a 1/24 version of this car but the price is probably way out of sight by now. Of course, any self respecting Ford GT modeler (they know who they are.....<G>) has to have one of these in 1/24 in their collection. 3d modeling is the answer so I will be following closely to your efforts. Thanks for putting this up and look forward to your results. -
Keith...that kit is not an early Tamiya...it was their very first 1/12 kit. It was issued around 1968 and was state of the art then with many working features not found anywhere else. By todays standards it is not so much. Still, it is an impressive kit and can be made into a great model but many areas will have to be re-engineered. Of particular note is the exhaust. That was the way it was engineered at the time. I bought this kit from my good friend Oscar at Auto World just as it was released. He sold over 1500 of these and received an award from Tamiya for his efforts. It was my introduction into the world of 1/12 . Some 70 kits later I have not looked back. I have a re-issued kit and plan a re-build of this as my kit is very dated. Do some research on this site and the web. I have seen in the past some very creative and detailed builds of this kit. Its been around a long time and still a favorite of detail builders. Good luck and post your results here.
-
Matt...thanks for the response and the picture. That's a pretty wild interior.
-
Looks real good Matt. The Espirit styling is a timeless classic. The photography is alone a work of art. Would have liked to see how you did the tartan on the seats and door panels. I painted this pattern on Tamiya masking tape then laid in on the seats on a 1/16 version of this car.
-
Jaguar XK120 Race Car
Rich Chernosky replied to Pierre Rivard's topic in WIP: Other Racing: Road Racing, Land Speed Racers
Pierre...you have taken on a real challenge. Metal kits are something else. But you are off to a good start and have gotten lots of good feedback. I am quite sure you will persevere. -
Couldn't agree with you more concerning the quality of this kit. (I built one) It is definetly one of Tamiya's finer efforts. Yours turned out fantastic. That color suits it so well.
-
decanting spray paint
Rich Chernosky replied to Paul Payne's topic in Model Building Questions and Answers
Paul....I decant a lot of spray cans and there is a trick to it. I also collect a lot of the "empties" from fellow modelers because there can be as much as 1/3 of an ounce left that won't spray out because the tube doesn't go all the way to the bottom of the can. Most of my friends don't airbrush so I have a huge supply. Here is the trick. Lay the can on its side, don't shake it as this only increases the pressure. Fold a paper towel over several times then take a sharp awl and go right through the towel into the can slightly. If there is any residual pressure you can slowly release it while squeezing the paper towel around the awl. This prevents you from getting sprayed. Most empty cans have little or no pressure. Once done take the awl and poke it through at the bottom at an angle and then backward to split the metal. Be careful pouring as it is just like soda and will bubble up over your container. Stirring it will do the same thing. Adding thinner will help release some of the propellant but it is still best left for it to sit awhile and fizz out. Don't cover your container either or you might find the top stuck to the ceiling. You will have to thin it anyway to airbrush it by the way. I have done half full or less cans but the more paint in the can the more pressure and the more careful you have to be. If your can has a lot of paint in it I would definetly go outside.