Rich Chernosky
-
Posts
2,104 -
Joined
-
Last visited
Content Type
Profiles
Forums
Events
Gallery
Everything posted by Rich Chernosky
-
Microscale Liquitape...waterbase contact cement. Dries clear and is very sticky even when dry. Apply a small dot or line where you want your emblem. Let dry. Use a small stick or similar with some poster tack around the end. Use this to pick the emblem up and attach. The Liquitape is stickier than the poster tack so it will release in place. You can apply even the very tiniest details ( like nuts, fasteners, etc.) with this method. A word of caution though, be very careful not to get this anywhere you don't want it. A tiny bit of it on a finger will pull a nice chunk of decal off. Clean all tools and hands immediately. Paint or laquer thinner will remove it when dry.
-
Looks great Dave, a fine tribute.
-
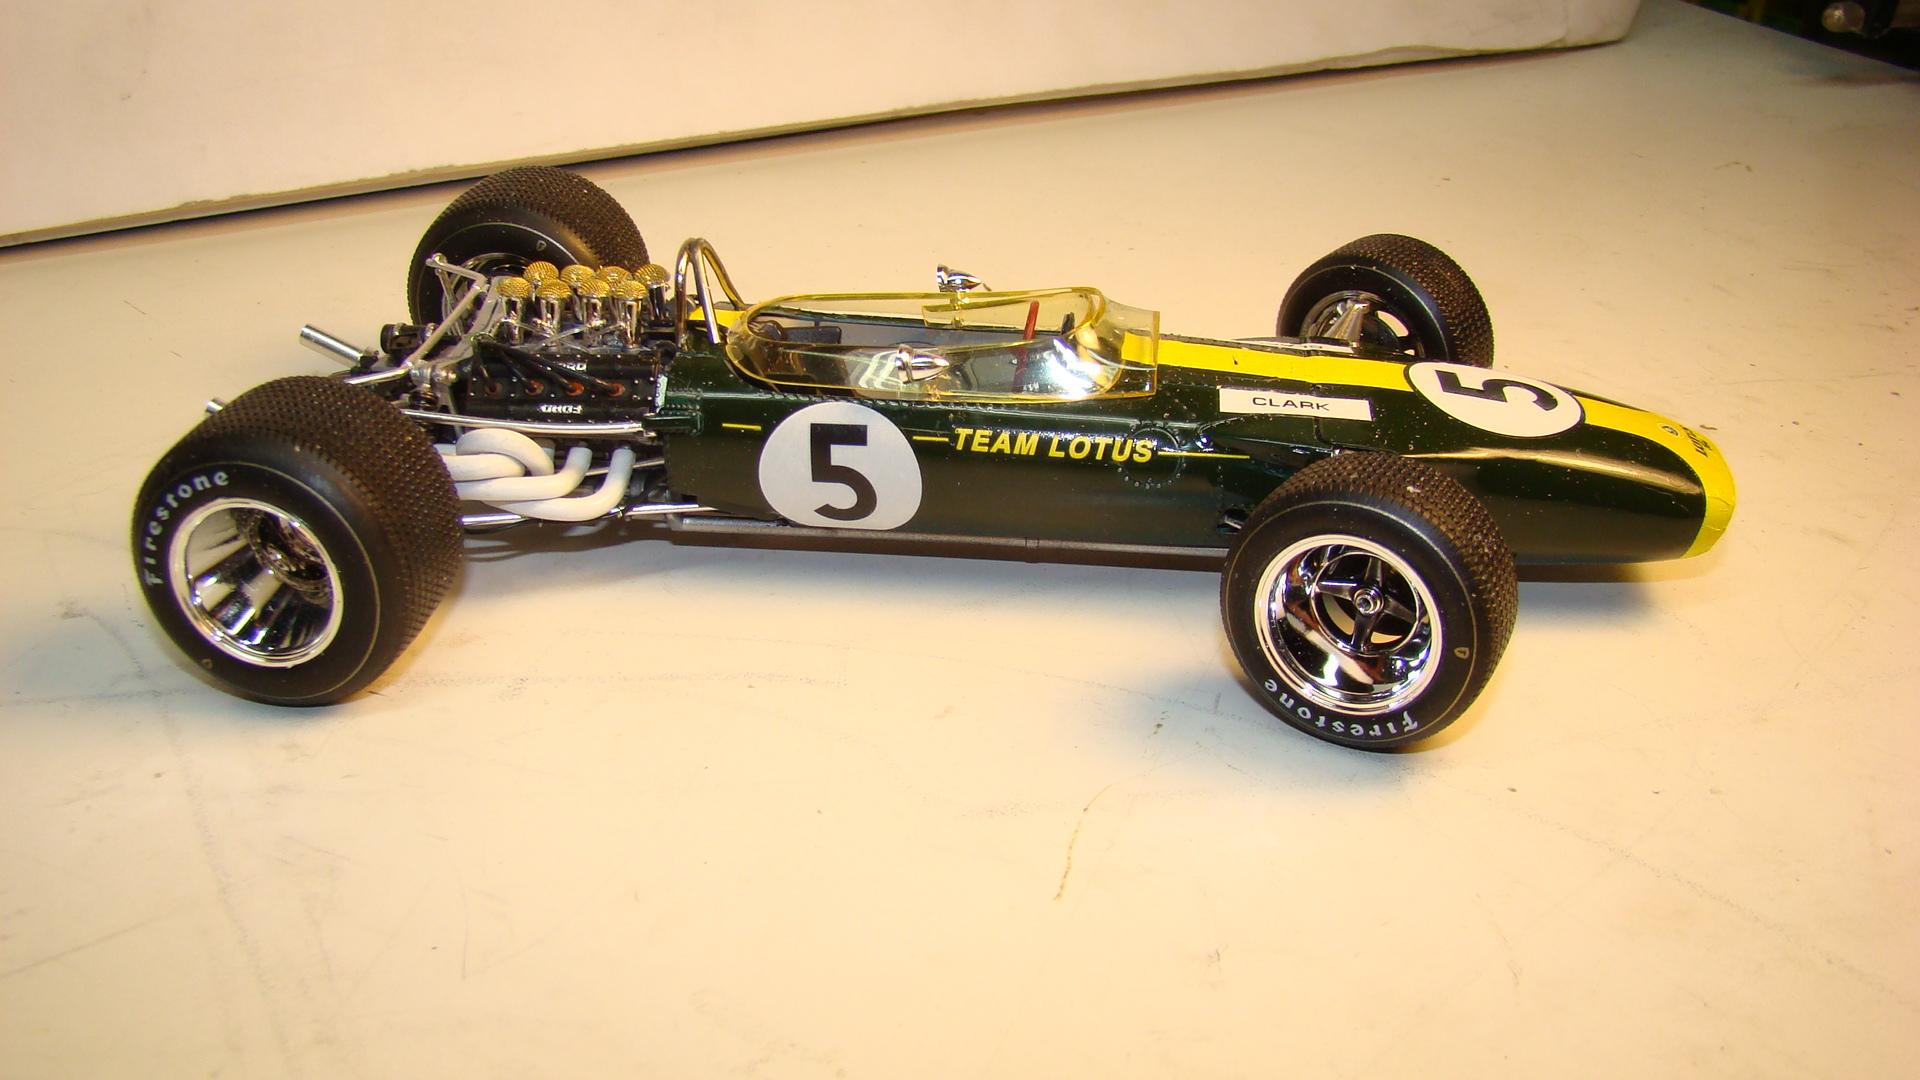
Lotus 49 complete with the Team Lotus script in place. A big thank you to Michael at Indycals for the prompt service in providing these. .

-
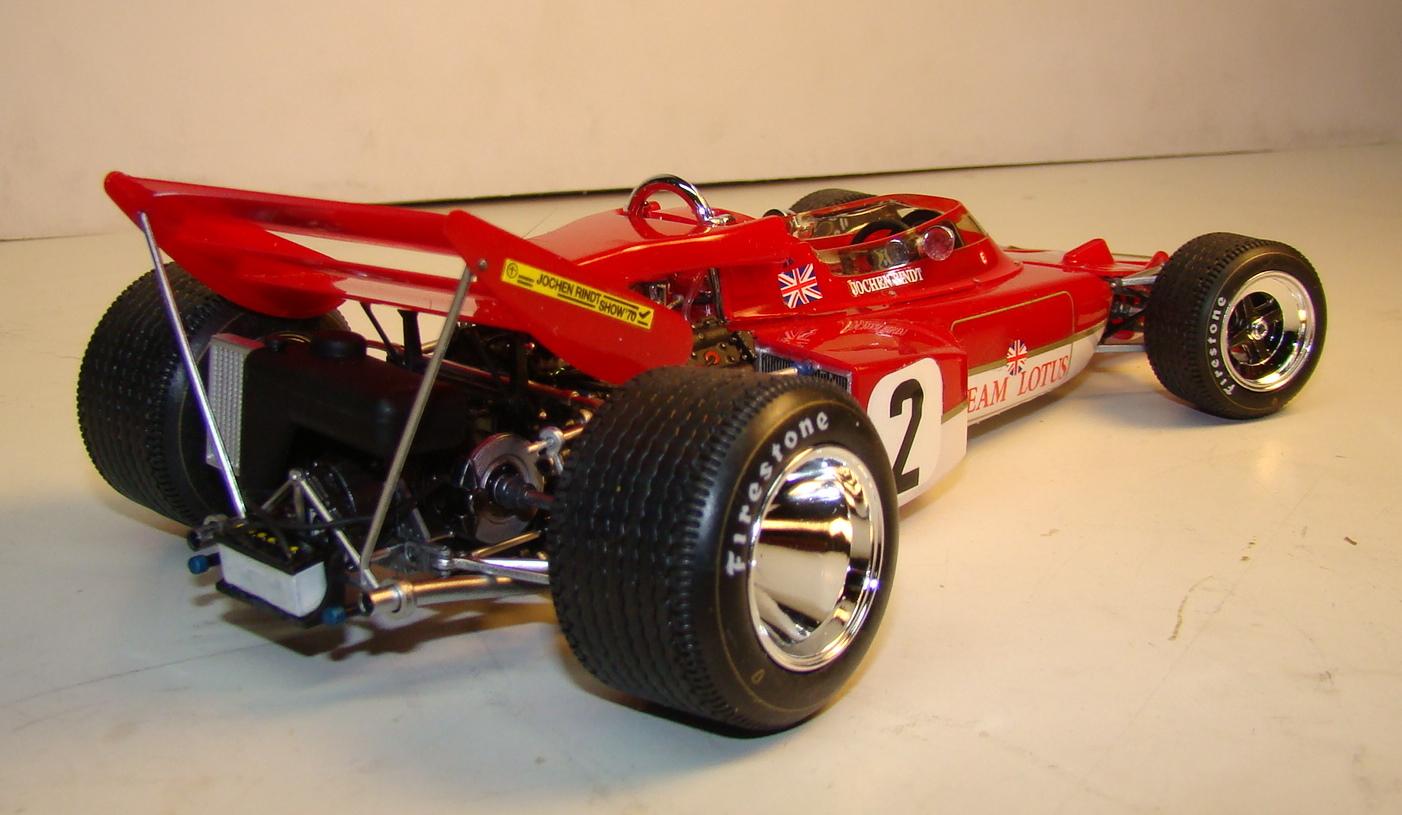
Jochen Rindt Lotus 72C
Rich Chernosky replied to Rich Chernosky's topic in Other Racing: Road Racing, Salt Flat Racers
-
John...thank you for the compliments. Getting all four wheels to touch is a real problem with 1/20 F-1 kits. Several factors contribute to this. The front suspension attachments, Chassis warp, engine to chassis alignment and rear suspension attachments. Get any of these just slightly wrong and you have a 3 wheeler. Often times you are just plain lucky. Both of these builds had this problem but it doesn't show in the photos. I have noticed that the longer they sit on their wheels they start to settle down as glue cures.
-
Tamiya 1/24 Jaguar XJR-9 #21
Rich Chernosky replied to Justin Porter's topic in Other Racing: Road Racing, Salt Flat Racers
Justin...this is one difficult project to decal and paint. (mine still sits in the box 90% complete) but you have mastered it. Great job on this one. -
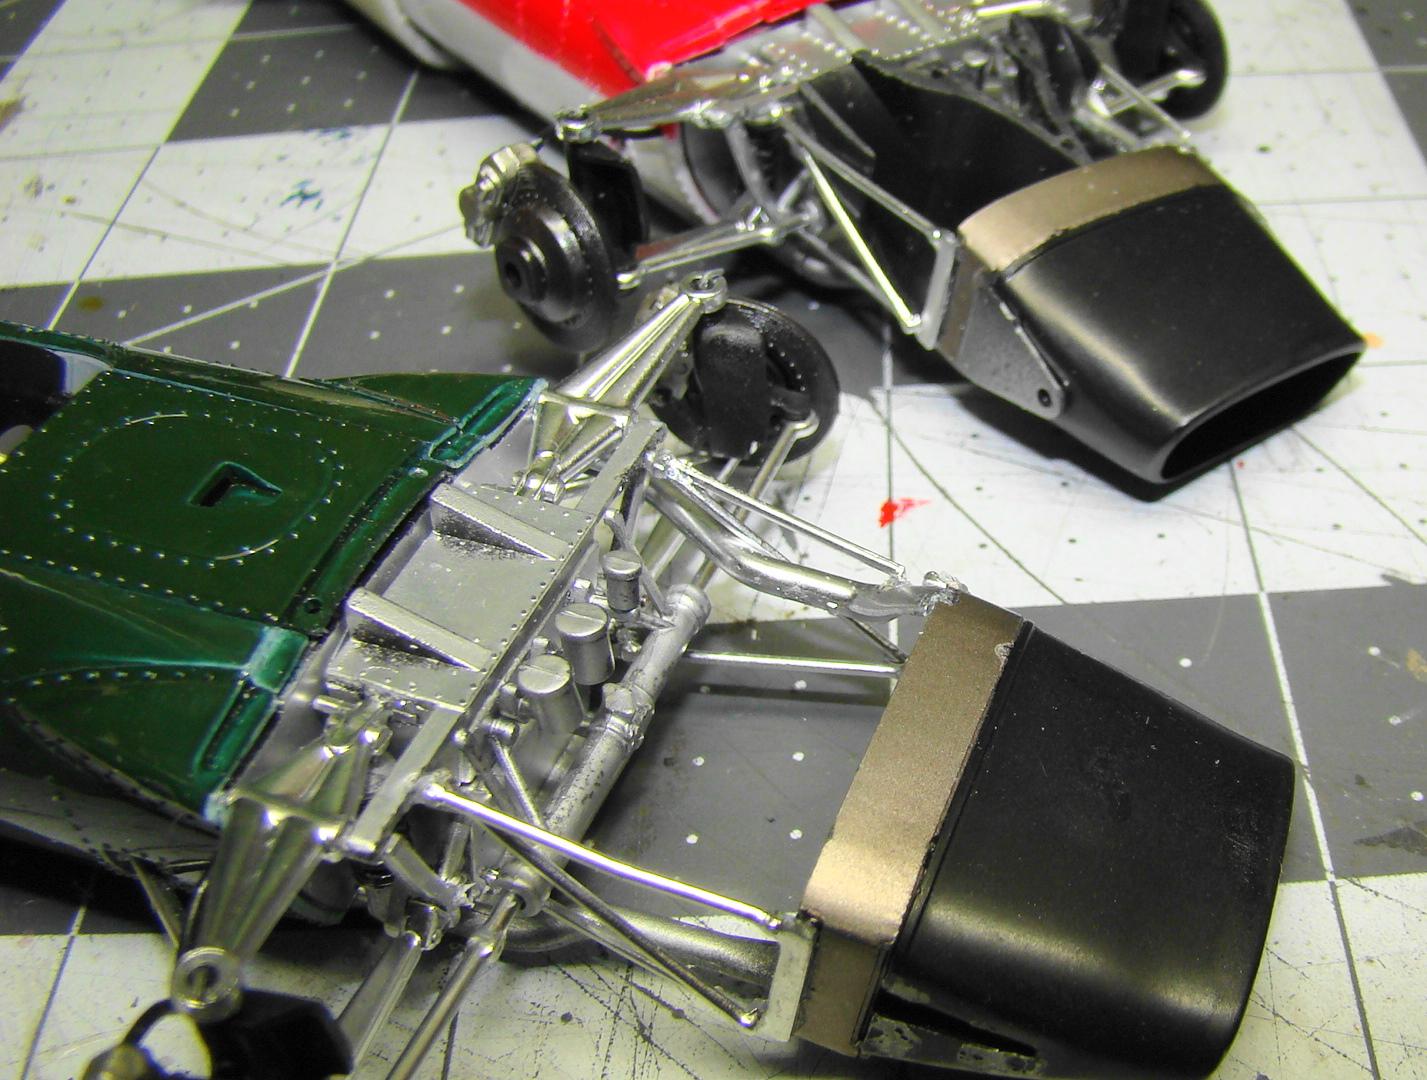
Doing two models at once has its advantages in terms of time saved. In this case I used two Ebbro Lotus 49C kits. Managed to get an extra one at and estate sale for cheap. Originally I was going to do one as a hi wing and the other as a low wing. But I don't have an original; Lotus 49 in 1/20. Ebbro makes one but the aftermarket price was prohibitive. Converting one of these back to 67 specs seemed to be the more reasonable solution.. Indycals had the decal set so I did all the the mods. Well...I can't say all. There were many changes made to the 49 between seasons and i decided to fix the most obvious. New roll bar, filling the nose scoops and remove the wings, new exhaust retainer and ignition tray on the transmission. Both cars recieved many extra lines and hoses. Paint on Clarks car was Tamiya TS9 British green. Hill's 49 got Tamiya TS8 Red, TS26 white and the gold came from a pen marker. When they dry up you can dump them out and spray them. I found it interesting that of all the golds I have this one suited me the best. More details in the picture captions. Thanks for looking. This will be the only time you see the detail under the noses. The fit on the original kit was OK but the modified nose required some exera surgery to fit. Finished Clarks 49. It took a lot of extra work to get that nose right. Another veiw of the original Lotus 49. This was how it ran at Watkins Glen in 1967. I was there and got to watch both Jim Clark and Graham Hill dominate the race and come in 1-2. Clark won. Note the "Team Lotus" yellow script is missing. It was not on my decal sheet but Michael at Indycals assures me they are on thier way. Always good service from him. Will post a new pic when they arrive. Hills car finished. The wing strut supports were not included in the kit but were easy to replicate. Another veiw. Note that Ebbro did not include the "Gold Leaf" tobacco in the Team Lotus section. This will be corrected as well. Note all the differences in the rear of these cars. Lotus moved the oil tank, fire bottle and cooler to the back of the car for better weight distribution. Making that exhaust bracket was challenging. The number 4 and 12 cars are Exoto 1/18 diecast. Makes and interesting collection now. Some of the extra detail on the engine. Those brass screens were formed over the plastic clear yellow thingies that were supposed to represent them. Much better.
-
Great job on a really tough kit.
-
Ferrari 412 T2
Rich Chernosky replied to bbowser's topic in Other Racing: Road Racing, Salt Flat Racers
Nice job Bruce. Luv the dash. -
Ford GT40 1966 Le Mans winner
Rich Chernosky replied to Pierre Rivard's topic in Other Racing: Road Racing, Salt Flat Racers
A beauty from you Pierre...and a winner too. Your skills with a brush are a source of amazement to me. I have built most of the variations of this kit and its one of my favorites. And thank you for the background information...always appreciated. -
Mario...those decals were the hardest part of that kit and you nailed it. Great job...looks good to me.
-
Revell 2015 Chevrolet Corvette C7.R
Rich Chernosky replied to Jim B's topic in Other Racing: Road Racing, Salt Flat Racers
You did well Jim...keep up the good work. -
Mark...looks like a real winner. Nice job in such a small scale.
-
Jochen Rindt Lotus 72C
Rich Chernosky replied to Rich Chernosky's topic in Other Racing: Road Racing, Salt Flat Racers
-
The decals can be a bit tricky. This is actually a Fujimi kit reboxed as a Revell.
-
Running out of Future / Pledge Floor Care?
Rich Chernosky replied to Pierre Rivard's topic in Tips, Tricks, and Tutorials
Pierre...if you can find a product called "Looks Like Glass" it will do the same thing and maybe even better. It was made for restoring plastic windshields and canopies. You can dip it, spray it or brush it. Thins with water. It is a little heavier bodied than Future and cures in 2-3 days. Used it on my last build...the Lotus 72C. -
Jochen Rindt Lotus 72C
Rich Chernosky replied to Rich Chernosky's topic in Other Racing: Road Racing, Salt Flat Racers
-
Mario....that is simply stunning. Everything is absolutley perfect, the car the background and the photography. A masterpiece.
-
Jochen Rindt Lotus 72C
Rich Chernosky replied to Rich Chernosky's topic in Other Racing: Road Racing, Salt Flat Racers
-
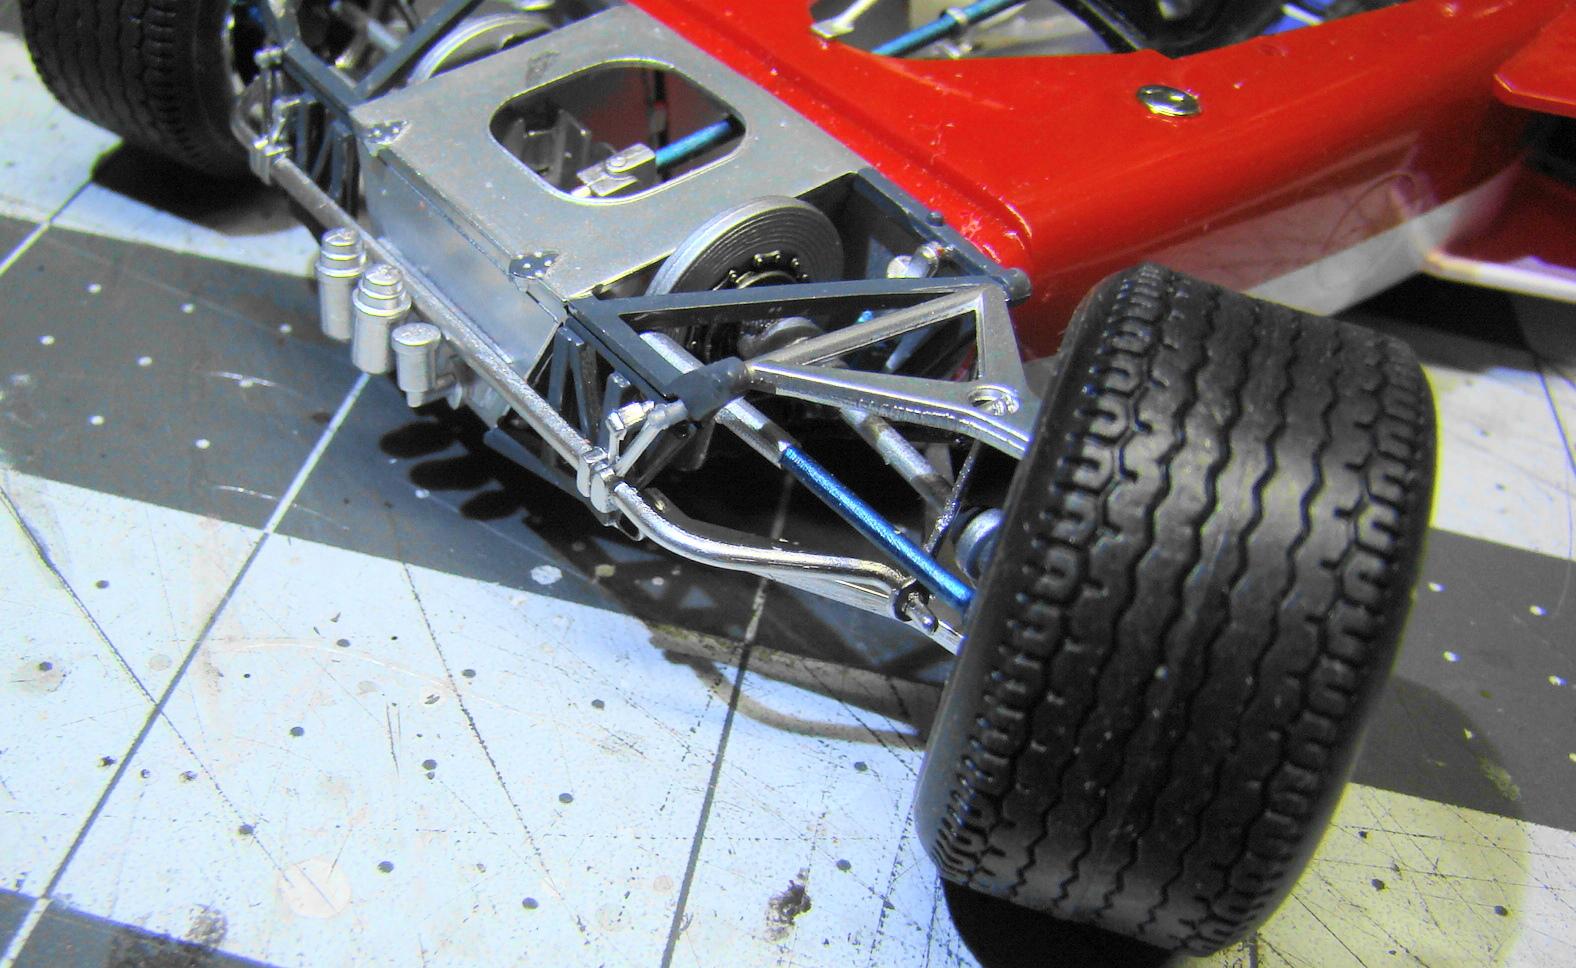
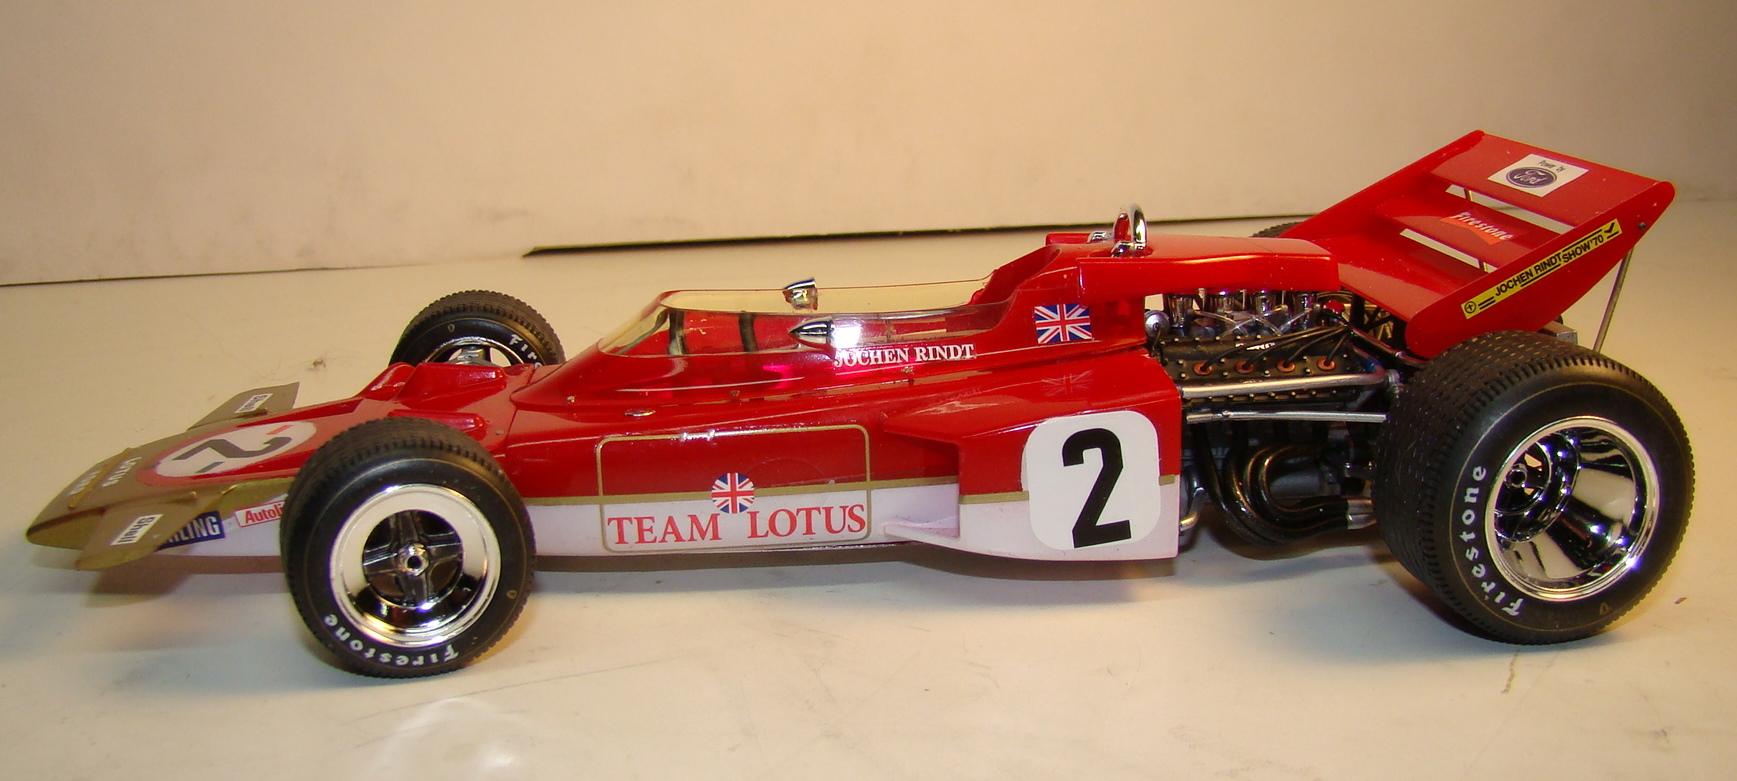
Another 1/20 Ebbro off the bench. This is their first attempt at F-1 and for the most part they didn't disappoint. Built mostly box stock with many added details. Color is Tamiya TS8 red, TS-26 white. The gold is out of one of those gold paint markers. I disassembled two markers and dumped the paint out then airbrushed it on.. Out of all the gold paint I have this is the one that suited me best. Clear coat is something called ":Looks Like Glass" It is a water base clear similar to future but heavier bodied. I did this so the solvents wouldn't eat into the gold and spoil it. More comments under the pictures. Thanks for looking. Front suspension was very delicate but if you take you time and follow the instruction order it goes together and works quite well. Inboard disc brakes and torsion bar suspension were Lotus innovations and a first for an F-1 car. Ebbro replicated these quite well. The engine recieved quite a bit of extra detailing in the form of wires, fuel lines and electrical. I changed the way I did the fuel injector lines. It was easier and looked more to scale. Not my first Ford DFV 1/20 engine. Finished car here. The striking red/white and gold livery is most evident here. This required 4 steps and several days watching paint cure. Kit provided decals for the white and gold but I opted to paint which was also an option on the decal sheet. Business end of the car. Rear suspension was also delicate but it all fit. Lotus mounted the oil tank, oil cooler and battery on the transmission of the 49C and carried it over to the 72. This put more weight on the rear wheels. The mid mounted radiators also did the same for the balance of the car. Once developed this car was the top of the field. Jochen Rindt won four straight races with it. Sise veiw and someone didn't quite get that number on straight. Its fixable but the camera never lies. Ebbro proved decals for these fasteners but I went with some very tiny jewelers screws. This wasn't for looks as these are functional and necessary. The cockpit cowling woujld not stay in its lugs without them. Gluing and clamping didn't make it. My only really peeve about this kit was the fit of the cowling. Either the chassis assembled warped or the cowling was. These were a real pain and I had to use the very smallest screwdriver I had. But they do the job.
-
The Silhouette was the second model car I ever built. I actually still have pieces form my original build (circa 1964) . What a cool idea to make it into a Hot Wheels replica. And well executed I might add. The Silhouette was an iconic custom car of the 60's. It was the very first "from the ground up custom". I t even starred in a movie, one of those teenage beach thingies if I recall.
-
Very nice job on this one Pierre. Always enjoy your WIP's very informative....even for us "old timers" One is never too old to learn something new. This hobby teaches me this every day. A cool collection too.