Rich Chernosky
-
Posts
2,104 -
Joined
-
Last visited
Content Type
Profiles
Forums
Events
Gallery
Everything posted by Rich Chernosky
-
IMC Ford GT40 - Art Print
Rich Chernosky replied to Gramps46's topic in Other Racing: Road Racing, Salt Flat Racers
Gary...now that is cool. I built all of the IMC kits all the way back to 1964. I saved all the box tops and related box art then framed them. I worked as a picture framer for 14yrs. They hang in the stairwell going down to my workshop. All the boxes had similar artwork so it made a cool collection all by itself. Didn't know the box art existed as a print. Wonder if the artwork exists for the other boxes as well...hmmmmmmm -
Absolutely awesome job Pierre. Followed your WIP all that way through. It looks even better completed. I'd put this one in my Ferrari case any day of the week.
-
A knock out Ford GT. Really like this color combo. Great job. Now I'm sorry I painted mine blue.
-
Nice looking "B". That color suits it well and the interior is killer. Very well done Ryan.
-
1975 McLaren Indy car - GSL
Rich Chernosky replied to absmiami's topic in Other Racing: Road Racing, Salt Flat Racers
All I can say is ...WOW...that is truly impressive. Thanks for the update and detail pictures. -
Pierre...you have taken your craftsmanship to another level. This WIP has been most enjoyable. Thank you for the effort.
-
Interesting color choice Mario. Actually think it looks pretty good on this piece. Well done.
-
1975 McLaren Indy car - GSL
Rich Chernosky replied to absmiami's topic in Other Racing: Road Racing, Salt Flat Racers
Andy...as a big F-1 and Indy fan I can really appreciate this one. It appears to be a heavily re-worked AMT kit. (correct me if I am wrong ) And considering it was done in 1983 before a lot of the new advancements in paint and casting, it is even more amazing. Of course we would like to know more sooooo...I will wait patiently. -
Peugeot 207 S2000 Rally
Rich Chernosky replied to Rich Chernosky's topic in Other Racing: Road Racing, Salt Flat Racers
-
Shelby Cobra 1963 Le Mans Coupe
Rich Chernosky replied to Gramps46's topic in Other Racing: Road Racing, Salt Flat Racers
Beatiful model Gary...right down to the last detail. And , as usual, thanks for all the background information. Well done. -
Peugeot 207 S2000 Rally
Rich Chernosky posted a topic in Other Racing: Road Racing, Salt Flat Racers
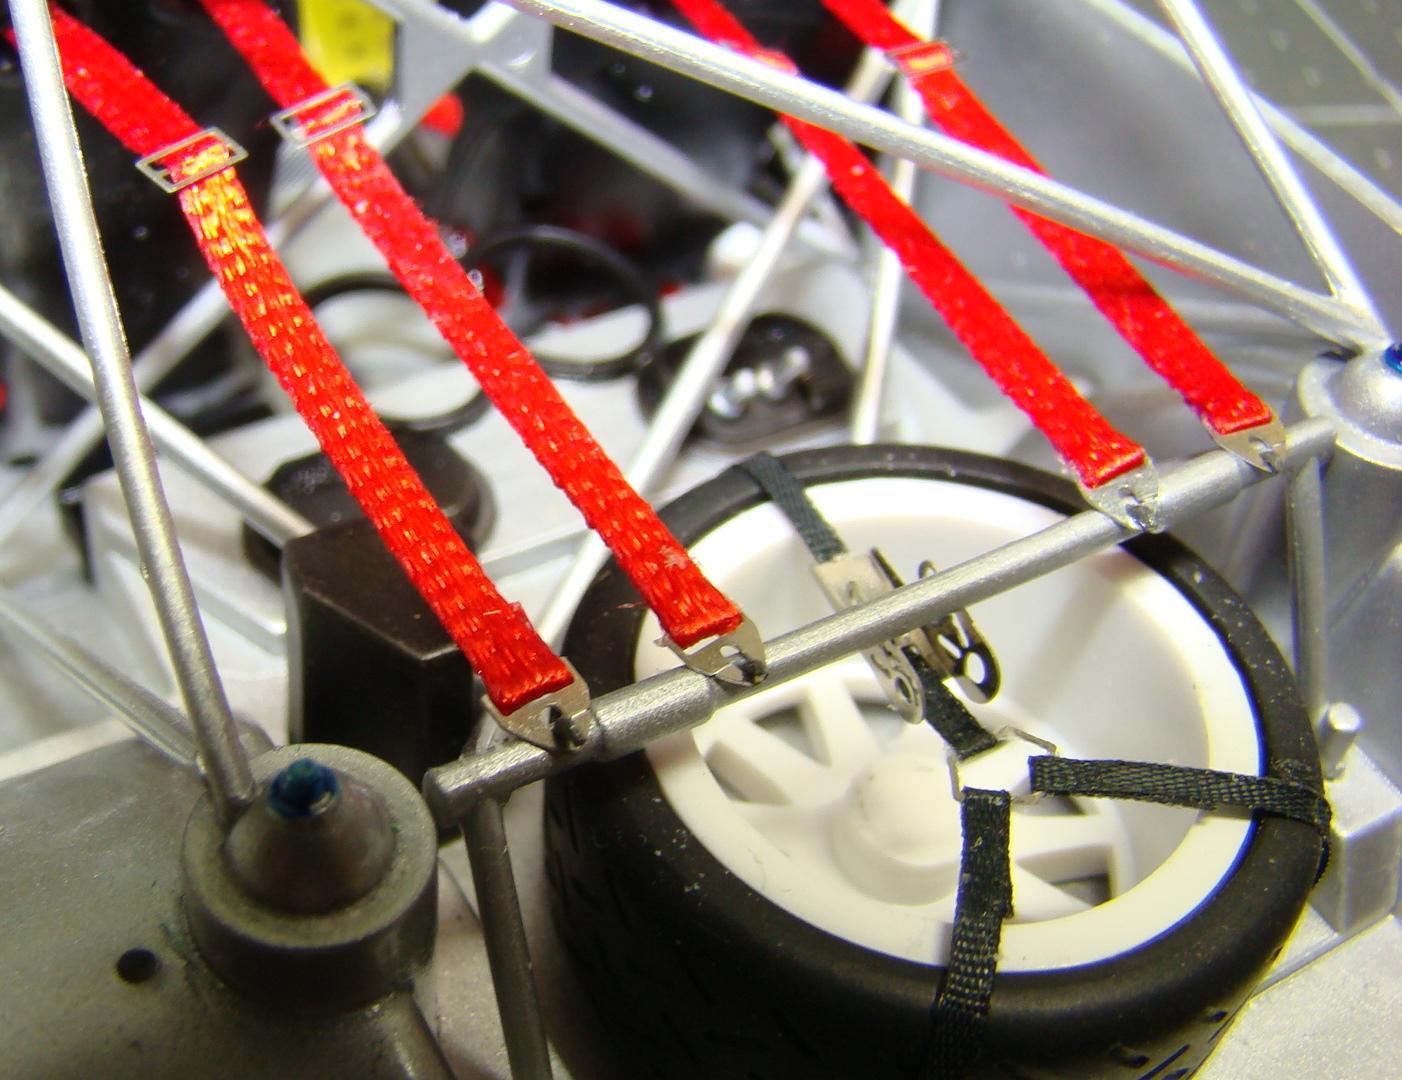
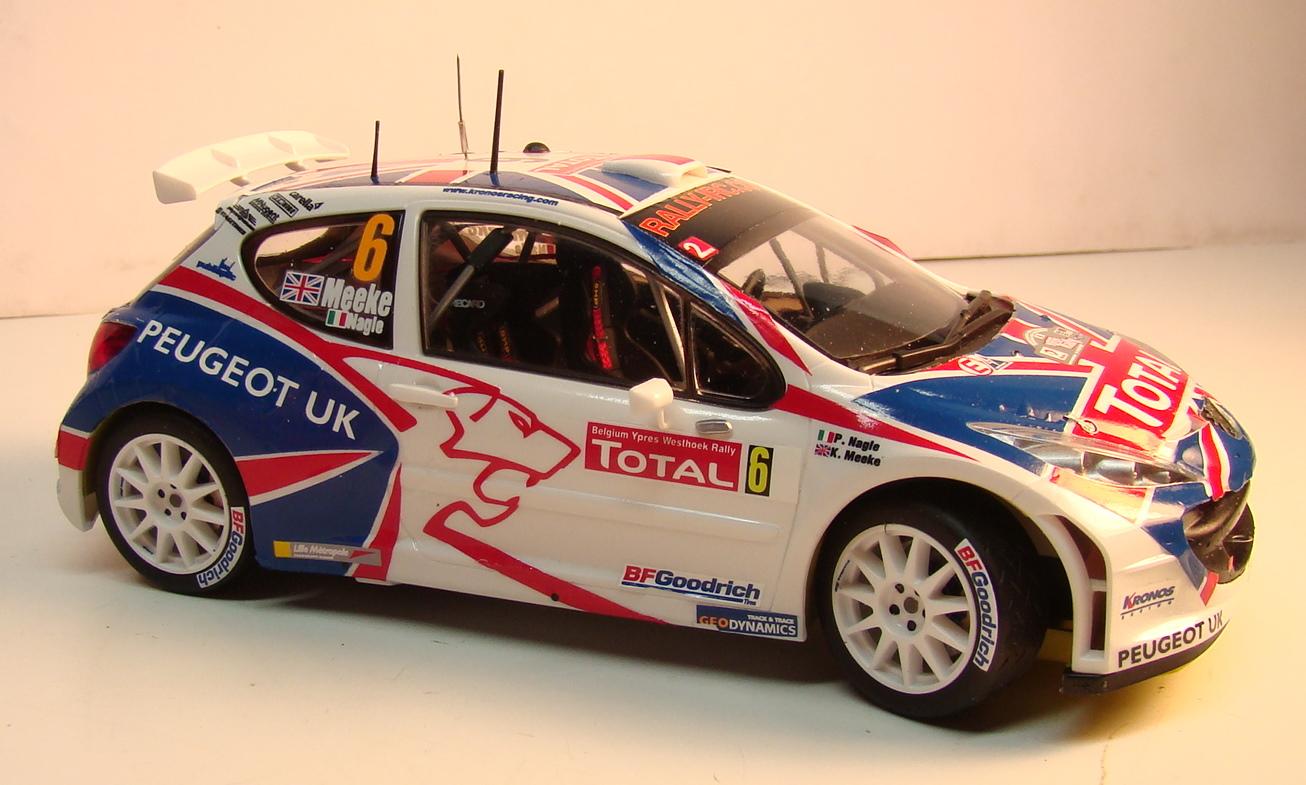
Just completed. Belkits Peugeot 207 S2000 rally racer. Color for this was Tamiya TS-26 white although about 80% of the car is covered in decals. This car was fielded by Chronos racing and represents Peugeot UK. Drivers were Chris Meeke with co-driver Paul Nagle. They were the 2009 IRC Champions. The kits was very nice and well molded. For the most part everything fit. There were a few sticking points which I will point out below the pictures in the captions. Thanks for looking and comments welcome. Interior was very well detailed and those seat belts and PE came with the kit. The steering wheel assembly was 7 parts and gave me fits. There was a y-brace that attached to the dash and installing that first then attaching the column to it proved to be the solution. I took 3 tries. Seat belts attach to roll bar as do most rally cars. I installed tiny bent over pins. The spare tire retainer PE came with the kit but I supplied the 1mm silk thread. Wheels did not steer in this kit and I had to cut the tie rod away from the engine brace. Most of the decals fit and laid down but some of the larger ones wrinkled here and there. A clear coat of Looks Like Glass is in the future once the decals set completely in a few days. Overall the fit and finish of this kit was good and it was a joy to do. The decals around the tail lights gave me the most trouble. The Peugeot lion on the side was one decal front to back and that was one of the problems. The kit instructions was one of the worst I have ever seen. Only part numbers with no text and very bad computer generated graphics that were vague at best. Other that that it was OK.
-
Alpine Renault A110
Rich Chernosky replied to TonyK's topic in Other Racing: Road Racing, Salt Flat Racers
Great little kit, beautiful build. -
An interesting topic to be sure. I see that most of us do it for relaxation or to just get away from the real world. I do that too. But I am also a collector and a builder. I will aquire a kit to be part of a collection and then build it to suit. . It can be a real crappy day but when you add something to your collection all is forgotten. Then there are the memories. Each piece completed represents someone or some place I have been. That's why I don't ever trade or sell off completed projects. How are you supposed to replace that memory., I could, and have, bore you to tears with all the stories of some 60 years of modeling and collecting.
-
Porsche 911 GT1
Rich Chernosky replied to Bruce Scully's topic in Other Racing: Road Racing, Salt Flat Racers
Really cool livery. I like it too. -
Jason...I have built 2 Pochers (an F40 & Testa Rossa) and also 2 Caterham kits, so I know all too well what you are saying. I also owned a Toyota MR2 which I raced in SCCA Solo II events for several years. Every once in a while a Caterham would show up to one of our events. I got to sit in one. They are quite small and if you have feet larger that size 10 you would not be able to work the pedals. The MR2 had more passenger room but it was not much bigger than the Caterham.
-
Jason...the Caterham kit is definetly the crown jewel in the Tamiya line. And you have definetly done it justice. Up in this neck of the woods we have a Caterham dealership not to far from here. I see them quite often at Watkins Glen. They are a real step up from the Lotus 7 and very fast.
-
Another beauty from you Mario. The color and wheel combo really suits this build. Sadly these cars were never imported to this side of the pond, but I have managed to see one in person. They are a surprisingly small car but definetly cool from almost any angle. Thanks for an excellent post.
-
1954 Jaguar D Type - Archive
Rich Chernosky replied to Gramps46's topic in Other Racing: Road Racing, Salt Flat Racers
Pretty cool Gary...really luv the engine. Do you remember where you sourced it ?. -
Inspiratiion for me to finish the two I have. Your work is top notch.
-
Nunu Audi R8 Red Bull
Rich Chernosky replied to Paul Waymouth's topic in Other Racing: Road Racing, Salt Flat Racers
Nice job on this one Paul....That blue looks perfect for this livery. -
This is turning into a real work of art. Most don't know all the little details that go into a model. I can really appreciate that work when I see it as a WIP. Some great ideas there too. Thanks for sharing.
-
1966 Ford GT40 MK1 P1038
Rich Chernosky replied to Gramps46's topic in Other Racing: Road Racing, Salt Flat Racers
Gary...I have a picture of my two children (ages 11-14) standing next to this car at a Watkins Glen Vintage race. (they are in their 40's now) This brings back some great memories. And....yah....great looking model too. Thanks for sharing. -
You are correct on that. Dirt and dust will collect on exposed glue. That is why you only apply to an area no bigger than the piece of PE you are trying to attach. I use this stuff a lot including pesky pieces of foil that don't want to adhere. It is also good for attaching things you want to remove repeatedly.
-
Otaki 1/12 Lamborghini Countach Twin Turbo...Mission Statement
Rich Chernosky replied to Dann Tier's topic in WIP: Model Cars
Awesome to see this one back on the bench. Boy...you sure do have a way with styrene. Those bamboo skewers do make some great modeling tools.,....<G>