VanSpence
-
Posts
171 -
Joined
-
Last visited
Content Type
Profiles
Forums
Events
Gallery
Everything posted by VanSpence
-
Thanks JC, I agree the car is pretty great looking and it will make a welcome addition to my shelf.
-
It has done the same for me! I have a few of the 73 body style sitting in my Hobby Search wish list that will end up on my next purchase. I totally botched the silver unfortunately. I found that my compressor blows at 55 psi and I have been using it this way for some time. No wonder my paint always turns out bad. Found it really affected how the Pledge went on as it just rippled everything every time I tried to paint. I will be posting more about this later today I think. Thanks Dann, the detail is pretty good on them and the black just brought out the detail nicely. This kit has a good amount of under the hood detail and as I have not really done engines before, it is both frustrating and exciting to see where it goes. I am super happy with it. Like my last kit, I have made some pretty big errors on it but overall, it has been pretty good. None of the errors have anything to do with the kit but more my own skills so there is that. I hope to have more of an update today.
-
You guys have been amazing! Thank you so much for all your input. Seems that indeed the bad brushes is just me and the way I have been using them. Always thought I was doing the right thing but maybe at time I do get too much paint on my brush making it difficult to clean properly and possible I am too aggressive with trying to get the paint and thinner out of the bristles as well. I really appreciate all the comments and I will be implementing much of what you are all saying. Thank you so much for your time.
-
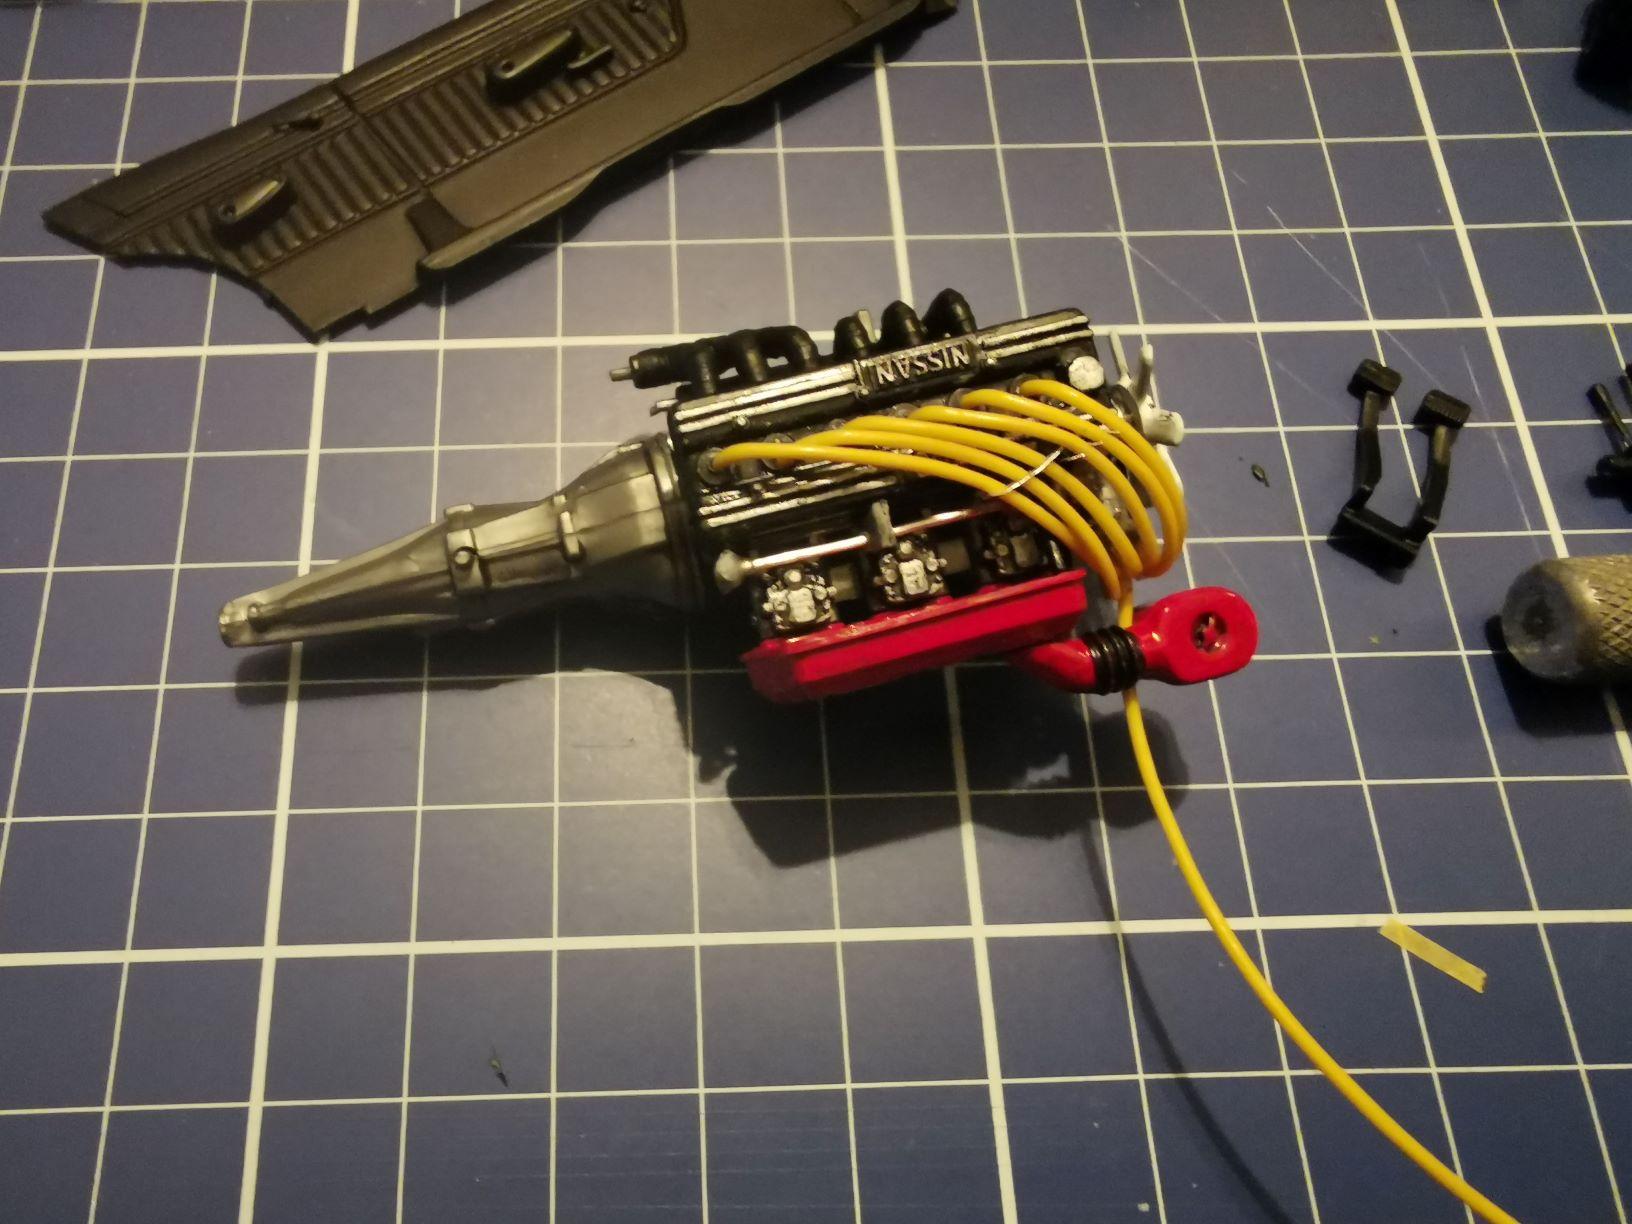
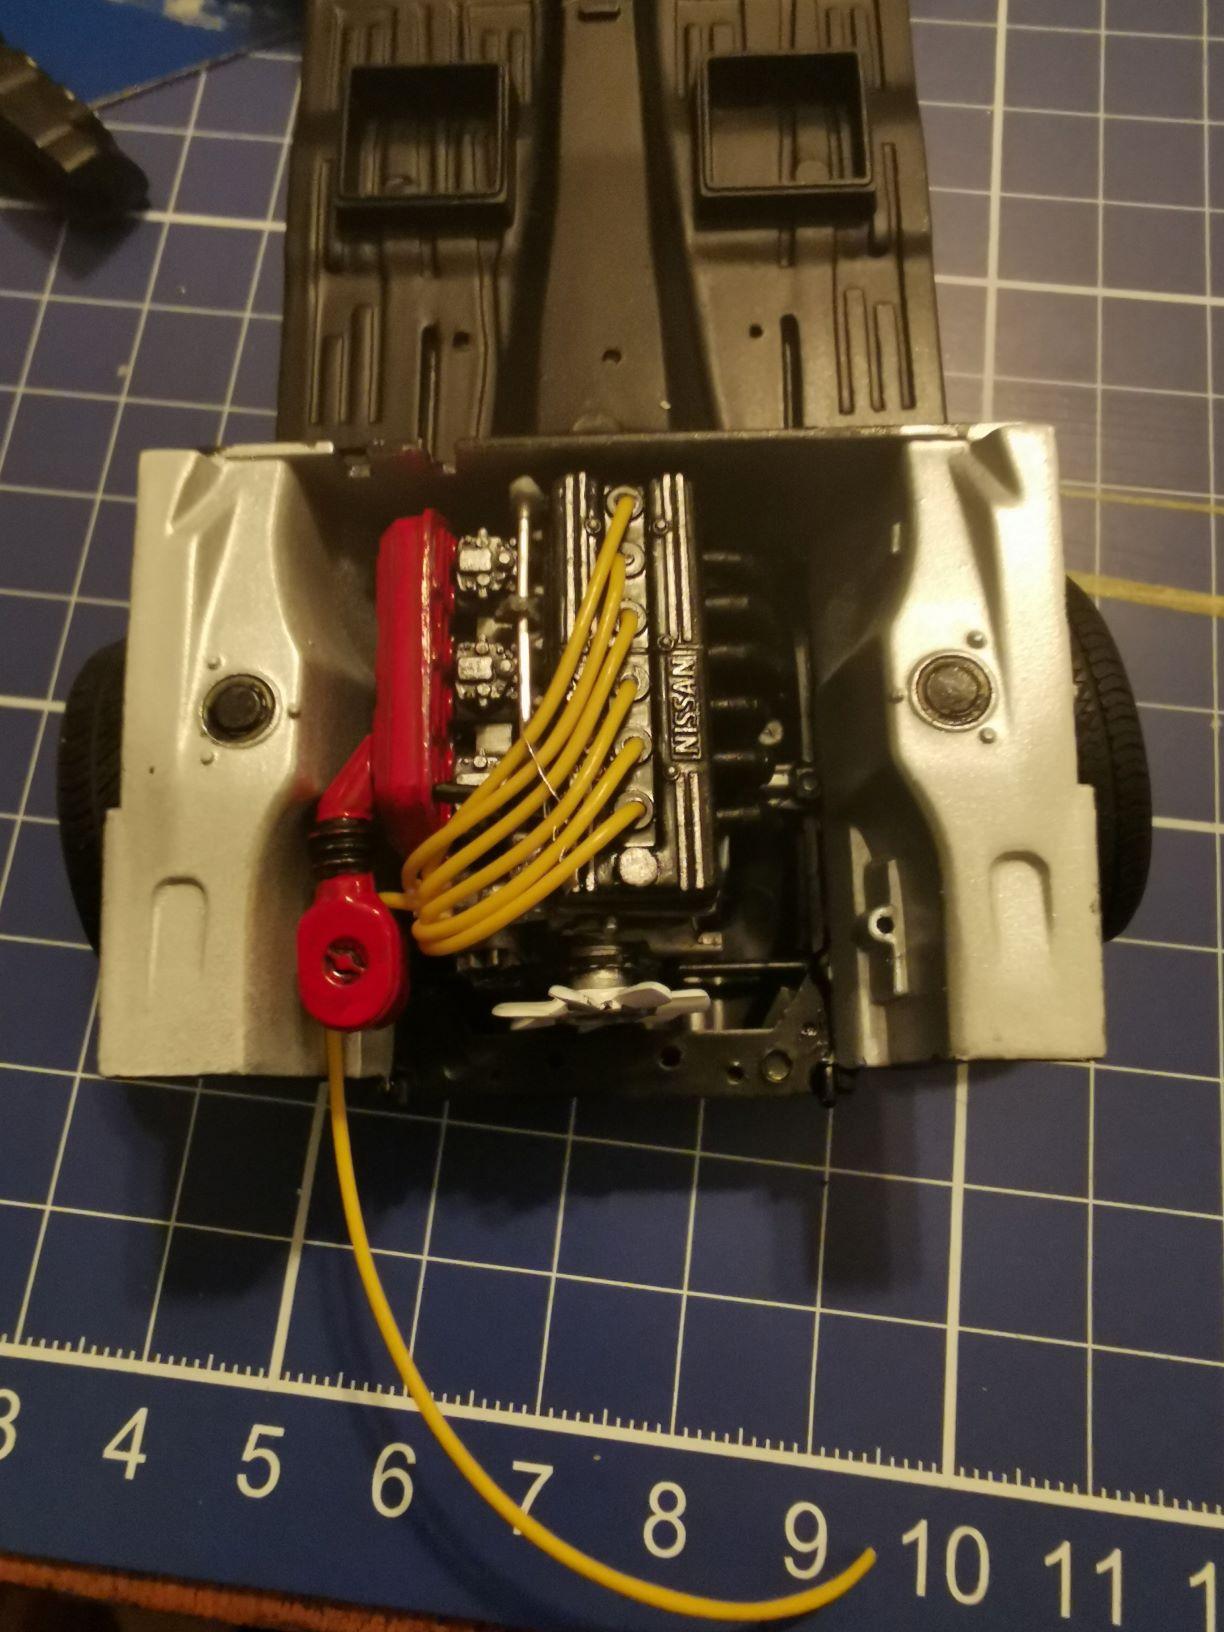
Got a little more done on the kit. Painted the inside of the engine bay body color and then added the engine to the frame. Still a bunch of details I want to add but definitely don't want to overdo it either. There is not that much room to work with on the one side. The suggestion of using pop cans for wire looms was brilliant and worked pretty good. I will know this more the next time I am considering this level of detail.

-
Replacement windshield heat formed
VanSpence replied to Lovefordgalaxie's topic in Tips, Tricks, and Tutorials
The original images are not showing up for me. Does anyone have them still or is it just something temporary? I would love to see more of this process as it will come into good use for me on a project I want to do this year. Thanks. -
This forum has been amazing for answers so far and I have found just about all my questions and more, but I have a question for you guys here: How do you take care of your brushes? For myself, it seems that I only get a few good uses out of a brush and then everything goes south. I usually buy the Tamiya 3 pack of brushes so I have all the different uses but for some reason I can never keep the thin detail brush in good shape. the hairs splay out and eventually won't keep a point at all. Happens on the detail brush more than the others but then I use it more than the others as well. When I clean my brushes, I rinse them in water first (usually use the Tamiya paints or Mr. Color so water is OK) then I will use the thinner from the brand of paint I am using. Dip the brush in the thinner and then use a paper towel to try and get the paint out of the bristles as much as possible. I use some pressure between my fingers and will sometimes roll the brush or bend it back and forth to try and get all the paint out of the base of the brush. I never push the brush into the towel point first and am always careful to try and keep it as composed as possible. Am I doing something wrong or it is just the type of brushes I am using? What can I possibly do to keep my brushes longer or do I have to buy new brushes every 4th or 5th kit I do? What is the standard for you other builders out there?
-
Spark Plug wire details?
VanSpence replied to SCRWDRVR's topic in Model Building Questions and Answers
Wow, never thought of using a can before but this info is GOLD. Thanks for sharing. I have already started to use and it works perfect. So glad I joined this forum. ? -
Those bumpers look great. Impressive to see what these pens can do.
-
Spark Plug wire details?
VanSpence replied to SCRWDRVR's topic in Model Building Questions and Answers
OK, that is actually brilliant. I never thought of that. Easy to find recycled cans for use. Thanks for that. -
Looks like a pretty awesome kit and your start looks to be just on the right track. I can't wait to see the final product.
-
What is that material you are using? Holiday Munchie packaging? what kind of munchies is it?
-
This look amazing. I am eagerly following this to see what you do with it. Never built anything like this but I am seeing more and more appeal to doing one.
-
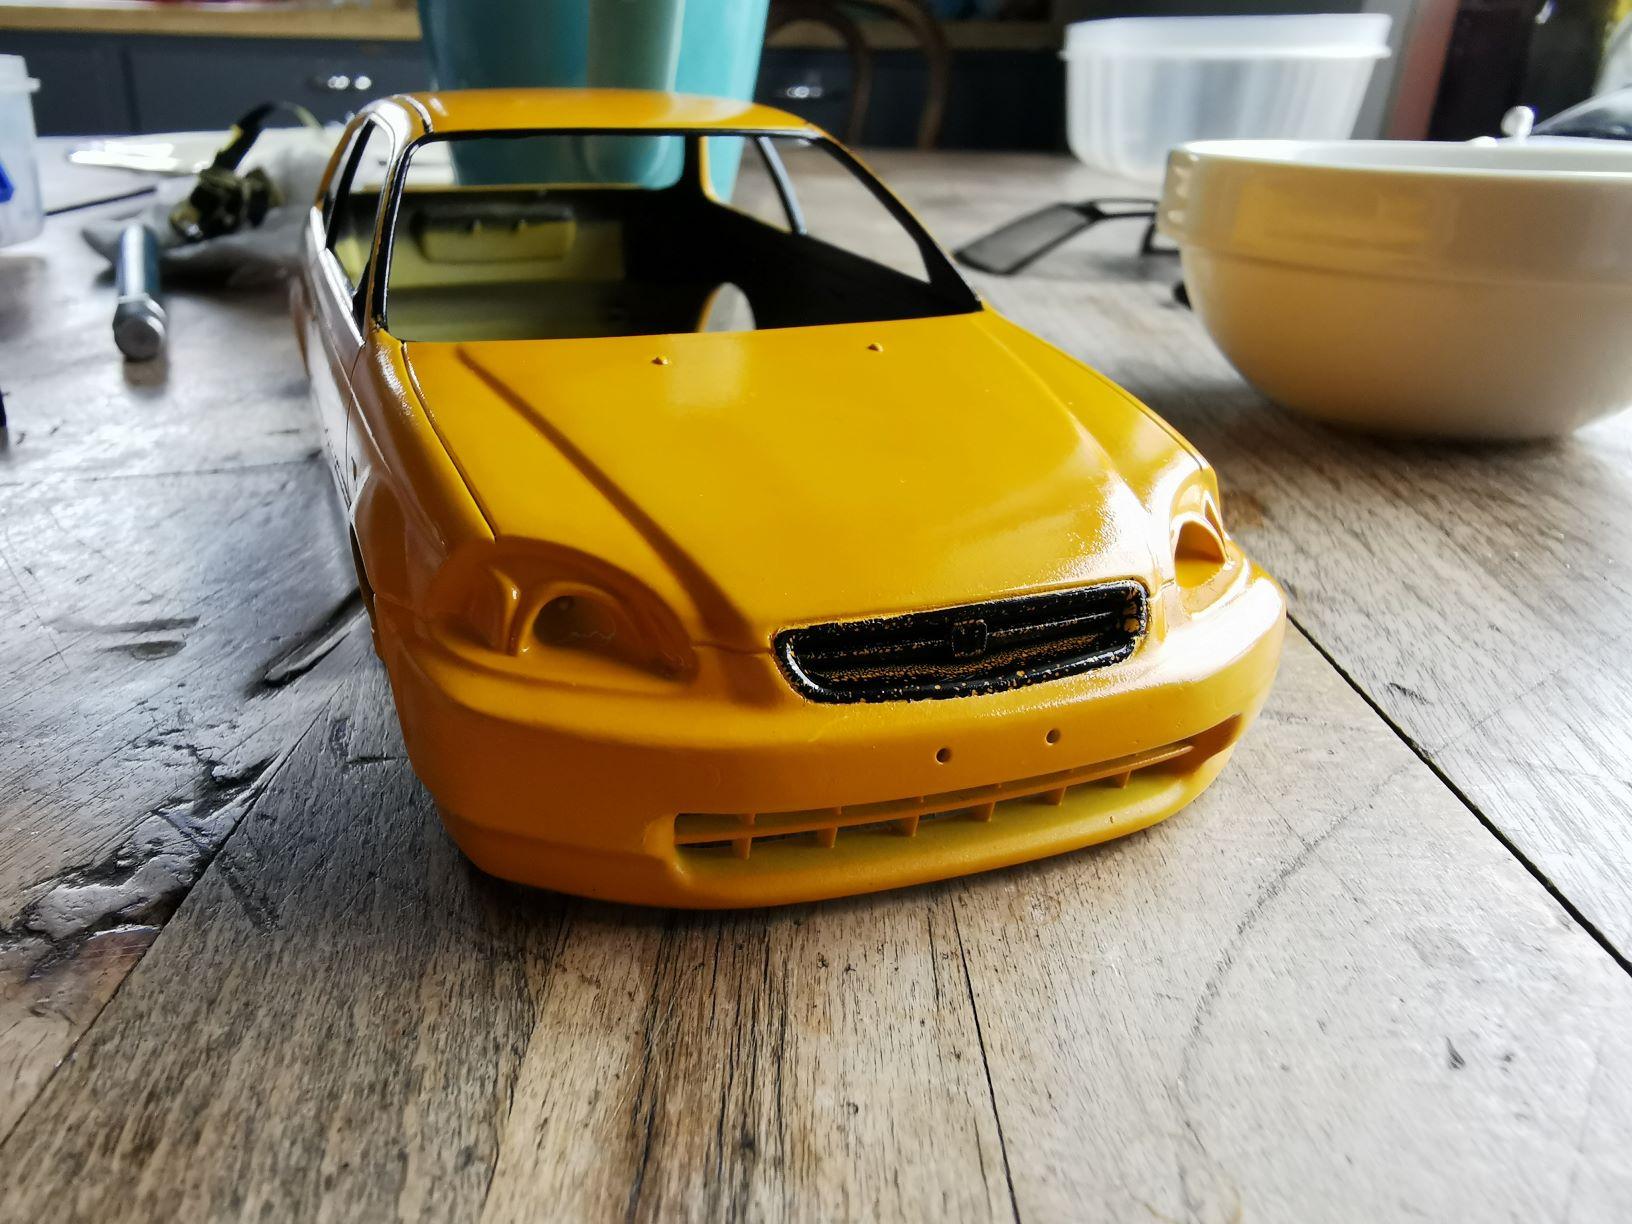
Another kit that I had sitting around for many many years and figure it is time to finish it off. I had glued part of the chassis together and some of the engine already so this is where we go from here. I figure on this one since it has an engine, I may as well try and detail it out a bit. Always build curbside kits so have very little experience doing engine stuff other than the basic glue it together and put it inside. I have always glued the hood shut on anything that had an engine so never needed to detail it out. Got the plug wires ready for it but the distributor is way too small to drill any holes in it so I took a bit of the runner and drilled 7 holes in it and glued my wires into this piece. I am using telephone cable wires and they do seem a little big for the scale but it is what I have on hand. Flattened the top of the distributor and glued the wires on and shaped it a little to help make it look round and like it is supposed to be there. I have part of the throttle linkage in place but not sure if I am going to do all the linkage direct to the carbs or leave it like this. Don't want it to get too cluttered and I do still need to put in the fuel lines to the carbs as well. Once I have made some brackets or something for the plug wires it should clean up nicely. I have sanded and prepped the body for paint. Just going to go with a basic silver and hope I can improve my body painting skills from my last kit.
-
Fantastic detail on that engine. Looking very good. The distributors look like several of the wires go into the sides and would be pretty easy to do but you would need to make a bulge on the top for the ones on the top for it to look right. As it looks like they will be pretty easy to see, you definitely don't want them just goobered on. The wires all fit into a tube that runs along the side of the block? That is a pretty interesting way of doing it. Very clean looking.
-
Re-engineering Monograms Lotus Esprit...new update!
VanSpence replied to Dann Tier's topic in WIP: Model Cars
That is awesome you will be doing a step by step. I will look forward to that. Appreciate the efforts. Thanks. -
Re-engineering Monograms Lotus Esprit...new update!
VanSpence replied to Dann Tier's topic in WIP: Model Cars
I have to say, that turbo set up is pretty amazing and look really good. Are you working from any images specifically or just going off the top of your head? What did you use to make the round parts of it? No where near considering this level of scratch building but it would be great info to have. Thanks for sharing. -
The wide body is really impressive. You say you did it all with styrene and putty? I am in awe as it looks pretty bang on IMO. I love the wheels as they are but my level of love for things like this is a lot higher than my levels of dislike so I tend to like almost everything but these wheels give me the feeling of enough aggression that they can be used, as you say, on the track or on the street. Impressed with your direction. I will be following this one for certain.
-
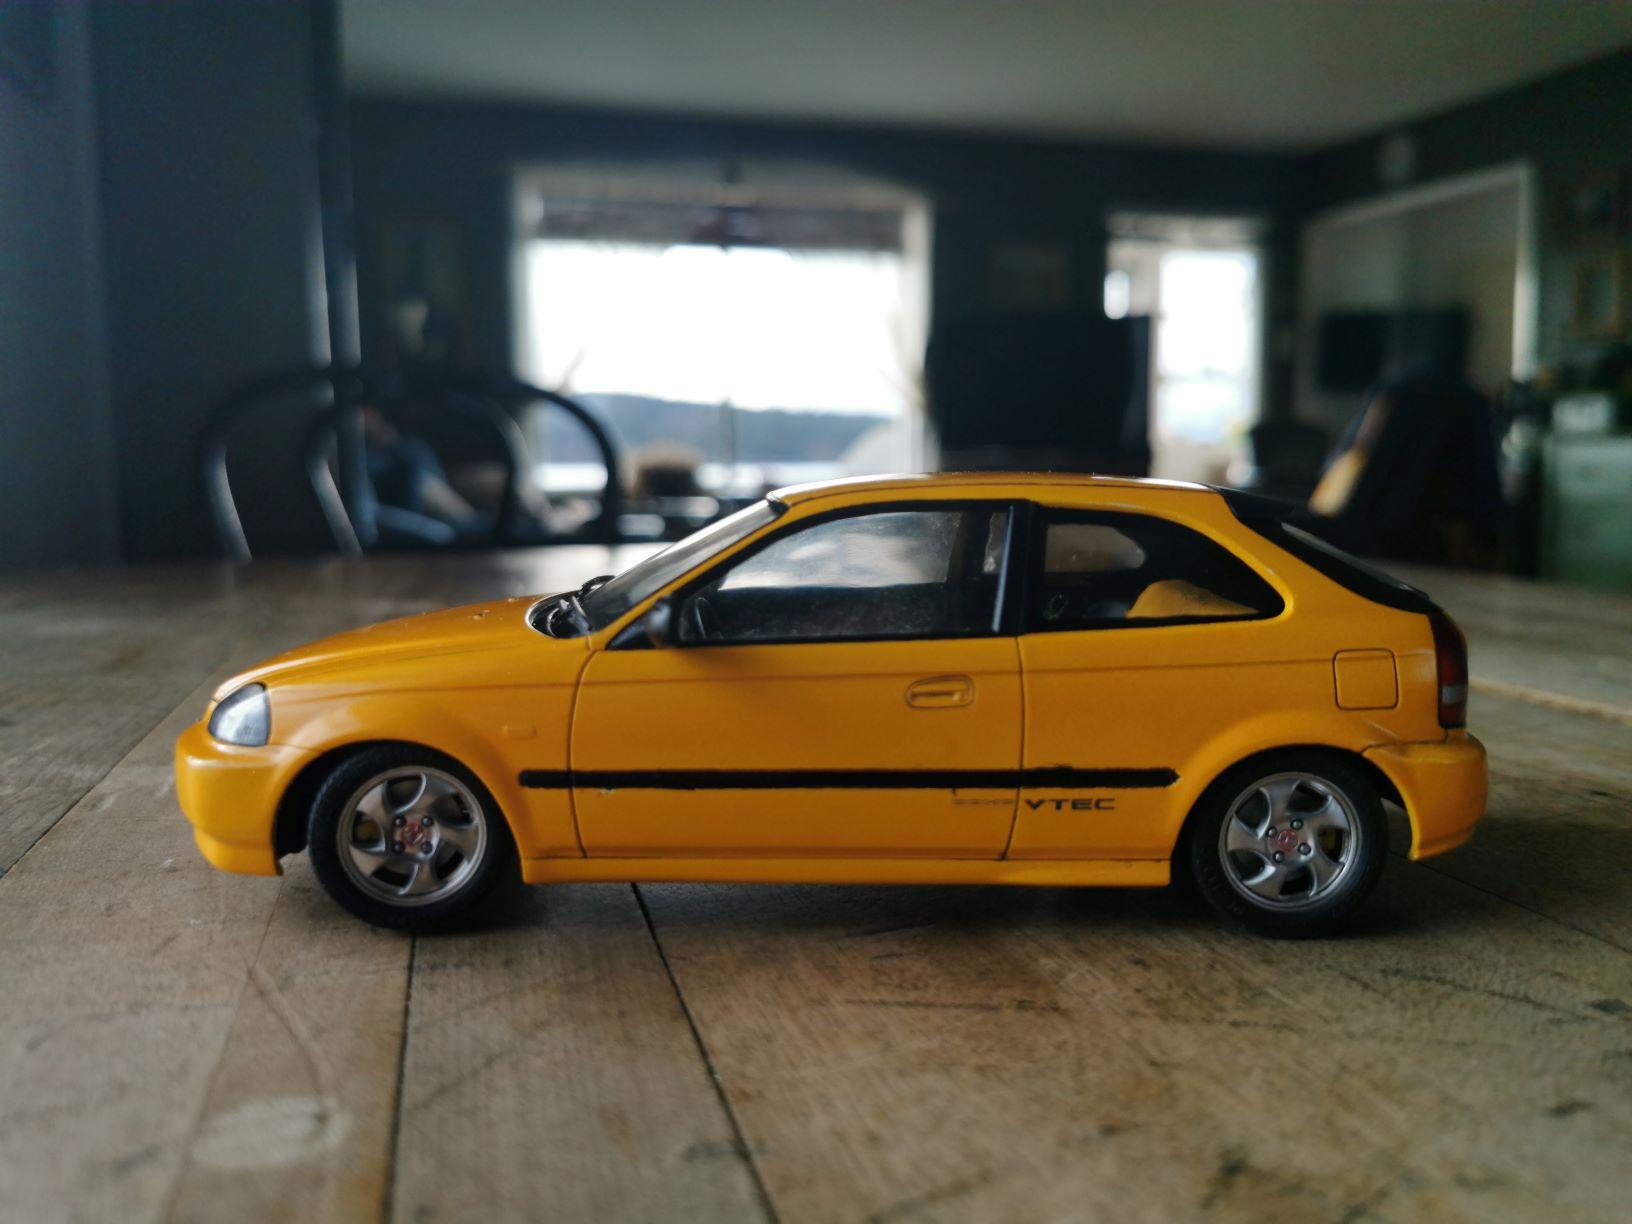
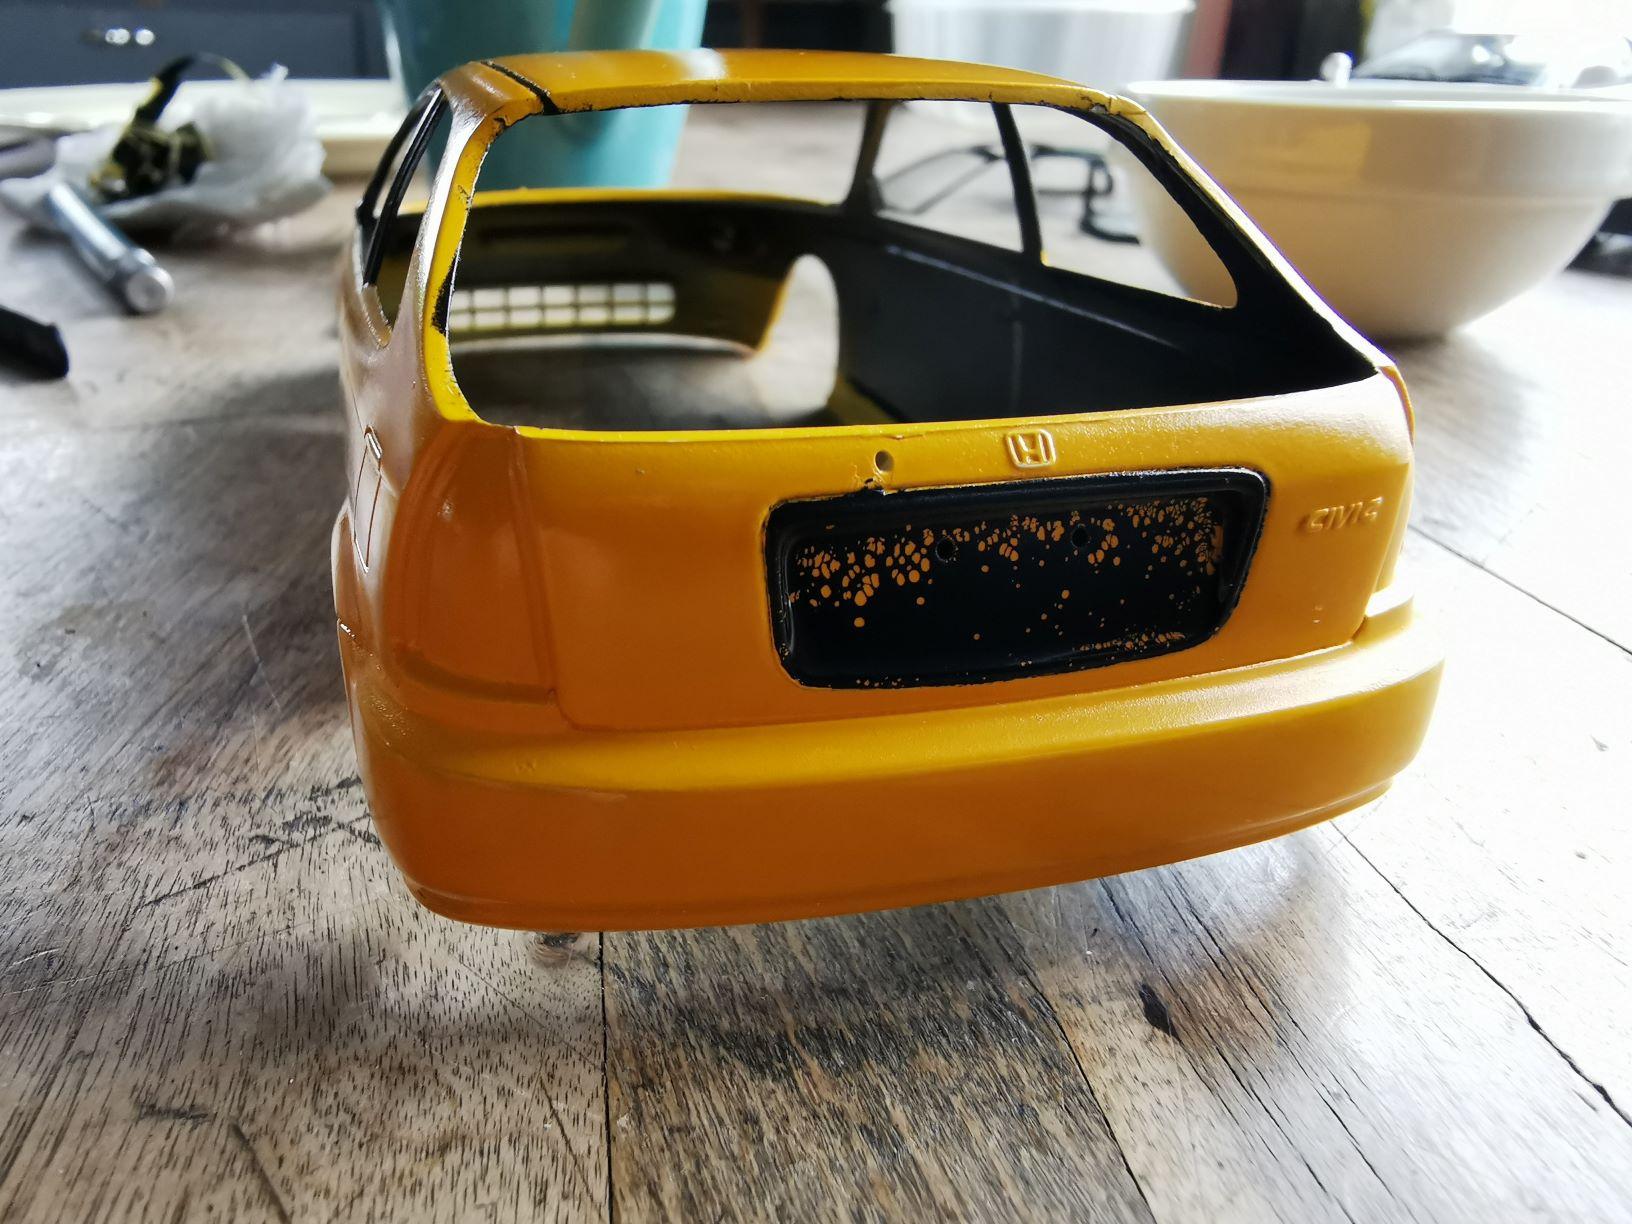
And I think that about does it for the Fujimi Civic. I am just waiting for some clear orange to finish off the marker lights and some seats from Kurt to fully finish it off but otherwise I will leave it at that. I am at about 80% on my thoughts with this one. Some pretty big mess ups but it did help me a lot in learning some different ways of doing things than I have done in the past. Going to apply those ideas and thoughts to my next build for certain. Any comments and critique are more than welcome. It is good to be able to 'see' things through someone else's eyes and honest, I am hear to learn and to improve. Only way to do that is by hearing from others. Once I have the seats and it is done done, I will post it in the under glass. Thanks for stopping by.
-
Those seats look pretty awesome actually. I like the style of them quite a bit. So I tried the sanding and polish and it actually worked pretty good, for the most part. Went ahead and masked and sprayed black and this happened Needless to say, I am pretty unimpressed. Again, since I only care so much about this one, not going to strip it but see what I can do with it for now. Total learning experience. Seems the sanding and polish was too good. I will have to make sure next time I sand out the parts that are getting the new paint. Getting close to that finish line. I can actually see those seats in this without head rests, like total low back seats.
-
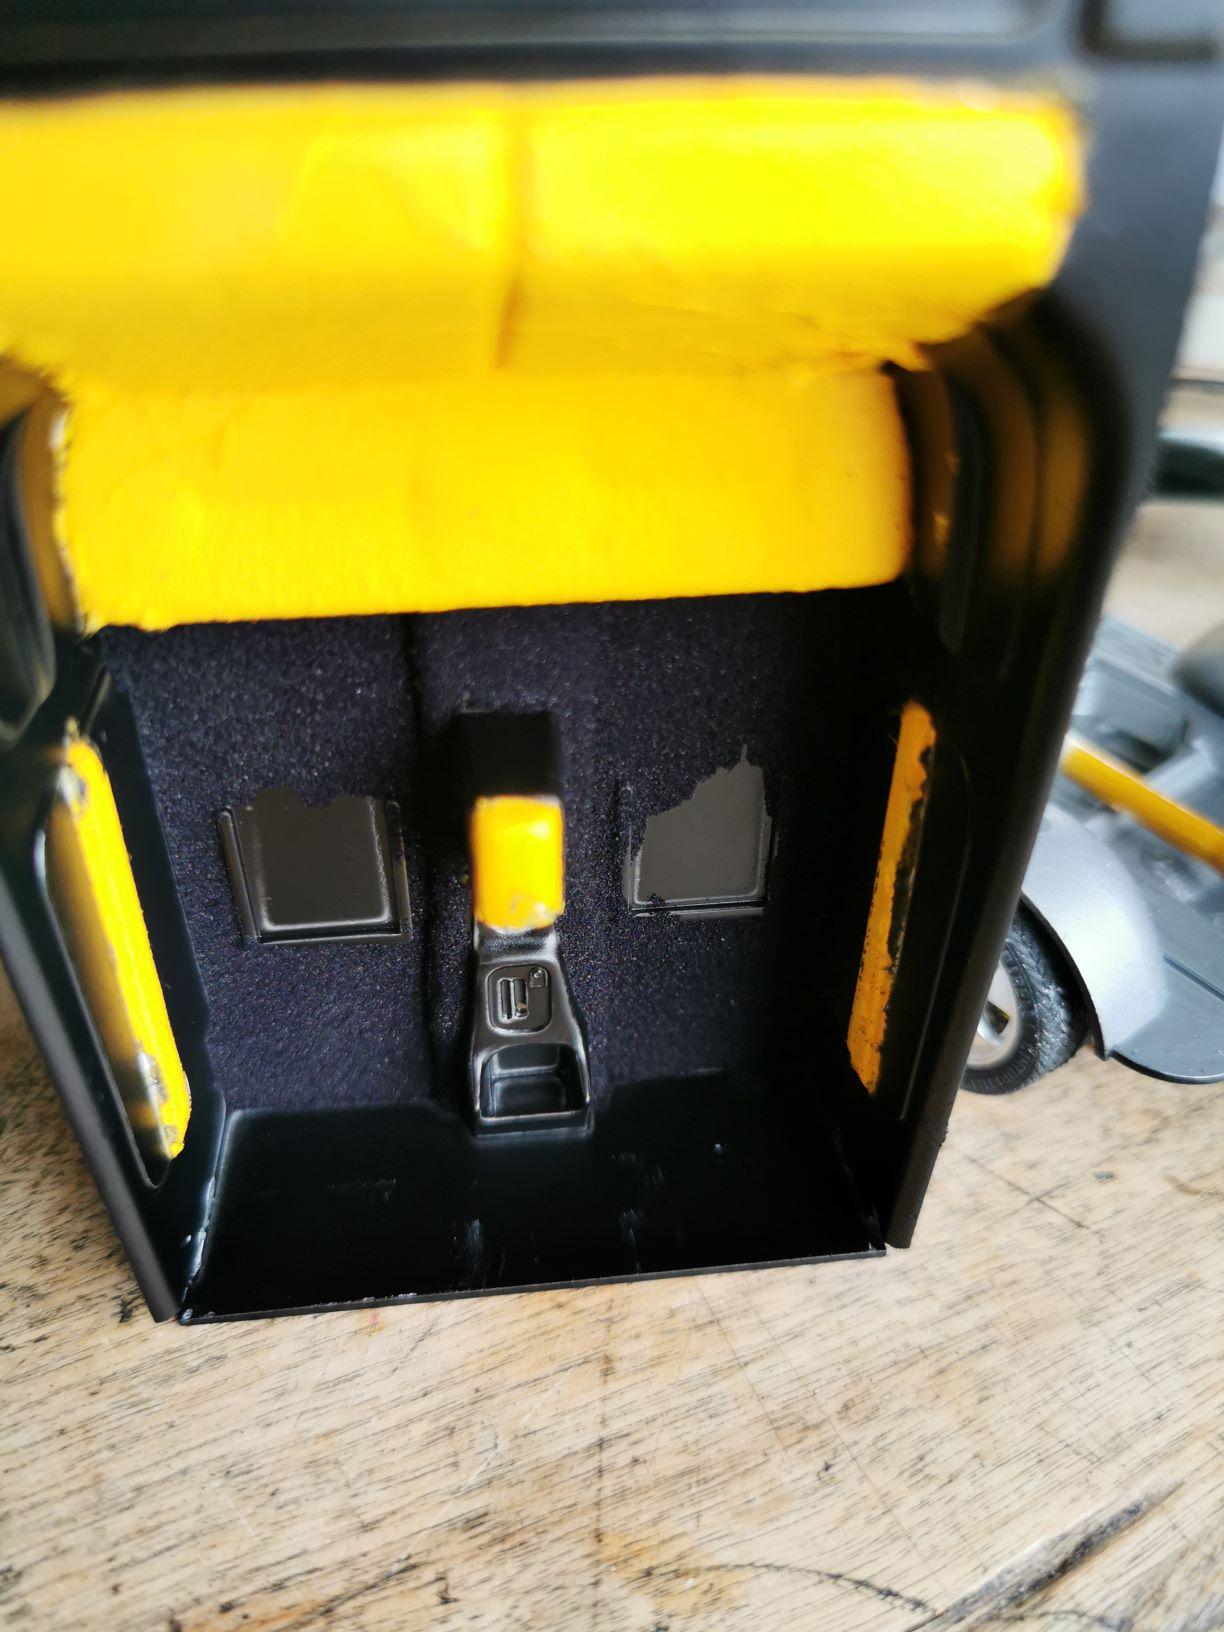
So today I pretty much completed the interior. I found this thing called embossing powder at a craft store when I was looking for flocking. I was told they don't carry flocking any longer and so I was looking for alternatives and found this stuff. I had no idea what embossing powder was or what you used it for but it looked pretty fine so I figured I would give it a try. Turns out it actually looks pretty good. I also did a little research on embossing powders and apparently you use heat on it to 'melt' it and create lettering or images on paper and other things. Kind of neat. Comes in tons of different colors and textures so it may be helpful, may not. I found that when using the clear paint as my base, it held OK but maybe not as good as I hopped. Apparently there is also embossing inks that are supposed to be supper sticky for this purpose. Maybe I will try some white glue next time and see how that turns out. This is the finished interior. No front seats for now but I won't glue it all together so when I do get some, I can just put them in. So you know the old saying 'Leave it well enough alone.' Yeah, I am not so good at that. I did try for another coat of the yellow clear on the body and really, I just shouldn't have. I think the yellow streaks are there for good unless I were to strip the entire thing and start from scratch, which I am not going to do on this tester piece. This last coat was terrible and seems that it got a lot of dust in it and even a hair, which none of the other coats had so I should have just stopped with the last coat and lived with it. Now I am just going to wait a bit, let this harden, take some 2000 and wet sand and then polish and see what happens. It is all a learning experience right?
-
Thanks for the heads up on this. I have no idea who any of those are but it gives me some hope and I have time to do some research....... oh man, from the floor would have been amazing to have a CRX of such caliber and your Civic looks awesome in red. I think once a Honda fan, always a Honda fan, especially '70s, '80s and '90s stuff. After that it seems Honda got a little boring. lol.
-
Thanks for the kind words. Yes, we have to stay on side while we are working. We get our holidays once or twice a year depending on how you set it up and then that is when you leave. It does take some getting used to but you get better at dealing with it as you go. Pretty hard to go and see the latest in movies tho...... As I go along, I will have to take time into consideration more and more. When you have certain colors you go through more frequently than others, it is a good idea to buy 2 or 3 jars at one time. I can only get supplies once a month as well so I need to time my supply deliveries carefully. I actually don't have any flat black on hand right now, and it is not on my next delivery either as I made an error. lol. I will have to wait another month before I can see any flat black but I was thinking about drilling out the ends to make them look a little better. I really do like how the flat white turned out and feel it makes the car look really quite good. With car wraps being all the rage these days, it is pretty easy to do anything you want to a car which IMO means even more reason to go off book with your builds.
-
As I was doing the TP, paper towel came to mind and I said I would try that next time to see if it worked out better. As it is meant to absorb and not break down I figure it would work better but also thought it was a little thick. Patterns are also may end up strange looking. Thank you. I have made it a big point that 2020 will be the year I will try a bunch of new things. I think I may do my first resin kit this year as well. Something about how he puts his videos together make for some really great watching. Doing each section as a complete video means not too much info in one go and still leaves you wanting more and can't wait for the next one. I find myself always hoping for certain kits with the next series. Kleenex actually sounds about right. lol, I can't believe I did not think of it. Thin and meant not to rip and tear and break down when wet. I will have to get some with my next groceries..... Thanks for the tip!
-
Turned out great. For such a quick build, the end result is perfect.
-
Woah, that is a great looking wagon. What kit is this if I may ask? Brand? Looks like I might have to source one out.