.jpg.b9265433dc8c3b550370b1d0e4e4d2fc.jpg)
MarkJ
-
Posts
4,698 -
Joined
-
Last visited
Content Type
Profiles
Forums
Events
Gallery
Everything posted by MarkJ
-
.jpg.b9265433dc8c3b550370b1d0e4e4d2fc.thumb.jpg.915f5b46e3c9402eeaa6972073121c87.jpg) Very cool. A driver. Where did you get that guy?
Very cool. A driver. Where did you get that guy? -
Wow, Pierre, this is going to be another great build. Looking forward to more updates.
-
2022 Nextgen Camaro
MarkJ replied to MarkJ's topic in WIP: Stock Cars (NASCAR, Super Stock, Late Model, etc.)
Thanks, I will have to check the 427 Cobra out. You should really try your hand at one of these. I'm sure you could knock one of these right out of the park. It's funny that with all of the excitement about these kits coming out there are very few finished builds to look at. -
Thanks Randy. Looks like I will be gluing my body to the chassis. Again, your builds are awesome. Sorry it took me so long to find them.
-
Excellent job on all three of your builds. So, you opted out on gluing the chassis to the body. I was hoping I would not have to either. Did the 4 inch rear spoiler come in your kits or did you have to scratch build them. They all look perfect. Again, Excellent job on all three of your builds.
-
2022 Nextgen Camaro
MarkJ replied to MarkJ's topic in WIP: Stock Cars (NASCAR, Super Stock, Late Model, etc.)
Thanks. Pierre. Paint is not that great, but I'm hoping the future will bail me out along with all the decals that cover most of the body. Where are you posting the wip on the light blue car? I would like to check it out. -
2022 Nextgen Camaro
MarkJ replied to MarkJ's topic in WIP: Stock Cars (NASCAR, Super Stock, Late Model, etc.)
After I posted the photo above, I realized the left top corner of the windshield had popped up. I went back and fixed it. Did any of you guys use shoe goo? I figured there was no way I could use that and not make a tremendous mess, but it probably would hold the glass down. I used that canopy watch crystal glue. -
2022 Nextgen Camaro
MarkJ replied to MarkJ's topic in WIP: Stock Cars (NASCAR, Super Stock, Late Model, etc.)
Installed the glass. Not fun at all. Hope it stays in.
-
2022 Nextgen Camaro
MarkJ replied to MarkJ's topic in WIP: Stock Cars (NASCAR, Super Stock, Late Model, etc.)
Thanks, Steve. But it still needs some work. Yes, I'm committed to brush painting. It's been cold and rainy here for the last week. If it wasn't for brush painting, I would not have got any painting done. -
2022 Nextgen Camaro
MarkJ replied to MarkJ's topic in WIP: Stock Cars (NASCAR, Super Stock, Late Model, etc.)
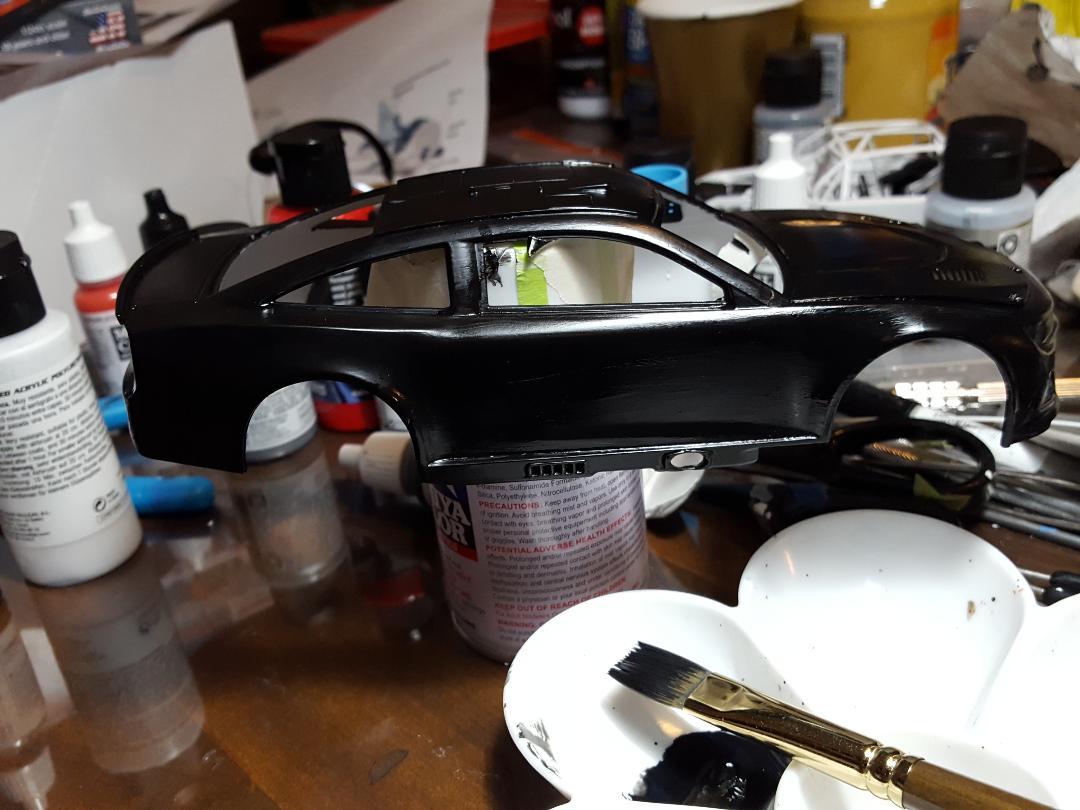
This is the first coat of Model masters gloss clear acryl brushed on the body. Need to polish it with 6000, 8000, and 12000 polishing pads. And probably put on another coat.
-
2022 Nextgen Camaro
MarkJ replied to MarkJ's topic in WIP: Stock Cars (NASCAR, Super Stock, Late Model, etc.)
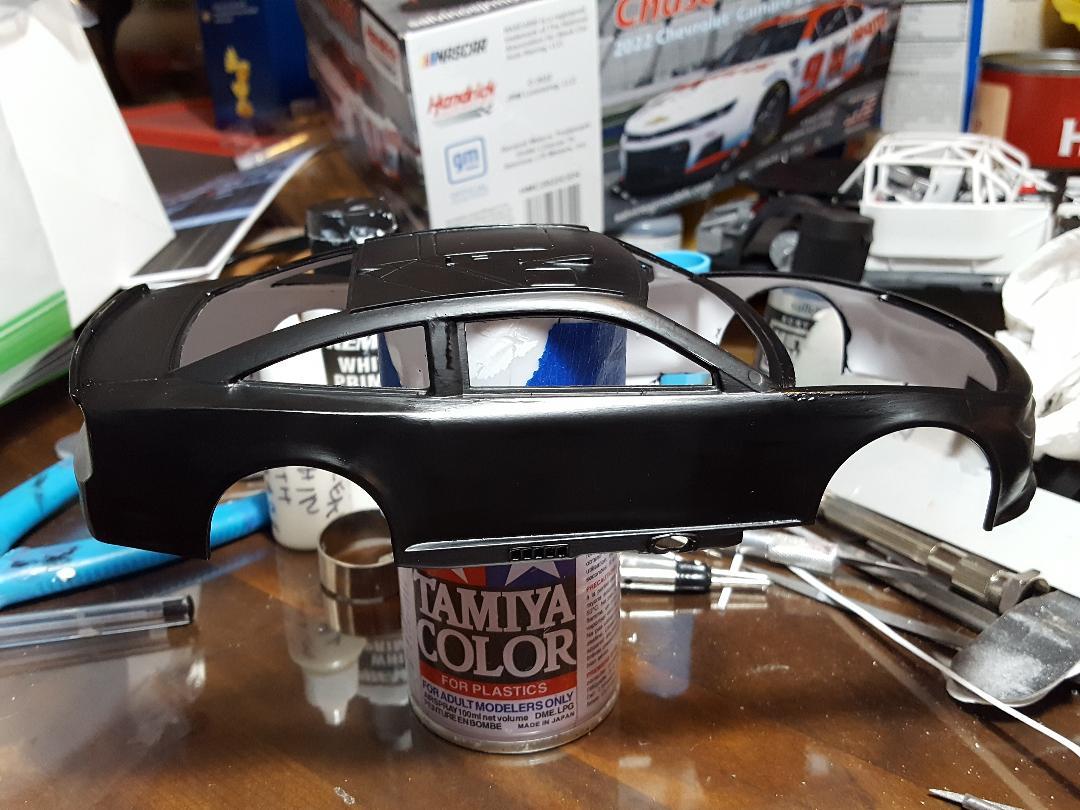
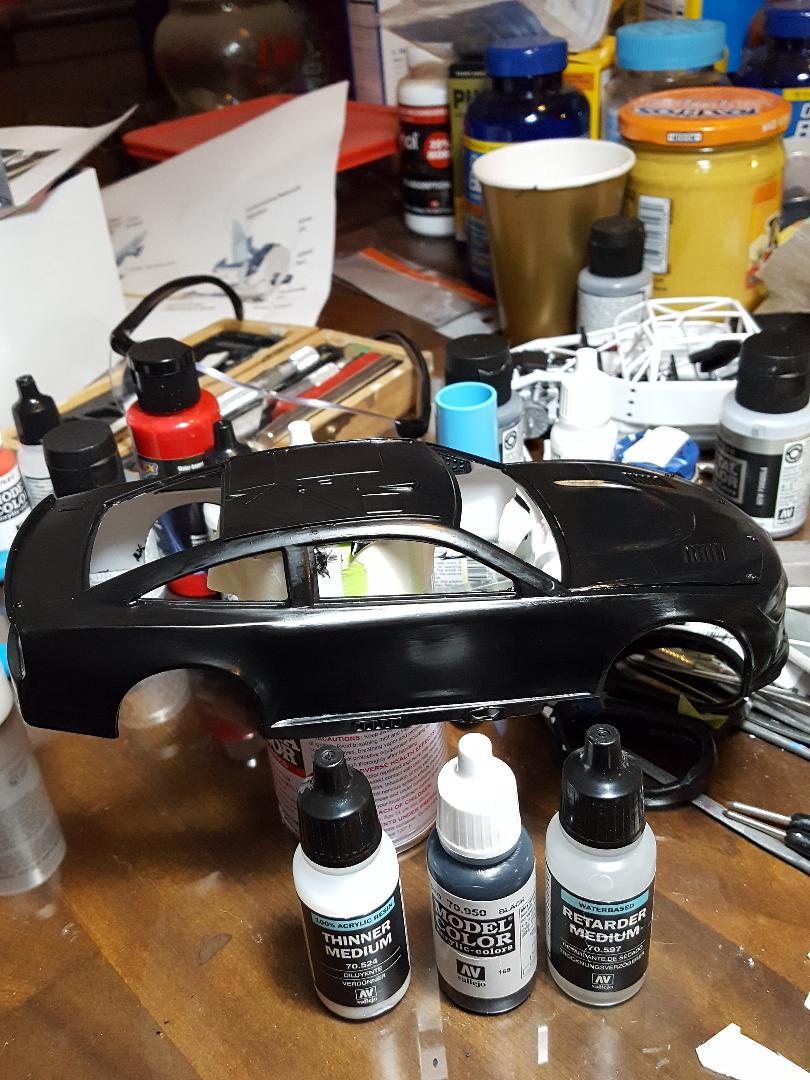
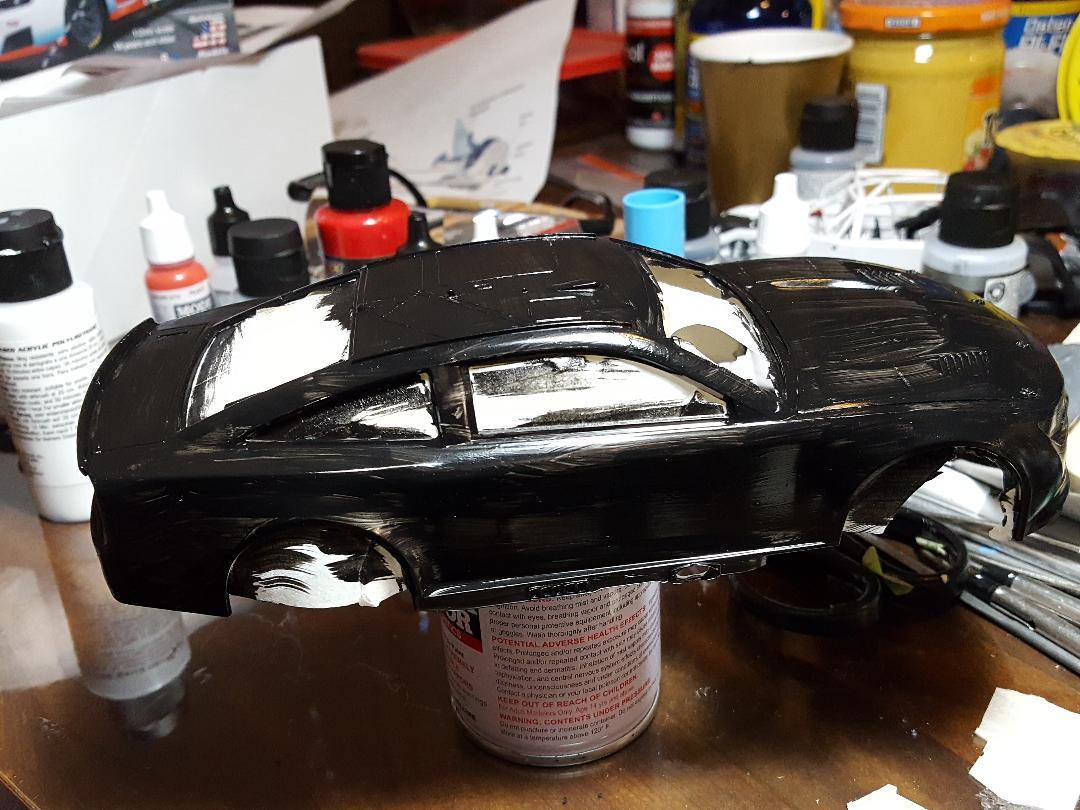
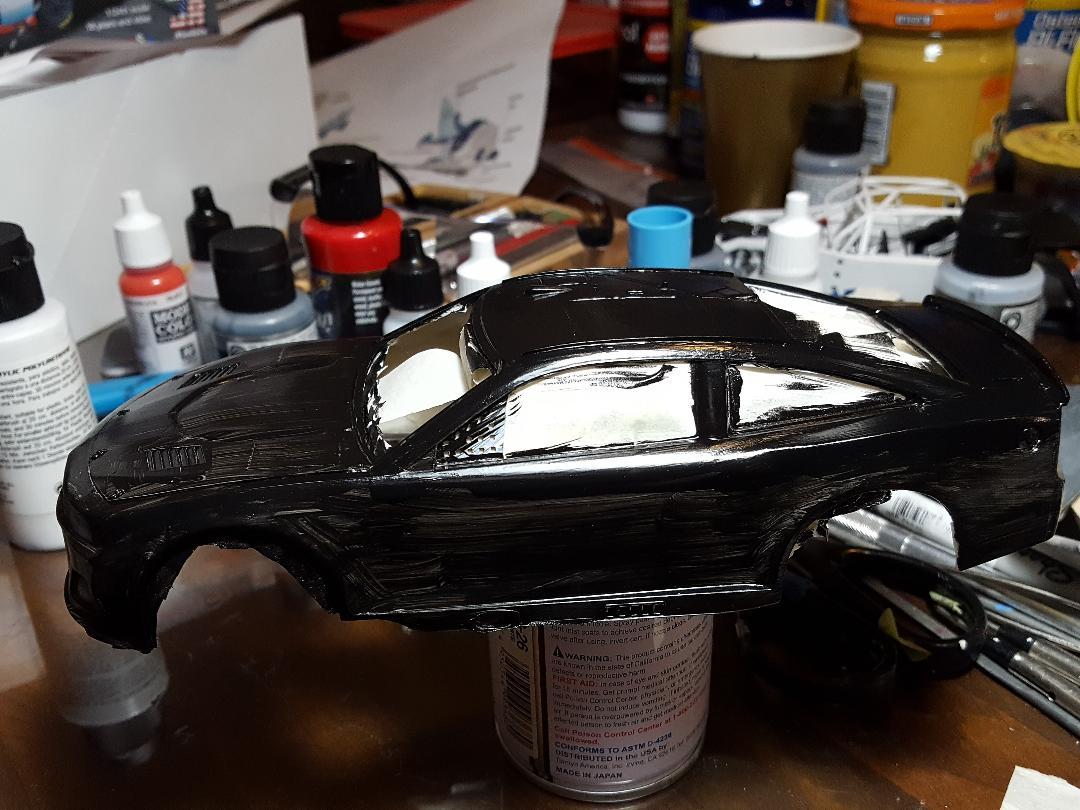
Here is the final coat of black. Next up will be the gloss clear acryl and polishing with 6000,8000, and 12000 grit polishing cloths and hope I don't go through to primer.
-
2022 Nextgen Camaro
MarkJ replied to MarkJ's topic in WIP: Stock Cars (NASCAR, Super Stock, Late Model, etc.)
I was looking at the decal sheets and to my joy, I realized that most of the body will be covered up with the decals. in fact, the whole roof and side roof panels are completely decals. The only thing thats going to be seen much is the hood and parts of the door. so, I just need to really concentrate on making the paint extra smooth there. -
2022 salvinos jr camaro
MarkJ replied to gatorfan69's topic in WIP: Stock Cars (NASCAR, Super Stock, Late Model, etc.)
Looks awesome, Mack. Love all the extra added goodies you put in her. Cant wait to see the body being processed. -
2022 Nextgen Camaro
MarkJ replied to MarkJ's topic in WIP: Stock Cars (NASCAR, Super Stock, Late Model, etc.)
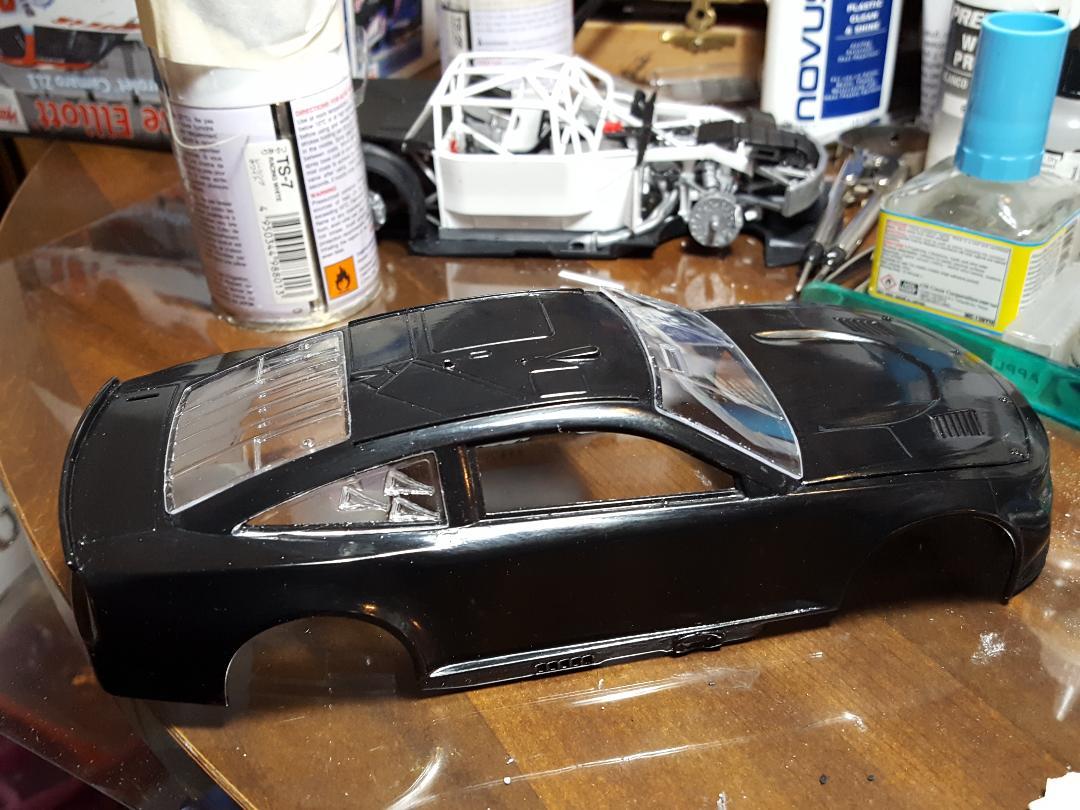
Sanded the first coat down and then hit it with another coat using a more satin black. Product I used is in the last picture. I will lightly sand this trying, not to go through to the primer and then hit it with an acrylic gloss clear. I will then polish that and see what I have.
-
2022 Nextgen Camaro
MarkJ replied to MarkJ's topic in WIP: Stock Cars (NASCAR, Super Stock, Late Model, etc.)
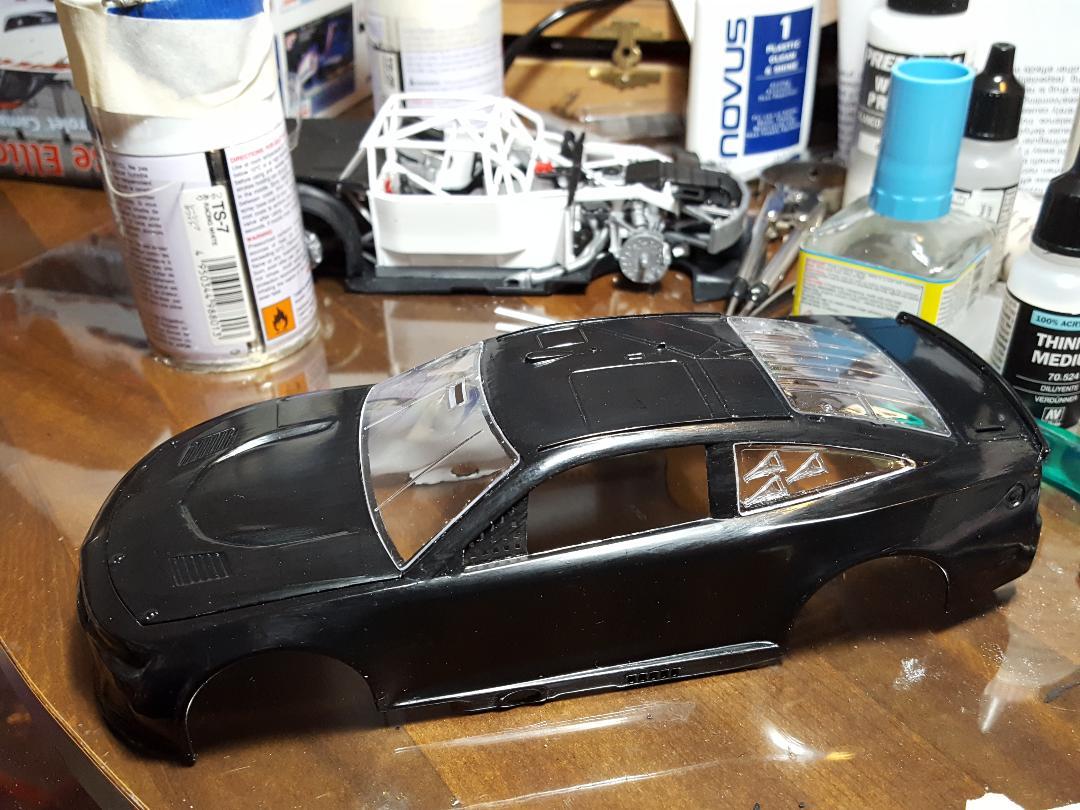
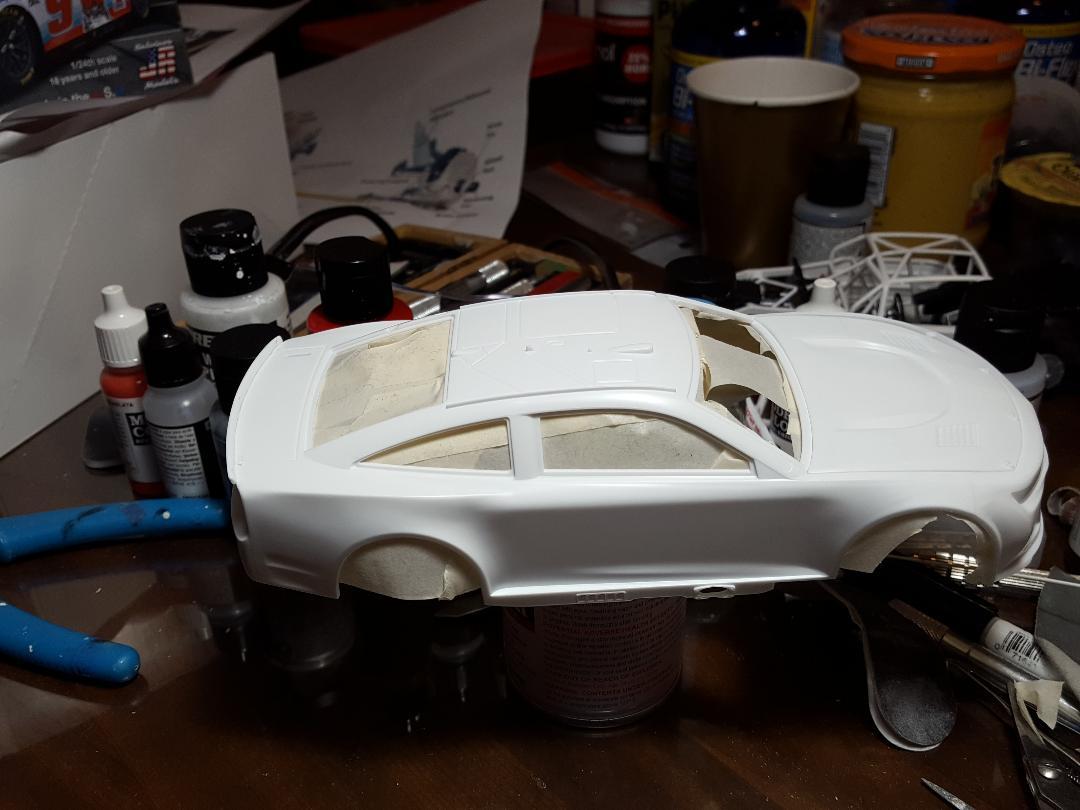
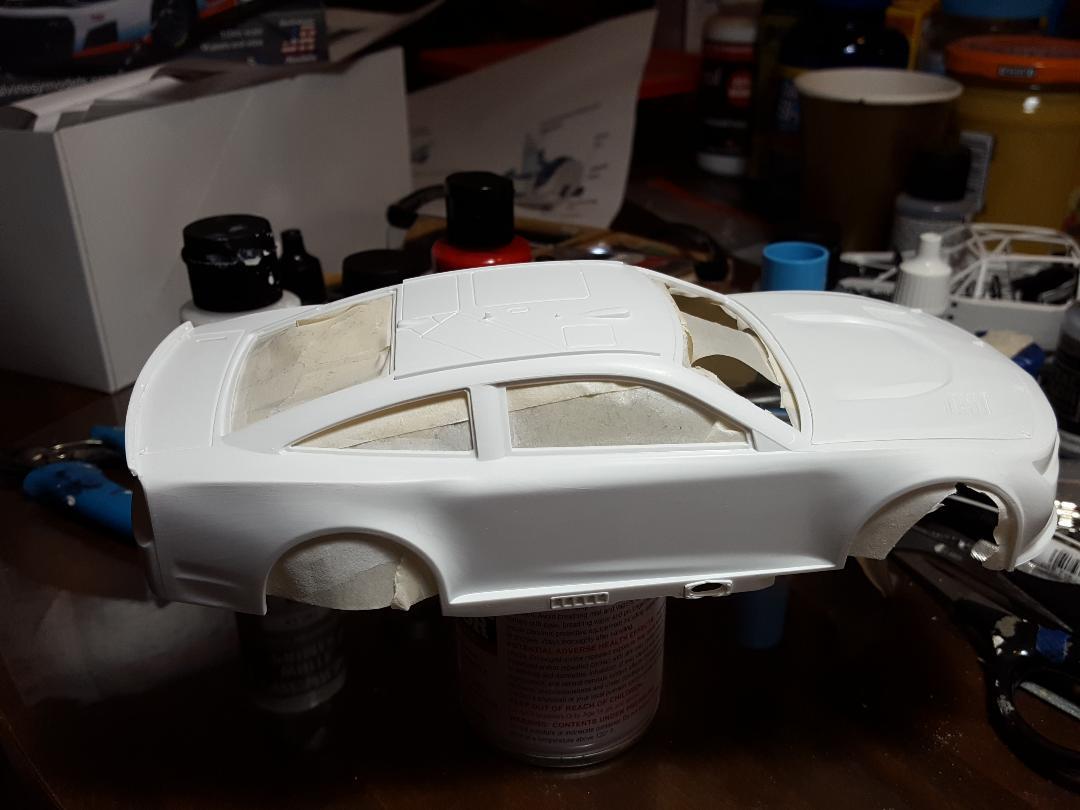
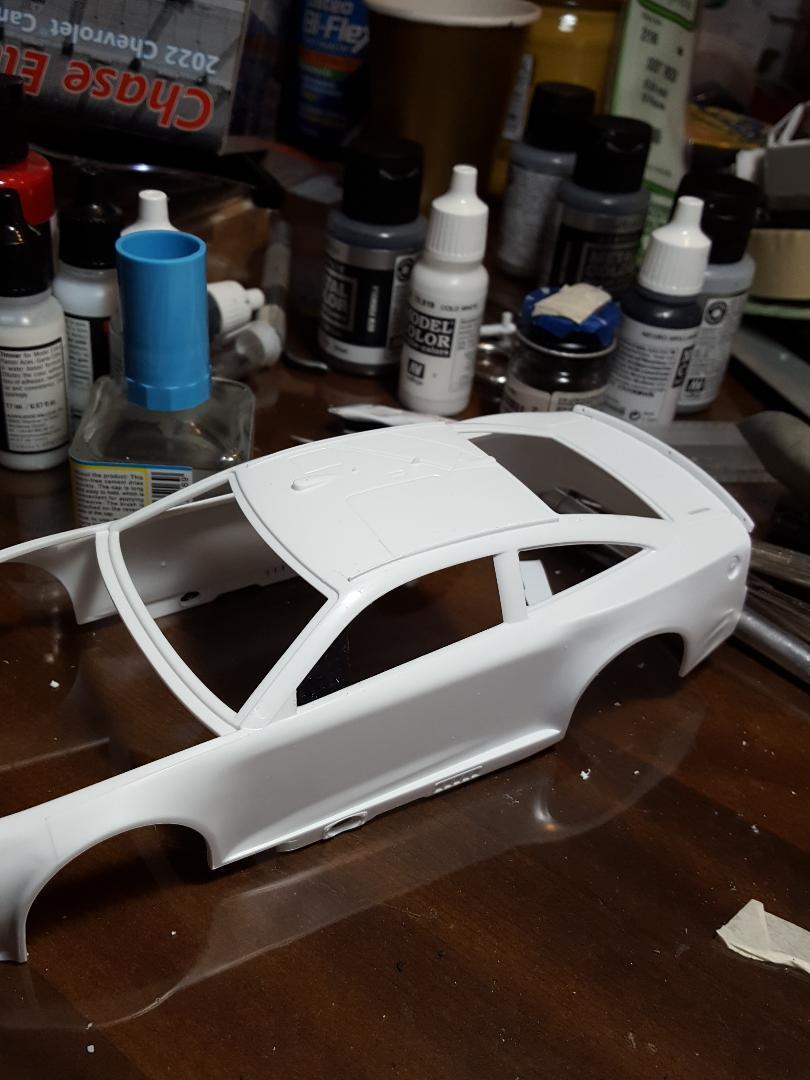
The pictures below are body ready for primer, body primed and the last two are first coat of black paint.
-
2022 Nextgen Camaro
MarkJ replied to MarkJ's topic in WIP: Stock Cars (NASCAR, Super Stock, Late Model, etc.)
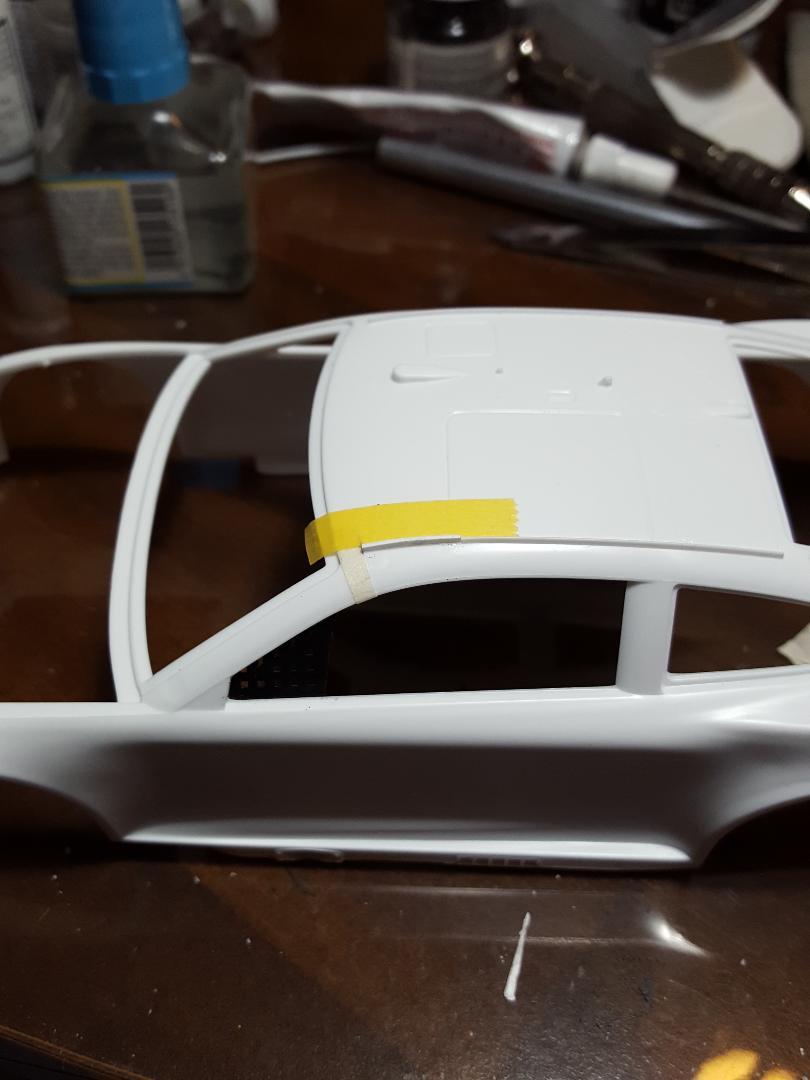
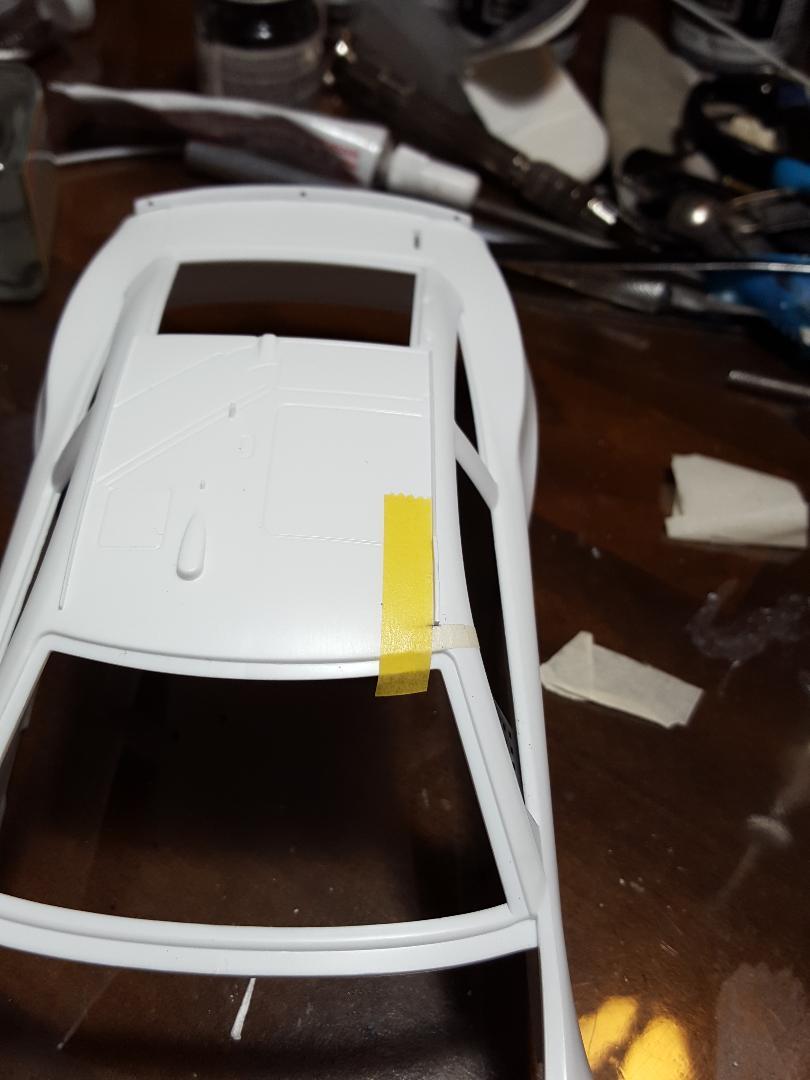
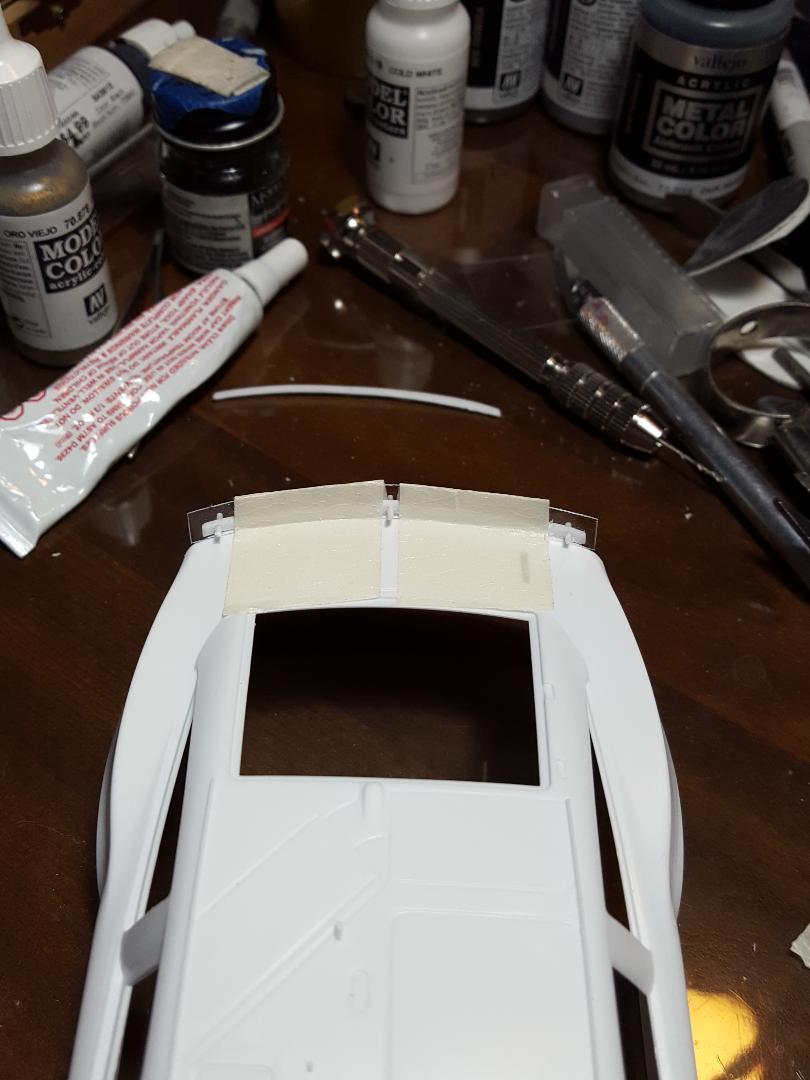
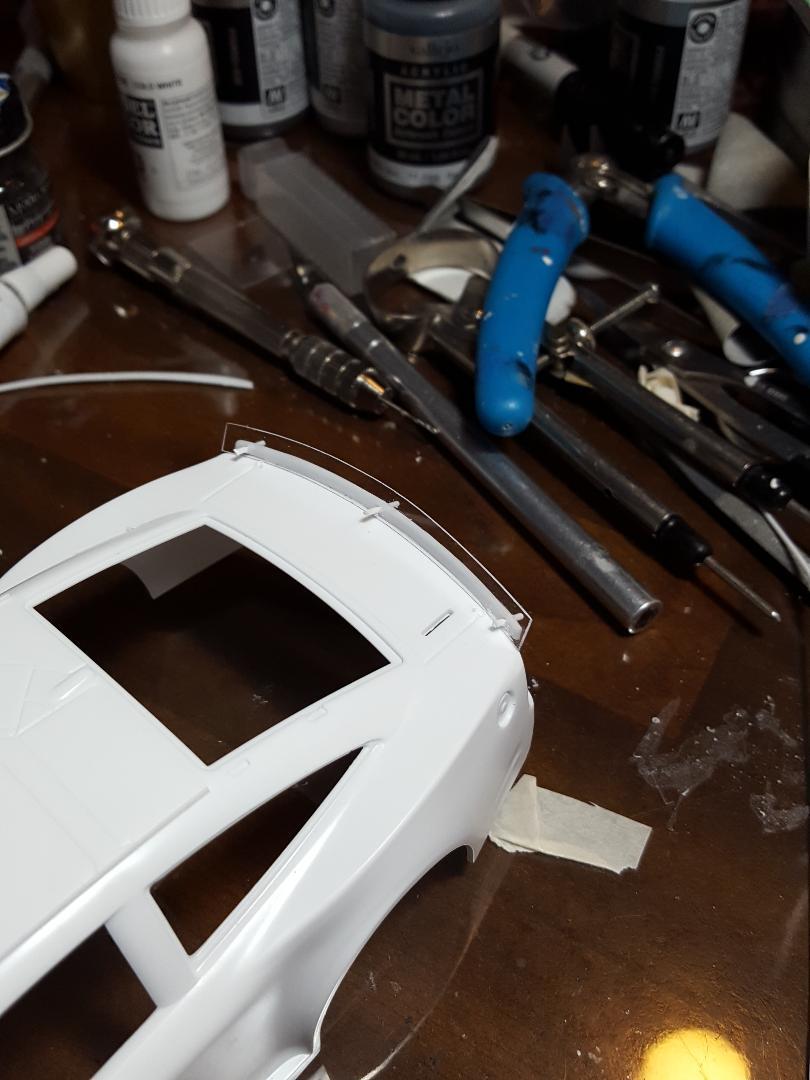
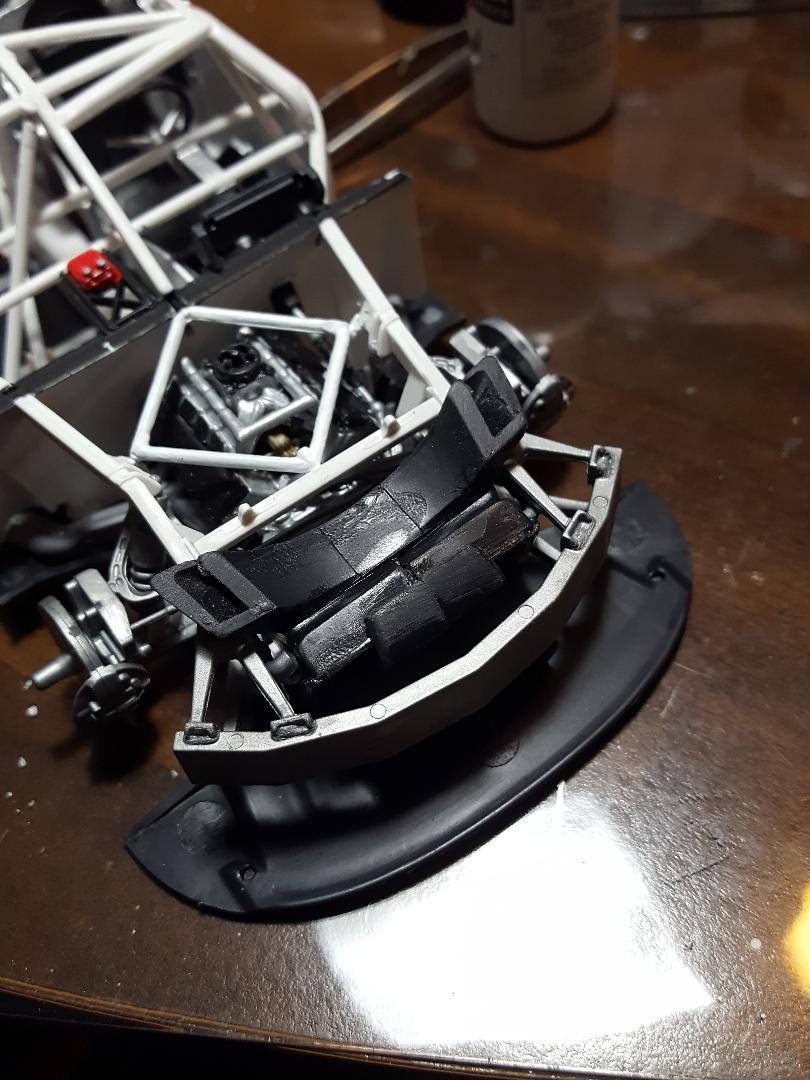
Got the left roof ridge done. Now I can move on to priming and painting the body. I'm going to tape inside the roof because I think that part needs to be white like most of the chassis is. If I don't I'm sure I will splash some body color paint on it somehow.
-
2022 Nextgen Camaro
MarkJ replied to MarkJ's topic in WIP: Stock Cars (NASCAR, Super Stock, Late Model, etc.)
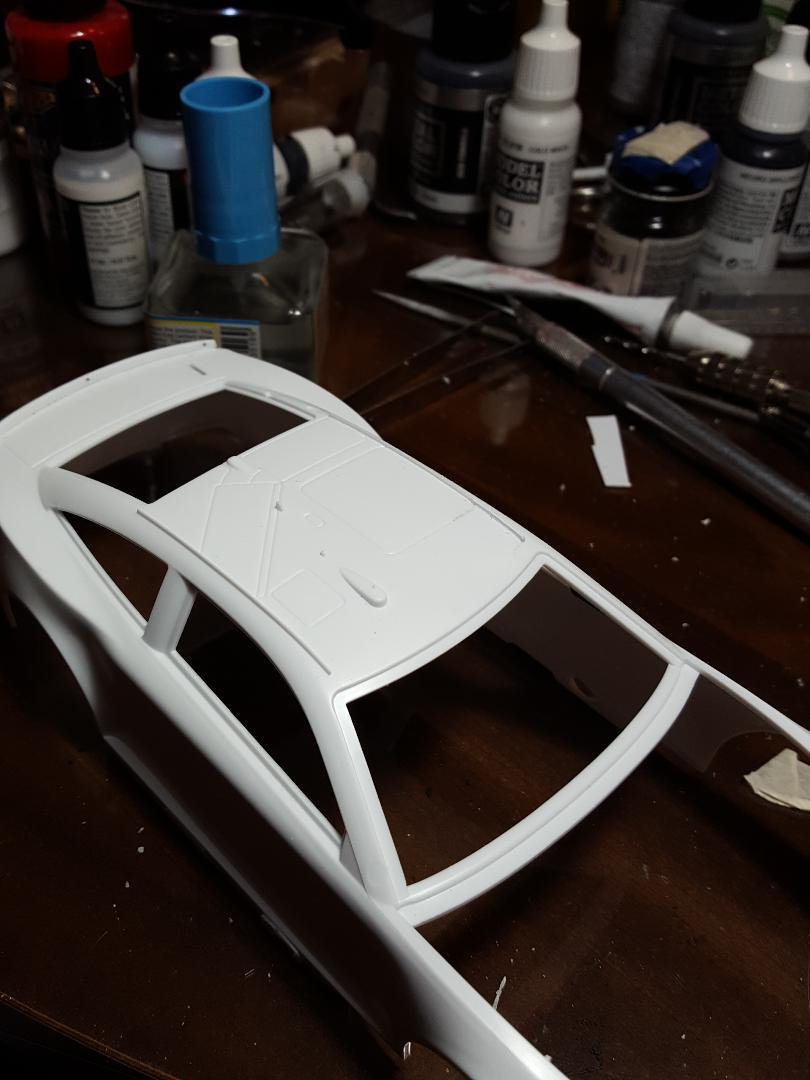
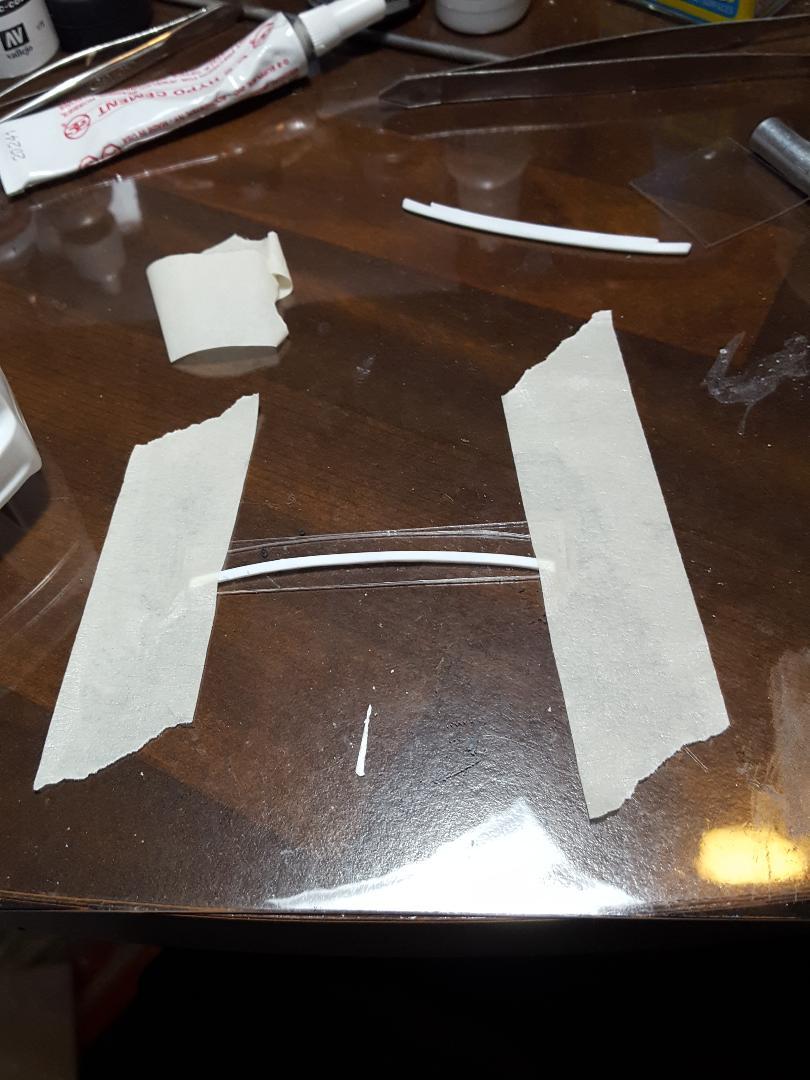
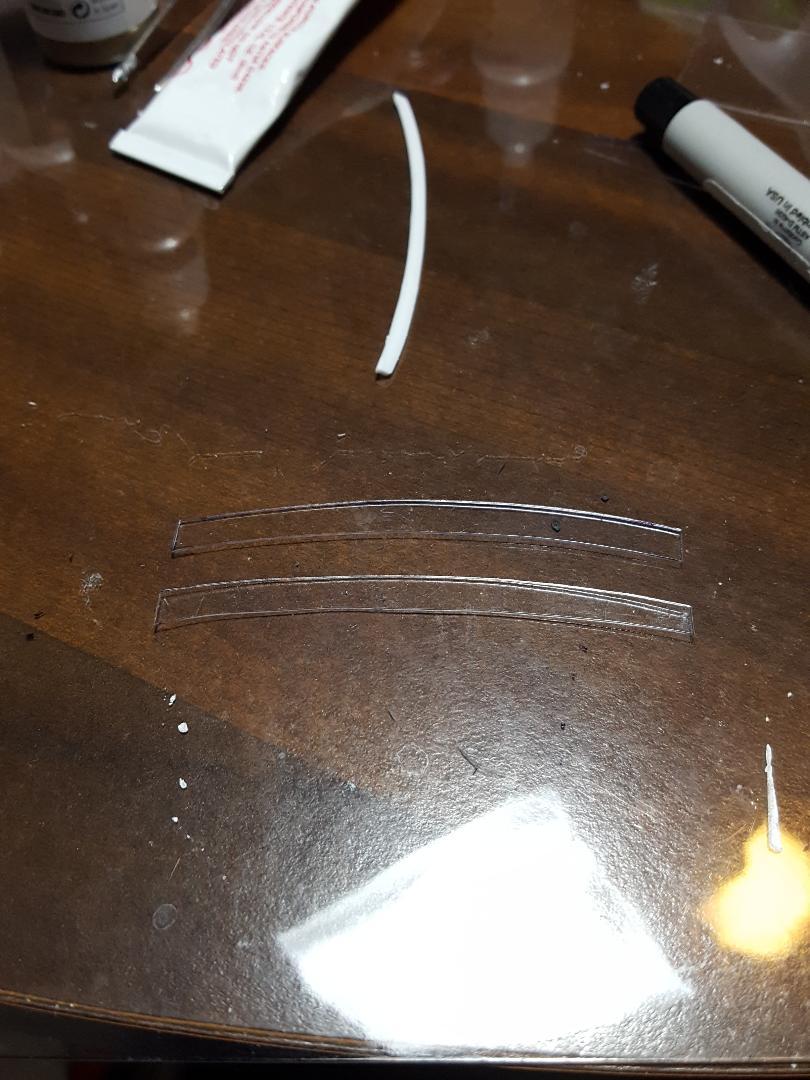
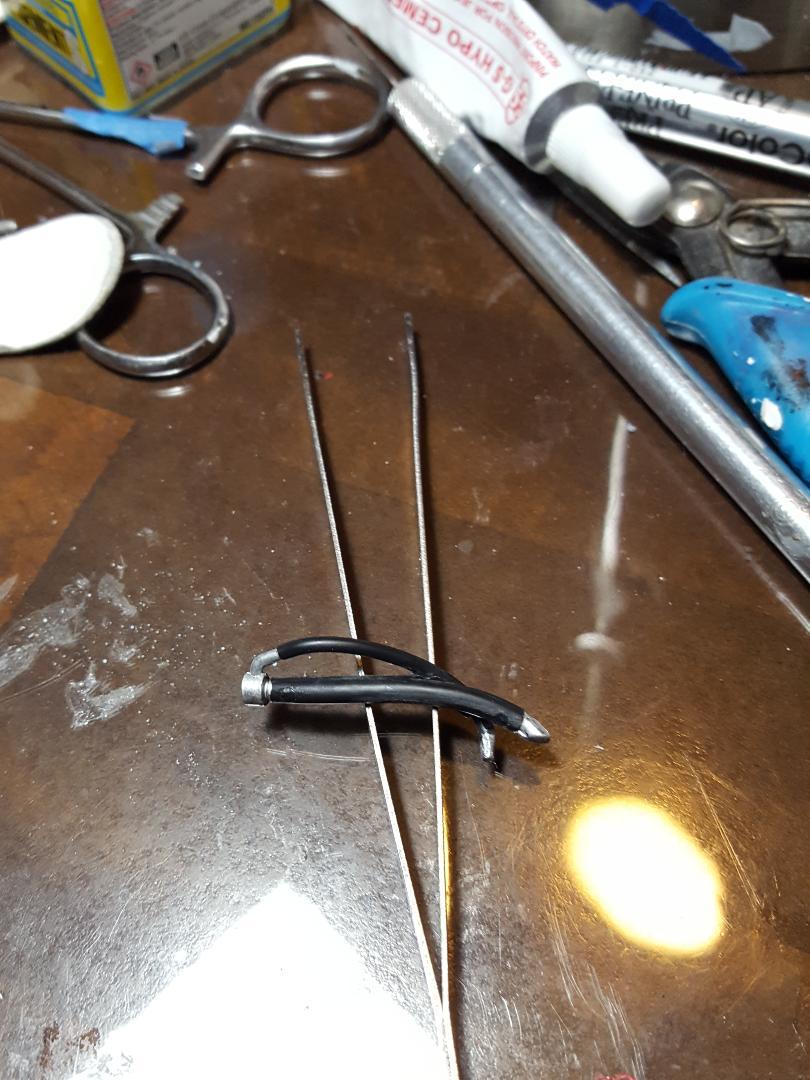
David, I believe they are all partially clear now because they need a metal base to attach them to the car. Half of the 4 inch spoiler is obstructed by the 2 inch metal base, so the driver only has 2 inches worth of transparency. That digital rear view mirror really helps with their rear viewing capability's instead of strictly relying on their spotter. -
2022 Nextgen Camaro
MarkJ replied to MarkJ's topic in WIP: Stock Cars (NASCAR, Super Stock, Late Model, etc.)
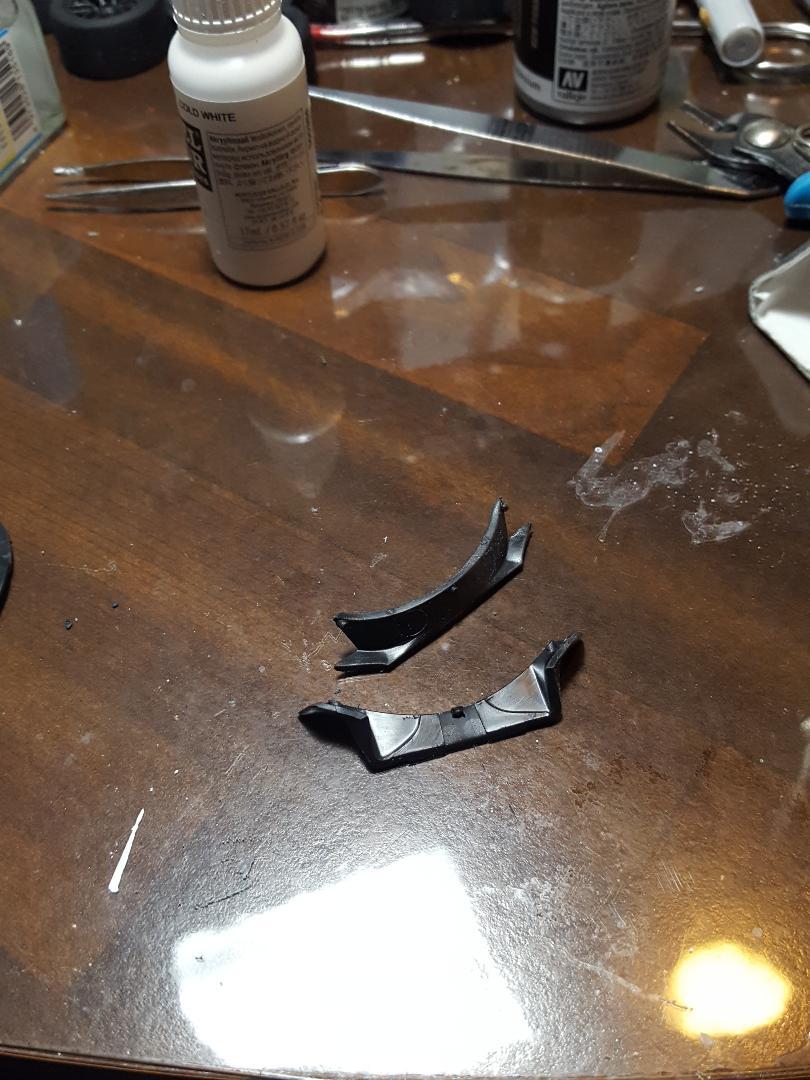
Randy, you did what I had to do. It would have been nice if they had cast both spoilers in clear. From what I understand the 4 inch spoiler is used everywhere except Daytona and Talladega . Maybe it's also being use at Atlanta. I'm not sure. -
2022 Nextgen Camaro
MarkJ replied to MarkJ's topic in WIP: Stock Cars (NASCAR, Super Stock, Late Model, etc.)
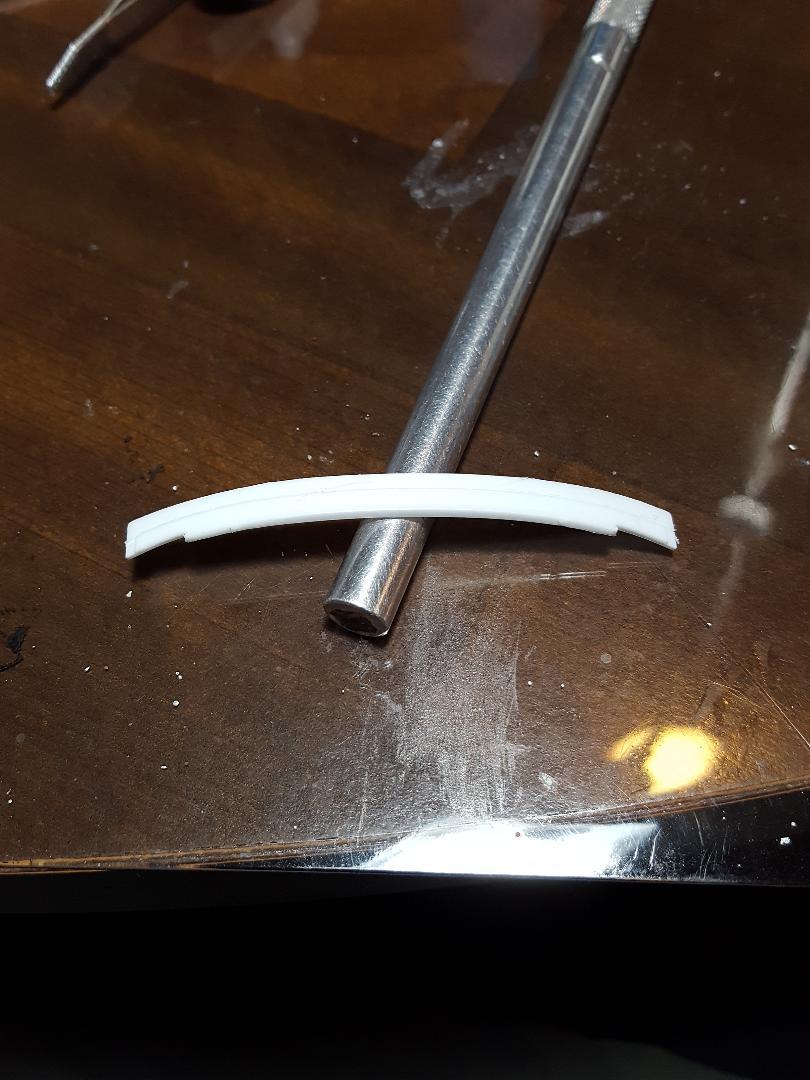
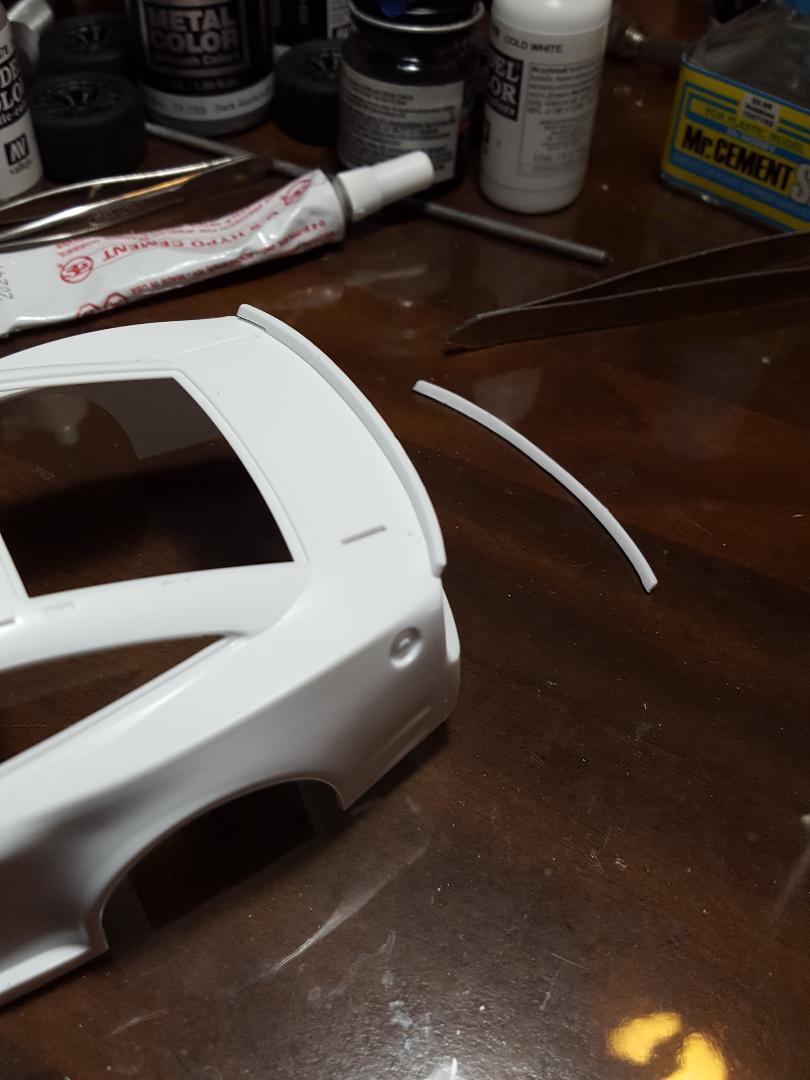
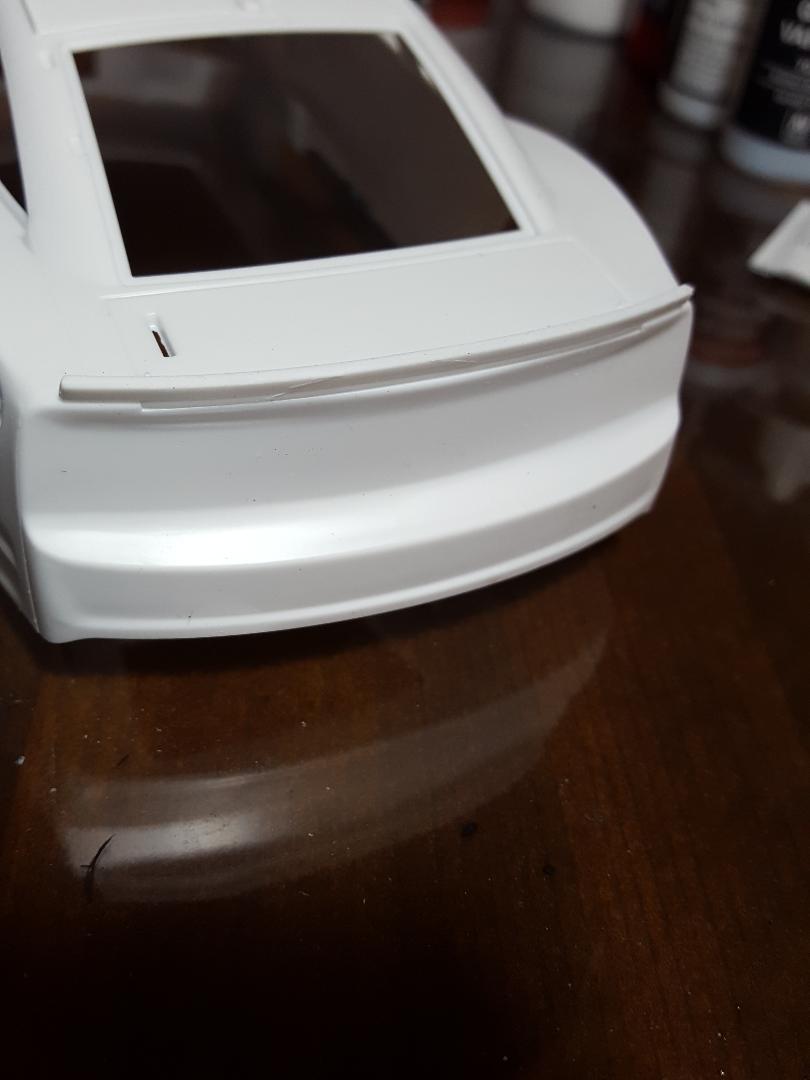
Steve, the kit I have has a clear seven-inch spoiler and a body color 4-inch spoiler, so I had to convert my 4-inch spoiler to a clear one because I'm not building a Daytona or Talladega car.
-
2022 Nextgen Camaro
MarkJ replied to MarkJ's topic in WIP: Stock Cars (NASCAR, Super Stock, Late Model, etc.)
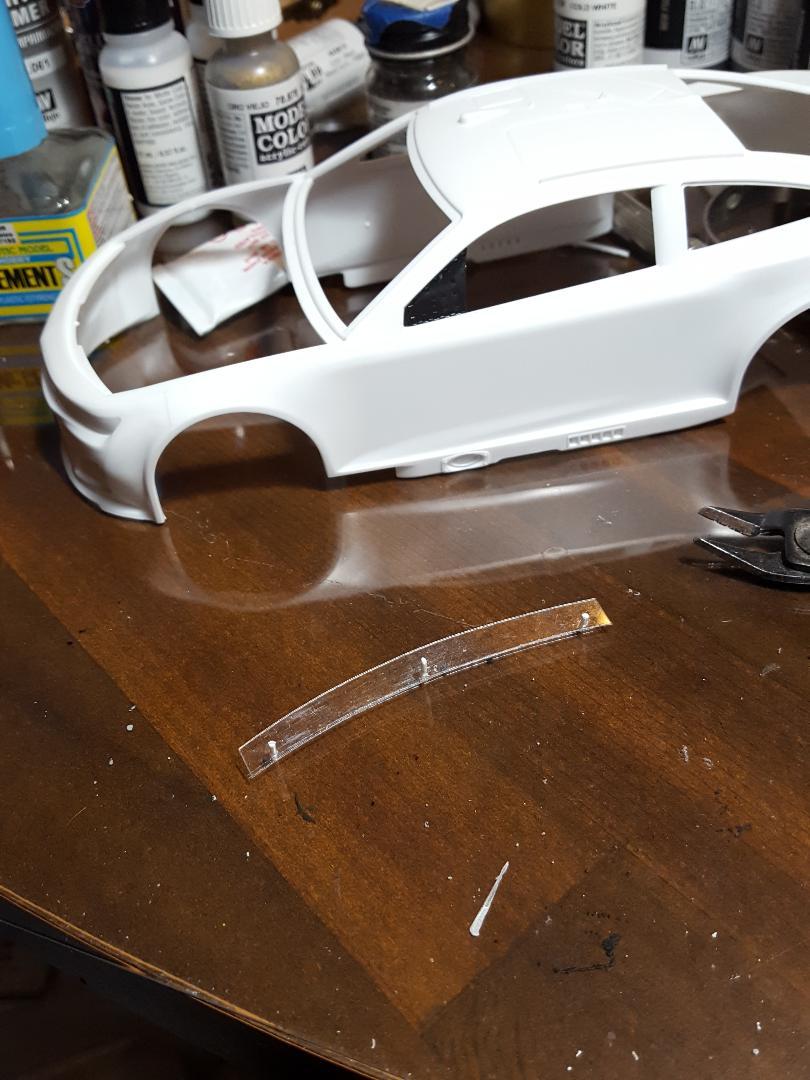
Mike, because of this new car, I have become a modern Nascar fan again, so I got the burning desire to build a couple of these. So far so good. I'm halfway there to getting one done. I have never done full panel decals before, but I know how good Powerslide decals are, so I'm hoping it turns out okay, because I don't have spare decals like I do when I make my own sheets. You should try one. It's a well-engineered kit, except I have questions about some of their choices for casting colors on some parts. Like I need a transparent 4-inch rear spoiler, but they cast it in white. So, I'm in the process of making my own. Thanks for checking in. What have you got going on? -
2022 Nextgen Camaro
MarkJ replied to MarkJ's topic in WIP: Stock Cars (NASCAR, Super Stock, Late Model, etc.)
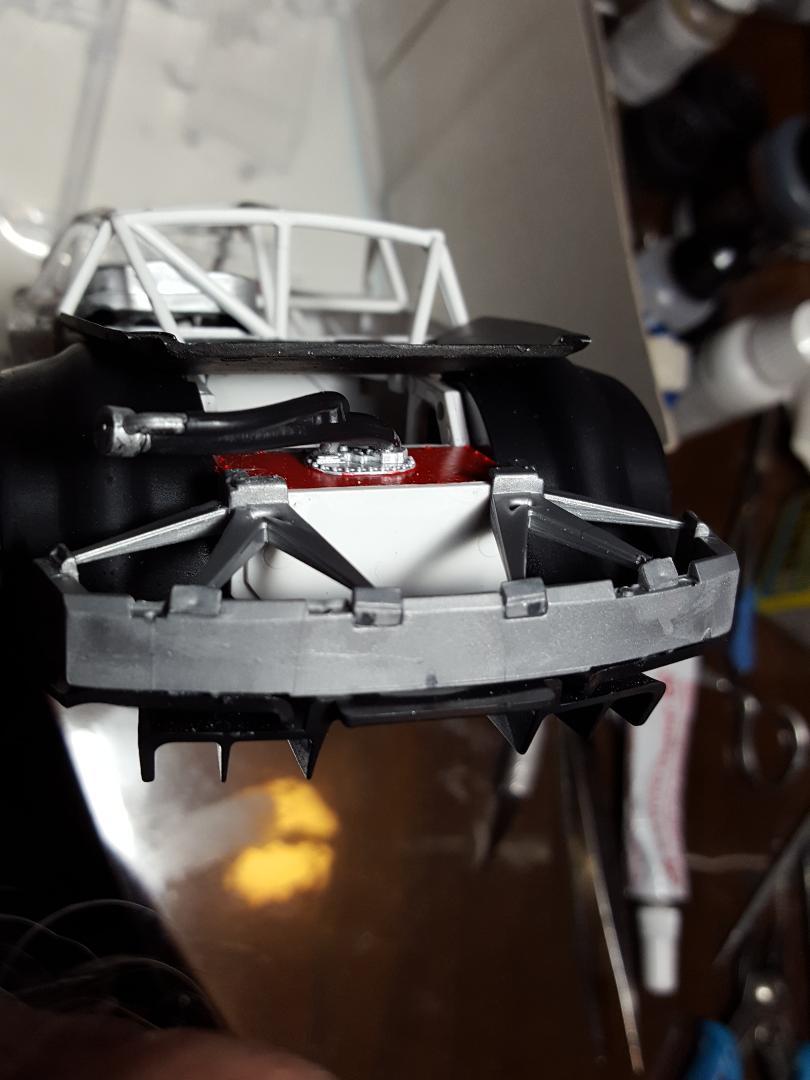
Instruction box 24. This is the last one dealing with the chassis, so I will be on to the body, and I won't be following the instruction boxes because they are pretty straight forward. There are 5 of them left and I don't need to bore anybody with them. I will just be showing the priming and painting and things I will have to add to the body, and then I will be finished after a last touch up of the chassis and then I will be done except for the decaling. Yay.
-
2022 Nextgen Camaro
MarkJ replied to MarkJ's topic in WIP: Stock Cars (NASCAR, Super Stock, Late Model, etc.)
Thanks for the info, guys. I wonder why it was left off the instructions. I will probably have to glue the body to chassis. Just thinking out loud. -
2022 Nextgen Camaro
MarkJ replied to MarkJ's topic in WIP: Stock Cars (NASCAR, Super Stock, Late Model, etc.)
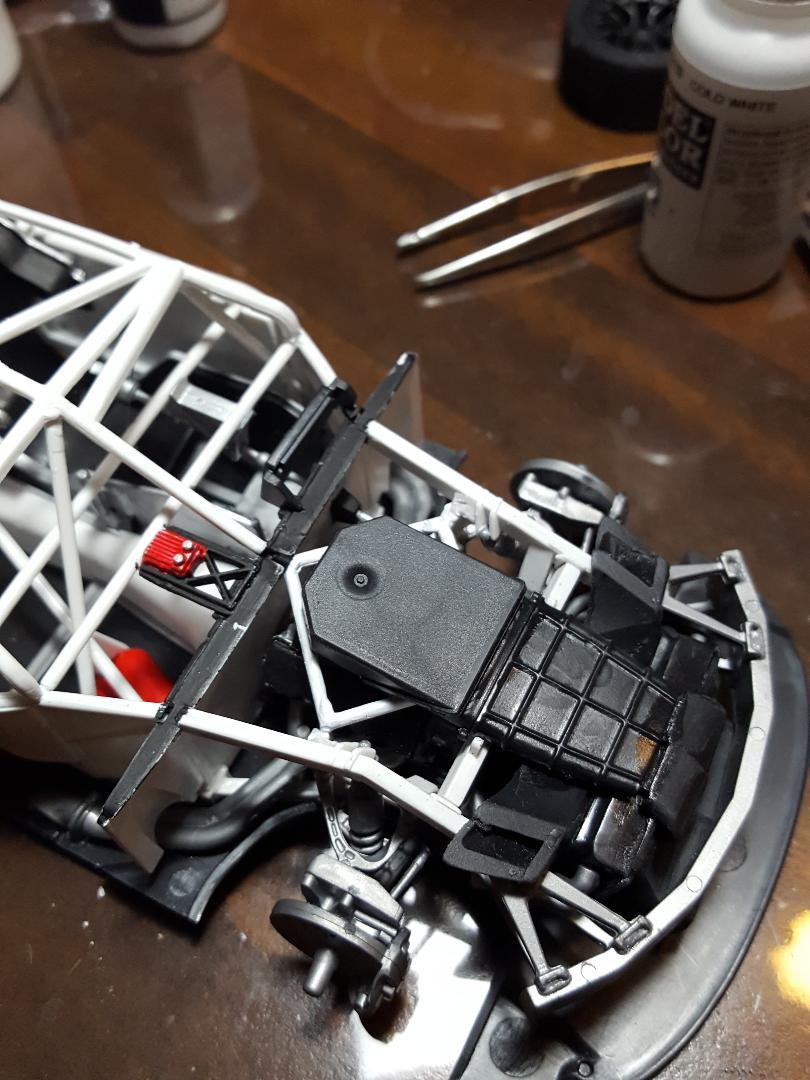
I have found two parts on the trees that are not in the instructions anywhere. One part is number 17 and it looks like a hose. The other part is number 72. It's a white part and it kind of looks like a milk bottle. If any of you guys know what they are for or just extras not used on the model let us know here please. Thanks. -
2022 Nextgen Camaro
MarkJ replied to MarkJ's topic in WIP: Stock Cars (NASCAR, Super Stock, Late Model, etc.)
Instruction box 23. I'm not going to glue the air cleaner down so I can take pictures of what's left to see of the engine in my final photos of the build. I'm also not going to glue the window net on for the same reason. Both parts stay put just with gravity to take pictures of them. When they are in the case, I will just let gravity hold them on too. I'm also going to see if I can get away without gluing the body to the chassis. Looks like it might be a possibility
-
2022 Nextgen Camaro
MarkJ replied to MarkJ's topic in WIP: Stock Cars (NASCAR, Super Stock, Late Model, etc.)
Instruction box 22