Spottedlaurel
-
Posts
1,980 -
Joined
-
Last visited
Content Type
Profiles
Forums
Events
Gallery
Everything posted by Spottedlaurel
-
The 21' Cannonball Ruse build thread
Spottedlaurel replied to disconovaman's topic in Community Builds
I sat and looked through them all yesterday hoping to make my mind up, but it was really difficult, and I'm not sure if I'm any clearer today! I'll have to give them all another look over the weekend. -
The 21' Cannonball Ruse build thread
Spottedlaurel replied to disconovaman's topic in Community Builds
A big thank you to you @disconovamanfor organising it! Looking forward to the 2022 run, with no house move planned for next year I hope to have a more relaxed time of it and not be finishing mine off on the very last night...... -
The 21' Cannonball Ruse build thread
Spottedlaurel replied to disconovaman's topic in Community Builds
Great to see another one make it at the last minute! Looks mean. -
"Cannonball Ruse" 2021 Finished Builds
Spottedlaurel replied to disconovaman's topic in Community Builds
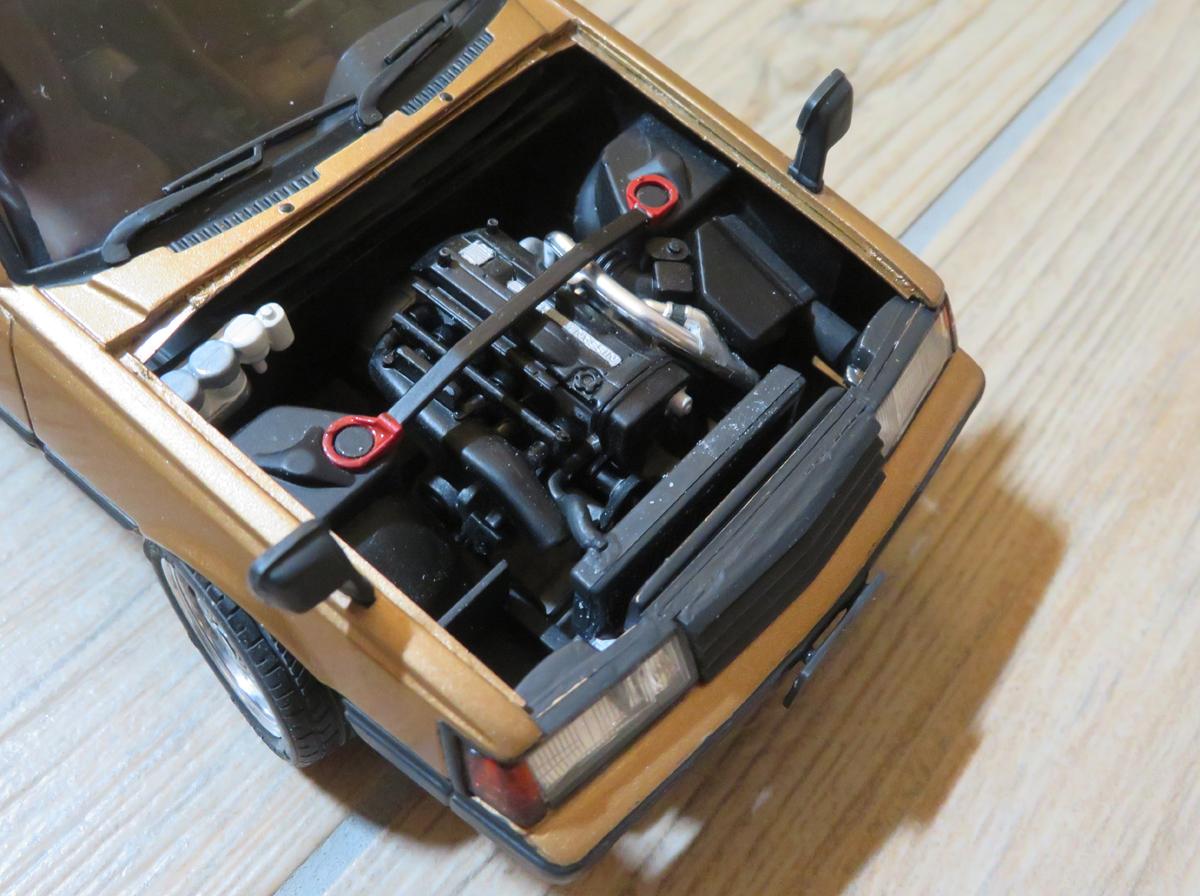
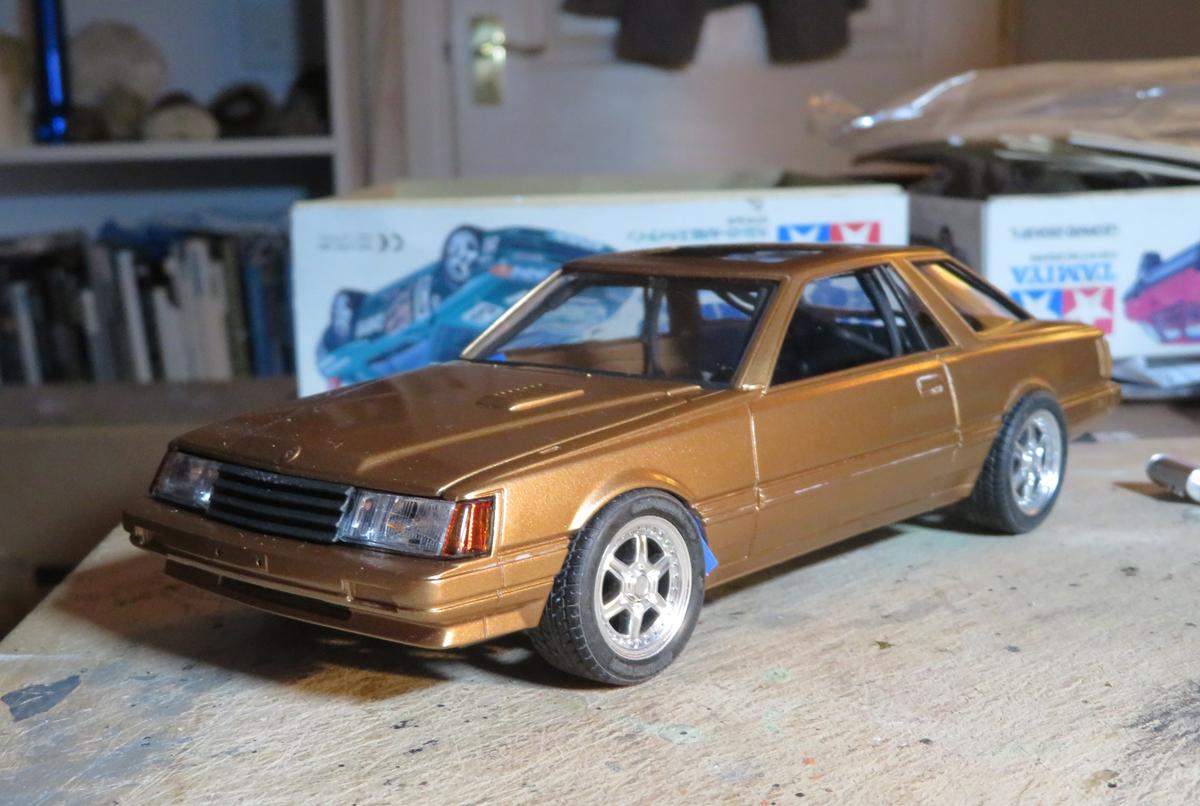
It's too late to come up with a clever back story to my entry, it's just a combination of early 1980s Nissan Leopard bodyshell dropped over the floorpan and running gear of a Skyline GT-R Group N racecar. Pretty much stock bodywork, I just had to cut open the bonnet and cut out a vent at the bottom of the bumper to feed the intercooler. Paint is automotive Motip 56000 metallic beige, quite coppery in reality. I probably used Halfords automotice clearcoat. Black trim brush-painted Revell #9 enamel. Volk GT-P wheels and Bridgestone Expedia tyres came from an Aoshima kit. I added a touch of wash to tone them down a bit. Interior tub base, front seats and part of rollcage from the Skyline. Rear seats (and side panels) from the Leopard, LHD dashboard from a Nissan 180SX (to make the most of overtaking opportunities). Skyline's RB26DETT engine from the racecar, which probablygives around 400bhp. I changed the turbo set-up and intercooler to one from a Nismo Skyline kit, and with some internal mod'slet's say it gives around 500bhp. The Nismo car also donated its big brakes, strut brace and exhaust system. At 1:1 the Leopard and Skyline share a very similar, if not the same, wheelbase. The swap was pretty easy really, I just got caught out at the last minute by the intercooler and rear seat fouling,but no worse than fitment issues with some OOB kits. Hopefully subtle enough not to attract too much attention.
-
The 21' Cannonball Ruse build thread
Spottedlaurel replied to disconovaman's topic in Community Builds
Nice work Snake! Finally got mine finished tonight. Had to do a couple of lunchbreak stints on it at work, even then I was tight for time and to be honest I rushed it more than I'd like. But it can go down as the first completion since moving house. A few more photos to go into the completed builds section as soon as I can edit them.
-
Information on Monogram's Exotics Series
Spottedlaurel replied to oldcarfan's topic in Car Kit News & Reviews
@Bob Johnson, it must be pleasing to see the time and attention these kits are still getting 40+ years on. -
The 21' Cannonball Ruse build thread
Spottedlaurel replied to disconovaman's topic in Community Builds
Good luck to all those finishing their builds off today! I'm at the point of not being able to fully tick anything off my list, but progress has been made on all areas and one way or another my entry will make it to the start line tonight. -
The 21' Cannonball Ruse build thread
Spottedlaurel replied to disconovaman's topic in Community Builds
I'm hoping the same thing too! -
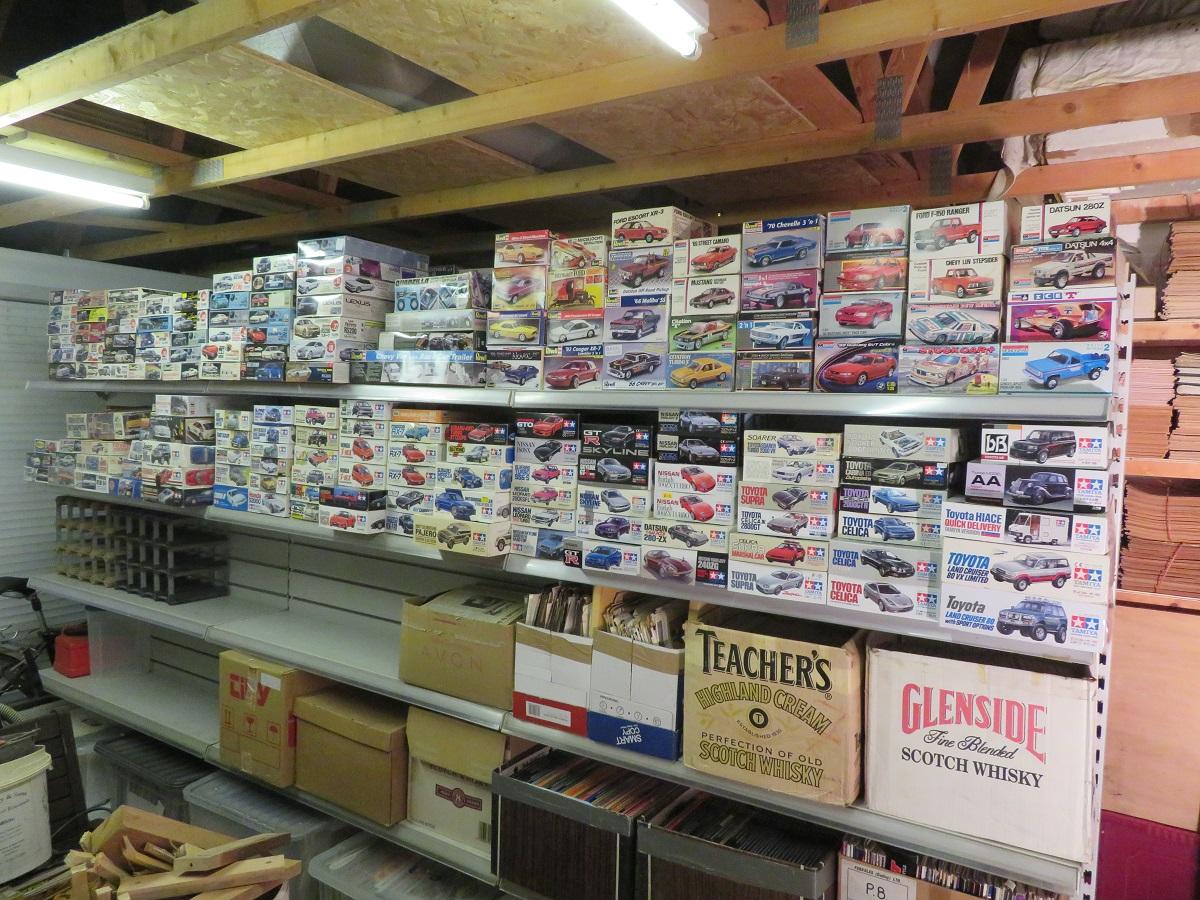
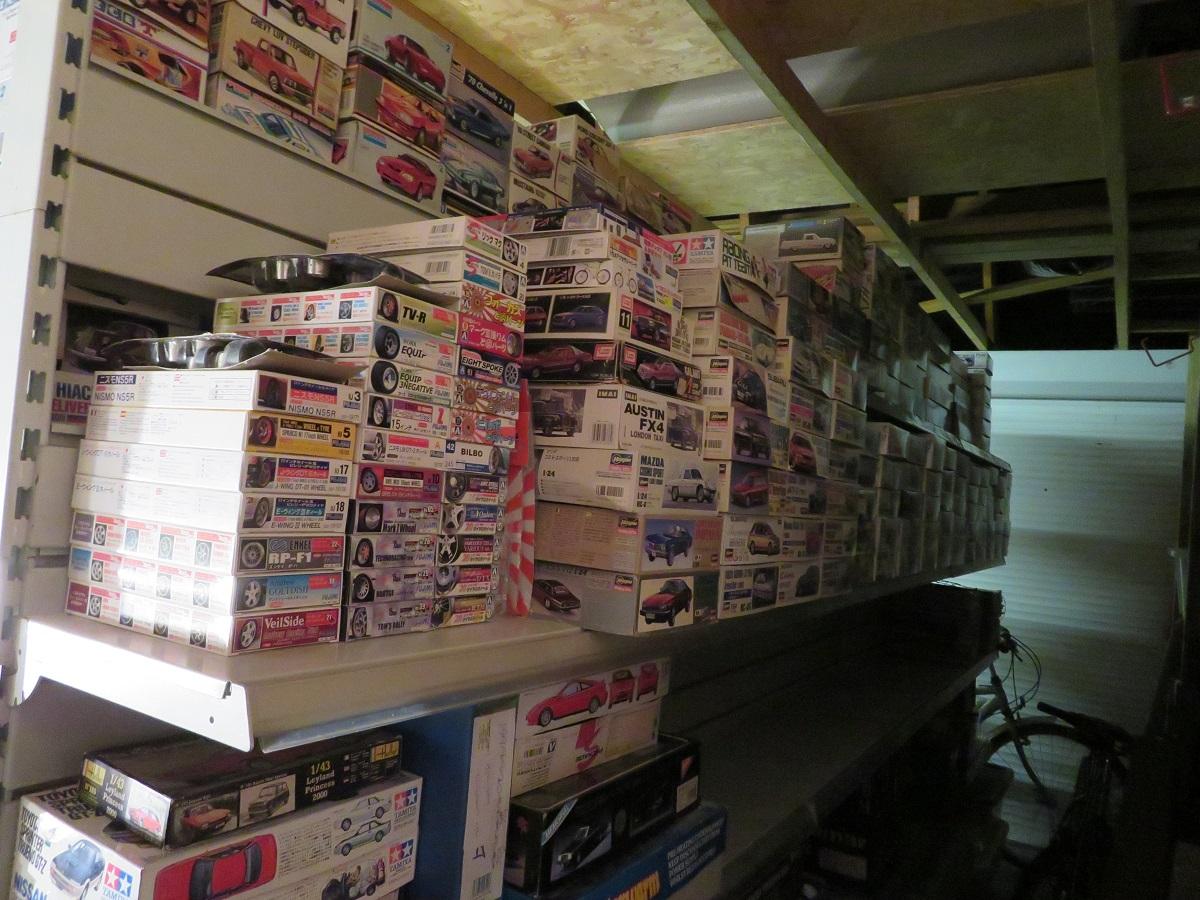
As well as spending a bit of time on my CBR '21 community build, I reassembled these ex-shop shelves and finally gave my stash a permanent home after being stored in my office for a while and then temporarily in various places around the new house: Before anyone things I've neglected them from my collection, Aoshima, AMT/Ertl and MPC are this side, amongst others. Now to spend more time getting them off the shelf, built and into the cabinet!
-
The 21' Cannonball Ruse build thread
Spottedlaurel replied to disconovaman's topic in Community Builds
That looks great! Love the timeworn look to it. I spent much of yesterday (and Saturday) with a brush in my hand doing fiddly paintwork, unfortunately it was for the woodwork on the staircase so until last night I didn't get any time in on my CBR build. The interior is done and some of the cage has gone in (like others here I've trimmed it back for reasons of discretion and keeping it more usable as a road car). If I've got three evenings left to get it finished then I should be OK. I know the bodyshell drops onto the floorpan and interior OK so it least looks like a complete car. For my own checklist purposes, I think this is what I have left to do: 1. Paint black trim around glass, lights, on bumpers and rubbing strips. If need be I'll just do the glass and revisit the remainder later on. 2. Panel line wash. 3. Minor paintwork on interior and cage. Work out some seatbelt painting/decals. 4. Fit glass and interior side panels. 5. Open out centres of brake discs to fit them into the Aoshima wheels. Fit wheels, somehow getting the fronts to sit a touch further in. I've made this more complicated by going from male fitment wheels to female. 6. Finish painting and fit wipers and mirrors, find and apply some US plate decals. 7. Take photos and sit back.
-
It looks really good, your effort and struggles with it were worthwhile!
-
The 21' Cannonball Ruse build thread
Spottedlaurel replied to disconovaman's topic in Community Builds
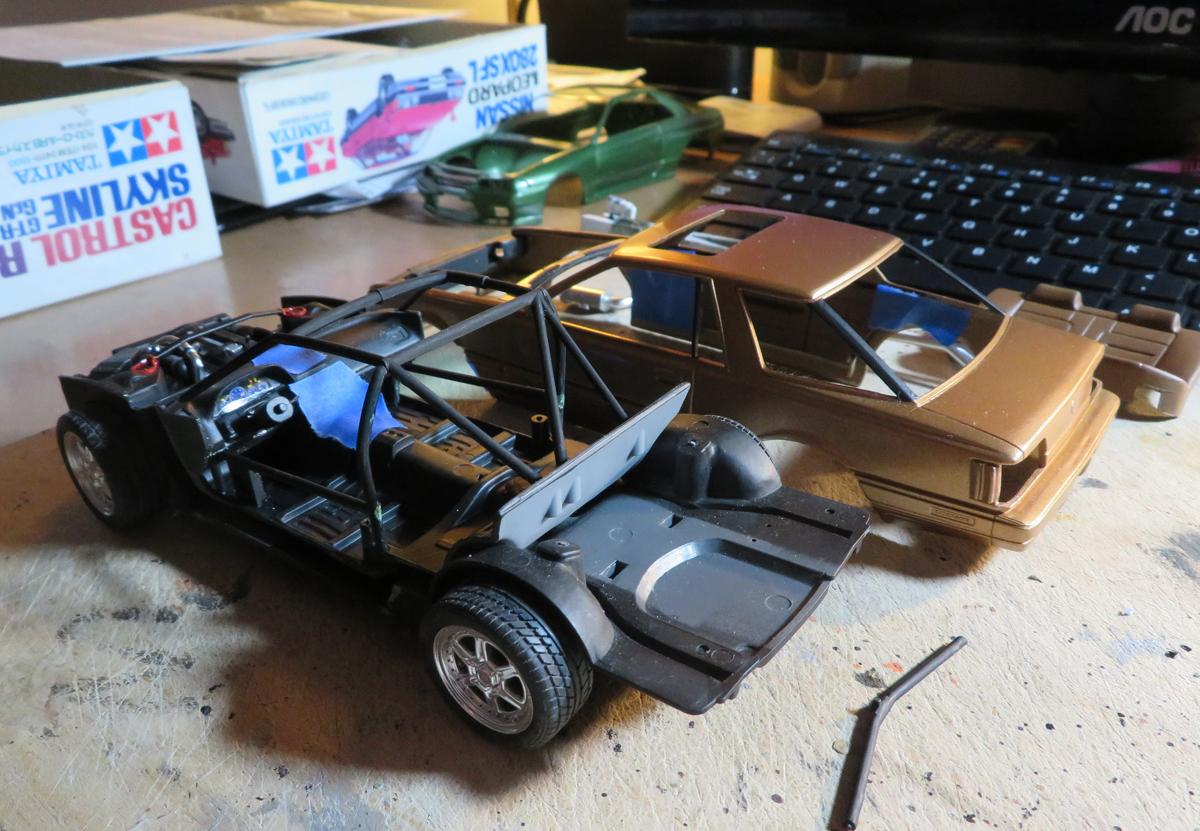
I hadn't intended being awake quite so early, but well before 6am I was up and working on my CBR project. Trying to make use of some quiet time before the rest of the family get up and I have to swap small tools and brushes for large ones to do some work on the house. Cage trial fitment, I had to cut some notches in the bottom of the dashboard. The rear members wil need shortening if I fit the rear seat. Before getting too much further thought I should see how it all fits together. This is with the glass and interios side panels installed, so all the likely culprits to cause a problem - I've built kits where everything from the same box doesn't work, but I'm pleased with how this is going. The bodyshell just drops on with no fouling. Now I'm looking at it sat next to me on the desk it almost looks too subtle, but I guess that's the point!
-
2022 Cannonball Group Build theme suggestion thread
Spottedlaurel replied to Fat Brian's topic in Community Builds
An ideal Christmas gift?...... -
The 21' Cannonball Ruse build thread
Spottedlaurel replied to disconovaman's topic in Community Builds
Thanks Anthony! Now I know Snake is only just putting a first coat of paint on his I don't feel so bad ? -
The 21' Cannonball Ruse build thread
Spottedlaurel replied to disconovaman's topic in Community Builds
I've got back into my CBR build again now: I'm pleased with how the headlights against the chrome backing panel - no need for BMF or silver paint here. The rear lights have a similar arrangement. Radiator, intercooler and other bits and bobs painted. Main work has been on the interior, which uses the base of the Skyline racer's tub with the side panels removed and LHD 180SX dashboard (to make the most of overtaking opportunities). I'll keep the original Leopard interior side panels and rear seat, to keep it civilized. I may try and find some different front seats, I really need a pair of proper buckets I don't yet know how much of the Skyline's rollcage will be used, I'll see how it fits inside the different roofline. If nothing else some trimming will be required due to the rear seat. The brakes from a Nismo tuner version of the R32 were much bigger than those which came with the original racecar, so I've pinched those (along with the strut brace, intercooler, turbo and exhaust system). With the wheels from yet another kit I'm now up to parts from five different sources. Biggest job to do is painting all the black trim on the bodywork - it's around all of the glass, on the front and rear bumpers, bonnet edge, side rubbing strips etc. I need to make use of daylight over the weekend to get that done. At least there's no black painting required on the inside of the glass, my least favourite job of all.
-
Car modelling in the UK
Spottedlaurel replied to Earl Marischal's topic in General Automotive Talk (Trucks and Cars)
For anyone in East Anglia, or holidaying on the Suffolk/Norfolk coast, it's worth a trip to Hannants' main warehouse in Lowestoft. Even though it's primarily for online and wholesale business Joe Public can turn up and wander around, selecting from big piles of kits on the warehouse shelves. I've been there several times over the years. Retail prices are no different to what they publish online, but there's a plenty to choose from. Now I look at their website I see they have a Hasegawa Toyota Starlet kit on special offer....... I'm lucky in that I also have a couple of decent independent shops fairly local to me. Even if I don't get so many kits from them now they're still handy for tools and paints. One has opened-up a separate shop selling secondhand kits and diecasts too. Inevitably there are other shops I can think of that have closed down, I still have unbuilt kits from them after 25-30 years. As I have a particular fondness for 1:1 Japanese cars then the range of cars and accessories available from online retailers like Kent Models and Hiroboy is perfect - I try not to look too often! Modelsforsale are also good too. Otherwise it's eBay, where there's no way of knowing what will pop up. For building, where it doesn't matter if the box is tatty or even if the kit has been started, there's still a fair choice at reasonable price on there. -
2022 Cannonball Group Build theme suggestion thread
Spottedlaurel replied to Fat Brian's topic in Community Builds
Anton, I may be able to help you with any missing/broken or alternative road car parts you require. I had a duplicate road car kit and I've used the bodyshell from it to reshell my original build, and I sold the engine to someone else, but I have the floorpan, suspension and interior all available and of limited use to me. -
2022 Cannonball Group Build theme suggestion thread
Spottedlaurel replied to Fat Brian's topic in Community Builds
That's at least three of us from 1970 ? The Galaxie idea sounds great! -
Information on Monogram's Exotics Series
Spottedlaurel replied to oldcarfan's topic in Car Kit News & Reviews
Here are my renditions of them: Low parts count but the shape looked good to me. The 280Z road car, complete with the Roadster that ended up fitted with its wheels. As took the bumpers off it highlighted the rather square rear end, so I did a bit of surgery there. The little Datsun Truck that ended up with the 280Z racer's wheels. Even out of all my Japanese accessory set wheels and tyres I couldn't have chosen anything better for it. -
I managed to get one of these recently. I haven't yet had a really thorough look, but the delicacy of some pieces and the level of detail is amazing to me. I hope I can do it justice, it certainly doesn't look like one to bash out over a weekend or two or a few evenings. It certainly appears that all sorts of versions could be spun-off from it, like Hasegawa with their recent releases.
-
Information on Monogram's Exotics Series
Spottedlaurel replied to oldcarfan's topic in Car Kit News & Reviews
Fascinating to read more about these kits and to see the catalogue scans, plus great to see some built-up examples. So good to hear Bob's view from the inside on them. I built the yellow TR7 road car as a youngster, sadly only the wheels/tyres and instruction sheet appear to have survived. I do have a plan for the wheels and I'd love to get hold of another one of this kit someday. In more recent years I've picked up the 308 (actually the Revell reissue) plus road and race versions of the 280Z. The Ferrari built-up nicely with lowered 'suspension' and staggered wheels and tyres from Tamiya/Fujimi kits. I had a lot of fun with the road 280Z, adding arch flares, wide Fujimi wheels and making a few minor mod's. It's amusing to compare it to Tamiya's newly-tooled 240ZG kit, yet it still does a great job of capturing the essence of the 1:1. I'm looking forward to building the other one at some point. The wheels on both Zs are really nice. I used the road car's slot mags on a Datsun Fairlady Roadster, and the racer's 4-spokes on a Datsun 1200 truck. In both cases I think I used the Monogram tyres too, they look just right on smaller 1:24 cars. -
Fujimi's Ferrari 575M. My first build in 11 years.
Spottedlaurel replied to beeRS's topic in Model Cars
Very nice Sonny! Well done for staying focused and keeping it simple, the end result looks really classy. -
The 21' Cannonball Ruse build thread
Spottedlaurel replied to disconovaman's topic in Community Builds
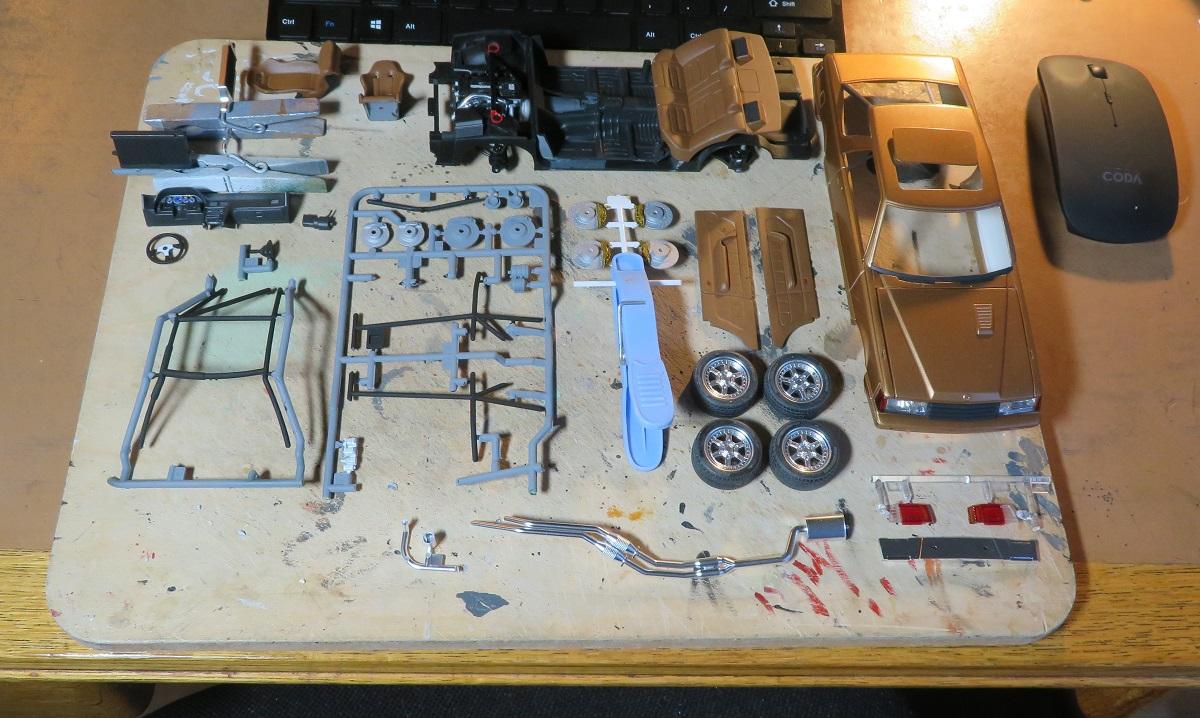
Managed to get a bit of time in on mine tonight: I'm going to be up against it, but I need to finish the interior, paint and assemble the rollcage, detail the bodyshell, fit an exhaust, radiator, intercooler and strut brace, and detail and mount the wheels and brakes. Getting a few big, simple things done tonight was useful, with a bit of luck I hope to make it.....
-
I might not have done much on one of my WIPs tonight, but the fact I did something is a major accomplishment. It must be at least three months since I last managed to do anything due to a house move in September, but over the last few days I've managed to get a display cabinet up on the wall, stock it with the built kits and at last get the tools, brushes and materials out: It needs a good sort-out, some extra shelves and better lighting, but being able to build in the house with the PC next to me is a major step forwards after years of being in a shed at the bottom of the garden.
-
1990 Mustang LX - SVT Cobra DOHC Powered! UPDATE! 1/22/23
Spottedlaurel replied to Dennis Lacy's topic in WIP: Model Cars
That's the one. I'm saying this from memory as it's been a while since I opened up the box - it's a great kit but I think the bottom of the engine and gearbox is moulded into the chassis/floorpan. That's why I'm looking at a complete engine/chassis swap and not just using the motor alone. It would give the recipent car better suspension and brakes, so there is a benefit. I think the wheelbase on the Monogram '79 Pace Car is similar.