Spottedlaurel
-
Posts
1,980 -
Joined
-
Last visited
Content Type
Profiles
Forums
Events
Gallery
Everything posted by Spottedlaurel
-
Thanks everyone. I must admit this one does stand out amongst the others in my cabinet. Thanks Hector, I don't think we had many FWD cars that were done with this sort of look - most that we had were either American or big Japanese/European saloons.
-
One of those 917s was one of the first couple of kits I built, along with an old Bentley. I recall it being quite fiddly and not ideal for a first kitbuilding attempt. Those two kits are the only ones I don't have any more, not even in the parts box.
-
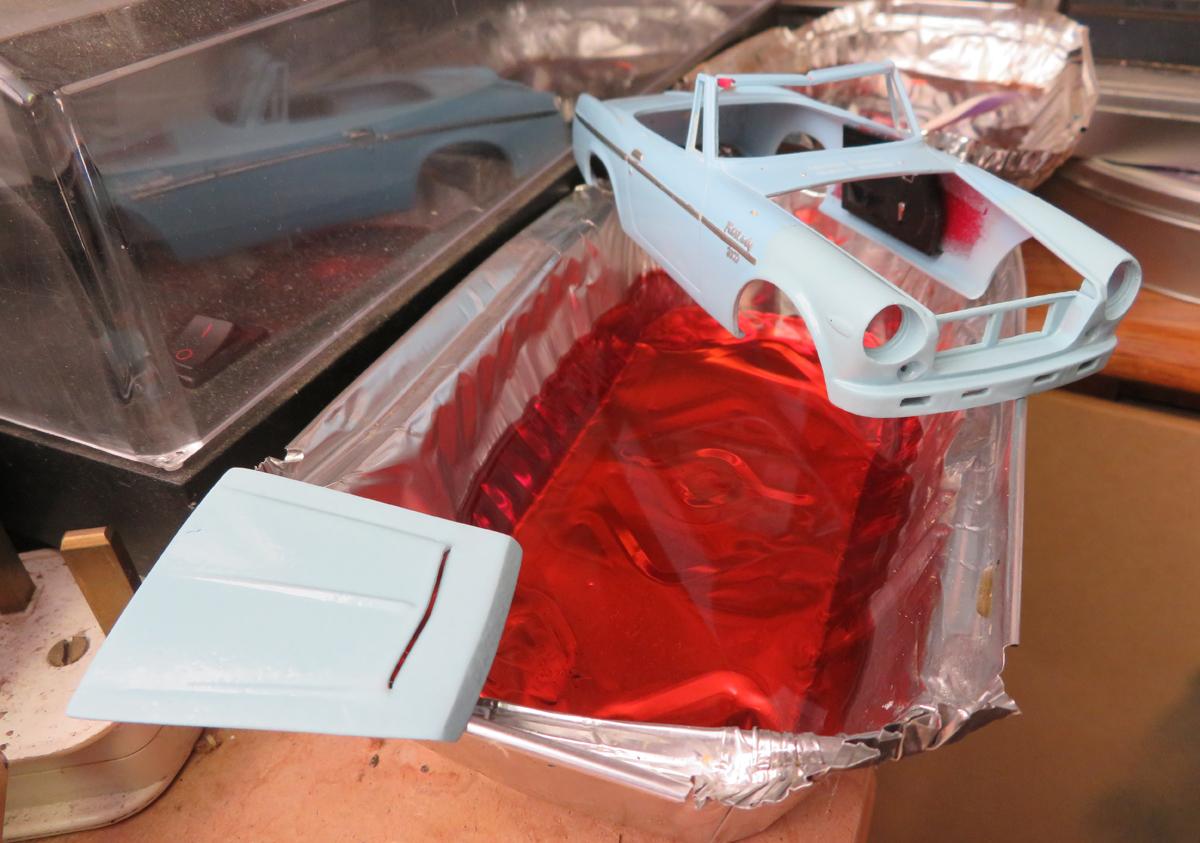
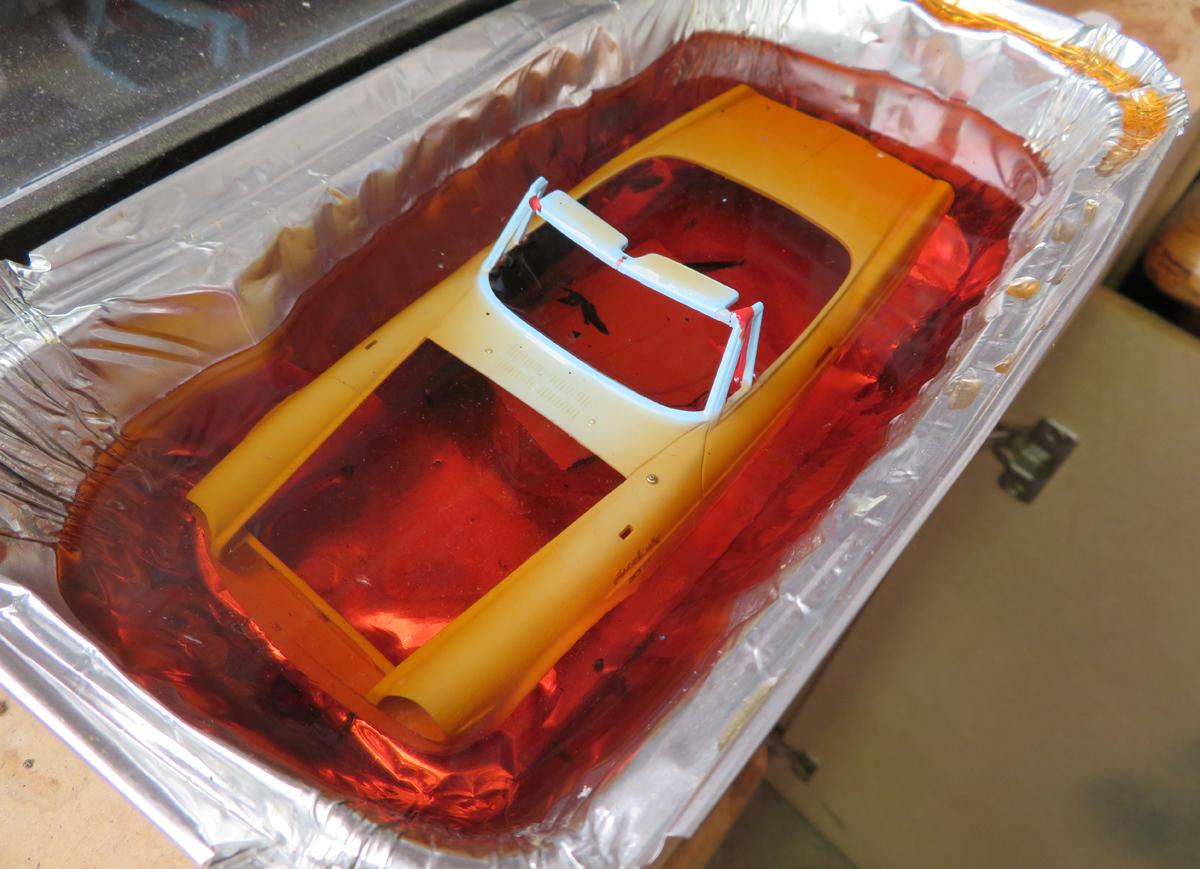
I attempted a repair on the Fairlady Roadster, it didn't work out so....... Into the bath of brake fluid it goes. I just hope I can buy that colour of paint again - the floor pan and underbonnet areas have all been painted the same colour. Anyone know of a source or a match for Tetrosyl Pastel Blue?......

-
That SM kit looks fantastic, I've never seen it before. Got this in the week, also French but rather less accurate: 1:24 Airfix Renault Alpine A310 kit by Spottedlaurel, on Flickr And some others over the last fortnight or so: 1:24 Tamiya 1981 Toyota Celica XX 2800GT by Spottedlaurel, on Flickr 1:24 Aoshima Nissan Skyline 2000 GTX-E.S GC111 kit by Spottedlaurel, on Flickr 1:24 Aoshima and Fujimi kits by Spottedlaurel, on Flickr The Skylines were bought primarily for the wheels, which are really nice new mouldings that will help when building loose replicas of a couple of 1:1 Datsuns. The Laurel is one I've been after for a while, I have a non-hardtop version in my garage and this is the closest I'll get to a 1:24 version of it.
-
Looks great, really nice work with the LEDs.
-
Shiny! Looks great.
-
Looking forward to seeing this one done, looks great so far. Didn't realise they offered a version without the engine. I have the R1 which does have it, I was thinking it could be transplanted into something else but it uses the same moulded-in sump and gearbox that you have on yours, so that won't be so easy.....
-
Never yet found a Luv, I'd be reliant on finding an old release and any I've seen have been more than I wanted to pay. Hopefully people will start bringing in the current one. I have a couple of Revell Datsun 4x4 720s (new and old releases of the Snap-Tite kit), Aoshima Datsun 720 Lowrider, MPC Datsun 620 "California Sunshine", AMT Ford Courier stepside (Mazda B1800), AMT Dodge Ram 50 (Mitsubishi L200), Aoshima 1994 Hilux and several Monogram GM and Ford trucks. I really need a Luv and an older Hilux to complete the set! You mentioning this got me looking me on my Flickr account, it reminded me of a few images I've scanned and others from old custom magazines, and my head is now buzzing with ideas......
-
The 4x4 style does look good on it, like you say that'd be the way to go with the flared arches. But with the fantastic work you've done on the arches on this version definitely keep the Centrelines. I have several light truck kits and I'm a bit stuck on ideas for them because of the odd arches they've been given. P.S. I like the one your friend has done. I'd like to try and get one myself, but it doesn't show up with any UK eBay sellers.
-
Looks great, I'd happily have that at 1:1.
-
Thanks both of you! I put a bit extra into this one because of the link to my real car, and I'm pleased with how it turned out.
-
I don't usually build anything at 1:20, but for some reason I ended up with this one. I chose the colour so it would be a loose replica of a real Skyline that I owned for some years. 1:20 Nichimo Nissan Skyline C211 kit by Spottedlaurel, on Flickr 1:20 Nichimo Nissan Skyline C211 kit by Spottedlaurel, on Flickr Very neatly presented. I started it back in 2008 or so, but only got round to finishing it this year..... 1:20 Nichimo Nissan Skyline C211 kit by Spottedlaurel, on Flickr A reasonable level of detail, although the straight-six engine suffers a bit as it was intended to house an electric motor. At least the batteries would have been in the boot, not below a shallow interior like some older Japanese kits. 1:20 Nichimo Nissan Skyline C211 by Spottedlaurel, on Flickr 1:20 Nichimo Nissan Skyline C211 by Spottedlaurel, on Flickr 1:20 Nichimo Nissan Skyline C211 by Spottedlaurel, on Flickr 1:20 Nichimo Nissan Skyline C211 by Spottedlaurel, on Flickr 1:20 Nichimo Nissan Skyline C211 by Spottedlaurel, on Flickr I swapped the wheels with the only other 1:20 kit I had (because I can't ever keep them standard) but otherwise it was pretty much OOB.
-
Thanks Tim. I don't enjoy filler work, I've never found anything that sands down particularly easily. I'll send you a PM so we can swap addresses, many thanks for that.
-
It doesn't warrant a WIP thread, but tonight I resurrected this long-term project: 1:24 Fujimi Nissan Fairlady Roadster by Spottedlaurel, on Flickr Started it back in 2007. It got further than this, with detail painting done and more parts attached, but then my daughter (then aged about 7-8) unfortunately knocked it onto the floor..... 1:24 Fujimi Nissan Fairlady Roadster by Spottedlaurel, on Flickr It was so long ago I'd forgotten what I'd done, but it appears that I started to repair the damaged areas. I've now sanded down the filler and I'll repaint the bonnet and front corners (don't have enough paint for a complete stripdown and respray).
-
Excellent save, well done to the original builder for doing a clean job in the first place and for the sympathetic job you've done on it. Yes, you could have stripped it right back but then it would have lost its character.
-
I am! Thanks Tim, that's incredibly kind of you. I'd be very happy to take you up on your offer. See photo below, are you OK with the fact I've given them a coat of satin black areosol paint and glued the back on? I've spent some time going through my parts boxes and other kits, the best I've come up with is either a those from the Revell Datsun truck or Monogram Datsun 280Z: 1:25 Revell 1966 Chevelle Wagon by Spottedlaurel, on Flickr Bodyshell after more filling and sanding: 1:25 Revell 1966 Chevelle Wagon by Spottedlaurel, on Flickr I've shaved the boot hinges as well. Happily I don't have to work out how it would be hinged in real life..... Should be able to at least get some white base coat on over the weekend, before the Camel Yellow.
-
Good luck, looks even better this time around and would be such a shame if it didn't work out again.
-
Good to see one of these in progress. Seen them for sale lots of times over the years. Looking good, definitely better lowered.
-
Another one here who's never heard of a fibreglass being used at this scale, it sounds awful! Great progress so far. I have no experience of Australian racecars like this, but the colour scheme reminds me of the Ford Anglias used here by George Polley on his oval track National Hot Rods back in the '70s. Probably a similar grassroots scene? Also interesting to see what the TS-37 paint looks like for real. I have an old can of it, not entirely sure what to use it on yet.....
-
Nicely done, very clean.
-
Shiny! Looks good, interesting to see one of these built. My son is finishing off a Koenig Specials version of the Ferrari Testarossa at present.
-
Thanks everyone! As I can point out with all of my builds, it's far from perfect but it was an enjoyable process and I'm pleased with the finished result - it matches the concept I had in my head. The blue wasn't the intended colour, I started off using a darker shade but it was a previously started can and I had concerns about whether there'd be enough and how it would spray if I was trying to get the last bit of paint out, so I switched to this one. It might have been 30+ years old, but it still worked nicely..... 1:24 Tamiya Audi Quattro by Spottedlaurel, on Flickr It's a relatively simplistic kit as it's from Tamiya's early days, but it does build up nicely and looks an effective display piece once done. However, if anyone wants to build one, I'd warn of a couple of issues. First, the moulding is a bit too thick under one of the rear side windows so the bodyshell doesn't sit nicely over the chassis unless that is thinned out a bit and/or the back of the interior side panels are shaved. Secondly, the front spoiler/bumper is a separate piece, to allow for the dfferent road and rally car front ends. As is the way with Tamiya and most Japanese kits, the bodyshell clicks onto tabs at the front and back of the floorpan meaning it's reliant on that glue joint between front wings (fenders!) and bumper. I chose to attach the spoiler/bumper onto the floorpan first, then lower the rest of the competed bodyshell onto it. Because of the first issue, it took a few attempts to get it to fall into place naturally. Looking back at my unpainted gluebomb first attempt, it appears that I had the same issue with that one.
-
Thanks Martin, it's going nicely so far! When I look at the shell I keep thinking of the Victor FD estate, I suppose there was the GM family connection. It was only by chance I found the wheels, I found them in a Monogram Mustang box and I must have been thinking of that as a project at one time. Sounds a good idea, but sadly I don't have either of them. A quick look online shows neither of them are available here at a price that I can justify for the seats alone (and yet another future project which I hadn't planned on). Just about to go for a rummage through a few boxes to see what I can find.....
-
Not a scene I knew about, I can now consider myself educated - they're having fun with cars, it's all good. I'm not entirely sure it's a look that would translate to the rural area where I live - I'd end up with a car wider than the roads I drive along! Good luck with the rest of the build, looking great so far.
-
AMT 1958 Impala - Biography of a Box Art Model
Spottedlaurel replied to Dave Darby's topic in Model Cars
What a fantastic story, and great to hear a bit about what went on 'behind the scenes'. A nice clean build too, as to be hoped!