Bainford
-
Posts
5,189 -
Joined
-
Last visited
Content Type
Profiles
Forums
Events
Gallery
Everything posted by Bainford
-
Anyone have any insight into this kit? I just learned that it existed. Is it decent quality, or a glorified door stop? Is it really 1/25 (some of those early Japanese kits are curiously scaled)?
-
Such an elegant machine. You have done a nice job of this.
-
 Cool, I love Pintos. Are you painting the tires with black paint, or with a dull clear coat? Either way, if you paint vinyl tires, your best bet is acrylic paint. In many cases, enamel will not dry when applied to vinyl tires. Ever. However, if your need is to dull them or remove the shine, there are other methods. Scrubbing them with a toothbrush and a slurry of abrasive cleaner and water (such as Comet or Ajax) can do a nice job. Depending on how hard you wish to weather them, steel wool or Brillo pads can work also. I have also dulled vinyl tires by giving them a scrub with lacquer thinner, though go carefully here, as a strong thinner can soften the details of the tires. I strongly recommend that any of these methods are tested on junk tires to ensure you get the look you want. If you go with the lacquer thinner method, definitely test first as some thinners are quite aggressive.
 -
Kits you can't seem to have enough of.
Bainford replied to Sledsel's topic in General Automotive Talk (Trucks and Cars)
Fujimi GT-40 and Tamiya Lotus Europa. Got a bunch of each, and always seem to have my eye out for a good deal on more. The model I've built the most of over the years is MPC Dodge Chargers. There must have been a dozen of them. -
Interesting. Those chrome reverse really set the car off perfectly.
-
Brilliant, Daniel. I'll be using that one.
-
Safety in the 50's
Bainford replied to TarheelRick's topic in General Automotive Talk (Trucks and Cars)
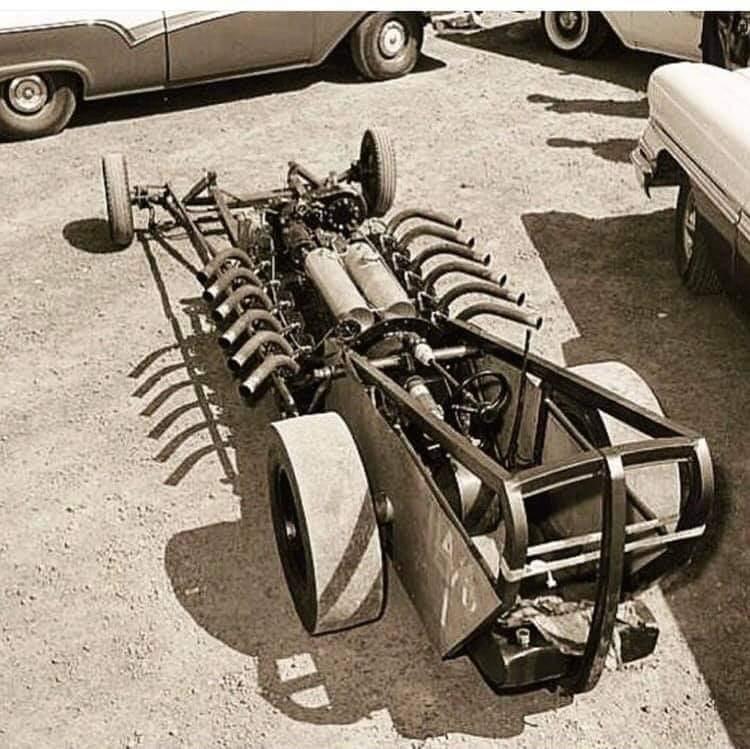
Cheers Bill. I suspected it had aircraft origins, but couldn't imagine what it might be. It's an interesting old lump. -
Simulating thin whitewalls on tires
Bainford replied to Mr. Metallic's topic in Model Building Questions and Answers
Yup, very clever, and nice looking results, too. -
When ten year old me saw this on this kit on the shelf of the local Woolworths, I thought it was the coolest looking model I had ever seen. I didn't have enough for the $3.50 so I tortured my Mom until she coughed up the deficit, and it came home with me. At the time, I never knew of the Little Red Wagon kit.
-
Agreed. That's about the coolest '57 Nomad ever, and everything about that photograph is perfect, from an artistic point of view. The perfect scene, perfectly captured. I think Bob Paeth was responsible for this box art.
-
Safety in the 50's
Bainford replied to TarheelRick's topic in General Automotive Talk (Trucks and Cars)
Check out the angle-iron cage on this thing, not to mention the sketchy looking fuel tank at the rear. But while you're checking that out, anyone have any thoughts on that odd looking engine? What the heck is it?
-
Safety in the 50's
Bainford replied to TarheelRick's topic in General Automotive Talk (Trucks and Cars)
-
Nice looking Ford. The Woods Brothers livery is one of my favourites. Nicely done.
-
Nice work Mario. Cool Bimmer.
-
(heh heh) What the heck... but, but, I thought you were cool, man.
-
Fantastic project. Looking forward to watching this come together.
-
Dodge Cabover
Bainford replied to Repstock's topic in WIP: Model Trucks: Big Rigs and Heavy Equipment
I just had a crawl through this entire build. Very impressive build. Excellent fab work. -
Wild Hoss Bronco
Bainford replied to iamsuperdan's topic in WIP: Model Trucks: Pickups, Vans, SUVs, Light Commercial
Ditto. I feel the same way about resin casting, machining, and complex soldering, too. All skills I'd like to master, but at the rate things get built on my bench, I'm worried any skill that requires a significant learning curve will only serve to take all my time developing it rather than doing any building. -
Wild Hoss Bronco
Bainford replied to iamsuperdan's topic in WIP: Model Trucks: Pickups, Vans, SUVs, Light Commercial
Cool project, and very nice printing. Should be a fun build. In the 90s I used to wheel with a buddy that had one of these. A very mild 460 with three inches of lift and 35" tires, otherwise stock. It was very cumbersome on the muddy woods trails, and when it got stuck, it was like digging a block of lead out of the mud. Everything about it seemed crazy heavy for its size. It was a fun machine nonetheless. -
T41 Bugatti sport coupe
Bainford replied to charlie libby's topic in WIP: Other Racing: Road Racing, Land Speed Racers
The english wheel is too cool. Nice work. -
Been away from the forum a while, and just checking up on some projects. Yours is coming along very nicely, Bill. Huge improvements. Love what you did with the wheels. Looking forward to seeing more.
-
Cool project! I've always been interested in this kit, and have heard all the issues regarding getting it to all fit under the body work. Your plan should solve that, and produce a stunning display. Nive work so far.
-
1932 ford saltlake car
Bainford replied to charlie libby's topic in WIP: Other Racing: Road Racing, Land Speed Racers
Just catching up on this build after being away for a while. Stellar work, Charles. Impressive and inspiring. I would love to see this thing in person. A beautiful creation indeed. -
Just returning to the forum after a couple months away, glad to find this cool build. Nice work so far Andrew. I admire your courage to redo the left side decals.
-
’72 Dodge Demon Drag Racer 1/25 scale
Bainford replied to AmericanMuscleFan's topic in WIP: Drag Racing Models
Very nice work, Francis. Good to see you back at the bench.