Casey429
-
Posts
441 -
Joined
-
Last visited
Content Type
Profiles
Forums
Events
Gallery
Everything posted by Casey429
-
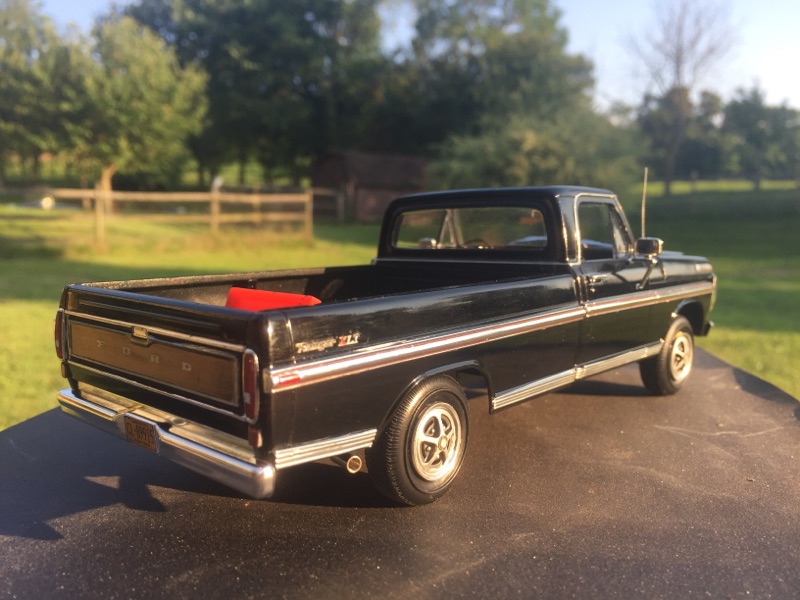
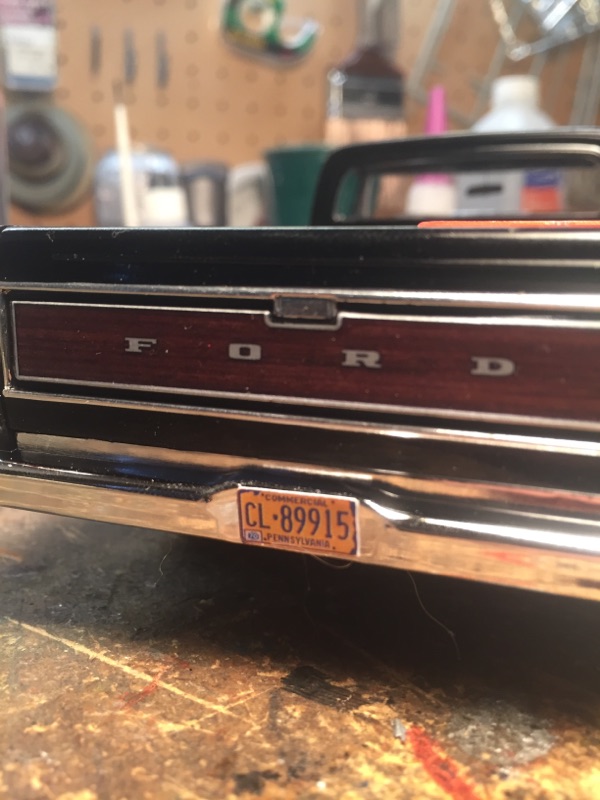
Good evening everyone. Here's the latest from my little corner of the world. It's a pretty basic mashup of a couple of Moebius/Model King F-100s. What we ended up with is a 1970 F-100 Ranger XLT with 390 power, 3 on the tree, longbed, 2WD. I used the majority of the '71 Ranger XLT to build this, with the grille, interior, mirrors and manual transmission from the '70 Custom. I added the missing lower bodyside molding to the rear of the bed, since the wide style as depicted would've had that piece. It would've been more difficult to modify the rest of the trim to match the narrower style that didn't. The Custom door panels were also modified to resemble the '70 Ranger XLT as the '71 is completely different. As a first for me, I threw some details at this thing too. I used a MAD prewired distributor (awesome parts!), added battery cables, a starter solenoid, and fuel line on. Hindsight says I should've stuck some heater hose in there too. Oh well. Also a first, I threw some photoetch at it courtesy of Model Car Garage. I didn't have it handy when I built up the interior, so other than an ignition key and the rearview mirror, PE is absent from there. Yet another first was the use of Tamiya paint on the body. I have mixed feelings about it. It fisheyed on me like nothing I've ever used before, but thankfully nowhere on the exterior. I rubbed it out with some Meguiar's Compound, and while it's far from flawless I'm pleased with the shine and the little bit of orange peel adds to the realism (HA!). I haven't decided if it will wear the wheelcovers yet, so they were only temporarily attached to one side. I stripped the chrome, and redid them in more correct finishes and restored the trim ring chrome with my new favorite thing ever, the Molotow pen. License plate is a photo reduced real one, and I learned that in the '70s PA tagged all trucks "COMMERCIAL" regardless of them being commercial use or not. I wanted to build a very loose interpretation of a truck my grandfather bought new in 1970. To that effect, the blown truck tires, spoons, jack, and tools are a nod to Pap's nearly 50 years of trucking. I took a few liberties on the unknowns, since I don't have any pictures of the real thing. My dad ended up trading in the real thing on a brand new 1977 F-250, the '70 basically toast by then. The rust belt was not kind to these trucks! I'd be happy to answer any other questions, and thanks for looking.

-
Comfort Models, Ya Have One?
Casey429 replied to martinfan5's topic in General Automotive Talk (Trucks and Cars)
This is a fun question! I'd have to say hands down, AMT's '53 Ford F100. I've built three of my own, restored a couple built-ups, and have enough parts to make up at least another or three. I couldn't help myself and picked up another when the latest issue came out. It's sitting off to the side of the bench right now, being built as a Marmon-Herrington 4x4. A close second would be the Moebius Bumpside Fords. I just finished my first one, and dove right into another. This was a long overlooked subject matter, and many others have praised it and I can totally see why. And even though we're not in the truck section, I'll even say that the reissued California Hauler has won me over. I could never bring myself to pay what originals were going for, and Round 2 hit a home run bringing that one back. I'm getting ready to build my second one, with plans for at least two more. -
Paystar Logger
Casey429 replied to Casey429's topic in WIP: Model Trucks: Big Rigs and Heavy Equipment
It's all fixed. Tried 5 minute epoxy the first time around and that was a fail. So I scraped all of that back off and tried again using good old Testor's orange tube to stick the pieces on, and a couple coats of Plastruct cement for extra insurance. Seems to be working so into the display case it went. I also turned the air intake the correct way, even though I didn't take pictures of it. I've been around enough 1:1 Paystars to know that wasn't going to fly. Other than that, I did absolutely no other restoration work other than reattaching the mirror. I still need to come up with 2 more mudflaps, those are all that appears to be missing. Also set my dad's old Paystar up with the photo op. It's a little worse for wear, and the front axle has been "welded" as a repair. I'm hoping for a reissue so I can give it a proper resto, since it's mostly all there. Thanks everyone! -
Hello everyone. Hope everyone's new year is off to a good start. I picked up this Ertl Paystar at an estate sale foe a whopping $5. It's a pretty clean build overall, and pretty well done if I do say so myself. No paint on anything, but it's 100% complete, save for the tractor's mudflaps. The downside is both ends of the front axle are broken off right at the springs. Shouldn't be much of a fuss to fix. I don't plan on a full resto for the time being, since it is pretty well done. I just figured on posting it here, since it's still awaiting the repair. Thanks for looking!
-
After much ado, I proudly present my freshly completed Peterbilt 359 "Pennsylvania Hauler". Peterbilts weren't all that common on the east coast back in the day I'm told, but that wasn't enough to stop me from building one with some east coast flavor. For greater details on what I did, you can check out the build thread here. Otherwise, here's a quick rundown, accompanied by pictures. Paint is Rustoleum (yes, really) Harbor Blue with kit decals. Luckily I had a second one of these in the stash because I tore the cab stripe on installation. But I salvaged part of it for the stripes on top of the hood. I have some door signs drawn up, but I haven't printed them out yet. Still waiting to get a batch together to print. I used some aluminum tube for the exhaust standpipes because the stock ones were a tad too short for my taste, and would've required more effort than it's worth to rid of the mating seams. Up on the roof, I decided on one blue light in the center, leaving the rest amber. The housings needed some attention to remove flash and mold lines, so I had to foil them. I have several photos of my dad's from back in the late '70s when he started driving and the blue light was a popular thing, around Pittsburgh anyway. I have several of a Mack tri-axle dump truck he drove, as well as a friend's dark blue Peterbilt 359 with a double bunk that both have the one blue light. The blue color is pure coincidence, I've seen other not blue trucks with a blue light as well. After browsing lots of Mr. Ahlborn's photos, I made a game day decision to drill a hole in the side of the roof to attach the spotlight to, which looks much better than just sticking the light to the side of the cab. Mine's in the "away" position. Under the hood is the stock 8V-71. Dressed in a Peterbilt appropriate coat of white. Farr air cleaner and matching elbow were swiped from a Road Boss. Pretty much box stock out front. In the build process, I lost one of the fender mounted marker/reflector brackets to the sink. I was washing parts after dechroming, and the drain ate it. I've seen pics of 359s without them so I'm more upset than angry. I'll get them on the next one. Peterbilt emblems are all BMFed and colored with a red Sharpie, and the letters were revealed with some 4000 or 6000 grit (can't remember at the moment) sandpaper. I also smoothed and foiled the front of the mirrors to get rid of some nasty pin marks. I still need some baby moon caps for the steer axle and the aforementioned door signs, and I think it needs some antennae. The grille could use a black wash but I don't have any acrylic black at the moment, easy enough to remedy later. That's all for now, thanks for looking everybody.
-
After much stalling, the PA Peterbilt is done! Check it out under glass.
-
-
Cabs under construction
Casey429 replied to Repstock's topic in WIP: Model Trucks: Big Rigs and Heavy Equipment
Excellent work on all of them, but I'm really digging the LTL. I've always liked the early hood, and it looks like you've nailed it. -
Looks like something a programmer would've dreamt up for use in Grand Theft Auto or some other video game. Blend together elements from several cars and make enough details generic, avoid copyright infringement. Neat!
-
My 3rd favorite Roadkill car, behind General Mayhem and the Raunchero. Nice job on Freiburger's "garbage" .
-
Another superb build in a timeless color combo. Well done!
-
Hot Rod Magazine did a very nice write up on the Reimer Brother's Dragonsnake in the May 2015 issue, an good read if you haven't seen it. This car was the only privateer Dragonsnake factory equipped with Weber carbs, a pretty neat setup. It was also the only Phase III built, and the only yellow Cobra ever to leave Shelby per the article. http://www.hotrod.com/cars/featured/1505-forgotten-shelbys-cobra-drag-car/ I'm looking forward to seeing this one come to life.
-
I always did love the "day two" look, despite it being about 30 years before my time. Excellent job as usual.
-
Dabbling in Die Cast
Casey429 replied to Casey429's topic in WIP: Model Trucks: Big Rigs and Heavy Equipment
Hi everyone. I haven't forgot about these old dogs, so here's a quick little update... DONE! Sort of... I say sort of because this little side project has opened a brand new can of worms. Before I get into that, first things first. Here's the original Bulldog Number One. This is the same chassis pictured above with a fresh coat of Rust Oleum satin black. I swapped out the original cab for one donated by a mixer that I wiped the tampo printed logos off of. The same mixer also donated it's wheels and rear suspension. I really dig the no-nonsense ready-to-work look. Only modifications were a few additional paint details. I removed the air cleaner and painted the inlet duct flat black to match the real trucks. I also trimmed the turn signals with silver and gave the hood ornament a proper coat of gold. All Mack parts here! To finish it up, I painted the rear axle flanges black. They come chrome on most First Gear trucks, and if they were moon caps, I'd have left them. The chrome flange doesn't work for me. In doing that, it inspired me to break out Bulldog Number two. This was one of the original 3 beaters I purchased that I never did anything with. So, it got the same treatment as the one above. Stripped down, cleaned up, and a fresh coat of the same Rust Oleum. I also swapped cabs on this one, from yet another mixer. Another mixer donated it's rear suspension and wheels as well. This one is only temporary, as I'm eyeing up another cab donor for it. It's tough to beat the paint on these things, so I like swapping cabs to do color changes. This one doesn't have a stack on it yet for that reason. This one also got the same paint details, along with the front wheel hubs getting it as well. I've also worked on whipping up a few additional details. First up, a cab guard. I was going for something that looked like it would have been fabbed up by a construction company's shop for their new truck. It's all Plastruct square rod and sheet with some mesh added to the window opening. The beacon is AMT. This will be painted with the same black as the chassis. I also fabbed up a behind the cab wet tank. This chassis originally had one, but it was long gone when I got it. First Gear installs them on tractors paired with dump trailers. Sides are mudflaps donated by a mixer (see the theme here?) and the rest is just bits of scrap sheet. A little more body filler, sanding, paint, and a fill cap and it should do the trick. Donor flaps: And last but not least...Bulldog Number ? I haven't decided when this one will get done or what order that will be in, but I couldn't resist tearing into it. This was yet ANOTHER mixer that I removed the barrel from. It's slated to become a water truck. I picked this one because a friend of mine has a 1:1 DM600 water truck that was a faded baby blue when he got it, reminiscent of this one, and it was also a former mixer. Real former mixers are popular for water truck builds due to the front mount PTO. I already wiped the graphics from this one, and added the grille guard from one of the other mixers that donated other parts. And one more for fun. Part of the draw for these is that they're so easy to tweak and re tweak as desired. The other part was I got a killer deal on six of the already mentioned mixers recently. I ordered doubles of two of them for my collection, and the rest are fair game. Some will be plucked for parts and others will be transformed into other trucks. I also haven't forgotten about the original cab pictured above. It's getting a fresh coat of paint and a new chassis that's still to be determined. Stay tuned! Thanks for looking! -
I hope you folks don't mind me trying to infiltrate our world of styrene with some metal, but I figured you all might like to see this. I had originally restored/customized this 1/34 scale First Gear Mack R600. In looking through some old pictures, I originally finished this up back in 2006! Years of shelf wear and some less than stellar building techniques had left it looking pretty rough. I'm not sure what the exact shade is, but the orange is duplicolor, black is factory. The fender unit is separate from the cab, enabling the factory paint detail to be retained. Wheels were originally black, I went with chrome and it's looking rough too. I'm going to swap in a set of spoke wheels, Camelback suspension and wide front tires from a junker First Gear R Model mixer I have. I don't know what Mack suspension the tractor currently has. It resembles upside down Camelback and has smaller springs. Teardown was pretty straightforward. Being that I have done it before along with the less than stellar build quality from the last go around, it came apart fairly easily. Since its metal, a bath in lacquer thinner made quick work of paint removal on the cab. I've cleaned up some of the mold lines and have the battery boxes, bumper and roof (also a separate piece) primered. The exhaust was missing from this truck when I acquired it years go, so I fabbed the straight pipe in the above photo. I had originially built the mufflered setup for another of these trucks. I originally purchased three of these and a lowboy trailer from a member on a die cast construction forum I also frequent. The muffler and standpipe are aluminum, the rest is solder. One other thing that needed addressed was the broken turn signals. I never did anything about them back when, so now was a good opportunity to fix that. They're a set of the turn signals found in most AMT truck kits on the amber light sprue, with a coat of Tamiya clear orange for added color. I think they're as close a match to the factory lights (left) as I'm going to get. I painted the edges silver to add a little extra something. One thing that always bugged me about the First Gear trucks was the interior. The truck is based on the early R model with the flat-back cab and steel dashboard, and is also incorrectly depicted in tan. At that, it's not even the right shade of tan for the later R cab either. Some Model Master "Hellgrun" remedies that. I had originially done this in "Lichtgrun" but I believe the other color looks more like the Mack green. Seats were left the previous shade. That's all for now, hope I don't catch too much flack for this. As a side note, for anyone who is into Mack trucks, I would highly suggest picking up one of the many different variants First Gear has produced over the years. They're great pieces. Thanks for looking.
-
Pete 352 Restart
Casey429 replied to Rigzndiesel's topic in WIP: Model Trucks: Big Rigs and Heavy Equipment
I know it's already been mentioned, but that paint is killer. Very period correct, nice job. -
1971 Southern 500 race in 1/25
Casey429 replied to DR JAY's topic in WIP: Stock Cars (NASCAR, Super Stock, Late Model, etc.)
This is one of the coolest things I've ever seen. Thanks for sharing with us! -
But, with a twist! I picked up this Lee Town white metal kit at a train show a couple weeks ago and couldn't wait to tear into it. It's HO scale, and it is downright teeny compared to 1/25. I've built other old Lee Town kits (still avaliable from a company called Alloy Forms) and they're a nice change of pace. Should look good on my christmas railroad layout next year. I also picked up another of these with a 22' dump trailer AND a GMC Astro with 30' dump trailer kit...all for $30! There aren't a whole lot of pieces to these, but they pack some good detail for their size. Wheels are plastic, tires solid vinyl, and axles are brass rod. The kit comes with a "universal" chassis, leaving lots of ways to build it and I believe there are other versions of this kit out there. This shows how much of the chassis I cut off. The kit gives a few options for building. One pair each of 3 sizes of air horn, 2 bumpers, along with the afformentioned universal chassis. It even has photoetched mirrors. And just for fun, here's a shot of the 1/87 version of the White Motor Corporation cab against it's 1/25 counterpart. Makes you appreciate how big 1/25 really is! I'm waiting on a new pin vise and drill bits so I can mount the airhorns, mirrors, and turn signals properly. Those locations are already spotted, taking the guesswork out of drilling those tiny holes. The instructions conclude with the phrase "Cute, isn't it?" and I have to agree with them. I think I'm going to build this and the other Diamond Reo identical, save for paint color. Thanks for looking!
-
Another quick update here. I've been having PC issues and had to switch to a back up. Malware is a royal pain! Without further ado... I got the interior buttoned up. I'm really into the classic blue. Might not be 100% accurate, but I'm digging it. My dad and grandfather had matching '93 Peterbilt 357 dump trucks that were blue on blue, so that was part of the draw. I can almost smell the naugahyde! The '93s I mentioned earlier were bought used in about '97 or so. They were a big jump in tech from the trucks that they replaced, being the first electronic engines that we ever had. This one is dad's, it had an East dump bed. Pap's had a Cobra. They were identical in every other respect. 3176 Cats, Eaton 8LLs, Hendrickson suspension and I believe 44k lb rear ends. I suppose it's worth noting that BOTH trucks ended up totalled after they were sold. Dad's was struck by a train and Pap's was rolled and repaired, but it isn't the same truck anymore (I pass it daily). Shoulda kept them... Other than that, I've been picking at the little things. Went ahead and did some red mudflaps, although they turned out more brown but they still look ok to me. I also got the battery box built, I used .060 styrene. I took some measurements from my old 352 cabover and based it on them. It sticks out a smidge farther than I'd like, but it's still inside the tire. It's got its few little boogers, but it turned out smooth and square, so I'm happy. I also got some miscellaneous items stuck in their places. Stuff like the radiator, hoses, fifth wheel, deckplate, and pogo stick. I also decided to go with the Farr aircleaner. I was able to find a photo on Hank's Truck Pictures in addition to the ones Jeff was kind enough to supply. Hank's site is a goldmine! That's all I have for now til the weather allows me some paint time. That and I need to find some paint lol! Anyone out there know off hand a good match for Gulf's light blue, like was used on many of their race cars? Also, I'm not sure if I want to run the rooftop AC or not...anyone care to weigh in? As always, thanks for taking a look!
-
Looking good, Chuck. Looks like a lot of snowplow warriors we see here in PA too. Although Dentside Fords aren't as common in ratty form as they used to be, I remember seeing more than a few with later beds. Easier to find and bolt right on, so why not?
-
Hey everyone, I snapped a few quick pics of my complete* Western Star logger. I didn't feel like waiting for a decent day since they're in short supply as of late, so I apologize for the not-so-great workbench photo shoot. The asterisk is for the fact that I still need to paint the trailer beam, but again, weather is the reason. That and I can't decide if it'll be red or something else. Without further ado, here she is! There are a few little easter eggs hidden in this one, but I figure I'll let you guys have fun with trying to pick them out. Also, if you have any question on where stuff came from, how I did something, or anything else related to it, fire away. The build thread is here for those that haven't seen it. As always, thanks for checking it out!
-
Neat little rig, nice work!
-
Jeff, thanks for the tip. I don't have either of the books you mentioned, but I think I need to get myself a copy of one or both.
-
Much as I like to see these old workhorses built as looked when they were new or lovingly restored, seeing one that's led a long life doing what it was built for is just as cool. Even if it is only 1/25 the size of the real thing. Nice work.
-
Ford LNT 8000 Mixer
Casey429 replied to guitarsam326's topic in Model Trucks: Big Rigs and Heavy Equipment
A well worn but sharp looking mixer, the weathering and faded paint are spot on. Where did you get the Detroit mudflaps?