Mr. Metallic
-
Posts
2,781 -
Joined
-
Last visited
Content Type
Profiles
Forums
Events
Gallery
Everything posted by Mr. Metallic
-
My continually updated CUSTOMS thread
Mr. Metallic replied to chris chabre's topic in WIP: Model Cars
How about the flat-4 from a Jeep, but with chrome goodies? I'm pretty sure the Willys came stock with an engine based on the same engine. That's what I'm planning to use in my 33 Willys custom whenever i get back to it. But that has a much smaller engine compartment to work with. Your 40 has a lot more room to work with. -
Chris, thanks for the credit on the bed idea. Like I said before, just glad to help someone else since I have borrowed so many ideas from other builders over the years. I like the Lindberg 32 pickup, but the angle chop has always bothered me. But, if you take it away then it starts looking like the AMT 34 pickup, so a builder almost HAS to leave it. Your section job takes away the awkwardness of the angle chop by giving the whole cab a better proportion, so nice job. And the asymmetrical styling elements you have added are really well done. My only critique, and you can tell me to go pound sand, is the bob of the rear fenders. In my opinion it leaves the rear pan hanging out there on it's own. If you brought some of the length of the fender back and blended it into the bed (you can also curve the outer edge of the fender to reduce the heaviness) I think it would complete the rear end treatment.
-
Sorry to continue the hijack Chris, but this thing is too cool @Bullybeef Not sure your exact plans for it, but I would dirty up the front whitewall to match the rear (or find some vintage painted whitewalls for the front since those modern tooled tires you have now give it away as not being a vintage build), and put a flat plastic tonneau on the bed with a big AMT creature decal on top. I'll try to find a pic so you know what I'm taking about. They came inlots of kits, but most memorable to me was the 61-63 chevy pickup. Otherwise this thing has such raw period appeal. It just needs a little help from you to get to the coolness finish line.

-
How about a proper 26/27 T roadster body and interior? In my opinion those would SELL. The resin body that has been available (and I believe copied by other vendors) is decent, but due to the shape of the interior leaves the builder to scratchbuild or just not do one. Even better if it was designed to fit the new Revell A frame. Coupe body w/interior would be cool too
-
No you're talking. A high line brand like Buick deserves a classy full dress bed, pre dating the Cameo. Very cool idea.
-
Sure, plus $6 shipping. I'm not saying that's unreasonable, but budget is a factor for many people. Makes sense to stock up on several sheets.
-
Headlight I D question
Mr. Metallic replied to customline's topic in Model Building Questions and Answers
They are Guide (brand?) headlights. The last issue of the Revell (formerly Monogram tool) 30 Phaeton street rod kit had a pair. But that issue is getting scarce, wish they would reissue it. Replicas and Miniatures of Md also offers something similar
-
Tamiya extra thin cement
Mr. Metallic replied to slusher's topic in Model Building Questions and Answers
I noticed that the brush seemed short. My bottle was starting to get to the point where I almost couldn't reach the glue. You just saved me from throwing away a half bottle of glue. Not that's it's expensive, just the principal of it. ? -
I just really wish that BMF Inc had done something better to differentiate the brand new stuff from everything that came before. Unless you buy directly from BMF you are taking a BIG gamble on whether or not you are getting something usable. There is still a ton of the older stuff floating around hobby shops, online retailers and swap vendors that you don't know what you're buying. The "new and improved" sticker is something that they have been putting on their product for years, so it does nothing to differentiate the truly NEW product.
-
Any interest in drawing these up? They are from an old Aurora 1/32 show rod, but I need them in 1/25, and sized to fit a certain set of tires. I can get the ID and depth of the tires if you decide you'd like to do them. They probably have some heavy truck applications too. It may be hard to tell from the pics but the spokes have a slight dish (concave) effect to them.
-
This body is 3D Printed, not cast? I see very minor evidence of "stepping" represented by the swirls in the door. I know that stepping is inherent in the process, but this is by far the nicest printed body i have seen. Kudos to the designer and printer.
-
Yellow Fever Competition Coupe, Keeler's Kustoms
Mr. Metallic replied to stavanzer's topic in Car Kit News & Reviews
No 392 Hemi in the kit. Not sure why it's on the decal sheet. Kit includes the 427 Ford and the parts pack Caddy -
delete
-
Yellow Fever Competition Coupe, Keeler's Kustoms
Mr. Metallic replied to stavanzer's topic in Car Kit News & Reviews
@Reegs -
I use a medical cauterizing tool to remove parts off a sprue when the part is too close to the runner to get my pliers in there. Especially with 60's tooled Revell kits.
-
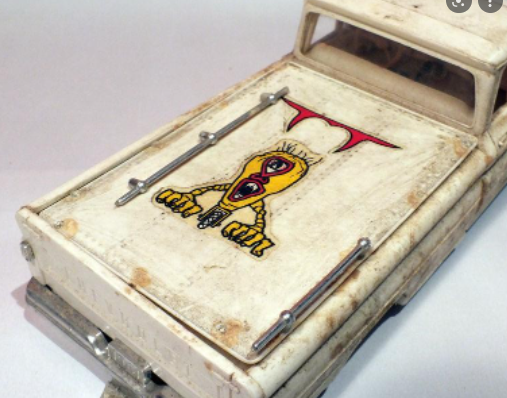
Still finishing up the paint on the challenge dragster, so I had a little time to finish up the rear end mods. Boxed in the front and back of the crossmember using pieces from the molded in yellow hood (note the remnants of the louvers). Much more finished look from the underside. Also carved a semi-circle out of the gas tank to give the QC some clearance, and boxed in the resulting gap. It was either do this or shorten the tail shaft on the QC, and this mod is what they would have done in 1:1. Not sure how the Big Deuce accomplishes this setup without the same accommodation to the gas tank, but maybe the clearances are different on the big kit? So, even though it doesn't 100% match the big kit, this is a real world 1:1 mod that could have appeared in the kit. This may be the last update for a little bit since I have the challenge dragster to hopefully button up this weekend and then I need to finish up my nova wagon gasser before June 1.
-
You caught me with Deuce, and reeled me in with east Coast. Not a lot of those get built in scale, and you're off to a fine start. Very nice job on the rolled pan. I know you said you were going to try to stay kit based due to time constraints, but backdating the hemi a bit with stock valve covers from the period would do the trick, with a set of the headers from the Phantom Vicky. I'll definitely be following. I'd also love to attend the Deuce Days show sometime. Not this year, but maybe in 3 or 6? ?
-
The steering column actually runs up through the firewall into the interior and then the steering wheel mounts at the end (like a real car) So as long as you're comfortable attaching the steering wheel through the opening in the roof you'll be fine. I believe the roof is separate to allow you to put the interior together after the body is on and then attaching the roof. It was done this way as opposed to their 32 ford line which all have a fixed rear bulkhead for the interior (with the exception of the Rat Roaster) that you attach the side panels to. The 30 A doesn't have the rear bulkhead molded together with the floor to anchor the interior together because they have two different interior heights, stock and channeled. All three I have built I've attached the roof to the body first.
-
I saw in the corner of one of the pics that ICM has a presence at the show. Wondering with everything going on in their home country what news they had to present at the show.
-
@mike s I feel like this thread deserves a bump. I am on a vintage Monogram Hot Rod building kick right now. I would like to know more about these if you don't mind my sharing. Your builds, and the builds of @TooOld were really inspirational to my interest in building my own Monogram what-ifs
-
This build is #3 currently on the bench, so activity comes in spurts. Over the weekend while I was making my way through the paint process on my challenge rail I was able to spend a little time making the biggest modification to this build, installing the quick change rear. I grabbed the QC from the former Little T tooling Boomer Bucket kit, but decided to use the better detailed spring from the Deuce tooling. In order to do that I needed to adapt the spring to sit on top of the axle instead of being mounted behind it because the tail of the QC would interfere with spring travel. It was a pretty straightforward mod, sanding a flat surface into the underside of the spring and then attaching small blocks of Evergreen onto the spring to slot into the top of the axle, just like the assembly out of the T kit. Due to the spring now being mounted above the axle that means the stock Deuce kit spring attachment point no longer works as it would set the wheelbase back 3-4 inches. Since this is another "paintless" build I needed a molded in yellow crossmember to stub into the Deuce frame. This came courtesy of a builtup Monogram 29 Ford pickup (former Blue Beetle tool). I severed the crossmember from the rest of the frame and proceeded to clean up the paint residue that was left after stripping and trimmed the ends to fit between the Deuce rails. Then I marked the area of the Deuce floor I would need to remove to slot the new crossmember in. Fortunately I mostly fit between a couple molded in details on the floor, so I broke out the Dremel and made quick work of it. After a little sanding of the opening and the crossmember it slid right into it's new home. Here's a mockup to show the new axle in it's home. I'll have to go back with some scrap yellow plastic to close in the gaps on the topside of the new crossmember, but otherwise this mod is complete.
-
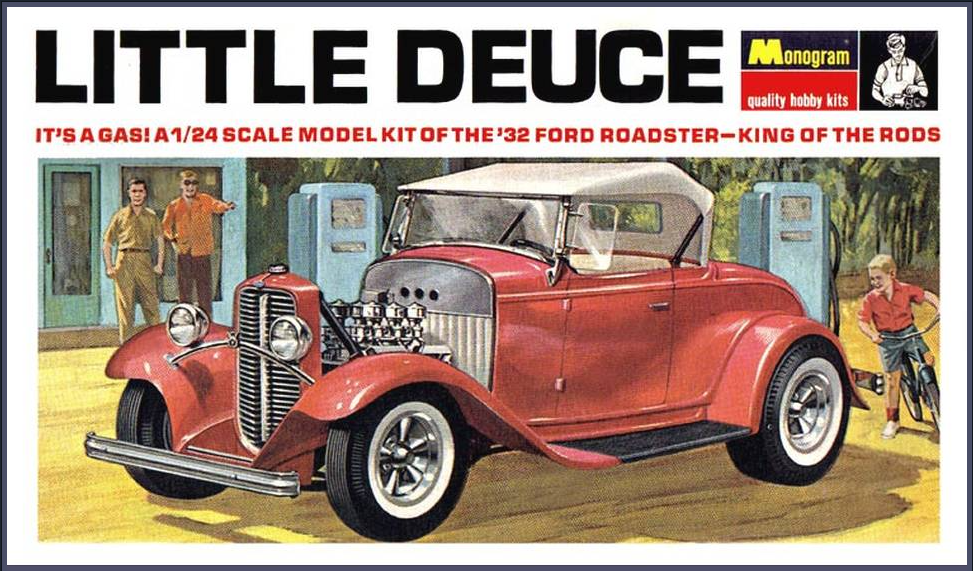
By now most of us are familiar with one of the iconic kits of our hobby the Little Deuce (LD) and it's 1/8 scale brother, the Big Deuce (BD). The LD kit in various forms has been around for nearly 60 years. I've even built 3 recently myself (as some of you may recall), all with a twist. Well, this one is another one with a twist. If you are familiar with the LD and the BD kits you are aware that there are quite a few differences between the two as far as parts content. For whatever reason when Monogram decided to tool up smaller version of their highly successful Big Deuce kit they made quite a few changes. Several of these were probably done to reduce complexity, but others (especially the switch from a quick change rear to a stock style item) kinda make you scratch your head. At least they made me scratch mine. I have had this build floating around in my head in various iterations for nearly 13 years now. It started out as being on a mission to find the LD parts and adapt them to the much more readily available Revell 32 roadster kit. That was done out of budget considerations. I even started that build, but abandoned it after a painting mishap, trying to match the old Monogram red plastic color. It went through various starts and stops over the years, and then I got bitten by the vintage Monogram hot rod kit bug. That's when I started to notice all the differences between the Little and Big Deuce kits. I set about mastering a set of the American Racing LeMans wheels for Drag City Casting to cast back in 2018. Last year I got on the kick of building up kits molded in color, and that's when the project evolved into it's final form. Unlike the other 3 kits in the Monogram hot rod series which came molded in multiple colors of plastic(Little T, Woody Wagon and Blue Beetle) the Little Deuce was all in white. This build proposes, what if they had molded it in color (yellow), and also steered closer content wise to the Big Deuce... After a lot of words, here we arrive at the "proof of concept" mock up. And here's a couple pics of the parts I have accumulated for this project. The yellow parts are actually from my parts box, not the virgin 80's kit seen in the background. Apparently the molded color of this kit when it was in the Monogram catalog back at that time varied quite a bit. The example in the box is a much darker yellow, where this one steers closer (but still a bit darker) than the color of the 2nd issue Big Deuce yellow. This is close enough for me. The usual suspect parts from the various retools of the Little Deuce have been gathered together, with these additions QC rear from the Little T (wide enough?) Molded in yellow rear crossmember from a Monogram 29 Ford pickup Spare tire cover and bracket from an AMT 32 Ford (Vicky?) Air cleaners from the Revell new Model A kits parts box seat belts (may not use) Drag City Casting Lemans wheels parts box 2 blade knock offs horn from the Monogram 29 Ford pickup Bumper bracketry from a Revell 32 Ford (may not use, but the ones on the Big Deuce were chrome) I need to find a better Little Deuce pleated firewall. The only one I have is badly discolored. I need to find a better brake reservoir I was hoping to find a plastic 5 gauge insert for the dash, but have given up on that. As always, comments and questions are welcome.
-
You must have accidently hit this tab when you were making your post? If you click on the three dots over on the far right above your post you should be able to edit it.
-
Nice repair work. Love using old bodies because the scripts and such are usually so crisp. Cool to see that set of rear Venture Flag wheels on the original builtup. Such a cool wheel, I'd love to have some. Only kit I know of that had them was an obscure issue of the Deora
-
Ghostbusters Ecto-1 by Polar Lights: WIP
Mr. Metallic replied to David G.'s topic in WIP: Model Cars
It looks great, but be forewarned, it needs to cure for a long time (weeks) before it can be handled. Otherwise the finish can get diminished. And it's not a paint, it's an ink. Don't get me wrong, it's a good product to have in the toolbox. But I only use it on parts I know I won't be touching again. The Bare Metal Foil Company is aware of the issue. They have recently received a new supply of the material they use to make BMF. If you contact them directly you can get new, good product. Sadly, they apparently made no attempt to differentiate the packaging at all so buyers don't know if they are getting the new-new product, the good old stuff, or the new BAD stuff if purchased from an online retailer or your LHS. So, buyer beware if you don't buy directly from them.