alan barton
-
Posts
2,105 -
Joined
-
Last visited
Content Type
Profiles
Forums
Events
Gallery
Everything posted by alan barton
-
Beautifully simple and effective. I have seen a few different colours on Black Widows over the years and they always leave me wondering why I painted mine black? Which is why I went out and bought another one! Cheers Alan
-
And the Understatement of the Year award, 2020, goes to Steve H for the following "Everything was a tight fit but"..... What I really like about this model is it looks like it would work. There aren't gaping holes or oversized flares all over the place. We will never if it wold work in the real world ( or maybe we will?) but if I saw this at a car event I would say "Good job!" Quality work Steve, love it!
-
Well, you've done it now. I had two projects on the bench that I wanted to make major headway on tonight but instead, first, I went and looked at Tim's Fotki site again and then I went to Drastic Plastic to check the instruction sheet for a parts audit. As I looked deeper into my parts boxes I found more and more parts and then it dawned on me - I have already built the XR6 and that is the other half of the double kit to this one - therefore I must have all the parts! So far the only parts that haven't turned up are the headlights ( they are already off the sprue but I know I have them) the custom dash, plus the timing cover and the headers for the Fronty. I'm pretty confident now that I will have all these parts - just haven't looked in the right boxes yet. I'm going to use the AMT parts pack slicks with the white/red/whitewall. I think this will be period correct because this kit came out around 1964 and the Munsters TV show can't have been far behind - and Grandpa's Dragula had these slicks in real life so that sealed the deal for me. I am fitting them to the chromed reverse rims in the latest 1925 T c-cab release - they are a tight fit but look great. Haven't had time to think about a colour yet but it will be light - not pearl white and not light green! No point re-inventing the wheel, eh? Maybe a pearl yellow with white trim or a coppery gold. I think I need to sleep on it. Might also run a half tarp over the back seats. I will be removing the original exhaust from the frame. I don't know if you know it but the original kit came with two simple notched crossmembers that are fitted to the frame to support the interior tub seeing as how the fender unit has been deleted. I hold you entirely to blame Jim! And Tim is your accomplice! Cheers Alan
-
Now look what you've done! You've got me digging through Model T boxes and yep, looks like I have enough fresh parts to build something very similar. I much prefer the Revell touring body for a stock bodied street rod look, but for a nostalgic kit history flashback, you can't beat this! And, it could be pretty quick to do, like you said, just sand prime, sand repeat! Every time I see your flame jobs it blows me away how sharp and precise you get the outlines. Are these stencils handcut or do you use a some sort of computerised cutter? Either way they look awesome. I think Von Dutch did vertical flames once but other than that, you never see them. A subject like this is just wacky enough to make it work! Looking forward to the next update! Cheers Alan
-
The paint is what draws you in but then you see how nicely assembled the whole car is. I think the black grille works really well - in chrome it would have little tinselly ( is that a word?) . I have yet to buildany of the Coddington kits in my stash but this is making me think about it! Cheers Alan
-
That is a really clean build of a great kit. Nice that you did the chrome trim around the hood vents, which a lot of people forget, but you did a rubber trim around the rear windows, which some people chrome when there is no chrome trim on a 37 rear window. Cheers Alan
-
1929 Ford Sport Coupe hot rod -update 10/4
alan barton replied to Rocking Rodney Rat's topic in WIP: Model Cars
Yeah, sports coupes are cool and I look forward to what you do with this one. In Australia, we also had 32 and 33 Ford Sports Coupes. By 34 they had the technology to form up the rear coupe roof section to produce a steel 5 window coupe. There are several hot rodded versions of each on our local scene. In the seventies when everything American was cool, many Aussie 32 coupes were converted into look-alike 5w coupes ( which we never got) by chopping up and welding on the rear quarters of a 4 door sedan. A couple of things to note although Dennis has hinted you might be passed the point of changing anything anyway. The doors in your photo appear to be off a Revell 29 Closed Cab pickup, like your cowl. The clue is the raised ridge around the edges - Model A closed cabs actually used a Model T Tudor or coupe based door (and ironically Henry didn't make a 27 T closed cab pickup to use the T door on anyway!) You could either go searching for the 31 Tudor doors you thought you had or file off the raised edge around those T doors . And for what it is worth, Tudor and coupe doors are the same length on most Ford products - four door sedans have the shorter doors. If you have a left over rear section of that 31 Tudor, it might pay to look at reworking that to produce a lift off plastic roof. You could add additional styrene or putty to the outside and you would have little evidence of hacking on the inside that needed lots of annoying and fiddly cleanup. Finally (sorry if I am dragging this out a bit) if you want the model to "read" like an early 28 or 29 sports coupe and you use the 31 doors, it would pay to use evergreen or putty to flatten out the swage lines across the doors. Early As had a flat swage, later ones had the ribbed swage. This will be only the second model of a sports coupe I have ever seen. A good friend produced a replica of a local, well known heavily chopped 30 model - it was a great looking model and I really look forward to seeing what yours comes out like. If it is anything like your green T it will be a stunner! Cheers Alan -
Thanks, Craig and Phil. I still cant believe that I ended up with this historic model simply by asking here whether an AMT Vicky or Revell Tudor body might be feasible as I didn't have an extra AMT Tudor to finish this one. Thanks to Steve (Muncie) it is now a highlight in my collection. And I might add, a bit of searching will reveal a stunning blue one, a pearl white one and a knockout Lime Pearl Vicky version on this forum. They are all very nice indeed. Cheers Alan
-
Just might be the best build I have ever seen of this kit. Getting all the panels on that multi-pieced body is a real challenge. To get that sorted and then combine it with such an assortment of parts is a credit to your ability. Really, really nice, Phil. I love it! Cheers Alan
-
1960 Ford F-100 Lightning
alan barton replied to Plowboy's topic in Model Trucks: Pickups, Vans, SUVs, Light Commercial
What a perfectly balanced truck. Everything in harmony, no one thing screaming for attention, as elegant as you could ever make a truck. Beautiful work, Roger, well worth whatever challenges you had to overcome. Cheers Alan -
Yes! An amazingly creative build and authentic to the last slice! I have seen four such vehicles here in Australia, two based on Volkswagen Kombis, one an imported Ford Econoline and the open I have shown here, a 46 Chevy pickup here in Perth. I am sure you will appreciate the colour and the wheel and tyre combo - it is surprisingly similar! I haven't seen this in its natural habitat at an event but I imagine there is more to it that is installed upon arrival. Apart from all the features that everyone else mentioned, I was amazed by the extra care you took to finish off the ends of the perforated exhaust shield and especially the surgical cleanliness of your clear plastic servery. Just incredible. Cheers Alan

-
I really enjoyed your colour combination here Ray. You did a nice job on your roadster. It continues to amaze me that of the dozens of these kits that have been posted here, they all look different. Such a great model! Cheers Alan
-
Mission Impossible - American Graffiti cop car from a wreck
alan barton replied to alan barton's topic in WIP: Model Cars
Thanks, Bill, for your offer - if you can find those items I would be happy to trade if there are any pieces I can help you with. Had a good solid session on the bench last night and it is starting to look like a car! I will need at least another application of bog, especially on the eyebrows on the front fenders but I think the roof and the deck are all done so things are shaping up. The original builder, in his quest for the ultimate smoothie, not only filed or ground off every detail from the body (except the cowl vents and wipers, thank goodness) he filled the concave recess between the tail lights with some kind of epoxy. I expected the worst but was lucky to excavate it fairly quickly with the broken point of an X acto. I have lost a few bits of bog where it has been very thin and where I have been scribing door lines. I have found that as long as I spot it lifting I can run a bit of superglue under the piece and lock it all down and continue sanding. Three main jobs to complete at this stage. 1. Finish the eyebrow on the side of the front fenders. 2. Add rain gutters with Evergreen strip 3. Construct a windshield frame - the Galaxie has slightly unusual contours so I am going to have to sneak up on this one. I may still have to remove the roof and refit it as it seems to have a slightly uphill stance at the moment - might have to ask Doctor Google for some help on this one but I will wait until the gutters are in place as they will help define the roof shapes. I have also used some of the tips in the panel line tutorial on this forum to run ink in my new door lines - it gives me a much better idea of how I am going especially being that the car is white plastic! On the other hand, it has revealed that the B pillar door line on the driver's side is a bit drunk so looks like I will have to go backwards to go forwards there. The bottom door line on both sides needs a LOT of finessing! Cheers Alan
-
Thanks Russell, be sure to check under glass for the finished product. Cheers Alan
-
Mission Impossible - American Graffiti cop car from a wreck
alan barton replied to alan barton's topic in WIP: Model Cars
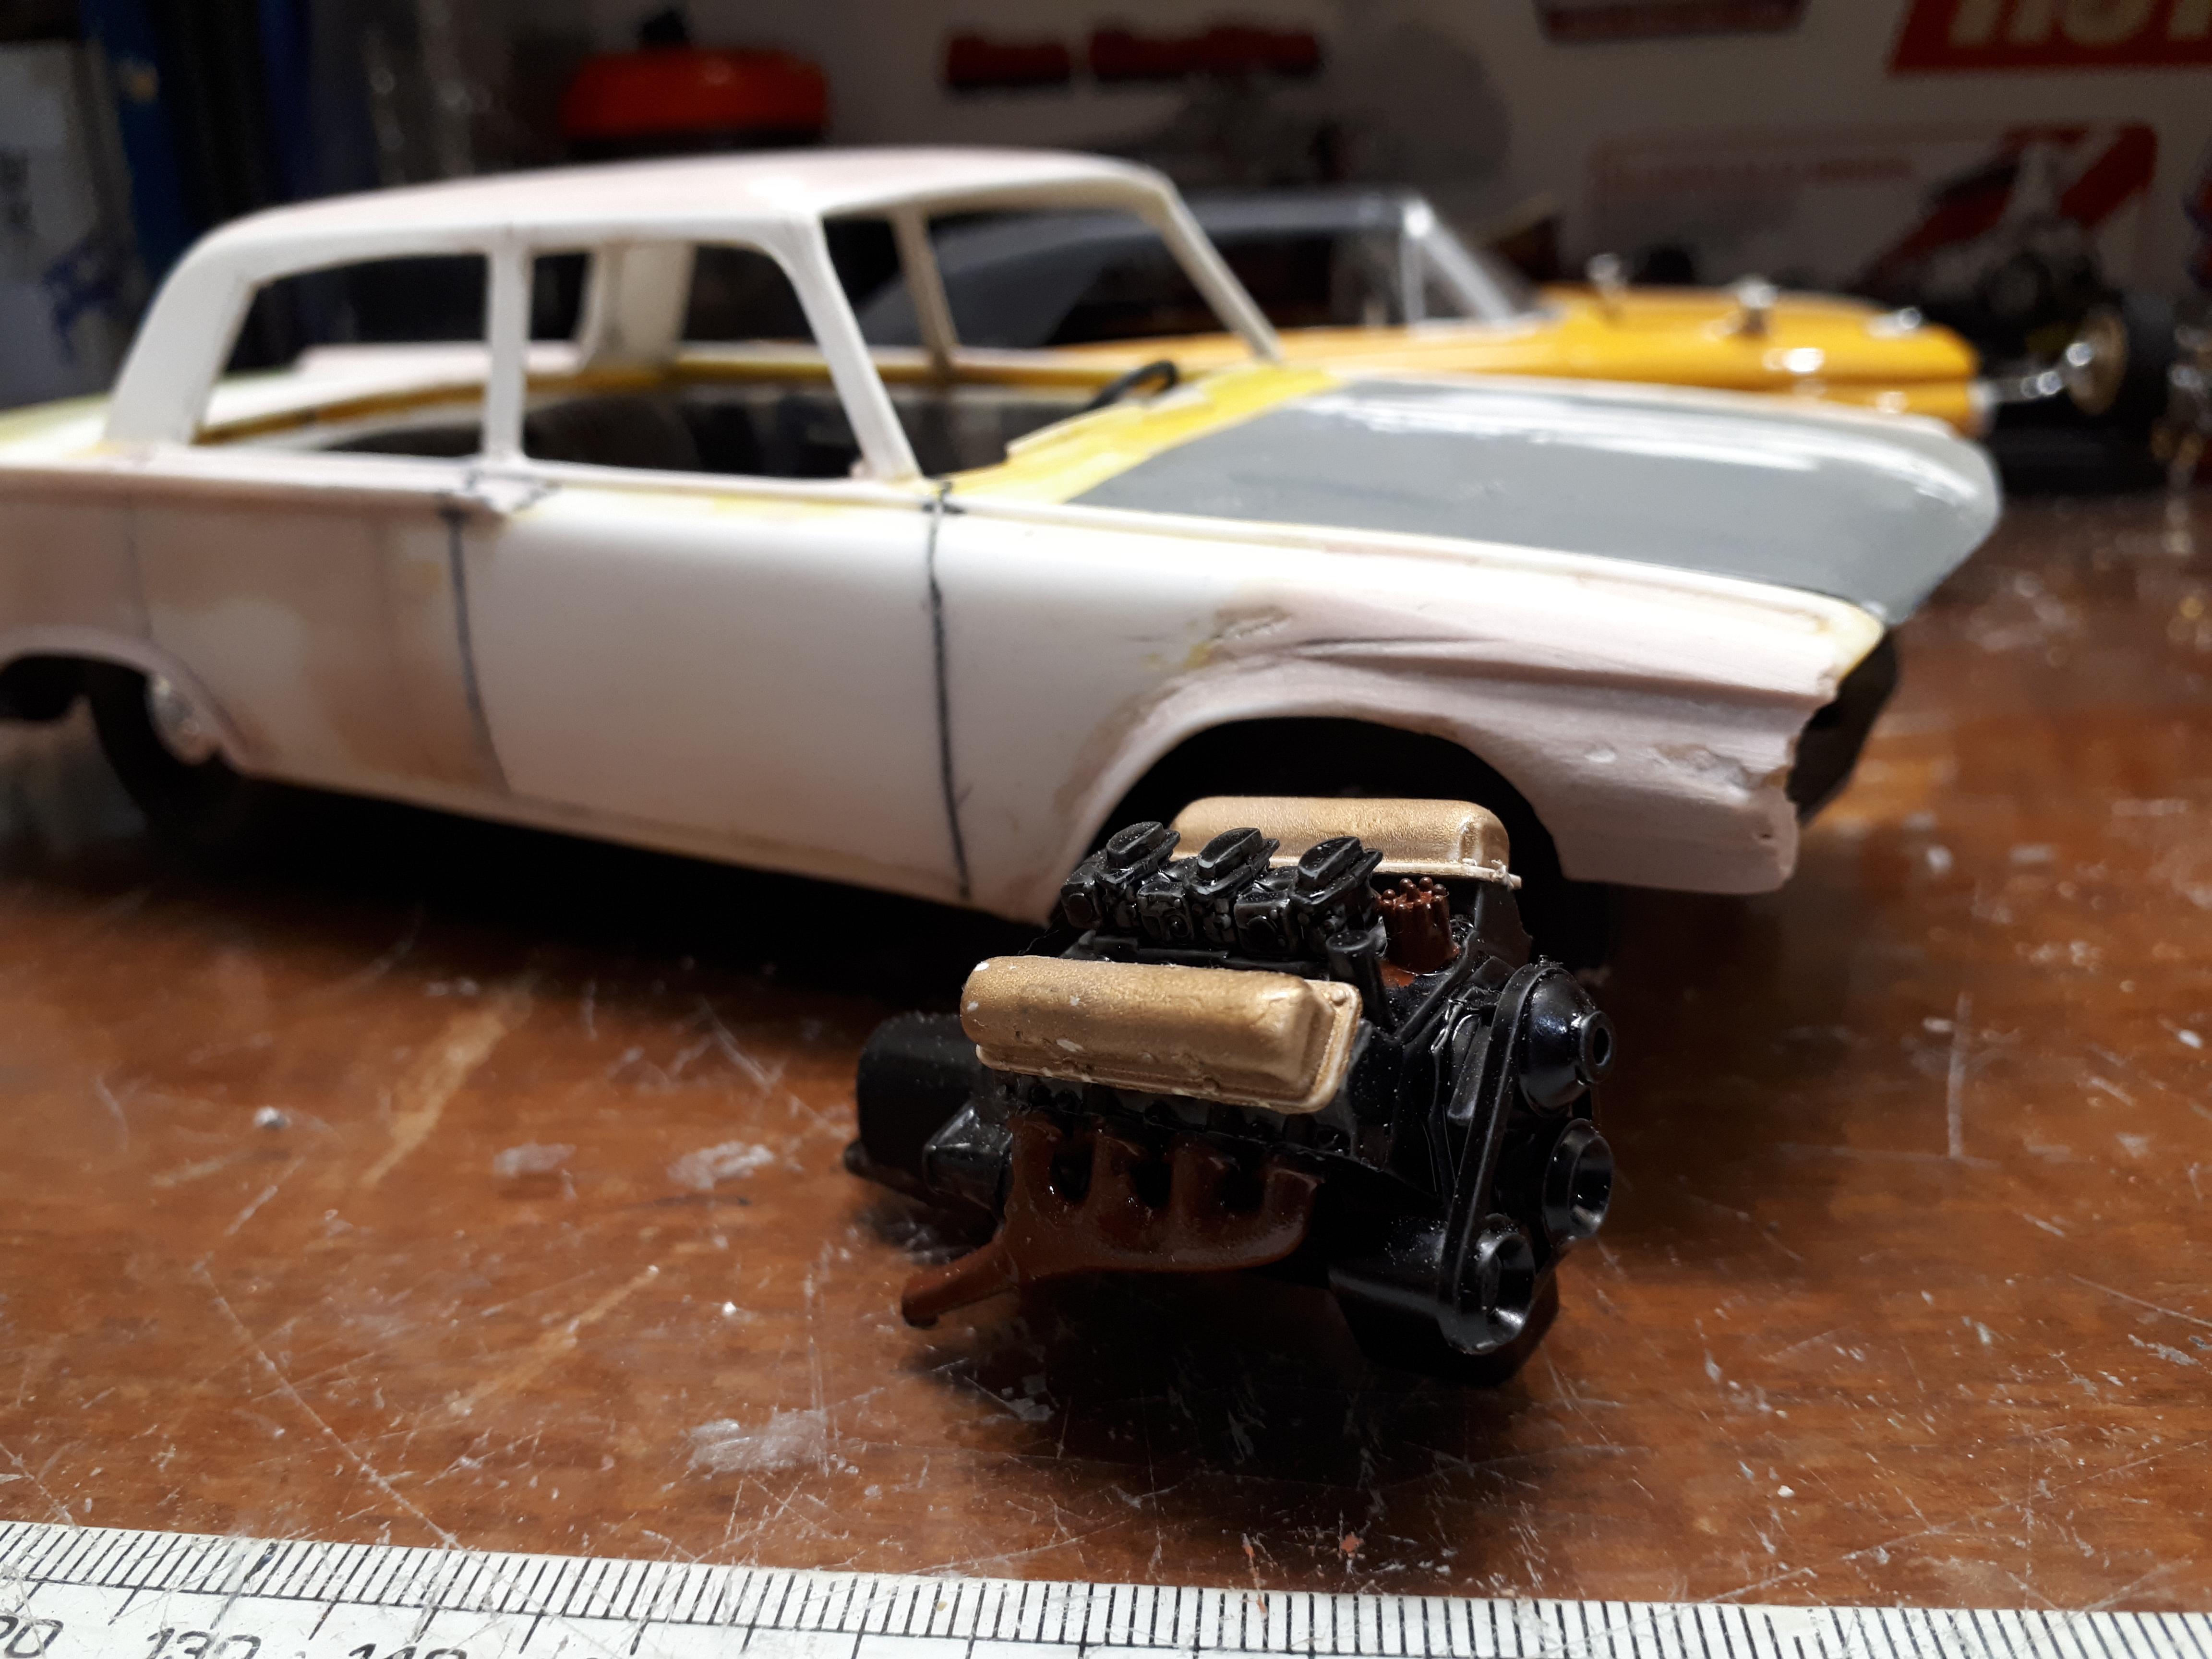
Bill, that would be absolutely amazing if you did! When I started this project I was basically working on near enough is good enough - it was going to have one day in the sun and then retire to the back of the cabinet. Problem is, I never expected it to go so well or be so much fun. Since I last posted photos I have done a lot of Bondo work but still have more to do, especially around the front of the car. I will post some more photos tonight. I did drop the lip a little last weekend, however. I found the correct smooth rocker covers of the FE motor, painted them gold and left them to dry. I then took them into the garage and plonked them on the bench while I did a few jobs before heading into the model room. And suddenly, one was missing! I figured I had travelled less than ten feet, how hard could it be to spot? You already know the answer to that one! So I carefully cleaned off the top of the bench. Nothing. Then I swept out the floor under the bench and went through the dirt in the dustpan. Nothing. There were two trays of scrap metal under the bench, you know, those odd pieces with cool shapes that will come in handy one day? Nothing. There is a shelf about six inches below the bench top with two old wooden drawers on it. One drawer has g-clamps and vice grips in it, the other has off-cuts of tubing in. I emptied them out one at a time, sorted them, rechecked the dustpan..... Nothing. I was starting to get desperate, no, cranky! These two parts had survived nearly sixty years and now on their big day, I had lost one of them. Not on my watch! So I turned on the flashlight on my phone to look across this shelf to see if the part had dropped down between the wall and the bench top and landed on the shelf. Nada. And then something sparkled. And I chuckled. My bench is approximately 1/4 inch steel plate. The mortar course in a brick wall is approximately a 1/4 inch wide by 1/4 inch deep. When the rocker cover had been accidentally swept over the back edge of the bench, instead of dropping straight down, it lodged in the mortar course. The mortar course exactly level with the benchtop. The top edge of the gold plastic part was hidden by the overhanging brick and literally the flange of the valve cover was the only thing protruding under the shelf. The light from the phone had caught the sparkle on that tiny visible sliver. After fishing it out ( another story but not as good as this one!) I went straight inside and glued it on before anything else happened! Thanks everyone for all your support, I will get more photos up shortly. Cheers Alan -
There's heaps of kits that I have built multiples of - I currently have eight versions of the Monogram deuce on my shelf and another four in the build - just love them! Which means the obvious choice for a kit for a lifetime would be the most recent version of the Big Deuce - the Revellogram one with two engines and two sets of wheels. The variations available are endless, you could keep going as your eyesight faded and if you bought a small lathe you could super detail every millimetre of that puppy. Every new build would give you opportunities to stretch the envelope a little further. Cheers Alan
-
I have been looking for some time as I have a real 35 Ford Phaeton project car and I would like to try some ideas out on a model. The only thing available in 1/24/25 is a very well done diecast Sedan delivery. Everything is very well done except for the shape of the windscreen - it bears little resemblance to a real 35 in this area but the grille, hood, fenders, and body mouldings are real good. I have cut the top off a spare one and have begun converting it into a phaeton. I will be using AMT 36 roadster parts to complete the conversion. If this conversion is successful I will get my mate to do a resin cast. The manufacturer is Unique Replicas and even here in Australia, admittedly about fifteen years ago, they were reasonably priced in the $35-50 range. Might be dearer now on eBay. There were a variety in both stock and street rod versions. The only thing a little funky is the work they did on the plastic chassis to give it poseable steering and spring suspension. Four small coils do the trick even though they moulded in the transverse spring! Cheers Alan
-
62 Valiant old track car
alan barton replied to BIGTRUCK's topic in WIP: Other Racing: Road Racing, Land Speed Racers
Suddenly I feel bad about complaining about my fibreglass body issues - at least I had some shape to work with! Yep, you are on a quest alright. I am a big fan of bringing unloved models back from the dead so totally understand what you are working to achieve here. The grooved tyres are looking OK as well. I know how hard they are to do nicely. You get one done and then realise you still have three to go!!! Cheers Alan -
Fond memories of building this one with my brothers in our teenage years. I loved the front but was never fond of the back so we used putty to make a flatter version of those pods. Your colour combo works perfectly with the wheels and tyres - this is very much a 62/63 type of build. I might have to build one myself! Nice work. I'm pretty sure those seats are from the Revell Anglia, for what it's worth. Cheers Alan
-
Well, I didn't expect that! Very cool Dennis. I have just done a two tone 34 pickup myself but it is not as arresting as this combo! Great to see the wheels tucked in, I haven't assembled this suspension before and I was surprised to see how much scrub radius it had. Just as well these things are plastic, eh? Mind you, everytime I see a real rod with finned Buick drums on a beam axle I wonder about scrub radius, when the kingpin is a short walk from the tyre contact patch! I particularly like the way the black fenders highlight the soft metal finish of your wheels - it just works! Cheers Alan
-
62 Valiant old track car
alan barton replied to BIGTRUCK's topic in WIP: Other Racing: Road Racing, Land Speed Racers
When you're done, Ken, Tom and I will have to post ours up in successive post so that we can have a Valiant stockcar family reunion! I like how you are saving an otherwise challenging body shell. As a dirt track car it will be perfectly believable. Cheers Alan -
I am trying to get around just how many hours went in the journey from the purple model to the red one!
-
Sorry, Eric, but not even close. The Charger is a similar size and configuration to the first gen Barracuda while the Galant is closer to a Corolla. Not saying it's a bad kit, just not something you would want to convert into a Valiant Charger. Cheers Alan
-
Nice job Michelle using a very tough medium to work with! From an Aussie point of view, the original 3D designer didn't quite nail the proportions. The body is a bit fat, the roof a bit curvy and the front wheel arch is a bit far back but hey, it is absolutely positively a Charger and yes, they do look a bit stumpy in real life too! Unlike most muscle cars here in Oz, they actually had a shorter wheelbase than the sedan from which they were derived. Always good to see an Aussie original on these pages! Cheers Alan
-
Absolutely on trend for thirty years ago! I've been finishing a few decades old projects myself lately and you do run the risk of looking out of date when in fact you are just catching up! I love that it is a total package, the grille shell slope matching the door cuts, the digital gauges, the smoothy body style ( not my favourite but absolutely accurate for the time) - it all comes together for a time warp model that is just as relevant as a black-and-red sidey powered hiboy from the fifties. Like gman said, it was these projects of yours in Street Rodder that got me back on the horse and brought me to where I am today in the hobby. Thank you for taking the time to answer a letter from a guy in the bush in Western Australia nearly forty years ago! Cheers Alan