David G.
-
Posts
11,326 -
Joined
-
Last visited
Content Type
Profiles
Forums
Events
Gallery
Everything posted by David G.
-

“BUILDING THE COVERS “ Vol # 16 Akron Arlen Vankee’s SS/B 1969 Barracuda
David G. replied to M W Elky's topic in Drag Racing
That's amazing! I love it when a model can be tied to the real world in such a way, nicely done. David G. -
Thank you Mario. For the decals, it seems that Revell found a thickness that provides enough opacity while still being workable. These decals definitely cover very well. Thank you Philippe, I'm glad you like it. Thanks Larry. Thank you for your kind comment Bob. I did consider calling it the 40 Hour Challenge but 7 Day Challenge just had a better ring to it. When I was planning this challenge, I thought I could complete it in less than thirty hours- maybe even twenty-four if all things went extremely well. So I planned to commit to four to five hours per day which would put me right on target between 28 to 35 hours. Where I fell short is in how much time I could commit to each build session. I do record my hours worked on an Excel Spread Sheet that I knocked together. Having it helps tremendously in keeping after myself. Thank you Trevor and you're right. It does look good on the shelf. Thanks for your comment Steve. Often, it's the little details that add the most to a build. The wire for the gumball machine is beading wire that I coined around the shaft of a T-pin. For the manifolds there's a technique I use. I start with base coat of Oxide Red Primer with a light misting of black primer followed by another very light misting of some sort of silver or steel color, whatever I happen to have available. All this is done using spray cans at my outdoor paint bench. Thank you Kurt. I too have many unfinished builds. So many, that I came up with a spread sheet to track them all. Thank you Chaz. Again, thanks to everyone for all the kind comments. David G.

-
Thank you for your kind words Carl. Hi Steve. For Spaz Stix I don't use a black base coat but I do when I spray Alclad. Thanks for your kind comment. I'm going through the photos of the completed build now and should have them ready to post soon. Thanks again, David G.
-
Hello Everybody! I started this one back in November of 2021 with the intent of it being my final build for the year. I thought, "Just a simple snap-together kit, should be no problem, right?". But I ended up jumping down the rabbit hole on this one.. that hole was long, twisty and deep. On top of that, I experienced a little setback with the chrome on the rear bumper that caused me to need to step away from it for a while. With 2022 almost half over I was feeling the need to complete a build for the year so I set a challenge for myself. My Seven Day Build challenge, here's a link to that. With that challenge completed (yup, here's another link) it's time to get this one back on the rails. OK, I stripped the Molotow off the bumper, then I had to spend time smoothing out some rough spots that arose in the plastic from the effects of multiple trips to the Purple Pond. For this attempt I decided to use up the last of my Spaz Stix. Though, in my opinion the results don't look as good as the Molotow did this should be easier to work with. The Spaz Stix worked pretty well. I think the multiple paint applications and removals had some minor adverse effects on the part's surface quality. It's not an ideal outcome but it will do. I've completed the detail painting with Tamiya Clear Red and a mixture of Tamiya Flat White and Clear. All that's left now is to double check all the sub-assemblies then put the whole thing together for the last time. It's been a long road but I'm glad I did it and I'm even gladder that it's done. Thanks to all of you who stuck with me through this one, your words of encouragement helped to keep bringing me back. This one is essentially done. Once I get the final photos together, I'll post them in the Under Glass section. Thanks again, David G.
-
Thanks Tom. Thank you Bob, I appreciate that. Thanks for your comment John. I have some experience in that realm too, wanting to add so much detail that it got in the way of my enjoyment of the hobby. I think I've found a balance between that and just slapping them together to get them done. Thank you Ray. Thanks David, I'm fond that bit myself. Sometimes little details can have a big impact. Thanks Lee. Thank you for your kind words Jürgen. Thanks Craig. Given its size, it was actually one of the easier decals that I worked with. It was a little thicker than I would have liked it to be. I think that thickness may have been responsible for the two small wrinkles that I ended up with. But overall, I'm pleased with the way they came out. Thanks Emre, I'm glad you enjoyed it. Thank you Don, I'm glad to hear that. Thanks Eric. Thank you Chris. Thanks Jason, It's kind of you to say so. David G.
-
Hello Everybody! After fourteen days, this build is finished and has been posted in the Under Glass section: Here's a link Thanks to all of you who followed along and helped to keep this one afloat. David G.
-
Thanks Patrick, I'm glad you like it. Maybe Revell updated and improved the decals after the first initial release, I had no big problems with them at all. Ol' Huggy would have made quite an eye-catching addition, wouldn't he? David G.
-
Nice progress, the body looks great. David G.
-
1961 Mercedes Benz 190SL - Revell with a few modifications
David G. replied to 89AKurt's topic in WIP: Model Cars
Holy Cow! ? The flares and air dam look fantastic! So does the headrest / tonneau. It must feel great to have made such progress. David G. -
AMT '70s Short Body R.E. Dragster (05/22/2022)
David G. replied to Straightliner59's topic in WIP: Drag Racing Models
Taking the best of what each kit has to offer. That's a nice option to have. It all looks good together. David G. -
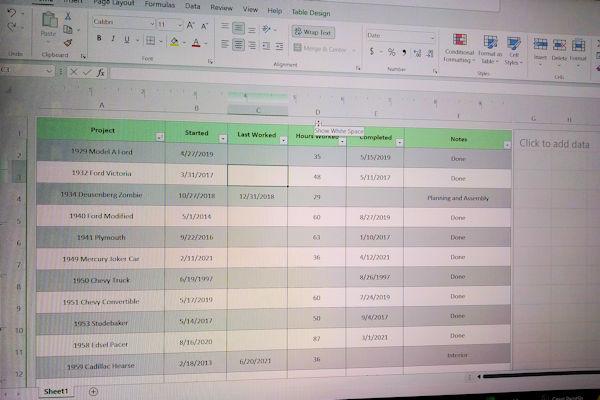
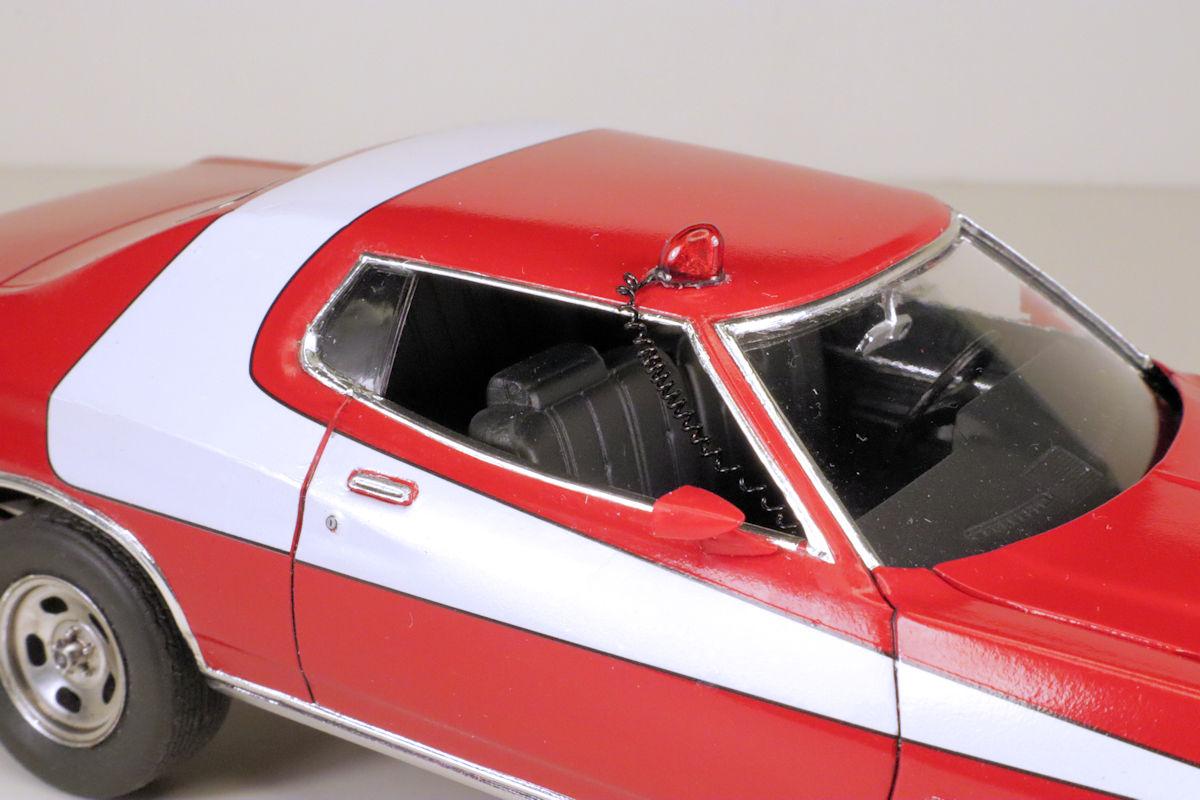
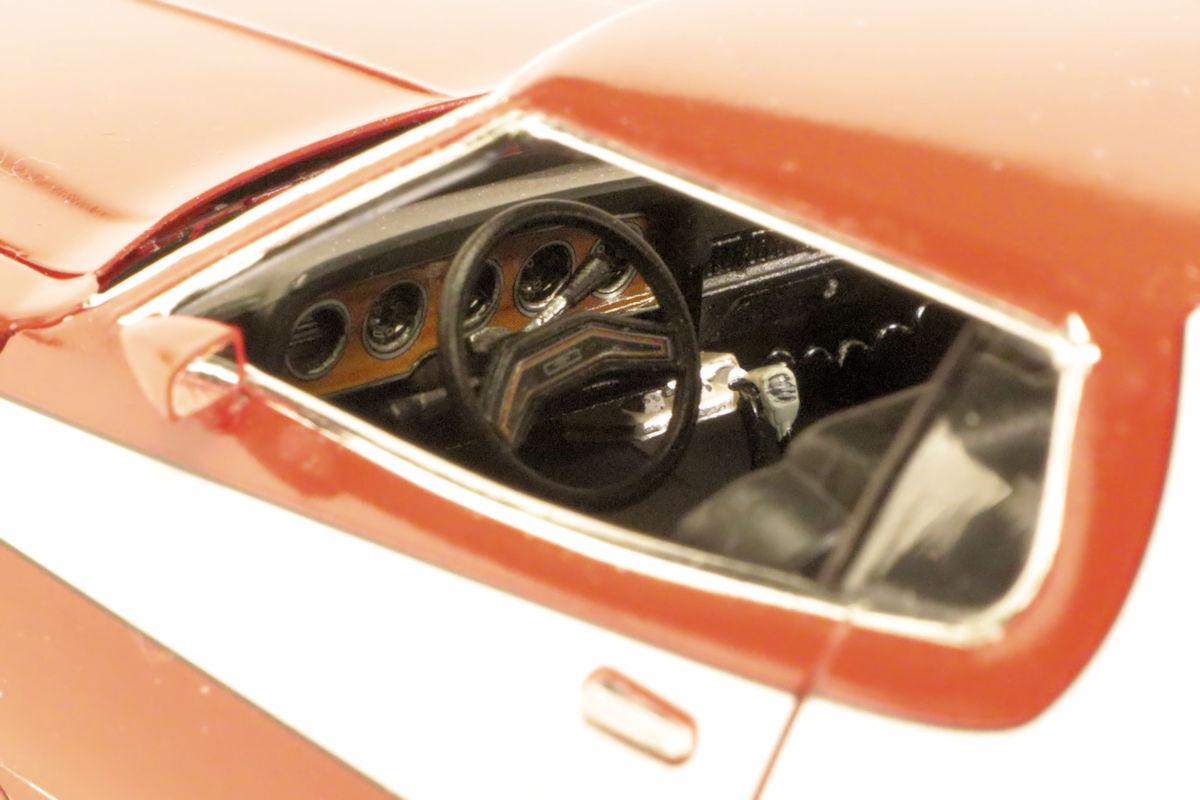
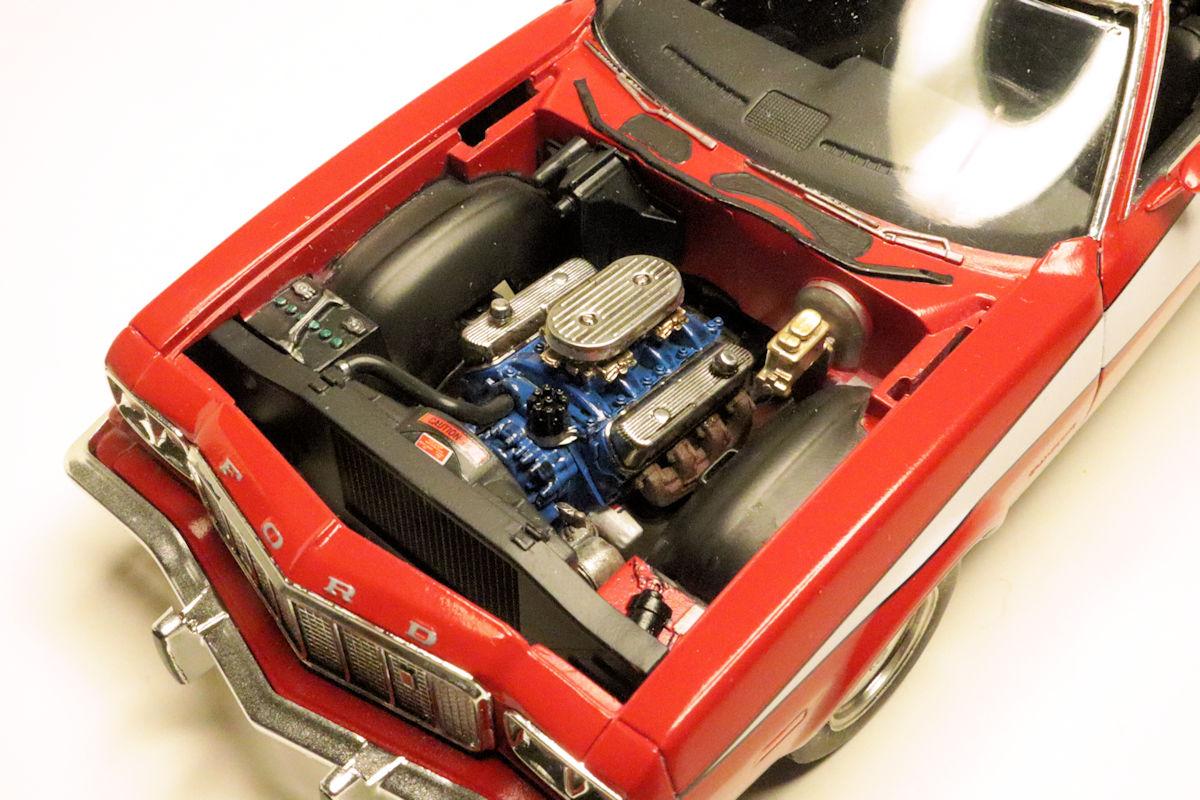
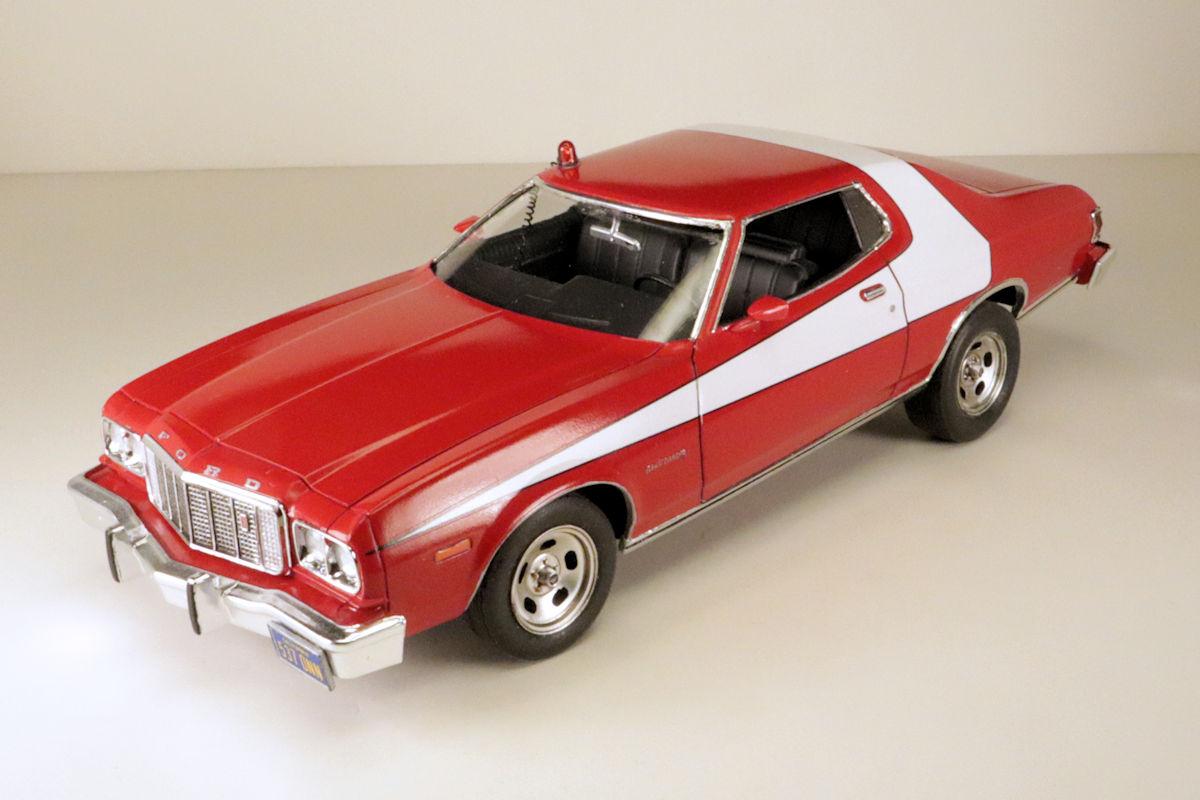
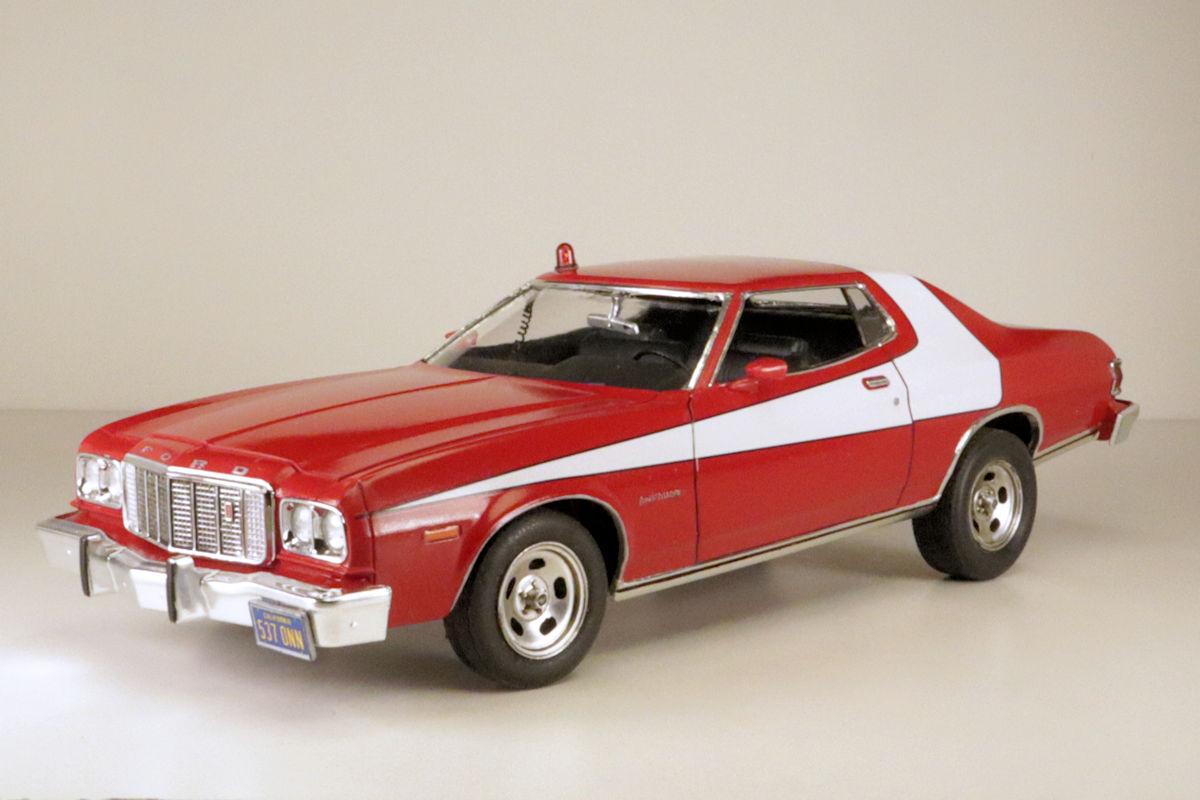
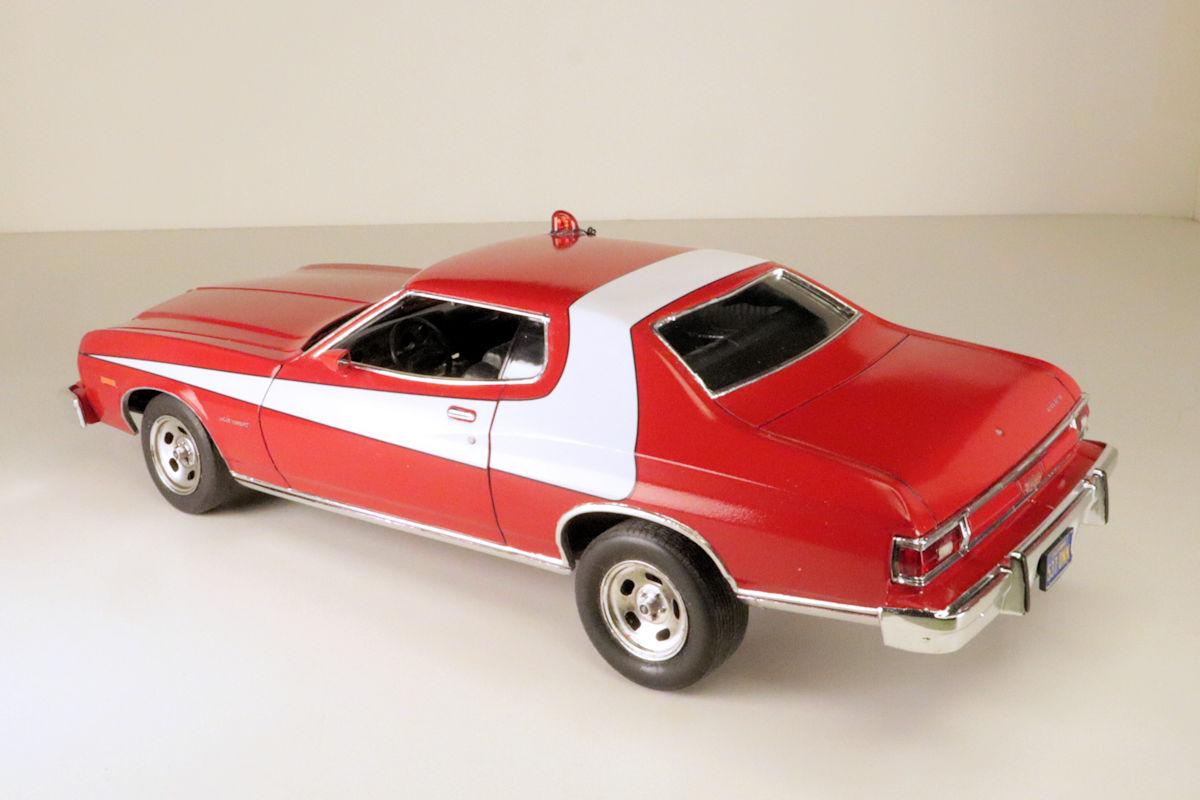
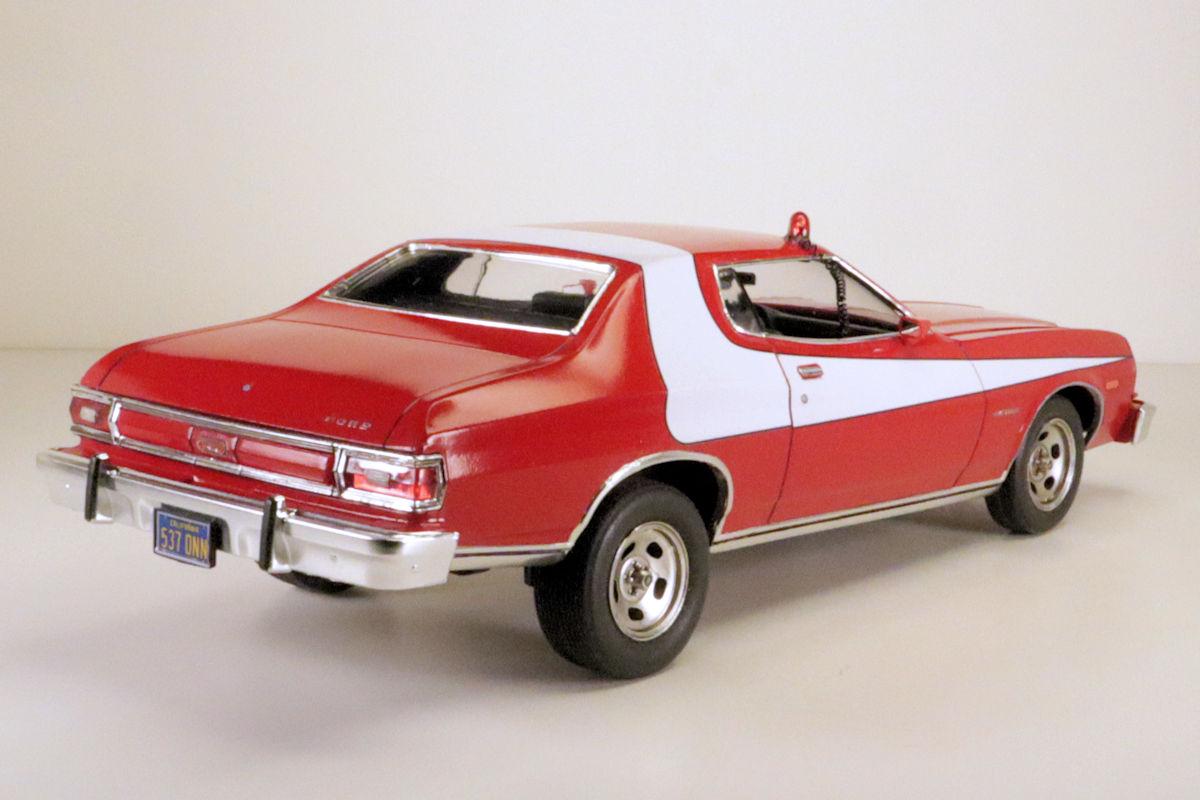
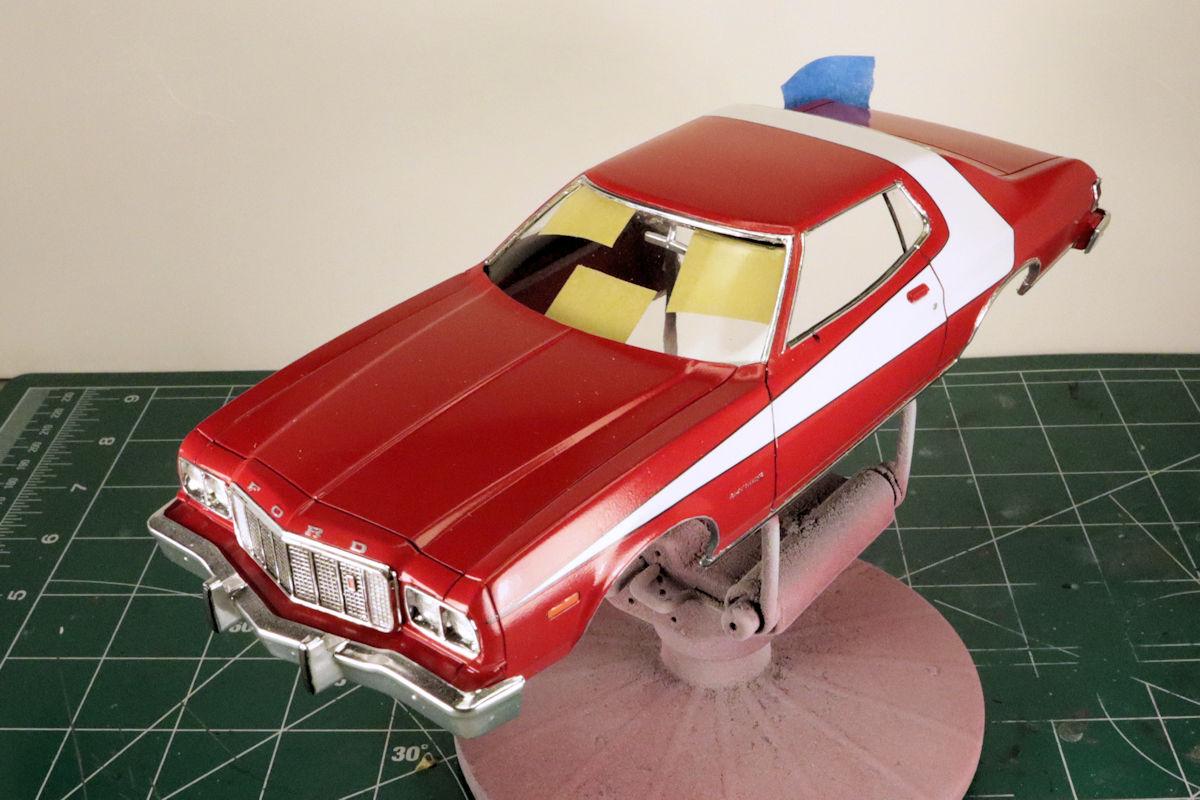
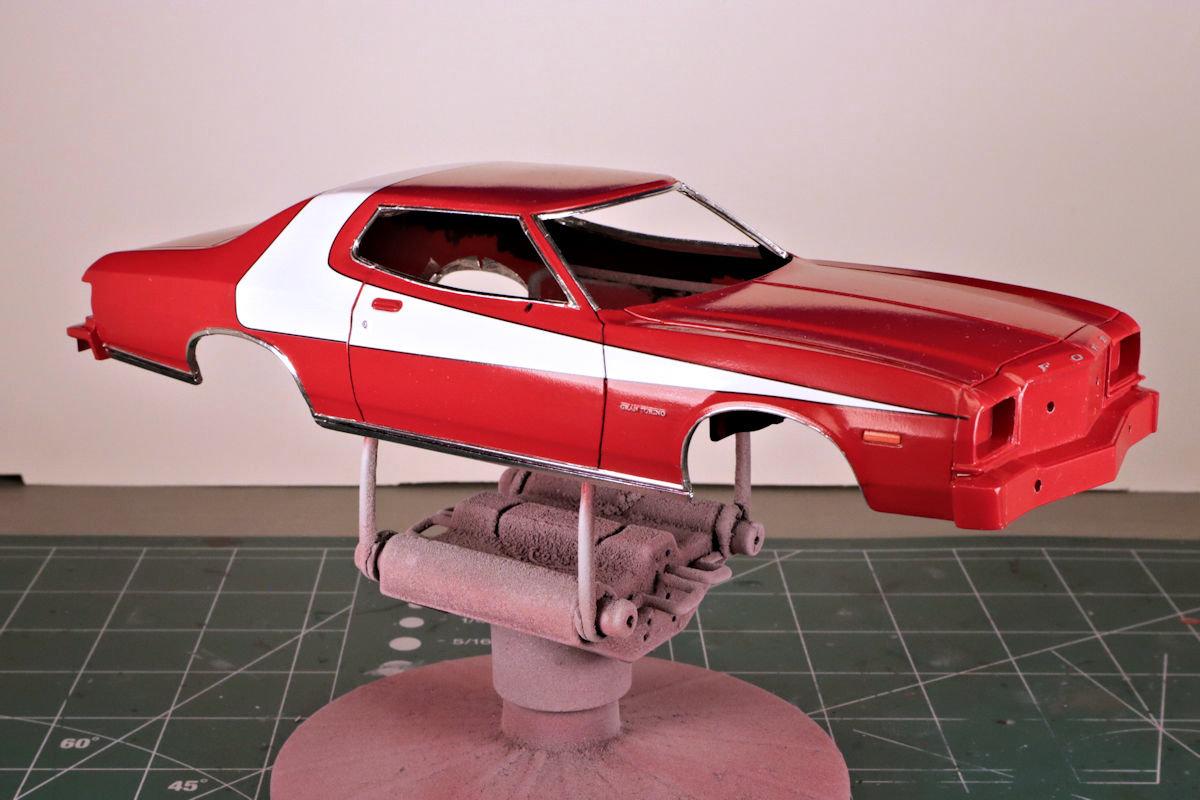
Hello Everybody! For those who have been following along in the WIP section (here's a link if you're interested), this is Day Fourteen of my self-imposed Seven Day Challenge. For those of you seeing this for the first time, a brief explanation is in order. This is a challenge that I came up with for myself. The idea is to completely build a model from start to finish in seven days. They don't need to be consecutive days but there must be only seven of them. The reason for coming up with the challenge was my desire to finish a build. I have several build projects that have stalled for various reasons and I felt the need to complete something... anything. The idea was to select a fairly simple kit (Revell's Starsky & Hutch Torino) that I could stand a reasonable chance of completing within the prescribed time. It took me fourteen days to complete the build with a total of approximately 33.5 hours invested. So yeah, if I had pushed a little more and committed to building five hours per day, I could have met my deadline. That's kind of the way I planned it but it didn't quite work out that way. So, it's done and here it is. One of Television's iconic cars of the Seventies, the 1975 Ford Gran Torino. Otherwise affectionately known as the "Striped Tomato". The decals were a lot easier to work with that I thought they'd be, credit to Revell. They were a bit on the thick side but still thin enough to conform adequately. the thickness made them a little easier to work with. I know that the stance on this one is a little too tall but my plan was to build it OOB and not to fuss with such details. At least Revell gave it that classic 70s rake. Revell provided the gumball machine. I added a tab-shaped peice from chrome sprue inside it to give it some depth and made a wire for it. Revell thoughtfully provided some excellent looking decals to spice up what would have been an otherwise bland interior. The police radio and wire for the gumball machine can also be seen. A nicely detailed engine. I'm not sure it it's the correct one but it looks good to me. I hope you enjoy the photos at least as much as I enjoyed the build. Thanks to those of you who followed along and supported me during "The Challenge". Having your feedback helped inspire me to complete it. David G.
-
Great start on this one Bob, I like your choice of colors. David G.
-
Yikes! How unfortunate. Before you tank it, try some water-based solvents for removing the foil. Start with warm soap and water, just like a paint prep. Then maybe Windex or rubbing alcohol. Best of luck with that, it really stinks to come so far only to have such a mishap so close to the finish. David G.
-
Beautiful details and clutter! It looks appropriately "lived in". David G.
-
REVELL 2017 FORD GT LEMANS
David G. replied to HSCHMIDT's topic in Other Racing: Road Racing, Salt Flat Racers
The Ford GT has been one of my favorite cars since I've been old enough to notice cars. You have certainly done this one justice, it looks great. David G. -
I've been considering one of these or similar. What's the RPM range on it? And is it corded or rechargeable? David G.
-
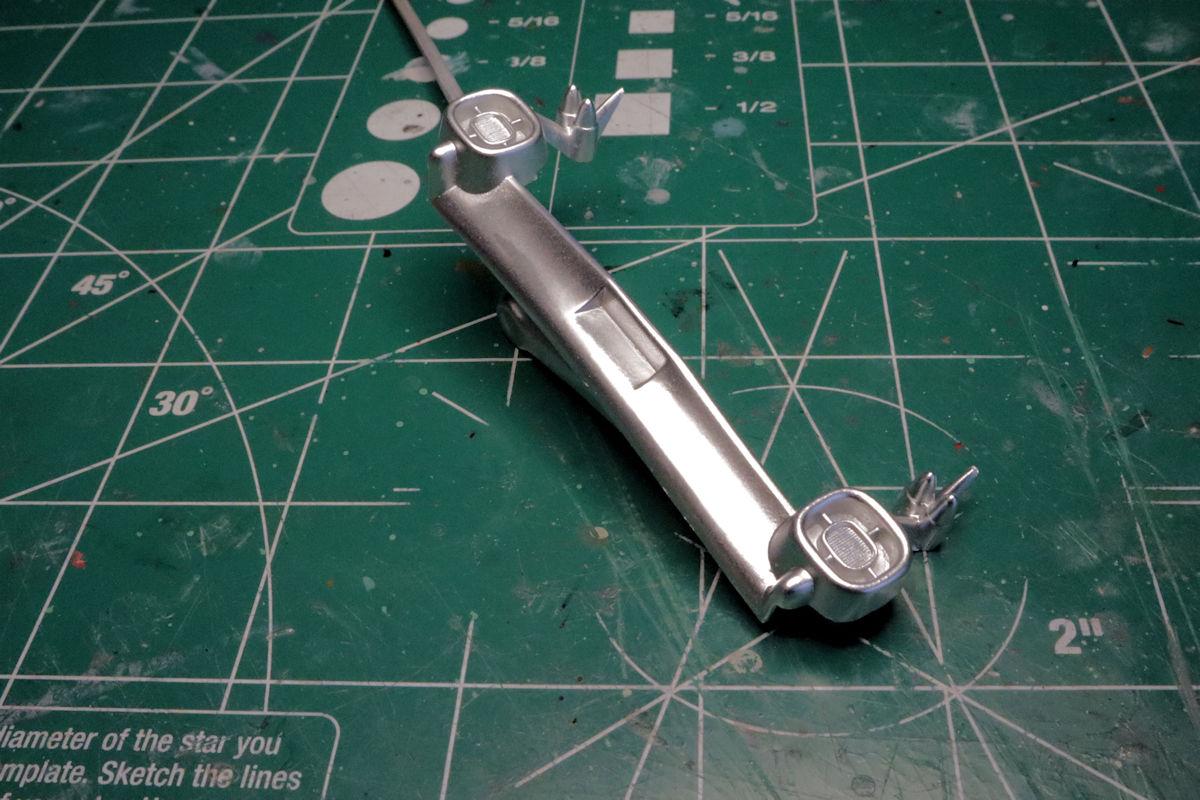
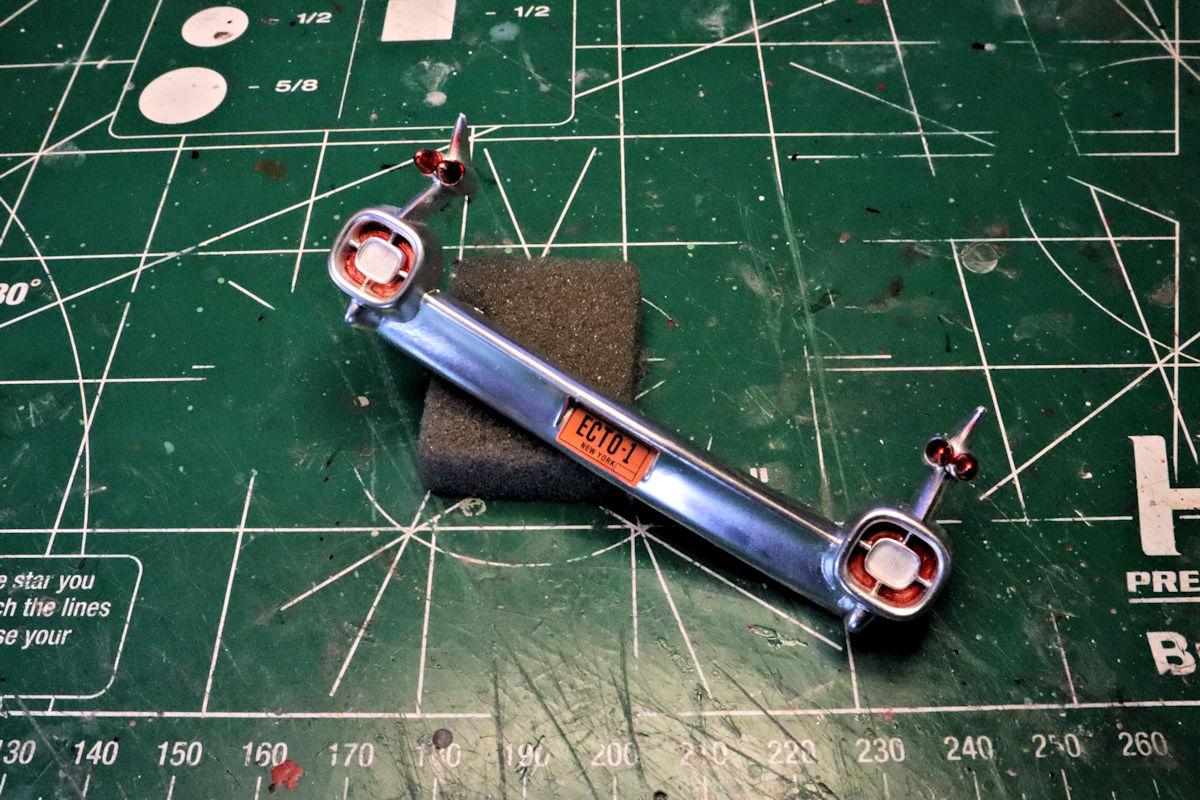
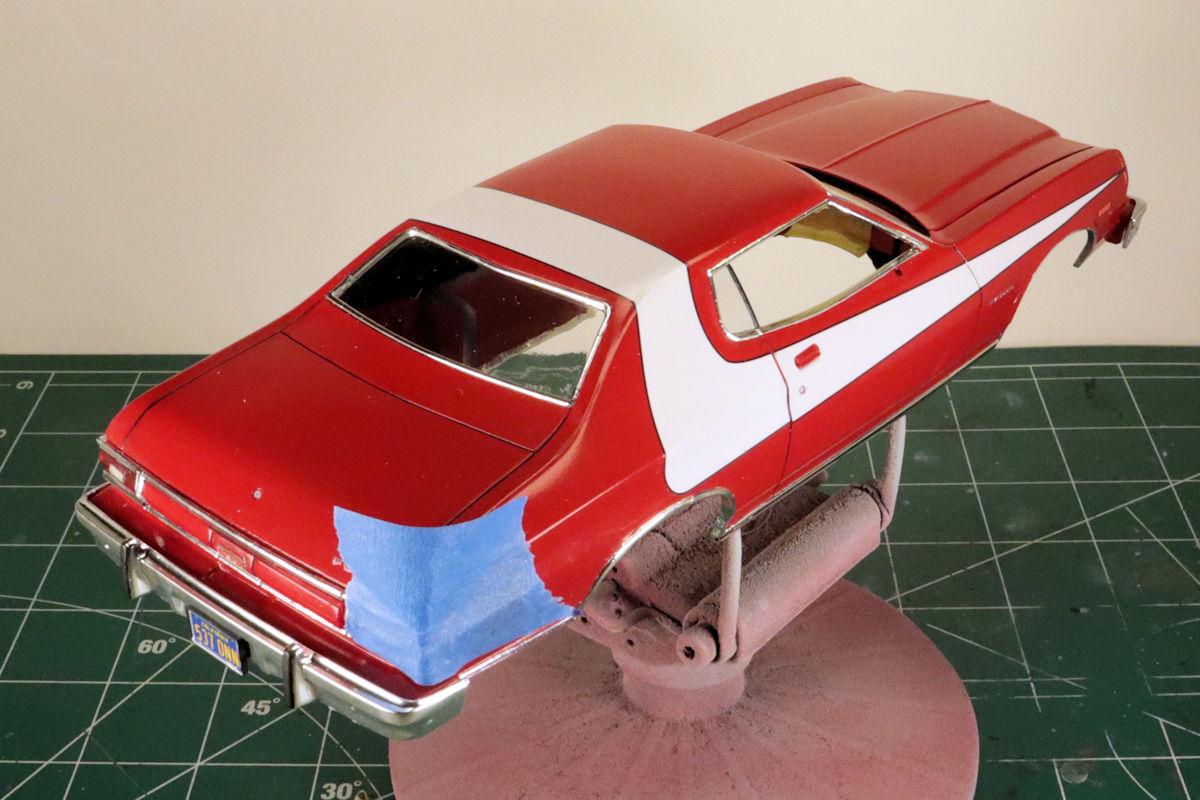
Hello Everybody! Day Thirteen of Seven: I thought that this was going to be the finishing session but alas, it was not to be. It is at about 95% completion though. The glass has been installed. The windshield is temporarily secured with masking tape, just like in the real world. This is one of the two things that kept this from being the final session. All the other glass snapped securely into place like they were designed for a snap-kit. The rear view mirror, grille, headlight pods and both bumpers are in place leaving only the sideview mirrors, front license plate and gumball machine to install. The other little hang-up was the rear tail light trim piece not having enough of an arc to conform to the curve of the rear panel below the trunk lid. Upon gluing the part into place, the left side settled in and held fast while the right wanted to spring away from the body. Even after clamping it in place for about ten minutes, it still popped out when I released the clamps so I taped it down and let it cure over night. That's all for this update, the next step is final assembly and completion. My next posting on this project will (hopefully) be in the Under Glass section. Thanks to those of you who followed along, I always enjoy your comments. David G.
-
Thank you Carl. David G.
-
Good call on the chrome, and a lucky find on the fan belt. Everything looks great so far. David G.
-
How tremendously cool! David G.
-
Good looking paintwork. David G.
-
truck, boat, and trailer
David G. replied to Paul Payne's topic in WIP: Model Trucks: Pickups, Vans, SUVs, Light Commercial
Nice progress! This thing is turning out to be quite the monster. David G. -
Hello Everybody! Welcome to Day Twelve of Seven. In a three hour build day split into two sessions, I managed to get the foil work completed. The trim on the front wheel arcs are painted on with a Molotow pen. I'll also be using some Molotow to touch up a few areas where the foil didn't lay down as well as I would have liked. As always, thanks for taking the time to look and please feel free to post a comment. David G.
-
Nice mockups. Do you plan on leaving the chrome on the valve covers and steering wheel as it is or stripping and refinishing? David G.
-
Thank you Zenon. PVA is polyvinyl acetate, or white glue. Essentially Elmer's Glue of some form or another. I used Zap brand Canopy Glue in this case. David G.