David G.
-
Posts
11,326 -
Joined
-
Last visited
Content Type
Profiles
Forums
Events
Gallery
Everything posted by David G.
-
Beautiful color combination and paint, clean and tight build, and a great stance. It's everything a custom Mercury should be! If you still plan on attaching the side pipes you may wish to consider using some PVA canopy glue. I find myself using it in such instances as the one you described. It works well for attaching light-weight nonstructural parts. And it does so without much chance of marring the paint finish. It takes longer to cure but holds fast once it does. David G.
-
 That's one beautiful Merc Greg! I love the interior. The black metal flake dash is a nice contrast to its straight-foreword basic black-n-white scheme. It's like the silk edging on a tuxedo's lapel. The whole build is fantastic! The color combination, stance and finish you chose highlight everything that's great about the lines and style in this car's design. Thank you for posting it here Greg! David G.
 -
Thank you most kindly David! -D-
-
That's a great color Jim! Nice looking paint too. David G.
-
Thank you Carl, I was glad to have you along for the ride. David G.
-
There's nothing like adding some features of personal interest. Those are some nice, faithful scale replicas. David G
-
1:16 Gunze Sangyo 1937 Rolls-Royce Phantom III Sports Saloon
David G. replied to Anglia105E's topic in WIP: Model Cars
I was wondering how those hinges would be mounted and secured. I must admit, I didn't imagine that solution! That method looks like it should be more than adequate for holding those hinges true and secure. I'm impressed by the elegance of it. Your work on this is top tier, as always. This kit is certainly getting the proper attention it deserves. David G. -
That's the nice thing about hobbies Jim, they're not jobs. If you're just not feelin' it, put it back in the box and finish it later. Or not. I had one build that took me almost nine years to complete and about a half-dozen I haven't, and may never finish. It's just a hobby. If you're not enjoying it, what's the point? Cheers, David G.
-
Thank you Len. I have some other options to consider. Currently, I'm kind of working through that part of the build. I usually don't dive into a build like this unless I've prepared at least one fallback position. David G.
-
Maybe they intended the product to by bought and used by people who are to young to have memories of or much interest in the movies on which it's based? Other similar kits have provided both options. That would have been nice. David G.
-
Thank you Alan. The good news is that since AMT has released the updated ambulance version that's actually an ambulance, none of ever have to go through this again! I almost feel as if I "took one for the team" as the saying goes. Thanks EMRE, I'm glad that enjoyed it. David G.
-
What would a car modelers Hades be like:
David G. replied to GLMFAA1's topic in The Off-Topic Lounge
I think that that's actually happened to me! ? I remember working on a Mustang and I was cleaning up one of the front parking light lenses, deburring it with a file when it slipped from my fingers and just... vanished! I was working less than six inches above my desk, I had a cutting mat down and a magnifier light lighting the scene. As I searched for it I remember thinking "Where the futz did it go?! There's no place for it to go! It should be right here!" Gone. That's okay, I left the other one off and just painted the holes where they went in transparent amber. No one even missed 'em. David G. -
Who doesn't love a mock-up? Let's see yours!
David G. replied to Belairconvertable's topic in WIP: Model Cars
Here's my next subject of interest. The multi-piece body will pose a challenge but it doesn't look like it will be too bad. David G.
-
1:16 Gunze Sangyo 1937 Rolls-Royce Phantom III Sports Saloon
David G. replied to Anglia105E's topic in WIP: Model Cars
Wow David, those hinge assemblies look like they would require a keen eye and a steady hand. And patience, lots of patience! I I like your idea of modeling the side window and quarterlight opened. It's a nice added touch of "lived in" character. On the whole, the doors look great. David G. -
What would a car modelers Hades be like:
David G. replied to GLMFAA1's topic in The Off-Topic Lounge
? -
What would a car modelers Hades be like:
David G. replied to GLMFAA1's topic in The Off-Topic Lounge
That would also work. But lacquer thinner has the added joy of being not only a paint solvent but a solvent for styrene as well. David G. -
What would a car modelers Hades be like:
David G. replied to GLMFAA1's topic in The Off-Topic Lounge
Spray cans of lacquer thinner labeled as "Clear Coat". David G. -
Thank you Len. Now that I have the color where I want it to be, I'll have to sort out the markings. The kit comes with stickers instead of decals. ? David G.
-
Thank you very much Donato. That's a bummer. Thanks Steve, I appreciate that. David G.
-
Thank you Jim. You have some impressive building skills yourself. I really enjoyed watching you knock that Plymouth into shape. David G.
-
Wow Ken! I don't know how I missed this one but I'm glad I found it. Great looking chassis and engine detail, excellent paint and choice of colors. Beautiful work as always! David G.
-
That's a sweet little roadster! The woodwork looks great! David G.
-
Great looking paint and build! David G.
-
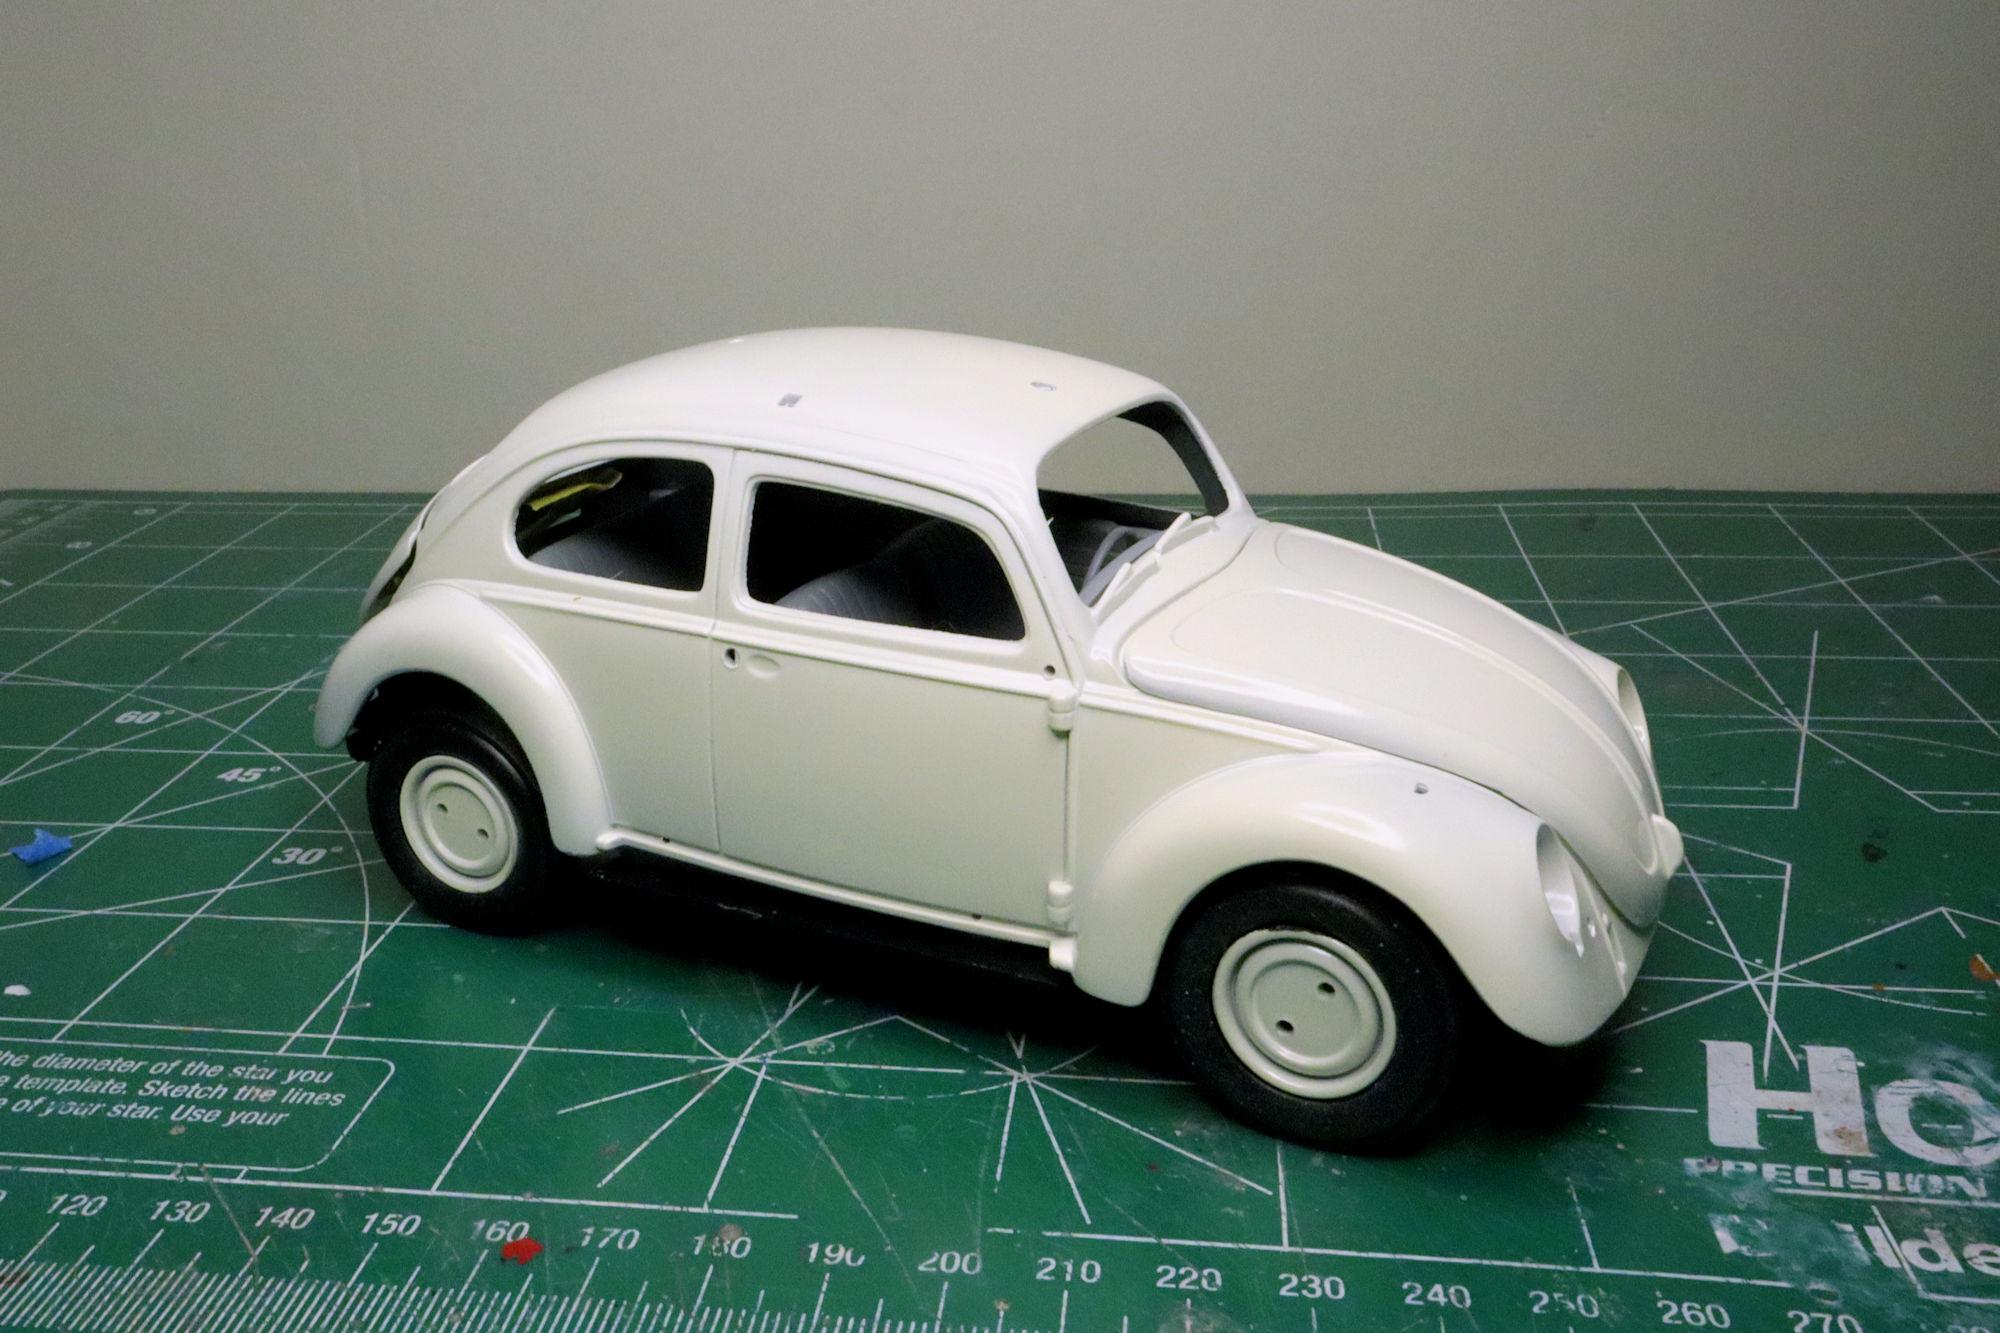
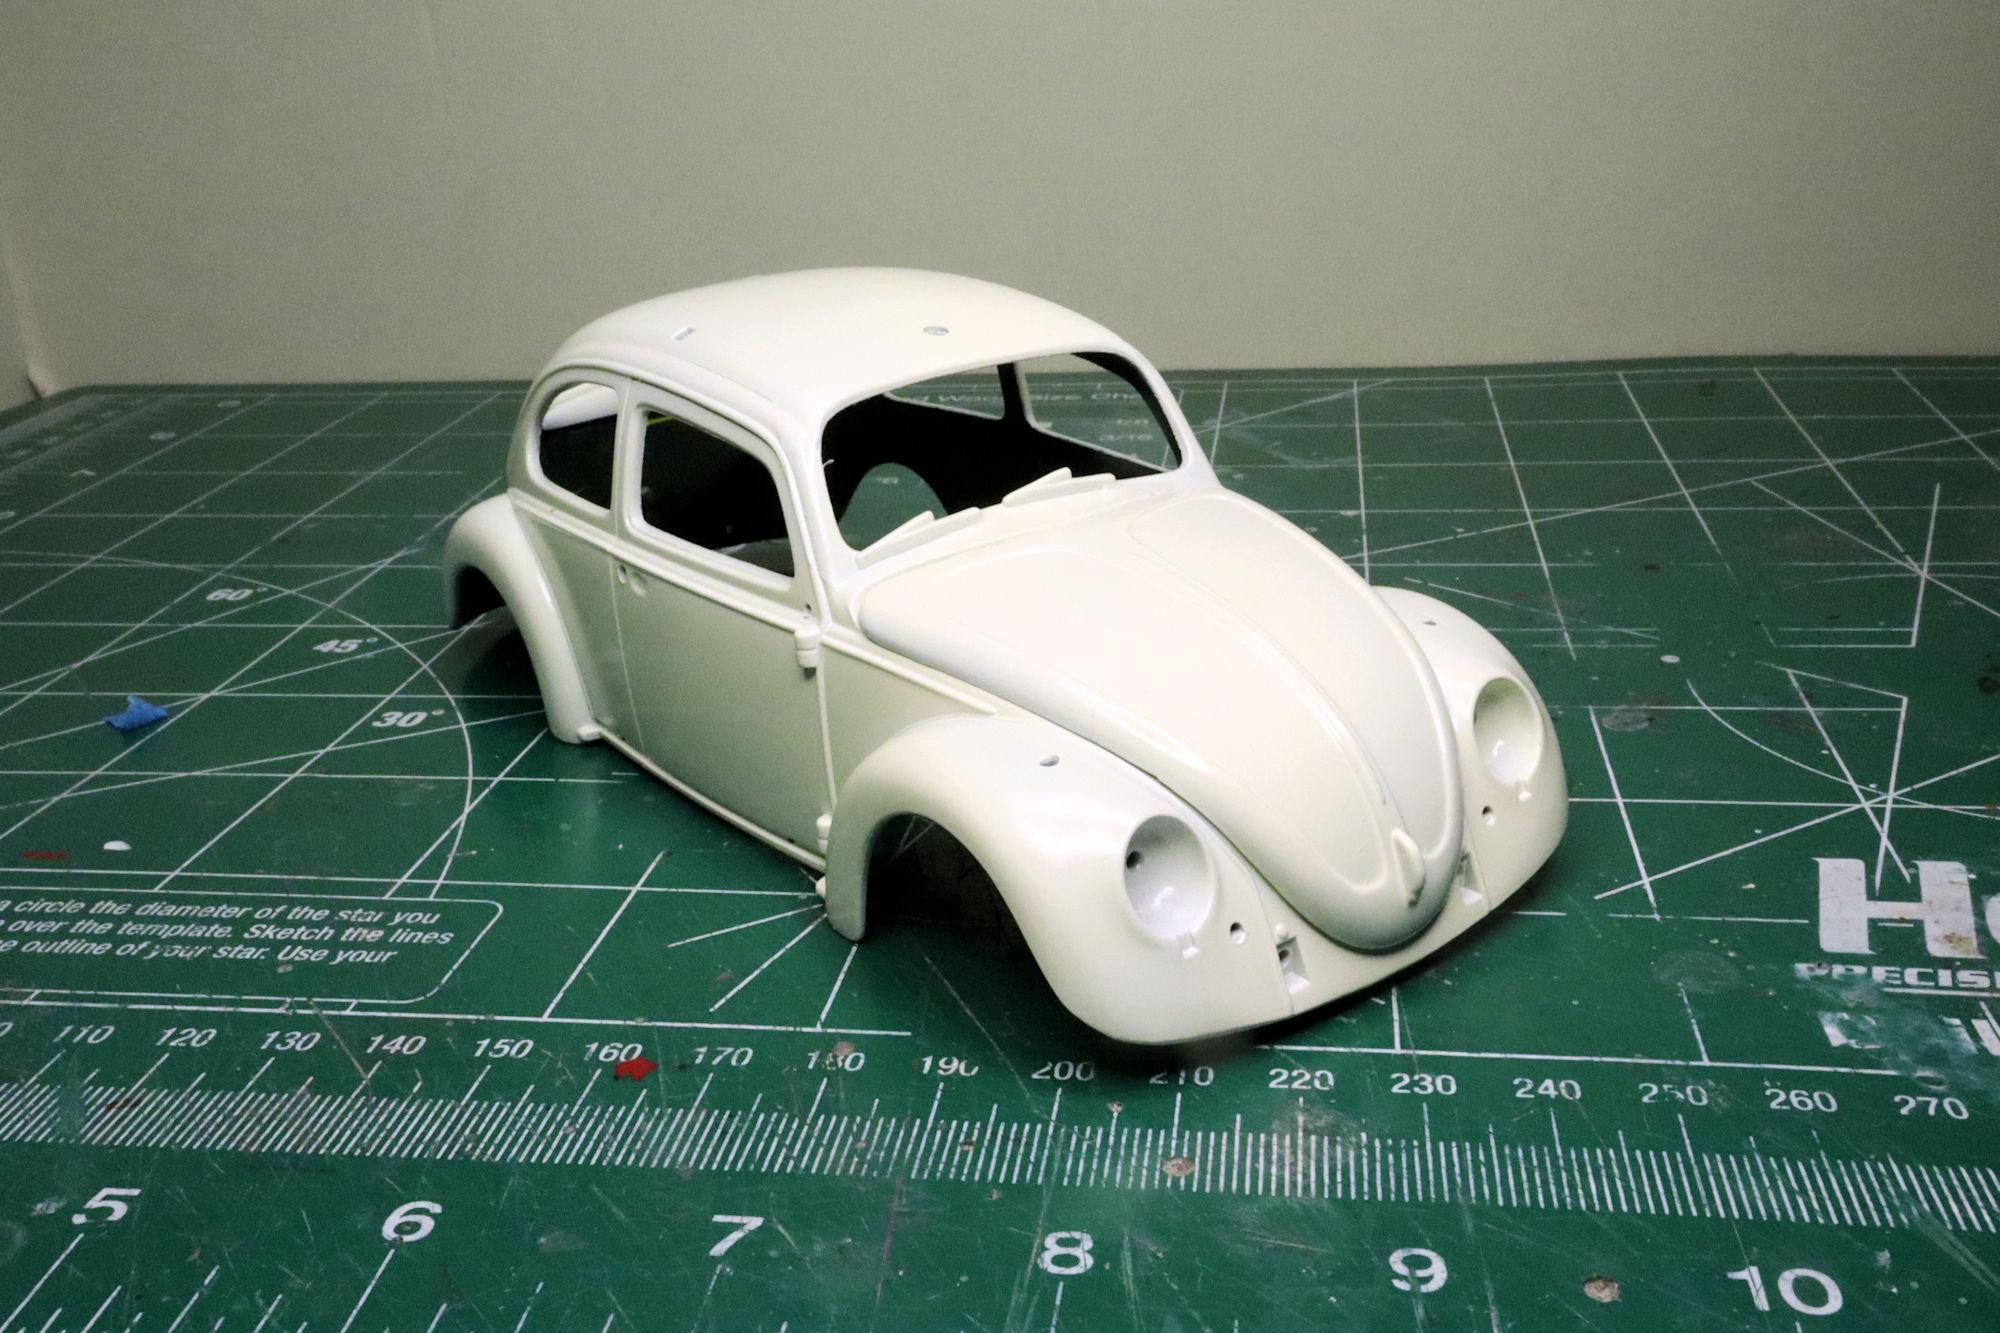
Hello Everybody! I'm still crankin' away on the Love Bug so here's the latest update. Ah, this is a little closer to the white I'm looking for. It looks like painting Tamiya TS-7 Racing White over a base of Tamiya TS-26 Pure White with the TS-45 Pearl White over top of that was the way to go. Doing that brightened up the Racing White and took a lot of the yellow cast out of it. The color has just a touch of that ivory blush, as it should. This calls for a celebratory mock-up! As always, thanks for your time and attention, comments are always welcome. David G.
-
That's a great looking Bug! Dual carbs, nice! 1776 CCs to go with the carbs? I once has a 1776 with a prog 2bbl. I loved smokin' Camaros with it. That really peed them off. I don't know much about the WC VWs but that's a cool looking Golf. I'll bet it's pretty quick too. Thanks for posting those pics, they brought a smile to my face. David G.