MrObsessive
-
Posts
9,785 -
Joined
-
Last visited
Content Type
Profiles
Forums
Events
Gallery
Everything posted by MrObsessive
-

Scam 'Bay Listings?
MrObsessive replied to Spex84's topic in General Automotive Talk (Trucks and Cars)
Well, it looks like that one bit the dust! I saw that auction recently by another LEGIT seller, and now this joker comes along trying to hijack it and put it in a bogus auction. Lately, when I see these bogus auctions, I just report them (like the one above) and it's comical to see them in your watch list only to come back a short time later and ZAP!!------they're history. -
Rex, that is one NICE Gulf GT40! One kit that hasn't been mentioned and it's proportions aren't bad is the pricey but nice LeMans Miniatures version. I had one of these kits for many years, and even went as far as getting the resin doors to open and close properly. I lost interest in it though and eventually sold it on eBay. At least to me, the lines of the body were quite good, although some may differ with that thought. It looked to me for the Gulf car that they modeled, the lines were mostly spot on.

-
Rattle Can Primers
MrObsessive replied to Philly Boy's topic in Model Building Questions and Answers
I'm one of the paranoid ones when it comes to rattlecan paints (even primer), and airbrush everything ESPECIALLY bodies! I stopped trusting spray cans in 1985, and Testors is the reason. Their newer stuff might be a little more user friendly, but I can't trust whatever pressure is coming out of the can, and I've gotten cans in the past that got a lot of "trash" in the paint that wasn't caused by me-------such as not washing the body thoroughly before painting. But that's just my 2¢..................your mileage may vary! -
better chassis for builds?
MrObsessive replied to Tim H's topic in General Automotive Talk (Trucks and Cars)
Brian, that's interesting about the Revell '65 Impala under the Poncho. I had a similar idea to use that chassis under the old '65 Grand Prix. Did you have any wheelbase alignment issues as the Pontiacs were longer than the Chevys in 1:1? -
Well, I was in touch with Luis Ayala in PR (Papin67) and he tells me that there are about 700,000 homes and businesses there on the island with no power. They didn't get the full force of the hurricane, but tropical storm winds about 60-70 MPH. Nevertheless, there are trees down, roads flooded, etc. He was able to get in touch as his job has power and he used their computer and whatnot, to see what's up. You folks down in FL.............look out! If you haven't left by now, I sure hope you got a REAL safe place to hunker down! This hurricane is no joke, and I've never seen anything like it as far as how powerful it is! Even if it skirts FL, the rain these things can produce can be still devastating!
-
Scott, it looks to me that Revell took some "artistic license" with those hood stripes, and added 'em in just for an option, not necessarily factory stock. One thing I wish Revell would really, really get away from is a "platform" for the interior and would do what AMT did in the '90's, and model their interiors to be on the flip side of the chassis. Real car interiors don't sit on platforms--------your seat/tracks are bolted directly on to the chassis floor. Sometimes this can lead to needless stacking and folks can have trouble figuring out why some things aren't fitting right, or is a real fight to get right. Just my 2¢ worth............
-
My only problem with the Fujimi Gulf GT40 while it's nice------there's something about the body that's not quite right to me, especially in the rear. The '68-'69 LeMans 1:1 had very bulgy rear fenders to accommodate those big meaty tires which were much in fashion by the late '60's. To my eyes, Fujimi's Gulf cars don't quite capture that shape, and it makes me want to "bulk up" the rear if I ever build mine. Of course, this is just me, and others may not see it that way............but here's a pic of the 1:1. I don't have the Fujimi kit's body on hand at the moment to take a pic, but judge for yourself...............the kits rear fenders just plain appear too flat for me. Maybe this car shown was later modified? I've seen other vintage pics though where the rear fenders looked quite bulged out.
-
AMT Ferrari 250 GT SWB - Updated 09-09
MrObsessive replied to Bernard Kron's topic in WIP: Model Cars
Aren't those wheels terrific Bernard? I've got a set from Fernando recently for a future restoration of a Heller Jaguar XKE coupe. For the price they're very sharp, and they look more realistic than PE ones. That's the first I've seen of those Ferrari scripts.......I've saved that seller on my favorites list as I want to keep them in mind for scripts later on. -
Pat, I remember when I built mine, I put the front fascia on ahead of time. Mostly because one of the "tweaks" I made to the body, was doing a correction to the grille area as I was replicating Stirling Moss's '61 car. I can't remember if it was troublesome putting it on first.......something tells me not terribly so, but then that was nearly 20 years ago!
-
Pat, you've picked one gorgeous Ferrari to build! This is one of my favorite ones and Italeri's version IMO is the best one out there shape wise. I built one years ago, and while there were some small tweaks I made to the shape, they capture the 250's classic lines very well. Great color too------I'm definitely following this one!
-
better chassis for builds?
MrObsessive replied to Tim H's topic in General Automotive Talk (Trucks and Cars)
Greg, the newer tool AMT 1967 Mustang/Shelby should work for that with some tweaking. -
better chassis for builds?
MrObsessive replied to Tim H's topic in General Automotive Talk (Trucks and Cars)
I don't think you'll find anything to go under that Rebel, unless you change what's already there. Johan was the only one to do most of the AMC's and of course they used whatever was on hand as far as the chassis--------they were "body" people as you couldn't beat the kits' shape as far as accuracy. Someone may know more than I, but I have the same model and I've not run across anything better. -
Next to the 1957-58 Golden Hawks, this one is my favorite of those "Loewy" coupes. Absolutely gorgeous job David, and as others have said, this is the car that others would copy in later years as "personal cars". You had the '55-'57 T-Bird, of course followed by the four place '58. Then you had the Grand Prix, Buick Riviera, Olds Toronado, etc. Studebaker also championed the low and lean look in '53 among mainstream cars------something the others wouldn't catch on till Chrysler's '57's, and then GM's '59's. Studebaker was ahead of its time..........that unfortunately was a detriment as they had some absolutely gorgeous cars by way of this Starliner. Too bad they couldn't adapt those same lines to their four door line which appeared tall and stodgy by comparison. BTW, did you paint those whitewalls or are they aftermarket?? I can never get mine to look nice painting them so I just go out and buy 'em!
-
1968 Shelby Green Hornet-----Update! 8/4/18
MrObsessive replied to MrObsessive's topic in WIP: Model Cars
OK! Mike I just went to Shapeways, and I found a set of U-Joints I think I can use. You can check them out here. I'll have to cut them down a bit, and I'll have more than I can use for a looooong time! TDR didn't have anything smaller than 1/16, that's OK though as in the future, I see some things they make that certainly got my interest! Thanks for the heads up..........I almost forgot about the big wide world of 3D printing, and it looks like it's come to the rescue once again! As far as the rear suspension, looking at those control arms reeeeall close, they look like they are about centered on the rear disc brake rotors-----so there's not much need 'cept for more stability for an "upper arm" per se, at least with the same shape and robustness of the lower one. I'm still plugging away at reshaping the gas tank, so I'm going to look into ordering those U-Joints and while I wait, I'll have some other things done on the chassis. -
I'm following this one too! Not too many of these I've seen built, and I happen to have a clean builtup which I haven't done a thing with yet, so I'm curious to see what happens with yours. As far as V8's------yeah, you could use the engines out of the NASCAR kits, or if you come across any old junk Jeep kits with a V8 that would work too as all late '60s AMC V8's were pretty much the same externally from 290 to 401 CI. Years ago (early '90's) I had a neighbor that lived a few houses from me that had a black '70. IIRC, his just said "Rebel" on it and not The Machine moniker. His had a 390, and it could REALLY get up and go! Frankly, I like the toned down look of the Rebels over The Machines-----they're just a bit too over the top for me with that wild paint job!
-
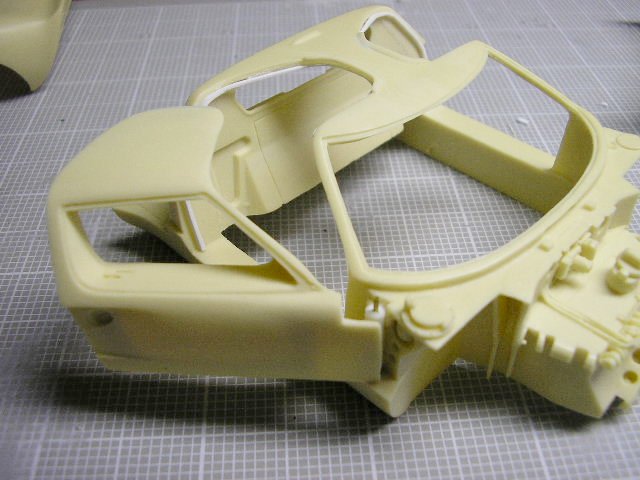
1956 Chevy Body - R&R Resin
MrObsessive replied to MeatMan's topic in Car Aftermarket / Resin / 3D Printed
Oh no, I was the one that was confused! Yeah, why this body style '56 Chevy keeps getting ignored is beyond me. Monogram did do one many years ago, but it left much to be desired in the proportions department. About as bad a job as RC2 did with their '58 Plymouth! This should be a no brainer...........we've got the newer tool '55 hardtop, '56 Nomad, even a '57 Bel Air 2 dr sedan. I'm still wishing and hoping that we could at least get a proper '57 Nomad, and a '56 Bel Air 2 dr hardtop. Time will tell.............. -
1968 Shelby Green Hornet-----Update! 8/4/18
MrObsessive replied to MrObsessive's topic in WIP: Model Cars
Mike, it looks like I may have to solder some brass for the lower control arms, as I don't think plastic will want to "stay" given its memory in wanting to go back to the shape it was formed in. I'm going to try my hand at creating my own U-joints as those are somewhat simple parts, and I don't want to part any kits out if I don't have to. I did make U-joints many years ago when I built my '57 Corvette. It originally was going to have working steering with a scratchbuilt steering gearbox, and I made a U-joint for the steering shaft. I just have to remember what I used and how! The hard part is seeing how the rear upper control arms are shaped. I have one pic that I have above that kinda gives an idea, but I'll have to fish around on my hard disc as I have many, many pics of the car and a lot of those are chassis shots. If all else fails, I'll just have to "fudge it" as I don't think anyone at a show can dispute how it's supposed to be. It's not like there were thousands of these things made, and someone can crawl underneath and snap a pic. As of now, I'm cutting out the gas tank like I did for my '67 as I hate how that's molded. Gas tanks don't sit on "boxes" and I want to reshape it slightly as it'll be easier to paint and then reinstall. Also, this will have fuel, brake, and emergency brake cable lines--------I'm marking off where those will be according to pics, and I'll be making tiny hangers for the lines as well. One thing I need to do this week is hunt down some green Pearl X paint for the slight overspray on the sides. When I was at the NNL East, Donn Yost gave me some very good advice on what color I should use to paint the green the car represents. So it's off to Michaels or some other Arts and Crafts shop to see if I can locate that. -
1968 Shelby Green Hornet-----Update! 8/4/18
MrObsessive replied to MrObsessive's topic in WIP: Model Cars
Mike, thanks for the heads up about the 9" rears! I came across a seller on eBay that happened to be parting out the new Revell Bronco, and I'm getting it from him. Monty, I put that question up also a while back but no one had an answer, so I guess there's no one at the moment that makes them. I do have a couple of the AM Grand Sport kits, but I don't want to part those out as one is an untouched kit that's a someday build, and the other is transkit for one of HRM's Grand Sport roadsters that I won years ago at the NNL East. I have very good blown up pics/diagrams that show what a U-joint should look like, so I may end up making those on my own. Or, eBay to the rescue once again as there might be a seller that's parting out a GS kit for cheap, and I could get them that way. -
1968 Shelby Green Hornet-----Update! 8/4/18
MrObsessive replied to MrObsessive's topic in WIP: Model Cars
Sorry about the long pause between updates! I haven't forgot about or gave up on this one-------I want to work as carefully as I can however as I want this to be part of my collection for a long, long time and want it to be as correct as I can build it with no regrets. As you've seen in a previous post, I scratchbuilt the pulleys I wanted since I had nothing in the way of turned parts that were the right type/size I wanted, and didn't want that to be a hangup in getting this one moving along. Here's where I'm at so far............. I added a fuel pump since that was lacking in the kit, as well as ran a fuel line to the fuel rails. While I was at it, I made a coil and bracket and fastened this to the block. I put a metal post in the lower section of the water pump as I'm going to add a hose later on in the build. Ok, I can just about call this engine DONE! Except for the painting and mounting the exhaust manifolds, and a couple other small details (oil filter being one) I'm ready to set this aside for now and move on to the next phase. Pardon all the wild looking hoses and whatnot----I like to put these on ahead of time so I'm not fighting tight spaces just before it's time to get 'er all in there. Need to do some touch up painting as well, despite having this thing smothered in Parafilm for most of its building. Taking the advice from DustyMojave here on the board, I did repaint the trans into more of an aluminum/steel color with the trans pan painted black. I like the contrast better as opposed to just basic black. I wasn't able to duplicate the bracket I pointed out earlier without some SERIOUS crowding. Since the engine will be buried under other detail once it's put in the compartment, I'm not going to make a big production out of it. I had to take some artistic license with some details. There's a lot of stuff going on in the front of the engine-------I must have put this in and out the body 50 times as I want to make sure when it comes down to final assembly, there's not much of an interference issue. Although, it never seems to fail that something will come up. Once the engine is installed I'm going to see if I can get that one hose to lay a little lower...........kinda sticks up a scooch to much for me. I'm going to steal the air cleaner from my old build of this car....it'll save me some work in having to make a new one, and it'll just need to be reshaped ever so slightly on the bottom so that it sits low enough for the hood to close without hitting it and sticking up in the air. Alright! Now I get to move on to what might be the most difficult aspect of this build-----------duplicating its IRS. EVERYTHING will need to be totally scratchbuilt and/or modified, and I can expect this to be a cliff hanger as I want the car to have a certain stance per the 1:1. You'll see what's in store for me as you look at the following pics................ Yeah, LOTS of work to do! I'm going to stray a bit in painting the floor pan. The pics show the floor to be painted what looks to be a semi gloss black. Well, I'm almost certain in 1968 this car's chassis would have originally been painted in red oxide primer with some slight overspray on the sides. It did start out as a California Special Mustang, and more than likely that's how it left the factory. Frankly, I like the better contrast of the red oxide primer, so that's what I want to go with. Of course, the 1:1 was restored so it's interesting that they didn't keep the floorpan that way. A couple questions for you Ford Guys......which kit would have a proper nine inch rear end? And would anyone know of an aftermarket maker for U-Joints? I can scratchbuild those however if need be.............. Thanks for tuning in--------- I don't know when the next update will be, but I'll still be plugging away at it little by little! -
1956 Chevy Body - R&R Resin
MrObsessive replied to MeatMan's topic in Car Aftermarket / Resin / 3D Printed
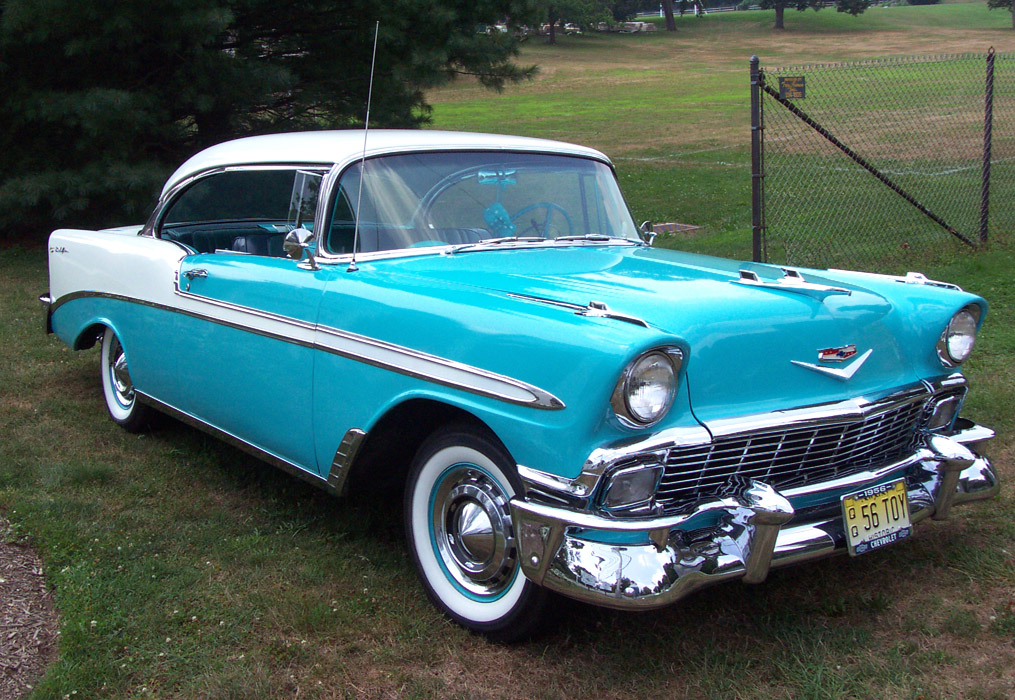
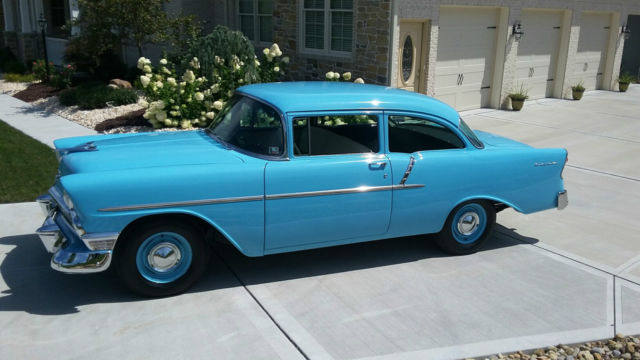
Dennis, that's the hardtop (pillarless), if you want the sedan what I mentioned above is what you want. What MCW has is this....................... What you want (if I read correctly) is this................... That's a 150 sedan however.........not hard to convert, but that beltline trim might be a challenge. Edit: OK..........I see you meant the sedan delivery. In that case, I misunderstood as Bel Airs did come in sedan styles also. Hmmm...........that 150 ain't bad that I posted. Gives me some ideas!
-
1956 Chevy Body - R&R Resin
MrObsessive replied to MeatMan's topic in Car Aftermarket / Resin / 3D Printed
Unless MCW recently cancelled it, I don't see it listed in their resin lineup which is here. Revell made a '56 Del Ray sedan a while back, and IIRC it was reissued in recent years. With some work, you could turn that into a Bel Air sedan. -
AMT 1959 CHEVY EL CAMINO 1:25 KIT REVIEW
MrObsessive replied to hpiguy's topic in Car Kit News & Reviews
Thanks for the review Chris! I want to pick up one of these.......the WWW printed tires are a selling point for me! I've got two other kits of this, but this is great to see again in the retro box art. -
LOL! That video was actually pretty good! You'd be surprised though how confused people get where I work when I try to explain the difference between "parallel" and "perpendicular"!
-
Wow Peter, I LIKE it! That's the first I've seen the C1 'Vettes inner structure in 3D........I have an assembly manual ('57) and it's lacking the views of the metal structure. Looking at how it's formed, it makes a lot of sense to have all that fiberglass something to sit on. And I see you got the doors to turn in correctly! The early Corvettes were among the first to use that type of hinge back in those days.
-
new issue Round 2 MPC 1960 Corvette
MrObsessive replied to AC Norton's topic in Car Kit News & Reviews
Maybe I'm one of the oddballs in all of this, but of all the C1 'Vettes made, I like the following in this order......... 1956-57 1961-62 1953-55 1958-60 I rate the '58-'60's last as to me they always appeared "busy" to me styling wise, compared to the very clean '56-'57's. GM came to their senses with the great looking "ducktail" '61-'62's and arguably some will take that '62 over the '61, as it lost the chrome surround in the cove area losing the two-tone, narrow band whitewalls, and lower rocker chrome trim added. The hardtop quarter windows are a tiny scooch sleeker as well as those very slightly reshaped to accommodate the reshaped rear deck. I also like the tiny "hump" in the rear window of the '61-'62 hardtop. That was added to clear the windsplit in the rear deck, and a little bit of a nod to the 1956 SR-2 Harlowe Curtice one off.