MrObsessive
-
Posts
9,785 -
Joined
-
Last visited
Content Type
Profiles
Forums
Events
Gallery
Everything posted by MrObsessive
-
 Little bit of trivia.........the guy who did the voice for the Lost in Space robot is the same fellow who did the voiceover for Tony the Tiger, "They'rrrrrre GREAT! " Darn if I can remember his name right now though........... EDIT: Whoops! I stand corrected......it was actually this guy.
 -
X2!! I'd definitely love one of these if you're going to cast it Paul! I'd even just take the body------I can come up with the rest! This is looking so goodl! I'm glad to see yet another overlooked car of the '70's finally see some love! Those of us who can remember when these cars were new can certainly appreciate this. While not a fast car by any means, it certainly turned heads back in its day and is just starting to become collectible. Keep up the great work!
-
DeAgostini 1/8 1967 Shelby GT 500....Update! 2/5/19
MrObsessive replied to MrObsessive's topic in WIP: Model Cars
David you got that right! With the 'little Shelby' I need to finish among other things and other WIP's I want to get started on, I'll have plenty to keep me busy for a looooong time to come! One hurdle I'll need to sort out is to find a display case large enough to hold this thing! It'll be too much work to have it sit out and collect dust, and I've got nosy cats to deal with. I already have a spot in my place I can display it once it's all built. On the ModelSpace English boards, I was told that a case was only available to those subscribers in the UK. Well, that kinda blows as it should have been available to all, but no matter------I'll either have one built, or buy one that's ready made. -
72 Buick Riviera Boattail (Update 18/12/26)
MrObsessive replied to camaro69's topic in Car Aftermarket / Resin / 3D Printed
This is looking really good Rico! I'd definitely be interested in the just the body and hood once this is done and ready to roll. This looks so much better already than the resin I got. I can come up with the rest BTW. -
Welcome aboard John! Glad you like the site and stick around..........you'll find out a whole lot of tips and tricks! Any questions don't hesitate to ask........someone's bound to come up with an answer.
-
DeAgostini 1/8 1967 Shelby GT 500....Update! 2/5/19
MrObsessive replied to MrObsessive's topic in WIP: Model Cars
But wait there's more! I want to mention one cool item that ModelSpace gives you is a couple neat binders to place all of your magazines you get with each issue. Roughly four magazines come in each box and with as many boxes as I got, those binders will certainly fill up! -
While this is a scale I have not built in a very long time (since the early '80's), I absolutely could not resist jumping on the subscription for this when it was announced a couple years ago. As if I didn't have enough to build, I decided to just keep collecting the parts for it and then when I have all the parts and the mood strikes, I'd go ahead and jump right in. Well, the mood hit me as I got the last box of parts about a week ago and looking over some of the build threads I've seen on ModelSpace, I figured it wouldn't hurt to build this a wee bit at a time. I'm already to the limit as far as how much I can build and how often. As far as this, updates well be VERY far and VERY few in between. I expect this to probably take as long as it took to get the parts which was about two years. So, here's what's up................... Not all are pictured, but here are most of the boxes I've gotten over the past two years with all the parts to build the car. I received the last box just the other day which holds the parts to finish it up which will be a loooooong time from now. The first parts pack is quite simple in its build sequence. You're just simply putting in the lower grill (PE), headlights, front bumper, and license plate. This is mostly a screw together job and they do provide you with a tiny Phillips Head screwdriver. I'm not crazy about it as while it useful for getting the screws started, you don't have enough 'leverage' to get the screws totally in place as the holes in the front fascia are not tapped. You're essentially threading the holes while you're turning the screws and I'll tell you it will require some elbow grease to make sure they're mostly seated. I have a several sizes of screwdrivers in my arsenal for just this purpose which will make it easier to get this together. I posted this on another thread a while back, but one of the boxes I got about four months ago contained the body. As you can see this is a BIG BEAST! I can imagine when this is all built that it certainly will be no lightweight as the chassis and wheels are also solid metal. One thing I found out when building up the front end is that there was a heavy coat of clear applied to the body parts. While I can see why they did this, it's yielded a somewhat orange peeled finish. My curiosity got the best of me, so in a hidden area on the lower front fascia, I got out the polishing cloths and wet sanded a tiny area. I see none of the color is rubbing off, so what I'll do is as I go along and before I assemble a particular body part, I'll wet sand those parts and give it a real nice shine. Should go a long way to making this stand out, and not just another factory painted product. So that's it for now! Looking at the instructions in the next parts pack, it looks like there's assembly of one of the brake rotors and steering knuckles and I'm going to use some artistic license on this as I can see some inaccuracies as far as the wheels are concerned, as one of them is to be mounted on the tires. BTW, I'll try to build this exactly in the order that DeAgostini sent them to me. So at times while it may seem that there's no rhyme are or reason in how this is being built, for the benefit of those that may want to get into this, I'm going to demonstrate in what sequence this is being built. Thanks in advance for tuning in and as I mentioned, updates will be quite sparse at times.
-
1974 Corvette Resto------Update! 12/31/18
MrObsessive replied to MrObsessive's topic in WIP: Model Cars
Another small update as I wind this up and head for the finish. As I mentioned above, I got the windshield in..........finally! Here are a couple pics.............. This was Take 2 of getting the windshield done. The first windshield while not bad, I wasn't satisfied about the fit of it especially in the lower corners. I took a chance and molded a couple more, and the second of the two windshields yielded a much better 'curve' and it meant that I wouldn't have to fight the glass to get it to stay in place. But, this wasn't without some drama.........I needed to use CA glue in this case as the glass mounts from the outside (better appearance than from the inside) and at first I was going to tint the glass from the inside. My better judgment told me to let that go as something told me that this still wasn't going to go as easy as I had hoped. Well sure enough, somehow I got a small drop of CA on the glass and I had to use a small smear of acetone to remove it. Of course, this fogged the glass somewhat so now I had the task of polishing it all over again. If I had tinted the glass with all the handling I had to do, it would have for sure ruined the tint (even though it was on the inside) and I would have had the troublesome task of taking the glass out and doing the whole process over. Not something I want to do! So no tint for this and the glass is shined up (some more polishing I'll do) and the rear glass should be no problem to get in, as it's basically a flat piece------no curve whatsoever. All BMF is on now and one saving grace about this era of Corvette is that there's not much chrome to 'em at all. Corvettes were never very 'chromey', so unless you're building something like a '58 car, yes you're going to have a fair amount of BMF to do, especially on the sides. That's all for the moment! I'll work on making some semblance of a headliner which would represent the car's removable tops, make an inside mirror, and then get it buttoned up with the chassis in place and get the wheels redone and mounted. Thanks for keeping up with this guys! -
1974 Corvette Resto------Update! 12/31/18
MrObsessive replied to MrObsessive's topic in WIP: Model Cars
In the after effects of the 404 Error, it wouldn't take the colored font, only the bold print. I tried editing after the error in my one post but for some reason, it wouldn't work. Sometimes I'll use word for very long posts such as in a WIP, but for just a coupla three paragraphs that's annoying to keep doing that. -
1974 Corvette Resto------Update! 12/31/18
MrObsessive replied to MrObsessive's topic in WIP: Model Cars
OK, this is weird! As some of you know I've had somewhat severe vision troubles for the last couple years ever since I had a torn retina in my right eye. It was 'fixed' but I still have very poor vision (especially the right eye) even after the surgery. It's one of the reasons I type with a bold font and in color so I can see what I'm typing much better than the small, plain font that the board defaults to. Just now when I made that last post, it showed up in the black and white instead of the blue I used. Originally I got that stupid 404 Error but when I submitted it again, the post showed up sans the color. Odd! But! Now I might have zeroed in that much more what might be causing that error from time to time. It may be that I have to use the plain font when posting when I get that error so it will take. I'll have to remember that the next time I get the 404 Error over, and over and over and over and over................ -
1974 Corvette Resto------Update! 12/31/18
MrObsessive replied to MrObsessive's topic in WIP: Model Cars
Just a teeny update as I haven't had a chance to upload any pics (about to go to work). I did get the front glass in, but not without a bit of trouble. I used just tiny drops of CA to glue put the glass in place since it's mounted on the outside, as opposed to the inside which is typical of most models when it comes to mounting the windshield. Well sure enough, somehow I got a spot of glue on it, which I had to use a small bit of acetone to get rid of. This had fogged it somewhat, but I was able to polish things back out and it looks normal again. My better sense told me not to tint the glass and I'm glad I didn't. With all the handling I had to do to get the glass up to snuff, it certainly would have ruined the tint (even on the inside) and I would not have been happy about that at all. Another fly in the ointment is I couldn't get the blue dye I needed to mix in the green so I could use an enamel clear paint which might have been tougher to handle than the acrylic. I have Tamiya's acrylic clear blue along with their green, but it's all now a moot point since I nixed the whole idea of tinting. Now it's a matter of getting the rear glass in using the pattern I made and I can use regular epoxy on that since it'll mount from the inside. Over the weekend if I get time (club meeting tomorrow after I get off work), I'll see if I can put up any pics, and get a bit more done. All the BMF is on now, and it's just a matter of getting the inner fenders, firewall, and other interior details done such as some sort of 'headliner' even though the car sports T-Tops. -
How'd I miss this one?? Super excellent as always bro! Is that one of Fireball Models carbs? Looks dead on great on that engine! EDIT: Ok, I just read on the other page that it's Joseph's! You just can't beat his carbs for realism!
-
Post retirement modeling
MrObsessive replied to misterNNL's topic in General Automotive Talk (Trucks and Cars)
Tom, I think about this from time to time. I'm 57, so I have quite a bit of time till I retire. I really don't plan on retiring to at least 70 the way things are going, maybe a tick later depending. You bring up an interesting point though, time marches on and the time will come to retire from whatever job we do on a daily basis and make room for 'the next guy'. I have sooooooooo many kits and projects however that I know that I'll never build them all. I buy them for just the enjoyment sometimes of having one of my favorite cars 'in my hand' and not always with the intentions to build it right away. But, sooner or later I'll have to decide what's going to become of all this stuff once I'm no longer around. I have no wife or kids to leave things to, and I'd hate to have all of it end up in God knows where. Tough things to think about as it's not always a pleasant subject, but a reality just the same. To your point though............I'd sure love to get at all those 'off putting' builds that have been rolling around in my mind in some cases for years now. I'd sure have plenty of time, but as you said-------we'll all reach a point when it may be physically impossible to do this any longer. BTW, I don't consider 76 to be really 'old' these days! You're a couple years younger than my Mom and while she has some health issues, she still gets around pretty darn well considering. -
Absolutely Gorgeous! I gotta hand it to you...........that is some VERY excellent work with a diecast! I've yet to try my hand at that as I have a diecast I'd love to detail sometime in the future. I take it that you had to solder the door hinge supports? If so, what type of solder did you use and what kind of iron? I have a couple soldering units, but diecast material is something I've never attempted. Interesting info about the Canadian Pontiacs of that era as I never knew about the subtle changes GM did to those back then. And yes, I like your idea of getting parts waaaaay in advance! You just never know when you're gonna need 'em!
-
1961 Monterey color combo
MrObsessive replied to Perspect Scale Modelworks's topic in Model Building Questions and Answers
That's a beautiful '61 Mercury! I have that same pic on my hard disc of '61 Merc pics and I'd like to do one in that same color someday, as I have a convertible builtup that needs a redo. -
Lookin' Good!
-
One type of vehicle I've NEVER built a model of........I love it! Now you've just given me an idea for a future WIP!
-
This is the set I got from Joseph...........I see no 2 barrel versions of this there.
-
Oh ok...........I take it you're looking for carbs that would fit the 3x2 setup? Joseph right now I think only has the four barrel carbs as I just got a set for my Corvette resto. I can't think of a more detailed set other than modifying what's in the kit. That's been another pet peeve of mine for some time with kit makers. Literally giving you blobs for carburetors instead of expending some effort to put more detail in them.
-
For Rochester carbs, I'd seriously check out Fireball Models! IMO, nothing else is like 'em and the detail is terrific!
-
Very nice! This can be one heck of a kit to get together. I do remember when I built mine (converted it to a D-Type), there were some troubles getting the hood to fit and open/close properly. I just don't remember what I did to fix it as this was nearly 20 years ago when I built it. Just the same, very clean and terrific build! Yeah, they can be pricey, but if you keep checking, they do turn up for reasonable prices at times-----especially the reissues.
-
Love the box art on the GTX, but I can 'bout guarantee Round 2 did nothing to fix the incorrect rear quarters on that car.
-
Chrome is tied to Google and lately they've been experiencing a series of 'shutdowns'. Frankly, I ditched Chrome months ago as I don't like how they'll restrict you via lack of Add-Ons to download and save any videos from YouTube for instance. Didn't use to be this way but it is now. Firefox is my go to browser now. No big issues lately.
-
In Box: Revell 1:16 Porsche 356B Coupe 07679
MrObsessive replied to The Creative Explorer's topic in Car Kit News & Reviews
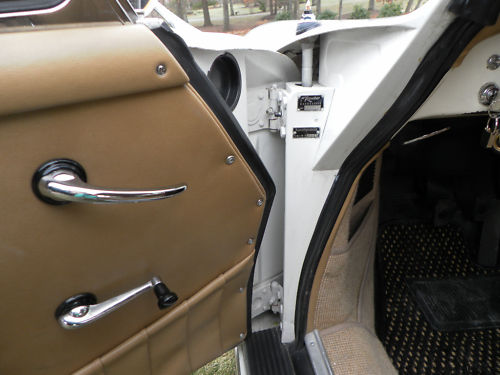
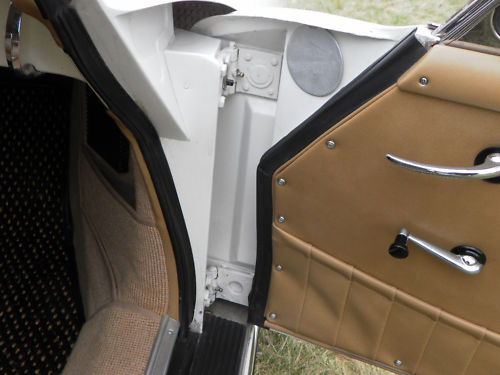
Matt, here are a couple pics I have of a 356's doors open. Somewhat unusual at best due to the body shape. I haven't seen the kit up close, but I can betcha there'd be some scratchbuilding needed.
-
1974 Corvette Resto------Update! 12/31/18
MrObsessive replied to MrObsessive's topic in WIP: Model Cars
Thanks for the nice comment Tommy and that is a GREAT tip! I happen to have a number of those still around somewhere when I still had 'teeth' (had them all pulled several years ago). I'll certainly look around for them as I don't remember throwing 'em out.