astroracer
-
Posts
451 -
Joined
-
Last visited
Content Type
Profiles
Forums
Events
Gallery
Everything posted by astroracer
-
 I don't know of a source for half round brass. You can make it yourself though. Clamp a length of .030 round to a bench and file it off flat. Use a sheet of .015 to gauge your progress. If you don't need a lot this will take about 5 minutes. If you need a lot then it's time to get busy. Mark
 -
Two Tone Paint /Masking
astroracer replied to Olderisbetter's topic in Model Building Questions and Answers
Two days should be safe. Once you have your second color masked off make sure ALL of your egdes are pressed down tight THEN spray a light coat of clear to seal the edges. Any seepage under the tape will be clear and that will go away when you shoot the final clear coats. Mark -
The easy answer to this is to run short wires from the components into a "loom". Run the loom into the firewall at the fusebox location and you're done. I use "Dial Cord" (google it). Radio Shack used to carry it. Some braided fishing line is a good substitute if it has an inner line you can pull out. Doing this you don't have to worry about correctness. Mark
-
Lookin for chassis tips..
astroracer replied to Evil Appetite's topic in General Automotive Talk (Trucks and Cars)
I've used Sharpie markers with some success. Get the fine point and you can pick out all kinds of detail with them. This is a '69 Camaro chassis with the subframes picked out in black and the bolt heads in silver. http://images22.fotki.com/v815/photos/9/904975/4650530/MVC011F-vi.jpg http://images22.fotki.com/v518/photos/9/904975/4650530/MVC012F-vi.jpg -
identifying the problem / paint question
astroracer replied to ERIK88's topic in Model Building Questions and Answers
Did you mean to say Dehydrator? As in a food dehydrator? Can I ask how the body was prepped before spraying? Sanded? Washed with hot water and TSP? Did you use Gloss or Satin paint? If it is Gloss it should come out shiney with no need to clear for the shine. Answer my questions and we can better help you. Mark -
Gremlin Street Freak / Gasser - Done!! 8/31
astroracer replied to Impalow's topic in WIP: Model Cars
If I could make a suggestion? Maybe you already have this in your plan but, if you shoot a light coat of clear around your taped edges it will "seal" the edge so no color can seep under the tape. If there is any seepage with the clear you won't see it. Mark -
NOMAD WHEELSTANDER - Belated Christmas - 1/13/16
astroracer replied to Nytrozilla's topic in WIP: Drag Racing Models
Mini R/C helicopters... The tail rotor motor is very small. Would need some gear reduction but it would be doable. Use the helicopter electronics to make it work... -
Not that hard to build one out of sheet plastic. Post up some photo's so we can see exactly what you want to replicate. Mark
-
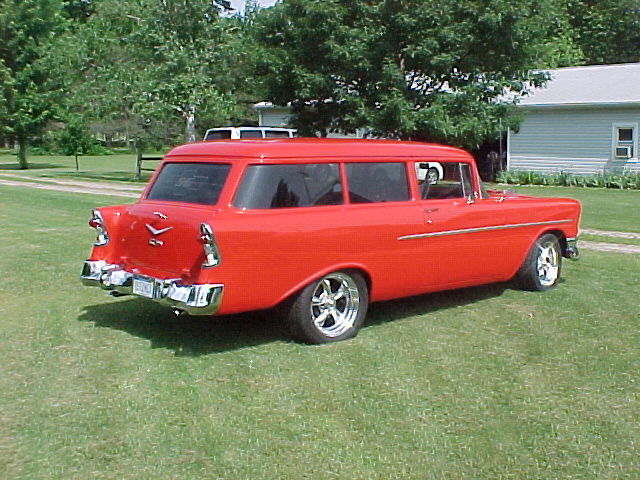
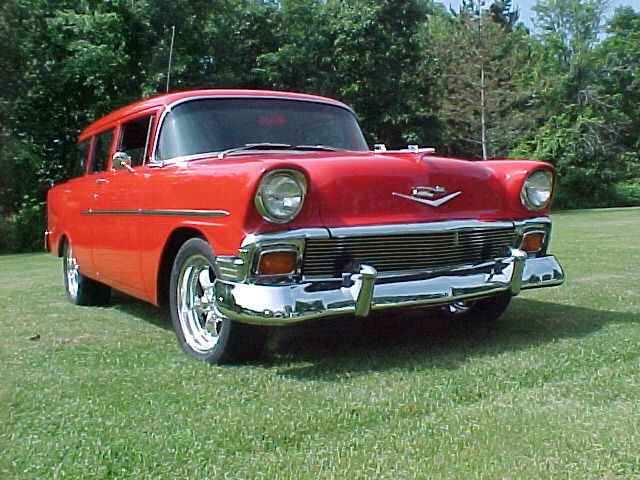
This is my '56 two door Handyman 150 wagon. You just don't see the wagons as much as the coupes and hard tops. It's fairly unique and always draws comments when I drive it. I would really like one in the Pontiac venue. Very stylish.

-
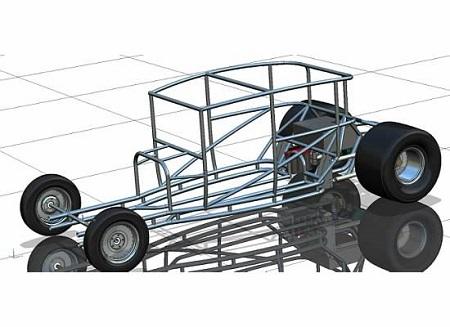
Probably not happening guys. I haven't received any real interest in these. Tires or wheels. I know a few of you have spoken up but, 5 or 6 "potential" buyers just don't make it worth while. Not only from the cost of the 3D CAD time and the printed parts but also the time and money spent in rubber and resin to reproduce them. I do have the Vector wheels on hand and they turned out beautiful, I haven't taken photos just because the interest isn't there. The guy that stiffed me on these really screwed up because the wheels and tires tuned out great! If anyone wants to pursue them further please PM me, I am open to suggestions but right now I am thinking these will be shelved. Mark Smakal 3D In Scale
-
Just to throw some what if's out there... Instead of brass why not use steel tubing? Steel hydraulic lines come in many sizes and can definetly be bought to replicate the 1 5/8, 1 3/4 (use 3/16th OD) and 2 inch (use .25 OD) sizes used in most race chassis. Mig or Tig welding the tubing would be far easier then soldering those large cross-sections presented by 1/4" diameter brass tubing. Doing this would eliminate any melt-back of other joints close to where the soldering is being done. Solid rod can be used for smaller "tubes". IF I was to build a large scale model, this is the way I would go. Mark
-
Best paint for aluminum engine blocks
astroracer replied to Mike Chernecki's topic in Model Building Questions and Answers
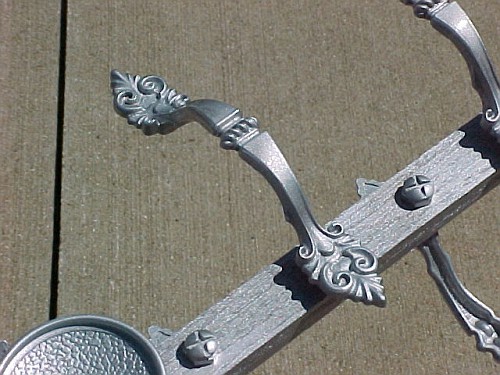
Get some CHROME look spray paint. Now wait... hear me out. Prep your parts and spray the paint. I will usually decant this stuff and use an airbrush as it comes out of the can very heavy. Once it sets up, (give it a day or two) shoot some clear on it. The clear mutes it down and what you end up with is a nice cast or brushed aluminum finish. Here are before and after pics of some cabinet handles I painted for a bench I built out of an old bathroom cabinet. The first one is the chrome paint and the second is after clearing. Of course you could always use the Alcad cast or brushed aluminum paint but that's too easy, right? Mark
-
`56 Heavy Chevy
astroracer replied to Ike's topic in 1:1 Reference Photos: Auto Shows, Personal vehicles (Cars and Trucks)
Looks to be in a major car show. Did you search for the actual show? The article should say where/when the pic was taken so searching the actual function may turn something up. Mark -
I use my 7.5hp 2 stage compressor for all of my painting needs. You will need a small regulator/Filter and the adapter fittings to get your airbrush hooked up to the big guy. I have a nice filter/regulaor I got at Harbor Freight. It works well with no issues. HF will also have the quick disconnects if you are using those in your current setup. They aren't the best but they work well for this application. Mark
-
I'm building an '88... It has an engine too...
-
HELP!......"3D" Printing!
astroracer replied to Grumpa's topic in General Automotive Talk (Trucks and Cars)
The problem with the smaller scales is getting the detail to show through the laminations the printer makes while "printing" the part. The smaller the scale the less detail you are going to see. I have been doing the 3D side for 30 years so it is easy. I can model up anything you have in mind. PM if you want to talk. Let me know what you want to do and we can go from there. All confidentiality applies. Mark Smakal 3D In Scale -
Anyone recognize these wheels?
astroracer replied to Monty's topic in Model Building Questions and Answers
No, they aren't Keystones, that's for sure. They look like some sort of early Boyd's style wheel. -
My 1:1's....
astroracer replied to 426-Hemi's topic in 1:1 Reference Photos: Auto Shows, Personal vehicles (Cars and Trucks)
The '39 is a nice looking car! It would take me about 5 minutes to make it "mine"! Clean up that engine, replace some funky looking radiator hoses, Put on a set of TT II's and drive it! You really do need to get rid of the generic 90's style aluminum wheels. Mark -
Not as far as I know... Do you want one 3D printed? I have two 1:1 of these. It wouldn't take long to model one up and have it printed... Mark
-
Scale Bolts, Nuts & Hardware
astroracer replied to taaron76's topic in Model Building Questions and Answers
Most of your automotive bolt sizes are going to be 5/16th's and 3/8th's. most suspension applications will be 1/2" on cars and 9/16th's or 5/8th's on trucks. These convert down to: (5/16) .3125 / 25 = 0.013" in diameter (3/8) .375 / 25 = 0.015" in diameter (1/2) .5 / 25 = 0.020" in diameter (9/16) .56 / 25 = 0.022" in diameter (5/8) .625 / 25 = 0.025" in diameter Mark -
And they are still available from most any hot rod parts supplier. http://www.jegs.com/p/Spectre/Spectre-Air-Cleaners-Lids/795648/10002/-1?itemPerPage=90&pno=1
-
I have the 3D Printed Vectors in hand and they look incredible! I haven't had time to get pics but I will do that in the next couple of days. These things turned out beautiful, I just hope a resin caster can do them justice... Mark
-
I always stick with the 2 part automotive style fillers. It's just good practice to be consistant and I know for a fact they are compatible with ANY type of paint I want to use. I use USC's ICING almost exclusively anymore. No shrinking at all and it sands just like the resin which is an important factor when you are trying to level a surface. If the filler sands harder then the resin it is almost impossible to get them to feather out smoothly. Keep that in mind guys as you are working with all of these different fillers. Scribing door lines goes much quicker in resin then in styrene so go slow and use very light pressure. I will also recommend making a template to guide the scriber until it gets a good groove made. Resin can have hard and soft spots in it which will make the scriber wander if it isn't controlled by a hard edge. Mark
-
Potvin Blower - Why?
astroracer replied to chunkypeanutbutter's topic in Model Building Questions and Answers
Here you go... Vortech also owns Paxton now. http://www.vortechsuperchargers.com/ Also... https://www.procharger.com/ Mark -
Potvin Blower - Why?
astroracer replied to chunkypeanutbutter's topic in Model Building Questions and Answers
Why does anything happen when the quest for more power and greater speed is the driving factor? Superchargers actually originated on airplane engines. So did nitrous oxide. Hot rodders simply took that technology and applied it to their car engines. And, to actually answer your question, the blower does add a "bit" more performance to a normally aspirated engine... And Potvin's were generally front mounted when they first came onto the scene. Mark