Codi
-
Posts
2,675 -
Joined
-
Last visited
Content Type
Profiles
Forums
Events
Gallery
Everything posted by Codi
-

1/16 Keeling and Clayton California Charger F/C
Codi replied to F/CNUT's topic in WIP: Drag Racing Models
It truly was a great looking Funny car Stephen. Yours turned out really nice. cheers, tim -
Thanks everyone for your shared sentiments & comments. Doctor says 20/20, which I can attest to and come Monday I can get back to the bench. cheers, tim
-
ROYAL CANADIAN 1/16 SCALE TOP FUEL DRAGSTER
Codi replied to Ian McLaren's topic in WIP: Drag Racing Models
"I kind of like this brass fabrication deal".........yup, he's hooked. You've mastered it quite well too Ian. Truly enjoying your thread. cheers, tim -
Don Garlits "Wynnsliner" 1/16 Scale on the Workbench 7/9/21
Codi replied to John Teresi's topic in WIP: Drag Racing Models
"till I get my mojo back".............seriously John? Ya' never lost it. So nice to see you back on the forum and I too look forward to your updates on the MT Mustang Funny as well. cheers sir, tim -
Model Factory Hiro Porsche 935/78
Codi replied to Chris Smith's topic in WIP: Other Racing: Road Racing, Land Speed Racers
I'm loving the details you're putting into it Chris. Looks like a really fun build. cheers, tim -
I always enjoy getting caught up with your thread Charlie. You always have some interesting techniques to share which is greatly appreciated. The engine is looking fantastic sir and it's hard to pic out one detail part above another as a favorite. I do admire your header too btw. Again, thanks for sharing, tim
-
Brabham BT52B F-1
Codi replied to Rich Chernosky's topic in Other Racing: Road Racing, Salt Flat Racers
I always admired that car Rich and another nice build you've shared. That was quite the interesting period in F1. cheers, tim -
I'm jealous Tomasz. Beautiful car and wonderfully rendered. cheers, tim
-
Ray, in the overall, was the kit what you expected? Nice work on yours. cheers, tim
-
Such a sweet looking car Nick. Congrats on a well executed build. cheers, tim
-
Hi everyone, well I had to take a "pause" on the build as I just couldn't see for the most part. Had my second cataract surgery yesterday and already I'm just about 100%. Other than having to change some of the light bulbs/lighting in the house back to something "normal" I should be at the bench in a week. Amazing what they can do anymore with lasers and such. Cheers to all and thank you for following the build. Tm
-
64 Dodge D100 Pickup Pro Street
Codi replied to AmericanMuscleFan's topic in WIP: Drag Racing Models
I thought the whole build looked great before Franics.........now after surgery, I can only say it looks even better if that's possible. Cheers, Tim -
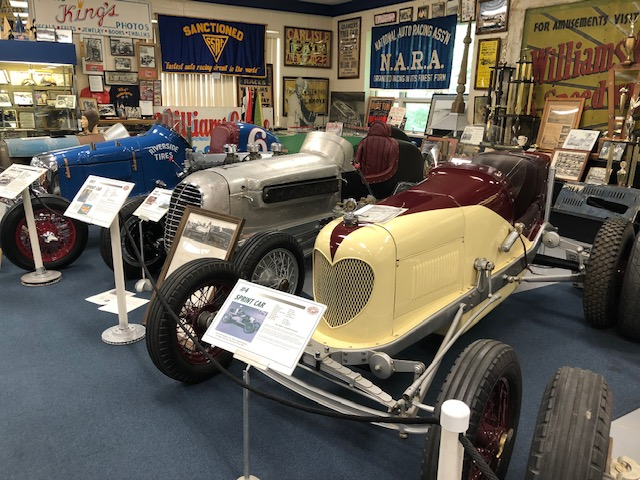
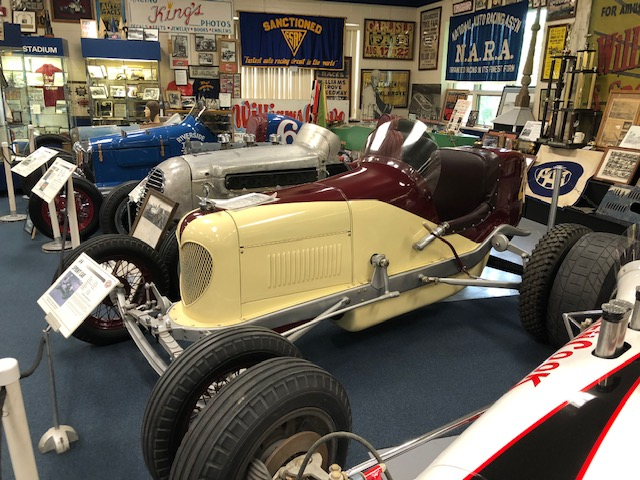
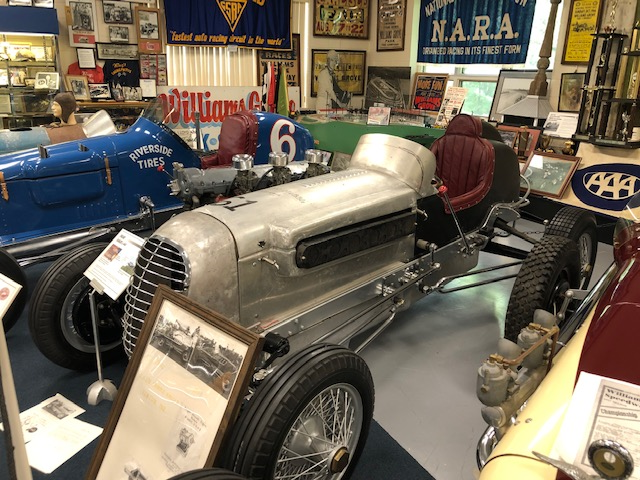
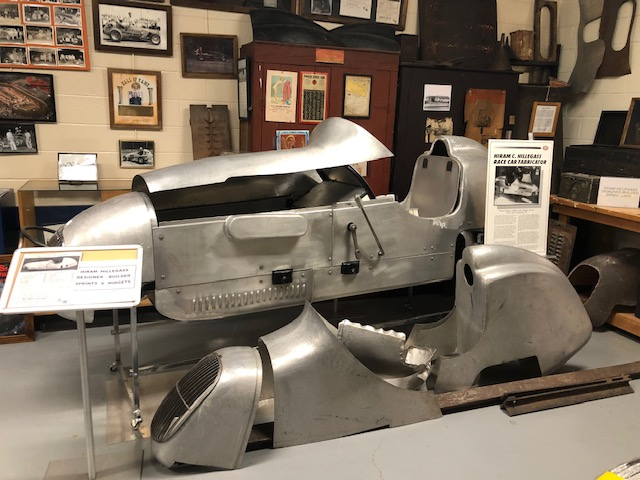
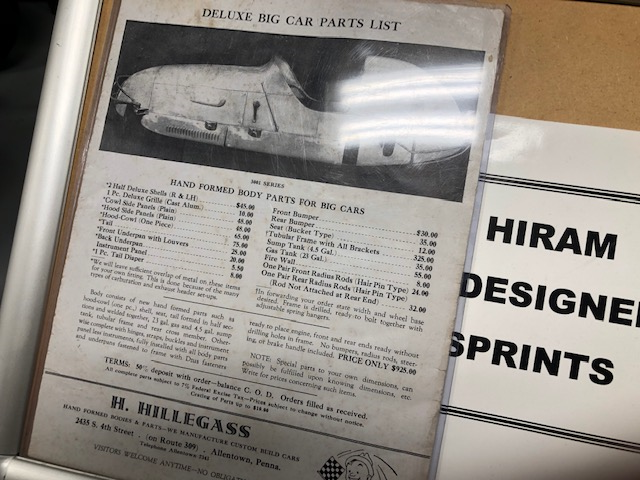
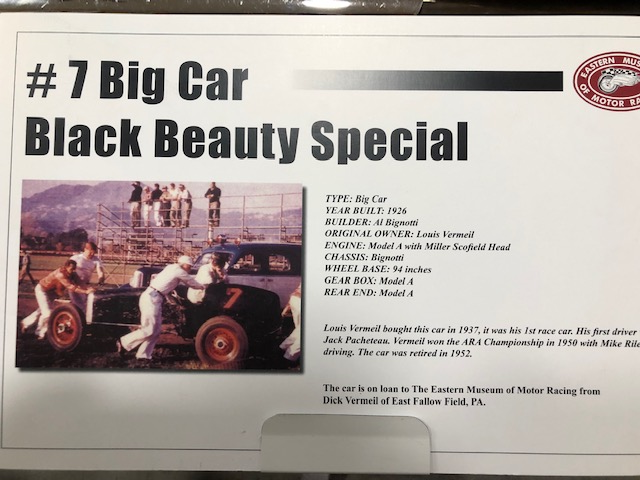
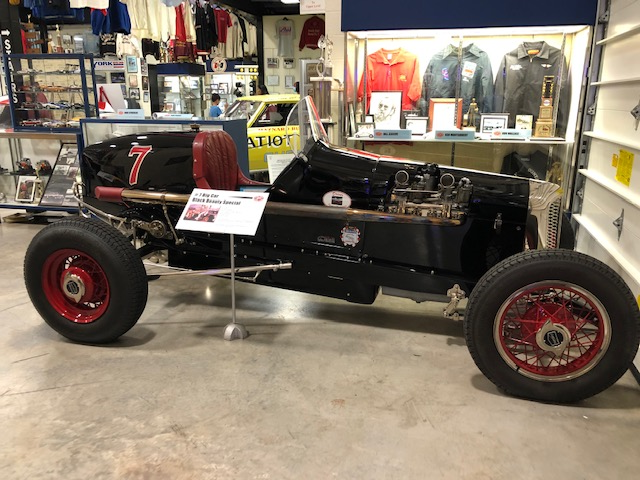
Love the newest post Charlie. The engine IS gorgeous. Today I was in York Springs Pa. and visited a race car museum. The main theme is sprint cars with some drag thrown in. I took some pics of some cars that I thought you might appreciate. I apologize in advance if I'm hi-jacking your thread in any way. Not my intent of course. The fabricator in Allentown was selling the aluminum body he made many decades ago as an all inclusive car for $925. Yup. Not a typo. Anyways, here are the pics and I'm sure you'll get a smile or two. Cheers, Tim

-
WOW Charlie..........just WOW! cheers, tim
-
Dave, you saying I'm all thumbs? ? Thanks Joe....again, bench time has been limited but I'm still pluggin' away. Thanks too Ian.......if either of those body's hadn't been so badly warped I would have been seriously challenged to go with it. The AMT was more stock looking and accurate in some important regards but it would have taken more work to modify it to work. The rear window was separate from the body which I really liked too......more to show. Appreciated Jason........nice to see you poppin' in and checking out the build. Here's the set of 4. Adding the valve stems tomorrow, have lug nuts on the way (for the fronts only btw) and I have to machine a pair of the front bearing caps. Couple hours and onto the chassis......cheers to all! Tim
-
You're good Steve........REALLY REALLY GOOD. Haven't checked on your thread for a bit and it was nice to get caught up. Like everyone else, that color will look phenomenal on the car. cheers, tim
-
Dave (comp1839) - Thanks sir. It's been so long since I made wheels that I had to back to the notes you shared a few years ago with me on some basics when I made the wheels for the Bantam. Each is a 3 piece construction. Again, many thanks! Thank you Marcus. Dave (goatguy) I agree on the Maverick body comment completely. I'm not looking back on it now.....sometimes I just get sidetracked. ? Thanks Hakan.......I forgot about the Flea.....too bad they got out of the business. Francis, do it man......I'd love to see what you can do one after seeing all your previous work. It'd be a treat for all of us on the forum. Pete J. - Flattered you'd ask. Let me ponder for a day and get back to you this weekend. I'll send a PM. Dave Willy - saw your post as I'm typing this and LOVE that pic you shared. Lucky man to drive that! Thanks again for the comments too. Today I did 1 of the rears spokes. The rim is not right but was one I had in the parts bin. The rims they provided were of 2 designs. One being smooth from the lip all the way back to the spokes. The 2nd one, and more common in the photos I've come across, is a stepped design. Subtle looking but a few extra steps to get the look. I couldn't help myself and took a couple pics with the car mocked up with the rear along with the front. I do like these better than the Fentons to be honest. Cheers to all! tim
-
Nicely done Joe. Saw a real one at the Air & Space Museum just outside of Dulles Airport. It's smaller in real life than what it appears to be in pics. If you haven't that particular museum try to get there some day. You won't be disappointed. cheers, tim
-
Model factory hiro Porsche 935/78
Codi replied to Brudda's topic in WIP: Other Racing: Road Racing, Land Speed Racers
Love the stance & look Bruce. Those wheels were a bunch o' work but well worth it. cheers, tim -
That's some serious masking you did there Ian. You must have a LOT of patience. cheers, tim
-
Wonderful updates Charlie as always. You've got some great vision along with the skills to make it happen. cheers, tim
-
ROYAL CANADIAN 1/16 SCALE TOP FUEL DRAGSTER
Codi replied to Ian McLaren's topic in WIP: Drag Racing Models
NAILED IT!! That's gorgeous Ian. Can't wait to see the rest, I've no doubt it will be sweet. I was not familiar with the 1:1 car but from the pics you've shared, it is one handsome ride. cheers, tim -
64 Dodge D100 Pickup Pro Street
Codi replied to AmericanMuscleFan's topic in WIP: Drag Racing Models
I had to chuckle Francis when I saw the Dodge logo. You sir, have now officially crossed over to the darkside. Turned out quite nicely I might add as well. Keep at it, we're enjoying the build for sure. cheers, tim -
Mercedes Outlaws & Hot Rods
Codi replied to 89AKurt's topic in General Automotive Talk (Trucks and Cars)
Saw this on "carbuzz"........a tuner is going to make this car based on their rendering. They've already made a gorgeous convertible version of it.- 130 replies
-
- 2
-

-
- mercedes benz
- outlaw
- (and 2 more)
-
Hi everyone......a bit of an update. I took a detour on the build and bought 2 (an AMT & an MPC) Mustang 2 model kits as a possible replacement for the Maverick body. That followed a ton more digging and research on what chassis I wanted to do. Don Hardy is the one I want to get closest to. Anyways, the Mustang kits came with warped bodies that I thought I could remedy. Researched our forum and followed the advice of others that had success. For me, not so much. So I'm sticking with the Maverick but the specific year I'm looking at is 1974. More on why later. Wheels, I have a beautiful set of aluminum Fentons that are drilled etc. and ready to go.........except I've become enamored with the Motorwheel "Fly" wheels. The wheel was discontinued in 74' when they got out of the business. The real fronts were magnesium but the rear Fly's were aluminum only. They did make the well known Spyder wheel and it was available in mag. I researched some pics and websites and drew them up so I could machine them. I'll do an entire set of 4 but I'm sharing the fronts which are done (except for the bearing caps, lug nuts & air valves) The rears I hope to complete in the next several days. To my eye they are just that little bit more contemporary for the car as I originally envisioned it. I'll post pics when all 4 are done soon and do a mock-up with the body for reference. The pics you see today have the Fenton rear mags in them but the Fly is on the front. Cheers, Tim