

Kit Basher
-
Posts
2,431 -
Joined
-
Last visited
Content Type
Profiles
Forums
Events
Gallery
Everything posted by Kit Basher
-
MPC/AMT display case trailer glue
Kit Basher replied to unclescott58's topic in Model Building Questions and Answers
I gotta say in advance, I have never done this, so take this second hand info for what it's worth. I'm told that acrylic display cases are made by clamping or taping the joints together, then applying a solvent (probably something similar to Ambroid Pro Weld) to the inside of the joint with a syringe. The solvent wicks into the joint and welds it, just like liquid model cement works. The outside of the joint is then polished. I have no idea if this process would work with styrene and liquid cement for your purpose, I'm just throwing it out there. -
That is absolutely spectacular! Love the surfing pig! Brilliant imagination and execution.
-
Sources for 4 and 6 clyinder engines
Kit Basher replied to 69NovaYenko's topic in General Automotive Talk (Trucks and Cars)
The recently re-released version has those engines also. -
Sources for 4 and 6 clyinder engines
Kit Basher replied to 69NovaYenko's topic in General Automotive Talk (Trucks and Cars)
The Lindberg '64 Dodge 330 has a slant six, and Kitchen Table Resins has a Ford inline six in different displacements. Here is his 300 c.i. EFI. -
1001 uses for Bondic on Fotki 7/30/17
Kit Basher replied to Foxer's topic in Tips, Tricks, and Tutorials
Those came out great, Mike! -
Ideas vrs. talent
Kit Basher replied to cobraman's topic in General Automotive Talk (Trucks and Cars)
Well put, Art. I agree individuals have talent that allow them to excel in some area, like art, science, music, language, etc. Those individuals still have to learn and practice skills to fully develop that talent. Those, like me, who do not have a talent for model building, have to make up for it with extra effort, and perhaps lower expectations. I know I will never reach the level of some of the builders I see on here, and I'm OK with that. For me, I'm satisfied if I did my best, whatever the outcome might be. -
Duplicating plastic parts
Kit Basher replied to aurfalien's topic in Model Building Questions and Answers
Both mold releases seem to work fine. The Alumilite one is a bit more stinky. -
Mr. Obsessive's "New" Obsession! :)
Kit Basher replied to MrObsessive's topic in General Automotive Talk (Trucks and Cars)
SWEEEET! -
Need help with detailing ignition coils
Kit Basher replied to nkempf99's topic in Model Building Questions and Answers
I feel your pain! I have been working on that same kit for a while, and even asked the same question you did on this forum. http://www.modelcarsmag.com/forums/index.php?showtopic=94279&hl= I got a bunch of helpful and useful suggestions. I found I do not have the skills to do those, but I did have success using an "artists blending stump". I sanded the end flat, and kinda "tapped" paint onto those letters. The stumps are sticks of rolled paper, and can be found at art and craft stores. Good luck! -
What's your favourite gloss black?
Kit Basher replied to 3100 chevy's topic in Model Building Questions and Answers
If you're airbrushing, Model Master also makes a gloss black lacquer in bottles. It lays down really smooth. I did not sand or polish this car, although I did put a coat of Pearl Ex and a coat of clear. (If it looks like it has orange peel, what you're seeing is the pearl. It's actually very smooth. Honest! ) -
1937 RR woody... I mean, "shooting brake"...
Kit Basher replied to Harry P.'s topic in WIP: Model Cars
No doubt! For your 1/8 version try using maple framing with bridle joints at the corners. That'll slow you down! -
1937 RR woody... I mean, "shooting brake"...
Kit Basher replied to Harry P.'s topic in WIP: Model Cars
Every thing about this model is spectacular. As a professional woodworker, I really admire your choice to use real wood, and the way you have used it. Getting mortised in butt hinges to work well can be a challenge in 1:1, doing it in this scale is awesome. It looks great, and I've enjoyed watching you build it. -
Another on the bench. A lot of bench space. Lol
Kit Basher replied to Jstfrnds's topic in WIP: Model Cars
"Give me 40 acres, and I'll turn this rig around, it's the easiest way that I've found." C'mon, sing along, you know the words! That thing is wild! I'll be watching. -
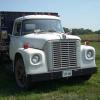
Nice job! I spent a lot of hours in the seat of one of those when I was a young man.
-
Duplicating plastic parts
Kit Basher replied to aurfalien's topic in Model Building Questions and Answers
Hey Brian. I've been buying Alumilite at Hobby Lobby with their 40% off coupon. They have this starter kit http://shop.hobbylobby.com/products/mini-casting-kit-579714/. The only problem with it is that it does not include mold release, a necessity for two part molds. They do have the mold release as a separate item. They also have this http://shop.hobbylobby.com/products/super-casting-kit-580068/ which has everything you need. I started out with a Smooth On kit, but the rubber went bad before I could use it all. The resin was still good, so I've been buying this http://shop.hobbylobby.com/products/quick-set-rubber-579599/. I usually use it up before it goes bad. If you end up making a lot of molds, or big ones, I think the Smooth On kit is more cost effective, even without the 40% coupon. Like I said before, I'm no expert, but if you ask a question I actually know the answer to, I'll be glad to help. -
I want to build a ship..........
Kit Basher replied to JollySipper's topic in Model Building Questions and Answers
I have huge respect for anyone that has the patience to put all 17 million strings on one of those things. As Bob Dylan said: "It aint me, babe". -
Duplicating plastic parts
Kit Basher replied to aurfalien's topic in Model Building Questions and Answers
If you would like to learn casting just for the fun of it (I personally think it is a lot of fun), then you could definitely cast those parts. It would be a bit tricky because there are some undercuts, and it would have to be a two part mold. Maybe not the best choice for your first attempt, but with some experience you could get there. I am no casting expert, I've just been fooling around with it, but I've used both Smooth On and Alumilite, and both have worked well for me. For starting out I would recommend Alumilite, just because they sell smaller quantities of the mold rubber, and mold rubber has a fairly short shelf life once you open it. -
Wow! That is impressive! I keep looking at it and I see more each time. I see these on the road from time to time, yours looks great.
-
I think it's gonna be fun. BTW, the link that Joe posted above has the instructions.
-
Thanks Art, I'll save my .030 for scratchbuilding.
-
Thanks, Greg. Windshields and headlight lenses are definitely something I want to try. Also hood scoops, and who knows what all!
-
Cool! I've got a bunch of .030 plastic. Isn't that about what plastic signs are?
-
Is the platen plastic? There are two rectangular ones, one with a bunch of tiny holes, and one with no holes and a ribbed surface. There is also a round one.with a ribbed surface and one hole in the middle. Thanks Thanks for the link, Joe. Looks interesting.
-
I picked up one of these at an auction today for cheap. It heats up and appears complete except for the instructions. I have a rough idea how it works, but would appreciate any advice. I don't have any of the perforated sheets of styrene for it. Can plain styrene be used without perforations? If so, what thickness? TIA
-
I use "artist's blending stumps", available at art and craft stores. They are basically sticks made out of rolled paper, so they are more absorbent than toothpicks, and hold more thinner. They can be sharpened with a pencil sharpener, and sanded to custom shapes. I suspect you could use the side of one to clean all your ribs at once, without having to worry about removing paint in the spaces between ribs. They're also good for burnishing BMF, and painting raised details, like scripts on valve covers.