
eviltwincustoms
-
Posts
903 -
Joined
-
Last visited
Content Type
Profiles
Forums
Events
Gallery
Everything posted by eviltwincustoms
-
Bills Bus
eviltwincustoms replied to old-hermit's topic in Model Trucks: Pickups, Vans, SUVs, Light Commercial
I agree with Ken, that nose makes the bus interesting. Don't think i would have thought to use a Track T Nose, and that roof with the curve in both directions, with all the different angles on this thing it makes it very unique. -
Scratch building a 1:8th Ford T
eviltwincustoms replied to peekay's topic in General Automotive Talk (Trucks and Cars)
That is an amazing build, I could only wish to have something turn out like that project. Very detailed in down to replicating to the N'th degree. -
Man Ken this is just outstanding craftsmanship! All the way from the building of the chassis and the detail bits to that somewhat futuristic front nose. I have to ask, because of your styrene skills you are exhibiting here.... and wanting to learn all I can from everyone. Now this pic, is there any primer or that much body filler? Because I am just amazed at the compound curves on that nose coming down and then off to the left and right sides.
-
I can't tell ROM, but is your Mastercylinder mounted under your carbon seat? Based on the picture I am trying to get a bearing on how you have it mounted up. Tell me if I am wrong or not. But it looks like the master cylinder is mounted perpendicular to your brake pedal and not parallel to the direction in which the pedal moves. Am I off base in my understanding of your second to last picture? Thanks,
-
Darryl, out of curiosity what is the length of your wheelie bar center to center? It looks really long, and I am amazed at how you have it detailed out it looks great! This color scheme and layout is perfect.... very cool looking.
-
Thanks Ken, is is slowly taking shape... Actually I just cut some more on the wedge and took out a scale 1.368" in the front of the rocker wedge (behind the front tire) and another scale 3.184" in the back. This brings the side right in alignment with the Real 1:1 body dimensions, that I am working off of and will lower the body a bit more over the wheels like it should be. Once I get some more free time, I will need to take some out of the front nose section to make sure I have my required 3" ground clearance requirement in front of the wheel and the 2" behind the front wheel after the adjustments I made to the body again.
-
Some Vertical Caddy Tail Lights would fit the bill.... like the ones from Cadzilla. This would allow you room for your tailgate. If you want to go with the 69 tail lights you could probably shrink them down and move them inboard some and that will give you the clearance you need for your tailgate as well. Nice project, though Brett good to see you thinking outside of the box and building something that isn't of the norm per say! Keep up the great work!
-
I agree with Chris, you definitely have some scratch building skills... I admire you taking on soldering brass with that head on mentality! Me not so much... a bit outside of my comfort zone. So on the Bell Housing (Can), keep in mind you don't need a large hole because the CAN isn't suppose to slide in and out of the firewall. The Hole in the Firewall is actually only large enough to mount your Mid Plate and the Converter or Clutch depending on your car. The Bell Housing then mounts solid to the Mid Plate and to the back of the block. I just don't want you cutting a larger hole if not necessary, because you have your chassis all painted up and it looks to nice to have to touch up with paint again!
-
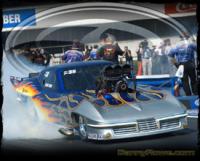
Okay.... so... I have a small but mighty update for everyone. I had been contemplating just how I was going to do the front clip and get my angle, but I think I pulled it off quite well considering. I cut the nose off at the Centerline point of the front wheel and extended it out so that now the car meets the Maximum requirement of the 45" by ADRL rules. And where she sits currently with the nose extended and addition of the Rockers in place. Let me know what you think of the new updates. Thanks,
-
Thanks Bill it is slowly getting there.... with each update the vette is coming into its own.
-
Thanks Scott! I know I am getting old when I lose track if I have replied to all of my emails.. Scott, do I owe you any follow up items from our discussions on 1/16th parts?
-
Hey Joe, outstanding job on the cuts! Lookin more and more like a pro builder with every update you post! I am playing catch up, but it sounds like your issue is you don't have any body mounts in the back like you need to hold the body up. Because the tail end is going to be heavier. After you add the mounts this will resolve your issue you are having with the sagging.
-
Mike that body looks incredible... Paint is smooooth!
-
Dave I hear ya.. I have been lurking, because I have been traveling for work. Actually just got back from Lorain Ohio on Saturday and head out to the Philippines a week from today. Took today off for my birthday, so working up a few things on my project and might have updates pics in the next day or so.
-
Thanks ROM, I couldn't agree more with you. It is really about setting your mind to do something and doing it. Although I am my worst critic, and if it doesn't turn out right the way I want it to I become frustrated and have to just step away...
-
Thanks Bill for the nice words... It was a pain to extend the front fenders.. But not just the fenders, I have extended the doors and in front of the centerline of the front wheels. Still a lot of body work to go.. And then getting everything to lay down smooth will be the challenge.
-
69 Nova outlaw prostreet Finished (09/02/12)
eviltwincustoms replied to tyrone's topic in WIP: Drag Racing Models
Now this is another of my top picks! I have the perfect picture for this car. The one I want to build has a PSI blower on a big block rat motor. I am talkin BADD AZZ... -
Chevrolet Beretta 632 Cid. Bracket Car.
eviltwincustoms replied to W-409's topic in WIP: Drag Racing Models
So Niko... What class are you building this car up for? I think you may want to start picking what class you want to build to, to better understand how you need to work in your rear fender wells and that chassis. You have a lot going on and I would hate for you to start building yourself into a corner and have to live with a decision you didn't or wasn't expecting. Otherwise, your build looks good, a lot of progress work going on in this build. -
Let me see if I can be of some assistance and give you some insight for the 1:1 application. Mark, I know you asked ROM about his specific application, so by all means if you are going for this technique use what he has provided. Now based on the QuarterMax site, Rivets are either 1/4" or 3/16" so the .7mm would be out of scale with the 1" measurement. As ROM said Scale Hardware is where you can find the parts. To scale down to the 1/4" you would use the .4mm which is .016" just my quick scan I don't see anything that will scale down to the 3/16" in an actual Rivet, you would need to probably make your own. ROM has went with a Square tubing around his windows and that worked for him. On a real 1:1 it is somewhere in the realm of 1/4" round maybe even 3/16" for the light weight window kit. I am sure Dave can chime in and give more specific's Here is a quick pic for you of the inside of a door.
-
1/8 1979 TRANS AM.......( UPDATE 2/20/2012)
eviltwincustoms replied to COOLBERG's topic in WIP: Model Cars
Cool, that is usually the way it goes... when I try and get something my Local Hobby store no longer has access to the product! Darn it. I think I may have to take Chris' route next time and start doing this, because I know I have spent more than $30.00 in Ambroid over the last couple years. This definitely would be a cost savings to me... Especially since I need the money for more detailed parts... cough cough..... -
1/8 1979 TRANS AM.......( UPDATE 2/20/2012)
eviltwincustoms replied to COOLBERG's topic in WIP: Model Cars
They don't make Ambroid any longer, the next best thing I have found is Tenax 7. -
Die Cast Opinions
eviltwincustoms replied to FASTBACK340's topic in General Automotive Talk (Trucks and Cars)
More than likely this has to do with the Oils in your hands and touching the bare metal before it has any sort of protection from contaminants for a good adhesion, if you clean the metal body well enough chipping wont be an issue. -
AH... maybe it would help if I spent more time making sure I understand what was being posted. LOL... I though you were referring to the 3M stuff when you posted that about uniformity of putting it down...sorry about that. That is very cool that you have gotten to use stuff before it has hit the market.
-
With fastners, it is easier and faster to get off and out of the way. You will just need to thin the deck lid and the area around your hole to add the material to hold it into place to look like the fiberglass body.
-
Great point, I use this stuff as well for like brackets to wrap around something and such, but from a scale perspective how does this stuff fair in the thickness area for window chrome trim?