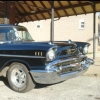
Goose1957 Posted June 29, 2020 Posted June 29, 2020 I finally finished this one. I still need to find a proper overflow reservoir and washer tank for in the engine bay, but with all the good model shows and swap meets shut down, that may take awhile. I started off with a scratch built suspension lift and bigger tires and wheels. I used the tires from the Lindberg 1/20 scale Baywatch Toyota that I bought from a friend at a swap meet. I didn't like the wheels that came with it so I found that the Revell top fuel rear wheels just about fit the tire openings. They have beadlock rims on and had the look I wanted. I used silicone to glue the wheels to the tires and help fill in the slight gap between the two. I wasn't happy with the rollcage that came with the monster truck version of the kit, so I ended up scratch building that too.(sorry, forgot to mention that I used the crew chief version for this build) I tried something new and ground/sanded the grill down to get the see through look. It was tedious and nerve racking, but I'm happy with the results. I used the Testors lacquer spray can in the Inca gold for the body and interior. I really like using that brand and hope they keep making it and adding to the color chart. I used some photo etched parts for the interior for the first time too and like the added dimension they bring to the interior. Scratch made the gas, brake, clutch, and parking break petals also. Parts box front and rear bumpers and a winch add to the build, along with all the doodads and geegaws inside to make it more personalized. Thanks for looking and all comments welcome. Jeff
89AKurt Posted June 29, 2020 Posted June 29, 2020 I'm too lazy to dig out that kit ..... did you open the grill? Headlights different? I like your winch detailing. I know you can scratch-build the overflow and washer tanks, come on man, YOU CAN DO IT! There have been times that I wan't happy unless I built a better unit than the kit part. But then, you did finish, so that's more important. Nice rig.
espo Posted June 29, 2020 Posted June 29, 2020 Beautiful looking build and very realistic looking as well. Almost to nice to take Wheel'n.
Goose1957 Posted June 29, 2020 Author Posted June 29, 2020 Thanks for the kind comments. 89AKurt, yes that is the kit grill and headlights. I found out that the sanding drum in my rotary tool kit fit the back of the grill section, and I used that to sand down the backside of the grill carefully till the holes were opened up. I guess I could scratch build the fluid tanks, just hoping to find them already made to save myself some time. Jeff
mikemodeler Posted June 29, 2020 Posted June 29, 2020 Nice work Jeff, great color choices and the details look spot on.
TarheelRick Posted June 29, 2020 Posted June 29, 2020 Super work, especially that grille. But it needs about 500 pounds of mud and dirt on it, or at least some McD's fries on the floorboard; it is way too clean.
vincen47 Posted July 12, 2020 Posted July 12, 2020 I like how you opened the grille. I wish all model kits came that way in the first place.
Recommended Posts
Create an account or sign in to comment
You need to be a member in order to leave a comment
Create an account
Sign up for a new account in our community. It's easy!
Register a new accountSign in
Already have an account? Sign in here.
Sign In Now