Pete J.
-
Posts
3,982 -
Joined
-
Last visited
Content Type
Profiles
Forums
Events
Gallery
Everything posted by Pete J.
-

how many models have you built?
Pete J. replied to l88 chevelle's topic in General Automotive Talk (Trucks and Cars)
Good Question- In the "Modern era" probably 50+ By the modern era I mean Since I got back into building the second time which happened after my son was about 5, so the modern era is the last 25 years. I built many, though I have no idea how many, from when I was a child until after my first year in the Air Force. In pilot training we had a contest for the students who built them as decorations for the Squadron ready room ceiling. Stopped then until my son came along, so there was a gap of 15 year. It is kind of interesting. In my modern building I can remember details of each build, but it doesn't seem like I built over 50. It seems like far less. Many of them I gave away. -
OK..........I gotta compose myself!!
Pete J. replied to MrObsessive's topic in General Automotive Talk (Trucks and Cars)
Gorgeous kit, but I am not even remotely tempted and no it is not about the money. I just never liked the "Daytona" body style. Something about it just seemed wrong to my eye. It just didn't have the nice curves of other Ferrari's. Would rather have the GTO or the Nart or California spyder. More pleasing to my eye. -
Airbrush in between coats
Pete J. replied to Dougboy's topic in Model Building Questions and Answers
Just one point. Paints don't actually "dry" per se. They cure. Part of that process is "off gassing" which means the solvent departs the paint as part of the chemical process. The issue with the thinkness of the paint is how long that process takes. Lacquers and other "fast drying" paints actual flash. That is they create a skin on the top that appears dry but the paint underneath is still soft and partially cured. Once the paint flashes, surface contamination like bugs or dust won't settle into the paint and mess up you finish. What is actually happening is that below the surface the solvents continue to migrate to the surface and have to pass through that flash for the paint to fully cure. During that time, surface contaminants may not get through but you can still get fingerprints in the paint because the substrate is still soft. Also at that time the solvent can be working on the plastic underneath and crazing it. The thicker the coat the longer it takes for the solvent to leave and the paint to be fully cured. An rule of thumb that an old painter told me was that double the thickness quadruple the cure time. Cured paint can be handled, sanded and polished. Uncured just makes a mess. -
Airbrush in between coats
Pete J. replied to Dougboy's topic in Model Building Questions and Answers
I agree with the metallic comments. You really don't need to do a complete strip and clean of the paint brush though. If you have a top feed, empty the cup and blow a little thinner through the brush. Since you are using solvent based paints, acetone is cheap on works. With solid colors, don't worry about it. Put the brush in the holder and walk away. I know some are going to call me nuts, but I have left paint in the brush overnight with no issues on solid colors or clear. If you use a siphon feed, have a second bottle with thinner only. Pull the color bottle and cap it, and blow the thinner through and you are good between coats. Pulling the needle and nozzle and cleaning all the passages is only necessary if you change color or are done for the session. A good clean and lube of the needle and seals keeps it running well and freely. One other maintenance tip. Pull your needle gently across a piece of tissue or paper towel while you rotate the needle between your fingers. It is snags any fibers, then you have a damaged tip. A light polishing on some very fine grit abrasive paper can fix that and keep your pattern even. -
Wow, that looks great! Nice work. Ok, so maybe I missed it. Where did you get all the "luggage"?
-
Oldmopars, I like the bumper overrides/brush guard. Looks like it would work well.
-
Canned Tamiya TS vs Bottled Tamiya LP
Pete J. replied to aurfalien's topic in Model Building Questions and Answers
What s the source of this quote? Tamiya? -
Canned Tamiya TS vs Bottled Tamiya LP
Pete J. replied to aurfalien's topic in Model Building Questions and Answers
I did this analysis when they first came out and someone said that the Bottles need to be thinned by 1:1. I can not confirm that, but if it is true then the price may be much more reasonable, assuming that you can even get them here. -
That is a solid thought. The shorter the wheel base, the more sensitive the vehicle is to small steering inputs. For very high speed cars you want the wheelbase to be as long and possible the control movement to have a minimal input(e.g. most amount of steering wheel imput for the minimum wheel deflection).
-
Tamiya '60s F1 Kits?
Pete J. replied to Richard Bartrop's topic in General Automotive Talk (Trucks and Cars)
Tamiya was really into the 70's and later era cars. I always wished they had done more of the 60's era cars. For the best of those in 1:20 scale you need to go the Model Factory Hero, but you also have to have a very big wallet for those. I saw the other day that they reissued several Ferrari's. I love the AAR Gurney Eagle. Gorgeous little kit. Same with the 312 kit. -
Chrome Chrome Chrome everywhere
Pete J. replied to SCRWDRVR's topic in Model Building Questions and Answers
I have to add one more comment. I use all the above methods. I have been doing the BMF method for scripts for a very long time and it is far and away the easiest way to get clean scripts. I have also used BMF to make badges. Very time consuming but the results are good. BMF the badge, put a good glop of white glue on the badge, let it dry. Then a large glob of putty over that to act and a handle. Let it dry, then put it all off. Fill the back of the indentation in the BMF with thick super glue and let that cure. Put the whole mess in warm water to dissolve the white glue and you have your own badge. Sand it down to fit and bingo. Replacement badges. -
Chrome Chrome Chrome everywhere
Pete J. replied to SCRWDRVR's topic in Model Building Questions and Answers
Bill, Glad to hear you are using the Alsa stuff and having good results. Too bad it is so expensive. I now own 4 oz and it cost me a little under $150. I am not sure what the shelf life is but I will continue to use it. -
Chrome Chrome Chrome everywhere
Pete J. replied to SCRWDRVR's topic in Model Building Questions and Answers
Yes, yes it is. However if you subscribe to there website they often have it for more than half off. Like a lot of these products a little goes a long way. Just for fun, I tried it on this little egg plane.
-
Oh, yea, forgot to mention that I ordered my 5 point harness from Scale Motorsport. Got them already. So I am up to 6 different sources for my parts and kits. That doesn't include paint and glue.
-
Chrome Chrome Chrome everywhere
Pete J. replied to SCRWDRVR's topic in Model Building Questions and Answers
Ok, this is a new system that I have been experimenting with and it works. Down side is it is stupid expensive, but you can brush it or spray it, but you need to follow their instructions. If you use your own base it will be no different than Alcad or other "chrome" paint. -
This is going to be an international build for me. I got mud tyres(their spelling not mine) from Spot model in Spain, the K&N filters are from Shapeways(USA) and the models are Japanese(Hasegawa and Tamiya). I actually need to get this going.
-
The seats are coming from Hobby Link Japan. They have a good selection of hobby design resin cast seats that should look good in a mid 60's to early 70's car.
-
Your not alone. I have the kits I need, just waiting on parts I have orders from various suppliers. Will get to work once I have the bits and pieces. Biggest hold up now is seats. The rules (for the real deal) suggest racing seat and require 5 point harnesses on new cars so that is what I am going for.
-
All paints are made up of three things. Pigments, binders and solvents. Binders are the "glue" that holds the paint together and to the surface you are painting. They are the predominate determinant in what the paint is called and what solvents are used to make them work. The purpose of the paint is determined by the different chemicals and ratios use in them. I said this as a preamble to what makes primer primer. Primers have two purposes. They provide key for your final color coats to stick to and to give you an even color surface to apply your color over. Two parts of the paint have the most effect on that. Most primers have a lot of pigment or solids in them so that unevenness of the base color will not show or bleed through and give your final paint an uneven look. They also have very aggressive binders to get a good grip(key) on the surface so the paint doesn't peel off. Some binders are actually designed to slightly dissolve the surface to get a better grip. These are referred to as "etching" primers. You will hear modelers talking about paint "crazing" the surface. This is what is going on. So, a long road to the final, "Why prime?" Primer is the final preparation for the surface to give you that even coat with just enough roughness for your paint to stick to. A couple of final thoughts about primer and it purpose. A lot of us use primer as a guide coat. We spray just enough on to cover everything and then sand the surface. As you sand you will see certain areas that the paint comes off of first. These are high spots. You will also see spots that the paint is last to come off. Those are low spots. Thus, it "guides" you to spots than need to be sanded down or filled. Once you lay a light coat on and sand it off and it all comes off evenly, then you know you have smooth surface without any dipples or high spots or other irregularities. Also, never use primer or paint for that matter, as a filler except for the finest of scratches. It was not designed for that and will often "ghost" through with successive coats of paint. Filler or putty is for repairs, paint is not. I hope this gives you a better idea of why and how you should use primer.
-
I would bet the guys in the Morgan would disagree! At about that moment they are probably thinking that it's "high" water.
-
Rob, in one of your posts you mentioned that you didn't think that there were any swift water crossings. I came across this photo in the 2019 site that thought I would throw it up there. Kind of looks like things can get a little dicey for the sports cars if they are not properly prepared. I wouldn't want to be in this Morgan.
-
Wow, 21 entries so far! This looks like it is going well. Thanks for run it Rob!
-
What do you think of this air compressor?
Pete J. replied to Monty's topic in Model Building Questions and Answers
I think you will find a lot of compressors look very similar. That is because the majority are made by Campbell-Hausfeld, Devilbiss and Ingersoll- Rand. The top end industrial compressors(and air tools for that matter) are made by Ingersoll-Rand, but they also make compressors for the home user and also have several generic brands. If you go into a large industrial shop, there is a high probability that you will find a large IR doing the work. Some of the Sear Craftsman compressors are IR's but you have to understand Sears source codes(the first three numbers of the model number) to figure out which ones. Devilbiss has been around for a long time. In fact the invented the paint gun and are well known for their painting equipment. They are owned by Porter Cable/ Black $ Decker so all of those are essentially the same. Campbell-Hausfeld also have a wide range of compressors from industrial to small homeowners machines. Home Depot's Husky brand are Campbel-Hausfelds as are some of Sears Craftsman(see the comment under Ingersoll-Rand). Having said all that, these are the primary american compressor manufacturers. Most are very good quality so you really can't go wrong with these. Everything else(except air brush only compressors made by the major airbrush companies) is a roll of the dice. You may get a good one, you may not. Kind of iffy. As to noise, well you really have to hear it to understand it. Here is the normal definition of decibels. Near total silence - 0 dB A whisper - 15 dB Normal conversation - 60 dB A lawnmower - 90 dB A car horn - 110 dB A rock concert or a jet engine - 120 dB A gunshot or firecracker - 140 dB By the way, the decibel scale is geometric not arithmetic. 10 dB's at the low end of the scale is much less difference that the higher end of the scale. 60 dB of constant sound from a compressor is much more annoying than being in a room where a normal conversation is going on. A compressor running at that level will render conversation unintelligible. -
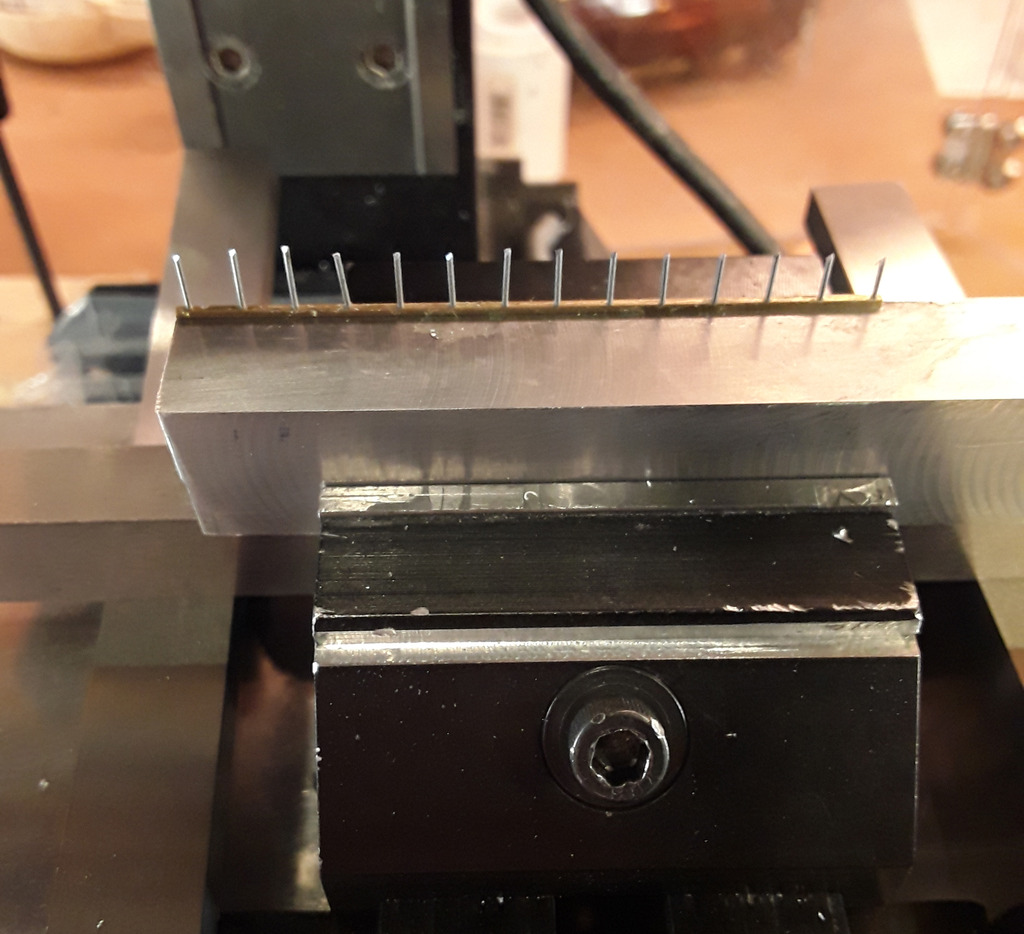
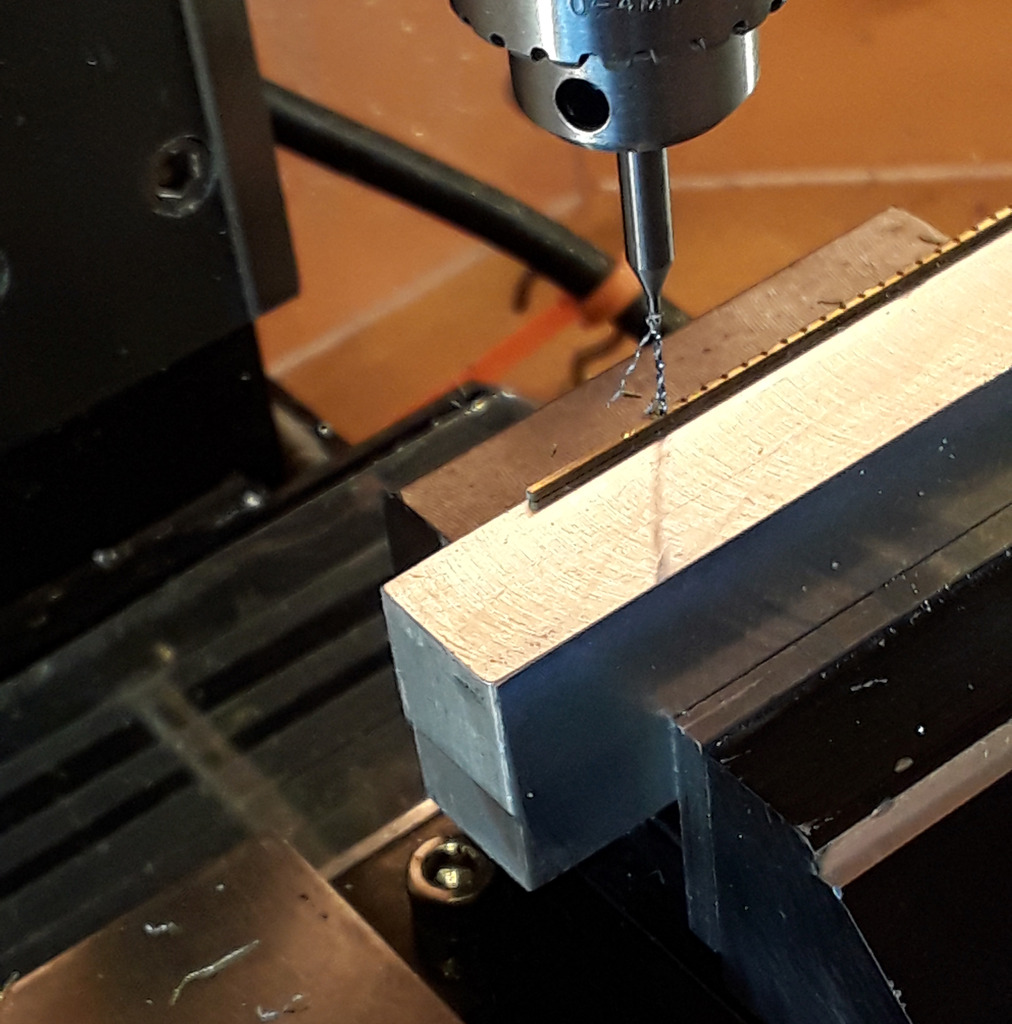
As has already been mentioned, it really comes down to what you are doing, as to the tool you choose. Just trying to get a hole through plastic, heat s needle over an alcohol burner would work fine, or cheap bits from a discount house. About the same. The pictures below show the need for a perfectly sharpened bit. That bit is .028 and the brass is .040. Anything less than perfect and the bit will wander and you will either break a bit or drill through the side. Ya, get wachya pay for.
-
Ok, I still have the high tech versions of both of these kits but was unaware of the figures. That is cool. Learn something new everyday in the hobby!