Straightliner59
-
Posts
5,809 -
Joined
-
Last visited
Content Type
Profiles
Forums
Events
Gallery
Everything posted by Straightliner59
-

"Bring Out Your Dead" Completion Build--ROUND 2 Is On!
Straightliner59 replied to Snake45's topic in WIP: Model Cars
Thank you, Vince! I'm looking forward to watching your tractor come together. It's looking good, so far! -
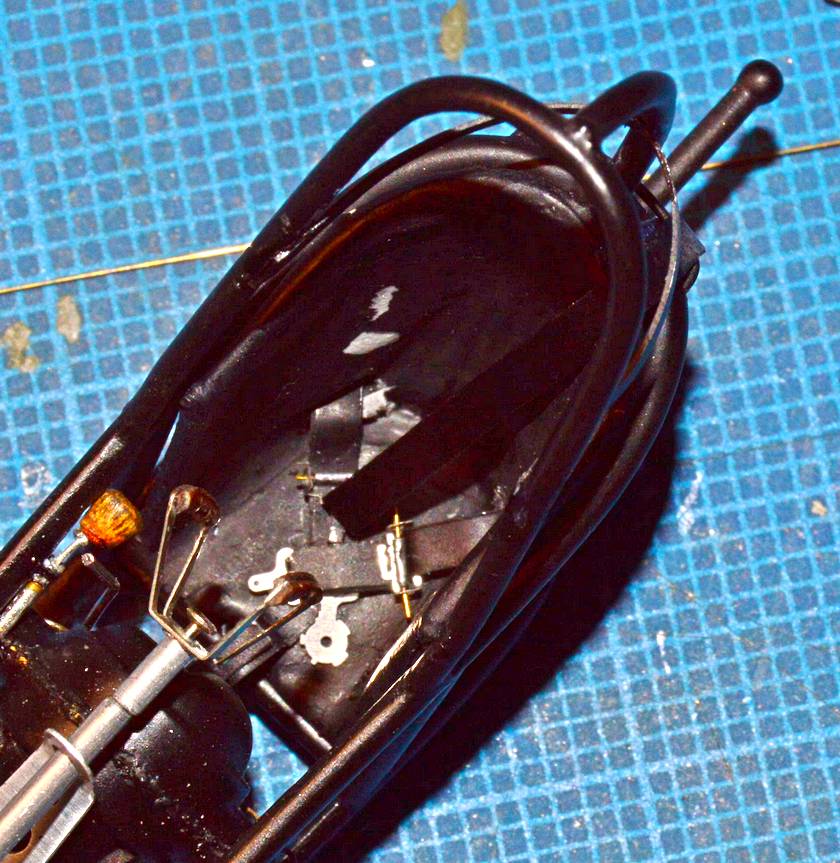
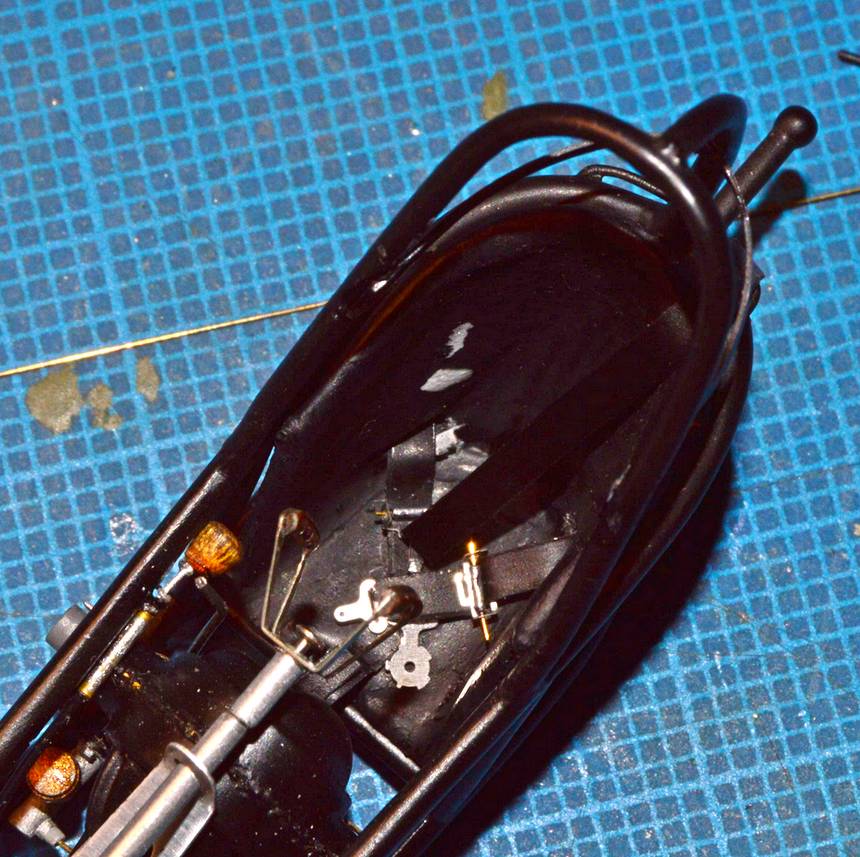
Quick update on harness installation. Still work to do! Hope to have this completed this weekend. Qs and Cs always welcome! Thanks for looking.

-
"Bring Out Your Dead" Completion Build--ROUND 2 Is On!
Straightliner59 replied to Snake45's topic in WIP: Model Cars
I've begun installing the harness. Detail Master's instructions could stand to be a bit more thorough, but, by studying photos of real assemblies, I think I figured it out. One recommendation I will make is to replace the photo-etched bars for the adjusters with brass rod--that makes things much easier! I still need to trim those. I also have touch up to do, along with installing the rest of the clasp assembly. I will also dry brush some highlights on the straps, once they are permanently installed and "posed". The shoulder harness in the photo is simply hanging there, as it still needs hardware.
-
Detail Master Racing Harnesses
Straightliner59 replied to Straightliner59's topic in Model Building Questions and Answers
Thanks! Usually, I fake it! Thought I'd try the full treatment, for once! Here's the progress...
-
Detail Master Racing Harnesses
Straightliner59 replied to Straightliner59's topic in Model Building Questions and Answers
Thank you, David. I looked around, and didn't find anything. I don't usually do the YouTube thing, because the sound on the computer doesn't work, and I don't care to watch it on my TV. I'd rather read it, and have photos. Anyway, I think, that by using reference photos of the real deals, I figured it out. I appreciate your input! -
Does anyone have photos of a set they've completed/installed? I'm using one for my junior fueler, and their instructions aren't very clearly stated. Thanks!
-
The point to melting it, is to create the extra "body", to represent the binder end of the tie.
-
Thanks for commenting. With no 'like' button we have no choice. You are welcome, sir! That is very true. I reckon it's a bit more meaningful, this way, however. It requires a little bit of effort! :-) Congrats again, on a fine bit of work.
-
I've been following and enjoying, but, I had to say something! Love the model, big time!
-
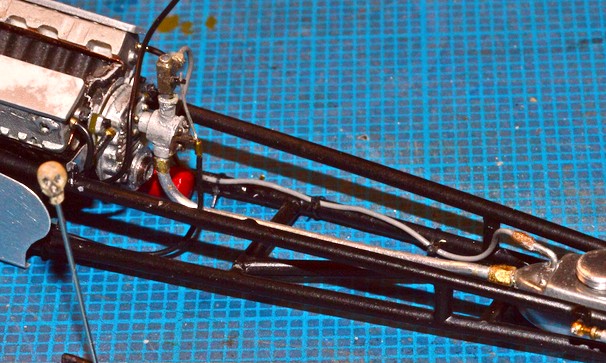
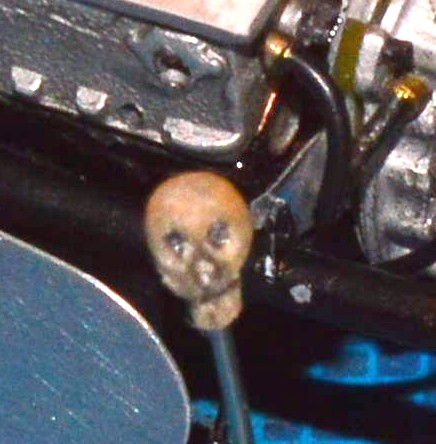
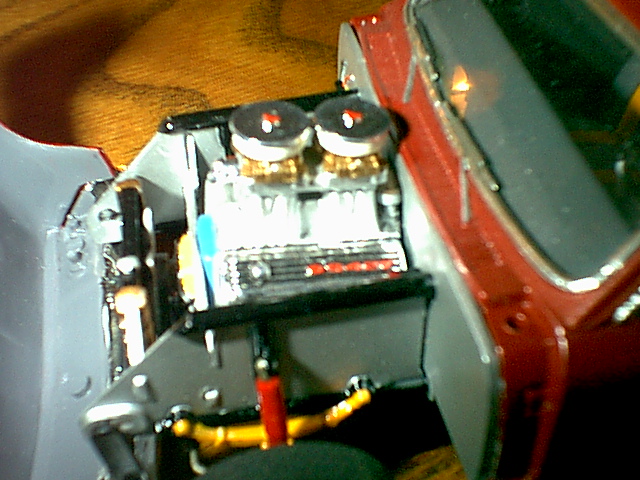
I have most of the fuel system, from the front of the engine, forward buttoned up. I changed the return line from the one in the "zip-ties" tutorial, because it was stupidly complex, when two simple return lines will do--one down each side, rather than a tee fitting that looked more like a manifold! The return line is 36ga. grey wire I bought from a model railroad specialty place, online. I applied a Purolator decal to the oil filter. That came from an Etzel's sheet. Also note the skull. I got some inspiration from a photo I have of the restored "Chizler" dragster's brake handle, and, since I need to shorten the brake handle, anyway...I though I was on my way, with a 1/72nd scale tank commander's head. Alas, it was too big. So, I used a birch (I think) cuticle tool from a bag I bought at the beauty supply, and began carving a skull. It still needs a bit of work, but I think I can use it, to replace the round head of the pin that's there, now. Thanks for looking! Comments/questions always welcome.
-
Beautiful work. From the skis and the roof rack, through the interior and engine compartment to the ice and snow clinging to the hubs and underside; freaking fabulous!
-
Glad I can help! I think you'll like it.
-
I have another one that I started playing around with, to build a car inspired by Bruce Larson's USA 1, with the "bent" injector stacks. I don't know how I developed such a "thing" for all those goofy old Monogram kits, but, here I am! The GTO would be cool!
-
I believe I saw this, recentlt, while wandering around the forums. You did a great job, with it! I can't see the other pic.
-
It was yours that caused me to remember that I might have photos of this one. Yes, it can be built! I don't recall having too much trouble with it, but, that was a while back!
-
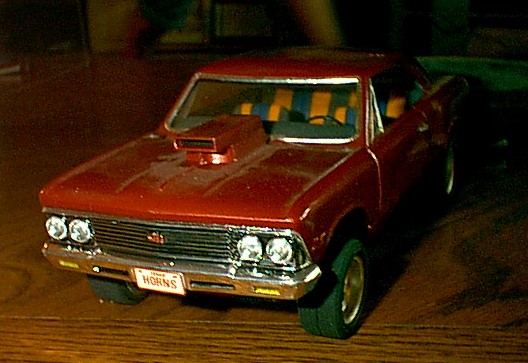
I just ran across these photos of a Monogram '66 Malibu I built 20, or so, years ago. I think the paint is an auto touch up color, but, I wouldn't swear to it. It's pretty much OOB, except for the Otaki wheels and tires. Sorry the pics are bad--early digital camera. My then girlfriend (2003) took these at the friend's apartment, I gave it to. I ended up in Minnesota, my friend died, so, I have no idea where it is, now. Comments, criticisms welcome. Thanks for looking!
-
Shoop is correct. I referred to it as monofilament, because there are also braided fishing lines. Those won't work. I am glad you guys are finding it useful! Thank you all, for the kind words! Have fun!
-
Porsche 356A - Speedster Wars style
Straightliner59 replied to Bernard Kron's topic in WIP: Model Cars
Another way cool project, Bernard! Nice work, sir! -
Sure thing! Thanks for looking.
-
Copperstate 1000 rally 2019
Straightliner59 replied to 89AKurt's topic in General Automotive Talk (Trucks and Cars)
Wow! A Maserati from Missoula, Montana! -
Hobby Lobby
Straightliner59 replied to Mike 1017's topic in General Automotive Talk (Trucks and Cars)
I remember when the only Hobby Lobby in Minnesota was in either Albert Lea or Rochester! I can't recall which (although Rochester makes more sense), I just remember it was "down south". -
Sweet! I've been watching those, too. One of these days...
-
Bantam Fuel Altered - New pics 1-7
Straightliner59 replied to Codi's topic in WIP: Drag Racing Models
Amazing and beautiful work, Tim! Your fit and finish is fabulous. Keep up the great work! -
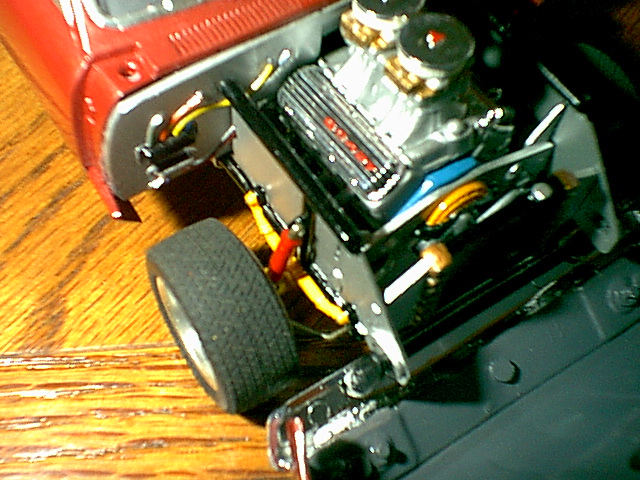
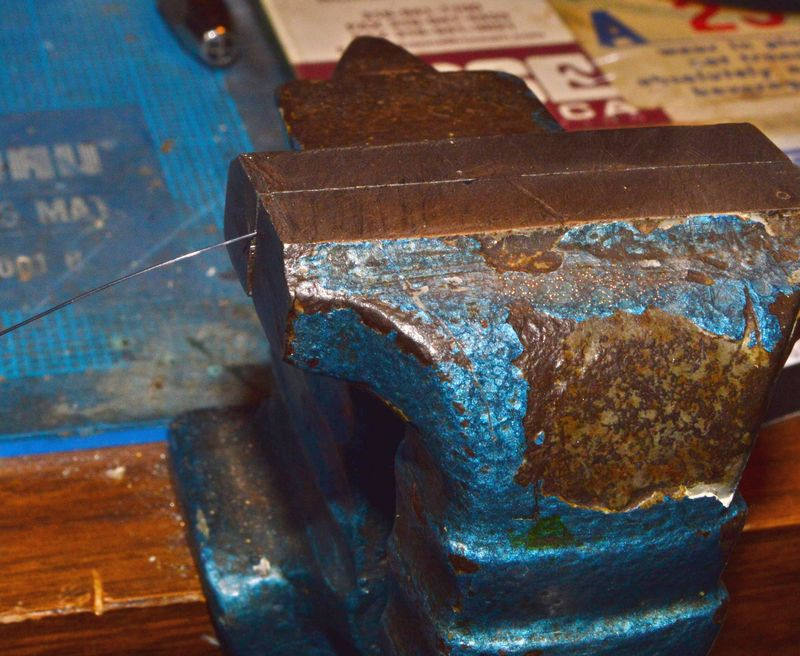
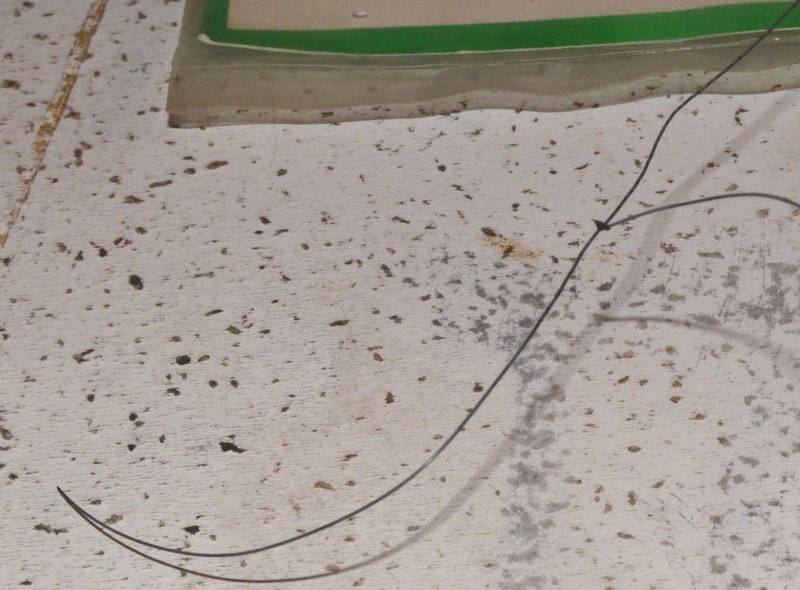
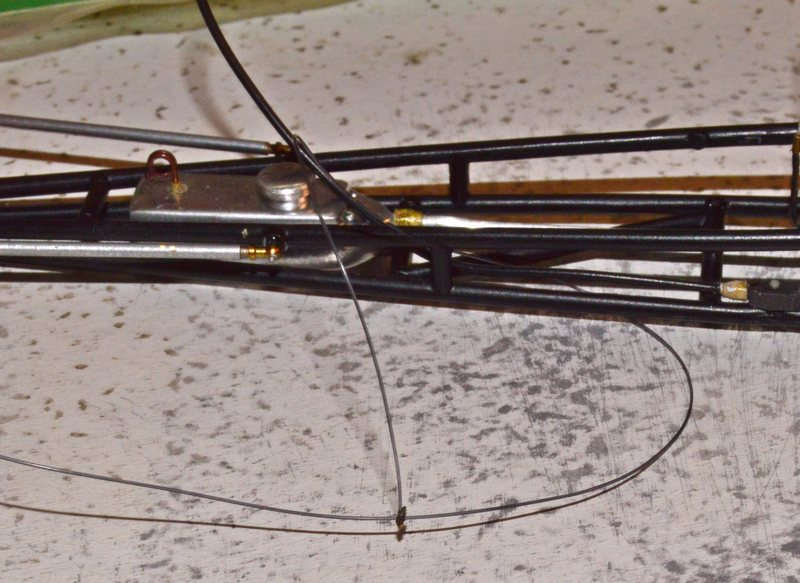
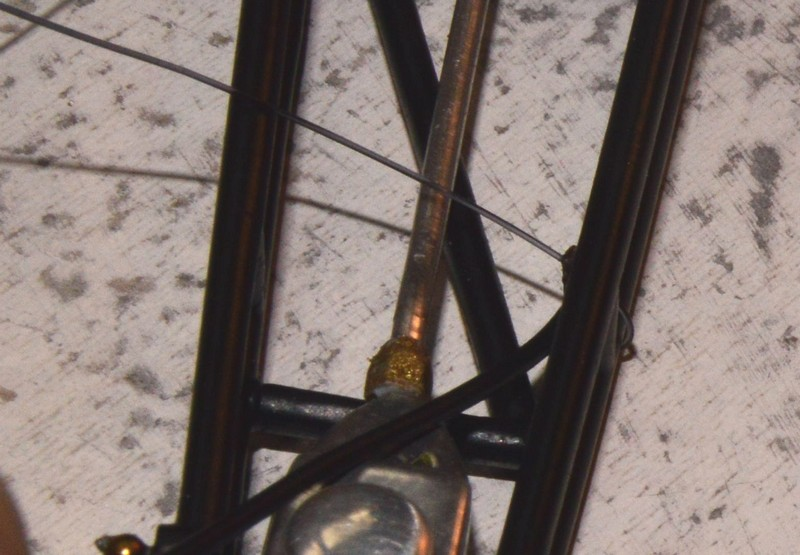
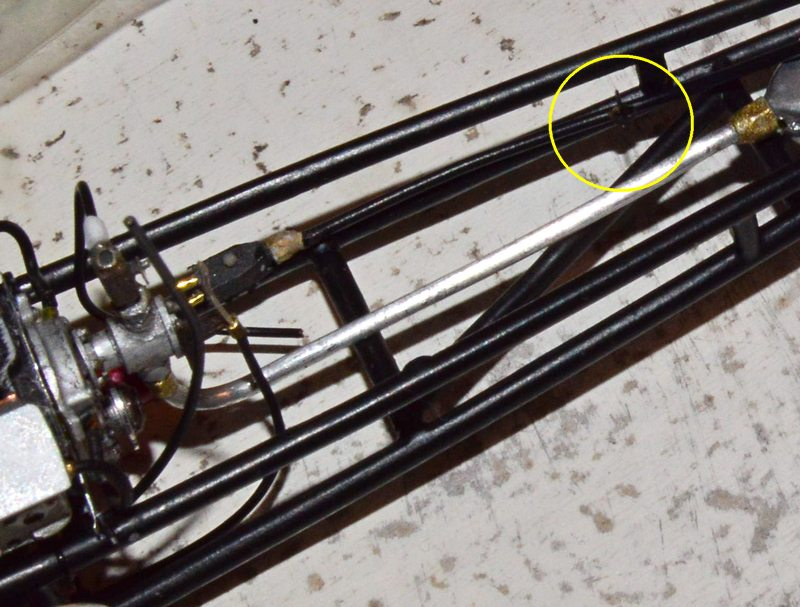
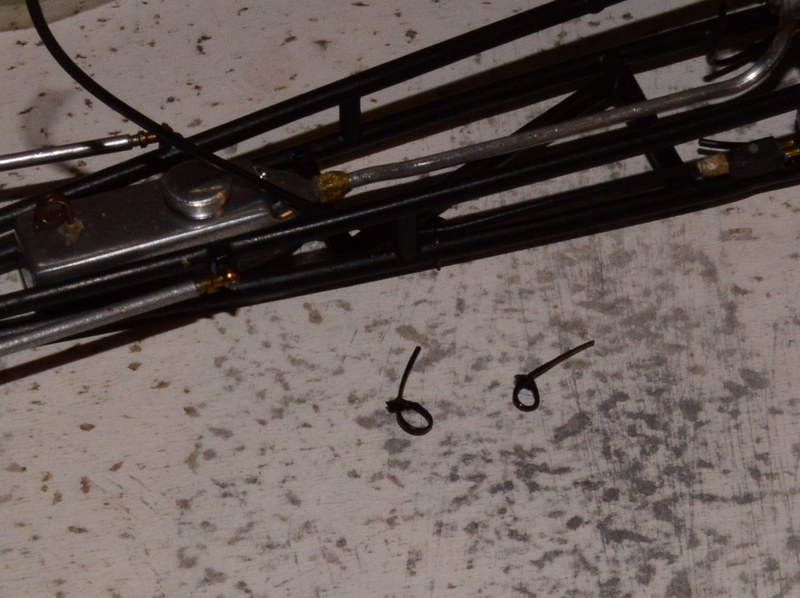
Since zip ties are so commonly used on race cars, I decided to figure out how to make them. I first used this technique in the late '90s, when I built the top fuel engine pictured below. I used Clover House black nylon monofilament for the one in this tutorial, but, those on the fuel motor's plug wires were made using monofilament fishing line. They can be made fairly quickly, and, they are pretty convincing! To begin, you'll need the following: X-Acto knife, a small scribe (anything that will pierce the monofilament, without tearing it "out"), a heat source (I use a lighter, but an alcohol lamp is just as good, maybe better), nylon monofilament (I used Clover House, because it's black. I have it in .011", .014", .015". Fishing line also works, and comes in different colors, too.) tweezers, super glue, and an applicator (I use a small wooden dowel, with a headless straight pin cemented into the end). A pin vise can be useful in cleaning out the holes, but, it isn't necessary for the application. Begin by cutting a six to eight inch length of monofilament. If you have a smooth-jawed vise, use it to flatten a segment of the mono, on one end. This step is optional, but, it does add a subtle touch of realism. Slowly push the end of the "mono" toward the flame, until it begins to melt, and forms a ball on the end. Gently mash the molten blob between your thumb and forefinger, to flatten it. If the "flat" is too distorted, it can be trimmed to shape with the knife. You should end up with something that looks similar to this: Next, using the scribe, awl, or other puncturing device, poke a hole through the now flattened end. Now, feed one end of the mono around/through the desired location. In this instance, I am using the "zip-ties to bind a return fuel line to the frame tube (see arrows in image, below), so, the mono needs to go around the lower frame tube and the fuel line, but, nothing else (I only provide this caveat out of my own experience--you can learn from my frustrations!). Now, feed the "virgin" end of the mono through the hole in the flattened end. Now, pull the monofilament taut, securing the line to the frame tube. Secure the tie by applying a tiny drop of super glue to the mono, where it passes through the hole (couldn't actually photograph this operation, because I only have two hands, and lack the necessary control for this operation with my left hand). You should end up with something like this: Now, simply snip the mono to the desired length, and you're done! Here's a shot of a fuel motor I built a couple of decades ago. I used Clover House line for the fuel lines and fishing line to make the ties for the plug wires. Here's photo with loose zip-ties, to illustrate how nicely they represent the real deal. The best way to represent any item, in scale, is to make it from the same material ad the real thing. While that isn't always a realistic goal, in this instance, is easy to accomplish using readily available materials and tools. Give 'em a shot, next time you need to tie up a loose end, or two (Sorry. Bad pun. It's genetic--I got it from my dad!)
-
"Bring Out Your Dead" Completion Build--ROUND 2 Is On!
Straightliner59 replied to Snake45's topic in WIP: Model Cars
I just discovered that the earliest photos I have of my junior fueler were taken on 12/31/2000! I'm going to finish in under 20 years!