Straightliner59
-
Posts
5,808 -
Joined
-
Last visited
Content Type
Profiles
Forums
Events
Gallery
Everything posted by Straightliner59
-
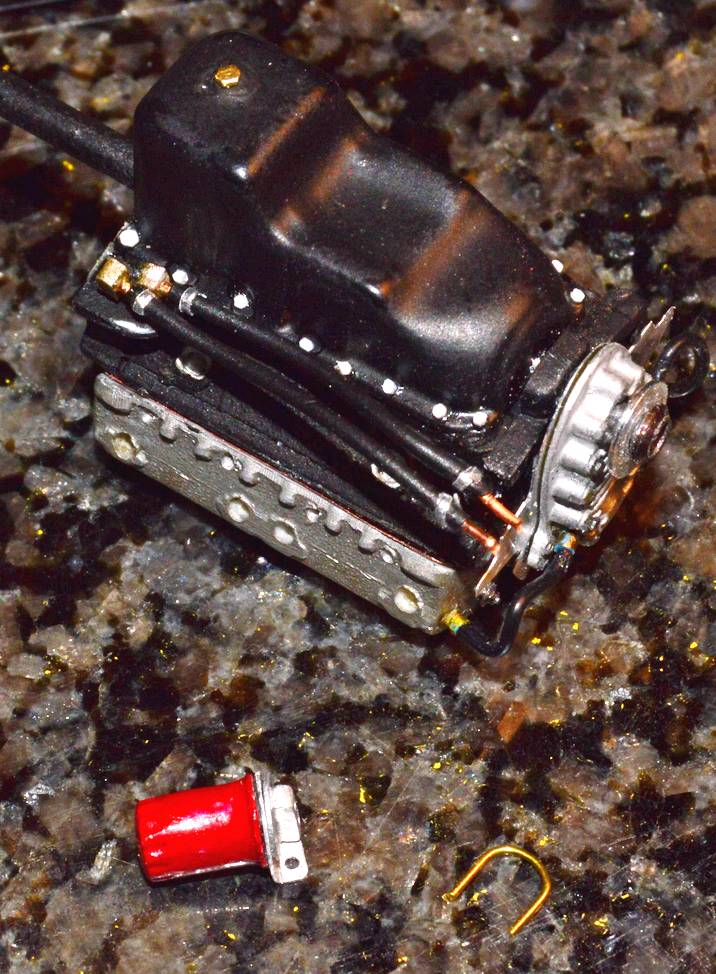
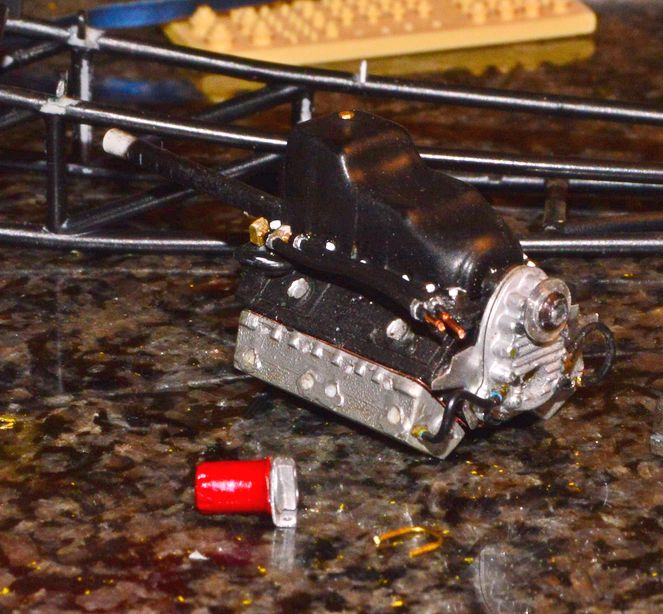
 Just a quickie of an update. I made the front motor plate tabs (the white tabs, seen above the pan sump.), added oil pan bolts from Plastruct hex rod, and built the filter "manifold" and bracket. The filter assembly will mount to the lower frame tube using the "u-bolt". Often, this assembly is mounted to the engine, but, there wasn't enough room, so, I have to attach it slightly forward. Also padded the seat. I'm still deciding on what I want to cover the seat with. I have a couple of ideas, but, not sure which direction I will go, just yet. The oil lines are made of some black "bell wire" or phone wire with hose clamps made from aluminum duct tape. In researching remote filters, I discovered there are a couple of different ways to connect them (compression fittings, etc.), and I liked the hose clamps, best. I'm hoping to have the engine installed, after the weekend, so i can get on with finishing the cockpit, and get it on the wheels (once I've built the other front wire, of course!). I am apparently happy with the injector stacks, since I haven't messed with them, in almost two weeks!
-
"Bring Out Your Dead" Completion Build--ROUND 2 Is On!
Straightliner59 replied to Snake45's topic in WIP: Model Cars
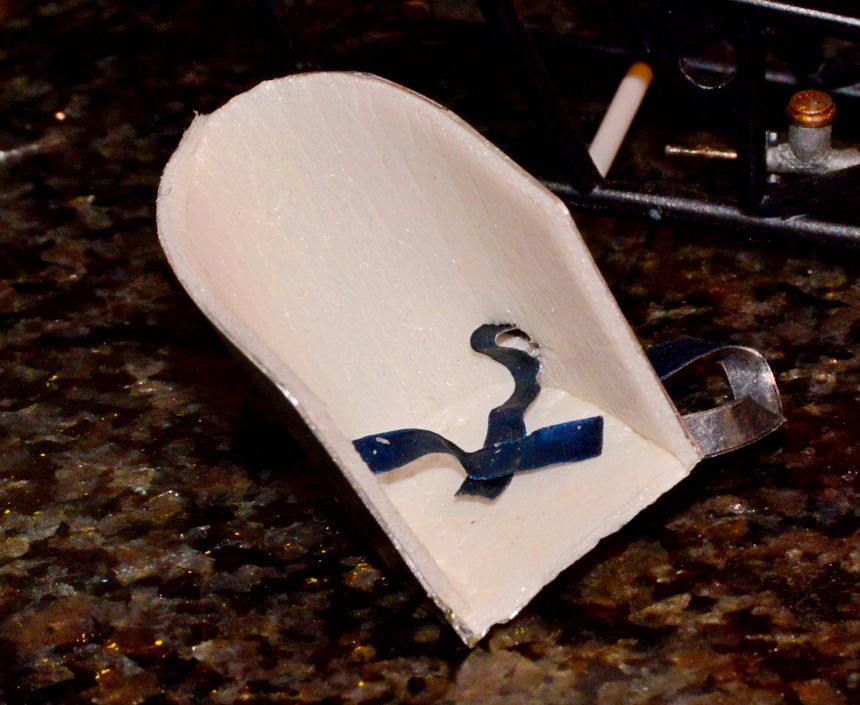
Just a quick update on the junior fuel dragster. I got the oiling system done (except for mounting the filter/bracket to the chassis, via the pictured "u-bolt.). Above the oil pan sump, you can see the two small white tabs that are the front motor plate tabs. Added bolts to the pan rails from Plastruct .020" and .030" hex rod. I got the seat padded. I'm still deciding what to "upholster" it with. I'll use either craft tissue or kitchen parchment, unless i can find a textured scrapbooking paper that I like, to create a patterned seat. The harnesses are simply fed beneath the seat, and are only installed, to make sure I could get them through the slots, easily.
-
I've found some pretty small diameter wire at the train store. I still have LOTS of the old MSC plug wire lying around, as well, although it's a bit large for stock wires, it's decent sized for competition wiring. I just collect wire! On a related note, here's the link to a tutorial I did a while back on making your own "pre-drilled" distributors/magnetos from readily available materials:
-
Quick update. Unfortunately, no photos until tomorrow. I have installed the padding in the seat--covering to come. I got the components made for the oil filter/bypass assembly. I also traded out the Blue Streaks, for the M&H slicks. Tomorrow, I will pull all the loose stuff from the chassis and install the lower firewall tabs, the front motor plate tabs, and the one that mounts the filter. Once those are installed, I should be ready to begin installing some of the chassis attachments, permanently. I'm hoping for a warmer day, soon, so that I can shoot some paint on a few parts (I really need to get my spray booth ducted!). Then, it will be on to the other front wheel! I still think I can make it, by deadline...
-
Actual size of AMT slicks?
Straightliner59 replied to andy12646's topic in Model Building Questions and Answers
Yessir! -
Actual size of AMT slicks?
Straightliner59 replied to andy12646's topic in Model Building Questions and Answers
Agreed. Just curious. It was probably a rhetorical question, anyway! -
Actual size of AMT slicks?
Straightliner59 replied to andy12646's topic in Model Building Questions and Answers
I've always wondered why people would assume that, just because someone strives for accuracy and detail, that they aren't enjoying the hobby. Same with the "I don't build for contests, just for fun." All the detail and pushing of my abilities is what IS fun, for me--and, for many others, too! -
I still have the booklet on detailing model car engines. I don't ever remember having a problem getting what I ordered. I still have some of the license plates, too, I think!
-
Quick update: While I have made quite a few parts for my models using the lathe, I've had a mill for several years, and had never made anything useful, using it. We all have seen the great millwork of guys like Chris and Tim. I don't know that I will ever achieve their level of expertise, but, we've all got to start somewhere. That said, I used the mill to make straight pins into bolts for the torsion arms ( I tried hand-filing them, but those sucked!), so, i thought, "why not?". So, finally, I have parts from the mill, on one of my models. Like I said, it ain't much, but, it's a start. Man, those front wheels are dirty! That's what happens when stuff sits in storage, in a less than stable (or clean) environment, for many years. I've also included a shot with the fuel tank set in place. I plan to build the complete engine, less manifold/injectors, and try to get it installed, along with the body, and cockpit details, then finish up the induction setup. I still need to build the other front wheel. I think I will likely switch to a set of the AMT parts pack M&H slicks, even though I love the way the Blue Streaks look, as, according to my research, M&H pretty much owned junior fuel. Qs and Cs always welcome!
-
I apply it same as I would flocking. I use paint to adhere it. No matter which way you choose, it definitely looks better than flocking!
-
Monogram Slingshot, Anyone?
Straightliner59 replied to Straightliner59's topic in General Automotive Talk (Trucks and Cars)
Allard's digger does resemble one variation of the Cook and Bedwell car, for sure! The Slingshot's rollbar is different, obviously. That would be a cool project! -
Monogram Slingshot, Anyone?
Straightliner59 replied to Straightliner59's topic in General Automotive Talk (Trucks and Cars)
I don't know if you do FB, but, Jack took his website down a while back. He has some sheets ready to go. Top End Decals on Facebook, is where to find them. If you don't FB, I'll see if I can get an email address for you. -
Monogram Slingshot, Anyone?
Straightliner59 replied to Straightliner59's topic in General Automotive Talk (Trucks and Cars)
Let me dig it up. Might take a day, or two. Happy to do it, Jesse! -
Monogram Slingshot, Anyone?
Straightliner59 replied to Straightliner59's topic in General Automotive Talk (Trucks and Cars)
Do you have Jack's contact info? I do, if you need it. -
Gotta' go with Snake, here. Micro Superfilm is excellent stuff. You can brush it right over the decals. It flows out, beautifully, and, I have never had a sheet fail on me, after using it.
-
Monogram Slingshot, Anyone?
Straightliner59 replied to Straightliner59's topic in General Automotive Talk (Trucks and Cars)
Thanks, Bernard! I didn't post any photos of mine, since I figured everyone had seen it, by now. And, the article shows just how flawed mine is (although, I am still happy with it). I think I could only find one or two color shots, when I was building mine, and, I chose the wrong color!grin Jesse, you're up! Jack Smith likely still has the artwork to do the decals, if he doesn't have some already done. -
Aluminum Printing Plate Source?
Straightliner59 replied to bigfatforty's topic in Model Building Questions and Answers
I use 5"X7" aluminum flashing. It has a plastic coating that needs to be sanded off, but it's worth the effort. Once it's annealed (if your application requires it), you can do anything with it, if you're patient. It's .005" thick, which, while a bit out of scale, looks better than plastic for things like dragster bodies, and provides more rigidity for things like firewalls, interior panels, dashes, etc. -
I just stumbled across this page. If anyone is looking for something to do with a Monogram Slingshot, here you go! https://www.drivingline.com/articles/the-isky-u-fab-dragster-cloning-our-heros-2-of-3/
-
That's how I made my masters. It wasn't too difficult to get them turned the same, but, it required a specific set of steps and measurements that included removing the key from my lathe, so I could rotate the headstock to cut the angle. I am pretty happy with them, as they are, but, it's been quite a journey, getting there. I just need to finish cleaning them up. Once I get the fuel injection done, it should move along at a more rapid pace!
-
I think that's worth a shot, for sure! I am interested in seeing what you come up with. Thanks for the input!
-
Thank you, Scott. Much appreciated!
-
Well, yeah. That did cross my mind. :-) In fact, that's how I finally came up with the ones I am using. And, you're right, and I certainly don't have any!
-
Hear, hear. I am generally notoriously slow!
-
Same here. I think it's important to be able to update threads in "On The Bench", as to when project threads have been modified.
-
Thanks for the heads-up, Snake. Those do have a similar shape, but, they aren't siamesed, like the Enderles. Speaking of fuel injection, I have decided on how to do the injector nozzles. I used some square nut/bolt/washer castings for model trains, and sanded the washers off, flush with the side faces of the bolt head, and drilled them to accept a piece of .008" brass wire. They might be a tad on the big side, but, I don't think it's too outrageous. At times, I think I should have just used a Hilborn setup, because it would be much easier to plumb, with the nozzles on the outer side of the throttle bodies! At any rate, here's what I have, so far: The sprue of drilled "bolts" (I will shape the other two sides of each, as I remove them from the sprue), The unfinished manifold, and a Cirello Frankenstein mag that I built years ago, for another project. Qs and Cs always welcome! Thanks for lookin'!