Straightliner59
-
Posts
5,804 -
Joined
-
Last visited
Content Type
Profiles
Forums
Events
Gallery
Everything posted by Straightliner59
-
Glad you're here, now! I try!?
-

65 Dodge Sedan AWB - "Gold Ru$h"
Straightliner59 replied to Nitro330's topic in WIP: Drag Racing Models
That looks good! -
ICM Model A and Monogram As build comparison
Straightliner59 replied to stitchdup's topic in WIP: Model Cars
I think that little four-banger is a gem! Thanks for sharing this, Les. Good work! -
65 Dodge Sedan AWB - "Gold Ru$h"
Straightliner59 replied to Nitro330's topic in WIP: Drag Racing Models
I agree with Roger. That shouldn't be too difficult to scratch. You certainly have the abilities to make it happen! -
Thanks, David! They would, but I used aluminum duct tape for the binders, because I wanted to add some stiffness, without having to cement the leaves completely together. I wanted to keep the ends of the leaves free, because I think it looks better that way. Otherwise I'd just stick with the molded kit springs.? I'm pretty sure that using wire to bind them would let them slip against each other, a little. Thanks again! Thank you, Pierre! I try to find enough information to build them, correctly. My friend--that part is a thousand times easier than it was 30 years ago, I am sure you are aware!?
-
Steve--At the time, it was easy! I just shot Model Master metallizer on it first. I would probably use Alclad, now. The silver just stopped the red pigment, in its tracks. In a development I couldn't believe, this thing actually placed in Salt Lake City! I still don't know why or how it did. It's a very basic build.
- 39,065 replies
-
- 1
-

-
- johan
- glue bombs
- (and 1 more)
-
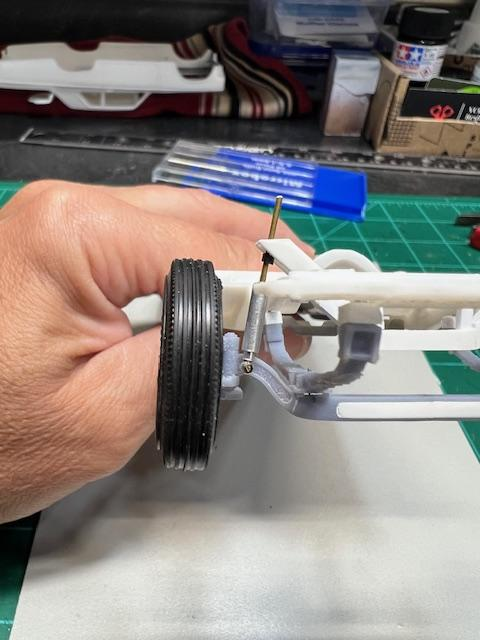
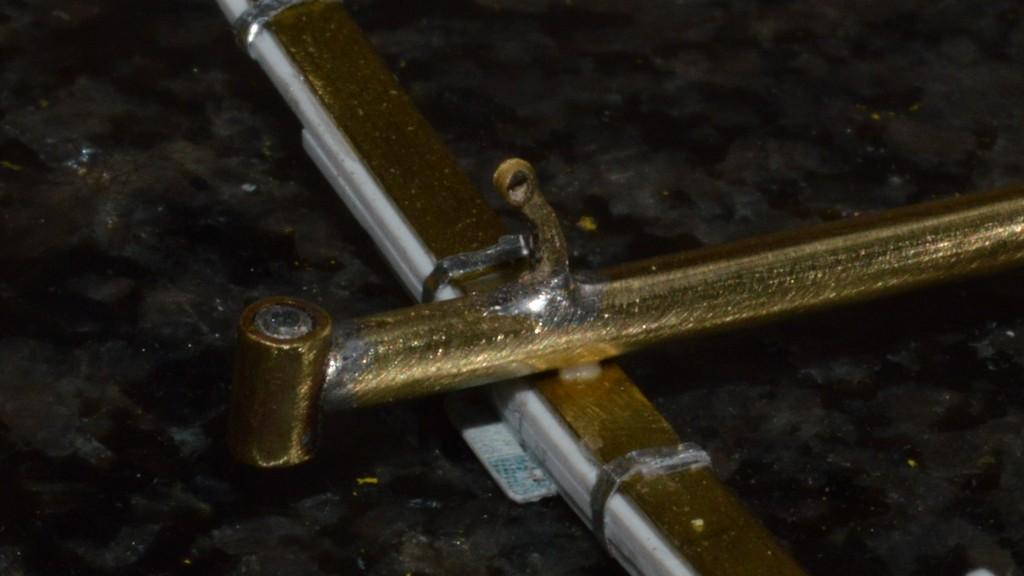
I made the front shocks from a couple of threaded watch shafts (they'll barely be visible, with double nuts on top, but they'll convey the threads), some 3/64" brass tube for the cylinders, and a different style of handrail stanchions for the piston rods. I decided the brass tube looked kind of thin, so, I added a layer of heat-shrink tubing (shrunk!), to bolster it, and painted it from a jar of red Pactra RC body paint. It dried quickly and properly on the vinyl, and laid down pretty nicely from a brush. Also seen are the steering box and mount (mount subject to change), and the down tubes with the upper shock mounts. I made a simple, static u-joint from 1/16" aluminum tubing for the steering column shaft. It's getting ever closer to paint. I have a bit of work to do on the bottom side, yet, and I need to add means to hold the fuel tank, and overflow tank. Anyway... As always, your comments are appreciated. Thanks for looking!

-
65 Dodge Sedan AWB - "Gold Ru$h"
Straightliner59 replied to Nitro330's topic in WIP: Drag Racing Models
Very nice assembly. Excellent work!
-
Thanks, David. It's getting there! I got the front shocks made and the mounts on the down tubes. I may have to make new bodies for the shocks, but, that shouldn't be too difficult. Chassis is almost ready for paint! Photos in the next 24, or so. Thanks for your comments!
-
What’s your favorite glue or adhesive?
Straightliner59 replied to slusher's topic in Model Building Questions and Answers
NoTox came around in about '73-'75. It was horrible! -
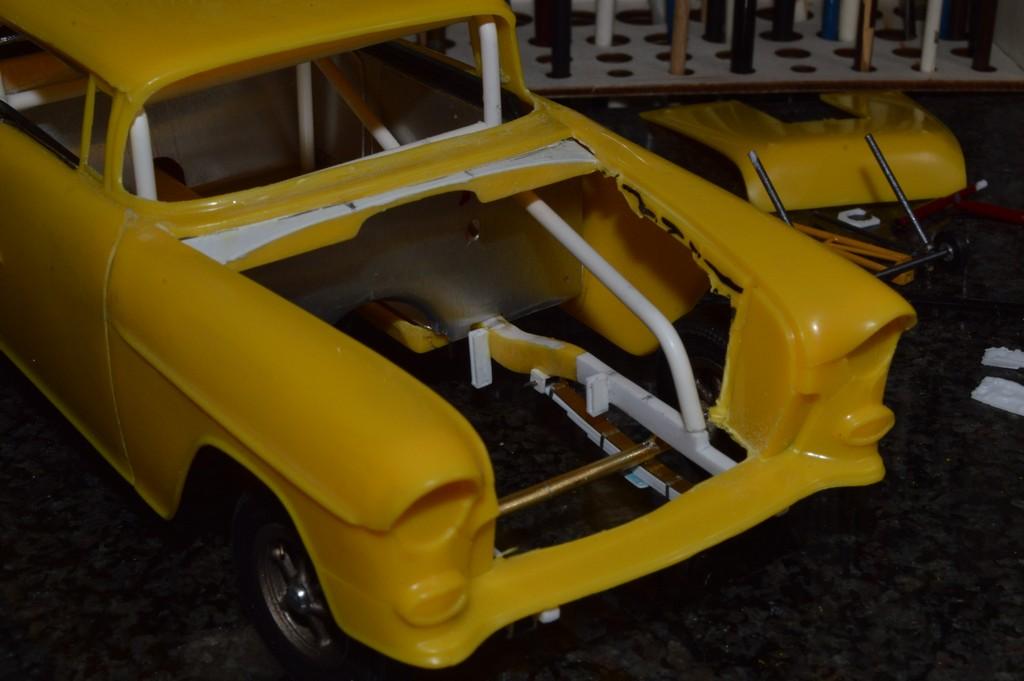
Thank you, my friend! I got some more work done on the front chassis. I made new down tubes, and now have a place to put the upper mounts for the shocks. I also stuck one of the valve covers/stud girdles to the head, just to check it out. I can live with that! I'll get the engine straightened out with the mount, during final assembly. Thanks for looking!
-
Steering box looks great!
-
What’s your favorite glue or adhesive?
Straightliner59 replied to slusher's topic in Model Building Questions and Answers
Pretty much! -
Yes. A better idea than finding it with your foot!
-
Thanks, Ian. I appreciate your input! I think these look pretty close to the proportions in the photos of the FC. Definitely closer than the first ones! I've got the second one flattened out, now. I also bent a pair of HO scale handrail stanchions, and soldered them to the axle, for the shocks. I'm going to make new down bars for the front clip, in order to create room for the length of the shocks. I plan to curve them, at the front. I shouldn't be too far from being able to paint and assemble the chassis! Comments are always welcomed. Thanks for looking!
-
Awesome! Ted would love it!
-
What’s your favorite glue or adhesive?
Straightliner59 replied to slusher's topic in Model Building Questions and Answers
Pactra No-Tox! Smelled like lemons, worked like--you get the idea! -
You did a nice job, with that! I found one a few years ago, on Ebay. I hadn't thought about it (it's sitting on top of my bookcases, with my other kitschy stuff) until you mentioned "Ideal". It's got an apparent V-8, in it.? While it's not super-detailed, I have a Monogram Kurtis Craft car I built about 30 years ago. It was one I got in the double kit, with the Edmunds Supermod. It was molded in red, so, of course I wanted it to be yellow!
- 39,065 replies
-
- 3
-
-
- johan
- glue bombs
- (and 1 more)
-
Thank you, Ian. I did make some new ones. I didn't get a chance, before bed, to shoot them, and I just got home, tonight, so it might be late tomorrow night, or Saturday, before I get a chance I think they look a little better, now. If they're too thick, I still have the first set!
-
Well, who wouldn't?!?
-
What’s your favorite glue or adhesive?
Straightliner59 replied to slusher's topic in Model Building Questions and Answers
It's been nearly fifty years, since I had any tube glue, excepting epoxies or GS Hypo cement. I haven't found any situation in which model tube cement would be the best option. -
How thick are they? It looks like I may need to make new ones.
-
Well, I could see these valve covers, that I really wanted to use, just weren't tall enough for the cam I plan to install!? Mine are only about an inch thick, though. Your printed head looks excellent! Adding little, authentic details, is such an enjoyable part of this hobby, for me! Stuff like this, is stuff I've seen and thought it would be cool, to do, in the right place. Some guys just throw stuff at their models, because they can--I like to think it through, a bit. Racers don't put stuff on their cars that isn't necessary, mostly. I try to follow that, even though I've never been on a crew, or anything. I've known a ton of racers, though, and getting it right, has always been important!
-
I'm watching all of these, on Ebay, now! I just missed one of the first Monogram Mustangs (Ford Motorsports) that went for $15. I'm not in any hurry, so, I'll wait until I find another at a good price. I originally bought the Escort, because I was interested in the Minilites. It's such a pretty kit, I just couldn't. I could never find the engine upgrade kit, available/in-stock. I think one of those DOHC four-bangers would be a nice option. If I do a street/road car, I may even see if I can get the turbo setup, in it.
-
I am having a blast, with it! Mine's becoming an Altered class racer. Enjoy!